
Chapter 2. Hello Pong
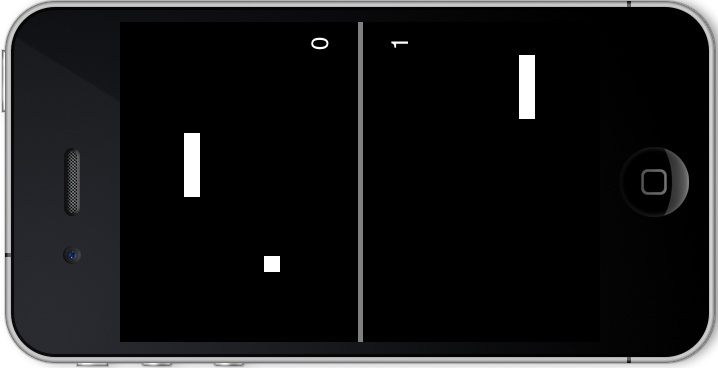
My addiction to playing video games started when my father purchased Atari’s Home Pong console. It plugged into a standard television, had two controllers, and displayed only in black and white. There were two white rectangles on each side of the screen that represented each player’s paddle. The controller had a rotating dial that placed the paddles into different vertical positions. There was a puck that was represented by a small white square that bounced off the walls and player paddles. Each successful paddle hit would increase the puck speed which in turn made it more difficult to hit. If a player missed the puck then a point would be awarded to the other player and the round would reset, putting the puck speed back to normal.
Although Pong didn’t sport flashy graphics and sounds, it had all the typical elements that current games have: an objective to accomplish, player representation in a world, a score that measures progress, and a way to finish the game. The Atari engineer that designed and built Pong was given the project as a training exercise to help him get acclimated at creating games. I feel that this exercise holds up even today as a great way to teach how to create a game on the iPhone (see Figure 2-1). You will learn how to implement multi-touch controls, animation, collision detection, and scoring.
Project Creation
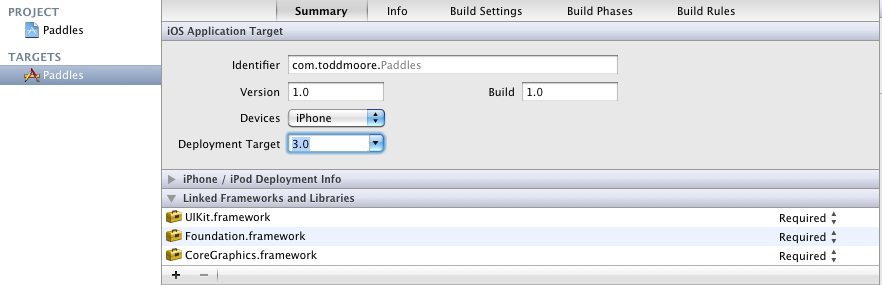
You need to start by opening Xcode and creating a new project (File→New→New Project) from scratch called Paddles. Select the iOS/Application/Single View Application template, and click Next. Enter “Paddles” as the product name and Class Prefix, put in your company identifier, change the Device Family to iPhone, and deselect the three checkboxes below. Click Next, as shown in Figure 2-2. Choose a location for this new project and click Create.
Once Xcode generates the new project, Xcode opens the target settings page, where you will need to adjust a few settings. You’ll see how to do that next.

Target Settings
The Summary page for the Paddles Target displays a few items of importance, including the supported devices and the Deployment Target version. The Devices pop-up lets you choose to support either iPhone, iPad, or Universal (which supports both devices in a single application). Leave supported devices set to iPhone and change the Deployment Target to 3.0, which will allow the application to install on iOS versions 3.0 and greater, as shown in Figure 2-3. It is always best to keep the version number as low as possible, as you don’t want to exclude customers that may be slow to upgrade their device. The game you are creating does not require features found only in newer versions of iOS.
Note
Apps that use features that require a version greater than your deployment target will crash devices running earlier iOS versions. It is important to handle version checks at runtime or raise your minimum deployment target to match the features you are using. Always check the iOS documentation for the minimum iOS version required.
You can also specify what the Supported Device Orientations will be for your application—Portrait, Portrait Upside Down, Landscape Left, and Landscape Right. This is more important for iPad apps because they can launch into any orientation (and must display different splash screens depending on orientation). However, this could change for iPhone apps in the future, so it is best practice to tell iOS which orientations the application supports. The Paddles game will only support portrait mode orientation, so make sure that the Portrait button is the only item selected.
Next, you’ll need to make some changes to the App Info file.
Note
The view controller class also specifies orientations that the underlying views will support. The default implementation is to only support Portrait mode, but the generated project code might override this to support additional orientations. Open the PaddlesViewController.h file and remove the shouldAutorotateToInterfaceOrientation method if it exists. This will ensure the view controller will not rotate our view while playing the game.
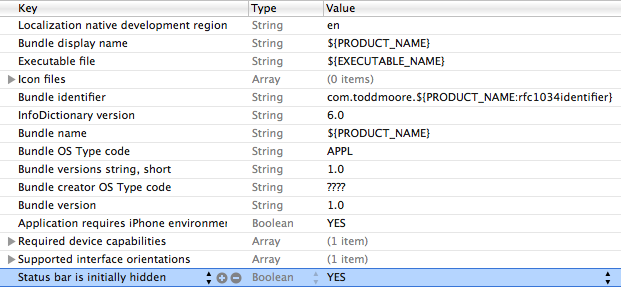
App Info
iPhone games will typically want to use the entire real estate of the screen, which means hiding the status bar. The App Info file contains many settings that describe the application to iOS, including the app version, icon files, and the display name. This information can be edited by either expanding the Supporting Files folder and opening Paddles-Info.plist or by selecting the Info tab from the Paddles Target. There are many settings that are not visible by default and hiding the status bar is one of them. You can add a new item by clicking on an existing row and clicking the plus icon or by option clicking to the pop-up menu and choosing Add Row. Use the dropdown to the right of the Key name entry to change it to “Status bar is initially hidden” and set its value to YES, as shown in Figure 2-4. The reason you want to do this here and not within code is that with this setting, the system will slowly fade the status bar out when the application is loading. It looks much better to have iOS animate the status bar away while the app loads rather than waiting for the app to load and then hiding it.
Laying Out the Game Pieces
I created my first iPhone game without using Interface Builder. This meant that I had to allocate all my views, images, and labels by hand and tweak their position and size until it looked right. Everything that I could quickly do in Interface Builder, I wrote out in source code, which was extremely tedious and error prone. If I could go back in time and give myself a 30 minute lesson on how to use Interface Builder’s powerful WYSIWYG (what you see is what you get) editor then my game would have been finished much sooner.
Interface Builder
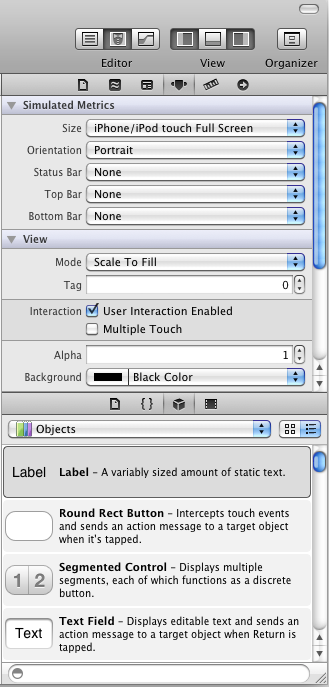
In the Project Navigator, click on the PaddlesViewController.xib file that displays Interface Builder in the Xcode Editor Area and allows you to modify the user interface. Next, make sure the Utilities view’s Attributes Inspector is open (click View→Utilities→Attributes Inspector). The Utilities view appears on the right side of Xcode and lets you choose from several inspectors by using the toolbar at its top. In Figure 2-5, the Attributes Inspector is shown at the top with the Object Library at the bottom. Click on the lone view that is sitting in the center of the Interface Builder window. Next, you’ll see how to use the Attributes Inspector to modify various properties for this, the root view.
Note
Now is a good time to familiarize yourself with the other inspectors available in the Utilities view. Hover your mouse pointer over the inspector icons to reveal the name of each inspector.
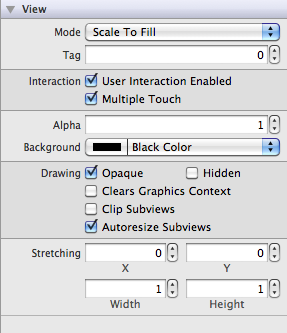
Change the View background color from Grey to Black. Change the Status Bar under Simulated Metrics to None since it will not be displayed in the game. The status bar reserves 20 pixels in height from the total screen height of 480 pixels. This means the root view is 460 pixels in height when the status bar is displayed. Click the Size Inspector tool, shown in Figure 2-6, and make sure the height is set to 480, which matches the screen height dimension without the status bar.
The Object Library view is located at the bottom of the Utility Area under the inspectors and allows you to drag new UI controls into the view. There are many objects to choose from, such as buttons, labels, and images. I will start with the most basic of elements, which is the View and the object that all user interface elements inherit from. The View object has properties such as frame dimensions and a background color. This is really all that is needed at the moment because the paddles and puck will be represented by white rectangles.
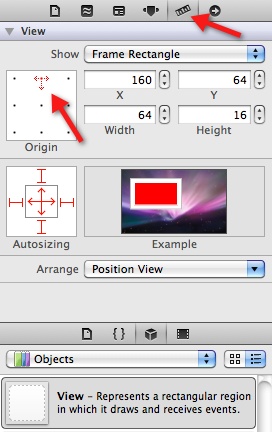
Scroll down the list of elements until you find View and drag it onto the existing root view so that it becomes a subview or child of the existing root view. Adjust the size of this view to be 64 pixels in width and 16 pixels in height, which represents one of the paddles. You need to position this paddle at the top but leave enough room for your finger to sit behind the paddle.
Click the Origin pane and change focus to center top, shown with the leftmost arrow in Figure 2-6, which will adjust the origin numbers to match that location on the paddle relative to the containing view. Adjust the X position of the paddle to be centered at 160 pixels from the left of the screen. Adjust the Y position to be 64 pixels down from the top of the screen.
Copy and paste this paddle to create the second paddle of the same size. You want the second paddle to be the same distance from the bottom of the screen as the first paddle was from the top. The total height of the view is 480 so you need to take the first visible pixel, which would be at 479, and subtract 64 from it (479 – 64 = 415). Change the origin pane to set focus on the center bottom of the new paddle and adjust the position to 160, 415. Both paddles should now be centered and be the same distance from their edge of the screen.
Create the puck by dragging another view in and resizing it to 16×16. Now click on the Arrange Position View drop-down and click Center Horizontally In The Container. Click Arrange Position View again and then Center Vertically In The Container. The puck should now be located directly in the center of the view.
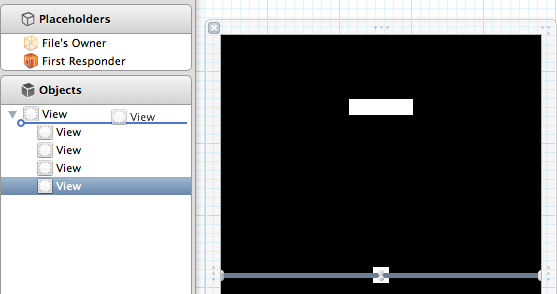
I want to add a middle line down the center of the screen that will help visualize each player’s side of the screen. Drag another view in and size it to 320×5. Center it vertically and horizontally like you just did with the puck. Click to the Attributes Inspector and change the Background color to Grey. Notice the line is placed on top of the puck because it was the last view added.
You can change the order of the view objects by using the Outline View located immediately to the left of the editor. You may need to expand it by clicking the Outline view button in the dock. This pane displays a hierarchical tree that reflects the parent-child relationships between the objects in the nib file. The view objects at the bottom of the list are drawn on top of those higher in the list. Drag the middle line up to be the first entry in the Objects view hierarchy, as shown in Figure 2-7. The middle line will now be drawn under the puck object. You could have also selected Editor→Arrangement→Send to Back from the menu to perform the same operation.
Connections
As in the previous chapter, you will need to enable the secondary editor so the associated PaddlesViewController header file is displayed next to the Interface Builder editor. Control-drag from the top paddle to just below the UIViewController interface definition. As you are dragging, you will see a line being drawn, as shown in Figure 2-8, as well as the location of where the outlet will be inserted.
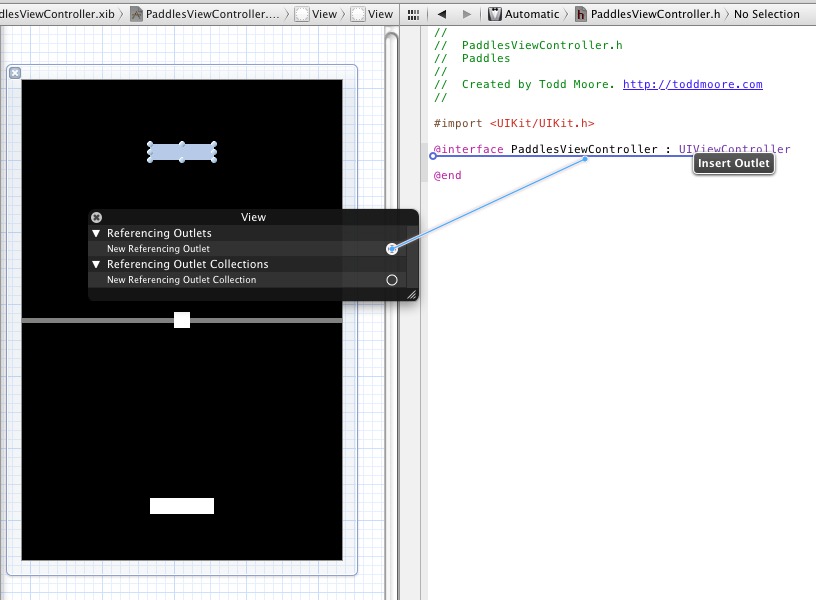
As soon as you release the mouse button, you will receive a pop-up that lets you specify the connection type, name of the object, and object type. The connection should stay as an Outlet, set the name to viewPaddle1, and keep the type set to UIView. Repeat this process for the other paddle and the puck, which will leave the interface looking as follows:
@interface PaddlesViewController : UIViewController

@property (nonatomic, retain) IBOutlet UIView *viewPaddle1;
@property (nonatomic, retain) IBOutlet UIView *viewPaddle2;
@property (nonatomic, retain) IBOutlet UIView *viewPuck;

@end
Open the PaddlesViewController.m implementation file and you will notice, as in the previous chapter, the views are being released in the dealloc and viewDid Unload functions:
- (void)dealloc
{
    [viewPaddle1 release];
    [viewPaddle2 release];
    [viewPuck release];
    [super dealloc];
}

- (void)viewDidUnload
{
    [self setViewPaddle1:nil];
    [self setViewPaddle2:nil];
    [self setViewPuck:nil];
    [super viewDidUnload];
}
Now that you have connected the two paddles and puck as properties of the controller, you have access to their position on the screen and can manipulate them as needed. The next step will be to control the paddles using multi-touch.
Multi-touch
Apple’s introduction of the original iPhone brought the world an impressive list of innovations in a really small device. Multi-touch is certainly at the top of that list, and even though touch screens have been around for a long time, it was Apple that showed the world how the technology could be effectively used in a consumer product. They built the whole user interface of the operating system around the concept of touch and multi-touch. The interfaces they designed were intuitive and easy to use, which ultimately led to the iPhone becoming extremely popular. Traditional desktop operating systems have attempted to add touch, but it typically has been implemented by just mapping your touch position to the current mouse position. That just doesn’t have the same feel as an iOS device, which was designed from the ground up to have touch be its primary form of input.
You may find touch to be initially similar to handling mouse events, but there are plenty of differences. The first and most obvious is there can be multiple positions on the screen at the same time. The original iPhone supports tracking up to five touch locations at the same time. The second difference, which may not seem so obvious, is that touch doesn’t always have a position on the screen. If you are not touching the screen then there is no position at all. Compare that to a mouse which always has a position on the screen represented by a pointer. Even if you do not move the mouse, it still has an active position on the screen and as a developer you can query the system to retrieve that position. Because of these reasons, I will cover how touch events work in more detail and the best practices for tracking multiple touches on the screen.
Four Methods of Touch
Multi-touch is handled by adding four methods to your view controller object. The system will call these methods whenever a touch changes into a different state. The touchesBegan method is called when a touch is first detected on the screen. The touchesMoved method will follow if the touch moves into a new position. And finally, touchesEnded will be called when the touch is lifted off the screen. It is possible that the touchesEnded method may not be called if the system decides to cancel the touch. In this case, the touchesCancelled will be called in its place. This can occur when the application gets interrupted by another function, such as the device receiving a text message or phone call.
Let’s implement code into the view controller that will log each touch method to the Debug window. Insert this code into the PaddlesViewController.m implementation file:
- (void)touchesBegan:(NSSet *)touches withEvent:(UIEvent *)event
{
    NSLog(@"touchesBegan");
}
- (void)touchesMoved:(NSSet *)touches withEvent:(UIEvent *)event
{
    NSLog(@"touchesMoved");
}
- (void)touchesEnded:(NSSet *)touches withEvent:(UIEvent *)event
{
    NSLog(@"touchesEnded");
}
- (void)touchesCancelled:(NSSet *)touches
               withEvent:(UIEvent *)event
{
    NSLog(@"touchesCancelled");
}
Make sure Xcode is displaying the Debug window by enabling it from the toolbar or selecting View→Show Debug Area from the menu. Run the program in the Simulator and click the Simulator screen very quickly. The output window should display something similar to the following:
2011-03-23 12:03:28.791 Paddles[6007:207] touchesBegan
2011-03-23 12:03:28.990 Paddles[6007:207] touchesEnded
Notice that it is possible that move events may not be generated during a touch sequence, however, there is always a touchesBegan event followed by either a touchesEnded or touchesCancelled event. Now click and drag your mouse across the Simulator screen. You will notice this results in multiple move events occurring between the touches Began and touchesEnded events.
2011-03-23 12:04:09.025 Paddles[6007:207] touchesBegan
2011-03-23 12:04:10.884 Paddles[6007:207] touchesMoved
2011-03-23 12:04:10.933 Paddles[6007:207] touchesMoved
2011-03-23 12:04:11.066 Paddles[6007:207] touchesMoved
2011-03-23 12:04:11.766 Paddles[6007:207] touchesEnded
Enable Multi-touch
At this point you have been using the Simulator to monitor each of the touch events. The Simulator can emulate two touches by holding down the Option key while clicking but it is very limited and best suited for pinch zooming. This is why it is best to test on an actual device when coding multi-touch. Connect an iOS device and then change the active project scheme to target the connected device.
If you build and run the application on the device and put two fingers on the screen you will notice the second touch is being ignored. This is because views, by default, ignore multiple touches. You have to specifically enable multi-touch for any view that requires it. You could do this within code by modifying the multipleTouchEnabled property of the root view or use Interface Builder to enable Multiple Touch, as shown in Figure 2-9.
The touch methods in the view controller will now be called for all touches on the screen. It is important to know that each UITouch object is guaranteed to be the same instantiation throughout the entire touch life cycle from start to finish. This means that the each individual touch on the screen is represented by the same UITouch object throughout all of the callbacks. In order to see this, add the following code snippet into all of the touch methods that you just added:
for (UITouch *touch in touches)
{
    NSLog(@" - %p", touch);
}
This code will print out the memory address location of every UITouch object contained in the set. If you run this on device and place two fingers on the screen you will see output similar to the following:
2011-03-23 14:48:05.015 Paddles[2962:307] touchesBegan
2011-03-23 14:48:05.019 Paddles[2962:307]  - 0x12eed0
2011-03-23 14:48:05.021 Paddles[2962:307]  - 0x12f3b0
2011-03-23 14:48:05.077 Paddles[2962:307] touchesMoved
2011-03-23 14:48:05.080 Paddles[2962:307]  - 0x12eed0
2011-03-23 14:48:05.083 Paddles[2962:307] touchesEnded
2011-03-23 14:48:05.086 Paddles[2962:307]  - 0x12f3b0
2011-03-23 14:48:05.093 Paddles[2962:307] touchesEnded
2011-03-23 14:48:05.096 Paddles[2962:307]  - 0x12eed0
Notice in the above example that two touches came into touchesBegan at the same time at address locations 0x12eed0 and 0x12f3b0. The touch at address 0x12eed0 then moves while the other touch does not. I know the other touch did not move because it was not included as part of the set. The touch at 0x12f3b0 then goes into an Ended state followed by the 0x12eed0 touch. At this point, both touches have finished and the address locations could be reused by the system. This is just a simple example of two touches on the screen at the same time. In your testing, you will probably notice a lot more log messages being generated and multiple touches being passed in through all the different touch methods.
Moving Paddles
You will now modify the touch handlers to move each paddle horizontally along the x-axis. In order to get the actual touch position within the view, you need to call upon a method of the UITouch object called locationInView. This method will return the position of the touch relative to the view provided. You will provide the root view, which has dimensions set to the full size of the screen. The return value is a CGPoint, which is a structure containing the X and Y position. The screen is 480 pixels in height, so you can use the Y value of this point to determine which paddle should be moved. If it is on the top half of the screen or less than 240 pixels, you move paddle1. If it is on the bottom half, you move paddle2. The paddle should only move along the x-axis so you need to set the new center position to be the X value of the touch point while keeping the Y value the same as it was before. You can make use of CGPointMake, which is a quick way to initialize a new CGPoint structure. Replace the previous implementation of touchesBegan with the following code:
- (void)touchesBegan:(NSSet *)touches withEvent:(UIEvent *)event
{
    // iterate through our touch elements
    for (UITouch *touch in touches)
    {
        // get the point of touch within the view
        CGPoint touchPoint = [touch locationInView: self.view];

        // move the paddle based on which half of screen the
        // touch falls into
        if (touchPoint.y < 240)
        {
            viewPaddle1.center = CGPointMake(touchPoint.x,
                                         viewPaddle1.center.y);
        }
        else
        {
            viewPaddle2.center = CGPointMake(touchPoint.x,
                                         viewPaddle2.center.y);
        }
    }
}
The code above handles initial touches but does not handle if those touches move along the screen. The paddles will be controlled by leaving your finger on the screen and moving it back and forth, so you also need to handle the touches Moved event. You can just call the touchesBegan handler for now to reuse the paddle-moving logic. Replace the previous implementation of touchesMoved with the following code:
- (void)touchesMoved:(NSSet *)touches withEvent:(UIEvent *)event
{
    [self touchesBegan: touches withEvent: event];
}
Run this code on the device and notice that you can move both paddles at the same time using multiple touches. Not bad for just a few lines of code! Keep playing with the paddles and see if you can find any issues with the current implementation. There are two problems that I want to address in the next section.
Multi-touch Issues: Third Finger on the Glassy Knoll
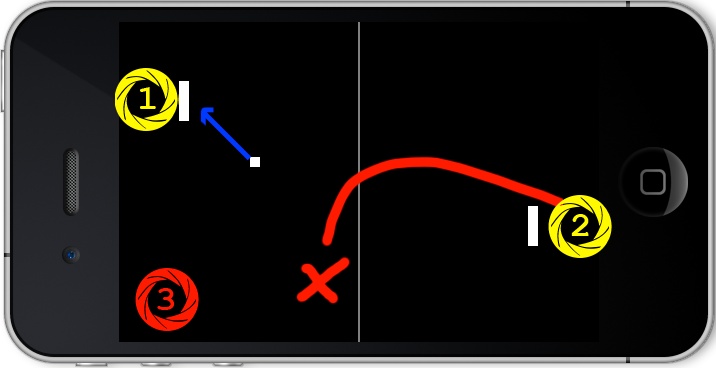
The person that will be controlling the paddle will typically start by placing their finger behind their own paddle on their side of the screen. They will move their finger back and forth and usually not let up until the game has finished. There are two issues with the current implementation that you may have noticed. The first is you can slide your touch across the middle line and it will move the other player’s paddle. As shown in Figure 2-10, player two moves their finger up past the middle line and to the left. This would result in player one’s paddle moving out of the path of the puck resulting in an unfair point given to player two. The second issue is if there are any additional touches on the screen they will also affect the player’s paddle position. The third finger on the screen, also shown in Figure 2-10, would cause player one’s paddle to jump out of the path of the puck resulting again in an unfair point given to player two. Both of these conditions should be prevented so the game will not suffer from years of conspiracy theories about what really happened that day you played air hockey on the glassy knoll.
This game should be no different from a real game of table tennis in terms of paddle control. In a real game of table tennis, once someone grabs a paddle, that paddle stays with them at all times until they are finished playing. In this game, the expected behavior should be the same. Once a player has control over a paddle then that paddle cannot be controlled by another until they let go of it. Therefore, you should ignore any additional touches that occur on that players side. In addition, if a player already has an assigned paddle then they should not be able to control another paddle such as when crossing the middle line. In order to solve this you need to track which touch belongs to which paddle. As previously discussed, touch objects will always be the same object instantiation throughout the entire life cycle of touch events. You can use that fact in order to bind a specific touch to a specific paddle.
Touch the Right Way
In order to track specific touch objects to each paddle, you will add a couple variables into the PaddlesViewController interface. You will use touch1 as the active touch bound to paddle1 and touch2 as the active touch bound to paddle2. If a paddle is not assigned a touch then it will be assigned a nil value. Add the following variables into the PaddlesViewController.h interface definition so it appears as follows:
@interface PaddlesViewController : UIViewController
{
    UITouch *touch1;
    UITouch *touch2;
}
You will modify the touchesBegan implementation to assign the paddle to a specific touch only if it is unassigned. You still want to use the logic that requires the touch to be placed at the top half of the screen to be assigned to paddle1 and bottom half of screen for paddle2. If those conditions are met then you will assign the correct touch object to the paddle and move the paddle to the position of the touch as coded previously. Replace the previous implementation of touchesBegan with the following code:
- (void)touchesBegan:(NSSet *)touches withEvent:(UIEvent *)event
{
    // iterate through our touch elements
    for (UITouch *touch in touches)
    {
        // get the point of touch within the view
        CGPoint touchPoint = [touch locationInView: self.view];

        // check which half of the screen touch is on and assign
        // it to a specific paddle if not already assigned
        if (touch1 == nil && touchPoint.y < 240)
        {
            touch1 = touch;
            viewPaddle1.center = CGPointMake(touchPoint.x,
                                     viewPaddle1.center.y);
        }
        else if (touch2 == nil && touchPoint.y >= 240)
        {
            touch2 = touch;
            viewPaddle2.center = CGPointMake(touchPoint.x,
                                     viewPaddle2.center.y);
        }
    }
}
Now that you have assigned specific touches to each paddle, you need to handle movement of the paddles. You can no longer just call the touchesBegan function because paddles that have already been assigned a specific touch will be ignored. Instead, you need to check if any of the touch objects provided in the set equals one of the touches that has been assigned to a paddle. If you receive an update to one of the assigned paddles then you can move it. It is safe to ignore all other touches that have not been assigned a paddle. Replace the previous implementation of touchesMoved with the following code:
- (void)touchesMoved:(NSSet *)touches withEvent:(UIEvent *)event
{
    // iterate through our touch elements
    for (UITouch *touch in touches)
    {
        // get the point of touch within the view
        CGPoint touchPoint = [touch locationInView: self.view];

        // if the touch is assigned to our paddle then move it
        if (touch == touch1)
        {
            viewPaddle1.center = CGPointMake(touchPoint.x,
                                      viewPaddle1.center.y);
        }
        else if (touch == touch2)
        {
            viewPaddle2.center = CGPointMake(touchPoint.x,
                                     viewPaddle2.center.y);
        }
    }
}
You need to handle when a paddle with an assigned touch has been lifted off the screen by implementing the touchesEnded handler. If any of the touches provided in the set equals one of the assigned touches of a paddle, then the assigned touch should be unbound from the paddle by setting the value to nil. If you didn’t do this then you would most likely lose control of the paddle once the player lifted their finger off the screen. This would be the equivalent of the controller becoming unplugged from the console, which would not be good! Replace the previous implementation of touchesEnded with the following code:
- (void)touchesEnded:(NSSet *)touches withEvent:(UIEvent *)event
{
    // iterate through our touch elements
    for (UITouch *touch in touches)
    {
        if (touch == touch1) touch1 = nil;
            else if (touch == touch2) touch2 = nil;
    }
}
You need to also make sure to handle the cancelled event, and the same code written for the touchesEnded handler can be reused in this case. Remember that this method is called when the touch has been interrupted. You can test this event by either calling the device if it is an iPhone or by setting an alarm for iPod touch. Before the interruption is displayed, you will notice that all touches will be cancelled. If you did not handle the cancelled event, the players would most likely not be able to control their paddles after the interruption completed. Replace the previous implementation of touchesCancelled with the following code:
- (void)touchesCancelled:(NSSet *)touches
               withEvent:(UIEvent *)event
{
    [self touchesEnded:touches withEvent:event];
}
Run it on the device and notice once your initial touch has been assigned to a paddle, additional touches will not alter the position of that paddle. Also notice that if an assigned touch slides across the middle line that it will not affect the other paddle. The game now has a solid implementation of multi-touch.
Animation
You have the paddles moving based on where each player touches the screen, so now it’s time to put the puck into motion. The game needs an animation loop that will move the puck in a specific direction and at a specific speed. Add the following variables to track direction and speed into the PaddlesViewController interface:
float dx;
float dy;
float speed;
The dx and dy variables represent the direction the puck is travelling and the speed represents how fast the puck is moving. I like to track speed and direction as separate variables so it is easier to speed up the puck while the game progresses. The dx variable is the direction the puck is travelling along the x-axis. If dx is –1 then the puck is moving left, if it is 0 then it is not moving, and if 1 then it is moving to the right. The dy variable represents the direction the puck is travelling along the y-axis. The dy variable will move the puck upwards if –1 and downwards if it is 1. The direction can also be any value between –1 and 1 so the puck can be moving on the screen at any angle.
You need a way to reset this information at the beginning of every round so you will add a function to handle initialization. The position and direction of the puck should be set to random values at the start of the game and the start of each round. You will again use the arc4random() function, as you did in the math game, but this time it will be used to pick either –1 or 1. Add the following reset function into the implementation file:
- (void)reset
{
    // set direction of ball to either left or right direction
    if ((arc4random() % 2) == 0) dx = -1; else dx = 1;

    // reverse dy if not 0 as this will send the puck to the
    // player who just scored otherwise set in random direction
    if (dy != 0) dy = -dy;
        else if ((arc4random() % 2) == 0) dy = -1; else dy = 1;

    // move point to random position in center
    viewPuck.center = CGPointMake(15 + arc4random() % (320-30),
                                  240);

    // reset speed
    speed = 2;
}
In the above code, I set the dx variable to randomly be either –1 or 1. This means the puck will either be moving left or right at the start of the round. I also set the dy variable to be either –1 or 1 if it is currently 0. However, if it is not 0 then it will reverse the direction. I did this because at the start of a game the puck should go toward a random paddle, but after a point is scored by a player I want it to go in the opposite direction so the player who scored the point has to hit the puck first.
The reset function also changes the position of the puck to be dropped somewhere along the center line. The speed is adjusted to 2, which is how many pixels the puck moves in a single frame of animation. Why did I select 2? I initially had it set to 1 but it just seemed too slow.
Add a simple animation function that moves the puck from its current center position into a new position offset by direction and speed. The animate function will be called repeatedly while the game is being played. Add the following code below the reset function:
- (void)animate
{
    // move puck to new position based on direction and speed
    viewPuck.center = CGPointMake(viewPuck.center.x + dx*speed,
                                  viewPuck.center.y + dy*speed);
}
Add an NSTimer to the PaddlesViewController interface:
NSTimer *timer;
You will schedule this timer to repeatedly call the animate function at an interval of 1/60, or 60 frames a second. The code also makes sure the puck is visible when the animation starts, and hides it when the animation has stopped. This has the effect of taking the puck off the field, which will be useful if the game is ever paused. That logic will be added later.
Note
The screen refresh rate for the iPhone is 60 Hz, which means the display gets refreshed 60 times a second. Performing animation logic faster than the screen refresh rate could cause some frames of animation to be skipped. For smooth animation it is best practice to schedule the timer as close to the screen refresh rate as possible.
Add the following code below the reset function, which will start and stop the game animation timer:
- (void)start
{
    if (timer == nil)
    {
        // create our animation timer
        timer = [[NSTimer
                  scheduledTimerWithTimeInterval: 1.0/60.0
                  target: self
                  selector: @selector(animate)
                  userInfo: NULL
                  repeats: YES] retain];
    }

    // show the puck
    viewPuck.hidden = NO;
}

- (void)stop
{
    if (timer != nil)
    {
        [timer invalidate];
        [timer release];
        timer = nil;
    }

    // hide the puck
    viewPuck.hidden = YES;
}
Add the viewDidLoad method by either uncommenting out the code provided to you in the implementation file or by adding it near the end of the implementation file. You will use this method to reset the game variables and start the animation timer. This is the appropriate place to initialize things, as the view will have been loaded and the view properties (paddles and puck) have been connected and can be accessed:
- (void)viewDidLoad
{
    [super viewDidLoad];

    [self reset];

    [self start];
}
Run the game and you will see the puck quickly animate off the screen never to return. In the next section, you will add code that will bounce the puck off the walls and paddles.
Collision
The game needs a way to detect if the puck collides with either the wall or the paddle. The good news is there is an easy way to determine if two views intersect each other. The UIView class contains a frame variable, which is a CGRect that represents the position and size of the view. You can use the function CGRectIntersectsRect to determine if the frames of these views intersect.
You need to create a function to check if a given rectangle intersects with the puck, and if so, allow changing the direction of the puck into a new specified direction. The new direction of the puck will be optional such that if you specify 0 for either dx or dy then no change will occur. Insert this above the animate function:
- (BOOL)checkPuckCollision: (CGRect) rect
                      DirX: (float) x
                      DirY: (float) y
{
    // check if the puck intersects with rectangle passed
    if (CGRectIntersectsRect(viewPuck.frame, rect))
    {
        // change the direction of the ball
        if (x != 0) dx = x;
        if (y != 0) dy = y;
        return TRUE;
    }
    return FALSE;
}
Now that you have a nice generic collision function, all that is needed is to check for collisions in the animate function. In the case of the left wall you need to create a rectangle that covers the left side of the screen. Creating a rectangle with CGRectMake(-10,0,20,480) will create a vertical strip along the left side of the screen. The wall actually starts offscreen at a position of –10 and has a width of 20, which means half of the rectangle is on the screen. You will create a similar wall on the right side of the screen with CGRectMake(310,0,20,480). You can use the fabs() function, which takes the absolute value of a floating point number to alter the puck direction. If the puck hits the left wall then the X direction is changed to a positive number. If the puck hits the right wall then the X direction is made a negative number. This will have the effect of bouncing off the walls at the same speed that it hit the wall. In both cases, the Y direction of the puck is ignored by passing in 0. You wouldn’t want to send the puck back towards the player that originally hit it. Add the following to the bottom of the animate function:
// check puck collision with left and right walls
[self checkPuckCollision: CGRectMake(-10,0,20,480)
                    DirX: fabs(dx)
                    DirY: 0];

[self checkPuckCollision: CGRectMake(310,0,20,480)
                    DirX: -fabs(dx)
                    DirY: 0];
For paddle collision, the frame variable of the viewPaddle1 and viewPaddle2 objects can be used. The Y direction of the puck can be adjusted to bounce off the paddle. If the puck hits the top paddle then the Y direction will be changed to 1, which sends it down the screen. If it hits the bottom paddle then the Y direction will be changed to –1, which sends the puck up the screen. The game should also adjust the X direction of the puck based on where it strikes the player’s paddle. If the puck hits the far left side of the paddle then it should bounce off in left direction and if it hits on the far right side then it should bounce off in the right direction. If you calculate the difference of both X center positions then it will give you either a negative or positive number depending on where it hit. Since the paddle is 64 pixels in width, you can divide the difference by 32 to normalize the resulting value between –1 and 1. For example, if the center of the puck hits the far left side of the paddle, the difference between both centers along the x-axis would be –32. If you took the difference and divided by 32 then it would result in dx being set to –1, which moves the puck in the left direction. Add the following to the bottom of the animate function:
// check puck collision with player paddles
[self checkPuckCollision: viewPaddle1.frame
                    DirX: (viewPuck.center.x -
                           viewPaddle1.center.x) / 32.0
                    DirY: 1];

[self checkPuckCollision: viewPaddle2.frame
                    DirX: (viewPuck.center.x -
                           viewPaddle2.center.x) / 32.0
                    DirY: -1];
You should now be able to play the game and find that the puck bounces off the left and right walls and off the top and bottom paddles. You will also notice that if the puck misses a paddle, it will leave the field never to return. You will need to handle this condition and also keep track of each player’s score.
Scoring
You need to add a couple labels to the view so you can track scores. Bring up Interface Builder and edit the PaddlesViewController.xib file again. Drag over a new label, set the initial Text value to “0,” change Alignment to center, and adjust the font size to at least 24. Move the label flush against the right edge of the view. Now switch over to the Size Inspector and change the Origin to the center position. Modify the Y value to be 200, which is 40 pixels above the center line. The result should look similar to Figure 2-11.

Copy and paste that label and then position it below the middle line at roughly the same distance. Make sure it is flush against the right side of the view and then change the Y origin to 280, which is 40 pixels below the middle line.
Just as you did before, create referencing outlets of the labels to the view controller so they can be accessed as properties within the code. Name the labels viewScore1 for player one’s score and viewScore2 for player two’s score. The resulting interface should look similar to the following:
@interface PaddlesViewController : UIViewController
{
    UITouch *touch1;
    UITouch *touch2;

    float dx;
    float dy;
    float speed;

    NSTimer *timer;
}

@property (retain, nonatomic) IBOutlet UIView *viewPaddle1;
@property (retain, nonatomic) IBOutlet UIView *viewPaddle2;
@property (retain, nonatomic) IBOutlet UIView *viewPuck;
@property (retain, nonatomic) IBOutlet UILabel *viewScore1;
@property (retain, nonatomic) IBOutlet UILabel *viewScore2;

@end
You need to add a new function to check if a goal has been scored by either of the players. If the puck hits the top edge of the screen then player two will receive a point. If the puck hits the bottom edge of the screen then player one will receive the point. In order to add a point to the score, you can convert each of the score labels into integer values. The NSString class has a method called intValue that will return the integer value of the string.
Note
The intValue method always returns an integer no matter what is contained in the string. If the text is something other than a number, such as letters or symbols, it will return 0. If there is white space at the start of the value, it will skipped. It also will return the value INT_MAX or INT_MIN on overflow.
The integer values of each label will be stored into s1 and s2 variables and then incremented by one depending on which player scored the point. The last step is to convert the scores back into strings, update the label values, and reset the round. The checkGoal function will also return whether a goal was actually scored or not. Add the following above the animate function:
- (BOOL)checkGoal
{
    // check if ball is out of bounds and reset game if so
    if (viewPuck.center.y < 0 || viewPuck.center.y >= 480)
    {
        // get integer value from score label
        int s1 = [viewScore1.text intValue];
        int s2 = [viewScore2.text intValue];

        // give a point to correct player
        if (viewPuck.center.y < 0) ++s2; else ++s1;

        // update score labels
        viewScore1.text = [NSString stringWithFormat: @"%u", s1];
        viewScore2.text = [NSString stringWithFormat: @"%u", s2];

        // reset round
        [self reset];

        // return TRUE for goal
        return TRUE;
    }

    // no goal
    return FALSE;
}
Now add a call to checkGoal at the bottom of the animate function:
- (void)animate
{
    // move puck to new position based on direction and speed
    viewPuck.center = CGPointMake(viewPuck.center.x + dx*speed,
                                  viewPuck.center.y + dy*speed);

    // check puck collision with left and right walls
    [self checkPuckCollision: CGRectMake(-10,0,20,480)
                        DirX: fabs(dx)
                        DirY: 0];

    [self checkPuckCollision: CGRectMake(310,0,20,480)
                        DirX: -fabs(dx)
                        DirY: 0];

    // check puck collision with player paddles
    [self checkPuckCollision: viewPaddle1.frame
                        DirX: (viewPuck.center.x -
                               viewPaddle1.center.x) / 32.0
                        DirY: 1];

    [self checkPuckCollision: viewPaddle2.frame
                        DirX: (viewPuck.center.x -
                               viewPaddle2.center.x) / 32.0
                        DirY: -1];

    // check for goal
    [self checkGoal];
}
Run the game and you should see the score increment and the round reset whenever the puck hits the top or bottom edge. You have successfully implemented a working scoreboard, but the game currently never ends. The next step will be to add the game over condition, along with a few more finishing touches.
Finishing Touches
The game needs a few final touches, such as displaying messages when a player wins the game, letting players have a chance to get ready before the game starts, increasing the difficulty of the game on each successful puck strike, and adding the ability to pause and resume the game.
Displaying Messages
The easiest way to prompt the user with a quick message is by using an alert view. An alert prompts the user with a message and requires tapping a button to dismiss it. The UIAlertView class is used to display these messages and has a very simple interface.
Add the following to the interface so you can track if a message is being displayed:
UIAlertView *alert;
You will add a function that takes a message and displays it to the user. It will also stop the animation timer so that the game will effectively pause while the message is being displayed. In addition, it will not display any other messages by checking if a message was already displayed. Add the following into the implementation file below the stop function:
- (void)displayMessage: (NSString*) msg
{
    // do not display more than one message
    if (alert) return;

    // stop animation timer
    [self stop];

    // create and show alert message
    alert = [[UIAlertView alloc] initWithTitle: @"Game"
                                       message: msg
                                      delegate: self
                             cancelButtonTitle: @"OK"
                             otherButtonTitles: nil];
    [alert show];
    [alert release];
}
You can use this function so when a new game starts it will prompt the user to get ready. You will also create a newGame function that will reset the round, set scores to “0,” and display the message “Ready to Play?” to the players. Add the following code to the implementation file below the displayMessage function:
- (void)newGame
{
    [self reset];

    // reset score
    viewScore1.text = [NSString stringWithString: @"0"];
    viewScore2.text = [NSString stringWithString: @"0"];

    // present message to start game
    [self displayMessage: @"Ready to play?"];
}
The viewDidLoad function would be a good place to prompt the user to start the game. You will remove starting of the animation timer in this method because the game should officially begin after the player has tapped OK. Replace the existing code in viewDidLoad to call the newGame function:
- (void)viewDidLoad
{
    [super viewDidLoad];
    [self newGame];
}
The UIAlertView will call the delegate back when the user taps a button. If you had more than one button on the alert message, you could check the button Index parameter to determine that, but in this case there is only a single OK button so checking it is not needed. In order to handle the alert callback, add the following code below the newGame function:
- (void)alertView:(UIAlertView *)alertView
             didDismissWithButtonIndex:(NSInteger)buttonIndex
{
    // message dismissed so reset our game and start animation
    alert = nil;

    // reset round
    [self reset];

    // start animation
    [self start];
}
The above code will reset the alert variable to nil, reset the round variables, and then start animation. If you run the game, you will now be prompted to get ready before the game actually starts. You will also use this logic to display the Game Over message.
Game Over
The game needs to have a score that, once achieved by either player, will end the game and announce the winner. I recommend setting the ending score to a low number, such as 3, so we can easily test the game over condition. I usually will use a #define so that we can easily change the maximum score value in the future. You will most likely want to increase this number or even make it configurable to the end user at a later point. Add this definition to the top of the implementation file:
#define MAX_SCORE 3Now add the following code, which will let you know if the game is officially over. You will convert both score labels to integers and check if they reached the maximum score that we just defined. It also returns if player one or player two has won the game. Add the following to the top of the implementation file:
- (int)gameOver
{
    if ([viewScore1.text intValue] >= MAX_SCORE) return 1;
    if ([viewScore2.text intValue] >= MAX_SCORE) return 2;
    return 0;
}
Modify when the alert view is dismissed to check for the game over condition. If the game is over, you will start a new game, which will prompt the user to get ready to play:
- (void)alertView:(UIAlertView *)alertView
             didDismissWithButtonIndex:(NSInteger)buttonIndex
{
    // message dismissed so reset our game and start animation
    alert = nil;

    // check if we should start a new game
    if ([self gameOver])
    {
        [self newGame];
        return;
    }

    // reset round
    [self reset];

    // start animation
    [self start];
}
You need to add to the check goal function and prompt the user if a win has been achieved. If a win has not been achieved then you just reset the round as before. Modify the checkGoal function to appear as follows:
- (BOOL)checkGoal
{
    // check if ball is out of bounds and reset game if so
    if (viewPuck.center.y < 0 || viewPuck.center.y >= 480)
    {
        // get integer value from score label
        int s1 = [viewScore1.text intValue];
        int s2 = [viewScore2.text intValue];

        // give a point to correct player
        if (viewPuck.center.y < 0) ++s2; else ++s1;

        // update score labels
        viewScore1.text = [NSString stringWithFormat: @"%u", s1];
        viewScore2.text = [NSString stringWithFormat: @"%u", s2];

        // check for winner
        if ([self gameOver] == 1)
        {
            // report winner
            [self displayMessage: @"Player 1 has won!"];
        }
        else if ([self gameOver] == 2)
        {
            // report winner
            [self displayMessage: @"Player 2 has won!"];
        }
        else
        {
            // reset round
            [self reset];
        }

        // return TRUE for goal
        return TRUE;
    }

    // no goal
    return FALSE;
}
Run and play the game until one of the players has scored 3 points. At this point the game should announce the winner. If you dismiss the message, the game will reset and then prompt you to get ready for a new game.
Increasing Difficulty
It is important to explore ways to increase the difficulty of your game as it progresses. The game as it stands is very easy to play and it is possible that two players may never miss the puck. Here is a list that I came up with that would increase the difficulty of the game:
Increase the speed of the puck
Decrease the size of the puck
Decrease the width of the paddles
Add additional objects in the path of the puck
You already have a speed variable that resets at the start of every round. The speed variable is also applied to the direction of the puck when it is moved in the animate function. Increasing the speed of the puck every time the paddle strikes it would be simple to implement. One important thing to know is there is a limit on how fast the puck can move, as it could jump over an existing paddle or through the rectangles used for the left and right wall. The paddles are 16 pixels in height and the walls are 20 pixels in width. If the puck had a speed greater than those amounts then it would be possible for it to jump over those objects and a collision would not occur. You will limit the speed of the puck to a maximum of 10 pixels per frame, which will ensure this condition will not occur. Add the following function above the animate function:
- (void)increaseSpeed
{
    speed += 0.5;
    if (speed > 10) speed = 10;
}
Remember the collision function and how it returns TRUE if a collision occurred? There was a reason you added that extra logic—it was so you could support additional actions. Modify the animate function to increase the speed of the puck when a paddle collision occurs:
// check puck collision with player paddles
if ([self checkPuckCollision: viewPaddle1.frame
                        DirX: (viewPuck.center.x -
                               viewPaddle1.center.x) / 32.0
                        DirY: 1])

{
    [self increaseSpeed];
}

if ([self checkPuckCollision: viewPaddle2.frame
                        DirX: (viewPuck.center.x -
                               viewPaddle2.center.x) / 32.0
                        DirY: -1])
{
    [self increaseSpeed];
}
Play the game and notice that after every paddle strike the puck gets faster. See how long you can keep the puck going to make sure it progresses to a difficulty that will cause player mistakes. If you feel it is not challenging enough then you could adjust the maximum speed or add a few of the other items discussed to make it more challenging, such as decreasing the width of the paddles.
Pause and Resume
Games usually support allowing the user to pause and resume an active game. There are a few scenarios that you should handle:
Screen lock button is pressed
Incoming phone call, text message, or alarm
Home button pressed to launch another application
For starters, you need to add a couple public methods to the view controller to support pause and resume. The pausing of the game will just stop the animation timer and resuming the game will prompt the user that the game is paused. Once the player taps OK from the message alert, the game will restart the round.
Add the following function declarations to the view controller interface after the property definitions and before the @end:
- (void)resume;
- (void)pause;
The pause function will be implemented to just stop the animation timer. The resume function will prompt the user that the game is paused. Add the following at the end of the implementation file:
- (void)pause
{
    [self stop];
}

- (void)resume
{
    // present a mesage to continue game
    [self displayMessage: @"Game Paused"];
}
The application delegate has two callback methods that tell us when an application becomes active and inactive. This is the best place to go ahead and call the new pause and resume functions. This will handle all the events that I listed when the game should pause, including screen lock, system interruption, and pressing the home button.
Note
Devices running iOS 4 or greater go into a suspended state when the home button is pressed. When the application resumes it will still have all of the existing game state, which means the pause/resume logic will work. Devices running iOS 3 or earlier always terminate the application when the home button is pressed. If you want to support pause/resume on iOS 3 devices, you have to store the game state and reload it when the application launches again.
Add calls to the new pause and resume methods from within the application DidBecomeActive and applicationWillResignActive methods of the PaddlesAppDelegate implementation file:
- (void)applicationWillResignActive:(UIApplication *)application
{
    [self.viewController pause];
}

- (void)applicationDidBecomeActive:(UIApplication *)application
{
    [self.viewController resume];
}
Play the game and test all the different scenarios, such as locking and unlocking the screen. The Simulator can be used to test locking the screen by pressing Command-L or from the menu by selecting Hardware→Lock. It also supports fast switching so you can press the Home button and then relaunch the app. The only way to test proper handling of a phone call, text message, or alarm interruption is by using an iOS device that supports those operations.
Shake Gesture
I will now investigate another type of input that can used on iOS devices: motion. You already have a good handle on how touch events work, and motion events are just as simple to support. As the device moves, the hardware reports linear acceleration changes along the primary axes in three-dimensional space. You could retrieve this continuous motion of data as a series of x,y,z values, but doing so requires you to analyze each of the data points passed in and create an algorithm to decide when a shake occurred. If every developer implemented their own shake-detecting algorithm, then every app that supported shake would most likely be implemented differently, resulting in some user confusion.
Apple decided to make this easier for developers in iOS 3.0 and came up with the concept of motion events. Motion events use the device accelerometer or gyroscope to calculate the type of motion that has been done with the device. As of this writing, there is only one motion event supported and that is the shake motion. Using this shake motion, as opposed to writing your own, allows the end user to have a consistent gesture that can be used across multiple apps.
When the device shakes, the system will evaluate the accelerometer data for you, and interpret it as a shaking gesture or not. The system only informs you when a motion starts and when it stops. It doesn’t inform you about each individual motion, just when the overall motion begins and ends. For example, if you shake the device quickly three times, you might only receive one shake motion.
The first thing you need to do in order to implement shake gestures is have the view controller become the first responder. This may sound familiar to you because of the math game you created in Chapter 1. In that application, the control asking for an answer became the first responder in order to display the keyboard automatically without having to tap it first. In order to use motion gestures, you need to do the same thing, but this time you will make the view controller the first responder and not an individual control. You also need to add a method that tells the system that the view controller can become first responder.
The best time to become the first responder is when the view appears. You should also resign the view controller as first responder when the view disappears. Add the following code into the PaddlesViewController.m file:
- (BOOL)canBecomeFirstResponder
{
    return YES;
}
Modify the viewDidAppear and viewWillDisappear methods as follows:
-(void)viewDidAppear:(BOOL)animated
{
    [super viewDidAppear:animated];
    [self becomeFirstResponder];
}
- (void)viewWillDisappear:(BOOL)animated
{
    [self resignFirstResponder];
    [super viewWillDisappear:animated];
}
Now the view controller is set up to handle motion events. There are three methods that are used to handle motion events. They are motionBegan, motionEnded, and motionCancelled. This is similar to how touches work, in that a motion will begin and then it will either end or be cancelled. Notice there is not a move method like there is in touch, as you are dealing only with full motions and nothing in between. Add the following functions so that you can investigate how these motion methods get called by logging each of the motion events:
- (void)motionBegan:(UIEventSubtype)motion
          withEvent:(UIEvent *)event
{
    if (event.type == UIEventSubtypeMotionShake)
    {
        NSLog(@"Shake Began");
    }
}
- (void)motionEnded:(UIEventSubtype)motion
          withEvent:(UIEvent *)event
{
    if (event.type == UIEventSubtypeMotionShake)
    {
        NSLog(@"Shake Ended");
    }
}
- (void)motionCancelled:(UIEventSubtype)motion
          withEvent:(UIEvent *)event
{
    if (event.type == UIEventSubtypeMotionShake)
    {
        NSLog(@"Shake Cancelled");
    }
}
Run this in the Simulator and then select Hardware→Shake Gesture from the menu. This will result in debug output that is similar to the following:
2011-05-21 16:14:22.196 Paddles[28765:207] Shake Began
2011-05-21 16:14:22.198 Paddles[28765:207] Shake Ended
Notice in the Simulator this results in both the motionBegan and motionEnd events being immediately fired. There is no way to simulate a motion cancelled event, so run it on your device to see what happens. You may notice that the “Shake End” message can appear much later than the “Shake Begin” message. And sometimes you might see the “Shake Cancel” message, especially if you start to shake the device in one direction and then pause for a few seconds.
2011-05-21 16:25:34.669 Paddles[7830:707] Shake Began
2011-05-21 16:25:35.273 Paddles[7830:707] Shake Ended
2011-05-21 16:25:36.074 Paddles[7830:707] Shake Began
2011-05-21 16:25:38.547 Paddles[7830:707] Shake Cancelled
For the purposes of this game, I think it is safe to assume if a motion starts then the game has somehow been interrupted. Maybe one of the players accidentally knocked the iPhone off the table or somebody grabbed the device quickly and put it in their pocket. In these cases, it would be best if you just paused the game. Either comment out the motion methods that was used for debugging or replace it with the following code:
- (void)motionBegan:(UIEventSubtype)motion
          withEvent:(UIEvent *)event
{
    if (event.type == UIEventSubtypeMotionShake)
    {
        // pause game then resume to display message
        [self pause];
        [self resume];
    }
}
You will notice that this code is calling both pause and resume in the same method. I originally created the pause and resume as two functions because of how interruptions occur in the application. Usually there is one method that starts the interruption and another to resume after the interruption has finished. In this particular case, everything is done in a single step, which is why you need to call both the pause and resume methods.
Run it again on the device and make sure the game pauses if you shake it. You may want to revisit this code after the computer player is added and modify it to take a power shot when the device is shaken. For now it will just be used as another way to pause the game.
Sounds
Playing simple sound effects can be done by using System Audio Services. It is recommended that the sounds be short in duration. Here are the iOS guidelines:
Must be .caf, .aif, or .wav files
The audio data in the file must be in PCM or IMA/ADPCM (IMA4) format
The file’s audio duration must be less than 30 seconds
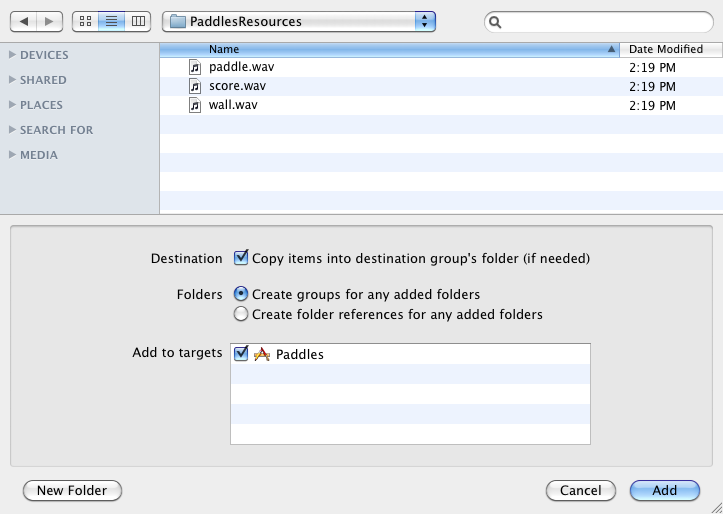
You will use this to play back three different sound files for wall collision, paddle collision, and scoring a point. I have already created a few sounds that you can integrate into the game that are available for download from http://oreilly.com/catalog/0636920018414 or at my website http://toddmoore.com/. The files are named wall.wav, paddle.wav, and score.wav. Once you have downloaded the ZIP file, decompress them, and drag them into your Xcode. When prompted, make sure the “Copy...” checkbox is selected, as shown in Figure 2-12, and click OK. The sound files are now included as part of the application bundle and you can access them from within the code.
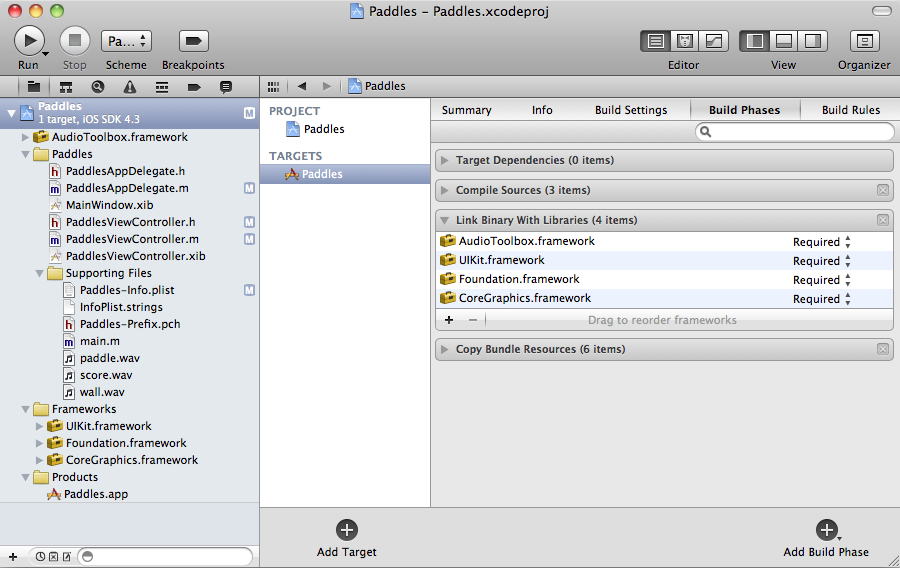
You also need to add the AudioToolbox framework to the application. Click on the project file, then Paddles under target, Build Phases, and expand Link Binary With Libraries. Click the plus icon at the bottom of the framework section, as shown in Figure 2-13, and select the AudioToolbox framework. The application should now be able to use the AudioToolbox library without linker errors.
Add the AudioToolbox.h header file at the top of the PaddlesViewController header file:
#import <UIKit/UIKit.h>
#import "AudioToolbox/AudioToolbox.h"
You need to create an array to hold the a sound identifiers that are given to you after loading each sound. Add the following code into the PaddlesViewController interface:
SystemSoundID sounds[3];
After adding the sound array to the header you need to implement a function that will load each of the sound files and store the results into the array. Add the following to the top of the implementation:
#define SOUND_WALL   0
#define SOUND_PADDLE 1
#define SOUND_SCORE  2

// load a sound effect into index of the sounds array
- (void)loadSound: (NSString*) name Slot: (int) slot
{
    if (sounds[slot] != 0) return;

    // Create pathname to sound file
    NSString *sndPath = [[NSBundle mainBundle]
                                   pathForResource: name
                                            ofType: @"wav"
                                       inDirectory: @"/"];

    // Create system sound ID into our sound slot
    AudioServicesCreateSystemSoundID((CFURLRef)
         [NSURL fileURLWithPath: sndPath], &sounds[slot]);
}

- (void)initSounds
{
    [self loadSound: @"wall" Slot: SOUND_WALL];
    [self loadSound: @"paddle" Slot: SOUND_PADDLE];
    [self loadSound: @"score" Slot: SOUND_SCORE];
}
Loading sounds using AudioServicesCreateSystemSoundID requires that you dispose of the sounds when you are finished with them using AudioServicesDisposeSystemSoundID. Add code to dispose of each sound from the sounds array at the top of the dealloc method:
// dispose of sounds
for (int i = 0; i < 3; ++i)
{
     AudioServicesDisposeSystemSoundID(sounds[i]);
}
Modify the viewDidLoad function so the sounds will be loaded before the game starts:
- (void)viewDidLoad
{
    [super viewDidLoad];

    [self initSounds];

    [self newGame];
}
Now lets add a simple method to play back a sound from a specified index of the sounds array. The playback of sounds can be achieved in a single call to AudioServicesPlaySystemSound. Although this doesn’t warrant creating a separate method to call this, it has been my experience that you may end up changing your audio implementation down the road and it will be much easier if all playback goes through your own custom function. Add the following after the initSounds function:
- (void)playSound: (int) slot
{
    AudioServicesPlaySystemSound(sounds[slot]);
}
Modify the animate function to play the appropriate sound if contact is made with the wall or paddle. You will also play the score sound if a goal is made:
- (void)animate
{
    // move puck to new position based on direction and speed
    viewPuck.center = CGPointMake(viewPuck.center.x + dx*speed,
                                  viewPuck.center.y + dy*speed);

    // check puck collision with left and right walls
    if ([self checkPuckCollision: CGRectMake(-10,0,20,480)
                            DirX: fabs(dx) DirY: 0])
    {
        // play hitting wall sound
        [self playSound: SOUND_WALL];
    }
    if ([self checkPuckCollision: CGRectMake(310,0,20,480)
                            DirX: -fabs(dx) DirY: 0])
    {
        // play hitting wall sound
        [self playSound: SOUND_WALL];
    }

    // check puck collision with player paddles
    if ([self checkPuckCollision: viewPaddle1.frame
                            DirX: (viewPuck.center.x -
                                   viewPaddle1.center.x) / 32.0
                            DirY: 1])
    {
        // play hitting paddle sound and increase speed
        [self increaseSpeed];
        [self playSound: SOUND_PADDLE];
    }
    if ([self checkPuckCollision: viewPaddle2.frame
                            DirX: (viewPuck.center.x -
                                   viewPaddle2.center.x) / 32.0
                            DirY: -1])
    {
        // play hitting paddle sound and increase speed
        [self increaseSpeed];
        [self playSound: SOUND_PADDLE];
    }

    // check for goal
    if ([self checkGoal])
    {
        // play scoring sound
        [self playSound: SOUND_SCORE];
    }
}
Run the game and now sound will be generated any time a collision is made with the puck or a player scores a point. You will learn how to record and edit your own sounds in Chapter 5.
Note
If you do not hear any sounds make sure your device is not in silent mode. This switch is located at the top lefthand side of the iPhone above the volume controls. Also make sure the device volume is all the way up. If you are still having sound playback issues check that the sound files were properly added to the project and that they are being initialized from within the code.