
Spring Roo is a rapid application development tool for Java developers. With Roo, you can easily build full Java applications in minutes.
We won’t be covering all aspects of Roo development in this chapter. We will focus on the new repository support for JPA and MongoDB that uses Spring Data to provide this support. If you want to read more about Roo, go to the Spring Roo project home page, where you can find links to the reference manual. While on the project home page, look for a link to download a free O’Reilly ebook by Josh Long and Steve Mayzak called Getting Started with Roo [LongMay11]. This ebook covers an older 1.1 version of Roo that does not support the repository layer, but it is a good introduction to Roo in general. The most up-to-date guide for using Spring Roo is Spring Roo in Action by Ken Rimple and Srini Penchikala [RimPen12].
Roo works its magic using code generation combined with AspectJ for injecting behavior into your domain and web
classes. When you work on a Roo project, the project files are monitored
by Roo and additional artifacts are generated. You still have your regular
Java classes that you can edit, but there are additional features provided
for free. When you create a class with Roo and annotate that class with
one or more annotations that provide additional capabilities, Roo will
generate a corresponding AspectJ file that contains one or more AspectJ
inter type declarations (ITD). There is, for instance, an
@RooJavaBean annotation that triggers the generation of an AspectJ aspect
declaration that provides ITDs that introduce getters and setters in your
Java class. There’s no need to code that yourself. Let’s see a quick
example of how that would look. Our simple bean class in shown in Example 9-1.
Example 9-1. A simple Java bean class: Address.java
@RooJavaBeanpublicclassAddress{privateStringstreet;privateStringcity;privateStringcountry;}
As you can see, we don’t code the getters and setters. They will be
introduced by the backing AspectJ aspect file since we used the
@RooJavaBean annotation. The generated AspectJ file looks like Example 9-2.
Example 9-2. The generated AspectJ aspect definition: Address_Roo_JavaBean.aj
// WARNING: DO NOT EDIT THIS FILE. THIS FILE IS MANAGED BY SPRING ROO.// You may push code into the target .java compilation unit if you wish to edit any member(s).packagecom.oreilly.springdata.roo.domain;importcom.oreilly.springdata.roo.domain.Address;privilegedaspectAddress_Roo_JavaBean{publicStringAddress.getStreet(){returnthis.street;}publicvoidAddress.setStreet(Stringstreet){this.street=street;}publicStringAddress.getCity(){returnthis.city;}publicvoidAddress.setCity(Stringcity){this.city=city;}publicStringAddress.getCountry(){returnthis.country;}publicvoidAddress.setCountry(Stringcountry){this.country=country;}}
You can see that this is defined as a privileged aspect, which means
that it will have access to any private variables declared in the target
class. The way you would define ITDs is by preceding any method names with the target class name,
separated by a dot. So public String Address.getStreet() will
introduce a new method in the Address class with a
public String getStreet() signature.
As you can see, Roo follows a specific naming pattern that makes it easier to identify what files it has generated. To work with Roo, you can either use a command-line shell or edit your source files directly. Roo will synchronize all changes and maintain the source and generated files as necessary.
When you ask Roo to create a project for you, it generates a pom.xml file that is ready for you to use when you build the project with Maven. In this pom.xml file, there is a Maven compile as well as an AspectJ plug-in defined. This means that all the AspectJ aspects are woven at compile time. In fact, nothing from Roo remains in the Java class files that your build generates. There is no runtime jar dependency. Also, the Roo annotations are source-level retention only, so they will not be part of your class files. You can, in fact, easily get rid of Roo if you so choose. You have the option of pushing all of the code defined in the AspectJ files into the appropriate source files and removing any of these AspectJ files. This is called push-in refactoring, and it will leave you with a pure Java solution, just as if you had written everything from scratch yourself. Your application still retains all of the functionality.
Spring Roo started out supporting JPA as the only persistence option. It also was opinionated in terms of the data access layer. Roo prescribed an active record data access style where each entity provides its finder, save, and delete methods.
Starting with Roo version 1.2, we have additional options for the persistence layer (see Figure 9-1). Roo now allows you to choose between the default active record style and a repository-based persistence layer. If you choose the repository approach, you have a choice between JPA and MongoDB as the persistence providers. The actual repository support that Roo uses is the one provided by Spring Data, which we have already seen in Chapter 2.
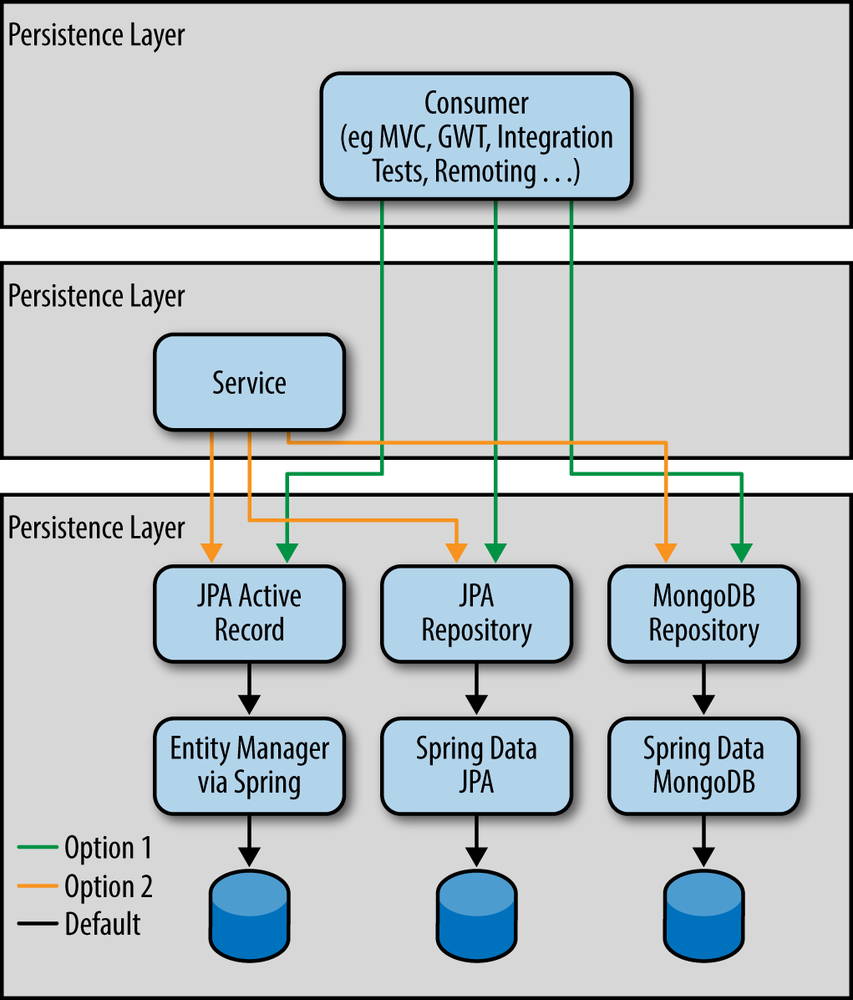
In addition to an optional repository layer, Roo now also lets you define a service layer on top of either the active record style or repository style persistence layer.
You can use Roo either as a command-line tool or within an IDE, like the free Spring Tool Suite, that has built-in Roo support. Another IDE that has support for Roo is IntelliJ IDEA, but we won’t be covering the support here.
First, you need to download the latest Spring Roo distribution from the download page. Once you have the file downloaded, unzip it somewhere on your system. In the bin directory, there is a roo.sh shell script for Unix-style systems as well as a roo.bat batch file for Windows. When you want to create a Roo project, simply create a project directory and start Roo using the shell script or the batch file. If you add the bin directory to your path, you can just use the command name to start Roo; otherwise, you will have to provide the fully qualified path.
Once Roo starts up, you are greeted with the following screen (we
entered hint at the prompt to get the additional
information):
    ____  ____  ____
   / __ / __ / __
  / /_/ / / / / / / /
 / _, _/ /_/ / /_/ /
/_/ |_|\____/\____/    1.2.2.RELEASE [rev 7d75659]


Welcome to Spring Roo. For assistance press TAB or type "hint" then hit ENTER.
roo> hint
Welcome to Roo! We hope you enjoy your stay!

Before you can use many features of Roo, you need to start a new project.

To do this, type 'project' (without the quotes) and then hit TAB.

Enter a --topLevelPackage like 'com.mycompany.projectname' (no quotes).
When you've finished completing your --topLevelPackage, press ENTER.
Your new project will then be created in the current working directory.

Note that Roo frequently allows the use of TAB, so press TAB regularly.
Once your project is created, type 'hint' and ENTER for the next suggestion.
You're also welcome to visit http://forum.springframework.org for Roo help.
roo>
We are now ready to create a project and start developing our
application. At any time, you can enter hint, and
Roo will respond with some instruction on what to do next based on the
current state of your application development. To cut down on typing,
Roo will attempt to complete the commands you enter whenever you hit the
Tab key.
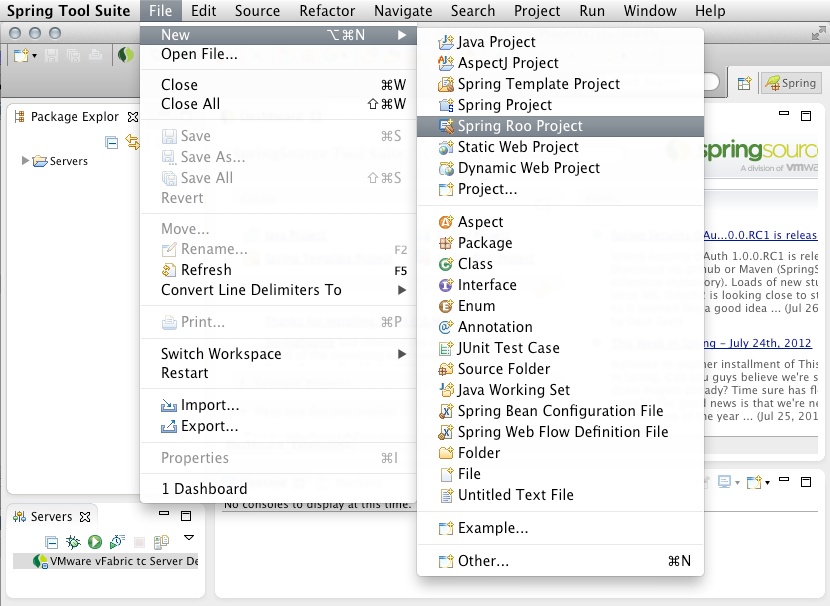
The Spring Tool Suite comes with built-in Roo support, and it also comes bundled with Maven and the Developer Edition of VMware vFabric tc Server. This means that you have everything you need to develop applications with Roo. Just create your first Roo application using the menu option File→New→Spring Roo Project. You can see this in action in Figure 9-2.
This opens a “Create a new Roo Project” dialog screen, as shown in Figure 9-3.
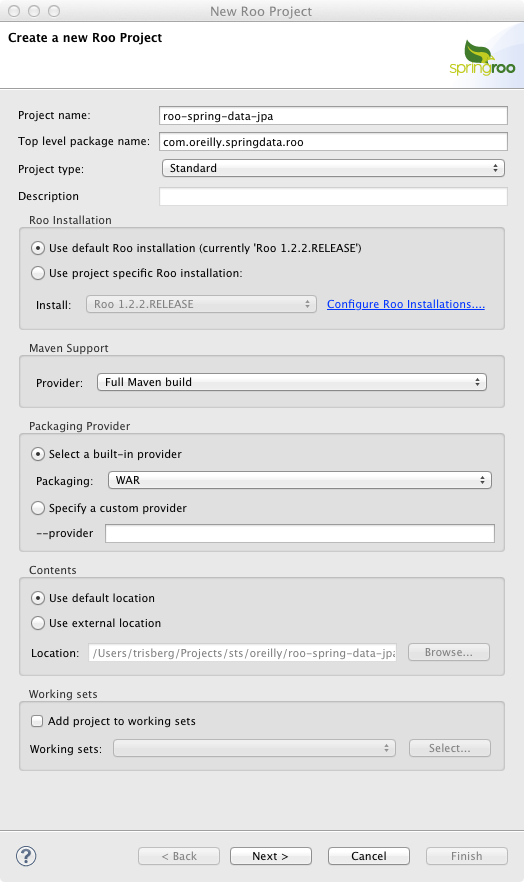
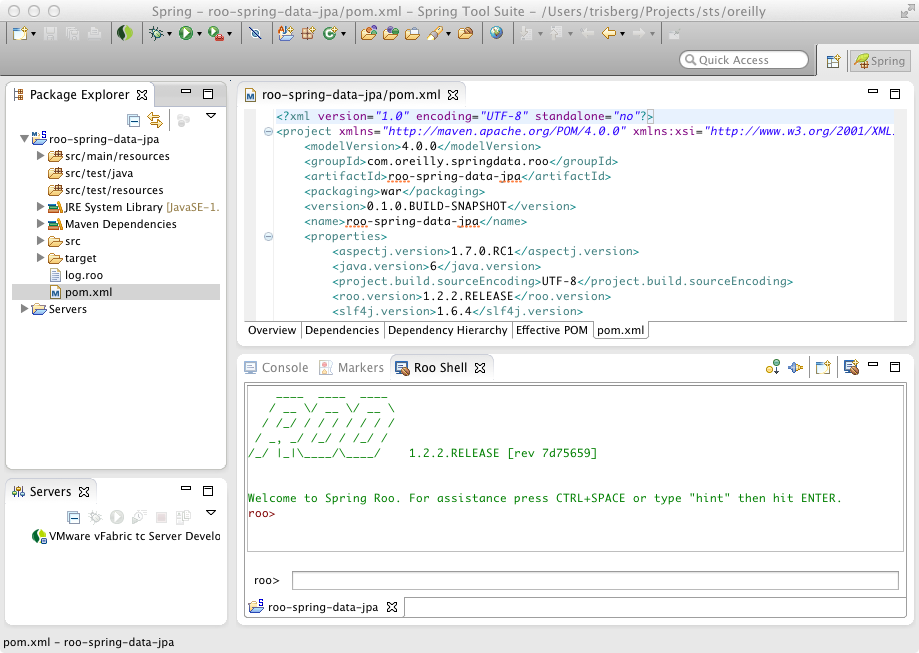
Just fill in the “Project name” and “Top level package name,” and then select WAR as the packaging. Click Next, and then click Finish on the next screen. The project should now be created, and you should also see the Roo shell window, as shown in Figure 9-4.
We are now ready to build the first Roo project. We will start with a
customer service application based on the same domain model that we have
seen in earlier chapters. We will create a Customer
class and an associated Address class, link them
together, and create repositories and really basic data entry screens for
them. Since Roo’s repository support supports both JPA and MongoDB, using
the Spring Data repository support, we will create one of each kind of
application. As you will see, they are almost identical, but there are a
couple of differences that we will highlight. So, let’s get started. We’ll
begin with the JPA application.
If you are using Spring Tool Suite, then just follow the aforementioned instructions to create a new Spring Roo project. On the “Create a new Roo Project” dialog screen, provide the following settings:
Project name:
roo-spring-data-jpaTop level package name:
com.oreilly.springdata.rooPackaging:
WAR
If you are using the command-line Roo shell, you need to create a roo-spring-data-jpa directory; once you
change to this new directory, you can start the Roo shell as just
explained. At the roo> prompt, enter the following
command:
project --topLevelPackage com.oreilly.springdata.roo ↪
  --projectName roo-spring-data-jpa --java 6 --packaging WAR
You now have created a new project, and we are ready to start developing the application. From here on, the actions will be the same whether you are using the Roo shell from the command line or inside the Spring Tool Suite.
Setting up the JPA persistence configuration consists of selecting a
JPA provider and a database. We will use Hibernate together with HSQLDB for this example. At the
roo> prompt, enter
the following:
jpa setup --provider HIBERNATE --database HYPERSONIC_PERSISTENT
Note
Remember that when entering these commands, you can always press the Tab key to get completion and suggestions for available options. If you are using the Spring Tool Suite, press Ctrl+Space instead.
Let’s create our entities, starting with the Address
class:
entity jpa --class ~.domain.Address --activeRecord false
field string --fieldName street --notNull
field string --fieldName city --notNull
field string --fieldName country --notNull
That wasn’t too hard. Note that we specified --activeRecord
false, which means that we will have to provide the CRUD
functionality using a repository. The resulting
Address class looks like this:
packagecom.oreilly.springdata.roo.domain;importjavax.validation.constraints.NotNull;importorg.springframework.roo.addon.javabean.RooJavaBean;importorg.springframework.roo.addon.jpa.entity.RooJpaEntity;importorg.springframework.roo.addon.tostring.RooToString;@RooJavaBean@RooToString@RooJpaEntitypublicclassAddress{@NotNullprivateStringstreet;@NotNullprivateStringcity;@NotNullprivateStringcountry;}
We see the private fields we declared and three Roo annotations: @RooJavaBean,
@RooToString, and
@RooJpaEntity. These annotations have
corresponding AspectJ aspect declarations that you can find in the same
directory as the Java class.
Let’s create the EmailAddress and
Customer classes next. The
EmailAddress is an embeddable class with a single
value field. We need to ask Roo to ignore the fact
that value is a reserved word for some SQL
databases. We also provide a column name of email
since that will be more descriptive for anyone inspecting the database
table. Using this embeddable in a field
declarations, we specify it as an embedded
field.
embeddable --class ~.domain.EmailAddress
field string --fieldName value --notNull --column email --permitReservedWords
entity jpa --class ~.domain.Customer --activeRecord false
field string --fieldName firstName --notNull
field string --fieldName lastName --notNull
field embedded --fieldName emailAddress --type ~.domain.EmailAddress
field set --fieldName addresses --type ~.domain.Address
The last command creates a many-to-many relationship to the
address table, allowing us to provide a number of addresses for each
customer. This is the resulting Customer
class:
packagecom.oreilly.springdata.roo.domain;importjava.util.HashSet;importjava.util.Set;importjavax.persistence.CascadeType;importjavax.persistence.Embedded;importjavax.persistence.ManyToMany;importjavax.validation.constraints.NotNull;importorg.springframework.roo.addon.javabean.RooJavaBean;importorg.springframework.roo.addon.jpa.entity.RooJpaEntity;importorg.springframework.roo.addon.tostring.RooToString;@RooJavaBean@RooToString@RooJpaEntitypublicclassCustomer{@NotNullprivateStringfirstName;@NotNullprivateStringlastName;@EmbeddedprivateEmailAddressemailAddress;@ManyToMany(cascade=CascadeType.ALL)privateSet<Address>addresses=newHashSet<Address>();}
For completeness, we’ll show the
EmailAddress class as well:
packagecom.oreilly.springdata.roo.domain;importjavax.persistence.Column;importjavax.persistence.Embeddable;importjavax.validation.constraints.NotNull;importorg.springframework.roo.addon.javabean.RooJavaBean;importorg.springframework.roo.addon.tostring.RooToString;@RooJavaBean@RooToString@EmbeddablepublicclassEmailAddress{@NotNull@Column(name="email")privateStringvalue;}
The most interesting part of this class is that it is
@Embeddable and that we have defined the value property to be stored in a
database column named email.
With the entities in place, we can now create the JPA repositories. We create one repository for each entity.
repository jpa --interface ~.repository.CustomerRepository --entity ~.domain.Customer
repository jpa --interface ~.repository.AddressRepository --entity ~.domain.Address
At this point we could also create a service layer, but since this is such a simple application, we’ll skip this step.
Now we need some really simple web pages so we can enter and modify our customer and address data. We’ll just stick with the screens generated by Roo.
web mvc setup
web mvc scaffold --class ~.web.CustomerController --backingType ~.domain.Customer
web mvc scaffold --class ~.web.AddressController --backingType ~.domain.Address
There is one thing we have to do. Roo doesn’t know how to map the
EmailAddress class between the
String representation used for web pages and the
EmailAddress type used for persistence. We need
to add converters to the
ApplicationConversionServiceFactoryBean that
Roo generated; Example 9-3 shows how.
Example 9-3. The generated ApplicationConversionServiceFactoryBean.java with converters added
packagecom.oreilly.springdata.roo.web;importorg.springframework.core.convert.converter.Converter;importorg.springframework.format.FormatterRegistry;importorg.springframework.format.support.FormattingConversionServiceFactoryBean;importorg.springframework.roo.addon.web.mvc.controller.converter.RooConversionService;importcom.oreilly.springdata.roo.domain.EmailAddress;/*** A central place to register application converters and formatters.*/@RooConversionServicepublicclassApplicationConversionServiceFactoryBeanextendsFormattingConversionServiceFactoryBean{@OverrideprotectedvoidinstallFormatters(FormatterRegistryregistry){super.installFormatters(registry);// Register application converters and formattersregistry.addConverter(getStringToEmailAddressConverter());registry.addConverter(getEmailAddressConverterToString());}publicConverter<String,EmailAddress>getStringToEmailAddressConverter(){returnnewConverter<String,EmailAddress>(){@OverridepublicEmailAddressconvert(Stringsource){EmailAddressemailAddress=newEmailAddress();emailAddress.setAddress(source);returnemailAddress;}};}publicConverter<EmailAddress,String>getEmailAddressConverterToString(){returnnewConverter<EmailAddress,String>(){@OverridepublicStringconvert(EmailAddresssource){returnsource.getAddress();}};}}
Now we are ready to build and deploy this example. For Spring Tool Suite, just drag the application to the tc server instance and start the server. If you use the command line, simply exit the Roo shell and from the command line run the following Maven commands:
mvn clean package
mvn tomcat:run
You should now be able to open a browser and navigate to
http://localhost:8080/roo-spring-data-jpa/ and see the screen
shown in Figure 9-5.
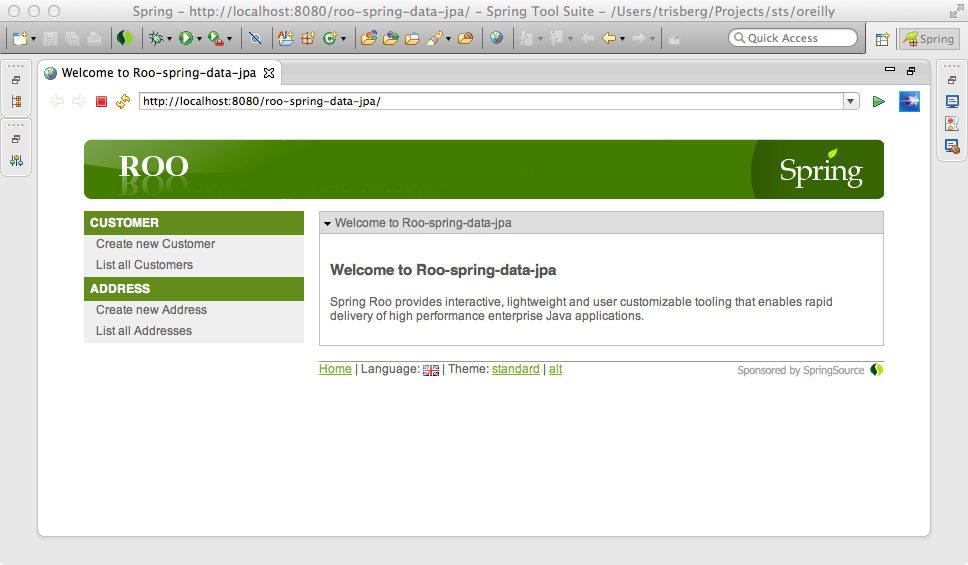
Our application is now complete, and we can add some addresses and then a customer or two.
Note
If you get tired of losing your data every time you restart your
app server, you can change the schema creation properties in src/main/resources/META-INF/persistence.xml. Change
<property name="hibernate.hbm2ddl.auto" value="create" /> to have
a value of "update".
Since Spring Data includes support for MongoDB repositories, we can use MongoDB as a persistence option when using Roo. We just won’t have the option of using the active record style for the persistence layer; we can only use the repositories. Other than this difference, the process is very much the same as for a JPA solution.
If you are using Spring Tool Suite, then just follow the aforementioned instructions to create a new Spring Roo project. On the “Create a new Roo Project” dialog screen, provide the following settings:
Project name:
roo-spring-data-mongoTop level package name:
com.oreilly.springdata.rooPackaging:
WAR
When using the command-line Roo shell, create a roo-spring-data-mongo directory. Change to
this new directory and then start the Roo Shell as previously explained.
At the roo> prompt,
enter the following command:
project --topLevelPackage com.oreilly.springdata.roo ↪
  --projectName roo-spring-data-mongo --java 6 --packaging WAR
Setting up the persistence configuration for MongoDB is simple. We can just accept the defaults. If you wish, you can provide a host, port, username, and password, but for a default local MongoDB installation the defaults work well. So just enter the following:
mongo setup
When creating the entities, we don’t have the option of using the active
record style, so there is no need to provide an --activeRecord parameter to opt out of it.
Repositories are the default, and the only option for the persistence
layer with MongoDB. Again, we start with the
Address class:
entity mongo --class ~.domain.Address
field string --fieldName street --notNull
field string --fieldName city --notNull
field string --fieldName country --notNull
That looks very similar to the JPA example. When we move on to the
Customer class, the first thing you’ll notice that is
different is that with MongoDB you don’t use an
embeddable class. That is available only for JPA.
With MongoDB, you just create a plain class and
specify --rooAnnotations true to enable the
@RooJavaBean support. To use this class, you
specify the field as other. Other than these
minor differences, the entity declaration is very similar to the JPA
example:
class --class ~.domain.EmailAddress --rooAnnotations true
field string --fieldName value --notNull --permitReservedWords
entity mongo --class ~.domain.Customer
field string --fieldName firstName --notNull
field string --fieldName lastName --notNull
field other --fieldName emailAddress --type ~.domain.EmailAddress
field set --fieldName addresses --type ~.domain.Address
We declare the MongoDB repositories the same way as the JPA repositories except
for the mongo keyword:
repository mongo --interface ~.repository.CustomerRepository ↪
  --entity ~.domain.Customer
repository mongo --interface ~.repository.AddressRepository --entity ~.domain.AddressThe web layer is exactly the same as for the JPA example:
web mvc setup
web mvc scaffold --class ~.web.CustomerController --backingType ~.domain.Customer
web mvc scaffold --class ~.web.AddressController --backingType ~.domain.Address
Don’t forget to add the converters to the
ApplicationConversionServiceFactoryBean like we
did for JPA in Example 9-3.
Now we are ready to build and deploy this example. This is again exactly the same as the JPA example, except that we need to have MongoDB running on our system. See Chapter 6 for instructions on how to install and run MongoDB.
For Spring Tool Suite, just drag the application to the tc server instance and start the server. If you use the command line, simply exit the Roo shell and from the command line run the following Maven commands:
mvn clean package
mvn tomcat:run
You should now be able to open a browser and navigate to
http://localhost:8080/roo-spring-data-mongo/ and see the
screen in Figure 9-6.
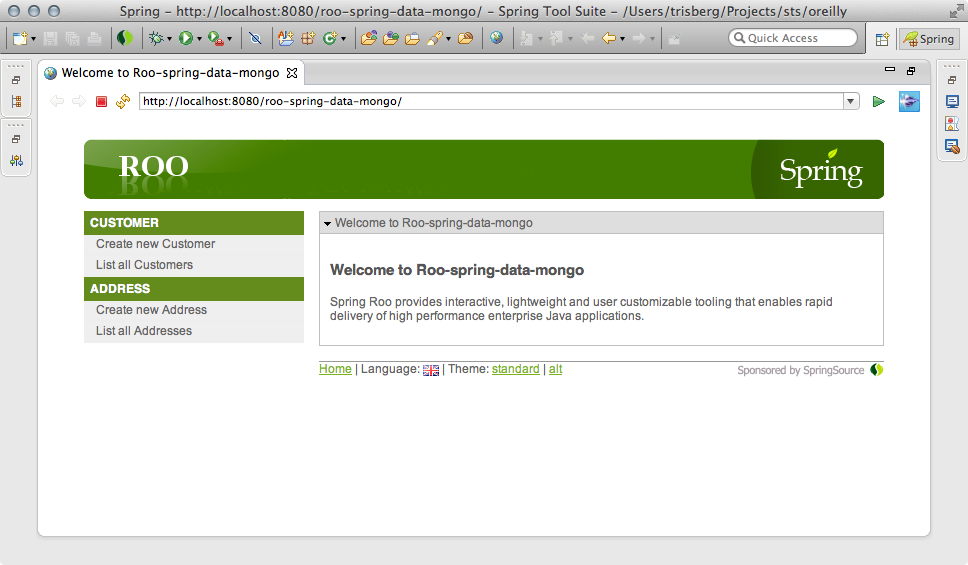
Our second example application is now complete, and we can add some addresses and then a customer or two.