
Chapter 7. Tour the iPod Nano
You’ll learn to:
Set up your Nano
Load it up with music, movies, and podcasts
Play music and spoken-word recordings
Tune the FM Radio
Track your workouts with the Nike+ software
IF THERE’S AN IPOD that’s been around the design block a few times, it’s the Nano. Since its debut in 2005, Apple’s mid-range media player has gone from looking like a pack of Trident gum with a tiny screen and click wheel to a small square of metal and glass resembling a high-tech pocket watch that plays music.
In between those versions, Apple molded the Nano into a squat version of the iPod Classic, and then stretched it out into a long, thin player that forced you to hold it sideways to watch videos. 2012 brings the latest rendition of the Nano, the seventh generation of Apple’s small-but-powerful media player.
While it now looks like an iPod Touch Mini, the newest Nano brings together many of the most popular features of Nanos Past. As this chapter explains, music, photos, and videos are all a tap away. The Nano is also the only iPod with a built-in FM radio and a pedometer that counts your steps as you strive for fitness. So when you’re ready to give this year’s model a spin, this chapter shows you the way.
Set Up and Autosync the Nano
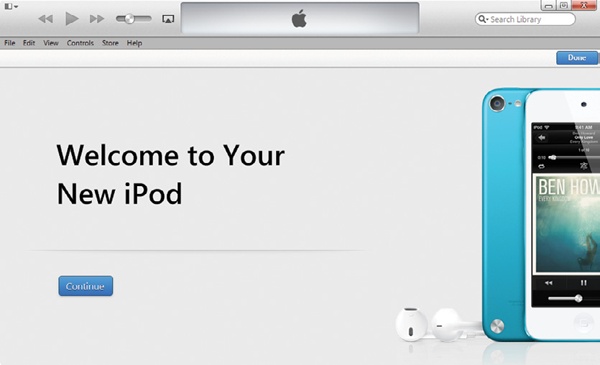
YOU DON’T HAVE TO do much to keep your Nano’s music and video collection up to date with what’s on your computer. That’s because iTunes has a nifty autosync feature that automatically makes sure that whatever is in your iTunes library also appears on your iPod once you connect ’Pod to desktop PC.
The first time you plug in your Nano, iTunes takes you through the setup process. Earlier versions of iTunes offered to automatically copy all your music and photos to your new ’Pod, but in iTunes 11, manual management is the default option. If you have a music library that’s small enough to fit on the Nano, click the Nano’s icon in the iTunes window, click the Summary tab on the next screen, and then turn off the checkbox next to “Manually manage music and videos.” Finally, click the Apply button, which turns into a Sync button.
You can selectively sync content by clicking the tabs (Music, Movies, etc.) along the top of the iTunes window on the iPod management screen.
Chapter 14 explains playing Nano-sized videos and Chapter 15 can fill you in on the photo business. If you generally like the autosync feature but want more control over what goes onto your iPod, check out the next page.
Note
If you have a small-capacity iPod, you may already have more music than can fit on your player. If that’s the case, your automatic option is the Autofill button at the bottom of the iTunes window. Skip ahead to Autofill Your Shuffle with Songs to learn more about Autofill, which lets iTunes decide what to put on your ’Pod.
Manually Load Your Nano with Media
IF YOU DON’T HAVE enough room on your Nano for your whole iTunes library, or if you plan to load music onto your iPod from more than one computer (say your work PC and home computer), you’ll want to manually manage your songs and other media. If you set up your iPod in iTunes 11, odds are the program automatically put you in manual-management mode. You can tell by clicking the iPod’s icon in the iTunes window and then clicking the Summary tab to see the Nano’s sync settings.
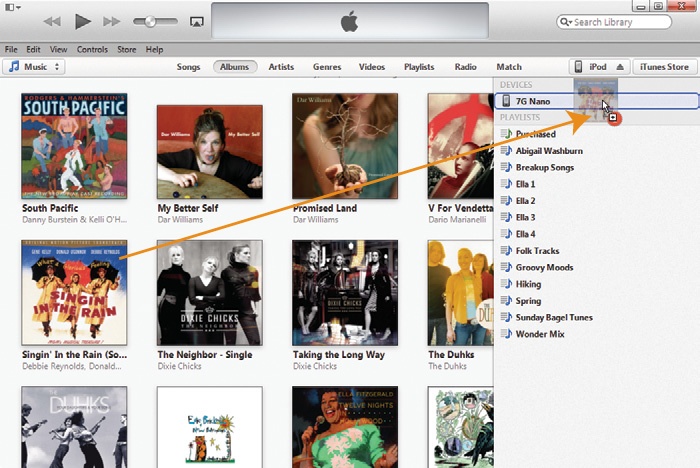
When “manually manage” is selected, iTunes does not automatically dump everything onto your iPod. “But,” you ask, “how do I get my music (or videos or podcasts) there by myself?” Easy—you just drag it:
Under the Library pop-up menu in iTunes, select a media type, like Music, Movies, or TV Shows. Click the buttons at the top of the window to sort your collection, say by Albums in the Music library, as shown below.
Click the items you want to copy to your iPod. Grab multiple songs, albums, or videos by holding down the Ctrl (⌘) key while clicking.
Drag your selections to the right side of the iTunes window. As you do, a panel slides open to reveal your connected iPod and your playlists. Drop the dragged items on the iPod icon to add them to the player. The number of songs you’re adding appears inside a red circle.
You can manually load any items in your iTunes library—movies, audiobooks, whatever—this way. To copy just some but not all items (like new podcast episodes), you can selectively sync files. Sync Content to the iPod Touch explains how to do this for the iPod Touch, and it works the same way for the smaller iPod.
iPod Nano Buttons and Ports
THE IPOD NANO IS not a complicated media player, but its buttons and ports handle very specific functions. Here’s how to work the Nano:
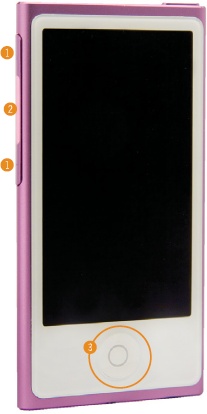
Volume. The Nano has buttons on its left edge to control playback volume through the headphones. Press the top button (+)to increase the sound and the bottom button (-) to lower it.
Play/Pause. Nestled between the two volume buttons is a flat indentation. This is the Nano’s Play/Pause button. Its easy access lets you quickly stop the music should someone come up and talk to you. The button has other uses, too: press it again to resume playback. Press it twice to skip to the next song on the current album or playlist. To jump back a track, press Play/Pause three times.
Home button. Deep in a photo slideshow and want to get back to the main screen with all the Nano’s apps on it? Press the Home button, that round indentation on the front of the iPod.
Sleep/Wake. The Tic Tac–shaped button on the Nano’s top-right edge turns its touchscreen on or off. Press it gently.
Lightning connector. This tiny jack is where you plug in the iPod’s USB cable so you can connect ’Pod to computer to sync up your iTunes library or charge up the Nano’s battery.
Headphone jack. The small, round jack on the bottom of the Nano (below) is where you plug in your white Apple EarPods or other headphones.

Control the Nano by Touch
IN ADDITION TO ITS hardware buttons, the Nano has a sensitive multitouch screen that responds to specific movements from your fingertips. Here’s how you move your digits to get the Nano singing (or speaking or showing photos):
Tap. Gently press your finger on an icon to open its menus, or on a song title to play it.
Double-tap. Tap two times to zoom in on a photo—repeat to zoom back out.
Swipe. Lightly whip your finger side to side on the glass to move through Home screen icons or back and forth through menu screens.
Flick. Whip your finger up and down to scroll through long playlists.
Drag. Hold down the on-screen volume control button and slide your finger left or right to adjust the sound.
Pinch and Zoom. You can selectively enlarge an area on the screen by placing your thumb and index finger on the glass and spreading them apart. To zoom back out, reverse the move and “pinch” your digits together.
The iPod Nano’s Home Screen
LiKE THE IPOD TOUCH, the Nano uses a grid of icons on its Home screen (the Nano’s main screen, where all your apps live) to organize its content. No matter where you are or how many menu levels deep, you can always return Home by pressing the Nano’s Home button (opposite page).
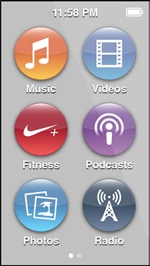
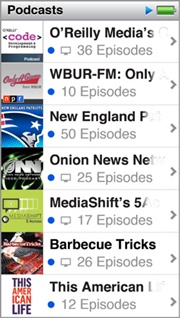
Each icon on the Nano’s Home screen represents the top menu for the app bearing its name. Want to hear a podcast you recently synced over from iTunes? Tap the Nano’s Podcasts icon to see a list of all the podcasts you copied over. From that menu, tap a podcast title to see a list of the episodes available, and from that list of episodes, tap the one you want to hear.
The Home screen displays six icons at a time, but the Nano has more than six icons. To accommodate them all, the Nano gives you a second Home screen. Put your finger on the first Home screen and flick from right to left to see it. When you’re deep in an app’s menu, you flick from left to right to page back through the menu screens. To learn what each icon on the Nano’s Home screen actually does, turn the page.
The iPod Nano’s Menus
ON THE MODERN NANO, you get to your songs, photos, FM radio, pedometer, and other fun stuff by tapping your fingers—or sliding, dragging, and flicking them, as described on the previous page. The Nano’s all about touch.
And here’s what you’ll find under those touchable icons:
Music. Tap here to see a list of icons for all the ways you can sort your song lists. You see tappable categories for Genius mixes (Adjust Your iPod’s Syncing Preferences with iTunes), playlists (Chapter 12), artists, albums, songs, genres, composers, and compilations. If you have them, you can also see a list of your audiobooks, podcasts, and iTunes U lectures. Tap a category to see its related tracks. For example, tap Artists to see all the songs and albums by that singer or band.
Videos. If you copied movies and TV shows from your iTunes library to your Nano, tap the Videos icon to see the list of viewing possibilities sorted by Movies, TV Shows, or Music Videos. Tap a category to see the list of movies or shows, and then tap the title of the video you want to watch. Chapter 14 has more on watching videos.
Fitness. The iPod Nano isn’t just an audio player. It’s a pedometer and a pocket workout coach as well. Get Fit With Nike + iPod Touch has more on those features.
Podcasts. If you subscribe to podcasts, those free audio and video shows from the iTunes Store, you’ll find them under this icon. If you have a lot of podcasts, you’ll see a menu that looks like the one pictured here.
Photos. If you synced digital photos from your computer, you can view them by tapping the Photos icon, and then tapping a photo album or image thumbnail. Chapter 15 has more on photo-viewing.
Radio. Tap here to fire up the Nano’s built-in FM radio. Play FM Radio has more on using the radio and its features.
Clock. Tap the faux-clockface icon to see an even bigger clock on-screen, one with the real time. Flick the screen left to get to the Nano’s stopwatch, and flick left again to see its timer.
Settings. Tap here to adjust the way your Nano works. See The Nano Settings Menu for more on what you can customize.
Audiobooks. If you synced over any audiobooks from your iTunes library, you see an orange Audiobooks icon on the second page of the Nano’s Home screen. Play Spoken-Word Recordings has more on audiobooks.
iTunes U. Likewise, if you transferred any free audio lectures from iTunes U, Apple’s big free digital university, they appear under this icon.
Voice Memos. If you plugged in a headset and mic and recorded some audio notes (Record Voice Memos), you’ll see a blue Voice Memos icon as well. Tap the icon to get to the next screen, where you can tap Record and say your piece. Tap the Memos button on the recording screen to see a list of your audio notes and play them back. When you plug the Nano back into your computer to sync, iTunes offers to copy the clips back to its Voice Memos playlist.
Play Music
As described on the opposite page, the Music menu holds all the albums, playlists, and Genius mixes you copied over from your iTunes library. Once you find a song and tap it to play it, you see the Now Playing Screen, with the name of the song, the artist, and other info on it.

The bottom part of the screen contains the usual music playback controls: Rewind (![]() ), Play (
), Play (![]() ), Pause (
), Pause (![]() ), Forward (
), Forward (![]() ), and there’s a volume slider along the bottom that you can drag with your finger if you don’t feel like pressing the physical buttons on the Nano.
), and there’s a volume slider along the bottom that you can drag with your finger if you don’t feel like pressing the physical buttons on the Nano.
Tap the screen again to see more icons, as shown here. Here’s what each of the glyphs does:
Loop (
 ). Want to play that album again? Tap the Loop button so that it turns blue (
 ). To repeat a song, tap it twice so it looks like
  .
.Genius playlist (
 ). Tap here to build a Genius playlist around the current song. Make a Genius Playlist on the iPod has more on the Genius.
Shuffle (
 ). Tap here to play the current set of tracks in random order. To stop the shuffle, tap
  , again.
Track listing (
 ). Tap here to see the list of tracks on an album or playlist.
Above all these icons sits a scrubber bar, which lets you manually jump to a certain point in a song. Just put your finger on it and drag to the good part.
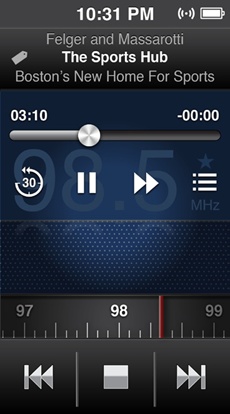
Play FM Radio
FORGET ABOUT THOSE BOXY transistor radios of yore—your sleek new iPod Nano can pull down FM signals and bring live broadcasts right to your ears. For stations transmitting RDS (Radio Data System) information, the Nano even displays the name of the song, the artist, and the station’s call letters on-screen. One thing: You need to listen to the radio through headphones or a set of connected external speakers, because the connecting wire doubles as the radio antenna. Here’s how it all works:
Tune and play the radio. Tap the Radio icon on the Home screen, and then tap
 at the bottom of the screen. Tap
  or
or  to sample stations up and down the dial, or flick the on-screen tuner bar with your finger to manually find a station. You can also press and hold the and buttons to scan FM stations. Tap
  to stop the radio.
To see a list of local stations, tap the screen to call up the Nano’s Live Pause and other controls. Tap
on the right side of the screen, and then tap Local stations to have the Nano round up a list of all the stations in your area. Tap a station to listen to it. Tap the radio-tower icon in the top-right corner of the Local Stations list to return to the radio screen, or tap Refresh to have the Nano scan the airwaves again (in case you changed locations).Add favorite stations. When you land on a station you really like, tap the star icon (
 ) next to the station number in the middle of the screen to turn it blue (
 ); tap it again to “unfavorite” the station. To see your list of favorite stations (which also appear as orange markers on the tuner dial), tap the screen, tap , tap Favorites, and then tap a station in the list to hear it. To edit the list, pull down on the Favorites list with your finger and tap the Edit button that appears. Tap
  next to the station you want to ditch, and then tap Delete to confirm.
Pause live radio. To pause a broadcast, tap the Radio screen to call up the Live Pause controls, and then tap
 . Tap to resume playing. A progress bar at the bottom shows you how long you’ve been in Pause mode. Like TiVo, you can fast-forward or rewind through the audio stored in the progress bar—just tap
  or
or  to jump forward in 30-second blocks, or press and hold the icon to skip ahead in 10-second hops. You can pause radio up to 15 minutes before the Nano begins to delete the earliest recorded section.
Tag songs. If you see a little tag icon (circled on the opposite page), the station supports iTunes tagging. When you hear a song you have to have, tap the tag icon. To see a list of your tagged tunes, tap the Radio screen, tap
, and then tap Tagged Songs. When you sync your Nano to your computer, the songs appear in a Tagged playlist in the Store area of the Source list. You can listen to previews there—and buy the songs, naturally.

Play Spoken-Word Recordings
Playing audiobooks, podcasts, and iTunes U lectures on your Nano works pretty much like playing music (Play Music): tap the menu, tap a title, and then tap play. In fact, these types of recordings even appear in the Nano’s Music menu. But if you want a shortcut to your favorite audiobook, podcast, or iTunes U recordings, the Nano gives you a Home screen icon for each.
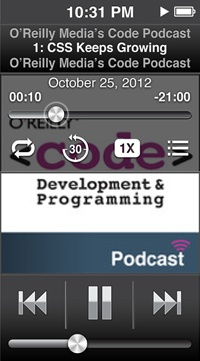
While the spoken-word playback controls are the same as they are for songs (described on Play Music), spoken-word recordings offer a few more options when you tap the Now Playing screen.
These controls, especially tailored for voice narration, include:
Repeat the last 30 seconds. Tap the
icon to jump back half a minute in the recording to repeat a line you missed.Playback speed. By default, the narration matches the speed at which the track was recorded, signified by a
 icon on the screen. If you find the narrator talking too slowly for you, crank that speed up to double-time by tapping until you see
  . If you find the narrator talking too fast, tap the icon until you hit
  , which slows the narration to half-speed.
The iPod Nano as Personal Trainer
WITH ITS SLIM SIZE and easy-to-read screen, the Nano has always been a natural for runners and gym fiends who need a lightweight music player to exercise by. Thanks to its included sporty software, the Nano’s also a workout coach.
The Nano as Stopwatch
The Nano has a stopwatch feature, but it’s tucked away where you may miss it: on the second screen of the Clock app. To summon the stopwatch, tap the Clock icon on the Home screen and flick from right to left past the standard clock to get to the stopwatch.
To start timing yourself, tap the green Start button. The timer starts counting, and the Start button turns into a red Stop button. (Tap that when you’re done.) If you’re running a series of laps, tap the gray Lap button each time you finish a turn on the track. The iPod records your time for that lap, and then starts timing your next one.
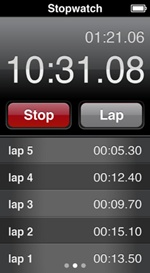
The Nano displays the time for the lap-in-progress above the overall session timer. It lists the time for completed laps below the timer, so you can track your workout. The timer keeps ticking even if you tap your way to another program to, say, play some jogging music. When you return to the stopwatch, it’s still going.
If you need to pause the timer, tap the Stop button; to pick up where you left off, tap Start again. When you’re done with your exercise, tap Stop to halt the clock. To clear the times from the screen, hit the gray Reset button.
Nike + the iPod Nano
On the iPod Nano, tap the Fitness icon on the Home screen to open the app. The Nano has a built-in pedometer, so you don’t need the Nike+ shoes and shoe sensor to track your steps, as you do with the Touch. (If you want more accuracy, however, you can still buy the $19 Nike + iPod shoe sensor at store.apple.com; on the main Fitness screen, tap ![]() in the lower-right corner to get to the Nike + iPod Sport Kit menu for linking the sensor, a remote control, or even a Bluetooth heart-rate monitor.)
in the lower-right corner to get to the Nike + iPod Sport Kit menu for linking the sensor, a remote control, or even a Bluetooth heart-rate monitor.)
On the Fitness screen, you have two main options: Walk and Run. When you tap Walk, the Nano turns into a musical pedometer as described on the next page. If you tap Run, you get the same choice of goal-oriented workouts as you do with the Touch: Basic, Time, Distance, and Calorie. Get Fit With Nike + iPod Touch describes these workouts and how to add your own music to the mix. Each type of workout lets you pick a playlist when you select it for action.
You can use the Nano’s Play/Pause button (iPod Nano Buttons and Ports) to momentarily pause a workout in progress. The workout screen itself displays buttons for changing the music, playing your “PowerSong” (Get Fit With Nike + iPod Touch), or ending the exercise. When you stop a workout, the Nano recites the statistics (like distance and calories burned) for that session into your earbuds; if you’re using the fancy Apple EarPods with the built-in remote control, hold down the center button to hear your current statistics at any given point in the workout.
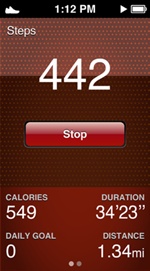
Later, when you tap the small clock icon in the bottom-left corner of the screen, you see a menu of your past personal bests and overall workout statistics. To upload your info to the Nike+ website, connect your Nano to iTunes. A box pops up asking if you’d like to send your data to Nike; if you do, you’re taken to the site to set up a free Nike+ account. You can find out more about how the Nike software works with the iPod at http://www.apple.com/ipod/nike.
Counting Steps With the iPod Nano
If walking is more your speed, take the Nano, with its colorful pedometer, along on your strolls so you know how many steps you took.
To set up the pedometer for the first time:
On the Home screen, tap Fitness→Walk.
Use the on-screen wheels to spin up your height and weight.
Tap Start to begin counting your steps, Nano-style (this also turns the Start button into a Stop button). A little shoe in the Nano’s menu bar tells you that the pedometer is on and counting away.
Tap the Stop button when you’re done so you can see the total number of steps you took (plus the distance walked and calories burned) for the day. Swipe the screen from left to right to see your daily, weekly, monthly, and overall stats.
If you need to change your weight, pick a daily step goal for your walks, or want to change the distance measures from miles to kilometers (or vice versa), tap ![]() in the bottom-right corner of the screen.
in the bottom-right corner of the screen.
The Nano Settings Menu
The Settings icon on the Nano’s Home screen has submenus so you can tweak your iPod experience. Here’s what you can do:
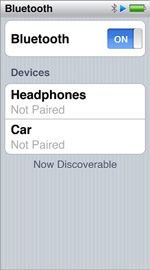
Bluetooth
Tap here to turn on the Nano’s Bluetooth receiver so you can pair the player with wireless accessories like a heart-rate monitor or Bluetooth stereo speakers. When the name of the gadget appears on the Nano’s screen, tap it to pair it.
General
Several settings live under this menu, including:
About. Find out how many songs and photos your Nano holds, the player’s format (Windows or Mac), the amount of space left, and its serial number.
Brightness. Use the slider to make the Nano’s screen dimmer or brighter.
Wallpaper. Tap here to pick a different background for the Home screen.
Date & Time. Set the date, time, and time zone here. You can also opt for the military-style 24 Hour Clock, have the Nano display the time when it wakes up from sleep, and pick a new clock-face style from six options. You can add a World Clock showing the time in three time zones by tapping Settings→General→Date & Time→Clock Face→World Clock. Once you select this clock face, you get a World Clock line in the Date & Time settings. Tap World Clock here and then, on the next screen, select two other cities for time display along with your home zone.
Language. Select the default language for the Nano’s menus here.
Accessibility. Turn on the VoiceOver function that speaks menus and item names out loud, or invert the screen colors for a high-contrast look. You can also switch the audio from stereo to mono and program the Home button to toggle VoiceOver or the Inverted Colors scheme when clicked three times.
Music
Turn on Shake to shuffle songs kinetically (you get a new song each time you shake your Nano-clenching fist), even out song volumes with Sound Check (or lock them in with Volume Limit), improve tracks with equalizer presets, or crossfade from one song to another.
Video
Have your videos pick up where you left off or always start from the beginning here, and also turn on alternate audio, closed captioning, and subtitles.
Radio
If you travel a lot and want to pick up local stations wherever you may be, duck into the Radio settings to pick your current geographic area. You can also turn on (or off) the radio’s Live Pause feature here (Play FM Radio).
Photos
The Nano puts photo slideshows right in the palm of your hand. Tap into the Photos settings to set the time each slide stays on-screen (from 2 to 20 seconds). You can also choose to repeat a slideshow once its played through, or shuffle the photos in an album as it plays.
Customize the Nano’s Home Screen
YOU’RE NOT STUCK WITH the iPod’s stock icon positions or menu items. On the Nano, you can rearrange icons across the Home screens. So if, for example, you want the Radio and Podcasts icons to appear first, you can make it so.
To redecorate your Home screen, press and hold your finger down on any one icon until they all start wiggling. While they’re wiggling, drag the icons into your preferred order. You can also drag an icon off the screen’s right edge to drop it on its own empty Home screen page. When you’re happy, press the Home button to stop the shaking and lock in the new arrangement.