
Chapter 15. Watch, Create, and Edit Videos
You’ll learn to:
Add videos to your iPad
Watch movies on your tablet or streamed to HDTV
Shoot and edit your own movies
Share videos by email, message, or YouTube
Delete old movies
APPLE ADDED VIDEO PLAYBACK powers to its handheld devices in 2005, when it introduced the first video iPod, with a 2.5-inch screen. The screens on Apple’s gadgets have gradually increased in size, now at 7.9 inches for the Mini and a glorious 9.7 inches on the regular iPad. Either tablet is perfect for immersing yourself in a movie, even if that means watching it inflight while crammed into a knee-knocking coach seat.
And now, with a 2012 iPad and iOS 5 or later, you can enjoy high-definition videos in top-quality 1080p resolution (instead of the bare-minimum 720p HD resolution on earlier iPads). And if you have a third- or fourth-gen iPad with a 3 million-pixel Retina display, HD movies look really good.
Finding video is easy. You can buy, rent, or stream movies, TV shows, music videos, and video podcasts from iTunes; download video-streaming apps (like Google’s standalone YouTube app) from the App Store; use the iPad’s built-in Safari browser; and even shoot your own videos with the iPad’s camera. And if the whole family wants to watch your movies, you can connect your iPad to your TV—with or without wires—and see them on an even bigger screen.
From getting video onto your tablet to sharing it once it’s there, this chapter guides you through one of the most fun parts of the iPad experience.
Get Video Onto Your iPad
DEPENDING ON WHAT YOU want to watch and where you want to watch it, you can get movies moving on your iPad in a variety of ways. Here are the common methods (besides shooting your own, as explained on Shoot Your Own Videos):
The iTunes Store. You can shop the iTunes Store from your desktop computer, browsing through the hundreds of movies, TV shows, music videos, video podcasts, and iTunes U lectures offered for sale, rent, or free (see The iTunes Store for info on shopping the Store). When you buy or rent a video, iTunes downloads it to your computer. You connect your iPad, either through Wi-Fi Sync or USB cable (see Sync Your iPad with iTunes), and transfer the video to your iPad with a quick sync (Transfer Video from iTunes to iPad). You can also buy Store videos right from your iPad. Tap the iTunes icon on the Home screen, browse to find what you want, and then click to buy or rent a video (video podcasts and iTunes U content are free). iTunes downloads the file to your iPad, where you can find it by tapping the Videos icon on the Home screen. Videos you buy on the iPad get copied back to the iTunes library the next time you sync, but rentals don’t.
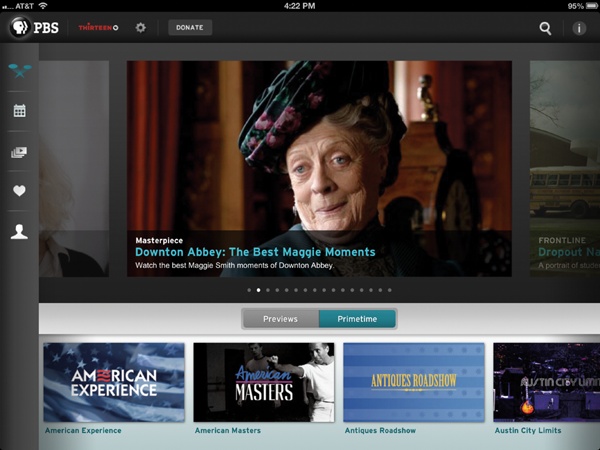
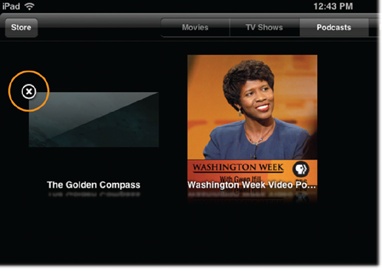
Video-streaming apps. With a speedy and steady Internet connection, you can skip bloating up your iPad with space-hogging videos and stream them with apps like Hulu Plus (TV shows for $8 a month) or the free PBS app (shown right). The broadcast networks NBC, ABC, and CBS all have apps for nightly news and other shows. The App Store also offers streaming apps from Time Warner Cable, HBO, and ESPN. Amazon’s Instant Video app plays all your purchased and rented videos from the monolithic megastore. Netflix, the ubiquitous movie-rental company, streams full-length films to the iPad with a paid monthly membership, which starts at $8.
Video-streaming websites. Many sites use Flash to play videos, but the Safari browser doesn’t work with that technology. Other sites, however, use Apple’s QuickTime technology (Troubleshoot Syncing Problems), and their videos play back just fine. In addition, sites are slowly switching to a new, more versatile web-page technology called HTML5, which offers video playback out of the gate, so in time, you’ll be able to play virtually all website streams on your iPad.
Transfer Video from iTunes to iPad
GOT VIDEO IN ITUNES that you want to move to your iPad? Here are a few ways to get those movies, TV shows, and wacky pet clips over to your tablet:
Syncing. Connect your iPad to your computer either wirelessly or with a USB cable (see Sync Your iPad with iTunes) and then click the iPad’s button in the iTunes window. On the iPad settings screen that appears, click the Movies tab and turn on the “Sync movies” checkbox; you can also sync individual movies. If you have TV programs in your iTunes library, click the TV Shows tab and select the shows—or episodes—you want to transfer. Ditto for video files on the Podcasts and iTunes U tabs; these videos sync to their same-named apps. Click Apply at the bottom of the iTunes window, and then click Sync.
Manual management. If you prefer the old drag ‘n’ drop approach and have your tablet connected and configured for manual management (Manually Sync Your iPad), click the desired Library category (Movies, TV Shows, Podcasts, and so on) on the left side of the iTunes window. In the center of the window, select the files you want and then drag them to the right side of the iTunes window. A panel slides open showing your iPad’s icon, where you can drop the files.
Getting Videos Into iTunes
While the iTunes Store is chock-full of video choices, sometimes you want to add your own flicks to your iTunes library. No problem, just choose File→Add to Library to locate and import your files, or drag the files from your desktop and drop them anywhere in iTunes’ main window. Once you get videos into iTunes, you can play them there or copy them to your iPad.
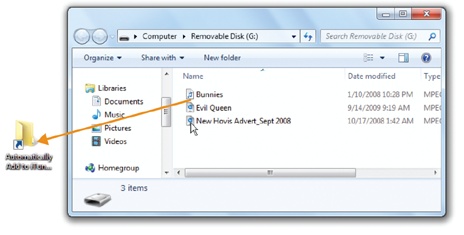
Another way to add videos to iTunes is to drag them into the “Automatically Add to iTunes” folder. This clever folder analyzes each file’s name and—based on its extension—shelves it in the right spot. You find the auto-folder not through iTunes, but by navigating your system files. In Windows, it’s usually at C:/Music→iTunes→iTunes Media→Automatically Add to iTunes. On Macs, it’s at Home→Music→iTunes→iTunes Media→Automatically Add to iTunes. (Creating a desktop shortcut for the folder makes adding video even quicker.) If iTunes can’t categorize a file, it dumps it into a subfolder called Not Added.
Find and Play Videos on Your iPad
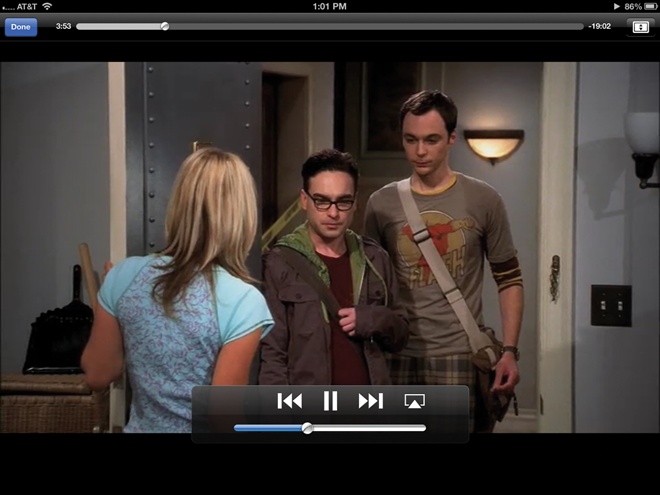
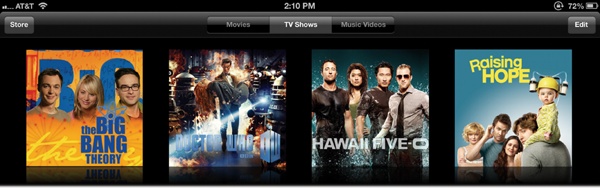
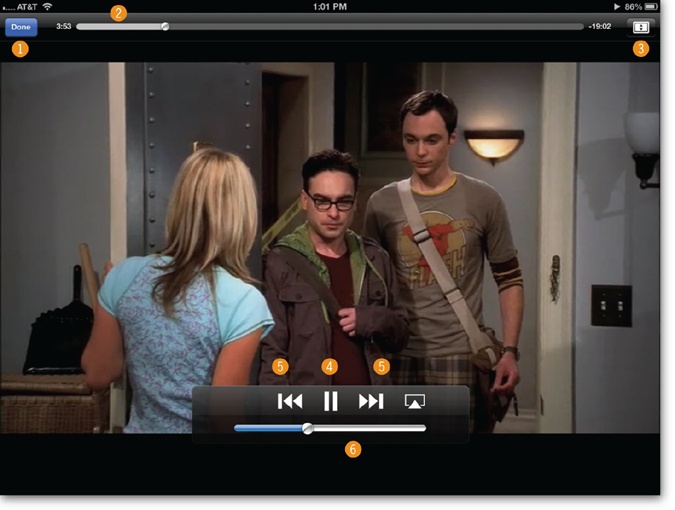
TO PLAY A VIDEO on your iPad, tap open the Videos icon on the Home screen. On the next screen, tap the tab for the type of video you want to watch: Movies, TV Shows, Music Videos, or a movie shared on your home network (Authorize Computers for iTunes and Home Sharing); video podcasts are in the Podcasts app (Play iPad Videos on Your TV). Then find the item you want to watch and tap its title or the Play button to start the show. (There’s a Store button in the lower-left corner if you want to buy new stuff.)
But how do you run the show when your gadget has no physical controls? Easy; the playback buttons are on the screen. When you watch video, anything else on the screen distracts you, so Apple hides the controls. Tap the screen once to make them appear and again to make them disappear. Here’s what the controls do:
Done. When the video is over (or when you’re over the video), tap
 in the top-left corner to stop the show and
jump back to your video library.
in the top-left corner to stop the show and
jump back to your video library.Scroll slider. The bar at the top of the screen shows the time elapsed and the time remaining in a video. To jump around during playback, drag the little white dot to the desired point.
Widescreen/Full Screen. See the little
 or
or  button in the top-right corner of the
screen? Tap it to adjust the zoom level of the video,
as described in Zoom/Unzoom a Video below.
button in the top-right corner of the
screen? Tap it to adjust the zoom level of the video,
as described in Zoom/Unzoom a Video below.Play/Pause (
 ). Just as they do with music files, these buttons
start playback and pause it when you need a break.
). Just as they do with music files, these buttons
start playback and pause it when you need a break.Previous, Next (
 ,
,  ). If you want to relive the glory days of VHS tapes,
hold your finger down on either of these buttons to see the video
speed by in reverse or ahead in fast-forward motion.
). If you want to relive the glory days of VHS tapes,
hold your finger down on either of these buttons to see the video
speed by in reverse or ahead in fast-forward motion.Many movies from the iTunes Store now include chapter markers for the scenes in a film, just as physical DVDs do. Tap the
or buttons to skip to the previous or next
chapter in a video.Volume. To raise or lower a video’s volume, drag the white knob on the slider below the playback buttons. If you like physical controls, use the volume rocker on the right side of the tablet.
If you’re watching a video that has multiple audio tracks, subtitles, or closed captioning, tap the icon shown at left to get to the settings for those features.

Zoom/Unzoom a Video
The iPad’s beautiful screen has always been one of its major selling points, and that’s even more true with the 2012 iPad’s razor-sharp Retina display. This iPad’s resolution of 2048 x 1536 pixels is twice that of the two original full-size models (1024 x 768 pixels) and the iPad Mini and it’s well into HD resolution territory (the low end for which is 1280 x 720 pixels, or 720p in TV lingo).
And there’s a lot of video to watch out there, including old-fashioned TV shows with their squarish 4:3 aspect ratio and widescreen movies and HDTV shows that use the rectangular 16:9 aspect ratio. To compensate for this proportion contortion, the iPad puts black bars above and below widescreen pictures to make them rectangular; for square-shaped TV shows, it adds bars to the sides.
The appearance of the black bars (called
letterboxing) sends some people around the bend.
They paid good money to see the whole screen
filled up. The iPad acknowledges this and has a solution. Simply
double-tap the video as it plays. The iPad enlarges the image to fill
the screen. (If the playback controls are visible, you can also tap
![]() . Tap
. Tap ![]() to go back to letterboxing.)
to go back to letterboxing.)
Truth is, part of the image is now off the screen; you lose the top and bottom of TV scenes, and the left and right edges of movies. If this effect winds up chopping off something important—say on-screen credits—restoring the original letterbox view is just a quick two-tap away.
Play iPad Videos on Your TV
MOVIES ON THE IPAD are great, but watching them on a bigger screen is often more gratifying—especially if everyone in the house wants to watch. You can put all those movies and videos up on your TV screen—you just need to connect your iPad to your television set. What you connect it with depends on the hardware you have.
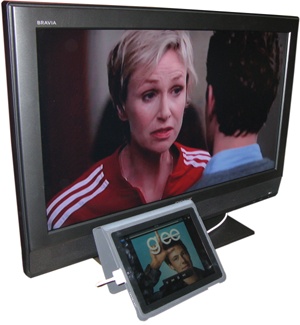
First of all, if you have at least a second-generation Apple TV (the little black square one), you can use its built-in wireless capability, called AirPlay, to grab video you stream from your iPad and display it on the big screen at up to 1080p resolution, the best available. (Of course, your actual resolution depends on the video’s and your TV’s native resolution.) In fact, with an iPad 2 or later and iOS 5 and later, you can mirror anything on an HDTV, including video games, as Video Mirroring shows.
But if you don’t have an Apple TV, you can use good old-fashioned cables to connect your iPad. Today’s TV sets (and those fancy AV receivers that connect all the components in your entertainment center) usually offer a few types of video port for connecting new gear. You can use component, composite, or VGA cables to tether your iPad to a TV or projector. And you can watch high-definition videos over an HDMI connection with a special adapter.
In late 2012, Apple replaced the wide 30-pin Dock Connector on the bottom of its iPhone, iPods, and iPads with a narrower 8-pin connector called a Lightning port. With new ports come new cables—and adapters for 30-pin ports to work with 8-pin cables. Before you buy an iPad cable, check the bottom edge of your tablet to see whether you need a 30-pin or an 8-pin.
And while Apple sells a $29 Lightning-to-30-pin adapter designed to let newer, Lightning-port iHardware work with docks and cables that have old 30-pin ports, the adapter does not support video output—so the adapter won’t work with older AV cables designed to work with the first three generations of iPad.
The easiest place to find any of these cables is the Apple Store (store.apple.com). Here, you’ll see the Apple Composite AV Cable for TVs that have older video inputs and the older Apple 30-pin Dock Connector on the iPad. You can also find the Apple Component AV Cable, made for high-end TVs and widescreen sets that handle higher-quality video and audio connections. Each type of cable costs $40, but that includes an integrated AC adapter to power your iPad for a whole-weekend movie marathon.
If you use HDMI cables to connect high-definition components to your widescreen HDTV, you can use Apple’s $40 iPad-to-HDMI cable (called the Digital AV Adapter, shown right) to connect your 30-pin iPad to your TV and get HD playback from the tablet. A Digital AV Adapter for the Lightning connector is also for sale at store.apple.com, but sells for $50.
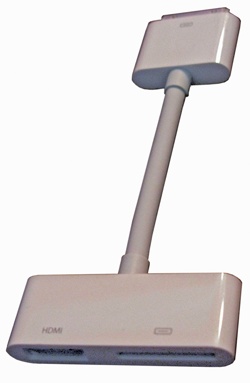
The Digital AV Adapter plugs into the iPad’s bottom port on one end and has an HDMI jack and a second dock connector on the other end (the latter in case you need to charge your iPad with its AC adapter while you watch). You don’t, however, get another white AC cube, so keep track of the power plug that came with your iPad. And you don’t get the HDMI cable that links the adapter to your TV, either.
The AV Adapter gives second- and third-generation iPad owners a special bonus, too: video output at up to 1080p resolution, the same one you get with AirPlay (Stream and Mirror Files with AirPlay). The adapter takes whatever’s on your iPad 2 or 2012 iPad screen and mirrors it on your TV. You can also use the AV Adapter with a first-generation iPad to show photos and videos, but you don’t get the screen-mirror effect—and it displays video at the lower-resolution (but still technically high-definition) 720p.
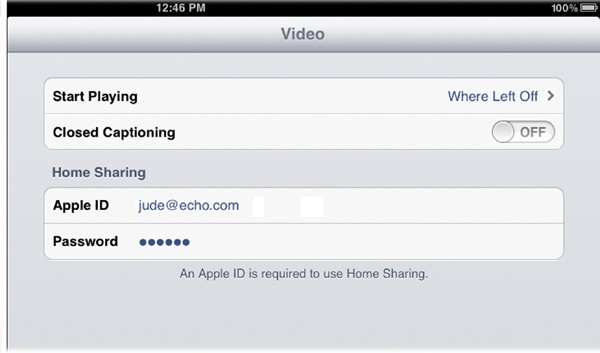
Whatever cable you use, the iPad senses when you connect it to a TV set and automatically pipes its video feed to the big screen, but there are some settings you can adjust at Home→Settings→Video. Here, you can turn on closed captioning for videos that include subtitles.
Once you get the iPad hooked up to play movies, be sure to select the alternate video source on your television set, just as you would to play a DVD or video game. Then call up the movie from the iPad’s library, press the Play button, pop up the corn, and enjoy the show from big screen to the bigger screen.
Shoot Your Own Videos
IN ADDITION TO PLAYING videos, the current crop of iPads can take and make high-definition videos using its built-in camera. The actual “shooting the video” part of the process can be a little clumsy because you have to hold the whole tablet up (and fairly steady) to snag decent footage—unless you’ve got it propped up on a table for a talking-head type show. But here’s how to channel your inner Scorsese the iPad way:
Tap the Camera icon on the iPad’s Home screen and, when the app opens, nudge the slider on the bottom bar over to
 .
.When you’re ready to start filming, tap the
 button (circled). It flashes red to indicate
that you’re recording. The time stamp in the screen’s upper-right
corner shows the current length of your video-in-progress. The tiny
microphone on the back of the iPad records the audio.
button (circled). It flashes red to indicate
that you’re recording. The time stamp in the screen’s upper-right
corner shows the current length of your video-in-progress. The tiny
microphone on the back of the iPad records the audio.When you’re ready to virtually yell “Cut!”, tap
again to stop recording.
The recorded video is stored not in the iPad’s Videos app, but in the Photos app—look in the Camera Roll album and tap the clip’s thumbnail to play it.

Like the still camera, you can tap an area of the screen to adjust the exposure, but there’s no zoom feature for video. You can hold the iPad vertically or horizontally to shoot video, but portrait-shot clips may get letterboxed if you upload them to a site that displays video in the horizontal orientation.
Share Your Video Clips
AFTER ALL THAT HARD work, don’t you want to show off your video clips to friends and family? (If you want to edit your clips before sharing, turn the page.) When they’re good to go, here’s how to share.
From the Home screen, tap Photos→Camera Roll to see thumbnail stills of your video clips. Tap one to play the movie.
In the upper-right corner of the screen, tap
 . In iOS 6, a visual menu (shown here) appears
with options to email the video, send it by text message, or upload
it to YouTube. (In iOS 5, the menu options are the same, but
appear as text buttons. You also get a Copy option so you can paste
the clip into another app, like Keynote.)
. In iOS 6, a visual menu (shown here) appears
with options to email the video, send it by text message, or upload
it to YouTube. (In iOS 5, the menu options are the same, but
appear as text buttons. You also get a Copy option so you can paste
the clip into another app, like Keynote.)

Tap the button for the action you want to take.
Mail. Tap here to compress the video clip into a QuickTime .mov file and automatically attach it to a new, blank mail message. All you have to do is address the message, write a note, and tap Send.
Message. For speedier gratification, tap this option to attach the clip to an iMessage and send it directly to an instant-chat partner who has iOS 5 or later and an iPad, iPhone, or iPod Touch—or has the desktop Messages program in Mac OS X. (See Send Messages for more on Messages.)
YouTube. You can also publish the clip directly to the YouTube video-sharing service. You need a YouTube account to do so.
You can also transfer your videos to your computer if you prefer to post, edit, or store them there. Connect your iPad to your Windows PC or Mac and use the Import command in your photo-organizer program (like Adobe Photoshop Elements or iPhoto) to copy videos over to your hard drive.
Edit Videos on the iPad
ONCE YOU GET THE hang of capturing video with the iPad (which, quite frankly, feels like shooting a movie with a ceiling tile until you get comfortable gripping and aiming the slab), your clips will begin to pile up in the Camera Roll. Some are simple enough to share (Share Your Video Clips) without any editing—the birthday girl blowing out the candles in one take or the dog showing his repertoire of fetching tricks. Others may need a little…help.
Look through them—do you have a video where all the good action is in the middle? You know, the one where the first 5 minutes consists of absolutely nothing but you coaxing an under-performing baby into demonstrating her agility with Cheerios. Or all those clips where the last 2 minutes show the inside of your tote bag because you forgot to turn off the camera? That stuff is easy to fix.
Here’s how to trim off the unnecessary parts from either end of a clip (you can’t edit within a clip unless you use a video-editing app, like iMovie for iPad, discussed on Edit Videos with iMovie):
From the Camera Roll album, open the video you want to edit.
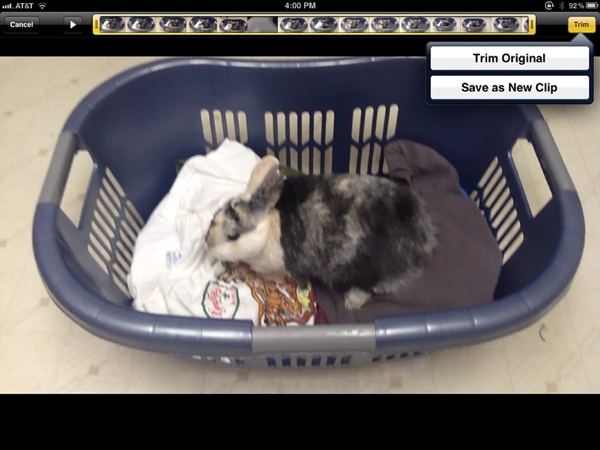
Tap the screen to call up the editing controls. The frame-viewer bar at the top of the screen displays scenes from the clip.
Use the frame-viewer to find the frames you want to cut off. Press the outer edge of the bar so it turns yellow (as shown below), and then drag either end of the bar to isolate just the frames you want.
Tap the Trim button in the top-right corner of the screen to cut away the detritus and leave the delicious center of your video.
As shown above, after you tap Trim, the iPad offers to cut the original clip, which makes this edit permanent, or save the edited video as a new clip—while leaving the original movie intact. If you’re not entirely comfortable with a complete deletion, choose Save as New Clip.

While some videos can benefit from a few nips and tucks, some just can’t be saved—like that blurry action shot where you almost dropped the iPad while you were recording. If you preview a clip and realize it’s unusable, just tap the icon in the upper-right corner, and then tap Delete Video to free up some space on your iPad.

You can mass-delete from the Camera Roll screen, too. In iOS 6,
just tap the Edit button (or the ![]() icon if you’re still using iOS 5) in the
upper-right corner. Tap the unwanted clips, and then tap the red Delete
button in the upper-left corner of the screen. Tap Delete Videos to
confirm.
icon if you’re still using iOS 5) in the
upper-right corner. Tap the unwanted clips, and then tap the red Delete
button in the upper-left corner of the screen. Tap Delete Videos to
confirm.
Edit Videos with iMovie
IPAD MODELS SINCE THE iPad 2, in conjunction with the basic video-editing tools in iOS 5, let you trim bad bits from the ends of a clip, but you may find that’s not enough. If you want to edit clips, stitch clips together, score background music, and add titles and Hollywood-style scene transitions, you need an app for that. When you get to the App Store, search for video editing. One app that pops up immediately is Apple’s own iMovie for iPad, which costs $5 and requires at least an iPad 2 to run. (If you have a Mac and use Apple’s iMovie software for OS X, the version for the iPad will seem familiar.)
For that measly five bucks, you get a portable post-production studio that lets you create professional-looking movies with your fingertips. With eight visual themes, a Precision Editor that lets you “cut” film clips together by tapping and dragging, and a collection of sound effects, iMovie turns your iPad into a portable video-editing workstation.
You can also create a trailer for your movie, add a soundtrack (including live narration or tunes from your music library), and upload your project directly to Facebook, YouTube, Vimeo, or CNN iReport.
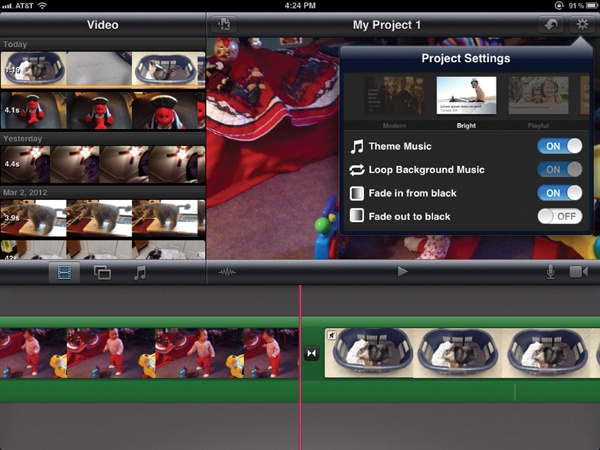
To get started with iMovie, open the app, tap the ![]() button, and then choose New Project or New
Trailer. As in Hollywood, a “project” usually means a movie, and the app
takes you right to a screen where you can get started pulling in the
video clips on your iPad and arranging them in a timeline, as shown
below.
button, and then choose New Project or New
Trailer. As in Hollywood, a “project” usually means a movie, and the app
takes you right to a screen where you can get started pulling in the
video clips on your iPad and arranging them in a timeline, as shown
below.
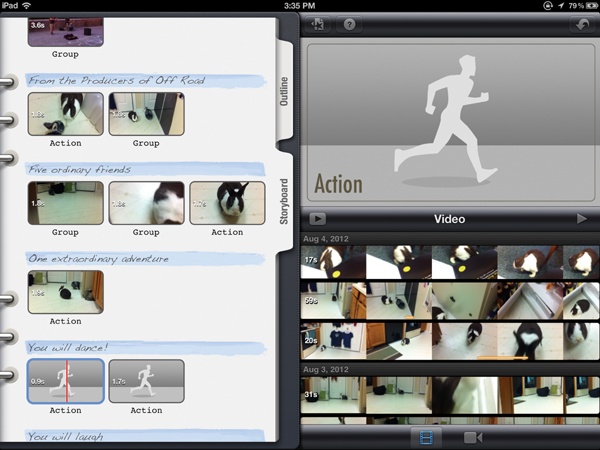
The iMovie app not only lets you edit together your own mini-films, it also lets you create your own trailers from your clips. Again, you start with a few stock trailer styles (like “Bollywood” or “Superhero”) that include preformatted titles and theme music. You also get a storyboard (shown below) that breaks down the visual narrative of the trailer into bite-size chunks of screen time and coaches you through dragging the right types of clips into the trailer template.
With its various buttons to pull in photos, video clips, music,
titles, and sound effects, the iPad edition of iMovie may feel a little overwhelming at first—especially
if you’ve never worked with video-editing software. Apple knows you have
questions, though, and includes an electronic help guide within the app
that explains how to do everything. Just tap the ![]() at the top of the screen.
at the top of the screen.
Tip
Apple’s iMovie app isn’t the only video-editing game in town. At least two others, Avid Studio ($5) and Nexvio’s ReelDirector ($2), are available, and both work on the first-generation iPad as well.
“Hey,” you say, “How do I get video clips on my original iPad if it doesn’t have a camera?” Just shoot the clips with whatever camera you use to shoot video, and then convert them to iPad-approved video formats (see the following page). Then import them into your iTunes-compatible desktop photo program of choice and sync them over to the iPad; just make sure you check the “Include videos” box in iTunes (Transfer Video from iTunes to iPad describes the syncing process in detail). Then craft your opus and export it to your favorite video-sharing site so the world can see your wacky short of a hamster mingling with Star Wars action figures.
Video Formats That Work on the iPad
AS DISCUSSED IN Chapter 12, the iTunes Store now sells movies, TV shows, and music videos. You can also import your own home movies, downloaded movie trailers, and other videos into the iPad via iTunes, so long as the files have one of these file extensions at the end of their name: .mov, .m4v, or .mp4.
Other common video formats, like .avi or Windows Media Video (.wmv), won’t play back in iTunes, but you can convert them with Apple’s $30 QuickTime Pro software or any of the dozens of video-conversion programs floating around the Web. (If you’re unsure whether a file’s compatible, it’s always worth trying to drag it into iTunes’ main window and then choosing Advanced→Create iPad or Apple TV Version.)
Commercial DVD and Blu-ray discs marked as Ultraviolet offer a free digital copy you can use on your iPad. You can find details on this at www.uvvu.com.
Here are a few popular video-conversion tools that create ’Pad-able movies:
Aneesoft. Aneesoft offers several DVD and video conversion programs for Windows and Mac OS X computers. Free trial editions are available from the site. An all-in-one “pro” version cost $30 for Windows and $50 for Macs. (www.aneesoft.com).
Wondershare. Based in China, Wondershare offers Video Conversion Pro, a Windows ($46) or Mac ($49) program that converts DVDs and standard or hi-def videos to iPad-compatible and other formats; www.wondershare.com.
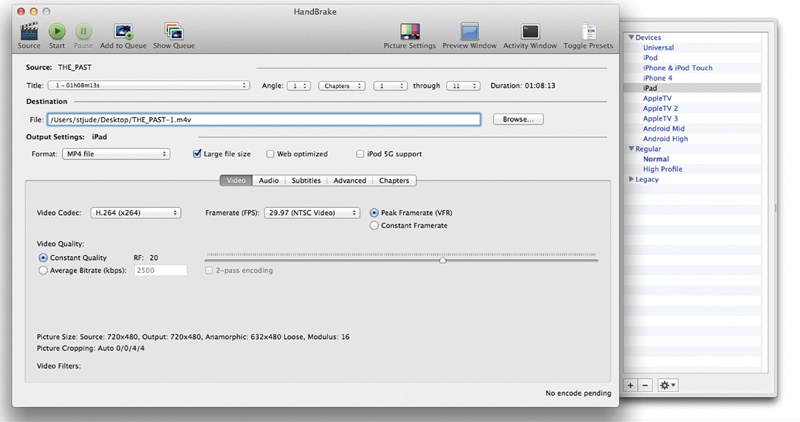
HandBrake. Available for Windows and Mac OS X, this freeware converts DVD movies and other files for playback on everything from iPods to the Apple TV. The software requires a bit of technical fiddling to get it to work properly, so it may not be for everyone. You can get HandBrake at http://handbrake.fr.
Tip
Movies and TV shows get their own libraries in the iTunes Source list. If you import a video and it lands in the wrong library, you may need to tweak the file’s labeling info. Open the file’s Get Info box (Ctrl+I [⌘-I]), click the Options tab, and then assign it a video format from the Video Kind drop-down menu: Music Video, Movie, TV Show, Podcast, or iTunes U file.
Delete Videos
HAVING A PERSONAL MOVIE library with you at all times is great, but high-quality videos are huge. Sure, movie rentals from iTunes delete themselves when they expire, but what about your regular collection? A long movie can take up almost 2 gigabytes of your limited iPad drive space. And if you’re traveling with a full iPad and want to download a fresh flick for the plane, what do you do?
Fortunately, you can delete videos directly off the tablet—without having to link your iPad to your computer and turn off iTunes checkboxes to “unsync” them. (However, removing files through iTunes is another way to regain drive space, with the added advantage that the videos stay safely in your computer’s iTunes library, ready for you to sync to your iPad again when you want to watch.)
When you’re ready to lose a movie or two:

The selected video goes poof! off the iPad. If you synced the video from your computer through iTunes, there’s still a copy on your computer, so you can sync it back to your ’Pad if you miss it. To delete several videos at once, tap the Edit button at the top of the screen, and then tap the videos you want to delete. Tap Done when you finish.
Note
Pay attention to what you delete. If you accidentally delete an unwatched or unfinished movie-rental download on the iPad, it’s gone for good. You have to rent the whole thing all over again to see it. And remember, you can rent movies in iTunes on your computer and transfer them to the iPad, but you can’t sync a movie you rented on the iPad back to iTunes.