
Chapter 16. View, Shoot, Edit, and Manage Photos
You’ll learn to:
Get photos onto your iPad
Shoot pics with the iPad’s camera
Edit pictures
Play slideshows on your iPad or HDTV
Make your iPad a digital picture frame
WITH ITS GLOSSY SCREEN and black or white border, you could easily mistake the iPad for one of those digital picture frames designed to display an ever-running slideshow of kids and pets. The iPad is no imposter here—it can serve as a digital photo album whenever you want.
You can even take those pictures with the iPad 2 or later. And the Retina display iPad models and the new iPad Mini come with a 5-megapixel rear camera that can detect and enhance the faces in your photos—just like a lot of today’s point-and-shoot cameras.
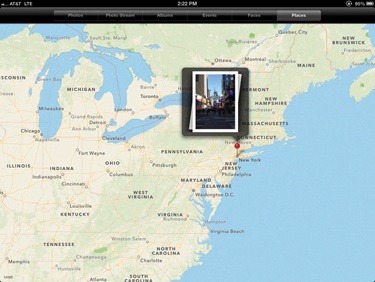
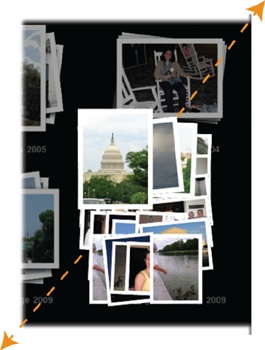
Your thin little tablet can store stacks’ worth of paper-based photo albums, and you can overlay your snaps on a map to see where you shot them (opposite). You can even email favorite pics to friends.
You can also touch up your photos on the go with photo-editing tools built right into the iPad’s software or with one of many third-party apps, like iPhoto for iPad. And with the right kind of audio/video cable or a later-generation Apple TV, you can play your pics on the big screen for the whole family to see—making it the Kodak Carousel of the 21st century.
A picture may be worth a thousand words, but when your friends see what you can do with photos on your iPad, you may hear a few thousand more.
Get Pictures onto Your iPad
YOUR IPAD CAN DISPLAY photographs in most of the file formats digital cameras use, including JPEG, PNG, TIFF, GIF, and even those large, uncompressed RAW files that serious photographers favor. But to show your pics off on the iPad, you first have to get them onto it. You do that several ways.
Transfer Photos with iTunes
If you keep your digital photos organized in programs like Adobe Photoshop Elements or iPhoto—or even if you store them loosely in a folder on your hard drive (think My Pictures for Windows, Photos for Macs, or an ad-hoc folder)—you can sling them onto your iPad with iTunes, so long as you sync only one photo library to your iPad—if you try to grab photos from another machine, iTunes overwrites all the pics from the first one. Chapter 12 has detailed information on syncing, but here’s what you need to do for photos:
Connect your iPad to your Windows PC or Mac through Wi-Fi Sync (see Sync Your iPad with iTunes for setup instructions) or the iPad’s USB cable.
Once the tablet shows up in the iTunes window, click its icon to select it.
In the iTunes tabs for your iPad, click the one for Photos.
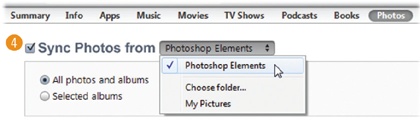
Turn on the checkbox next to “Sync photos from” and then choose your photo program or photo-storage folder; that lets iTunes know where to find your pics. You can copy everything over or just the albums (sets of pictures) you select. If you don’t use any of the programs listed under the “Sync photos from” menu and you just want to copy over a folder of photos from your hard drive, select “Choose folder” from the menu and navigate to the desired folder.
Click Sync (or Apply, if this is your first time syncing photos) after you make your selections.
Once the sync starts, iTunes copies the photos over to your iPad. You can follow the program’s progress in the iTunes display window. If you’re copying hundreds of pictures over to your iPad, the syncing session may take several minutes.
When the process is complete, your synced pictures appear in Home→Photos. If you copied pictures from photo albums in iPhoto or Adobe Photoshop Elements, the same album names appear on the iPad side.
Automatically Download Photos with Photo Stream
If you use Apple’s iCloud service (Chapter 17), you can have it automatically download copies of the photos it syncs from your computer or other iOS device to your iPad. See Stream Photos with iCloud for details.
Transfer Photos from Mail Messages and Web Pages
Do you have a bunch of photos someone sent you as file attachments to an email message? Or do you see a copyright-free image on the Web that you want in your image collection?
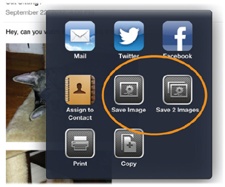
To add these pictures to your iPad’s Photos app, press your
finger on the photo. Wait for a box to pop up with a Save Image or
Save Images button on it (circled). Tap one to store the picture in
your Photos→Camera Roll album. You can also tap the ![]() icon, and then choose the menu option there to
save all your pics.
icon, and then choose the menu option there to
save all your pics.
Transfer Photos with iPad Camera Adapters
The iPad can slurp up pictures from your digital camera too, but there’s a catch: You first have to plunk down $29 for Apple’s iPad Camera Connection Kit or for an adapter that works with the Lightning port at store.apple.com or other establishments.
The kit contains two white adapters for the large iPad’s original 30-pin Dock Connector port. One has a jack for your camera’s USB cable and the other has a slot for Secure Digital memory cards full of pictures—in case you don’t have your camera’s USB cable. For $29 each, you can get a Lightning to SD Card or Lightning to USB Camera adapter for newer iPads and the Mini.
Once you plug an adapter into the iPad and connect your camera via USB cable or plug-in a memory card, wait for the iPad’s Photos app to open, and then:
Tap Import All to grab all the pictures, or tap individual shots to checkmark them before you tap the Import button.
When the iPad asks, decide if you want to keep or delete the photos on the camera or memory card after you import them.
To see the new arrivals on your iPad, tap Photos→Last Import.
Unplug the iPad camera connector. When you get back to your computer, you can sync these pics to your desktop version of iPhoto or Adobe Photoshop Elements by connecting the iPad and using your picture program’s Import command.
If you have an iPad 2 or later, you can also shoot photos with the iPad itself. Turn the page to read about the Camera and Photo Booth apps. They’re loads of fun.
Take Photos With the iPad’s Camera
THE MODERN IPAD HAS not one but two built-in cameras. With its huge slab screen, the iPad is probably one of the more unwieldy point-and-shoot cameras out there, but photo quality has gotten better since the days of the iPad 2’s barely 1-megapixel rear camera and lower-resolution front cam. While the front cam hasn’t changed, the Retina iPad and the iPad Mini both sport a 5-megapixel camera in back. But enough of the backstory. To shoot a digital photo on the iPad:
A preview of your last shot also appears in the bottom-left corner of the screen; tap it to jump to the actual photo in the Camera Roll album. You can also swipe the screen from left to right to see it. The iPad cameras offer other controls:
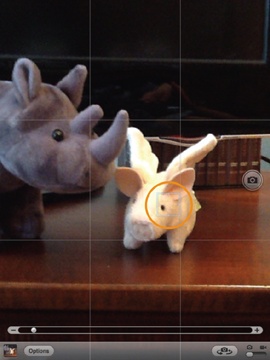
Exposure adjustment. The iPad doesn’t have a flash, but it does let you adjust the exposure (the overall lightness or darkness) of an image. If you have a shot lined up but one part of the frame is cast in shadows, tap a lighter area of the image. A blue-white square (circled right) appears briefly and the iPad’s camera adjusts its exposure based on that area. To lock the exposure, press and hold the screen until the blue square flashes and “AE Lock” appears at the bottom of the screen (until you tap again). Now snap the pic.
Zoom. Pinch the screen to bring up the zoom slider (above). To narrow in on your subject and lose distracting background elements, drag the slider to the right until you get the framing you want. Drag the slider the other way to zoom back out. You can also use the ol’ finger pinch-and-spread on the screen to zoom.
Alignment grid. Tap the on-screen Options button to turn on (or off) the nine-square grid you might find useful for composing and aligning shots.
To change cameras and take a self-portrait with the front camera,
tap the Switch Cameras icon (![]() ) in the bottom-right corner of the photo
screen.
) in the bottom-right corner of the photo
screen.
Take Portraits with Photo Booth
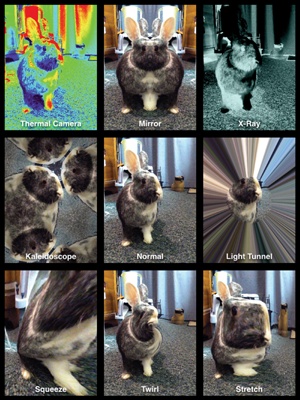
REMEMBER THOSE OLD-FASHIONED INSTANT-PORTRAIT kiosks you can still find in arcades and along boardwalks? You know, the kind where you and your pals cram together to make goofy faces for the camera and you get a strip of four black-and-white shots for a buck? Camera-equipped iPads can do the same thing, but better—the pictures are free and in color. Meet Photo Booth.
Like its desktop predecessor, Photo Booth (part of Mac OS X for
years) is a simple app that lets you take your own picture if, say, you
need a quick head shot for your Facebook page. You can use Photo Booth
with the rear camera as well; just tap the ![]() icon. And for loads more fun, you can add one of
eight special effects to your photo, including several funhouse-mirror
style distortions, a thermal camera simulation, or even a creepy faux
X-ray filter.
icon. And for loads more fun, you can add one of
eight special effects to your photo, including several funhouse-mirror
style distortions, a thermal camera simulation, or even a creepy faux
X-ray filter.
Here’s how to get going with Photo Booth:
Tap the Photo Booth icon on the iPad’s Home screen.
You can take a regular photo, or you can pick a special effect. Tap the
 icon to preview all the effects. Tap one to
use it. (If you pick one of the funky funhouse-mirror distortions,
you can distort it further by dragging your finger around the
screen.)
icon to preview all the effects. Tap one to
use it. (If you pick one of the funky funhouse-mirror distortions,
you can distort it further by dragging your finger around the
screen.)

A thumbnail version of your pic slides into the photo tray
underneath the main screen. Tap the photo to see it full-size. Tap
![]() to email or copy the image. To delete a Photo
Booth picture, press its thumbnail in the photo tray, tap the
to email or copy the image. To delete a Photo
Booth picture, press its thumbnail in the photo tray, tap the
![]() that appears in the thumbnail’s corner, and then
tap Delete Photo.
that appears in the thumbnail’s corner, and then
tap Delete Photo.
Photo Booth saves copies of your pictures in Photos→Camera Roll, and you can share the pictures from there as well (Share and Print Photos).
Find Pictures on Your iPad
NOW THAT YOU’VE GOT some pictures on your iPad, it’s time to locate them. Go to the Home screen and tap the Photos icon (the happy little sunflower).
The iPad organizes your picture collection in up to six ways—if you happen to use all the features of iPhoto ’09 and later on the Mac. After you open the iPad’s Photos app, tap the buttons at the top of the window to see the ways you can sort your images:
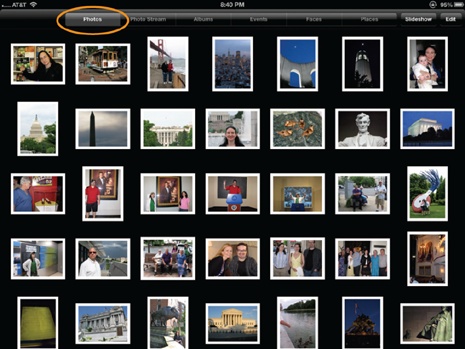
Photos. This view displays thumbnails of all your pictures lumped together in one place. If you didn’t group your images into albums before you transferred them, they all show up here.
Photo Stream. Tap here to see the pics that iCloud automatically sends to your ’Pad through the magic of the Internet (Stream Photos with iCloud). Shared Photo Streams (Share Your Photo Stream) are displayed here as well.
Albums. If you imported individual albums by ticking off their boxes in iTunes, tap this button to see those pictures grouped in same-named albums. You can also make your own albums right on the iPad these days, as the next page explains.
Events. Mac folks using recent versions of iPhoto or Aperture can also view photos by Event. These two programs group similar images, like those taken on the same day, into Events. Tap the Events button to see any of the Event sets you synced from your Mac.
Faces. Apple introduced a face-recognition feature in iPhoto ‘09 and later that automatically groups photos based on the people in them. If you use this feature on the Mac, iTunes gives you the option to sync entire albums of just one person. That way, you can find your Cate or Zachary photo sets when you tap the Faces button on the iPad.
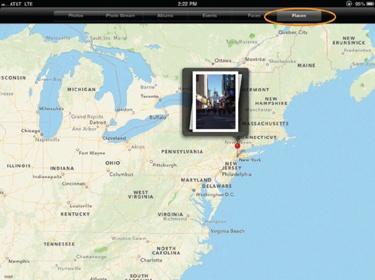
Places. If you geotag your photos—by shooting them with a GPS-enabled camera or by manually placing them on a map in iPhoto ’09 or later—the iPad groups them based on their geographic coordinates. Tap Places to see your photo sets stuck to a world map with virtual red push-pins.
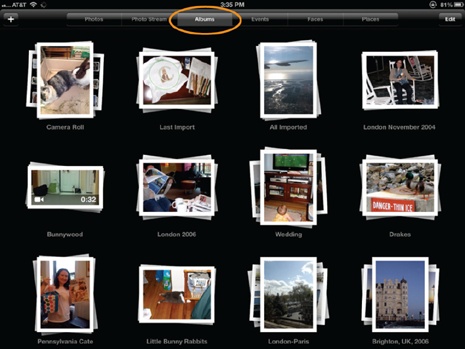
Working with Albums
In album form, your picture sets look like stacks of loose photographs clumped together in a sloppy pile. Tap one of the piles and the photos snap into a grid, where you can see each one as a thumbnail. If you’re looking for a specific image and you’re not quite sure which album it’s in, pinch and spread your fingers over a picture pile to get a quick animated preview of its contents without opening the album itself (right).
You can create your own photo albums on your iPad, too. In iOS 6, if you’re in
the Albums view already, tap ![]() in the upper-left corner; in iOS 5, tap Edit at
the top of the screen and then tap New Album on the left. Now, type a
descriptive name for the album in the box that pops up. On the next
screen, tap to select the pictures you want in this brand-spankin’-new
album, and then tap Done.
in the upper-left corner; in iOS 5, tap Edit at
the top of the screen and then tap New Album on the left. Now, type a
descriptive name for the album in the box that pops up. On the next
screen, tap to select the pictures you want in this brand-spankin’-new
album, and then tap Done.
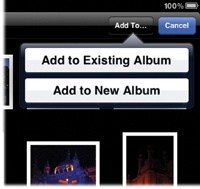
To copy photos into an existing album from the Photos screen (or
to create a new album here), tap ![]() . Select the photos you want to reorganize, then
tap Add To and opt for an existing or new album (and then name the
latter). You can delete pics from albums (but not from the iPad) by
selecting them and tapping the
. Select the photos you want to reorganize, then
tap Add To and opt for an existing or new album (and then name the
latter). You can delete pics from albums (but not from the iPad) by
selecting them and tapping the ![]() icon. Share and Print Photos
has instructions for deleting photos from the iPad itself.
icon. Share and Print Photos
has instructions for deleting photos from the iPad itself.
View Pictures on Your iPad
TO SEE THE PICTURES you synced over from your computer, tap the Photos icon on the iPad’s Home screen. Then tap the Photos button at the top of the screen; the iPad arranges your pictures in a grid of thumbnails. If you chose to copy over photo albums, tap the name of an album. Mac syncers can also tap the Events, Faces, or Places buttons to see photos sorted by those categories (Find Pictures on Your iPad).
On the thumbnails screen, you can do several things:
Tap a thumbnail to see the photo full-size.
Spread and pinch your fingers on-screen (one of those fancy moves described on Finger Moves for the iPad) to zoom in and out of a photo. Drag your finger around the screen to pan through a zoomed-in photo.
Flick your finger horizontally across the screen in either direction to scroll through your pictures at high speed. You can show off your vacation photos really fast this way (your friends will thank you).
Rotate the iPad to have horizontal photos fill the width of the screen or to have vertical photos fill its height.
With a photo open, tap the iPad’s glass to display a strip of itsy-bitsy thumbnails of all the photos in the current album at the bottom of the screen. Tap or slide to a thumbnail to jump to a particular picture.


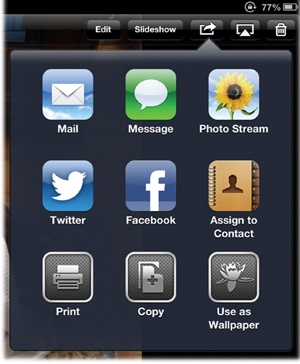
Tap ![]() in the menu bar to email a picture (Add Picture and Video Attachments to Mail Messages), message it
(Send Messages), tweet it to followers (Use Twitter), assign it to one of your iPad’s contacts
(Maintain Contacts), set it as wallpaper (Change the iPad’s Wallpaper),
print it (Print with Your iPad), or copy it. In iOS
6, you can post it right to Facebook from here, too. To get back to your
library, tap the Photos or album-name button at the top of the
screen.
in the menu bar to email a picture (Add Picture and Video Attachments to Mail Messages), message it
(Send Messages), tweet it to followers (Use Twitter), assign it to one of your iPad’s contacts
(Maintain Contacts), set it as wallpaper (Change the iPad’s Wallpaper),
print it (Print with Your iPad), or copy it. In iOS
6, you can post it right to Facebook from here, too. To get back to your
library, tap the Photos or album-name button at the top of the
screen.
Share and Print Photos
To share your photos, you can email, tweet, message, post, or print pics right from the iPad’s Photos app:
One photo. To share or print the photo currently on-screen, tap the iPad’s glass to make the photo controls appear, and then tap
 in the upper-right corner. Tap Mail to have
the iPad’s mail program attach the photo to a new message; in iOS 6, you can select the
size of the image you send; when the draft message appears, tap
Images in the message header, and then tap the file size you want
to send along with the message.
in the upper-right corner. Tap Mail to have
the iPad’s mail program attach the photo to a new message; in iOS 6, you can select the
size of the image you send; when the draft message appears, tap
Images in the message header, and then tap the file size you want
to send along with the message.There are other ways to share as well. Tap Tweet to share the photo with your Twitter followers (Use Twitter). Tap Message to send a copy to someone using Apple’s handy iMessage service (Send Messages). Tap Print for a paper copy (as long as you have your iPad configured for printing; see Print with Your iPad). In iOS 6, you can also post a photo to your Facebook page (Use Facebook on the iPad) or to your iCloud Photo Stream (Share Your Photo Stream).
Multiple photos. To email a bunch of pics at once, tap open the album containing the photos. In iOS 6, tap Edit; in iOS 5, tap
in the top-right corner. Now, tap the
pictures you want to send; blue checkmarks appear in the corner of
each thumbnail you select. Tap Share and choose Mail to attach the
pics to a new message. If you have a draft message-in-progress,
tap Copy, switch to your mail program, open the message, hold down
your finger until the Paste button appears, and then tap it to
paste in the pics.
Delete Photos
You can delete photos from your iPad two ways. If you synced photo albums over from iTunes, connect the iPad to your computer, open iTunes, click the iPad button, hit the Photos tab, and turn off the checkboxes next to those albums. Click Apply and then Sync to remove, those pics from the iPad’s gallery.
If you have pictures in your Camera Roll or Saved Photos album you want to ditch, you can delete a
currently open picture by tapping the ![]() icon, and then tapping Delete Photo. To delete
multiple pictures from the Camera Roll/Saved Photos thumbnail view,
tap the Edit button (or the
icon, and then tapping Delete Photo. To delete
multiple pictures from the Camera Roll/Saved Photos thumbnail view,
tap the Edit button (or the ![]() icon in iOS 5), and then tap the unwanted
pictures to assign them the Blue Checkmarks of Selection. Tap the
small red Delete button on the menu bar, and then tap Delete Selected
Photos. Tap the blue Cancel button on the other side of the menu bar
if you change your mind.
icon in iOS 5), and then tap the unwanted
pictures to assign them the Blue Checkmarks of Selection. Tap the
small red Delete button on the menu bar, and then tap Delete Selected
Photos. Tap the blue Cancel button on the other side of the menu bar
if you change your mind.
Edit Photos on the iPad
IN THE DARK, BADLY cropped days before there were apps, you couldn’t do much besides view the digital pictures you snapped, downloaded, or received on your mobile gadget. It was a “look, don’t retouch” approach to photos. Thankfully, things have changed.
Need to chop out that goofy guy off to the side in your Mount Rushmore photo? Want to lighten the exposure of that party shot so you can see the birthday girl’s face? With the iPad’s built-in editor or the growing collection of photo-editing programs in the App Store, you can improve your photos right on your iPad.
And best of all, once you’re done, you can share your pics online, send them to other people by email, or, if you have a second-generation or later Apple TV, proudly beam the fruits of your labor right onto your TV using AirPlay.
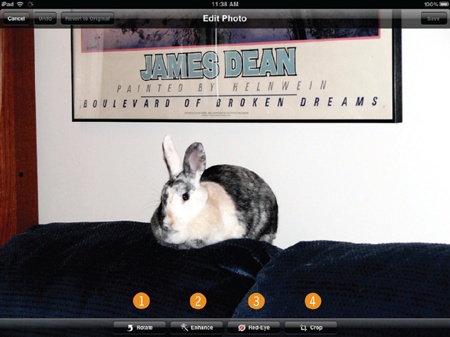
To do basic image-editing in iOS 5 and later, first tap open a photo that needs fixing. Then tap the Edit button at the top of the screen. Here’s what you can do:
Rotate (
 ). Tap the
Rotate button to spin a vertical shot into a
horizontal one or flip it upside down.
). Tap the
Rotate button to spin a vertical shot into a
horizontal one or flip it upside down.Enhance (
 ). Tap here to
have the iPad analyze a picture and automatically improve its
contrast, exposure, and saturation.
). Tap here to
have the iPad analyze a picture and automatically improve its
contrast, exposure, and saturation.Red Eye (
 ). If your
subject has glowing red demon eyes from your camera flash, tap the
Red Eye button to give those devil peepers a neutral
color.
). If your
subject has glowing red demon eyes from your camera flash, tap the
Red Eye button to give those devil peepers a neutral
color.Crop (
 ). Tap here to
chop out the boring, distracting, or ex-boyfriend parts of a
picture. In Crop mode, tap the Constrain button to conform to
standard photo sizes, like 4 x 6, and then tap the yellow Crop
button.
). Tap here to
chop out the boring, distracting, or ex-boyfriend parts of a
picture. In Crop mode, tap the Constrain button to conform to
standard photo sizes, like 4 x 6, and then tap the yellow Crop
button.
Hate that last change you made to a picture? Tap Undo to reverse it. Hate everything you’ve done so far? Tap “Revert to Original” to go back in time and undo all the changes you made. Once you like an edited photo, tap Save to put a copy in your Camera Roll album.
Find Third-Party Photo-Editing Apps
To do more complex photo-editing on your iPad, jump into the App Store and search for photography or photo editing. Dozens of apps pop up that can do everything the iPad’s built-in tools can, plus handle adjustments like:
Straighten. If your picture was unintentionally shot at an angle or simply looks too crooked for your taste, tilt it a few degrees.
Contrast. Increasing the contrast can perk up pics that seem flat and muddy.
Exposure. When a photo looks too light or too dark, fiddling with the exposure controls might help.
Saturation. Not all digital cameras have accurate sensors, so if the green, green grass of the ballpark looks pale or brown, increasing the color saturation can liven up a shot.
The number of photography apps in the App Store can be a bit overwhelming, but a few well-rounded options for editing and image-adjustment include Apple’s iPhoto for iPad (see next page), Ghostbird Software’s PhotoForge 2 ($2), and Snapseed ($5), which is now owned by Google.
Then there’s the Adobe empire. The company that makes Adobe Photoshop, the industry-standard program for photo-editing on the desktop, has two iPad offerings: the free Adobe Photoshop Express and the powerful $10 Adobe Photoshop Touch (below). While you can make basic edits with the former, the latter is a powerful app for photographers who want to burrow into Photoshop’s toolbox to work with layers, curves, gradients, and other elements in detail.

Use iPhoto for iPad
SINCE THE IPAD’S ARRIVAL, Apple has been converting the Mac desktop programs in its iLife suite into slick, affordable $5 iPad apps. iTunes, GarageBand, and iMovie all got the tablet treatment, and now, so has iPhoto.
So you may be asking, “Why should I pay $5 for this extra iPhoto thing when the iPad comes with a perfectly good free Photos app that lets me get rid of red-eye and crop out the bad parts of a picture?” If red-eye reduction and cropping are all you ever need to do to your pictures, you probably don’t need iPhoto. But if you want to do all the image-editing tasks (like exposure and contrast fixes) mentioned on the previous page—and you want a powerful app designed specifically for the iPad by its creator—well, iPhoto is pretty darn good.
When you tap open the app for the first time, it finds all your picture collections from the Photos app and displays them in the same album groupings on the Albums screen. The familiar tabs at the top of the screen also include Photos and Events, along with a tab called Journals, which lets you make a little digital scrapbook of photos you select—a good way to share memories.
But it’s iPhoto’s retouching powers that really make it impressive. Tap the Brushes icon in the toolbar (circled below) to get tools for removing blemishes and red-eye from your subjects. You can also choose to saturate your image—make that sky more blue or the grass more green. And if a picture seems a bit gaudy or garish, you can also desaturate (tone down) the colors.
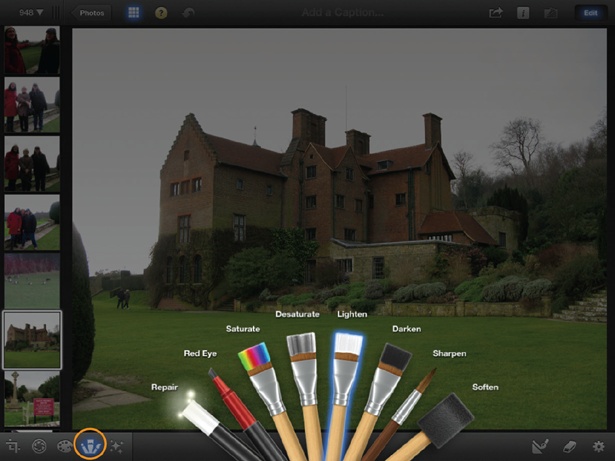
Use other brushes in the set to lighten, darken, sharpen, or soften parts of an image—all with gentle swipes of your finger. And you can adjust the exposure of the whole image with a screen slider or drag your finger around a photo to find the perfect balance of color.
The iPhoto for iPad app includes several filters for turning color photographs into retro-looking black & white shots, as well as options for adding tints and effects that make the pictures seem like they were taken by cameras from an earlier era. You can spend hours tapping new looks onto your photos, and if you have any regrets about a move, you can always tap the Undo button—or ditch all the changes you made to a picture and revert to the original image.
Sharing Pictures with iPhoto
Once you get your picture all picture-perfect, you’ll probably
want to share it. When the time comes, tap ![]() in the iPhoto toolbar to open a box full of
friendly options. As shown below, you can save photos to a Journal
scrapbook (previous page); copy pics to the Camera Roll in your Photos
app; sync ’em over to your computer via iTunes; and email, print, or
release them into the social network wilds of Twitter, Flickr, or
Facebook. There’s a cooler way to share, too.
in the iPhoto toolbar to open a box full of
friendly options. As shown below, you can save photos to a Journal
scrapbook (previous page); copy pics to the Camera Roll in your Photos
app; sync ’em over to your computer via iTunes; and email, print, or
release them into the social network wilds of Twitter, Flickr, or
Facebook. There’s a cooler way to share, too.
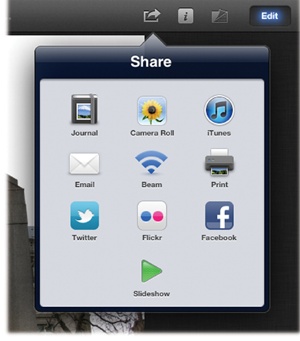
If you have more iOS devices running iPhoto (including iPhones, iPod Touches, and other iPads) in the area, you can beam pictures right to them over your wireless network connection. Who needs email when you can teleport?
To live the beam dream on your iPad, go to the top iPhoto
toolbar and tap ![]() →Wireless Beaming→On. In that same settings
area, make sure you have Photo Location turned on as well. You need to
have Location Services (Sounds) turned on in the
main Settings area of the target iOS devices, too. Then tap the Beam
button and transport those photos right over to the other
gadget.
→Wireless Beaming→On. In that same settings
area, make sure you have Photo Location turned on as well. You need to
have Location Services (Sounds) turned on in the
main Settings area of the target iOS devices, too. Then tap the Beam
button and transport those photos right over to the other
gadget.
The iPhoto app may not be for everyone, but you do get a lot of
artistic bang for your five bucks. If you have any questions about how
the app works, tap the ![]() icon up in the toolbar to see instructions and
tips appear instantly on-screen.
icon up in the toolbar to see instructions and
tips appear instantly on-screen.
Play Slideshows on Your iPad
A SLIDESHOW TAKES ALL the photo tap-and-drag work out of your hands, freeing you up to sit back and admire your pictures without distraction. To run a slideshow on your iPad, you need to set a few options, like how long each photo appears on-screen and what music accompanies your photo parade.
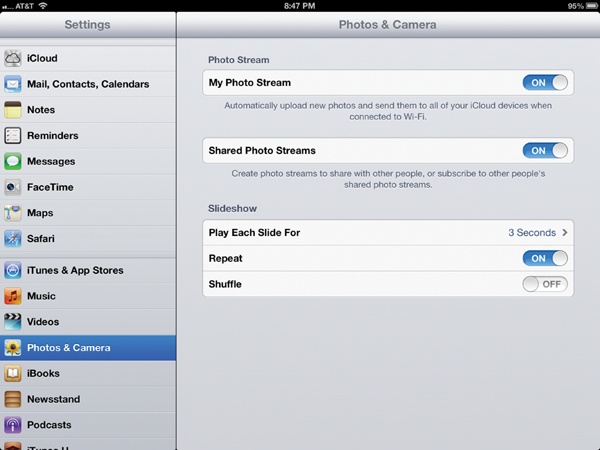
The iPad keeps its slideshow settings in two places. All of the timing and order-of-pic options are in the iPad’s Settings area. To get there, tap Settings→Photos & Camera (Settings→Photos in iOS 5). Then, you can choose:
Play Each Slide For… Pick the amount of time you want a picture to stay on-screen. You can choose 2, 3, 5, 10, or 20 seconds (for those photography buffs with really long attention spans).
Repeat. Tap this setting to On if you want the slideshow to keep looping, starting over again after it plays through the first time.
Shuffle. To randomly mix up the order of the pictures in an album, tap the On button next to Shuffle.
Note
Looking for info on the iPad’s other native camera-related app, namely, the FaceTime videochat program? Flip back to Make Video Calls with FaceTime for details.
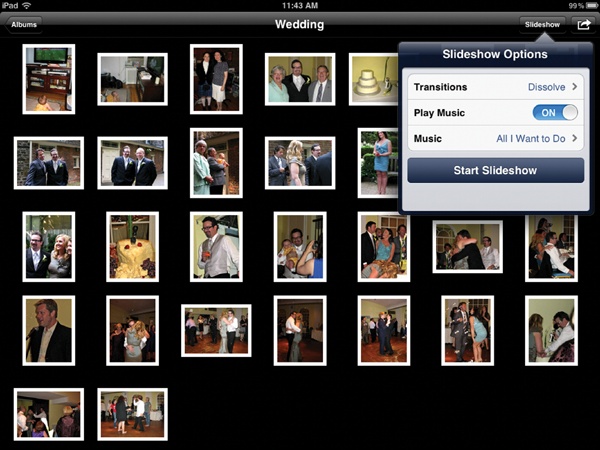
Now that you have these matters worked out, go back to the Photos app and tap open the album you want to present as a slideshow. On the upper-right side of the menu bar, tap the Slideshow button to open the Slideshow Options box (above). Here, you can choose:
Once you make all your selections, you’re ready for showtime. Tap the Start Slideshow button. To stop the show, tap the iPad screen.
Many accessories makers sell iPad cases that can form an impromptu stand or easel so you can prop the tablet up on a table top. If you have one of these, you don’t need to hold the iPad up to look at your photos with friends. You, like everyone else, can just lean back and watch the show as it unfolds across the screen.
Play Slideshows on Your TV
YOU CAN GET YOUR photos flipping across a TV screen a couple of ways. For one, you can wirelessly stream them to a connected second- or third-generation Apple TV using AirPlay (see Stream and Mirror Files with AirPlay for a description of AirPlay). Or, you can connect your tablet to the TV with a cable (flip back to Manage Your Expectations With Up Next for help doing that).
To beam your show to your little black Apple TV over the airwaves of your own home network via AirPlay—and then onto your connected HDTV—follow these steps:
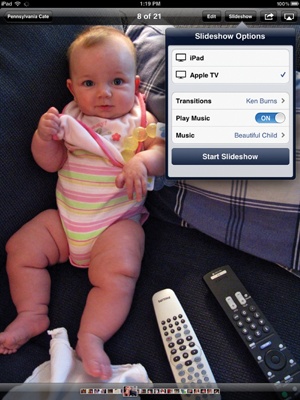
Tap open the album of pictures you want to show off from Faces, Places, Photos, or wherever. Once the photos are on the screen, tap Slideshow in the top-right corner.
When you see the AirPlay icon (
 ) in the top-right corner, you know the iPad
has sensed your Apple TV. Tap the Slideshow button again. In the
Options box (right), tap Apple TV to stream the show to your
TV instead of playing it on your iPad; tap iPad here later to
reverse the setting. You can also pick transitions and accompanying
music on the fly by tapping the controls in the Slideshow Options
box. Tap Start Slideshow to begin the picture parade and wow the
crowd.
) in the top-right corner, you know the iPad
has sensed your Apple TV. Tap the Slideshow button again. In the
Options box (right), tap Apple TV to stream the show to your
TV instead of playing it on your iPad; tap iPad here later to
reverse the setting. You can also pick transitions and accompanying
music on the fly by tapping the controls in the Slideshow Options
box. Tap Start Slideshow to begin the picture parade and wow the
crowd.
Tip
If you wrangle your picture collection in iPhoto ’09 or later on the Mac, you can export your intricately crafted and scored iPhoto slideshows as little movies, sized up just for the iPad—and put them right into iTunes. Select a slideshow in iPhoto and click the Export button. In the “Export your slideshow” box that appears, turn on the checkbox for Medium or Large (the preferred settings for iPad viewing) and make sure you turn on the checkbox next to “Automatically send slideshow to iTunes.” Click the Export button. To actually complete the transfer, connect your iPad to your computer and click the Movies tab on the iPad screen in iTunes. Select the slideshow and sync away.

If you don’t have an Apple TV, but do have an Apple AV cable:
Connect the TV and iPad with the cable (Play iPad Videos on Your TV). Turn on your TV and select the iPad as your video input source. You do that the same way you tell your TV to display the signal from a DVD player or videogame console: Typically, you press the Input, Video Source, or Display button on your TV’s remote to switch from the live TV signal to a new video source.
On the iPad, navigate to the album you want. Press the Slideshow button in the menu bar at the top of the screen, tap Start Slideshow, and watch the show begin. (You can change music and transitions here, too.)

Tip
Apple sells its own AV cables ($49, shown left) for either component or composite video connections between the Dock Connector port on the iPad and the input jacks on your TV or AV receiver. If you want to hook up the iPad to a TV, computer monitor, or projector that uses a VGA connection, you can get the $29 Dock Connector to VGA Adapter. And if you have a high-definition TV and want to pipe in whatever happens to be on the iPad screen over an HDMI cable, get Apple’s $39 Digital AV Adapter. Digital AV Adapters that work with the Mini’s Lightning port are available for $49, and everything is available in Apple stores or online at store.apple.com.
Change the iPad’s Wallpaper
THE IPAD COMES PRE-STOCKED with several gorgeous high-resolution photos—mostly nature scenes and textured patterns intended as background images for both the Lock and Home screens. (In case you’re wondering what the difference is, the Lock screen is the one you see when you first turn on the iPad, and the Home screen has all your app icons scattered about.)
If you want to change these background images to spice things up, you can assign new photos two ways.
The first is to go to the Home screen and tap Settings→Brightness & Wallpaper. Tap the Wallpaper panel (circled). On the next screen, choose a photo from any of your photo albums, or tap Wallpaper to pick an Apple stock shot. Tap the photo you want to use. You can drag the image around and finger-pinch and spread it to shrink or enlarge the parts of the picture you want to display.
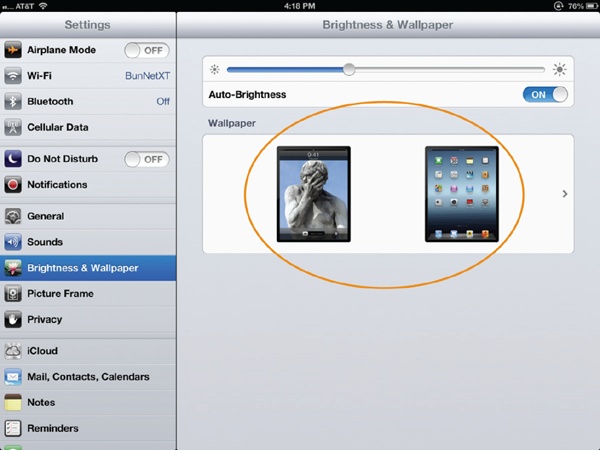
When you’re done, tap the appropriate button at the top of the screen. You have your choice of Set Lock Screen, Set Home Screen, or Set Both. You can also bail out with a Cancel button in the left corner.
The second way to wallpaper your ’Pad is to pick a picture out of
one of the iPad’s photo albums and tap ![]() at the top of the screen, and then tap the “Use
as Wallpaper” option. Here, you can size and save the photo as described
above. No matter which way you choose to change it, there’s nothing like
fresh new wallpaper to personalize your iPad—and show off your own
photography.
at the top of the screen, and then tap the “Use
as Wallpaper” option. Here, you can size and save the photo as described
above. No matter which way you choose to change it, there’s nothing like
fresh new wallpaper to personalize your iPad—and show off your own
photography.
Turn the iPad into a Picture Frame
AS MENTIONED AT THE beginning of this chapter, the iPad resembles a digital picture frame. And if you want one of those, you can turn the iPad’s Lock screen into an ever-changing window that displays your photo collection, a pleasant diversion as the iPad recharges from a wall outlet.
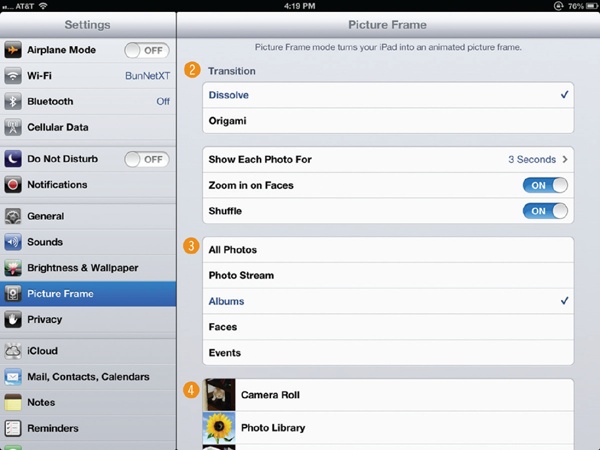
Go to the Home screen and tap Settings→Picture Frame.
Pick the type of transition you want between photos—either the traditional Hollywood-style Dissolve or Apple’s foldy-paper Origami animation. You can also set the amount of time each photo stays on-screen, whether the iPad zooms in on photos, and whether the pics appear in random order.
In the middle of the Settings screen, choose the source of the images you want to use—all your photos, your Photo Stream, Albums, Faces and so on.
Finally, based on your selection in the previous step, select the specific album or event you want to feature in your digital picture frame.

To test out your framed photo parade, press the Sleep/Wake button to turn off the iPad screen and press it again to get back to the Lock screen. Tap the small flower icon next to the lock slider to start the slideshow. To pause the pictures, tap the iPad’s screen. You can either tap the flower icon again to resume the show or swipe the slider to unlock the iPad and get back to work.