Chapter 2. Typing, Editing, & Searching
The iPhone is amazing, all right. But as a pocket computer, it faces some fundamental limitations: It has no real keyboard and no real mouse. Which might be considered a drawback on a gadget that’s capable of running hundreds of thousands of programs.
Fortunately, where there’s a problem, there’s software that can fix it. The modern iPhone virtual keyboard is smart in all kinds of ways—automatically predicting and correcting typos, for example. In iOS 4, you can even tap a mistyped word to see some suggestions for fixing it. This chapter covers every aspect of working with text on the iPhone: entering it, fixing it, and searching for it.
The Keyboard
Very few iPhone features have triggered as much angst, hope, and criticism as the onscreen keyboard. It’s true, boys and girls: The iPhone has no physical keys. A virtual keyboard, therefore, is the only possible built-in system for typing text. Like it or not, you’ll be doing a lot of typing on glass.
The keyboard appears automatically whenever you tap in a place where typing is possible: in an outgoing email or text message, in the Notes program, in the address bar of the Web browser, and so on.
Just tap the key you want. As your finger taps the glass, a “speech balloon” appears above your finger, showing an enlarged version of the key you actually hit (since your finger is now blocking your view of the keyboard).
In darker gray, surrounding the letters, you’ll find these special keys:
Shift (
 ). When you tap this key, it glows
white to indicate that it’s in effect. The next letter you type appears as a capital.
Then the key automatically returns to normal, meaning that the next letter
will be lowercase.
). When you tap this key, it glows
white to indicate that it’s in effect. The next letter you type appears as a capital.
Then the key automatically returns to normal, meaning that the next letter
will be lowercase.Tip
The iPhone has a Caps Lock feature, but you have to turn it on. In the Settings program, turn on “Enable caps lock,” as described on General.
From now on, if you double-tap the
key, it turns blue. You’re now in Caps Lock mode, and you’ll
now type in ALL CAPITALS until you tap the key again. (If you can’t seem to make Caps Lock work, try
double-tapping the key fast.)Backspace (
 ). This key actually has three
speeds.
). This key actually has three
speeds.Tap it once to delete the letter just before the blinking insertion point.
Hold it down to “walk” backward, deleting as you go.
If you hold down the key long enough,it starts deleting words rather than letters, one whole chunk at a time.
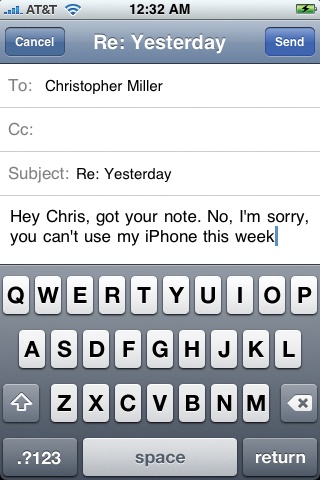
 . Tap this button when you want to type numbers or punctuation. The keyboard changes to offer a palette of numbers and
symbols. Tap the same key—which now says
. Tap this button when you want to type numbers or punctuation. The keyboard changes to offer a palette of numbers and
symbols. Tap the same key—which now says  —to return to the letters keyboard.
Once you’re on the numbers/symbols pad, a new dark gray button appears, labeled
 . Tapping it summons a third keyboard layout,
containing the less frequently used symbols, like brackets, the # and % symbols,
bullets, and math symbols.
. Tapping it summons a third keyboard layout,
containing the less frequently used symbols, like brackets, the # and % symbols,
bullets, and math symbols.Note
Because the period is such a frequently used symbol, there’s an awesome shortcut that doesn’t require switching to the punctuation keyboard: At the end of a sentence, just tap the space bar twice. You get a period, a space, and a capitalized letter at the beginning of the next word. (This, too, can be turned off—see General—although it’s hard to imagine why you’d want to.)
Return. Tapping this key moves to the next line, just as on a real keyboard. (There’s no Tab key or Enter key in iPhone Land.)
The Widescreen Keyboard
In some programs, you can turn the phone 90 degrees to type. When the keyboard stretches out the long way, the keys get a lot bigger. And it’s a lot easier to type—even with two thumbs.
This glorious feature doesn’t work in every program, alas. Fortunately, it works in some of the programs where you do the most typing: Mail, Messages (text messages), the Safari browser, Contacts, and Notes. (The screen also rotates in Camera, iPod, Calculator, and Stocks, though not for typing purposes.)
Making the Keyboard Work
Some people have no problem tapping those tiny virtual keys; others struggle for days. Either way, here are some tips:
Don’t be freaked out by the tiny, narrow keys. Apple knows your fingertip is fatter than that.
So as you type, use the whole pad of your finger or thumb. Go ahead—tap as though you’re trying to make a fingerprint. Don’t try to tap with only a skinny part of your finger to match the skinny keys. You’ll be surprised at how fast and accurate this method is. (Tap, don’t press.)
This may sound like New Age hooey, but trust the keyboard. Don’t pause to check the result after each letter. Just plow on.
Tip
Although you don’t see it, the sizes of the keys on the iPhone keyboard are actually changing all the time. That is, the software enlarges the “landing area” of certain keys, based on probability.
For example, suppose you type tim. Now, the iPhone knows that no word in the language begins timw or timr—and so, invisibly, it enlarges the “landing area” of the E key, which greatly diminishes your chances of making a typo on that last letter. Cool.
Start with one-finger typing. Two-thumb, BlackBerry-style typing comes later. You’ll drive yourself crazy if you start out that way, although it’s not bad when you’re using the widescreen keyboard layout.
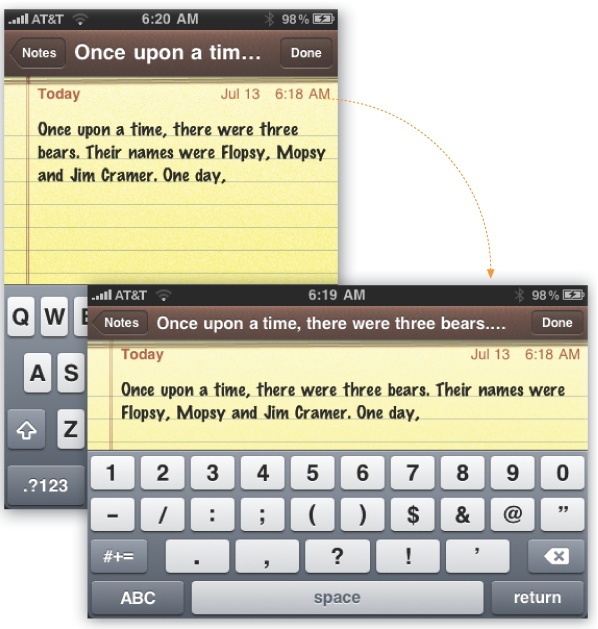
Without cursor keys, how are you supposed to correct an error you made a few sentences ago? Easy—use the Loupe.
Hold your fingertip down anywhere in the text until you see the magnified circle appear. Without lifting your finger, drag anywhere in the text; you’ll see that the insertion point moves along with it. Release when the blue line is where you want to delete or add text, just as though you’d clicked there with a mouse.
Don’t bother using the Shift key to capitalize a new sentence. The iPhone does that capitalizing automatically. (To turn this feature on or off, see General.)
Auto-Suggestions
If you make a mistake, don’t reflexively go for the Backspace (![]() ). Instead, just beneath the word you typed, you’ll find the
iPhone’s proposed replacement. The software analyzes the letters
around the one you typed and usually figures out what you really meant. For example, if you
accidentally type imsame, the iPhone realizes that you meant
insane and suggests that word.
). Instead, just beneath the word you typed, you’ll find the
iPhone’s proposed replacement. The software analyzes the letters
around the one you typed and usually figures out what you really meant. For example, if you
accidentally type imsame, the iPhone realizes that you meant
insane and suggests that word.
To accept its suggestion, tap the space bar or any punctuation, like a period or question mark. To ignore the suggestion, tap it with your finger.
Tip
If you turn on Speak Auto-text (Speak Auto-text), your iPhone 3GS or 4 will even speak the suggested word out loud. That way, you can keep your focus on the keyboard.
The suggestion feature can be especially useful when it comes to contractions, which are normally clumsy to type because you have to switch to the punctuation keyboard to find the apostrophe.
So you can save time by deliberately leaving out the apostrophe in contractions like I’m, don’t, can’t, and so on. Type im, dont, or cant. The iPhone proposes I’m, don’t, or can’t, so you can just tap the space bar to fix the word and continue.
The suggestion feature also kicks in when the iPhone thinks it knows how you intend to complete a correctly spelled word. For example, if you type fathe, the suggestion says father. This trick usually saves you only a letter or two, but that’s better than nothing.

Accented Characters
To produce an accented character (like é, ë, è, ê, and so on), keep your finger pressed on that key for one second. A palette of diacritical marks appears; slide onto the one you want, as you can see on the facing page.
Not all keys sprout this pop-up palette. Here’s a list of the keys that produce alternative markings.
How to Type Punctuation with One Touch
On the iPhone, the punctuation keys and alphabet keys appear on two different
keyboard layouts. That’s a serious hassle, because each
time you want, say, a comma, it’s an awkward, three-step dance: (1) Tap the
![]() key to get the punctuation layout. (2) Tap the comma. (3) Tap the
key to get the punctuation layout. (2) Tap the comma. (3) Tap the
![]() key or the space bar to return to the alphabet layout.
key or the space bar to return to the alphabet layout.
Imagine how excruciating it is to type, for example, “a P.O. Box in the U.S.A.”! That’s 34 finger taps and 10 mode changes!
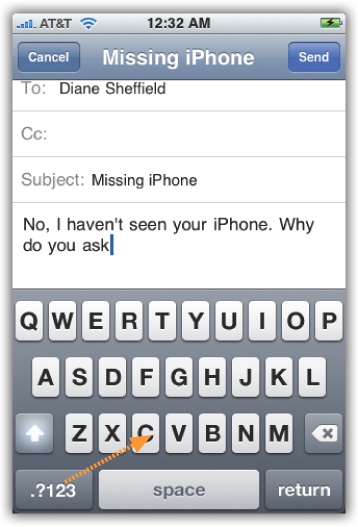
Fortunately, there’s a secret way to get a punctuation mark with only a single finger gesture.
The iPhone doesn’t register most key presses until you lift your finger. But the Shift and Punctuation keys register their taps on the press down instead.
So here’s what you can do, all in one motion:
Tip
If you’re a two-thumbed typist, you can also hit the ![]() key with your left thumb, and then tap the punctuation key with
your right. It even works on the
key with your left thumb, and then tap the punctuation key with
your right. It even works on the ![]() sub-punctuation layout, although you’ll probably visit that
screen less often.
sub-punctuation layout, although you’ll probably visit that
screen less often.
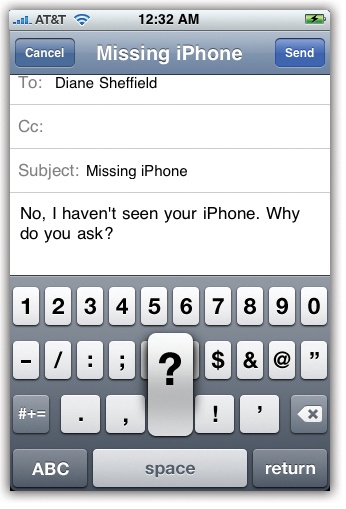
In fact, you can type any of the punctuation symbols the same way. This technique makes a huge difference in the usability of the keyboard.
Tip
This same trick saves you a finger-press when capitalizing words, too. You can put
your finger down on the ![]() key and slide directly onto the letter you want to type in its uppercase
version. Or, if you’re a two-handed iPhone typist, you can work the Shift key like the
one on your computer: Hold it down with your left thumb, type a letter with your
right, and then release both.
key and slide directly onto the letter you want to type in its uppercase
version. Or, if you’re a two-handed iPhone typist, you can work the Shift key like the
one on your computer: Hold it down with your left thumb, type a letter with your
right, and then release both.
How the Dictionary Works
The iPhone has an English dictionary (minus the definitions) built in. As you type, it compares what you’ve typed against the words in that dictionary (and against the names in your address book). If it finds a match or a partial match, it displays a suggestion just beneath what you’ve typed.
If you tap the space bar to accept the suggestion, wonderful.
If you don’t—if you dismiss the suggestion and allow the “mistake” to stand—then the iPhone adds that word to a custom, dynamic dictionary, assuming that you’ve just typed some name, bit of slang, or terminology that wasn’t in its dictionary originally. It dawns on the iPhone that maybe that’s a legitimate word it doesn’t know—and it adds it to the dictionary. From now on, in other words, it will accept that bizarre new word as a legitimate word—and, in fact, will even suggest it the next time you type something like it.
Words you’ve added to the dictionary actually age. If you stop using some custom term, the iPhone gradually learns to forget it. That’s handy behavior if you never intended for that word to become part of the dictionary to begin with (that is, it was a mistake).
Tip
If you feel you’ve really made a mess of your custom dictionary, and the iPhone keeps suggesting ridiculous alternate words, you can always start fresh. From the Home screen, tap Settings →General→Reset, and then tap Reset Keyboard Dictionary. Now the iPhone’s dictionary is the way it was when it came from the factory, without any of the words it learned from you.
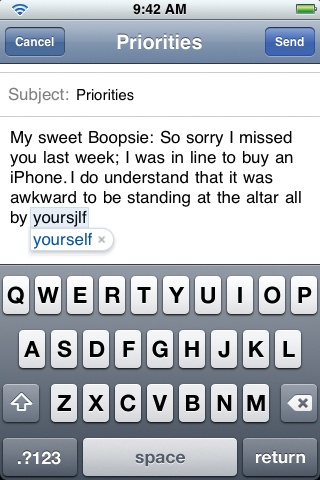
The Spelling Checker
Here’s the world’s friendliest typo-fixer, new in iOS 4. Apple calls it a spelling checker, but maybe that’s stretching it.
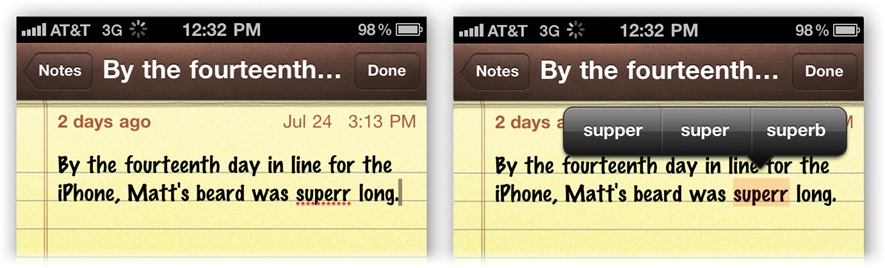
The idea is that anytime the iPhone doesn’t recognize something you’ve typed, it draws a dotted red underline beneath. Tap the word to see a pop-up balloon with three (and only three) alternate spellings. Often, one of them is what you wanted, and you can tap it to fix the mistake. (Equally often, not, and it’s time to break out the Loupe and the keyboard.)
Tip
You can also invoke the spelling checker’s suggestions even if you haven’t made a typo. Tap just before the word; tap the insertion point; tap Replace. (You can see this effect on Step 1: Select the Text.
International Typing
As the iPhone goes on sale around the world, it has to be equipped for non-English languages—and even non-Roman alphabets. Fortunately, it’s ready.
To prepare the iPhone for language switching, go to Settings→General→International. Tap Language to set the iPhone’s primary language (for menus, button labels, and so on).
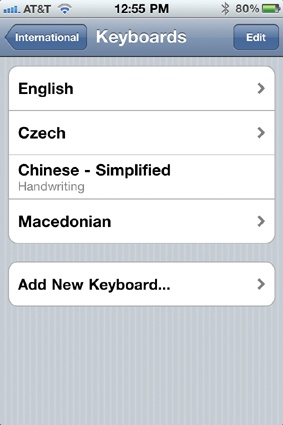
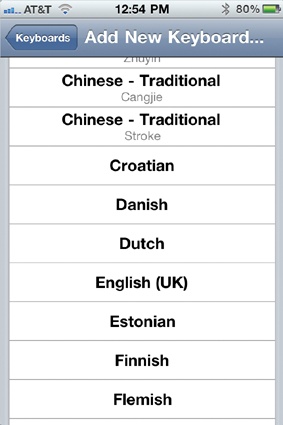
To make other keyboards available, tap Keyboards, and then turn on the keyboard layouts you’ll want available: Russian, Italian, whatever.
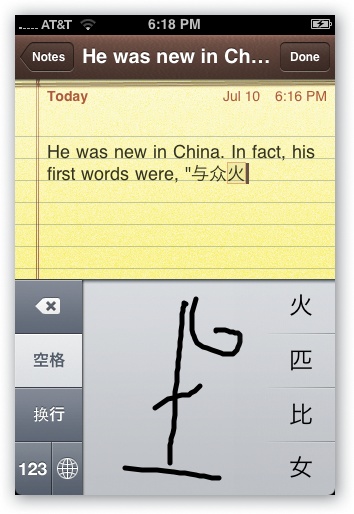
If you choose Japanese or Chinese, you’re offered the chance to specify which kind of character input you want. For Japanese, you can choose a QWERTY layout or a Kana keypad. For Simplified or Traditional Chinese, you have a choice of the Pinyin input method (which uses a QWERTY layout) or handwriting recognition, where you draw your symbols onto the screen with your fingertip; a palette of potential interpretations appears to the right. (That’s handy, since there are thousands of characters in Chinese, and you’d need a 65-inch iPhone to fit the keyboard.) Or hey—it’s a free tic-tac-toe game!
Now, when you arrive at any writing area in any program, you’ll discover that a new
icon has appeared on the keyboard: a tiny globe (![]() ) next to the space bar. Each time you tap it, you rotate to the
next keyboard you requested earlier. The new language’s name appears briefly on the
space bar to identify it.
) next to the space bar. Each time you tap it, you rotate to the
next keyboard you requested earlier. The new language’s name appears briefly on the
space bar to identify it.
Thanks to that ![]() button, you can freely mix languages and alphabets within the same document, without having to duck
back to some control panel to make the change. And thanks to the iPhone’s virtual keyboard, the actual letters on the “keys” change in real time. (As an Apple
PR rep puts it, “That’s really hard to do on a BlackBerry.”)
button, you can freely mix languages and alphabets within the same document, without having to duck
back to some control panel to make the change. And thanks to the iPhone’s virtual keyboard, the actual letters on the “keys” change in real time. (As an Apple
PR rep puts it, “That’s really hard to do on a BlackBerry.”)
Tip
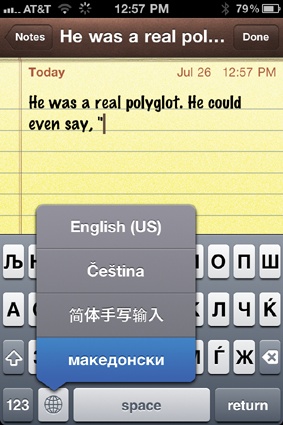
Here’s an unsung new feature in iOS 4: If you, some United Nations translator,
like to write in a lot of different languages, you no longer have to tap that ![]() key over and over again to cycle through the keyboard layouts. Instead, hold your finger down on the
key over and over again to cycle through the keyboard layouts. Instead, hold your finger down on the ![]() key. You get a convenient pop-up menu of the languages you’ve
turned on, so you can jump directly to the one you want.
key. You get a convenient pop-up menu of the languages you’ve
turned on, so you can jump directly to the one you want.
Connecting a Real Keyboard
This new iOS 4 feature barely merited an asterisk in Apple’s marketing materials. But if you’re any kind of wandering journalist, blogger, or writer, you might flip your lid over this: You can now type on a real, full-sized, plastic keyboard, and watch the text magically appear on the iPhone screen—wirelessly.
That’s because you can now use a Bluetooth keyboard (the Apple Wireless Keyboard, for example) to type into your iPhone.
To set this up, from the Home screen, tap Settings →General→Bluetooth. Turn Bluetooth on, if it’s not already.
Now turn on the wireless keyboard. After a moment, its name shows up on the iPhone screen in the Devices list; tap it. You’ll know the pairing was successful, because when you tap in a spot where the on-screen keyboard would usually appear, well, it doesn’t.
As you can probably imagine, typing is a lot easier and faster with a real keyboard than when you’re trying to type on glass. As a bonus, the Apple keyboard’s brightness, volume, and playback controls actually work to control the iPhone’s brightness, volume, and playback.
Tip
The Apple keyboard’s ![]() key even works: It makes the iPhone’s onscreen keyboard appear or
disappear. Oh, and to switch languages, press ⌘-space bar on the wireless keyboard.
You’ll see the list of languages. Tap the space bar again to choose a different
language.
key even works: It makes the iPhone’s onscreen keyboard appear or
disappear. Oh, and to switch languages, press ⌘-space bar on the wireless keyboard.
You’ll see the list of languages. Tap the space bar again to choose a different
language.
When you’re finished using the keyboard, turn it off. The iPhone goes back to normal.
Tip
There’s another way to bypass the onscreen keyboard, too: Dictate. Using the free app called Dragon Dictation, you can actually speak what you want to type. Over an Internet connection, your words are turned into typed text in about 2 seconds. From there, one tap copies the results to a text message, an outgoing email, the clipboard for pasting somewhere, or Facebook or Twitter as an update.
Cut, Copy, Paste
After two years of customer whining and pining, Apple finally blessed the iPhone with Copy and Paste. You can grab a picture or text off a Web page and paste it into an email message, copy directions from email into Notes, paste a phone number from your address book into a text message, and so on.
Part of the problem, according to Apple, was the challenge of designing a way to select text and trigger Cut, Copy, and Paste functions—on a machine with no mouse and no menus! As on the Mac or PC, it takes three steps.
Step 1: Select the Text
Start by highlighting the text you want to cut or copy. Sounds simple, but there are two different ways to go about it:
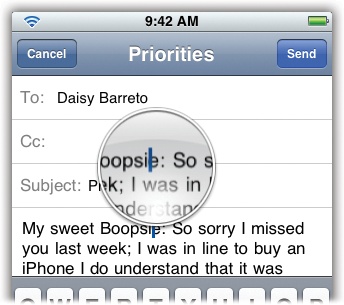
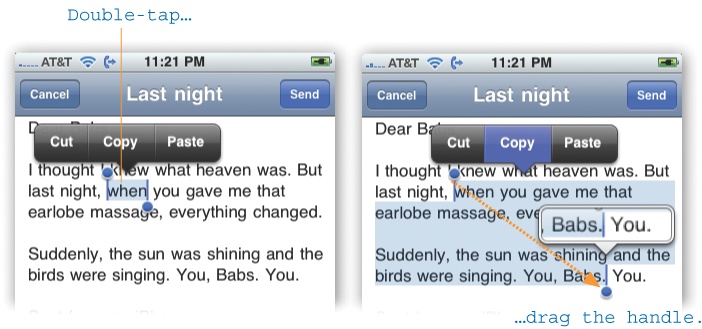
Double-tap method. Here’s the quickest way. Double-tap the first word (or last word) that you want in the copied selection. That word is now highlighted, with blue dots at diagonal corners; drag these handles to expand the selection to include all the text you want to include. The little magnifying loupe helps you release the dot at just the right spot.
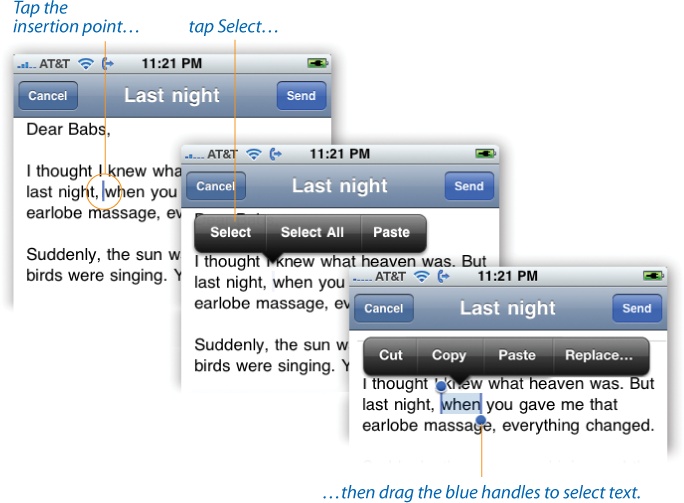
Insertion-point method. This method involves more steps but offers a Select All option that you don’t get with the double-tap.
Tap in your text to place the blinking insertion point where you want it (below, left); then tap the insertion point itself to summon the selection buttons (middle). Tap Select All to copy everything in the text box or message. Or tap Select to get the two diagonal blue selection dots (right); drag the handles as already described.
Tip
On a Web page, you can’t very well double-tap to select a word, because double-tapping means, “zoom in.” So instead, hold your finger down on a word to produce the blue handles; the Loupe magnifies the proceedings to help you. (If you highlight the wrong word, keep your finger down and slide to the correct one; the highlighting goes with you.)
However, if you’re zoomed out to see the whole page, holding down your finger highlights the entire block of text (a paragraph or even a whole article) instead of one word. Now you can expand the selection to include a photo, if you like; that way, you can copy and paste the whole enchilada into an outgoing email message.
Step 2: Cut or Copy
At this point, you’ve highlighted the material you want, and the Cut and Copy buttons are staring you in the face. Tap Cut (to remove the selected text) or Copy (to leave it but place a duplicate on your invisible Clipboard). (The Replace button summons three alternate suggestions from the new iPhone spelling checker; see How the Dictionary Works.)
Step 3: Paste
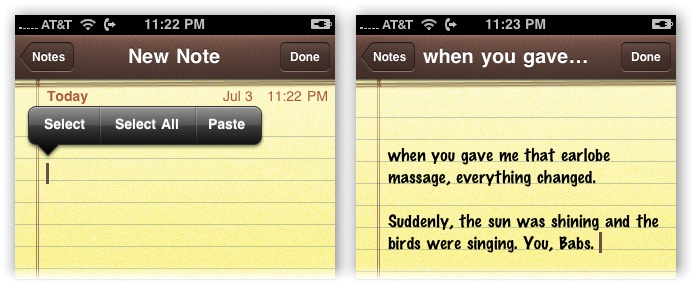
Finally, switch to a different spot in the text, even if it’s in a different window (for example, a new email message) or a different program (for example, Calendar or Notes). Tap in any spot where you’re allowed to type: Notes, email, text message, Safari’s address bar, the Spotlight search box, a text box on a Web page, someone’s Contacts screen, the top of the Calculator, even the phone-number display on the dialing keypad—just about anywhere. Tap the Paste button to paste what you cut or copied.
Ta-da! And to think that it took only two years.
(Possible Step 4: Undo)
Everyone makes mistakes, right? Fortunately, there’s a secret Undo command, which can come in handy when you cut, copy, or paste something by mistake.
The trick is to shake the iPhone. The iPhone offers you an Undo button, which you can tap to confirm the backtracking. One finger touch instead of three.
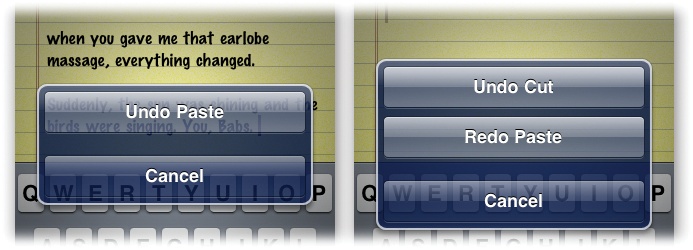
In fact, you can even Undo the Undo. Just shake the phone again; now the screen offers you a Redo button. Fun! (Except when you shake the phone by accident and you get the “Nothing to Undo” message. But still.)
Spotlight: Global Search
Man, you will love this one.
The iPhone has a feature so fast, powerful, and useful, you’ll wonder how the heck anyone survived without it: a global search feature called Spotlight. Just by typing a few letters, you can search almost the entire phone at once—or even the whole Web. Here’s where it looks to find matches:
Contacts. First names, last names, and company names.
Mail. The To, From, and Subject lines of all accounts. (The iPhone doesn’t try to search the text inside your email.)
Calendar. Appointment names, meeting invitees, and locations (but not any notes attached to your appointments).
iPod. Song, performer, and album names, plus the names of podcasts, videos, and audiobooks.
Mail. The header information (name, subject) of your email messages
Messages. Yep, you can search your SMS text messages in iOS 4, too.
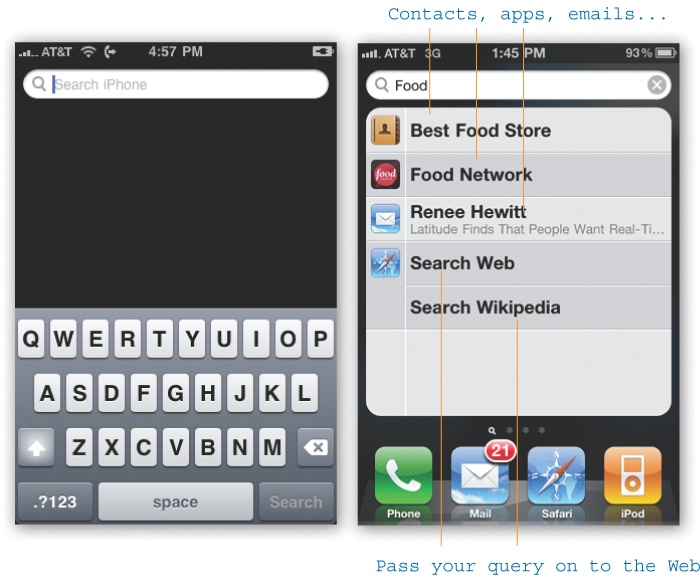
Your apps. For frequent downloaders, this may be the juiciest function of all: Spotlight also searches the names of every single app on your iPhone. If you have dozens or hundreds installed, this is a much more efficient way to find one than trying to page through all the Home screens, eyeballing the icons as you go.
Search Web. At the bottom of the list of search results, the Search Web button appears. Tap it to open Safari and begin an automatic search for the term you’ve typed, using Google or whatever search page you’ve specified in Settings.
Search Wikipedia. At the very bottom of the list of search results, you get a Search Wikipedia option. As you could probably guess, tapping it opens up Wikipedia and performs a search for the term you’ve typed.
These last two options are new in iOS 4. They might not quite seem to fit into the same categories as Mail, Apps, and so on. But once you get used to the idea that you’ve got quick Web search options right there in Spotlight, they can save you a few steps the next time you want to look something up online.
Tip
It’s worth noting that the Contacts, Mail, Calendar, iPod, and Notes programs have their own Search boxes (usually hidden until you scroll all the way to the top of their lists). Those individual Search functions are great when you’re already in the program where you want to search. The Spotlight difference is that it searches all these apps at once.
How to Open Spotlight
The Spotlight screen is built into your Home screens (The Home Screen)—at the far left.
Once you’ve pressed the Home button, you can either keep swiping your finger to the right, or press the Home button again (and maybe a third time), until the Spotlight screen heaves into view.
(Truth is, that’s an overly wordy description of what’s usually a simple task. A slow double-press is usually all it takes.)
Tip
If you have an iPhone 3G, you can designate the double-quick-press Home-button shortcut to mean “Open Spotlight,” as described on General.
How to Search
The keyboard opens automatically (below, left). Begin typing to identify what you want to find and open. For example, if you were trying to find a file called Pokémon Fantasy League, typing just pok or leag would probably suffice. (Spotlight doesn’t find text in the middles of words, though; it searches from the beginnings of words.)
A results list immediately appears below the search box, listing everything Spotlight can find containing what you’ve typed so far. (This is a live, interactive search; that is, Spotlight modifies the menu of search results as you type.)
They’re neatly grouped by category; the beginning of each category is marked with an icon, and the light gray and medium gray backgrounds alternate to help you notice when a new category has begun.
Tip
If you drag your finger to scroll the list, the keyboard helpfully vanishes so you can see more of the list.
If you see the icon of whatever you were hoping to dig up, just tap it to open it. The corresponding program (Contacts, Mail, iPod, the app you tapped, whatever) opens automatically.
How to Tweak Spotlight
You’ve just read about how Spotlight works fresh out of the box. But you can tailor its behavior to fit it to the kinds of things you look up most often. To open Spotlight’s settings, start on the Home screen. Tap Settings→General→Spotlight Search.
You can tweak Spotlight in two ways here:
Turn off categories. The checkmarks identify the kinds of things that Spotlight tracks. If you find that Spotlight uses up precious screen space listing categories you don’t use much, then tap to turn off their checkmarks. Now more of Spotlight’s space-constrained screen is allotted to icon types you do care about.
Prioritize the categories. This screen also lets you change the order of the category results; using the little
 grip strip at the right side, you can drag an individual list
item up or down.
grip strip at the right side, you can drag an individual list
item up or down.
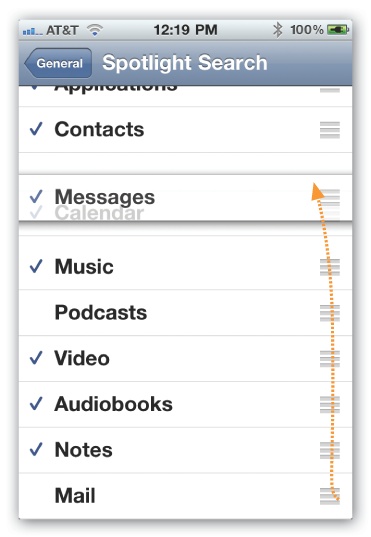
For example, the factory setting is for Contacts to appear first in the menu. But Contacts has its own search box, so it might make more sense to put Calendar or Applications at the top of the list so that it’s quicker to do a schedule check or fire up a certain app. You’ll have less scrolling to do once the results menu appears.