Chapter 6. OOP
Classes
Inheritance
Composition
Encapsulation
Polymorphism
Navigation Bar Revisited
What’s Next?
Object-oriented programming (OOP) is an approach to coding that uses classes to create individual objects and control how those objects interrelate. It’s sometimes described as a problem-solving technique—a programming style that addresses issues that procedural programming (which is also referred to as timeline programming in Flash Professional) can’t handle well. It’s a way of organizing your code into small, specific, easily digestible chunks to make project or application development more manageable. These objects are typically designed to be as self-contained as possible, but are also usually designed to play well with other objects.
Whether you know it or not, you’ve been flirting with object-oriented programming for some time now, You’ve been creating objects from classes, calling methods, getting and setting property values, and so on. Each time you create a movie clip with ActionScript, for example, you’re creating an object by instantiating the MovieClip class. But although you may be using objects fluently while coding in the timeline, this is only the tip of the OOP iceberg. To really embrace OOP, you need to write your own custom classes, guided by a few basic object-oriented principles that we’ll discuss in this chapter. For our discussions, we’ll further define OOP as using classes primarily, if not entirely, rather than simply using objects in procedural programming.
Choosing OOP as a programming methodology is a decision that is sometimes fairly obvious, such as when working with large projects or with a team of collaborating programmers. At other times, however, adopting OOP as a development strategy can be less obvious, and even debated. In still other cases, using OOP can be like driving a finishing nail with a sledgehammer—overkill that just doesn’t make sense for quick experiments or proofs of concept.
The goal of this chapter is to give you a high-level view of object-oriented principles, as well as supporting examples, to help prepare you to make these decisions on a project-by-project basis. Each subsequent chapter in this book will continue to introduce syntax in concise, timeline-based exercises, but also make increasing use of classes. Ultimately, we hope you will continue your learning using the book’s companion website, where a cumulative project will collect much of what you’ve created along the way into a “lab” of experiments. The larger project will be OOP-based, but also will contain exercises that you create throughout the book using procedural techniques, exposing you to both programming paradigms.
Knowing when to opt for an object-oriented model depends largely on understanding the benefits of OOP. Among the highlights we’ll cover in this chapter are:
Classes. Classes are collections of related functions and variables (called methods and properties, respectively, in class vernacular) gathered to facilitate one or more specific goals. They are the foundation of OOP, and we’ll look at a few ways to use them.
Inheritance. Inheritance is one of OOP’s greatest sources of power, especially in ActionScript 3, as it allows you to add functionality to an existing feature set without reinventing the wheel. This is known as extending an existing class to create a subclass, rather than originating a new class. Inheritance can save you time and labor, as well as improve project design.
Composition. Inheritance isn’t appropriate for every situation, and composition is often a useful alternative. Using composition, new classes are assembled using other classes, rather than inheriting from parent classes.
Encapsulation. It’s usually not a good idea to expose all aspects of a class to other classes or the surrounding application. Encapsulation isolates most elements of a class from the outside world, allowing only a select few elements, if any, to be seen by other classes.
Polymorphism. Polymorphism is a design practice that allows you to use objects of different types in a uniform manner. For example, it allows you to have methods that share the same name but that behave differently (if desired) when called. Considering a method responsible for motion, you can name it
move()everywhere instead ofdrive()for a car andfly()for a plane. This makes it easier to document, write, and even change your code.
It’s important to understand that OOP is not appropriate for everyone, and it is not even appropriate for every situation. OOP can dramatically improve the development cycle of large projects or projects to which more than one programmer can contribute. OOP can even be ideal for smaller projects that are particularly suited for object-based coding (such as some kinds of arcade games, as one example).
The common thread is that object-oriented programming benefits from economies of scale. The time, labor, and learning investments begin to pay off over time. Procedural programming is often more appropriate for small tasks and is sometimes less time-consuming for smaller-scale projects, resulting in code that is simpler to maintain.
You don’t need to learn OOP to use ActionScript 3.0. The benefits and buzz of object-oriented programming—particularly the continuing swell of interest in design patterns—sometimes lead to almost fetishistic adherence to their principles, without context and at the cost of practicality.
The key to adopting any programming paradigm is finding the right tool for the job. It’s certainly a good idea to learn OOP as soon as your schedule and skill set permits, simply because it gives you more options to choose from. Remember, however, that there is more than one way to skin an interface. Before embracing your next significant project, try to set aside some time for planning, information architecture, and programming design. You may find that your goals will be more easily achieved by adopting an object-oriented approach.
If your typical production schedule or project budget cannot allow the inevitable time and resource stumbles associated with attempting new challenges, try learning OOP through a series of fun experiments or artistic endeavors. You may find that the things you learn, the mistakes you make, and the epiphanies you experience will improve your next project.
Having said all that, we’ll hit the high points in this introduction to object-oriented programming. This chapter is meant to be a transition between prior and future chapters. As mentioned, we’ll continue to show simple procedural examples for syntax, but we’ll make more frequent use of OOP techniques—particularly in applied examples at the end of the chapters, and even more so in the supplemental source code and enhanced learning available on the companion website.
Classes
In Chapter 1, we discussed the three most common programming paradigms: sequential, procedural, and object-oriented. We described procedural programming as an improvement over sequential programming because, instead of being limited to a linear sequence of statements, you can group related tasks together into procedures (called functions, in ActionScript).
Classes offer a similar improvement over procedural programming, in that they collect related functions (methods), variables (properties), and other relevant items. They are the foundation of object-based programming, yet you have probably been working with them for some time. Even if you are new to programming, if you have followed this book through to this chapter, you already have some experience with classes but may not realize it. This is because most of what goes on behind the scenes in ActionScript is accomplished through the use of classes.
To start off with, Chapter 1 of this book gave you a quick peek at classes, and introduced the first use of the document class. We’ll look at that again in just a moment, as a quick review.
Beyond that, you learned how to use events (using several event classes, including Event, MouseEvent, and Timer in Chapter 3), how objects are displayed (using a large number of display classes, including TextField, MovieClip, DisplayObject, DisplayObjectContainer, and more in Chapter 4), and how to control navigation and timelines (including FrameLabel, among others in Chapter 5). Even in Chapter 2, when discussing basic language fundamentals, you were using classes when learning about data types.
If you’re suddenly concerned that you’ve missed a lot of material, don’t be. In part, that’s the point. All of these examples make use of classes. You just may not be aware of it because it’s happening behind the scenes.
Take a look at the movie clip, for example. Throughout the preceding chapters, you’ve worked fairly extensively with movie clips. You’ve set numerous properties (such as x, y, rotation, alpha, and more), called methods (play() and stop() among them), and handled events (like Event.ENTER_FRAME)—all while making use of the MovieClip class. You even learned how to create a movie clip dynamically by creating an instance of the class—a fundamental step in working with classes:
varmc:MovieClip=new MovieClip();
So, with all that experience, what’s the big deal about classes? A bit of a flippant thought, perhaps, but not entirely off the mark. The fact is, you can apply that history to learning OOP. You may not have a lot of experience writing classes, but you do have some experience using them. In fact, it isn’t until you begin working with custom classes that things begin to look new.
Custom Class Review
Start by revisiting the structure of the first custom class introduced in this book, all the way back in Chapter 1—a very basic use of Flash Professional’s document class. A document class is little more than a timeline replacement—allowing you to move timeline code into a class. But it eases you into OOP because it’s a simple way to start using classes. Moving from timeline to class not only points you in the direction of object-oriented programming, it makes your code easier to reuse, share, and archive.
If you need to, you can review Chapter 1 for more information about the document class, including how to create it and how to reference it in Flash Professional’s Properties panel. Here, however, we’d like to quickly review the formatting of the class, as you’ll use this format for many classes in the future. Consider the following class code:
1package{ 2 3import flash.display.MovieClip; 4 5public classMainextends MovieClip{ 6 7public functionMain() { 8trace("Flash"); 9 } 10 11 } 12 }
Line 1 and the balancing brace in line 12 surround the class in a package. Packages help organize your code and are the programming equivalent of your computer’s folders or directories. We’ll discuss this in a moment or two, but for now, think of a package as a wrapper for your class. While getting started, you don’t need to concern yourself with packages if you place all your classes in the same directory as your .fla file. The ActionScript compiler will automatically look for classes in this location.
Line 3 is an import statement. It doesn’t really import anything: it just tells the compiler where to find the classes needed by your code. The compiler can then use the class to validate your code and add the needed class to your SWF when it is compiled. This gives your class access to all the properties, methods, and events needed by your script.
Line 3 also demonstrates the use of a package. This document class requires the MovieClip class, which is found in the flash.display package. In other words, the MovieClip.as file is inside a “display” directory, which is inside a “flash” directory, which is in a classpath, or location of classes known to the compiler. Your ActionScript editor of choice, such as Flash Professional, already knows about a few such locations, and you’ll learn to create your own in the next section of this chapter.
None of the timeline examples in the previous chapters included import statements because the examples used only items found in flash packages. Importing classes from these packages is not required when writing Flash Professional timeline scripts, but you must import them in classes. As a rule of thumb, import all classes used when writing your own classes.
Note
Some ActionScript editors, such as Adobe’s Flash Builder, PowerFlasher’s FDT, and even Flash Professional as of version CS5, will automatically add class import statements as you edit your code.
Line 5 declares the class. The first thing you may notice about this is the word public beginning the declaration. This is called an access control modifier and determines how something can be accessed by code elsewhere in your project. Using public makes the class available to the rest of your project. Additional modifiers are covered in the Encapsulation section of this chapter.
The next thing you may notice is the phrase extends MovieClip following the name of the class, Main. This is called inheritance and means that the publicly accessible events, methods, and properties of the MovieClip class will also be available to (are inherited by) this class. This use of the MovieClip class requires the import in line 3. We’ll talk more about extending classes in the Inheritance section of this chapter.
Finally, lines 7 through 9 are the class constructor. This is a function that’s executed automatically when an instance of the class is created. Just as you can create instances of a library symbol in the Flash Professional timeline, you can create instances of a class. Although Flash Professional instantiates a class for you when you use a document class, you can also do this manually:
varmain:Main =newMain();
Note
We should reinforce from Chapter 1 that the name of an external class file must match the name of the class and constructor. In the class being discussed, the file must be called Main.as. It is common practice to start class names, and therefore their file and constructor names, with a capital letter.
Does this manual instantiation look familiar? It should. This is the same format used to instantiate the vast majority of classes in ActionScript 3.0, including the recently cited example of creating a movie clip. So, you already have some of the skills required for working with custom classes!
Classpaths
You have a few choices when deciding where to place your custom classes. The ActionScript compiler will automatically look for a class in the same directory as the file (FLA or other class) making use of the class. This is the easiest way to store classes because it’s easy to transport them with your project by just moving the parent directory.
However, you can also organize your classes into directories, grouping classes of similar functionality for easier management. This technique was detailed when using existing ActionScript classes, as in the cited movie clip example, but applies to custom classes as well. When using classes in a package, you must import them—including classes in the flash package.
It’s usually a good idea to import every class needed so you can see all dependencies of your class—other files your class relies on—at a glance. However, you can also import all classes in a package by using an asterisk (*) as a wildcard. This saves a little time and reduces the number of lines in your script so you can focus more on your code. (We’ll use this approach as a space-saving technique from time to time in this book.) It’s also no less efficient, because the compiler will include only classes required by your code, rather than the entire package, when compiling a SWF.
Here are examples of a full package and wildcard used with built-in ActionScript 3 classes, as well as a full package for a custom class:
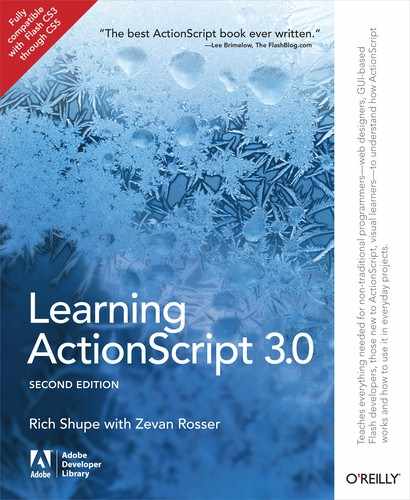
import flash.display.MovieClip;import flash.events.*;importcom.mycompany.effects.Water;
Naming the parent directory of a class library com stems from what is called reverse domain naming. It breaks your domain into folder names in reverse order, starting with your domain extension (.com, .org, .edu), then the next portion of your domain, and so on, until you want to stop. This is common but only a convention. It’s helpful to think of this when you work with other programmers, but you can organize your package folders any way you like and your code will still work.
Here is an example structure of the fictional Water class cited in the prior import statement. Note the path—up to, but not including, the class name—in the package declaration. Forgetting to include this will result in a compiler error telling you that the package declaration of the class does not reflect the location of the file.
packagecom.mycompany.effects {public classWater {public functionWater() { } } }
Finally, the ActionScript compiler needs to know where to start looking for these packages and classes. Because the compiler will automatically look in the same folder as the file using the class, you can put package directories (as well as individual classes) next to your FLA file. This is often called a local or relative classpath (local or relative to your FLA). For most situations, this is all you need to worry about. Figure 6-1 shows an example parent directory for a project that uses the aforementioned Water class.
However, this approach can be somewhat impractical if you intend to build a library of classes that you will reuse often. In this case, you can store frequently reused classes in a centralized location, and add that location to the list of classpaths your compiler will search.
You can add paths to folders, or SWCs if you have them (Flash Professional CS4 and later)—the latter being compressed collections of classes and assets that can be used for compilation but can’t be edited. You can also add paths of runtime shared libraries, which we’ll demonstrate in Chapter 10 when we discuss the Text Layout Framework, the new text options introduced in Flash Professional CS5.
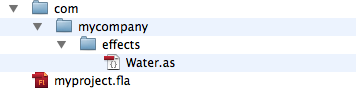
You can add your own classpath to Flash Professional either at the application or project level. To make a classpath available to all projects, you can go to Flash Professional’s Preferences (Macintosh: Flash✓Preferences; Windows: Edit✓Preferences), select ActionScript from the left menu, and click on the ActionScript 3.0 button at the bottom of the ActionScript preferences. Using the resulting dialog, seen in Figure 6-2, you can browse to the directory in which you will be maintaining your class libraries, and Flash will thereafter also search in that directory when importing your classes.
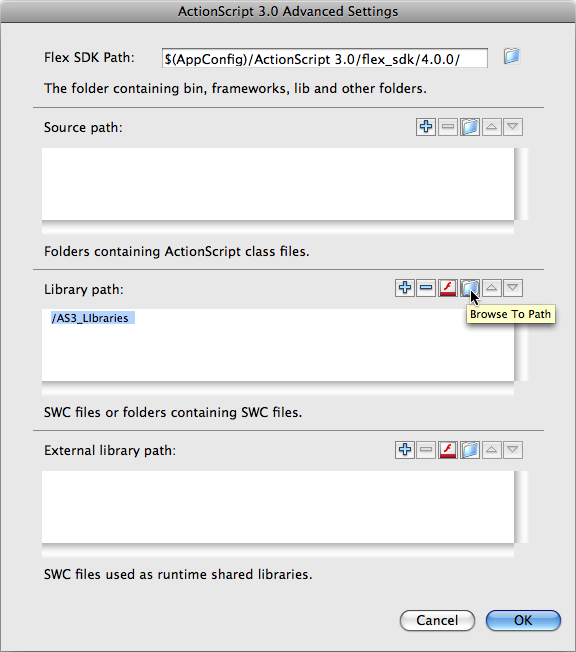
To add a file-specific classpath, the process is very similar and begins in the dialog, File✓Publish Settings✓ActionScript 3.0 Settings. (In Flash Professional CS5, the new menu item File✓ActionScript Settings accesses this dialog immediately.) As seen in Figure 6-3, choose the Source Path section of the dialog and again browse to the directory you want to add.
Note to Flash Professional CS5 users
Flash Professional CS5 now offers code completion and color syntax highlighting for custom classes as well as built-in ActionScript classes. It accomplishes this by parsing all known classpaths and building a cache of all classes in these paths. A side effect of this feature is that the process of building the cache can become overwhelmed if there are too many classes to analyze. Therefore, try not to collect every class you have into one giant folder. Move applicable classes in and out of your folder, or create classpaths for smaller folders on a project-by-project basis. See the companion website for more information about this issue.
Inheritance
Among the most easily explained concepts of an object-oriented programming model is inheritance. This means that you can create a new class, typically called a subclass, which can inherit attributes from the original class, also called the superclass. This is similar to the way you inherit characteristics from your parents. You share many things in common with a parent but also have several unique attributes. The same can be said of classes. Through inheritance, a class can acquire from its parent useful methods and properties, as well as add entirely new methods and properties.
The source files for this section are found in the inheritance_mc folder in the Chapter 6 archive—available from the Downloads page at the companion website, http://www.LearningActionScript3.com. Ultimately, you’ll test the FLA file, inheritance_mc_01.fla, but you’ll be working primarily with the Box.as and Square.as class files.
The following script creates a class called Box, found in the Box.as source file, that is a subclass of MovieClip. As a result, it has access to all the properties, methods, and events accessible in a movie clip, including the x property seen in line 22, and the graphics property used in lines 13 through 16 to draw a blue box. We’ll discuss drawing vectors with code in Chapter 8, but the script sets a 1-pixel black line style, sets a fill color stored in the color variable, draws a rectangle from x,y coordinate point (0, 0) to the coordinate point (100, 100), and ends the fill.
The color variable is declared in line 9. This is an example of a class property. As you can see, it uses the same syntax as the variables you create in the timeline, with one exception. Like timeline programming, it is defined within the scope of the script (inside the class just like inside a frame script), but outside all methods, so it can be available to the entire script scope (in this case, the entire class, similar to the entire frame script in the timeline). The declaration uses a var keyword and data type and is given a color value that produces a dark blue. The only exception is that here the public access modifier is added, which makes the variable available to code outside the class. We’ll continue our explanation after the code.
1package{ 2 3import flash.display.MovieClip; 4import flash.display.Graphics; 5import flash.events.Event; 6 7public classBoxextends MovieClip{ 8 9public varcolor:uint= 0x000099; 10 11public functionBox() { 12this.graphics.lineStyle(1, 0x000000); 13this.graphics.beginFill(color); 14this.graphics.drawRect(0, 0, 100, 100); 15this.graphics.endFill(); 16 17this.addEventListener(Event.ENTER_FRAME, onLoop, 18false, 0,true); 19 } 20 21public functiononLoop(evt:Event):void{ 22this.x+= 5; 23 } 24 25 } 26 }
The Box() method is a special kind of method called a constructor. In the class, it appears no differently than any other, but it’s unique because this code will automatically be executed the moment an instance of the class is created. A class instance is created using the new keyword or, in the case of a document class in Flash Professional, when a SWF is launched. In ActionScript 3.0, if a constructor is used, it must always be available to other parts of your program, so it must always use the public access control modifier.
In this class, the constructor draws a box at runtime and adds an event listener. The event listener created in lines 17 and 18 calls the onLoop() function on every enter frame event, which adds five pixels to the current horizontal location of the class.
But what does it draw the box into? This class extends MovieClip, so Box is, essentially, a movie clip. Box is still unique, because it has visual content and a new movie clip does not, but creating an instance of this class is just like creating an instance of MovieClip.
As discussed in the Classpaths section of this chapter, the ActionScript compiler must know where your class resides. The Box class does not include a path in its package declaration, so if you place this class into the same directory as your FLA, the compiler will find it. Therefore, all that is required to create an instance of this class in the timeline is using the new keyword. Finally, just like a movie clip, you must add the instance to the display list to see the box on the stage. The inheritance_mc_01.fla source file demonstrates this code, in the first keyframe:
varbox:Box=new Box();addChild(box);
With these two lines, an instance of the Box class will be created and added to the display list, and the drawn square will move across the stage at 5 pixels per enter frame event. Very much a benefit of OOP, this box is given autonomous behavior. With just the two preceding lines of code, the box can create its own appearance and control its own movement. This class can also easily be reused elsewhere with the same result.
Symbol Base Classes
We can take further advantage of inheriting from the MovieClip class by linking a class directly to a movie clip library symbol. You did this more than once in Chapter 4 when adding symbol instances to the display list. (See “Adding Symbol Instances to the Display List” in Chapter 4.) At that time, however, you had not written a class to link up with the symbol instance, so you let Flash create a placeholder class just for the purpose of supporting runtime creation.
Now, you can make use of this existing link by providing the symbol with a custom class to execute when instantiated. As described, creating an instance of the symbol either by manually dragging it to the stage, or using the new keyword, will execute the constructor in the linked class.
The following example is nearly identical to the previous class but excludes visual content, focusing only on motion. Similarly, in the inheritance_mc_02.fla source file, no timeline code is used to create the movie clip. This demonstrates the automatic link between a linkage class assigned in the symbol’s property dialog, and a custom class with the same name. Simply by adding an instance of the symbol to the stage, the class is applied. This code is in the Square.as class.
1package{ 2 3import flash.display.MovieClip; 4import flash.events.Event; 5 6public classSquareextends MovieClip{ 7 8public functionSquare() { 9this.addEventListener(Event.ENTER_FRAME, onLoop, 10false, 0,true); 11 } 12 13public functiononLoop(evt:Event):void{ 14 this.x+= 5; 15 } 16 17 } 18 }
Can You Figure Out Why?
As a fun break, and a bit of review, take a look at the inheritance_mc_03.fla source file. This file combines both the Square class, instantiated by virtue of the Square symbol placed on the stage, and the Box class, instantiated through its use as a document class. Each class moves itself 5 pixels to the right every enter frame. Why then does the square instance (red) move twice as fast as the box instance (blue)? Look for the answer to the left.
Note
ANSWER: In the file inheritance_mc_03.fla, why does the square instance (red) move twice as fast as the box instance (blue)? Because square is a child of box.
Remember that a document class is a timeline replacement. As such, the reference this in the Box document class refers to the entire timeline. Updating its x coordinate moves the timeline (document class) and all its children. Because square is placed manually, it is a child of the timeline so it moves accordingly. However, square also moves on its own, due to the Square class. So, for every enter frame event, the entire timeline (thus both movie clips) is moved 5 pixels and then square is updated 5 pixels again, effectively moving square 10 pixels every enter frame event.
For comparison, take a look at inheritance_mc_04.fla, in which Box is instantiated using the new keyword, rather than via the document class. In this example, both movie clips update themselves and the timeline is not affected. For further reference, you can also see the entire timeline move without any classes in play by looking at timeline_move.fla.
A More Traditional Look at Inheritance
Now that you have a basic idea of how a custom class inherits the attributes of a movie clip, let’s look at a more traditional example with a bit more substance. The files in this section are found in the inheritance folder of this chapter’s source. We’ll also build on this example throughout the remainder of the chapter, adding features as we go, to demonstrate the various tenets of object-oriented programming.
We described inheritance earlier by discussing how a child inherits from a parent. The same analogy can be made from other real-world scenarios. A Puppy class might inherit from a Dog class, a Ball class might inherit from a Toy class, and a Car class might inherit from a Vehicle class.
Consider a very simple execution of the vehicle metaphor. Whether a vehicle is a car or a truck—or even a plane or a boat, for that matter—it’s still a vehicle and shares much in common with other vehicles. It makes sense, then, to create a class that contains basic methods and properties that are common to all vehicles. For simplicity, think about fuel availability (the number of gallons of fuel the vehicle has in its tank) and fuel efficiency (gas mileage, in miles per gallon, for our purposes). Also, a calculation based on that information could result in miles traveled and the resulting reduction in the amount of fuel. Obviously not every vehicle uses gas (such as a glider or bicycle), but this limited scenario will suit our purposes.
Vehicle class
Here is a basic class you can use to represent a generic vehicle. We’ll call this class Vehicle, so the document name will be Vehicle.as, and the class will be saved in the same directory as your FLA. This class creates a vehicle and, when activated (by calling the go() method), increases the number of miles traveled and decreases the remaining gallons of gas after each enter frame event, tracing the result. It will show in the Output window how many miles the vehicle traveled, and how much fuel remains until it runs out of gas.
The class has four public properties, representing: gas mileage, available fuel, miles traveled, and a Boolean property called moving. The latter will enable functionality when true, and disable functionality when false. All the properties and methods in the class are public so other classes can see them. We’ll discuss that in further detail in a little while.
The constructor does only two things. It sets the properties for gas mileage and available fuel to the arguments passed in when the class was instantiated, and adds a listener to the vehicle that reacts to the enter frame event and calls the onLoop() method. Here’s what this portion of the class looks like:
Note
Note that default values have been added to the parameters in the Vehicle class constructor in line 13. If an instance of the class is created without passing in arguments, the default values will be used.
1package{ 2 3import flash.display.MovieClip; 4import flash.events.Event; 5 6public classVehicleextends MovieClip{ 7 8public vargasMileage:Number; 9public varfuelAvailable:Number; 10public varmilesTraveled:Number= 0; 11public varmoving:Boolean; 12 13public functionVehicle(mpg:Number=21, fuel:Number=18.5) { 14 gasMileage = mpg; 15 fuelAvailable = fuel; 16this.addEventListener(Event.ENTER_FRAME, 17 onLoop,false, 0,true); 18 }
Now let’s talk about the listener function in the next segment of the script. When the moving property is true, the onLoop() method first decrements the fuelAvailable property and increases the milesTraveled property by the value of the gasMileage property. So, if a vehicle claims a gas mileage rating of 21 miles per gallon, the car will travel 21 miles using 1 gallon of gas.
Next, the method checks to see if there’s less than one gallon of gas remaining. If so, the listener is removed. While the listener remains, the class will trace the vehicle object, miles it’s traveled, and remaining fuel to the output panel. In addition, the x coordinate of the class instance will be set to the current number of miles traveled, so any visual asset associated with this class will move. Because Vehicle inherits from MovieClip, the x property is accessible to Vehicle so it doesn’t have to be added anew. The effect is that a corresponding movie clip will move across the stage by pixels that correspond to miles driven.
Finally, the go() method, when called from outside the class, sets the moving Boolean property to true and allows the frame loop to work. This could be likened to starting the engine of the vehicle and driving. A more complex system might also provide a method for stopping the vehicle, as well as other features, but let’s keep this example simple.
1public functiononLoop(evt:Event):void{ 2if(moving) { 3 fuelAvailable--; 4 milesTraveled += gasMileage; 5if(fuelAvailable < 1) { 6this.removeEventListener(Event.ENTER_FRAME, 7 onLoop); 8 } 9trace(this, milesTraveled, fuelAvailable); 10this.x= milesTraveled; 11 } 12 } 13 14public functiongo():void{ 15 moving =true; 16 } 17 18 } 19 }
Simple example
To see this class in action, all you need to do is create an instance of the class, and call the go() method from that instance. If desired, you can also pass in a new value for gas mileage and available fuel. If there is a visual component to the instance (and we’ll see that soon), you would also add the instance to the display list. Here is an example of all three steps, including new values for the mpg and fuel parameters, as seen in the vehicle_only.fla source file. This is the last time in this chapter that we’ll use the timeline. For future examples, we’ll use a document class, moving all aspects of each example from the timeline to classes.
varvehicle:Vehicle =newVehicle(21, 18);addChild(vehicle); vehicle.go();
When testing this file, the resulting trace lists the Vehicle class instance, the accumulating miles traveled, and the decreasing fuel available. After several iterations (condensed with the ellipsis in the sample that follows), the trace stops and shows the final number of miles traveled and less than one gallon of gas remaining.
//output
[object Vehicle] 21 17
[object Vehicle] 42 16
[object Vehicle] 63 15
...
[object Vehicle] 336 2
[object Vehicle] 357 1
[object Vehicle] 378 0
That’s fine if every vehicle you ever create is exactly the same kind of vehicle. However, the principle of inheritance allows you to subclass this Vehicle class, inheriting the attributes of Vehicle, but customizing each subclass into a specific kind of vehicle, like car and truck, as in the following examples.
The following two classes, Car (Car.as) and Truck (Truck.as), both extend Vehicle, so they inherit the properties and methods of Vehicle. Because the properties are inherited, they’re not included in the subclasses. Although these classes extend Vehicle, you can add unique properties and methods to make each class further specialized. For simplicity, we’ll add a method to each class to control an accessory—a sunroof for the car and a tailgate for the truck.
Note
Although not used in these example classes, both Car and Truck can take advantage of MovieClip properties and methods by virtue of inheritance because Vehicle inherits from MovieClip and Car and Truck inherit from Vehicle. This is just like passing DNA on from grandfather to father to son. The inheritance chain is not limited to the immediacy of superclass and subclass.
Car class
1package{ 2 3public classCarextendsVehicle { 4 5public functionCar(mpg:Number, fuel:Number) { 6 gasMileage = mpg; 7 fuelAvailable = fuel; 8 } 9 10public functionopenSunroof():void{ 11trace(this,"opened sunroof"); 12 } 13 } 14 }
Truck class
1package{ 2 3public classTruckextendsVehicle { 4 5public functionTruck(mpg:Number, fuel:Number) { 6 gasMileage = mpg; 7 fuelAvailable = fuel; 8 } 9 10public functionlowerTailgate():void{ 11trace(this,"lowered tailgate"); 12 } 13 } 14 }
Note
As shorthand, neither the Car class nor the Truck class must import Vehicle because all three classes are in the same classpath. However, listing the import to show all dependencies at a glance won’t hurt.
Because of inheritance, the Vehicle class constructor is called implicitly when you create instances of the Car and Truck classes. This adds the enter frame listener so the cars and trucks can move, and then the Car and Truck class instances redefine the gasMileage and fuelAvailable public properties from the Vehicle class. It’s also possible to explicitly call the constructor, or other accessible method, of a superclass, which we’ll demonstrate when we discuss encapsulation.
Document class and revised FLA
Now we can revisit the FLA and, instead of instantiating the Vehicle class, we can create instances of the new Car and Truck subclasses. We can also create car and truck movie clips in the FLA’s library and associate those symbols with Car and Truck by adding their names as linkage classes in each symbol’s Library Properties dialog. The new symbols will add a visual element to the example because they will be updated by the classes automatically. Because the Vehicle class extends MovieClip, and the x coordinate of Vehicle is updated, any subclass of the Vehicle class will also update its x coordinate.
In this example, we’re going to move away from the timeline and use a document class instead. So start by creating a new ActionScript 3.0 file (ActionScript 3.0 Class file in the New Document window in Flash Professional CS5). We’ll discuss its contents in a moment, but first save the file as Main.as in the same directory as your FLA file, and reference this class, Main, as the FLA’s document class. If you’d rather use the source file provided to get you started, it’s called car_truck.fla.
Lines 1 through 7 create the package, import the necessary class dependencies and create this class. Remember a document class should extend MovieClip so they can behave as a timeline. Lines 9 and 10 create two properties, compact and pickup, and type them as Car and Truck, respectively.
Lines 14 and 20 create instances to these classes, passing in values for gas mileage and fuel available. Both compact and pickup are set to the same initial x value (lines 15 and 21), and pickup is given a different y value (line 22) so you can easily see both vehicles once they are added to the display list (lines 17 and 23).
The custom methods for both instances are called right away (lines 18 and 24), but the vehicles don’t move because the go() method calls are inside an event listener function (lines 38 through 41) waiting for you to click the stage. Setting up the event listeners in lines 26 through 36 is very important, and we’ll discuss this after the code and a description of this example’s output.
1package{ 2 3import flash.display.MovieClip;4import flash.events.Event;5import flash.events.MouseEvent;6 7public classMainextends MovieClip{ 8 9public varcompact:Car; 10public varpickup:Truck; 11 12public functionMain() { 13 14 compact =newCar(21, 18); 15 compact.x= 0; 16 compact.y= 20; 17addChild(compact); 18 compact.openSunroof(); 19 20 pickup =newTruck(16, 23); 21 pickup.x= 0; 22 pickup.y= 100; 23addChild(pickup); 24 pickup.lowerTailgate(); 25 26this.addEventListener(Event.ADDED_TO_STAGE,27 onAddedToStage, 28false, 0,true); 29 } 30 31public functiononAddedToStage(evt:Event):void{ 32this.removeEventListener(Event.ADDED_TO_STAGE,33 onAddedToStage) 34stage.addEventListener(MouseEvent.CLICK, onClick, 35false, 0,true); 36 } 37 38public functiononClick(evt:MouseEvent):void{ 39 compact.go(); 40 pickup.go(); 41 } 42 } 43 }
The first thing to appear in the Output panel when testing your FLA is the initial trace caused by the custom method calls:
[object Car] opened sunroof
[object Truck] lowered tailgate
When the stage is clicked, the go() methods start the car and truck moving, and traces like the one seen in the vehicle-only example will now compare the miles traveled by the car and truck instances. Which will travel the farthest on a tank of gas? The car gets better gas mileage, but has a smaller gas tank. Try it and see!
Accessing the Stage in a Class
In the document class from the preceding section, you may have noticed that we didn’t just add the mouse click event listener to the stage inside the class constructor. This is because the stage usually doesn’t yet exist in a constructor and this technique will typically result in an error.
When referencing a display object outside this class, such as the stage or root, the document class is a special exception to this rule. Because the document class is a timeline replacement, it automatically becomes a part of the display list. If the very same class is not used as a document class, however, this exception will not apply. Therefore, when referencing a display object outside this class, it’s important to set up your listeners as we are about to describe to make your classes more flexible.
In the display list (the new display architecture of ActionScript 3.0 discussed in Chapter 4), the stage is the senior-most item, and you must access it through a display object. We discussed this in the Chapter 4 sidebar, Display Objects and References to Stage and Root, but this is particularly important when writing classes. Remembering that you must access the stage through a display object, knowing when the class is instantiated, and when the stage is referenced in a class, play a big part in the success of your script.
Recall how to instantiate a display object class: you first use the new keyword and then add the instance to the display list. The prior example of creating a Vehicle instance is repeated here for reference:
varvehicle:Vehicle =newVehicle(21, 18);addChild(vehicle);
Earlier we told you that the class constructor executes immediately upon instantiation. In other words, it executes before adding the instance to the display list. As you may have read in the Display Objects and References to Stage and Root sidebar, this means that you can’t access the stage in the constructor.
So, when we need to access a display object like the stage, we must add an event listener to the constructor that listens for the ADDED_TO_STAGE event. This listener will be executed when the class instance is added to the display list, with the stage as its senior-most object. At that point, the class instance is a part of the display list and access to the stage or root is possible.
Composition
Although inheritance is a common practice in object-oriented programming, it’s not the only way to build OOP projects. Composition is more appropriate in some cases. Composition says that an object is composed of other objects, rather than descending from other objects. The best way to decide when to use inheritance or composition is to follow the “is a/has a” rule.
Consider how to add tires to the car example. You might be able to use inheritance (“is a”), but composition (“has a”) is likely better. A car “is a” vehicle, meaning inheritance will work well, but tires don’t fit the “is a” vehicle, or car, or truck model. However, a car (or truck) “has a” set of tires, making this model suited to composition. In a real-world scenario, this might be particularly useful in an expanded version of our vehicle metaphor. For example, land vehicles typically have tires, but water vehicles usually don’t.
Composition makes it easier to switch out items that compose a class. If a car is extended from a vehicle, you can’t change that any more than you can change your parents. However, if a car is composed of things, you can easily remove one object and substitute another. Now let’s use composition to put tires onto our car and truck.
Continuing our work on our vehicle example, this time using the files in the composition folder of the source archive, let’s set up the process by adding a tires property to the Car and Truck classes, as seen in line 5 of the following code excerpts. This will hold an instance of the Tires class we’ll create, and is typed accordingly. Next, we’ll create an instance of the new Tires class. The new class will be able to equip vehicles with different kinds of tires so we’ll pass in a different tire type for car and truck, as seen in line 10 of both excerpts that follow. The class will also trace the kind of tire used, by querying a public property called type, shown in line 11 of both excerpts.
Car class
3public classCarextendsVehicle { 4 5public vartires:Tires; 6 7public functionCar(mpg:Number, fuel:Number) { 8 gasMileage = mpg; 9 fuelAvailable = fuel; 10 tires =newTires("highperformance"); 11trace(this,"has", tires.type,"tires"); 12 }
Truck class
3public classTruckextendsVehicle { 4 5public vartires:Tires; 6 7public functionTruck(mpg:Number, fuel:Number) { 8 gasMileage = mpg; 9 fuelAvailable = fuel; 10 tires =newTires("snow"); 11trace(this,"has", tires.type,"tires"); 12 }
New Tires class
This basic Tires class simulates functionality by putting the type of tire requested into a property. In a real-world situation, the new class might affect the performance of a car or truck object. For example, using snow tires might reduce fuel efficiency, and upgrading to high-performance radials might improve mileage. In our simplified example, the Car and Truck classes will just trace the value of this property.
1package{ 2 3public classTires { 4 5public vartype:String; 6 7public functionTires(tire:String) { 8//simulated functionality change based on tire type9switch(tire) { 10case"snow": 11 type ="storm-ready snow"; 12break; 13case"highperformance": 14 type ="high-performance radial"; 15break; 16default: 17 type ="economical bias-ply"; 18break; 19 } 20 } 21 } 22 }
As you try out the amended classes, the most important thing to understand is that inheritance is not used to introduce the Tires class. Instead, the car and truck are composed of objects. In this simplified case, only the tires were added, but a complete car (for example) would consist of seats, windows, and so on, all composed rather than inherited from Car or Vehicle. Again, this satisfies the “is a/has a” rule, which should be your guide when deciding whether inheritance or composition is optimal.
Document class
No change is required to the document class, but testing the car_truck.fla file again will show a new element to the trace output. In addition to the use of the accessories (sunroof and tailgate) and the resulting miles traveled until fuel is depleted, the tires used will also be traced, as shown:
[object Car] has high-performance radial tires
[object Car] opened sunroof
[object Truck] has storm-ready snow tires
[object Truck] lowered tailgate
[object Car] 21 17
[object Truck] 16 22
[object Car] 42 16
[object Truck] 32 21
...
Encapsulation
In the preceding examples, all class properties and methods were public. This is convenient in that it allows code outside the classes to see properties and methods inside classes. However, this is also risky because other elements of the application can change property values or execute methods—intentionally or even accidentally—when not desired.
The way to avoid this possible problem is through encapsulation. Put simply, encapsulation is the practice of hiding class properties and methods from other areas of your project while still allowing you to manipulate them in a controlled fashion.
There are a handful of built-in namespaces in ActionScript 3.0. They are also called access control modifiers because they control how outside objects access properties and methods. Although we’ll focus primarily on private and public modifiers in this book, Table 6-1 describes some of the other access control modifiers available.
Note
There is another access control modifier, called static, which is a bit different. The static modifier indicates that a property or method is accessed from a class reference, but not an instance of the class. For example, random() is a static method of the Math class. You call this method not from a class instance, but from a reference to the class directly. Compare this syntax of an instance method, like play() from the MovieClip class, and a static method, like random() from the Math class.
varmc:MovieClip=new MovieClip(); mc.play();trace(Math.random());
In the first case, the method is called from mc, the class instance. By contrast no instance is created before invoking the random() method. Instance methods and properties are not aware of static methods or properties, and vice versa.
A loosely related analogy might help describe the ideas behind encapsulation. If you include your email address in the text of an HTML page, spam bots will likely harvest it and flood you with unwanted solicitations. However, if you keep your email entirely private, potential contacts won’t be able to reach you. One solution to this problem is to use a contact form that connects to a server that, in turn, sends information to your email address. This allows you to keep your email address private, but provide some sort of public access. This control is the basis of encapsulation.
Getters and setters
How, then, can you provide public access to private information? This is accomplished with a special group of methods called getters and setters. These public methods are used to retrieve from, or reassign values to, private properties. In their simplest use, getters and setters can provide a friendly or consistent public name for a possibly more obscurely named property. For example, a property named “registeredUserEmail” could be referenced outside the class as “email.”
Beyond that use case, getters and setters can also add functionality. A simple example includes wanting to allow a programmer to get, but not set, the value of a property. Or, you might want to convert a property value behind the scenes when requested or supplied, without requiring a custom method or two to do so. For instance, a currency value might be stored as a number but, when retrieved with a getter, might be formatted as a string with a leading currency symbol (such as a dollar sign, $), commas, and a decimal point. Neither example is possible when just exposing a property as public.
Note
A property that a programmer can get, but not set, is called a read-only property.
Getters and setters are also special because they behave like properties as far as the rest of your application is concerned. This simplifies what is typically called an application programming interface (API)—all the public properties and methods of your class (and, by extension, all the classes that make up your application) that a programmer can access.
Let’s revisit our email address discussion to show how this works. The first step in changing from using a public property to using getters and setters is to change the property from public to private. This requires only changing the access modifier, but a common naming convention advocates preceding private properties with underscores. This is a personal choice, and some favor it because you can see at a glance if access to the property is limited to the class. We’ll follow this convention in this book. This first snippet shows both changes:
private var_registeredUserEmail:String="[email protected]";
Next, to provide access to the property, a getter/setter pair is added to the end of the class. Let’s discuss the content of the functions first. The public getter will return the value of the private property, and the public setter will assign a new value, sent in as an argument, to the private property:
public function getemail():String{return_registeredUserEmail; }public function setemail(newEmail:String):void{ _registeredUserEmail = newEmail; }
Note, however, that both methods are named “email.” This would ordinarily cause a conflict error because all methods within the same scope must have unique names. However, this is part of how getters and setters work. The matching method names are preceded by identifiers get and set, and both methods work together to appear as a single property in the code that is referencing the class. That is, instead of having to remember and document two functions, perhaps called getUserEmail() and setUserEmail(), all you need is one property: email. Getting and setting are both shown in the following snippet (assuming an example class instance called user):
user.email = "[email protected]";
trace(user.email);
As you can see, property syntax, rather than method syntax, is used. Which version of the method in the class is called is determined by usage. In the first line, a value is being assigned to the property, so the class knows to call the setter. In the second line, no value is assigned, so the class calls the getter, and the property value is retrieved. Now that you have a brief background on implementation, let’s put that information to use in our ongoing vehicle example.
Note
The use of getters and setters, versus using public properties, is often debated. You may find it interesting to search online resources for discussions about this concept, and the companion website may have additional information about this and related topics in the future.
Vehicle class
Let’s move to the encapsulation folder of this chapter’s source archive. The first thing we’ll do to adapt our existing code is make the properties in lines 8 through 11 and the method defined in line 20 in the Vehicle class private. All constructors in ActionScript 3.0 must be public, and the go() method should remain public so it can easily be executed from other areas of your project.
1package{ 2 3import flash.display.MovieClip; 4import flash.events.Event; 5 6public classVehicleextends MovieClip{ 7 8privatevar_gasMileage:Number; 9privatevar_fuelAvailable:Number; 10privatevar_milesTraveled:Number= 0; 11privatevar_moving:Boolean; 12 13public functionVehicle(mpg:Number=21, fuel:Number=18.5) { 14 _gasMileage = mpg; 15 _fuelAvailable = fuel; 16this.addEventListener(Event.ENTER_FRAME, onLoop, 17false, 0,true); 18 } 19 20private functiononLoop(evt:Event):void{ 21if(_moving) { 22 _fuelAvailable--; 23 _milesTraveled += _gasMileage; 24if(_fuelAvailable < 1) { 25this.removeEventListener(Event.ENTER_FRAME, 26 onLoop); 27 } 28trace(this, _milesTraveled, _fuelAvailable); 29this.x= _milesTraveled; 30 } 31 } 32 33public functiongo():void{ 34 _moving =true; 35 }
Now that the properties are private, getters and setters must be added to access them. Lines 37 through 55 add a getter and setter pair for each of the private properties in the class.
36//new getters and setters37publicfunction getgasMileage():Number{ 38return_gasMileage; 39 } 40 41public functionsetgasMileage(mpg:Number):void{ 42 _gasMileage = mpg; 43 } 44 45public functiongetfuelAvailable():Number{ 46return_fuelAvailable; 47 } 48 49public functionsetfuelAvailable(fuel:Number):void{ 50 _fuelAvailable = fuel; 51 } 52 53public functiongetmilesTraveled():Number{ 54return_milesTraveled; 55 } 56 } 57 }
Getters and setters are used to update properties, but subclasses can also update properties of a superclass directly. Remember that when Car and Truck instances were created, the constructor of these subclasses updated the gasMileage and fuelAvailable properties of Vehicle class. If those properties are no longer public, this isn’t possible using the same techniques.
A subclass uses the super() method to call the corresponding method in its superclass. For example, placing super() in a subclass constructor will call the constructor in the superclass. You can even pass arguments into the superclass method, if the superclass constructor normally accepts the same arguments. We will modify the Car and Truck classes to use this technique.
When building instances of these classes, you can pass arguments in to create custom miles per gallon and available fuel values for each car or truck. Because the classes inherit properties from Vehicle, these properties are not recreated. However, now that we’re exploring encapsulation, and the properties are private, a direct assignment is not possible. Instead, you can use the syntax super() to pass the incoming values on to Vehicle where the properties are assigned. The object super refers to the superclass, and the super() statement explicitly calls the constructor of the superclass. Line 8 in both of the following excerpts uses this technique.
Note
Another way to access properties from a superclass, without making them public, is to use the protected access control modifier. For more information, see the companion website.
Also note that, just like in the Vehicle class, we’ve changed the property from public to private (line 5 in both Car and Truck classes), and added an underscore to the start of the property name (line 5, and again when used in lines 9 and 10, of both classes).
Car class
3public classCarextendsVehicle { 4 5private var_tires:Tires; 6 7public functionCar(mpg:Number, fuel:Number) { 8super(mpg, fuel); 9 _tires =newTires("highperformance"); 10trace(this,"has", _tires.type,"tires"); 11 }
Truck class
3public classTruckextendsVehicle { 4 5private var_tires:Tires; 6 7public functionTruck(mpg:Number, fuel:Number) { 8super(mpg, fuel); 9 _tires =newTires("snow"); 10trace(this,"has", _tires.type,"tires"); s11 }
Tires class
The Tires class (Tires.as) is adjusted in much the same way the Vehicle class was altered, shown in the bold lines that follow. First, the lone property becomes private, and its uses are updated to add the underscore reserved for private properties. Next, a getter and setter pair is added to make the property accessible outside the class.
1package{ 2 3public classTires { 4 5private var_type:String; 6 7public functionTires(tire:String) { 8//simulated functionality change based on tire type9switch(tire) { 10case"snow": 11 _type ="storm-ready snow"; 12break; 13case"highperformance": 14 _type ="high-performance radial"; 15break; 16default: 17 _type ="economical bias-ply"; 18 } 19 } 20 21public function gettype():String{ 22return_type; 23 } 24 25public functionsettype(tire:String):void{ 26 _type = tire; 27 } 28 } 29 }
Document class
The only changes required to the document class to complete our encapsulation example are to make the properties and methods private, and add an underscore to the property names. Only the class and constructor remain public. Note these changes in bold:
7public class Main extends MovieClip {8 9public var_compact:Car; 10public var_pickup:Truck; 11 12public function Main() {13 14 _compact =newCar(21, 18); 15 _compact.x= 0; 16_compact.y= 20;17addChild(_compact); 18 _compact.openSunroof(); 19 20 _pickup =newTruck(16, 23); 21_pickup.x = 0;22_pickup.y = 100;23addChild(_pickup);24 _pickup.lowerTailgate(); 25 26this.addEventListener(Event.ADDED_TO_STAGE,27onAddedToStage,28false, 0,true);29}
The property names also appear in the onClick() method.
30private functiononClick(evt:MouseEvent):void { 31 _compact.go(); 32_pickup.go();33 } 34
Polymorphism
The last important concept of object-oriented programming that we want to discuss is polymorphism. Although we’ll expand the explanation as this section evolves, you can start by thinking of polymorphism as a design practice that allows you to use objects of different types in a uniform manner. For example, for our vehicle exercise, you might create classes for land-, water-, and air-based vehicles and write code to move each type of vehicle. In this scenario, it’s better to use one method name for moving all of these vehicle types (such as “move”), instead of separate method names (like “drive,” “pilot,” and “fly,” for moving a car, boat, and plane, respectively). Doing so makes your code more flexible, more reusable, and easier to read and document.
In ActionScript 3.0, polymorphism is commonly used with inheritance and/or interfaces. We’ll work with interfaces in a moment but, for now, think of them as rulebooks for classes. An interface is nothing more than a list of public methods that must be present in any class that conforms to the interface. For example, you might continue to develop our vehicle exercise and eventually end up with vehicles that contain public methods that activate (start up), go, stop, and deactivate (shut down) your vehicles. You can create an interface that includes these method names and requires classes to adhere to that interface. This makes certain all of those classes can be controlled consistently.
An interface doesn’t restrict your class to those methods, either. Classes can have their own public methods that are not in the interface, without consequence. As long as the interface methods are present, everyone will be happy. We’ll discuss the further role that interfaces play in polymorphism a little bit later. For now, let’s extend what you already know and show how to use polymorphism with inheritance.
Polymorphism and inheritance
Employing polymorphism with inheritance allows you to design subclasses that can use the same method names as their superclasses, but without creating a conflict. For example, a superclass can have a public method called “turn,” which multiple subclasses use. One subclass, however, might also have a public method called “turn,” that is either entirely different or enhanced. Ordinarily, the fact that a subclass inherits public methods from a superclass means that the subclass would effectively have two methods called “turn” and a conflict would exist.
However, polymorphism allows the subclass method to replace or augment the superclass method of the same name by overriding it. Overriding a method tells the compiler that the new version of the method (in the subclass) takes precedence over the previous version of the method (in the superclass).
Note
Only public and protected methods can be seen by ActionScript 3.0 subclasses, so they are the only kinds of methods that can be overridden.
To demonstrate this process, let’s begin by adding two methods to our Vehicle class. If you want to look at the source files, they are in the polymorphism folder of the chapter archive. The new methods can be seen in lines 33 through 39 in the following excerpt, and are named useAccessory() and changeGear(). Both of the new methods are available to the Car and Truck subclasses through inheritance and notice that the functionality of the useAccessory() method is to turn on a vehicle’s lights.
Vehicle class
20private functiononLoop(evt:Event):void{ 21if(_moving) { 22 _fuelAvailable--; 23 _milesTraveled += _gasMileage; 24if(_fuelAvailable < 1) { 25this.removeEventListener(Event.ENTER_FRAME, 26 onLoop,false, 0,true); 27 } 28trace(this, _milesTraveled, _fuelAvailable); 29this.x= _milesTraveled; 30 } 31 } 32 33public functionchangeGear():void{ 34trace(this,"changed gear"); 35 } 36 37public functionuseAccessory():void{ 38trace(this,"vehicle lights turned on"); 39 }
Next let’s see how to override the useAccessory() method in the Car and Truck classes so we can customize its functionality without having to change our API.
Car class
A public method also named useAccessory() is added to the Car class, seen in lines 17 through 19 of the following excerpt. Remember that this would ordinarily conflict with the method of the same name in the Vehicle superclass, because of inheritance. As discussed previously, we avoid this by preceding the method declaration, including its access control modifier, with the override keyword.
The functionality of the method is the same in both classes: to use an accessory. So the useAccessory() method in the Car class can call its existing openSunroof() method.
13public functionopenSunroof():void{ 14trace(this,"opened sunroof"); 15 } 16 17override public functionuseAccessory():void{ 18 openSunroof(); 19 }
The beauty of this arrangement is that you’ve created an API that employs the flexible “use accessory” idea to . . . er . . . use accessories. Hereafter, you can write instancename.useAccessory() and be free to change your Car class without having to change the rest of your application. For example, you might have many method calls using the syntax useAccessory() that all open car sunroofs. If you later decide to change the accessory to something else, you would need to edit only the Car class, not the many existing method calls, to update your application.
Truck class
Now we’ll do the same thing with the Truck class, but with a twist. In some cases when overriding, you may not want to entirely replace the original behavior that exists in the superclass. When needed, you can execute the custom code in the subclass method and call the same method in the superclass. To do this, add an instruction in the subclass method to explicitly call the original superclass method, as seen in line 18 of the Truck class. In this case, you can’t simply use the super() statement the way you did earlier, because that only works in the constructor. Within a method, you must reference the superclass using the super object, and follow it with the superclass method you want to call. The edit is in bold.
13public functionlowerTailgate():void{ 14trace(this,"lowered tailgate"); 15 } 16 17override public functionuseAccessory():void{ 18super.useAccessory(); 19 lowerTailgate(); 20 }
Tires class and Document class
No change to the Tires class is required, but we’ll make two changes to the document class Main to show the outcome of your efforts. First, in both Car and Truck instances (compact and pickup), we’ll call the other method we added, changeGear() (lines 18 and 25). This will show that the outcome of a public method called from either car or truck will be the same if polymorphism is not in play.
Next, we’ll follow the example discussed and change our code from calling openSunroof() and lowerTailgate(), for compact and pickup respectively, to both instances calling useAccessory() (lines 19 and 26). This will make our code a bit more flexible, as we can later change the accessories in one or both classes and not have to change our FLA to benefit from the adjustment.
12public functionMain() { 13 14 compact =newCar(21, 18); 15 compact.x= 20; 16 compact.y= 20; 17addChild(compact); 18 compact.changeGear(); 19 compact.useAccessory(); 20 21 pickup =newTruck(16, 23); 22 pickup.x= 20; 23 pickup.y= 100; 24addChild(pickup); 25 pickup.changeGear(); 26 pickup.useAccessory(); 27 28this.addEventListener(Event.ADDED_TO_STAGE, 29 onAddedToStage, 30false, 0,true); 31 }
An abbreviated output follows. As you can see, the car class traced its tires, the compact instance changed gear, and then used its accessory. This opened the sunroof, but nothing more because the Car class override replaced the functionality of the Vehicle useAccessory() method, which turned on the vehicle’s lights. The pickup behaved similarly, but in addition to lowering its tailgate, also turned on its lights. This is because the Truck class also called the useAccessory() method in the superclass, rather than just overriding it.
[object Car] has high-performance radial tires
[object Car] changed gear
[object Car] opened sunroof
[object Truck] has storm-ready snow tires
[object Truck] changed gear
[object Truck] lowered tailgate
[object Truck] turned on lights
[object Car] 21 17
[object Truck] 16 22
[object Car] 42 16
[object Truck] 32 21
...
Polymorphism and interfaces
Earlier, we said there’s another way to use polymorphism that doesn’t focus on inheritance. Because it’s not based on method overriding between subclass and superclass, it’s applicable to more situations. The general idea is the same, in that your coding is simplified by using the same method names across different object types. However, it’s even more useful in that it adds additional flexibility by not requiring that you type your object to a specific class.
To help explain this, let’s sideline a bit to revisit two important ActionScript 3.0 topics: compile-time error checking and the display list. The benefit of using data typing with your objects is that the ActionScript compiler will warn you if you do something that’s incompatible with your stated data type. By design, the simplest case means that you can only work with one data type. (A look at Chapter 2 will reinforce this idea if you need a quick review.)
However, there are times when you may want things to be a bit more flexible. For example, you may want to put either a MovieClip or Sprite into a variable. If you type the variable as MovieClip, only a movie clip will be accepted. To get around this, you can type a variable as the base class DisplayObject, from which both MovieClip and Sprite descend (see Chapter 4 for more information), and the compiler won’t object.
The downside to this is that it can be a bit too generic. If, for example, you used a movie clip method on an object that the compiler only understood as a DisplayObject, an error would occur:
varthing:DisplayObject=new MovieClip(); thing.play();
Why? Because, although play() is a legal movie clip method, the compiler doesn’t understand that thing is actually a movie clip. It might be a sprite (and that flexibility is the very reason we’re discussing this), and a sprite doesn’t have a timeline.
This can be addressed by casting (also discussed in Chapter 4), but that kind of defeats the purpose of what we’re doing. Instead, what if you could specify a data type that was flexible enough to work with different kinds of objects, but also knew which methods those objects supported? That’s where interfaces come in.
As we explained earlier, an interface is simply a list of public methods that must be present in a class. The following is an example of an interface that might be used with classes for devices that play music (like a radio or CD player). All of the code for this discussion can be found in the polymorphism_interface source code directory. The interface is called IAudible and is found in the IAudible.as source file. It’s a very common practice to start the name of all interfaces with a capital I, to differentiate them from classes.
1package{ 2 3public interfaceIAudible { 4 5functionturnOn():void; 6functionplaySelection(preset:int):void; 7functionturnOff():void; 8 9 } 10 }
As you can see, not even the content of a method is included. Only the name, parameters and data types, and return data type (which are collectively called the method’s signature) are included. Also, any import statements needed to support included data types are required. (In this case, the compiler automatically understands the int data type. However, if a data type represents a class, such as MovieClip or Event, that class must be imported.)
Once you’ve created an interface, you can require a class to adhere to it by implementing it using the implements keyword in the interface declaration, as shown in line 3 of the following simple Radio class (Radio.as):
1package{ 2 3public classRadioimplementsIAudible { 4 5public functionRadio() { 6trace("radio added"); 7 } 8 9public functionturnOn():void{ 10trace("radio on"); 11 } 12 13public functionplaySelection(preset:int):void{ 14trace("radio selection: channel", preset); 15 } 16 17public functionturnOff():void{ 18trace("radio off"); 19 } 20 } 21 }
All this class does is trace appropriate diagnostic statements, identifying itself as “radio” each time. It complies with the interface because every method required is present. Here is a CDPlayer class (CDPlayer.as) that also implements, and complies with, the same interface. The purpose of the class is similar, but it identifies itself as “cd player” in each trace to demonstrate unique functionality.
1package{ 2 3public classCDPlayerimplementsIAudible { 4 5public functionCDPlayer() { 6trace("cd player added"); 7 } 8 9public functionturnOn():void{ 10trace("cd player on"); 11 } 12 13public functionplaySelection(preset:int):void{ 14trace("cd player selection: track", preset); 15 } 16 17public functionturnOff():void{ 18trace("cd player off"); 19 } 20 21public functioneject():void{ 22trace("cd player eject"); 23 } 24 25 } 26 }
Although the Radio and CDPlayer classes do different things (demonstrated simply by the unique traces), the method names required by the interface are present in both classes. This means that you can write a full application using a radio, later swap out the radio with a CD player, but not have to change any of your basic method calls—a key benefit of polymorphism. The CDPlayer class also demonstrates that additional methods, not referenced by an interface, can appear in classes—as shown by the eject() method in lines 21 through 23. An interface is only designed to enforce a contract with a class, making sure the required methods are present. It doesn’t restrict the functionality of a class.
Simple example
All that remains is putting this into practice. The following basic implementation is found in the sound_system.fla source file. The key step in using interfaces in this context is typing to the interface. If you type to Radio, you can’t switch to CDPlayer later. However, if you type to IAudible, the compiler will nod approvingly at both Radio and CDPlayer. Also, because the interface rigidly enforces that all public methods are present, you don’t run into situations where the compiler is unsure if a method is legal. This is polymorphism at its best. The following script starts with a radio and then switches to a CD player, using methods in both cases without error.
varsoundSystem:IAudible =newRadio(); soundSystem.turnOn(); soundSystem =newCDPlayer(); soundSystem.turnOn(); soundSystem.playSelection(1);
Adding a sound system to your vehicles through composition
Now let’s practice what you’ve learned by composing the sound system example into the ongoing vehicle exercise. This will review encapsulation, composition, and polymorphism.
First, add another private property to the Vehicle class to hold the sound system, just like we did when we composed Tires into the exercise. It’s typed to the interface to allow a vehicle to have any sound system that implements IAudible. The property can be seen in line 12 of the following excerpt from the Vehicle.as source file:
8private var_gasMileage:Number; 9private var_fuelAvailable:Number; 10private var_milesTraveled:Number= 0; 11private var_moving:Boolean; 12private var_soundSystem:IAudible;
Next, provide public access to this property by adding a getter and setter, again typed to the IAudible interface. The following excerpt, still in the Vehicle.as source file, shows this addition in lines 64 through 70:
60public function getmilesTraveled():Number{ 61return_milesTraveled; 62 } 63 64public function getsoundSystem():IAudible { 65return_soundSystem; 66 } 67 68public function setsoundSystem(device:IAudible):void{ 69 _soundSystem = device; 70 }
The last class changes involve adding an instance of CDPlayer in the Car class, and a Radio instance in the Truck class—just as we did when adding Tires in the composition example. This excerpt from the Car class (Car.as) shows the change at the end of the constructor:
7public functionCar(mpg:Number, fuel:Number) { 8super(mpg, fuel); 9 _tires =newTires("highperformance"); 10trace(this,"has", _tires.type,"tires"); 11 soundSystem =newCDPlayer(); 12 }
This excerpt from the Truck class (Truck.as) also adds the sound system at the end of the constructor. The edits in both classes appear in bold at line 11:
7public functionTruck(mpg:Number, fuel:Number) { 8super(mpg, fuel); 9 _tires =newTires("snow"); 10trace(this,"has", _tires.type,"tires"); 11 soundSystem =newRadio(); 12 }
Finally, the document class is modified to use the sound system in both the Car instance (compact) and Truck instance (pickup) when you click the stage. Shown in bold in the Main.as excerpt below, lines 42 through 44 access the CD player and radio through the soundSystem property. This triggers the getter method in the respective classes and returns the car’s CD player and the truck’s radio.
39public functiononClick(evt:MouseEvent):void{ 40 compact.go(); 41 pickup.go(); 42 compact.soundSystem.turnOn(); 43 compact.soundSystem.playSelection(2); 44 pickup.soundSystem.turnOn(); 45 }
The trace immediately reflects the fact that the car has a CD player and the truck has a radio. Once you click the stage (shown by the gap in the output that follows), the sound systems are used and the vehicles drive off into the sunset.
[object Car] has high-performance radial tires
cd player added
[object Car] changed gear
[object Car] opened sunroof
[object Truck] has storm-ready snow tires
radio added
[object Truck] changed gear
[object Truck] lowered tailgate
[object Truck] turned on lights
cd player on
cd player selection: track 2
radio on
[object Car] 21 17
[object Truck] 16 22
...
Note
Push Yourself: A great way to make sure you understand packages is to reorganize the source files in the polymorphism_inheritance exercise by putting the sound system files in their own package. Pick a package name such as app.las3.soundsystem, or try your own reverse domain path. Don’t forget to revise the package declaration line in each affected class, and add import statements to the other classes referencing your sound systems. An example of this kind of organization can be found in the polymorphism _packages directory.
Navigation Bar Revisited
Chapter 5 concluded with the start of a simple navigation bar created using procedural programming techniques. We’ll now step through a new exercise to demonstrate one way to approach the same task using OOP. This exercise combines the use of standalone classes with classes that are linked to movie clips in the main Flash file, LAS3Lab.fla—found in the nav_bar folder of the chapter source archive.
This exercise is also the start of the navigation system for the cumulative book/companion website collective project. In this chapter, we’ll use a basic array to create five main buttons. Later, in Chapter 14, we’ll add submenus to this system and load all the content dynamically through the use of XML.
The files and directories you create here will continue to be used and enhanced throughout the remainder of this book, so establishing a logical directory structure now will be very helpful. The FLA and document class should reside in the top level of a new directory. Adjacent to the FLA, you’ll eventually create two directories for classes. In later versions of the exercise, you’ll create a com folder for general packages that you may use in multiple projects. At this point, you’re ready to create an app folder for classes specific to this project that you are less likely to reuse. As always, adopting naming conventions and organization recommendations are personal choices that you can adapt when your comfort increases.
The FLA requires two symbols in the library (included in the source):
- MenuButtonMain
In our example, this is a movie clip that looks like a tab. (Its name was influenced by the fact that submenus will be introduced to this example, later in the book.) The symbol’s linkage class is called
MenuButtonMain, too. However, we’ll be using a custom class this time, rather than just relying on the automatic internal class created by Flash Professional for the sole purpose of birthing the object with ActionScript. Therefore, the fully qualified path name, which includes not only the class name but also its package, is used as the symbol’s linkage class:com.learningactionscript3.gui.MenuButtonMain.- HLineThick
This is simply a thick line, approximately 8 pixels tall and the width of your file. This serves as the horizontal plane on which the main menu buttons reside to form the navigation bar. Unlike the button symbol, there’s no external class for this line, as it has no functionality. Still, we’ll give it a linkage class that includes a package location anyway:
com.learningactionscript3.gui.HLineThick. The result will be the same as using a class name without package information; Flash Professional will still create a placeholder class in the SWF. However, the nice thing about preplanning this way is that if you ever want to add functionality to this asset, you can create a class in this location and perhaps avoid additional edits to the FLA.
Document class
The entry point to this project is the document class, LAS3Main.as, which follows. Lines 3 and 4 import the MovieClip class and custom NavigationBar class, which you’ll create in a moment. Line 6 declares the class and extends MovieClip. Lines 8 through 14 contain the class constructor.
This navigation bar can feature a variable number of buttons, determined by the contents of an array seen in lines 9 and 10. Lines 11 and 12 creates an instance of the NavigationBar class and passes in the array of labels for the new buttons. Finally, line 13 adds the navigation bar to the display list.
1package{ 2 3import flash.display.MovieClip; 4importcom.learningactionscript3.gui.NavigationBar; 5 6public classLAS3Mainextends MovieClip{ 7 8public functionLAS3Main() { 9varmenuData:Array= ["one","two","three", 10"four","five"]; 11varnavBar:NavigationBar = 12newNavigationBar(menuData); 13addChild(navBar); 14 } 15 } 16 }
NavigationBar
Next we need to create the NavigationBar class (NavigationBar.as), which will be the home for our buttons. Here we’ll focus on the times that are appreciably different in purpose from the prior class, or are otherwise noteworthy. Line 1, for example is the package declaration discussed several times previously in the book, but is worthy of mention because it reflects the location of the class—in the gui directory, within the com directory, found in the same folder as the FLA. Lines 9 through 12 contain the class constructor, populate the properties with the incoming argument data, and call the build() method:
1packagecom.learningactionscript3.gui { 2 3import flash.display.MovieClip; 4 5public classNavigationBarextends MovieClip{ 6 7private var_navData:Array; 8 9public functionNavigationBar(navData:Array) { 10 _navData = navData; 11 build(); 12 }
In the next code segment, the build() method uses a for loop to add each button to the navigation bar. The loop first creates an instance of the MenuButtonMain class, passing the name of the button as a string for the button’s label. This string comes from the button array passed into the constructor from the document class, and can be seen in line 9 of the prior class. Next, the button is positioned horizontally by starting with a 20-pixel offset, and then multiplying the width of the button plus a 2-pixel space for each button. That is, the first button starts at 20 pixels because i begins as 0 and no further offset is added. The second button starts at 20 and then 1 * (button width + 2) is added, and so on. A fixed y location is also used, and each button is added to the display list.
Finally, the aforementioned horizontal bar from the FLA library is added to the bottom of the menu buttons (lines 22 through 25). Two things are important here. First, the line is typed as MovieClip to give you a bit more flexibility. We haven’t yet created a dedicated class for this object, and it’s a movie clip in the FLA. Second, as a display object, this line movie clip can be a target of mouse events. Because it has no active role in the navigation bar, we disable it from interacting with the mouse by setting its mouseEnabled property to false.
13private functionbuild():void{ 14for(vari:uint; i < _navData.length; i++) { 15varmenuBtn:MenuButtonMain = 16newMenuButtonMain(_navData[i]); 17 menuBtn.x= 20 + i * (menuBtn.width+ 2); 18 menuBtn.y= 75; 19addChild(menuBtn); 20 } 21 22varhline:MovieClip=newHLineThick(); 23 hline.y= 100; 24 hline.mouseEnabled=false; 25addChild(hline); 26 } 27 } 28 }
MenuButtonMain
Finally, we present the MenuButtonMain class, which creates the button for each menu added to the navigation bar. In addition to the previously explained package declaration and imports, this class also uses two text classes originally discussed in Chapter 4—the display list class TextField and the text automatic sizing and alignment class, TextFieldAutoSize. The text field goes into a private property called _btnLabel, and the remainder of the functionality will be explained after the code.
1packagecom.learningactionscript3.gui { 2 3import flash.display.MovieClip; 4import flash.events.MouseEvent; 5import flash.text.TextField; 6import flash.text.TextFieldAutoSize; 7 8public classMenuButtonMainextends MovieClip{ 9 10private var_btnLabel:TextField; 11 12public functionMenuButtonMain(labl:String) { 13 _btnLabel =new TextField(); 14 _btnLabel.autoSize=TextFieldAutoSize.CENTER; 15 _btnLabel.textColor= 0xFFFFFF; 16 _btnLabel.text= labl; 17 _btnLabel.mouseEnabled=false; 18addChild(_btnLabel); 19 20buttonMode=true; 21useHandCursor=true; 22addEventListener(MouseEvent.CLICK, onClick, 23false, 0,true); 24 } 25 26private functiononClick(evt:MouseEvent):void{ 27trace(_btnLabel.text); 28 } 29 } 30 }
Lines 13 through 18 apply to the text label inside the button. When a button is created, a string that will serve as the button text is passed into the labl parameter (custom-named to differentiate it from an ActionScript property called label). Line 13 creates a new text field and line 14 sizes the field to the minimum dimensions required to display the text—reducing the field at left, right, and bottom, effectively centering the text. Line 15 colors all text in the field white, and line 16 places the string from labl into the field.
Line 17 is particularly important in this example. The default mouse behavior for a dynamic text field is to display a standard I-beam text cursor and allow a varying degree of text editing (depending on properties we’ll discuss in Chapter 10). As such, a text field used inside a button will follow this behavior and intercept mouse events, preventing the button from behaving properly. Line 17 disables mouse interaction with the text field, so it won’t interfere, and so the mouse will display a pointer cursor when interacting with the button. Line 18 adds the field to the button.
Lines 20 through 23 apply to the button itself. Although a movie clip will react to mouse events, it will not exhibit the mouse cursor feedback associated with a button. For example, it won’t switch from a pointer to a finger. Line 20 tells the movie clip to behave like a button, and line 21 enables the button mouse cursor. Lines 22 and 23 assigns a mouse click listener to the button.
Note
Practice Your Skills: Now would be a great time to practice what you’ve learned in the previous chapter. Try to replace the trace() statement in this example with a navigation instruction that would control a movie clip timeline. An example of this change is included in the source files in the movie_clip_navigation directory.
For simplicity, this exercise merely traces the text of each button clicked to the Output panel. Later in the book, we’ll show you how to format text and load external assets using the next generation of this navigation bar. Figure 6-4 shows the final navigation bar.

What’s Next?
Although we’ve really just scratched the OOPy surface, this chapter presented some key concepts of object-oriented programming. As the chapter unfolded, and each section extended the vehicle/car/truck example, you addressed inheritance, added composition, improved data security with encapsulation, and simplified your method vocabulary with polymorphism. From a tutorial standpoint, the final set of files demonstrated basic best practices in these areas.
You also learned how to create a system that uses document classes as well as standalone classes that require instantiation. Finally, you learned how to link a class to a movie clip to give a symbol instance its own behavior.
In the next chapter, we’ll look at animating with ActionScript. You’ll learn:
Movement using the x- and y-coordinate system, velocity, and acceleration
Light geometry and trigonometry, including circular movement, angle and distance calculation, and more
Simplified physics, including gravity, friction, and springs
ActionScript alternatives to timeline tweens, including easing
Particle systems that put several of these principles into action while generating endless individual particles