
14 Basic Techniques
Mysterious Al. In 1949, photographer Gjon Mili visited Pablo Picasso in France. Together they hit upon the idea of painting with light, which is simply sketching out a picture in the air using a flashlight in total darkness. Here artist Mysterious Al demonstrates the same technique at the Shunt Lounge and Theatre Company, London, England. Handheld 580EX II zoomed to 105mm fired at 1/32 manual power at the end of the drawing. EOS 5D Mark II, 25 sec at f/4, ISO 400, 29mm.
All the tech talk of the previous two chapters is really in the service of one thing: taking great photographs. Photos are nothing more than recorded patterns of light. The trick has always been to combine light and shadow in a way that’s evocative, informative, moving, or simply interesting.
Flash photography is about taking control of shadows and light. Ambient or available light photography takes advantage of existing light conditions; but with flash, you have to make deliberate and very conscious decisions about what sort of photograph you want.
There are arguably four fundamental aspects of light that matter to a photographer: direction, intensity, quality, and color. The tools and technologies described so far are tools for guiding photons to do your bidding in those four basic ways. This is obviously a vast topic, and one that can fill many books, so the discussions of technique here really just serve as an introduction to the basics of lighting with flash.
14.1Direction
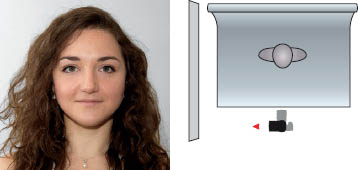
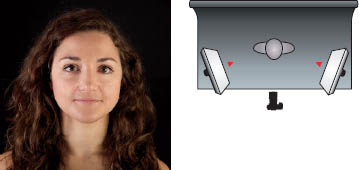
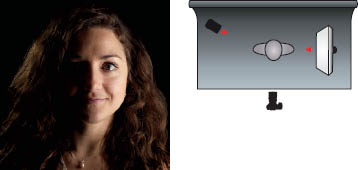
The first basic property of light is direction, or simply where the light comes from. In everyday life, we’re used to light from overhead sources—the sun or a ceiling fixture. We may want to simulate that effect in a photograph. Or we may want to avoid it altogether and go for something quite different. Take the sequence of photos on the next page.
This is a series of photographs of a model lit by a single studio flash unit. The distance between the light and the model never varied. The brightness remained the same. The only difference was the physical position of the light source, yet the mood changes completely from picture to picture.
The full-on frontal lighting shows the model’s face well but has a very flat effect. The backlight results in a silhouette, emphasizing the form but losing the model’s face. Side lighting brings a sense of dimensionality and drama at the cost of hard shadows. Top-down and bottom-up lighting tend to look exaggerated and unrealistic. Each direction brings a certain look to the fore, and whether that’s good or bad depends on your goals and priorities. ![]() 14.1 and 14.2
14.1 and 14.2

14.1

14.2
14.1.1Short and broad lighting
Two common approaches to lighting a person’s face, when the person isn’t directly facing the camera, are to position the main light source, the “key” light, on the subject’s side that is facing the camera, or to position it on the side away from the camera.

14.3

14.4

14.5

14.6
Short or narrow lighting refers to a key light positioned to illuminate the side of the face turned away from the camera. This tends to emphasize the shape of the face and is very common in studio portraiture. ![]() 14.3 and 14.4
14.3 and 14.4
Broad lighting refers to a key light illuminating the side of the face that faces or is closest to the camera. This can tend to make faces look wider and broader, so it is more often used for people with narrower faces. ![]() 14.5 and 14.6
14.5 and 14.6
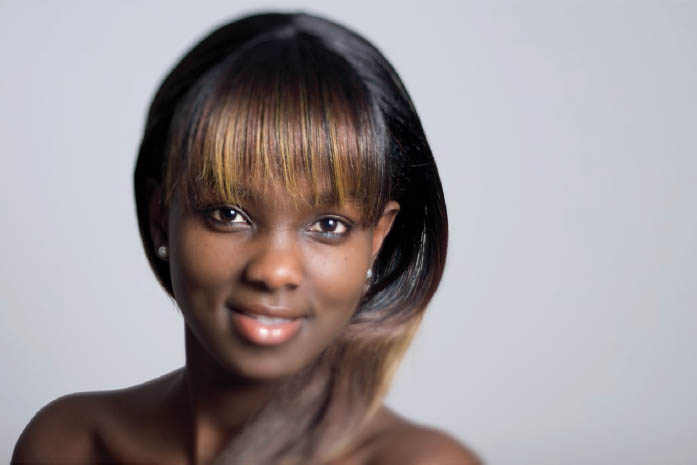
14.1.2Multiple light sources
Multiple light sources can of course be combined from various angles to produce specific effects. This actor’s headshot, for example, uses two light sources and one reflector. The key light is positioned slightly above camera left. A reflector is positioned below his face to “fill” in shadows. A small unit is positioned behind him to outline his hair and shoulders, in order to separate them from the black background. ![]() 14.7 and 14.8
14.7 and 14.8

14.7

14.8

14.9
Incidentally, this “rim” light has one side effect in this shot: tiny white dots that will need to be painted out in an editing program. These white dots are not, Internet rumor notwithstanding, spiritual orb entities, but simply specks of dust lit by the flash. They’re most apparent in backlit situations with dark backgrounds, or when using built-in flash at night in dusty or rainy conditions. ![]() 14.9
14.9
14.2Intensity
Intensity is the brightness of the light. Most cameras are designed to meter everything to a mid-toned grey, but of course that isn’t always going to be what you want. Exposure is as much an artistic decision as it is a technical one. Is the goal to create a bright, cheerful mood? A dark, somber one?
Two particularly pronounced examples of light intensity are high-key and low-key lighting.
14.2.1High key
High key refers to lighting that’s bright and even, with a light or white background. It’s used a good deal in advertising to convey feelings of youth, friendliness, happiness, and so on. Medical and health advertising often uses high key to indicate healthiness and cleanliness. ![]() 14.10 and 14.11
14.10 and 14.11

14.10

14.11 EOS 5D Mark II, 1/100 sec at f/6, ISO 100, 110 mm. The lighting arrangement for this shot is also seen in section 13.4.
14.2.2Low key
Low key lighting, on the other hand, is darker and moodier. It’s not simply a photo with the brightness turned down. Instead, it’s a photo that emphasizes shadows and the shapes cast by them. Light is often used to paint the edges of things rather than fill them in. Film noir detective movies from the 1940s are renowned for their mastery of low-key lighting. ![]() 14.12 and 14.13
14.12 and 14.13

14.12 EOS 5D Mark II, 1/100 sec at f/2.8, ISO 100, Hartblei 80 mm Super-Rotator tilt/shift lens, 8° tilt. Speedlite 430EX with 1/2 CTO, camera left behind model. Speedlite 580EX with 1/2 CTO and Honl grid, camera right.

14.13
14.3Quality
Quality of light doesn’t refer to how fancy or expensive your gear is, but basically to the hardness or softness of the light. Consider these photos of a naturally occurring pyrite cube formation from Navajun, Spain. ![]() 14.14 and 14.15
14.14 and 14.15

14.14

14.15
The image on the left is lit by a flash unit located on the other side of the room. The light source is quite small relative to the subject, so it yields very sharp-edged, high-contrast shadows. Hard lighting is light in which the beam is tight and fairly parallel, with minimal spreading as it moves farther from the source.
The image on the right is lit by the same flash unit, but now the light is positioned close to the cubes, and behind a sheet of ordinary paper. The result is a larger area of light relative to the subject, so the shadows are much more softly defined. Soft light spreads out widely and bounces off everything.
Another classic example of quality of light is the sun. Although the sun is incredibly big, it’s also incredibly far away. As a result, it doesn’t fill a very big area of the sky when seen from our planet. On a bright cloudless day, particularly at high altitudes, the sun is almost a point light source, emitting directional light and casting very sharp-edged, high-contrast shadows. But on an overcast day, the entire sky becomes a giant softbox. Light is almost shadowless, since it’s striking everything from multiple directions at once.
Take the two photos on the next page. The latest space probe photos of one of Saturn’s moons? No, just the end of an ordinary chicken egg. ![]() 14.16
14.16
The left-hand shot was taken using a bright studio flash unit reflecting off a white ceiling. The entire ceiling thus became a reflective surface, resulting in soft lighting.
However, the right-hand shot was taken with a small Speedlite flash unit, zoomed out to 105 mm and positioned camera left. The result is a hard and intense light, sometimes called a “raking” light, which brings up the interesting texture on the egg’s surface. Photographers of ancient manuscripts and archeological artifacts often use raking light to reveal otherwise unnoticed surface detail.

14.16
Hardness or softness of light significantly affects all types of photography. It’s particularly an issue for portraiture. Hard light emphasizes slight facial blemishes, and is one reason why snapshots taken in restaurants and pubs aren’t desirable for user profiles on social networking sites.
14.3.1Achieving soft light
Portable camera flash units are essentially designed to work like spotlights and have small light-emitting areas—about one-third the size of a playing card. This is partly for portability reasons, and partly because flash units are designed to achieve the maximum distance range possible by concentrating their light output with a reflector and lens. Any softening of the light necessarily involves a reduction in efficiency and range.
There are two basic ways to soften light: reflect it off a large surface, or diffuse it through a large surface. Either way some light will be lost, but the tradeoff comes in light quality.
When using a battery flash unit, bouncing light off large white surfaces such as white walls or ceilings is one way to use the first technique. Remember that colored surfaces will add a color cast to the light—something to be aware of when bouncing light in interior spaces. A blood-red wall will reflect red light onto the subject, which may or may not be the desired effect.
Many of the large flash diffusers described in section 12.5 employ the second technique, increasing the size of the light-producing area. Studio softboxes and shoot-through umbrellas also use this method. They must be positioned close to the subject to provide truly soft light, however. A large softbox positioned a long way from the subject will provide light that’s as hard as a smaller light source close at hand.
Of course, having said all that, hard flash lighting isn’t some pernicious evil forever to be eschewed. It’s just good to start with the benefits of soft light, then move into mastering hard light later, as discussed in the next section. ![]() 14.17
14.17

14.17 This photo was lit by a medium-sized softbox with an Elinchrom monolight camera right. A reflector under the model’s chin filled in the shadow.
14.4Color
Contemporary photography is usually about color, black and white having lamentably fallen into the niche fields of art and education in the 1980s. As discussed in the section on color temperature (section 7.18), there are many complex subtleties about white light and the way it’s perceived by the human brain.
Flash units are designed to produce a fairly neutral white light similar in color to daylight. Portable units like Canon Speedlites typically have a color temperature of around 5500K. Studio lights sometimes have slightly bluer light, up to 6000K or so. Regardless, the light is quite blue compared to ordinary tungsten lights and LED bulbs that are designed to simulate tungsten.
Accordingly, it’s important to keep light source differences in mind when shooting. The preview screen on digital cameras, while not a perfect rendition of the finished results, can be a useful tool for checking how the camera sees the scene compared to the way the eye sees it. This is particularly important for long shutter times. ![]() 14.19 and 14.20
14.19 and 14.20

14.18 CTO (orange) filters are needed to get the blue-white light of a flash unit to match the warm light from the practical on-set tungsten and candle lighting.
14.19 Cooler color balance.

14.20 The same photo with a warmer color balance. Which shot is better is a matter of opinion. The blurring effect was created by a Hartblei manual focus tilt-shift lens set to maximum tilt (8°).
14.5Basic Speedlite portrait photography
This sequence of photographs shows different approaches to lighting a person using a single flash unit.

14.21 This photo was taken using an EOS 50D’s built-in flash, which resulted in harsh, unflattering light and a sharp-edged flash shadow.

14.22 The next step was to add a shoemount flash unit. Here a 580EX II was used on the same 50D. It isn’t vastly better.

14.23 Next, the flash unit was angled upwards to bounce light off the ceiling. The room had eight-foot ceilings painted white. Accordingly, enough light bounced around the room to fill in the shadowed areas.
14.5.1Bounce flash
Direct flash—a flash unit pointing straight ahead—is an efficient means of illumination, but it is rarely flattering. The light is harsh because it originates from a very small area relative to the subject. Fortunately, most Speedlites have the ability to tilt and swivel the flash head independently of the flash body. This can send light bouncing off walls, ceilings, reflectors, bystanders, etc. Bouncing light in this way means that the light reaching the subject originates from a larger area than the flash head and is therefore softer. ![]() 14.24
14.24

14.24 Bounce flash off the ceiling can produce a soft and consistent look, which is often a good thing. Here the flatness of bounced light is used to emphasize the drabness of the hotel room.
Bounce flash can soften light nicely but has disadvantages. For one, it obviously isn’t possible to bounce flash outdoors without a reflector or something that can serve as one, so the technique is most immediately useful in interior spaces. Some interiors, in fact, aren’t much good either if they have really dark surfaces or high ceilings. Another drawback is that colored surfaces (such as painted ceilings or walls) can end up tinting the light from the flash, resulting in unwanted color shifts.
Relying purely on ceiling bounce flash can result in unattractive shadows appearing under the eyes and nose, sometimes referred to as “raccoon shadows.” The traditional approach to filling in these shadows has been to elastic-band an index card around the back of vertically pointing flash heads in order to bounce a bit of light forward. Some Speedlites, in fact, have built-in, pull-out catchlight cards.
Finally, bouncing the light reduces the amount of light hitting the subject, and this easily costs about half the range. For this reason, it’s sometimes necessary to use a higher ISO setting or a larger lens aperture with bounce flash. Remember that increasing the shutter speed won’t help at all, since flash durations are too brief to be affected by shutter time.
14.6Building a studio portrait
Bounce flash with a single flash unit is a useful technique for quick photos on the go, but it doesn’t yield much control over lighting a scene. The traditional studio portrait, in contrast, has long been a structured, multiple-light affair. Here is one approach to building a studio portrait using only Canon Speedlites.
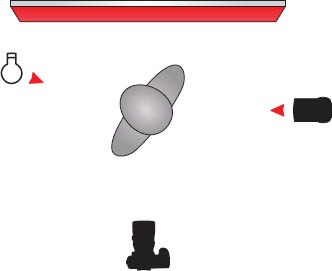
14.6.1External flash off-camera with shoot-through umbrella diffuser

14.25

14.26
The flash unit is moved off-camera onto a light stand. It’s a 580EX II assigned to group A, and it’s fired using wireless E-TTL by an ST-E2 transmitter located on the camera. The flash unit is set to fire into a shoot-through umbrella to camera right, at about a 30° position. This is the dominant light for the photo, known as the “key” light.
14.6.2Two off-camera flash units with shoot-through umbrellas

14.27

14.28 Now the model is lit by a pair of shoot-through umbrellas, one located on either side of the camera. One has a 580EX II assigned to group A; the other has a 580EX assigned to group B. Both are still controlled by an ST-E2. The second light fills in the shadows so that they aren’t too dark, and therefore is known as the fill light.
14.6.3Two off-camera flash units with shoot-through umbrellas, one background light

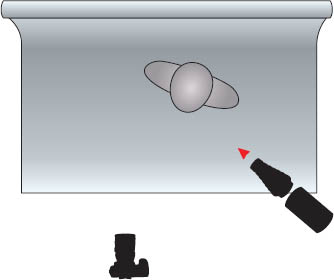
14.29

14.30 Same as above, but a third Speedlite is added immediately behind the model, illuminating the backdrop. This helps add contrast between the subject and the background, providing a little dimensionality. Since the ST-E2 can’t control group C, this flash unit has its output set manually. Additionally, it has a blue filter, but no diffuser or umbrella.
14.6.4Two off-camera flash units with shoot-through umbrellas, one background light, one hair light

14.31

14.32 Finally, a fourth Speedlite is added to skim the model’s hair. This is a 430EX II, also set manually and zoomed out to 105 mm.
14.7Experimenting with light
The traditional approach to taking a photo uses three-point or four-point lighting, as demonstrated in the previous section. While it yields perfectly nice results, ready for the corporate bio or the school yearbook, it’s fair to say that the portraits in figures 14.33 and 14.35 won’t win any prizes for original lighting. Sometimes simpler can be more interesting. ![]() 14.33 and 14.35
14.33 and 14.35
The two portraits here were taken consecutively, with lights positioned in identical locations. The first image has a large softbox camera left, a light with a small diffuser camera right, and a self-illuminating Lastolite backdrop. The second image is identical, only the backdrop and camera right lamps are switched off. Just one softbox, with a little spill onto the white backdrop, turning it gray. Yet this style of lighting, known as split lighting, is perhaps more flattering to the subject and is certainly more dramatic.

14.33

14.34

14.35

14.36
There’s also a lot that can be done by combining staging with lighting. The remaining photos in this section were designed to show interesting flash- illuminated shots but without any complicated equipment requirements.
The next shot was quite simple to set up. In fact, it was a quick photo taken during preparations for a fashion event. The model had just been bodypainted (her “corset” is in fact entirely painted on) and she was getting ready to leave.
The key light is a Speedlite 580EX zoomed out to 105 mm, with no modifiers, positioned on a portable lightstand, camera right. It was triggered manually at quarter power using a generic radio remote. A tungsten bulb positioned camera left provides a small amount of subtle fill, mainly on her left hand and shoulder. That’s it: the Speedlite lit the model’s back and the red-paneled wall, resulting in a shadowed silhouette of her face.
14.37

14.38
The next shot is slightly more complex, and was constructed intentionally to convey a bit of narrative. The idea was to suggest a hoodlum being interrogated by a fellow gangster to the right. But hidden in the shadows stands the real power figure. No props were used other than the chair, which gives the sense of a bleak empty warehouse.

14.39

14.40
The photo was shot using wireless E-TTL controlling three Speedlite flash units. A 580EX was used on-camera as the controller but did not contribute light to the scene. A 580EX II was positioned camera right on top of a six-foot light stand with its flash head set to 105 mm. This created a spotlight effect shining downward over our hapless hoodlum. This flash was positioned to spill slightly to the right-hand gangster. A 430EX, also set to 105 mm zoom, was positioned camera left in front of a cardboard grid to create patterns, like a crude windowblind effect, on the wall. This provided enough back illumination to shadow our Mr. Big.

14.41

14.42
The next shot was designed to give a sense of theatricality, as though our elaborately costumed figure is reaching in vain for a spotlight on a distant stage. The backdrop was plain black paper so as not to distract from the foreground interest.
Compositionally it deliberately mixes hard light with soft light. A large softbox with studio flash was positioned camera right, providing soft key lighting for the portrait and illuminating the complex costume. To camera left, however, I positioned a studio flash unit with a simple “spill kill” reflector and no light modifiers for a deliberately hard form of lighting. This light illuminates our subject’s hand and sleeve, with some spill on his face. However, his lower front is in shadow.


14.43
The above shot combines Speedlite and studio flash, and was shot on location inside an old freight elevator. The portrait employs foreground fill from an on-camera Speedlite 580EX firing manually. It was dialed down low to prevent the model from looking too flat. A large Bowens studio unit (with a simple spill kill reflector but no modifier) was positioned behind the model and the gate, aligned to provide some direct light into the lens to create a visually interesting glare, and was triggered optically by the onboard flash. A haze machine was used to lower the contrast, diffuse the backlighting, and reduce some of the details in the somewhat uninteresting elevator.


14.44
The layering effect of smoke is a useful and affordable tool. For this example, I wanted rays of light to appear behind the model in the photo above. The technique was actually pretty low-tech. I took a roll of black backdrop paper and cut a handful of small holes in it. I then placed a high-powered studio flash, gelled red, behind the paper, and positioned a low-cost party smoke machine between the model and the backdrop. A little experimenting with the alignment of the flash unit yielded interesting directional rays. The model was lit with a beauty dish, which was equipped with a grid to prevent spill onto the backdrop. The final element was a 35mm photographic slide depicting a stylized pair of wings. I used a Light Blaster (see 12.9) behind the model to project the slide onto the smoke itself. Obviously this shot could easily have been done with an image editing program, but the whole point was to do it in-camera. ![]() 14.44
14.44

14.45 This photo, for example, was taken with a single flash unit to camera right. The Elinchrom Style 600 had a snoot installed (section 13.4.8), which projects a circle of light, almost like a spotlight.
This last photo was an obvious homage to the low-key look of 1940s film noir movies. The model playing my hardboiled reporter is holding a Speed Graphic press camera with Graflex flash, and wearing a suitable fedora. He’s lit by a single Elinchrom Style 600 studio flash unit, which is positioned to rake light obliquely from the right. The flash unit has a snoot (section 13.4.8), which restricts the light output, projecting a loose circle. Sort of a spotlight on a budget. The result is a bold and dramatic photo, with sharp shadows casting strong graphic forms.
The key to effective lighting is always to experiment with different lighting positions and types. The next section has some other starting points for more creative exploration.

Direct camera-mounted flash. Horrible. Don’t do this to your friends!
On-camera flash, ceiling bounce

The on-camera flash is pointed toward the ceiling, which reflects the light off a large area, but tends to result in shadows under the eyes. The flash unit’s pull out card yields a bit of a catchlight in the eyes.
On-camera flash, wall bounce
The on-camera flash is rotated to point at the left-hand wall. This can produce soft lighting with some shadows on the right, depending on the size of the room.
Rembrandt lighting with umbrella

A shoot-through umbrella is camera-right at about 45 degrees and slightly above the face. This yields soft lighting, with some nice sculpting of the shadows and the signature light triangle on the cheek. Umbrellas bounce light everywhere, filling shadows.
Rembrandt lighting with gridded softbox

Same as left, but a medium sized softbox is used. A fabric grid reduces off-axis spill, resulting in less light bouncing around the room. This is why this shot has more shadow on the unlit side of the face.
Loop lighting

Similar to the Rembrandt, but the softbox is slightly closer to the camera. This reduces the amount of shadowing on the far side of the face. The shadow between nose and chin isn’t linked, so there’s no cheek triangle. Instead, a curved C-shaped loop of shadow is visible under the lower-left edge of the nose.
Butterfly lighting
(diffused beauty dish)

A metal beauty dish was placed directly above the camera, in line with the axis of the lens, though a softbox or umbrella could have been used instead. This creates the characteristic butterfly shaped shadow under the nose. A white fabric sock was put on the dish for soft diffused light.
Butterfly lighting
(beauty dish with grid)

The diffusing sock was removed, and a fine metal grid was added to the beauty dish in its place, reducing the amount of general spill and concentrating the light. The white backdrop is grey in shadow around the periphery, and shadows appear on the edge of the face.
Clamshell lighting
(diffused beauty dish with reflector)

An overhead beauty dish is used as at far left. However, a light or reflector is also placed directly beneath it, shining upward. A large curved Eyelighter was used in this case. Normally light from below produces a somewhat ghoulish look but, combined with the light from above, the clamshell method produces a bright and cheerful look that’s popular with beauty advertising. The lower reflector fills in under-eye shadows.
Two medium-sized soft boxes were used, one to either side. Each had the same light output. The result is soft and even, almost shadowless, lighting. The lack of sculpting makes the shot a bit dull.
Split lighting

A softbox is positioned 90 degrees to camera right. This divides the face into two halves – shadows and light. A bit too dramatic for most applications. The backdrop is actually white paper, but far enough away from the subject that it’s poorly lit and records as gray.
Split lighting with hair light
Same setup as above, but a black backdrop throws the entire photo into tenebrous shadow. A flash is positioned camera left over the shoulder, to illuminate the edge of the hair so it doesn’t vanish entirely into the darkness.
Three point lighting and background light

As shown on page 316, the traditional three-point setup uses a main or key light (in this case camera right), with shadows filled in using a smaller or lower-output fill light (in this case camera left). A third light is used in the background to skim the edges of the head to highlight the hair. In this example, a fourth, and blue-gelled, light is also used to change the color of the background from gray to blue.
Broad lighting with softbox

In this shot the face is angled and a softbox is used to illuminate the near side of the face. This type of lighting is bright but tends to over-emphasize the shape of people with rounder faces.
Short lighting with softbox

The opposite of broad lighting. The light source is used to illuminate the far side of the face, resulting in a more narrow slice that’s lit. This type of lighting tends to narrow the face.
Ring flash

A ring flash is attached around the camera lens providing an oddly flat and shadowless look. It also creates the characteristic white doughnut catchlight in the eyes and a dark halo shadow.
Rim lighting

A narrow softbox (striplight) is placed camera left, and behind the model so that only the edge of her face is outlined. The striplight is gridded to minimize the amount of stray light hitting the gray backdrop, rendering it totally black.
Cross lighting with visible backlight

Cross lighting refers to lights that are positioned 180° and pointing at each other. In this case a large softbox is positioned camera left to yield a Rembrandt lighting arrangement. A flash unit in the background is positioned opposite to illuminate hair and shoulders. For extra drama the back light was moved right so it appears in the frame.