
15 Advanced Techniques
Blue Water Drop. 580EX II with blue gel, positioned behind a sheet of white paper, to light the water surface. 430EX II with red gel located camera right to illuminate the drop. ST-E2 as wireless E-TTL trigger. Shot in a glass of water in my studio. f/6.3, ISO 100, 100mm macro.

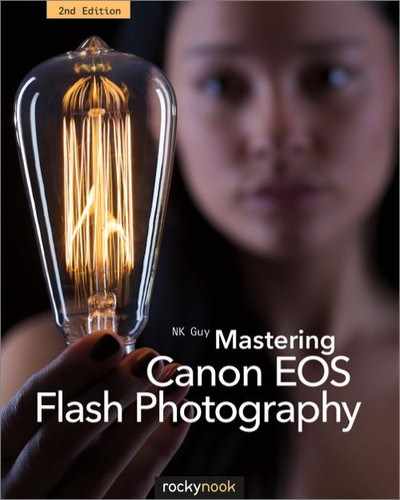
15.1 Two separate flash units were used to freeze the fire performer’s body and the background. The slow shutter speed captured the swirling motion of the fire staff. In this instance, the camera was motionless.
The previous chapters in this book deal with figuring out the fundamentals of flash photography. This final section is a compendium of ideas of other directions to explore.
15.1Slow shutter sync and motion
Slow shutter sync and its usefulness for exposing a background correctly with low light levels were discussed early on in this book. Also mentioned was the importance of using a tripod to reduce motion blur in areas not illuminated by flash.
The same principle can be deliberately exploited to take advantage of motion blur for dynamic effect. Essentially, a photo taken with flash and a slow shutter speed can provide an interesting mix of frozen flash-illuminated subject and ambient-light-illuminated motion blur. The effect isn’t always easy to predict, but it can be very striking and exciting when it works.

15.2
15.3 Another trick is to adjust the position of the zoom lens during the course of a slow sync exposure. In figures 15.2 and 15.3, flash is used to freeze the foreground, and the zoom motion causes dynamic blurring outwards.

15.4 A classic use of slow shutter sync is this shot of a car interior. A flash unit, carefully positioned so as not to distract or blind the driver, was used to illuminate and freeze the car interior. The two-second exposure nicely blurred the lights visible through the windshield.
15.2Hard isn’t all bad
Introductory material for beginners make it sound as if hard light is malevolence in photon form, and that professional studios have nothing but huge softboxes in them. This isn’t the case, of course. Light that’s too soft can be boring and flat. Shadows define a picture as much as light, and skillful photography is as much a matter of choosing and positioning good light sources as it is composing the elements of the scene.

15.5 Direct flash is also useful for illuminating iridescent insects. This male banded demoiselle damselfly (Calopteryx splendens) was photographed with on-board direct flash mainly to help freeze motion, since I was in a bobbing rowboat at the time. However, the direct flash also helped bring out the insect’s magnificent metallic sheen.

15.6 A group of masks from Jiichi Asami’s working collection of Japanese Noh theatre masks. The masks were side lit by a single 580EX II Speedlite.

15.7 This photo of author Cory Doctorow at his desk was taken using two 580EX Speedlites triggered by an ST-E2. One 580EX was filtered 1/2 CTO and positioned camera left to rake along the bookcase. The other was filtered blue and positioned on the floor to illuminate his handcrafted raygun, which he uses to defend Earth from malevolent space invaders and the evils of DRM. No light modifiers were used other than the filters.
15.3Narrowing down the light
Standard automatic flash lighting systems emphasize getting as much light on the scene as possible. But brightly lit scenes can be a bit boring. Spots or patches of light in shadow can make for much more interesting pictures. Think of the dark chiaroscuro or tenebrist paintings of 17th century artists such as Caravaggio: shadowed scenes with pools of light gathered around, or hinting at, mysterious narratives.
The zooming mechanism in most portable flash units is a great tool for narrowing down the cone of light from the flash head. Some photographers think of the zoom as a “portable snoot” rather than a mechanism to compensate for focal length. Naturally, the zooming mechanism has to be under user control, but fortunately most Speedlites have manual zoom override.
Add-on flags (light-blocking panels), snoots, and grids are also useful tools for keeping the light focused in one place.

15.8 This shot was taken with two lights. One was a large Elinchrom studio flash unit inside a large Lastolite HiLite box (section 13.4.6). This provided a silhouette of the subject, since there was no foreground lighting. The second light was a 580EX in manual mode, equipped with a Speedlight Pro Kit add-on grid. The Speedlite was aimed by hand at the subject’s neck in order to focus an oval patch of light on his tattoo.
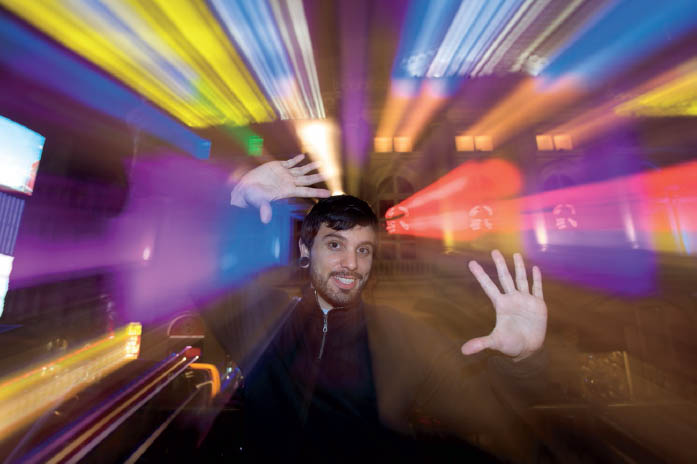
15.9 A Honl grid was used to concentrate the light from a Speedlite 580EX II onto the nautilus shell.

15.10 This shot of ceramic artist Andreas Alefragís used a single CTO-filtered Speedlite 580EX II, positioned camera right and shooting through a large sheet of transparent bubblewrap. This created the effect of the photo being taken in late evening light.
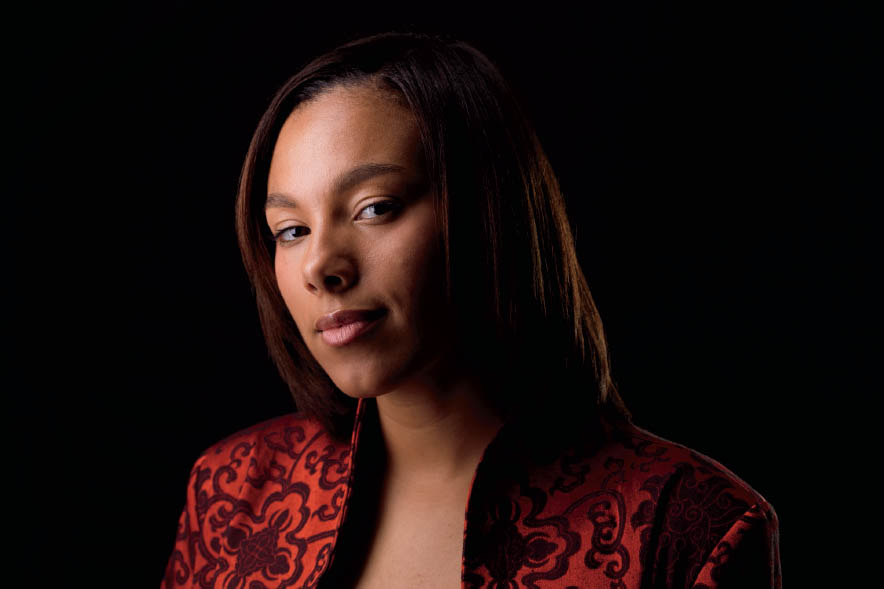
15.4Backlighting and flash in the frame
One of the first rules most beginners are taught is never to point a camera toward the light source. This is a useful rule for learning how to meter, but backlit scenes can be quite interesting.
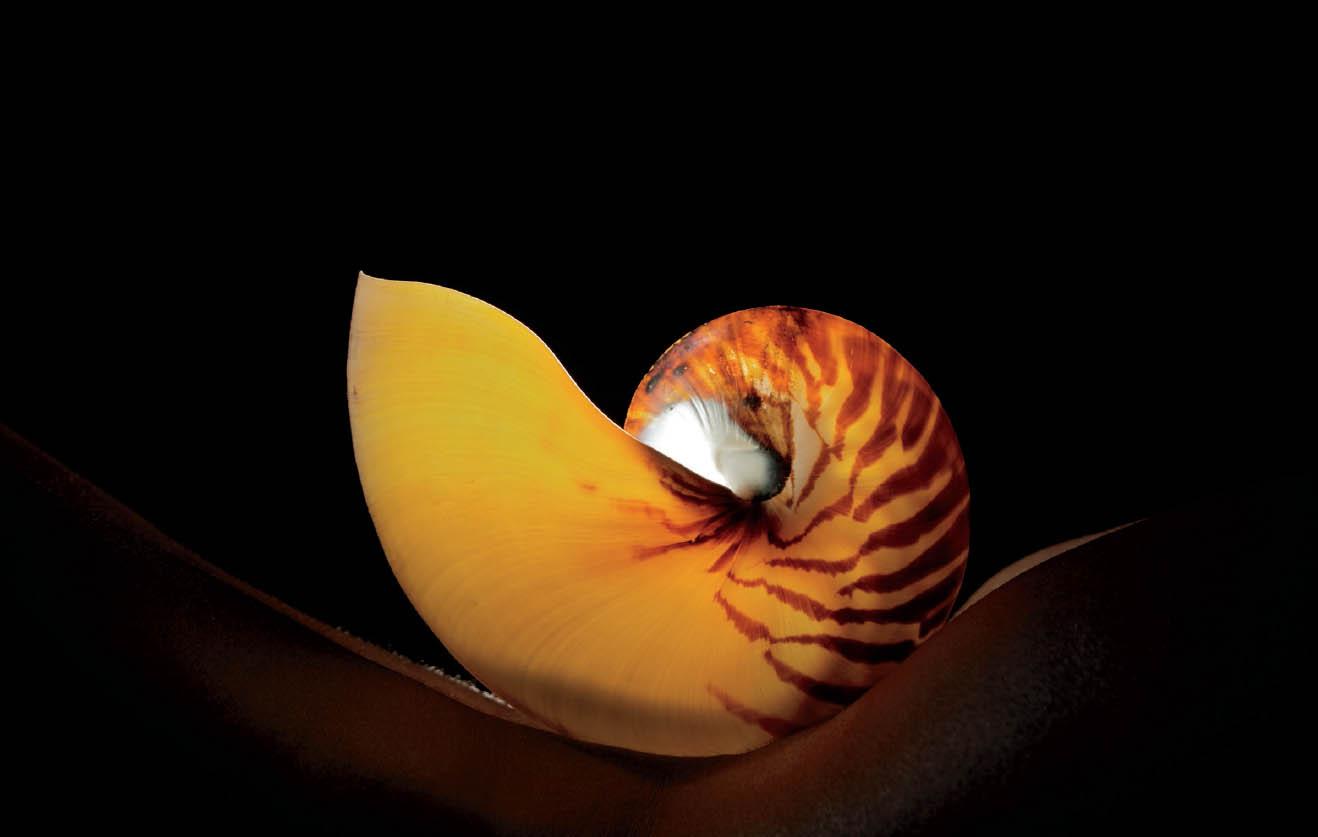
15.11 Mobius Arch, Alabama Hills, California. This photo was a two-minute exposure taken at moonrise. A 580EX II was fired from behind the arch to outline its inner edge and provide an unusual burst of light. The tall mountain visible through the arch is Lone Pine Peak. The mountain to the very far right is Mount Whitney, the tallest mountain in the contiguous United States.

15.12 This picture was taken using two Speedlites mounted back-to-back on a light stand. One had a red filter and was pointed at a white wall. The other faced the camera and backlit the model, creating a silhouette with an outline of white.
Silhouettes are a particularly dramatic way to light something. Even showing the flash in frame can bring in a sense of drama. Positioning a light to the side of the subject, but behind it, can give an attractive halo of light, helping separate the subject from the background. This technique lends itself to manual metering, however. Automatic metering tends to underexpose badly if the flash unit is visible, since it’s designed to record reflected light and not direct light.

15.13 This portrait was lit by a beauty dish, out of frame, and a Bowens ringlight with translucent glass diffuser, very obviously in frame.
15.5Kill the ambient
As discussed in section 6.3, each flash exposure is essentially a double exposure—there’s the subject lit by flash, and the background, which may be lit by ambient light. In the case of night or other low-light conditions, it’s fairly easy to reduce shutter times to minimize the amount of light contributed by ambient without affecting flash. But in daylight, this becomes trickier, because the X-sync limit puts an upper ceiling on the maximum attainable shutter speed.
Fortunately, high-speed sync means that X-sync is easily broken. You can set a high shutter speed to keep ambient exposures low while exposing the foreground normally using flash. This technique can create moody atmospheres under what appear to be fairly uninteresting or banal lighting conditions.

15.14 This shot was lit by a 580EX firing into a California Sunbounce reflector. As can be seen by the dark shadow to the model’s right side, she was lit primarily by flash.

15.15 You knew it was coming, didn’t you? What book on flash photography would be complete without a picture of somebody pointing a flash unit at his own head? This off-camera 420EX was triggered by an on-camera 580EX II using ordinary wireless E-TTL. High-speed sync was used for a shutter speed of 1/400 sec at f/6.3 despite the bright sunlight. The camera was an EOS 5D Mark II, which has a maximum X-sync of 1/200 sec.
15.6Cookies
A basic lighting tool for cinema and stage is the “cookie,” short for “cucoloris.” The best part about “cucoloris” is that nobody seems to know where the word comes from. Whatever its etymological origin, a cookie is simply a flat board with holes cut into it. Or a piece of mesh with fabric leaves stuck on to it. Or a bunch of branches. Or a glass of water. Or anything, really, used to break up light into interesting shadows.
Speedlite-type flash units are ideal for working with cookies because the hard-edged light from a battery unit automatically wants to cast sharp shadows.

15.16 This photo is simply a blank white wall with a houseplant positioned to the left, out of frame. A blue-filtered Speedlite 430EX was put behind that.
15.17 Here’s a portrait taken in front of the same wall. The filter was changed to red to match the model’s corset, and a beauty light was used camera right as the key light.

15.18 What appears to be the shadow of a mighty bird is actually an ordinary household electric fan positioned in front of a Speedlite 580EX II. A straw-colored filter was used to give the feeling of late afternoon light.
15.7Open flash
A fun way of taking interesting photos in the dark is to use open flash, described in sections 5.5 and 11.2. It’s certainly the most direct way to apply light to a scene.
The basic technique is to lock the camera to a solid tripod, find a location with little or no ambient light, and then open the camera’s shutter in “bulb” mode. This is best done with a remote that can be locked in the open position. Then it’s just a simple matter of walking around the scene, firing the flash by hand to illuminate areas of interest. Colored gels can be taped over the flash head to illuminate the photo with different colors of light.

15.19 The Neverwas Haul

15.20 By comparison this snapshot was taken using direct on-board flash. The image looks flat and lifeless, and dust motes in the air are illuminated.

15.21 It’s been done before, but it’s still a lot of fun. This picture of the windmills in Oia Santorini, Greece, had a very long shutter setting to record the faint light of dusk. Then I took a 580EX II with a blue gel and ran past the right-hand windmill, firing the flash once by hand as I jumped. EOS 5D mark II. 10 seconds at f/6.3, ISO 200, 45 mm.
The Neverwas Haul shown in figure 15.19, a self-propelled three-story art vehicle in the form of a Victorian house, was created by the Travelling Academy of Unnatural Science. In this shot, the Haul was lit primarily by the full moon, camera left. The lengthy exposure, nearly a minute and a half, made the picture look like it might have been taken in late evening light. The keen-eyed observer will notice that there are two shadows cast by the vehicle, hinting that there was also a large light tower camera right, positioned a good mile away.
The vehicle is outlined by handheld flash triggered manually. A 580EX II was fired at full power at various positions around the vehicle and through its port-side windows to backlight its steering wheel. The flash was colored using red and blue filters for effect. More subtly, there was also a single half-power burst fired onto the left side of the vehicle, with a 1/4 CTO filter, to fill in the shadowed areas by the wheels and the staircase. EOS 5D mark II. 70 seconds at f/7.1, ISO 100. 35mm.
Canon Speedlites with manual controls or old flash units with manual metering are ideal for this application, since the output power can easily be adjusted. It helps to wear dark clothing and point the flash away from one’s body. Naturally, a flash unit isn’t the only tool for doing this sort of photography. People often take outdoor night scenes using high-powered floodlamps, or indoor photos with small flashlights (electric torches) or blinky light toys.
15.8Stroboscopic (MULTI) flash
“Stroboscopic” photography is the process of firing a sequence of brief flashes during the course of a single photographic exposure. The result can capture the steps of a dancer in motion or the swing of a golfer, like the classic photographs that Harold Edgerton took in the 1940s and ’50s. Each frozen moment is recorded on the same frame, like a multiple exposure.
The ingredients required to take a stroboscopic photo are a Speedlite (or other flash unit) with stroboscopic capabilities, a very dark background, and a relatively light-colored moving subject. Reflective or light backgrounds don’t usually work because the multiple pops of light will build up cumulatively to overwhelm the foreground subject. Put the camera on a tripod, install fresh batteries in the flash unit, use either M (metered manual) or Bulb modes, and ideally use a remote shutter release. Multiple Speedlites can be controlled wirelessly for more light output if necessary. Stroboscopic mode is not compatible with second curtain sync or high-speed sync. ![]() 15.22 and 15.23
15.22 and 15.23
The 400EZ series and all 500 series Speedlite flash units have built-in stroboscopic flash capabilities, known in the Speedlite menu as “MULTI.” All models can specify the number of flash pulses per second (i.e., the frequency in Hertz), as well as the length of time the flash unit will fire. Some can also specify the total number of shots to be taken per exposure, but older models require this to be calculated by hand. The full details for engaging stroboscopic flash are described in section 9.21.
Note that there are some practical limits posed by stroboscopic lighting. First, a flash unit can only fire a certain number of times before it overheats, so it can’t be pressed into service as a disco strobe light at your next party. It also can’t fire full-power pulses very rapidly, since the unit needs time to recharge its capacitors. For this reason, Speedlites are pre-programmed with flash frequency and power limits.

15.22 The complex motion of an aikido throw, captured as a sequence of freeze frames.

15.23 A 580EX II pulsing at a relatively slow one-flash-per-second (1 Hz) was used to capture the movement of the dancer’s fans. The flash head was zoomed to 105mm to create a spotlight effect.
15.9High-speed photography
While flash units are used today mainly as a photographic light sources, the flash tube was originally used as a device for stopping time—at least, photographically speaking. In the mid-1920s, MIT’s Harold Edgerton was studying the behavior of synchronous electric motors. He had made some calculations predicting their performance and built a mercury arc lamp that could photograph the spinning motors as they were put under load, thereby testing his theories. Over the next few years, he generalized the concept for photographic applications, eventually switching to xenon gas in the tubes. Edgerton was following in the footsteps of photographic pioneer William Henry Fox Talbot, who in June 1851 used an electric spark to freeze the motion of a sheet of paper fastened to a rotating disc.
Today, the same photographic flash units that are used for snapping photos can be used for freezing motion. The duration of a flash pulse can be set in milliseconds, making it much faster than a mechanical shutter. Since the light pulses are so brief, exceeding the highest shutter speeds of most cameras, the field is often called high-speed photography. There are a few basic points to keep in mind.
First, the faster the object motion that needs to be stopped, the briefer the flash of light needed to freeze it. Ordinary subjects, such as people and slow-moving cars, can easily be frozen by the pulse of light from a regular flash unit. For this reason, portraits and similar shots always look sharper when taken with flash. However, really fast-moving objects such as water drops, hummingbirds, and bullets need extremely brief light pulses.

15.24 Even captive and trained animals move around unpredictably, such as this great grey owl (Strix nebulosa) at the Birds of Prey Centre, Old Warden Park, England. A wireless 580EX and reflector held camera right was perfect for freezing the motion of the owl as it looked around.
Second, AC powered studio gear is usually not the best option for freezing motion. Most studio units control the brightness of light output by changing the amount of power discharged through the tube. They often have long “tails” as light output drops off. In contrast, battery-powered flash units control overall light output by altering the duration of the flash pulse. A full power pulse from a Speedlite-type unit is actually not all that brief—values of 1/700 sec to 1/1000 sec are typical. But at low power settings, the light produced by battery units is extremely brief, since power to the tube is cut off very rapidly. Therefore, high-speed photography is best performed with ordinary battery flash units at low power settings, or studio units designed specifically for motion-freezing purposes. If the light from one unit is insufficient, then multiple units can be set up to fire simultaneously. Note also that many flash units will extend the duration if power is low, and the fastest flash bursts will be from fully charged units.
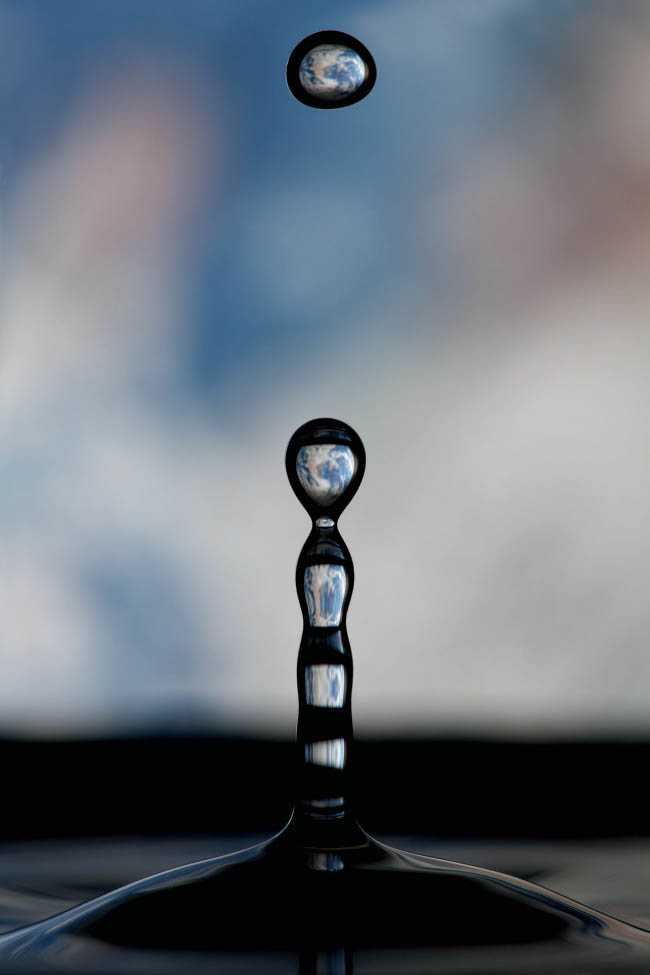
15.25 The world in a drop of water. The tiny liquid droplets act as lenses, showing the photo of Earth that was taped to the wall behind the container of water. Triggered using a StopShot timer (page 345).

15.26 A studio flash unit was used to backlight the falling paper moths, but the pulse of light wasn’t brief enough to freeze them completely. This was actually intentional, since the blurred edges of the ethereal moths help convey a timeless fairy tale feeling. A story of a woman and her granddaughter lost in some mysterious place, their way guided by some magical moths. Or something.
The interior of the lantern was lit by a 430EX III RT in radio slave mode. An orange gel, a cylinder of paper, and some bubblewrap plastic simulated a candle. At camera left, a studio flash unit,with a blue-gelled gridded dish was used for foreground fill.
A blue-gelled studio flash unit on a tall light stand was used to simulate moonlight and outline the models’ hair and shoulders. Barn doors were used to prevent spill onto the black backdrop paper.
Finally, moths cut from vellum paper were shaken down from a tray above and behind the models.

15.27 This shot from the cover of the first edition of this book was taken without any specialized equipment. I set up a 580EX II behind a translucent screen and a 420EX to camera right. I then dropped raspberries into a water-filled wine glass, firing a manual shutter release over and over. It took quite a few attempts to get the timing right, since the flash has to sync to an event (the splash in this case) and not to the shutter opening.
Manual timing is pretty tedious work, so a flash trigger timer is highly recommended for high-speed photography. These electronic devices can fire a flash after a beam of light is broken (a falling water drop, say) or after a microphone hears a sound (perhaps a balloon popping). Variable time delays can then be set so that the flash fires at the perfect moment to capture the action.

15.28 The complex curl of smoke from a stick of incense, frozen by a burst of flash from a 580EX II.
Many people build their own high-speed triggers, so this has become a popular photographic hobby. However, people low on electronic skills or time can also purchase advanced computerized flash triggers such as the ones shown opposite. ![]() 15.29
15.29
The left-hand device is the deceptively simple looking Universal Photo Timer from UniversalTimer.com. While compact and equipped with a simple LED display, it has five basic functions.
It can perform time lapse photography and other timed work as an infrared remote; it can trigger cameras and flash units in response to external events such as water drops and the like; it can work as an optical slave for a flash unit; it can perform stroboscopic flash; and it can operate as a remote shutter release. It has two sockets for controlling two separate flash units.
The right-hand device, the StopShot timer from Cognisys, has an advanced LCD screen with control over three separate output devices plus timing and intervalometer options. It supports conditional triggers for crossed beams (e.g., a flying insect will only trigger a shot if two beams are broken, not just one) and can memorize preset configurations. The maker also sells a variety of input devices, such as laser sensors.

15.29

15.30 This image of a light bulb hitting a piece of polished black slate was taken using a Universal Photo Timer.
The timer’s built-in microphone was used as the trigger, and a few millisecond delay was required. Two 550EX flash units, one to either side of the bulb, were fired at 1/128 power to immortalize the bulb’s demise.
15.10Cross-polarizing
A common photographic problem is taking a photo of something made of reflective material, such as an oil painting or anything under a sheet of glass. Art documentation has to deal with this problem on a regular basis. The usual suggestion is to put a polarizing filter on the lens. This helps, but any reflected light sources still appear in the photo. A solution? Cross-polarizing.
Cross-polarizing involves putting a sheet of polarizing plastic over a light source, such as a flash unit, as well as placing a polarizing filter over the lens. The lens filter is then rotated so that it’s aligned at 90° to the material on the light. When a photo is taken, non-polarized light will record as usual, but polarized light such as direct reflections will almost completely vanish.

15.31

15.32
This work by street artist SNUB23 demonstrates the technique. Since the art was made using glossy enamel spray paint, it was very difficult to photograph without getting rogue hotspots and reflections. Additionally, the art was located in a narrow stairwell, which limited lighting choices considerably. The photo to the left has a very objectionable hotspot. The photo to the right was taken from the same position with the same lighting, but with a polarizer placed over the lens and a sheet of polarizing plastic over the flash head. The polarizer was rotated until the hotspot vanished.
This technique is also useful for nature, wildlife, and food photographers who photograph wet or moist surfaces such as the eye of a fish or a sliced piece of fruit. It can also reveal interesting structures in minerals or reflective surfaces.
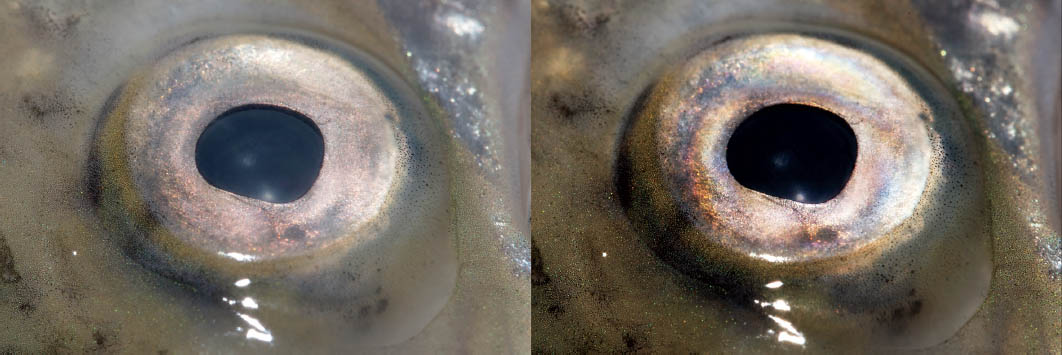
15.33 Eye of a rainbow trout, shot normally (left) and cross-polarized (right).
Incidentally, cross-polarizing can also reveal stress lines within transparent plastic objects made using injection molding. The normally transparent items suddenly burst forth into a rainbow of stress patterns. (Though to be honest, the easiest and cheapest way to photograph these patterns is to put a clear object in front of a polarized light source, such as ordinary LCD monitor, and put a polarizer on the lens.) ![]() 15.34
15.34

15.34
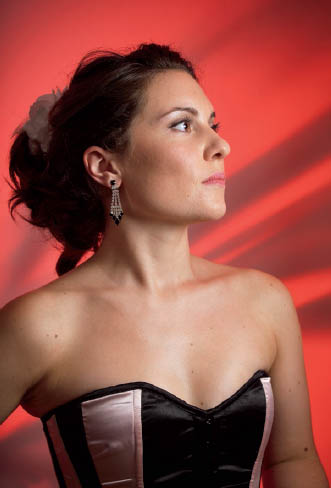
15.11Learning from the masters
There is much to be learned by studying the works of great painters. They only had oils and canvas rather than CMOS image sensors and xenon flash tubes, but they sure knew a thing or two about light. One painter whose techniques are of great value to portrait photographers is Rembrandt van Rijn.
Many of Rembrandt’s paintings are lit predominantly from one side. This effect can be reproduced photographically by positioning a key light to one side of the subject, fairly high up. The other side is filled in by either a lower powered light or a reflector. The result is a simple and elegant portrait, with the shadows providing a dimensionality to the face. A key hallmark of the Rembrandt technique is that the side of the face in shadow typically has a downwards-pointing triangle of light on the cheek, under the eye.
While the formula doesn’t have to be strictly followed to work, it can be a useful starting point for basic portrait photography, as shown here.

15.35
15.36

15.37 Musician, producer, and entrepreneur Thomas Dolby.

Bamboo. Sagano bamboo forest. Kyoto, Japan. Sometimes flash can be used to very subtle effect. This photo uses predominantly ambient lighting, but a 580EX II was fired at full power to lighten the color of the nearest bamboo trees, providing a little more depth to the scene. 0.6 sec at f/11, ISO 100, 17 mm.