
2 Getting Started
Poulnabrone Dolmen. A megalithic portal tomb, some 5,000 years old, in County Clare, Ireland. The photo was taken a few hours before a solstice dawn, but the orange glow of the sky is actually caused by the sodium streetlights of a distant town, and not by the rising sun. During the three-minute exposure I walked around to the other side of the dolmen and manually fired off a Canon 580EX flash unit three times at full power. This created the bluish glow and backlit the ancient stones. EOS 5D Mark II, 3 minutes at f/4, ISO 200, 40mm.
This is an example of manual flash triggering.
At its most basic level, flash photography just involves lighting a scene with a single, brief burst of light. It sounds simple, but flash has always been difficult to master.
This is largely because the human eye can’t make out the effects of a flash burst when an image is taken—the pulse of light is too short. It’s also because small light sources can produce a very unnatural form of light. So mastering flash requires two basic skills: understanding how flash will light a scene, and knowing how to modify the intense, direct light to suit your photographic needs.
Most of this book is dedicated to describing how flash works and what tools are available. But if you want to get going right away, here are some quick and easy starting points.
2.1A beginner’s configuration: Canon Digital Rebel T5/1200D with a 430EX III flash unit
The EOS Rebel T5 or 1200D (same product, different markets) is an entry-level digital SLR camera. While it contains a perfectly functional built-in popup flash unit, you can gain a lot of versatility and power by adding an external flash unit.
The Speedlite 430EX III-RT is a medium-sized flash unit that’s fully compatible with all the automatic features of the camera (though since the camera is so tiny, the flash unit is a bit large by comparison!) ![]() 2.1.
2.1.

2.1
Most of the information here also applies to most digital EOS cameras, to the Speedlite’s radio-equipped sibling (the 430EX III-RT) and to the Speedlite’s predecessors (the 430EX and 430EX II).
- To begin, install four new or freshly charged AA batteries into the flash unit.
 2.2
2.2 - Slide the foot of the flash unit into the hotshoe on the top of the camera, as shown here. The base of the flash foot has a rotating lever mechanism that must be in the left-most position before attaching. The lever is then turned to the right to lock the flash unit firmly into place. 2.3
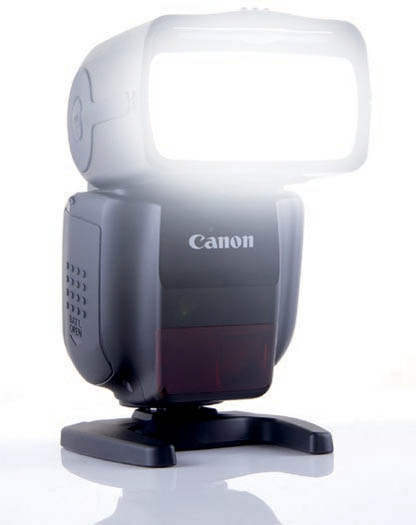
- Next, turn on the flash unit using the ON / OFF switch. After a few moments, a light marked PILOT will appear on the back of the flash unit, indicating that it’s charged and ready to go. 2.4
- If you half-press the shutter button on the camera, you’ll notice the
 symbol in the viewfinder, indicating that the camera recognizes the presence of the flash unit, and that it’s charged up and ready. 2.5
 - Point the camera at your subject, then press the shutter release button all the way to take a photo. The flash will fire automatically if it’s fully charged.

2.2

2.3
2.4

2.5
2.2Flash exposure compensation (FEC)
Examine your photo. Is the area lit by the flash too dark or too bright? The output level of the flash unit is determined by the camera’s automatic flash metering system, but it isn’t capable of making artistic decisions.

2.6
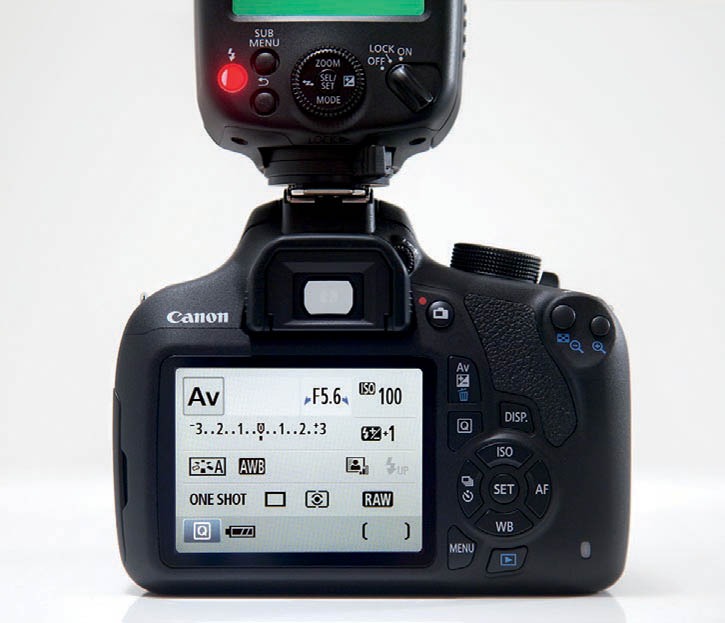
- To make the output of the flash brighter, press the
 button on the back of the 430EX III. It’s the one directly to the right of the SEL/SET button. You can then turn the flash unit’s dial to change the on-screen slider position. This is one way of applying more or less flash output, a feature known as Flash Exposure Compensation (FEC) (sections 6.17 and 9.9). Adjust to taste. In the example shown here, the flash has FEC reduced by 2/3 of a stop (rounded to 0.7) in light output. 2.6
2.3Bounce flash
Direct flash is a notoriously harsh form of lighting, since most of the light illuminating the subject comes from a small and focused beam. This is very efficient but will not result in a great portrait since harsh light emphasizes the tiniest of skin imperfections.
One way to soften the light is to reflect it off a larger surface so that the light hitting the subject no longer originates from a small area. This is known as “bounce” flash, and is an easy way to improve flash photos at essentially no extra cost. All you need is a flash head that can be rotated and tilted independently of the flash unit’s body. Fortunately the 430EX III-RT has this feature.
- Let’s start with figure 2.8, which was lit by direct flash. The flash unit’s head is pointed directly at the model, and the result is a pretty unflattering shot. Every slight skin blemish is highlighted, and the slight sheen to her face reflects a bright glare. Also, since the camera was rotated 90° into portrait configuration, an ugly shadow caused by the flash is visible to the right. 2.8
- This photo was taken in a room with a white ceiling of average height, so bouncing the flash upwards was a good possibility. To adjust the 430EX III-RT’s flash head, press the release catch on the side of the flash unit that’s marked PUSH, and tilt the flash head so it points directly upwards. 2.9

2.7 Direct flash.

2.8
- Figure 2–10 is the result, and it’s an improvement. The light from the flash has scattered across the surface of the ceiling and bounced back toward the model. This has eliminated the flash shadow, and the softer light is much more flattering for portraiture. There are still problems, though. Since most of the light is coming from the ceiling, her eyes and neck are somewhat shadowed, and her forehead is a little shiny. The picture is also lit in a fairly symmetrical fashion, which isn’t very interesting. 2.10
- In figure 2.11 the flash is bounced off the wall. This simply involves rotating the flash head sideways and bouncing the light off the wall to camera left. Since the wall is off-white and fairly close, it provides a good lighting surface. Additionally, the wall light is reflected in her eyes, providing a lively and friendly “catchlight.” Finally, although there’s plenty of light reflecting off the right-hand wall, more light is coming from the left, providing some interesting shadowing to the model’s face. This picture looks both softer and more three-dimensional. 2.11

2.9 Ceiling bounce flash.

2.10 Wall bounce flash.
These are three very different-looking photos, yet the only change I made was to the angle of the flash unit’s head.
Obviously, bounce flash isn’t always an option. It doesn’t really work outdoors or in huge rooms where there’s nothing nearby to serve as a reflector. It can also be a problem if the walls or ceiling are painted bright or dark colors. Fortunately, in a typical small indoor location, it’s an effective and simple way to get a more flattering portrait.
2.4Daylight fill flash
Flash seems like the sort of thing that’s only really useful at night, but in fact it has its uses in bright sunshine as well. When flash isn’t the primary source of light in a scene like this, it’s referred to as “fill flash” since it’s filling in the shadowed areas.
- Consider the first photo, which was taken in direct sunlight. Sunlight on a cloudless day casts very sharp shadows, as can be seen under the model’s eyebrows and neck. 2.12
- The second photo, on the other hand, was taken with a flash as on-board fill. Note how the use of flash has certain advantages and disadvantages. 2.13

2.11

2.12
- On the positive side, the shadows are less high-contrast. Fill flash lightens shadows more than it lightens areas that are already bright. The flash also causes a bright catchlight to appear in the model’s eyes.
- On the negative side, the image is now flatter and less three dimensional in appearance. In fact, if fill flash is too bright, it can give a sort of cardboard cutout look to a portrait.
- From a user’s point of view, enabling fill flash is as easy as turning on the popup flash or connecting a Speedlite. Canon EOS cameras automatically apply fill flash if they detect that they’re photographing scenes lit by daylight levels of light. However, if your camera is applying too much flash, it can be useful to use FEC to dial down the flash output slightly.
2.5An advanced configuration: two wireless 430EX III-RT flash units
Modern flash technology makes it easy to control more than one flash unit simultaneously. This allows you to illuminate various areas of a scene, applying light like a painter with a brush. In the past, a degree of skill and experience was needed to combine multiple flash units, but automated wireless technology makes it much simpler.

2.13
To control flash units wirelessly using Canon’s system, you need at least two devices. One is the controller (the “master” in Canon terminology) and one the remote unit (the “slave”). Historically, only top of the line Canon Speedlites could act as masters, but now the midrange 430EX III-RT used in this example can serve as either master or slave in radio mode.
Important note: this example uses two 430EX III-RT units. The RT bit matters. The 430EX III (with no RT) has no radio capabilities, and since neither version of the 430EX III can transmit commands using light (i.e., optical wireless), you can’t do a setup like this with two 430EX III units. That doesn’t mean you can’t use other 430EX models wirelessly, but you’d need a different master unit. ![]() 2.14
2.14
Some of this information applies generally to all digital EOS cameras and Speedlites, but each model has some differences. Check chapter 9 for details on each Speedlite.

2.14
2.15
- Attach the 430EX III-RT you want to use as the master to the camera’s hotshoe, since the master and camera need to be linked directly—only the slave communicates wirelessly. Turn on camera and flash unit.
- To enable radio wireless mode on the 430EX III-RT, press the button marked with the
 symbol. This horizontal zigzag symbol with two heads means “wireless master /slave flash” in Canon’s symbology. Then rotate the dial until the
  MASTER symbol appears on the screen. 2.15
 - Do the same for the second 430EX III-RT, but rotate the dial to choose SLAVE rather than master.
- Position the remote “slave” flash unit in an interesting location off-camera relative to the subject. The Speedlite ships with a small plastic stand that can be used to prop up the flash unit.
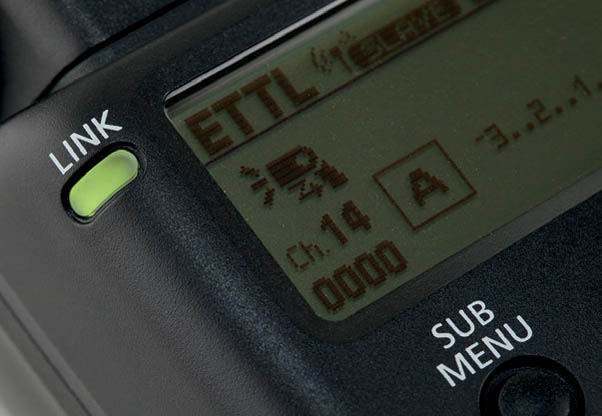
- Make sure the LINK light is green on both master and slave. If they’re not, then it’s likely that the two units are on the wrong radio channel or have different radio ID numbers set. Check sections 9.19.1 and 9.19.3 for details on changing channels and IDs. A slave unit with a red LINK light won’t fire. 2.16
- Take a photograph. Both units should fire simultaneously, the result being a picture lit by both the on-camera Speedlite and the off-camera unit. Canon EOS cameras support multiple off-camera flash units, so complex photos can be designed with up to 15 slave units if your budget can afford it! 2.17
2.16
2.6A practical example of wireless flash
For this example, we’ll take another portrait in a dimly lit room. The standard on-camera direct flash photo looks, to be frank, absolutely horrible. The model’s face looks kind of flattened, and the background is an empty void. This is an example of why direct flash lighting does such a disservice to humanity. ![]() 2.18
2.18
- To cut the harshness, the on-camera flash is put into bounce mode and directed toward the ceiling. The problem is that the background is still pretty dark. The solution? A second light source.
- First, the on-board 430EX III-RT is put into master mode. Then the second 430EX III-RT is placed on a light stand and positioned behind the model, camera right. Its beam is narrowed by setting the zoom to 80mm, it’s put into slave group B, and it’s pointed toward the curtains.

2.17

2.18

2.19
- When a photo is taken, the on-board master is bounced off the ceiling, providing softer light to the model. The richly colored maroon curtains are lit by the second flash unit, providing a more sophisticated texture. It looks like a photo of a completely different person. 2.19
- In basic wireless mode, both flash units will fire at the same output level. For more control over multiple flash output, wireless E-TTL supports a concept known as “ratios.” This allows for finer control between different groups of flash units. It’s also possible to prevent the on-camera master unit from lighting the scene. For more details on wireless E-TTL flash, consult sections 9.17 and 11.8.
- Wireless flash doesn’t have to be expensive, especially if you use optical wireless rather than radio wireless. Many post-2009 Canon EOS cameras can control remote slaves by using the built-in flash. This makes wireless flash even more convenient and affordable.
2.7Dragging the shutter
One of the challenges we face as photographers is conveying motion in a still image. One way to take a photo of a moving dancer or a speeding racecar is to freeze the action by using a short shutter speed. Since that can look static, another way is to use a long shutter speed to record a blurring, flowing motion.
- Here’s a photo of a dancer taken at 0.4 seconds. 2.20
- Although the shot looks fine as it is, it’s too blurry to make out the dancer’s face. But what if flash is fired at the same time? Flash is so short in duration that it freezes motion for that one moment. By combining flash and a long exposure, we get a sort of double exposure. 2.21

2.20

2.21
- This technique is known as slow shutter sync or “dragging” the shutter. You can see how the flash has recorded the dancer’s face quite well, but there are also blurring swirls of motion.
- To use this technique on a Canon EOS camera, set the camera to Av (aperture priority), Tv (shutter or time priority) or M (manual) modes. Don’t use P (program) mode or most of the icon modes, as they can’t drag the shutter.
- Turn on the flash as usual. In this example, the flash is actually an off-camera 430EX unit positioned camera left and triggered wirelessly.
- It may be best to use Tv mode and experiment with different shutter times to record more or less of the subject motion. This can be tricky if light levels vary, so M mode is often the most reliable way to use this technique.
- While useful for photographing wedding dances and rock concerts, dragging the shutter is a little hit-and-miss by its very nature. It often takes quite a few shots to get one that truly captures the moment perfectly.
- The keen-eyed will note that the areas of the image lit by flash are a different color than the slow, swirly areas. This is because light from a flash is fairly blue in color, and light from an ordinary tungsten light bulb, which was used to light the scene, is fairly orange. For more information on this phenomenon, known as color temperature, check out section 7.18.
2.8Getting the flash off the camera
One of the key lessons in any book on flash photography is that it’s vitally important to get the light source away from the lens. With a handful of exceptions, such as ring flash and light applications of fill flash, most subjects don’t look very good when lit with on-camera flash.
Take the previous examples. While technically the bounce flash shots were lit by on-camera flash, it’s important to note that the light from the flash was actually reflected off a nearby surface. Accordingly, the shots were lit from the wall, not the camera.
So, however you do it—cables from camera to flash, wireless E-TTL as described above, or high-end radio-based flash triggers—try moving the flash off camera. The results may surprise you!

2.22 Using a custom-built shallow indoor pool, designer Nelly Ben Hayoun built a stylized model of Japan’s Super-Kamiokande neutrino detector. Mylar balloons represented the photomultiplier tubes used in the real detector’s sensors. The installation, Super K Sonic Boooum, was in Shunt Lounge, a performance space in the now sadly demolished tunnels beneath London Bridge railway station. To illuminate the work I put a radio-triggered Speedlite 580EX into the small rowboat. All the white light in the shot originated from the bottom of the boat, and was reflected by the balloons.

2.23 This children’s fairground ride was photographed with available light. Frankly, it isn’t a particularly interesting shot, and too much clutter is visible.

2.24 The same shot, but this time lit with a handheld flash on a cord, positioned low and to the left of the camera. The result is more interesting—and quite a bit spookier!