
In this chapter and the next, we’ll build our own version of the classic arcade game Snake. In Snake, the player uses the keyboard to control a snake by directing its movement up, down, left, or right. As the snake moves around the playing area, apples appear. When the snake reaches an apple, it eats the apple and grows longer. But if the snake hits a wall or runs into part of its own body, the game is over.
As you create this game, you’ll combine many of the tools and techniques you’ve learned so far, including jQuery and the canvas as well as animation and interactivity. In this chapter, we’ll look at the general structure of the game and go through the code for drawing the border and the score and ending the game. In Chapter 17, we’ll write the code for the snake and the apple and then put everything together to complete the game.
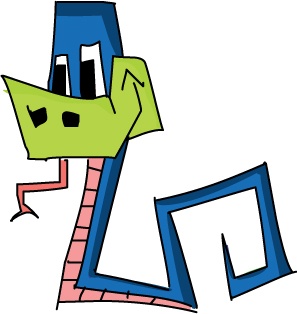
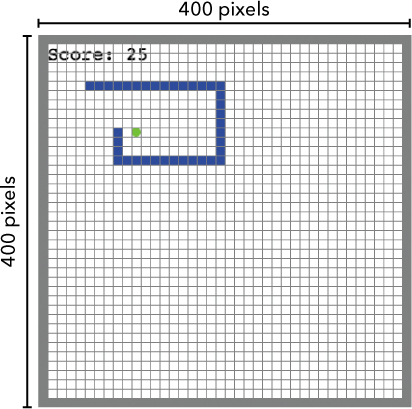
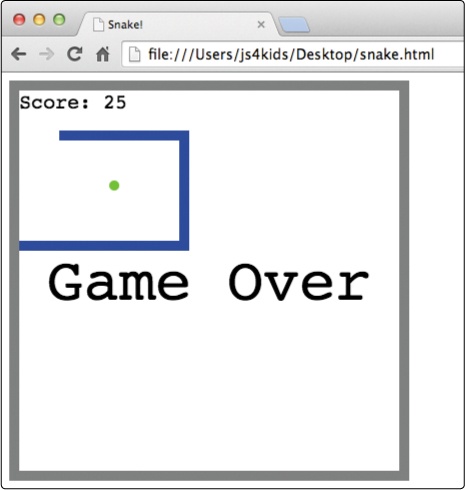
Figure 16-1 shows what our finished game will look like. We’ll need to keep track of and draw four items on the screen as the game runs: the border (in gray), the score (in black), the snake (in blue), and the apple (in lime green).

Before we start writing code, let’s take a look at the overall structure of the game. This pseudocode describes what our program needs to do:
Set up the canvas
Set score to zero
Create snake
Create apple

Every 100 milliseconds {
  Clear the canvas
  Draw current score on the screen
  Move snake in current direction
  If snake collides with wall or itself {
    End the game
  } Else If snake eats an apple {
    Add one to score
    Move apple to new location
    Make snake longer
  }
  For each segment of the snake {
    Draw the segment
  }
  Draw apple
  Draw border
  }

  When the user presses a key {
    If the key is an arrow {
      Update the direction of the snake
         }
  }
Over the course of this chapter and the next, we’ll write the code to execute each of these steps. But first, let’s talk through some of the major parts of this program and plan out some of the JavaScript tools we’ll use for them.
As you can see in the pseudocode, every 100 milliseconds we need to call a series of functions and methods that update and draw everything to the game board. Just as we’ve done in Chapter 14 and Chapter 15, we’ll use setInterval to animate the game by calling those functions at regular intervals. This is what our call to setInterval will look like in the final program:
var intervalId = setInterval(function () {
  ctx.clearRect(0, 0, width, height);
  drawScore();
  snake.move();
  snake.draw();
  apple.draw();
  drawBorder();
}, 100);
In the function that we pass to setInterval, the first line clears the canvas with clearRect so that we can draw the next step in the animation. Next we see several function and method calls. Notice that these all roughly match up with the steps in the pseudocode listing on the previous page.
Also notice that we save the interval ID in the variable intervalId. We’ll need that interval ID when the game is over and we want to stop the animation (see Ending the Game).
For this program, we’ll use the object-oriented programming style we learned about in Chapter 12 to represent the two main objects in the game: the snake and the apple. We’ll create a constructor for each of these objects (called Snake and Apple), and we’ll add methods (like move and draw) to the prototypes of these constructors.
We’ll also divide the game board into a grid and then create a constructor called Block, which we’ll use to create objects that represent squares in the grid. We’ll use these block objects to represent the location of segments of the snake, and we’ll use a single block object to store the apple’s current location. These blocks will also have methods to let us draw the segments of the snake and the apple.
In the earlier pseudocode, there’s a section devoted to responding to keypresses by the user. To allow the player to control the snake using the arrow keys on the keyboard, we’ll use jQuery to respond to keypresses, as we did in Chapter 15. We’ll identify the key that was pressed by looking up the keycode, and then we’ll set the snake’s direction accordingly.
Now that we’ve gone through an overview of how the program will work, let’s start writing some code! In this chapter, we’ll start by setting up the HTML, the canvas, and some variables we’ll need throughout the program. Then we’ll tackle a few of the more straightforward functions we need for this game: one to draw the border around the board, one to draw the score on the screen, and one to end the game. In the next chapter, we’ll create the constructors and methods for the snake and apple, create an event handler for arrow keypresses, and put it all together to complete the game.
To begin coding our game, enter the following into your text editor and save it as snake.html.
  <!DOCTYPE html>
  <html>
  <head>
      <title>Snake!</title>
  </head>

  <body>
➊     <canvas id="canvas" width="400" height="400"></canvas>

➋     <script src="https://code.jquery.com/jquery-2.1.0.js"></script>

➌     <script>
      // We'll fill this in next
      </script>
  </body>
  </html>
At ➊ we create a canvas element that is 400 × 400 pixels. This is where we’ll draw everything for our game. We include the jQuery library at ➋, followed by another pair of <script> tags at ➌, where we’ll add our JavaScript code to control the game. Let’s start writing that JavaScript now.
First we’ll define the variables canvas and ctx, which will let us draw on the canvas, and the variables width and height, to get the width and height of the canvas element.
var canvas = document.getElementById("canvas");
var ctx = canvas.getContext("2d");

var width = canvas.width;
var height = canvas.height;
The code in the HTML sets the width and height to 400 pixels; if you change those dimensions in the HTML, width and height will match the new dimensions.
Next, we’ll create variables to help us think about our canvas as a grid of 10-by-10-pixel blocks, as shown in Figure 16-2. Although the grid will be invisible (that is, the game won’t actually display it), everything in the game will be drawn to line up with it.
The snake and apple will both be one block wide so that they fit within this grid. For every step of the animation, the snake will move exactly one block in its current direction.
We’ll use these variables to create the blocks on our canvas:
➊ var blockSize = 10;
➋ var widthInBlocks = width / blockSize;
  var heightInBlocks = height / blockSize;
At ➊ we create a variable called blockSize and set it to 10, since we want our blocks to be 10 pixels tall and wide. At ➋ we create the variables widthInBlocks and heightInBlocks. We set widthInBlocks equal to the width of the canvas divided by the block size, which tells us how many blocks wide the canvas is. Similarly, heightInBlocks tells us how many blocks tall the canvas is. At the moment the canvas is 400 pixels wide and tall, so widthInBlocks and heightInBlocks will both be 40. If you count the number of squares in Figure 16-2 (including the border), you’ll see that it’s 40 blocks wide and tall.
Next, we’ll create a drawBorder function to draw a border around the canvas. We’ll make this border one block (10 pixels) thick.
Our function will draw four long, thin rectangles, one for each edge of the border. Each rectangle will be blockSize (10 pixels) thick and the full width or height of the canvas.
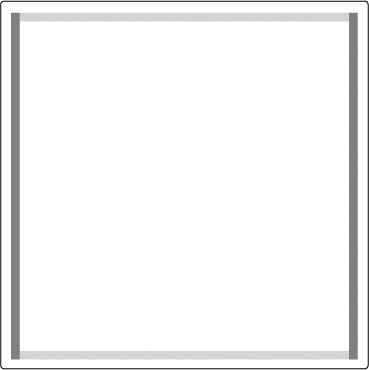
  var drawBorder = function () {
    ctx.fillStyle = "Gray";
➊   ctx.fillRect(0, 0, width, blockSize);
➋   ctx.fillRect(0, height - blockSize, width, blockSize);
➌   ctx.fillRect(0, 0, blockSize, height);
➍   ctx.fillRect(width - blockSize, 0, blockSize, height);
  };
First we set the fillStyle to gray, because we want the border to be gray. Then, at ➊, we draw the top edge of the border. Here we’re drawing a rectangle starting at (0, 0)—the top-left corner of the canvas—with a width of width (400 pixels) and a height of blockSize (10 pixels).
Next, at ➋, we draw the bottom edge of the border. This will be a rectangle at the coordinates (0, height - blockSize), or (0, 390). This is 10 pixels up from the bottom of the canvas, on the left. Like the top border, this rectangle has a width of width and a height of blockSize.
Figure 16-3 shows what the top and bottom borders look like.

At ➌ we draw the left border, and at ➍ we draw the right one. Figure 16-4 shows the addition of these two edges.
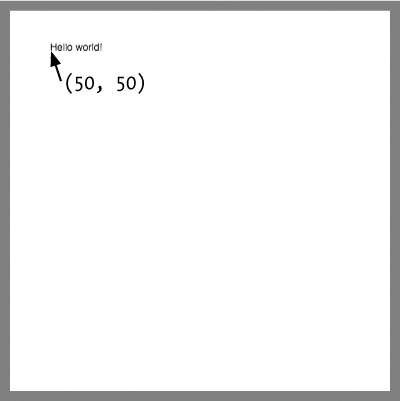
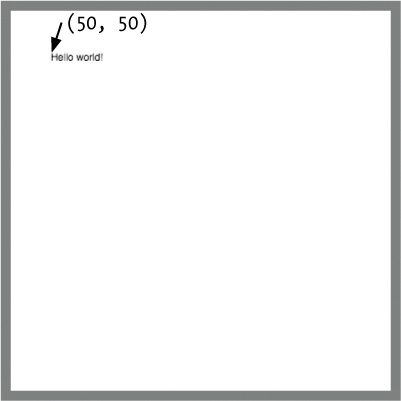
Now let’s write a drawScore function to display the score at the top left of the canvas, as shown in Figure 16-1. This function will use the fillText context method to add text to the canvas. The fillText method takes a text string and the x- and y-coordinates where you want to display that text. For example,
ctx.fillText("Hello world!", 50, 50);would write the string Hello world! at the coordinates (50, 50) on your canvas. Figure 16-5 shows how that would look.
Hey look, we’ve printed text to the canvas! But what if we want to have more control over how the text looks by tweaking the size and font or changing the alignment? For the score in our Snake game, we might want to use a different font, make the text bigger, and make sure the text appears precisely in the top-left corner, just below the border. So before we write our drawScore function, let’s learn a little more about the fillText method and look at some ways to customize how text appears on the canvas.
The coordinate location that determines where the text appears is called the baseline. By default, the bottom-left corner of the text is lined up with the baseline point so that the text appears above and to the right of that point.
To change where the text appears in relation to the baseline, we can change the textBaseline property. The default value for this property is "bottom", but you can also set the textBaseline property to "top" or "middle". Figure 16-6 shows how the text is aligned for each of these options, in relation to the baseline point (shown as a red dot) that you pass to fillText.

For example, to run your text below the baseline, enter:
ctx.textBaseline = "top";
ctx.fillText("Hello world!", 50, 50);
Now, when you call fillText, the text will be below the point (50, 50), as you can see in Figure 16-7.
Similarly, to change the horizontal position of the text relative to the baseline point, you can set the textAlign property to "left", "center", or "right". Figure 16-8 shows the results.

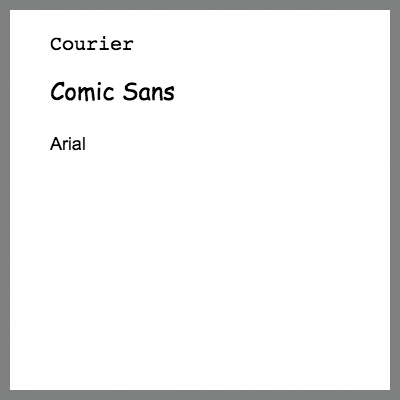
We can change the size and font of the text we draw by setting the font property of the drawing context. This listing shows some examples of different fonts we could use:
➊ ctx.font = "20px Courier";
  ctx.fillText("Courier", 50, 50);

  ctx.font = "24px Comic Sans MS";
  ctx.fillText("Comic Sans", 50, 100);

  ctx.font = "18px Arial";
  ctx.fillText("Arial", 50, 150);
The font property takes a string that includes the size and the name of the font you want to use. For example, at ➊ we set the font property to "20px Courier", which means the text will be drawn at a size of 20 pixels in the font Courier. Figure 16-9 shows how these different fonts look when drawn on the canvas.
Now we can go ahead and write the drawScore function, which draws a string showing the current score on the canvas.
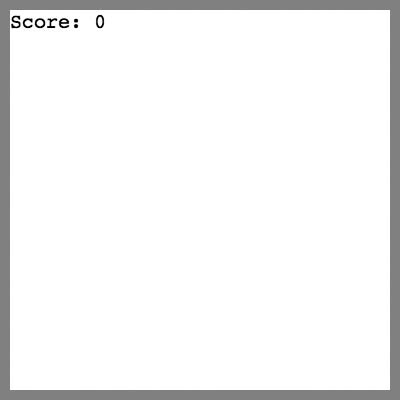
var drawScore = function () {
  ctx.font = "20px Courier";
  ctx.fillStyle = "Black";
  ctx.textAlign = "left";
  ctx.textBaseline = "top";
  ctx.fillText("Score: " + score, blockSize, blockSize);
};
This function sets the font to 20-pixel Courier (20px Courier), sets its color to black using fillStyle, left-aligns the text with the textAlign property, and then sets the textBaseline property to "top".
Next, we call fillText with the string "Score: " + score.
The score variable holds the player’s current score as a number. We set the starting score to 0 at the beginning of the game (in Defining the score Variable), so at first this will display "Score: 0".
When we call fillText, we set the x- and y-coordinates to blockSize. Since we set blockSize to 10, this sets the score’s baseline point to (10, 10), which is just inside the top-left corner of the border. And since we set textBaseline to "top", the text will appear just below that baseline point, as shown in Figure 16-10.
We’ll call the gameOver function to end the game when the snake hits the wall or runs into itself. The gameOver function uses clearInterval to stop the game and writes the text “Game Over” on the canvas. Here’s what the gameOver function looks like:
var gameOver = function () {
  clearInterval(intervalId);
  ctx.font = "60px Courier";
  ctx.fillStyle = "Black";
  ctx.textAlign = "center";
  ctx.textBaseline = "middle";
  ctx.fillText("Game Over", width / 2, height / 2);
};
First we stop the game by calling clearInterval and passing in the variable intervalId. This cancels the setInterval animation function that we created in Using setInterval to Animate the Game).
Next, we set our font to 60-pixel Courier in black, center the text, and set the textBaseline property to "middle". We then call fillText and tell it to draw the string "Game Over" with width / 2 for the x-position and height / 2 for the y-position. The resulting “Game Over” text will be centered in the canvas, as shown in Figure 16-11.
In this chapter, we looked at the general outline of our Snake game and some of the functions we’ll need to make the game. You learned how to draw text onto a canvas and how to customize its size, font, and position.
In the next chapter, we’ll finish off our game by writing the code for the snake and the apple and to handle keyboard events.
Here are a few exercises you can try before you go on to finish programming the game.
#1: PUTTING IT TOGETHER
Although I haven’t shown all the code for the game yet, you can run the code for drawing the border and the score. Take your HTML file (from Creating the HTML) and add the code for setting up the canvas, creating the score, drawing the border, and drawing the score. Now you just need to call drawBorder and drawScore to see the border and score. It should look just like Figure 16-10. You can try out the gameOver function, too, but before you call that function, you’ll need to delete the clearInterval(intervalId); line. You haven’t created the intervalId variable yet, so for now, if you call the function without removing that line, it will produce an error.
#2: ANIMATING THE SCORE
Write your own call to setInterval with a function that increases the score by 1 and then draws the updated score using the drawScore function every 100 milliseconds. Remember that you’ll need to clear the canvas each time, using the clearRect method on the canvas context.
#3: ADDING TEXT TO HANGMAN
Programming challenge #4 in Chapter 13 was to draw the man in our Hangman game using canvas. Try extending your Hangman game by using the fillText method to draw the current word underneath the hangman, as shown.
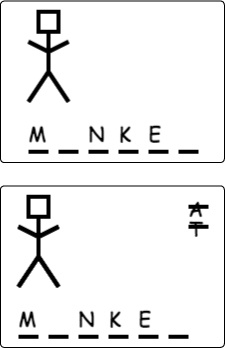
Hint: To underline each letter, I’ve used 30-pixel-long stroked lines, with 10 pixels between each one.
For even more of a challenge, draw the incorrect guesses crossed out, as shown to the right.