
Go Mobile with Online Photo Services
The speed at which photography has gone mobile is stunning. The presence of high-quality cameras in phones has turned millions of people into photographers, whether they realize it or not. Just as significantly, people now expect to access any sort of information on phones and tablets, including photos.
That’s a tall order. Photos and videos occupy a vast amount of storage, and the capacities of mobile devices are still relatively small. So, until recently, we’ve had to compromise: if you wanted to access a good-sized portion of your photo library, complete with edited photos and applied metadata, if any, on a mobile device, usually, you had to manually sync them from your computer.
Today, several services fill this mobile gap. It’s now possible to carry a representation of your entire photo library in your pocket (with some limitations). This means you can bring up nearly any photo in your library, no matter where you are—or which device took the photo.
Notice the qualifiers in that paragraph: possible, representation of, nearly. There’s no way to transport the entirety of an average library at full quality onto a mobile device, so tradeoffs are involved (which I cover in this chapter).
As much as I’d like to, I can’t recommend one service as the single, gold-star solution for mobile photography. Some, like iCloud Photo Library and Lightroom mobile, are tied to ecosystems, while others, like Google Photos and Mylio, stand on their own. So before we delve into the specifics of each service I’m comfortable recommending, let’s revisit our Take Control goals and apply them to mobile photography.
Set Online Photo Goals
Using the guidelines I set forth earlier for choosing software on the desktop, here’s what I think are important criteria for any service that offers mobile photo management:
- It must access either your entire photo library, or at least a useful subset of it, without a lot of extra work on your part.
- It should let you view important metadata, and even better, allow you to edit the data.
- It must let you find photos easily. Just having photos in the cloud doesn’t make them easy to access.
- It should take the photos you capture using the mobile device and incorporate them into your main library. I hate that we still need to remember where a photo might be located—the external hard disk at home? The iPhone? iPad?—instead of having just a single library. We’re getting closer.
- If possible, the service should serve as an offline backup of your images. (I talk more about backups in Back Up and Archive.)
Like I said, that’s a tall order. And not every service meets all of these goals.
Choose an Online Service
After a lot of consideration, I see online photo services as a parallel option to your main desktop photo library. They’re not as seamless as I’d like, so I think of them as standing just to the side: you’re able to access photos that otherwise wouldn’t be on a mobile or remote device, even if those aren’t the originals.
In this section, I break down my top contenders and describe what’s good and not so good about them. They are: iCloud Photo Library (just below), Google Photos, Lightroom mobile, Mylio and Amazon Prime Photos.
iCloud Photo Library
The closest option to a seamless solution is Photos for Mac with iCloud Photo Library enabled. You’re able to view photos on any device, edit them, and see the edits carry along to all devices sharing the same library. You can also view the photos in your account at iCloud.com, in the Photos Web app.
How iCloud Photo Library Works
When you enable iCloud Photo Library, the images in Photos for Mac—as well as on any other devices logged in to the same iCloud account and with iCloud Photo Library turned on—are uploaded to iCloud.
To turn on this feature in Photos for Mac:
- Choose Photos > Preferences > iCloud.
- Select the iCloud Photo Library checkbox to start the service.
- If you have a large hard disk, you probably want to select the option to Download Originals to this Mac. If you don’t have much free storage, or if you’re setting up a satellite Mac such as an SSD-equipped MacBook, then select Optimize Mac Storage.
To turn on this feature on your iOS devices:
- Open Settings > Photos & Camera.
- Tap iCloud Photo Library.
- Tap Optimize Device Storage.
After some time—hours or days, depending on the size of your library and the speed of your Internet connection—all of your photos should appear on all your enabled devices. Also, photos you add to those devices in the future, such as images shot using the iPhone’s camera, will be added to iCloud Photo Library automatically.
Enabling iCloud Photo Library alters some of the ways you interact with Photos. First, you’ll no longer be able to copy photos from your Mac to your iOS devices by syncing via iTunes. Because the photos are transferring via the cloud, Apple removes that option from iTunes. Second, the Camera Roll “album” in Photos for iOS disappears. To view photos that you took on an iOS device, look in All Photos. (If you are also using My Photo Stream, that “album” also disappears and those photos appear in All Photos.)
Metadata and Finding Photos in iCloud Photo Library
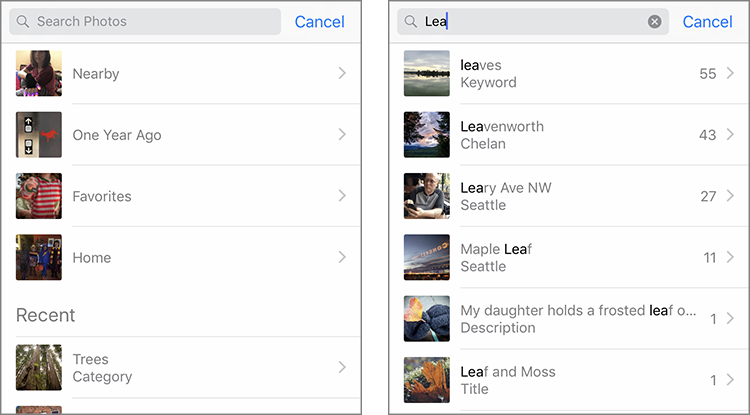
Unlike on the Mac, in Photos for iOS you can’t view or edit any of the metadata, even though it’s present in the files. Perhaps to compensate for that omission, the search function offers shortcuts such as bringing up photos near your current location, ones shot a year ago, recent searches you’ve performed, and auto-assigned category searches (Figure 66) (see Take Advantage of Software Intelligence).
Tradeoffs in iCloud Photo Library
If you don’t manage your library using Photos for Mac, you can’t take full advantage of iCloud Photo Library. Since Photos for iOS remains the default app for any images you capture with your iPhone or iPad, you may still find iCloud Photo Library useful as a handy way to access those images (though I’ll soon get into options for importing them into the other apps).
If Photos is your ecosystem of choice, be aware that you’ll likely need to buy additional storage. Every Apple ID account gets 5 GB of storage for free, which is also used by other services such as iCloud Drive and iOS device backups. Here are the plans in the United States (Apple also offers international rates):
- 50 GB: $0.99 per month
- 200 GB: $2.99 per month
- 1 TB: $9.99 per month
- 2 TB: $19.99 per month
That 2 TB is a hard limit—if your library exceeds it, you can’t store any more images without the oldest ones being removed from iCloud.
Google Photos
Google’s online photo service is quite impressive. It takes advantage of Google’s scale in the service of helping people track and enjoy their photos. (Yes, I just used the word “enjoy” in the context of Google without irony.)
How Google Photos Works
Google has an enormous amount of distributed processing power at its disposal, which the Google Photos service uses to organize and analyze the photos you upload. The images are then available via the Web at photos.google.com or on your mobile devices running the Google Photos app.
To use Google Photos on the Mac:
- Install the Google Photos Backup app.
- When the Google Photos Backup dialog appears, specify which folders it should watch. You also select the file size of the images you want to upload; I discuss that in more detail in a moment.
When new images are added to the watched folder, they’re automatically uploaded to Google Photos in the background. The uploader can also scan and upload photos directly from attached cameras and memory cards.
On iOS devices, the Google Photos app can be set to back up and sync the contents of your Photos library, so any new photos you take are uploaded to Google. Images and videos you’ve added to the Google Photos library are also available for viewing within the app.
Metadata and Finding Photos in Google Photos
The Google Photos approach to metadata is interesting. Google assumes (probably correctly) that people don’t want to spend time applying keywords, so it ignores them entirely—even in photos that have keywords written to the image file. The only way to add any information not contained in the EXIF data created by the camera is to include the information in a Description field.
Instead, Google Photos identifies noteworthy things about each photo. Click the Search field and feel free to choose any search terms you’d like, versus trying to remember how you keyworded a batch of photos. (See Take Advantage of Software Intelligence.)
Tradeoffs in Google Photos
I like Google Photos, but using it does involve several tradeoffs when viewed in the context of our desire to take control of digital photos.
Not only can you not add your own keywords, but you also can’t rate images or choose favorites. One workaround is to create an album for favorites and add selected photos to it.
There’s no good integration with your master photo library. You can point Google Photos at the folder in which your Lightroom originals reside, for example, but the two don’t synchronize. Edits you make in Lightroom aren’t reflected in Google Photos, and vice-versa. So, you end up with a separate copy of your library. That’s not terrible, but it veers away from the cohesiveness of a central place to store all your photos.
Google Photos offers two storage options: free and paid. The free level lets you store an unlimited number of photos, but the images are stored as compressed JPEGs. The quality of those versions is high, but it excludes raw files from your online library and, at the deepest level, you’re working with photos that have had data removed.
The other option is to pay for storage, which allows you to upload original files, including raw files. A free Google account includes 15 GB of storage that covers all Google services (like Gmail or Google Drive). For more than that, you pay:
- 100 GB: $1.99 per month
- 1 TB: $9.99 per month
- 10 TB: $99.99 per month
- 20 TB: $199.99 per month
- 30 TB: $299.99 per month
Then there is the Google Question. The company makes a lot of money by collecting data about everything and everyone it can, and parlaying that into targeted advertising. Google representatives have stated that Google Photos is not collecting personal information for advertising or sales purposes, and will not use any photos for its own use. And for now, I believe them. But the company could change that policy at any time.
I maintain an active Google Photos account, because I like many of the Assistant features and it’s clear that the Google teams involved with the service are genuinely attempting to revolutionize the way we store and interact with digital photos. But it stands to the side of my master library. If some catastrophe befell my library (and its backups, and backups of backups), I’d have the Google Photos images—the compressed JPEGs—as a last resort fallback.
Lightroom mobile
Adobe’s Lightroom mobile doesn’t meet most of the expectations I’ve established. For one thing, synchronizing photos between Lightroom on the desktop and Lightroom for mobile devices is accomplished only at the collection level; there’s no way to include your entire library. Lightroom mobile also includes no facility for adjusting metadata other than applying ratings and flags.
However, it is the direct link to Lightroom on the desktop, and since I think Lightroom is currently the best option for managing a photo library, that makes Lightroom mobile compelling. And if you’re already invested in Lightroom, it’s the best way to edit and review photos that have been transferred from the desktop app.
How Lightroom mobile Works
Like iCloud Photo Library, Lightroom mobile is cloud based: Adobe’s Creative Cloud, in this case. In Lightroom CC, you mark specific collections (but not smart collections, alas) for synchronization. Those photos are then copied to Adobe’s servers and passed along to the Lightroom mobile app on your devices or Lightroom on the Web.
To add photos to a collection and then mark it to sync:
- In Lightroom on the Mac, select one or more photos.
- In the Collections pane, click the New Collection button and choose Create Collection.
- Give the collection a name, select Include Selected Photos and make sure Sync with Lightroom mobile is selected.
- Click Create.
To synchronize an existing collection, click the checkbox that appears to the left of the collection name in the Collections pane.
Lightroom CC uploads the images to Creative Cloud and then copies them to Lightroom mobile when the app is next opened on the device. As you edit photos in Lightroom mobile, the changes are synchronized to the desktop and any other devices running Lightroom mobile.
The Lightroom mobile app is particularly helpful for moving new photos in the other direction, though. You can set up a collection within Lightroom mobile that automatically adds new photos you’ve captured or imported onto the iPhone or iPad to ensure those images are added to your master library. On the Organize screen, tap the Lr button to view app preferences and enable Auto Add Photos (and optionally Auto Add Videos) from the menu that appears.
Metadata and Finding Photos in Lightroom mobile
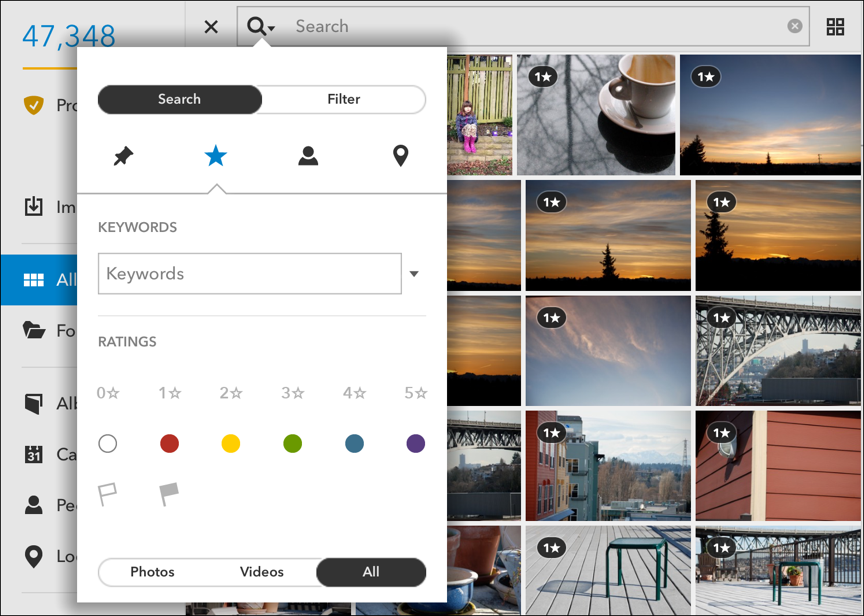
Lightroom mobile doesn’t expose—and therefore you can’t edit—titles, descriptions, or any other descriptive metadata that makes Lightroom CC a powerful organizer. You can, however, assign star ratings and flag photos as Picked or Rejected, making the app a good first-pass sorting tool if you’d rather peruse your shots on the couch using an iPad or iPhone instead of at a desk in front of your Mac.
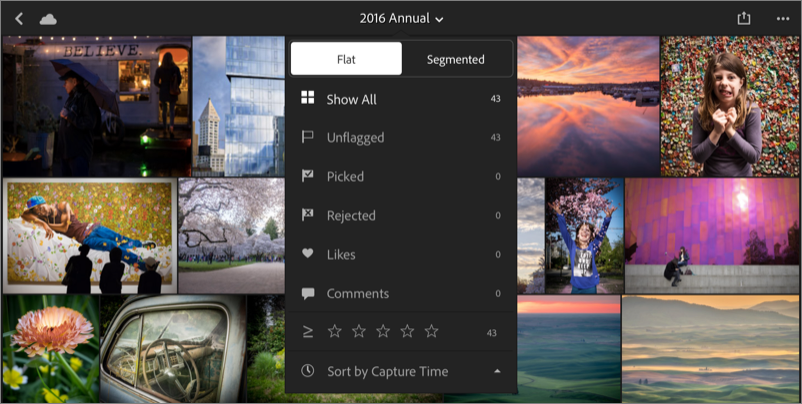
Searching for photos is similarly limited. You can filter visible photos by tapping the name of the currently viewed collection and specifying a star rating or attributes such as Picked or Rejected (Figure 68).
Tradeoffs in Lightroom mobile
The biggest concern here is that Lightroom mobile isn’t designed to represent your entire library. As long as you go into it with realistic expectations, the app can be quite useful as a tool for rating and applying adjustments to selected photos.
Mylio
If there’s anything close to a unicorn of mobile photo organization, it’s Mylio. It runs on nearly everything (Mac, iOS, Windows, Android), works with Lightroom, and makes metadata available and editable on mobile devices. There are only a few quibbles that are keeping me from using it more intently, which I’ll cover shortly. But first, let’s take a look.
How Mylio Works
At the outset, Mylio looks like a direct competitor to Lightroom. It can organize your entire photo library, edit images (including many raw formats), and perform many of the tasks we want in a modern application. However, since I think Lightroom is a better all-around tool, I still prefer it—but that doesn’t leave Mylio out of the running. It works with Lightroom’s data, so you can use Mylio as your preferred multi-device solution.
What’s especially cool about Mylio is how it synchronizes photos between devices: it doesn’t shuttle everything through a cloud server. Instead, devices work peer-to-peer; as long as your iPad, iPhone, and Mac are all on the same Wi-Fi network, they update each other directly.
(You can also choose to add cloud storage if you’d like, between 10 GB and 25 GB depending on your subscription plan, for storing favorites or shuttling images between devices that are not available for peer-to-peer sharing.)
On the Mac, do the following:
- In the Mylio application, click the Import button in the sidebar.
- Click the Lightroom option (Figure 69).
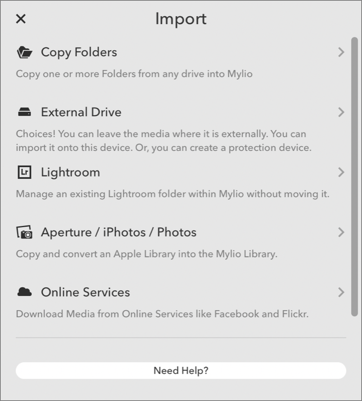
Figure 69: Mylio can import your Lightroom library, among other options. - Select the folder in which Lightroom stores your photos.
Whenever something is added to that folder (i.e., you import new photos into Lightroom), the images are also added to Mylio. On the iOS app, Mylio grabs the contents of your device’s Camera Roll. Mylio also stores compressed versions of images on devices so your storage isn’t overwhelmed.
As you would expect, any changes on one device are reflected on the others, so your Mylio library stays up to date on any machine you’re using.
Metadata and Finding Photos in Mylio
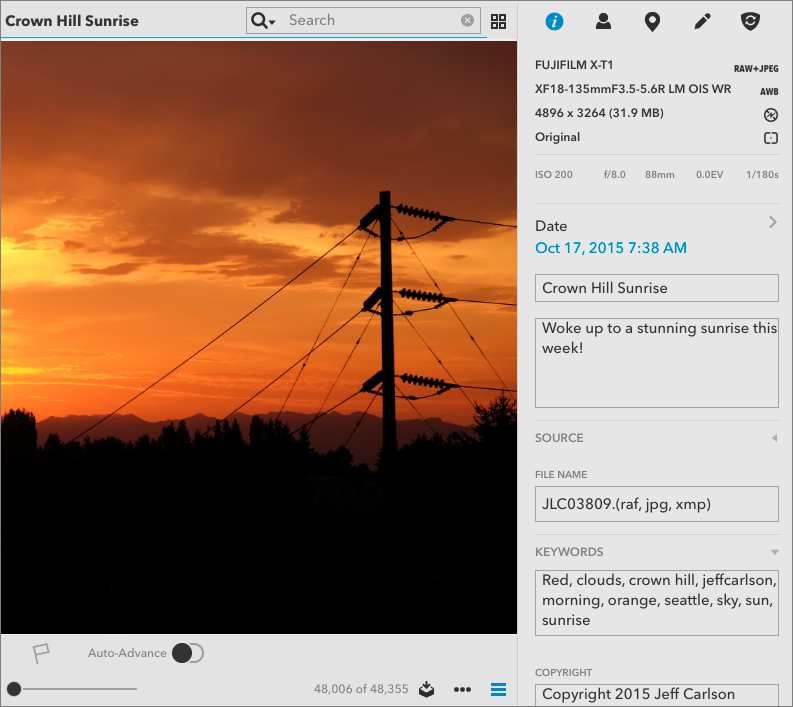
After resigning myself to the reality that no online service wants to bother with metadata, Mylio was a surprise. The application picks up all the metadata found in Lightroom, from titles and descriptions to keywords, ratings, and color labels (Figure 70). Not exposed is IPTC metadata, but that information is included in the image file (if it’s a JPEG) or in the XMP file that travels with the original raw file.
In terms of searching for photos, the Search field finds text matches. Or, if you tap the Search icon, you have the option of filtering the results by ratings, flags, keywords, identified people, or locations (Figure 71).
Mylio also includes a Calendar view for searching by date that isn’t just an endless scroll back through time, which is welcome.
Tradeoffs in Mylio
Using Mylio with a Lightroom library involves one complication. To make sure any edits are applied in both places, you need to remember to save the changes with each photo you work on. For example, if you changed the rating and keywords for a set of photos in Mylio on an iPad, here are the steps for synchronizing those edits to Lightroom:
- On the iPad, check the Sync
 pane to make sure the mobile device has synced with the Mac version of Mylio.
 - In Mylio on the Mac, select the photos you’ve edited.
- Choose Photo > Save Metadata to File.
- Open Lightroom.
- Select the photos you’ve edited. (You can select a range that includes the ones you worked on instead of pinpointing each image.)
- Choose Metadata > Read Metadata from Files.
- Confirm your action in the dialog that appears by clicking Read.
The images in Lightroom are updated not only with any metadata changes, but also with image adjustments (which are stored in the XMP sidecar file for each photo).
In terms of pricing, Mylio offers multiple subscription tiers ranging from free to $250 per year depending on the number of devices you want to sync, the size of your library, and the features desired. A 30-day trial is available to see if the features fit with your workflow.
Amazon Prime Photos
Amazon’s entry in the photo-storage game was initially heavy on storage with little else. Amazon runs an extremely profitable side business providing virtual hosting and data processing, so a photo service was a natural fit. However, it was basically just a giant box in the cloud.
In 2016, though, Amazon released a revamped Amazon Prime Photos that matches most of the features of Google Photos. Your photos can be uploaded from the Mac via the Amazon Drive application or the Prime Photos app on iOS devices. One notable differentiator is the Family Vault, which enables up to six people to share an account. Storage is unlimited for the Amazon Prime subscriber, and each family member gets 5 GB of private storage.
How Amazon Prime Photos Works
On mobile devices, download the Prime Photos app, which uploads images from the photo libraries stored on each device, much like Google Photos does.
On the Mac, the service uses the Amazon Drive application, which creates a folder in the Finder into which you can copy just about anything. Image files found there appear in the Prime Photos mobile app or on the Web at amazon.com/photos/.
Metadata and Finding Photos in Amazon Prime Photos
Amazon’s expanded image analysis capability means that you can search for not only people, locations, and dates, but also “things” based on objects that Amazon’s algorithms detect within your photos. Those are listed to the left of your library at the Prime Photos Web site for easy access (Figure 72). You can also use the Search field to look up those terms and other metadata, too.

Tradeoffs in Amazon Prime Photos
The biggest annoyance with Prime Photos is that, on the Mac, uploading photos is a manual operation. The Amazon Drive application doesn’t offer the ability to watch folders or grab images from your Photos or Lightroom libraries, which makes it more of a hassle.
You also won’t find a way to rate or favorite images, other than to add them to albums.
The good news is that photo storage is unlimited, and the service recognizes many (but not all) raw image file formats; my FujiFilm .RAF files can be uploaded, but won’t display as photos.
Oh, and as indicated by the name, you need an Amazon Prime subscription to take advantage of the service.