
![]()
Resources and Quiz Answers
The purpose of this appendix is to help you set up the development environment that you will use to write, compile, and execute the Spring applications specific to this book and to provide detailed responses for the questions in the quiz attached to each chapter.
The appendix for this book is quite small because it was written in such a way that you are guided through the normal succession of steps that you would have to through every time you start development of an application.
- Choose your tools
- Install your tools
- Verify installation
- Design the application
- Develop and test
At the end of Chapter 1, I presented the tools and instructed you how to install them and how to verify the correct installation. The code samples for the book were written on an Apple Mac computer. One of the strong points of Java is that it is multi-platform, so the code can be run on any operating system. The tools recommended (Gradle, Intellij IDEA, Liferay, and Tomcat) are Java based, and are available at their official sites. The installation instructions are almost identical for any operating system, the only difference is in how an environment variable is set. Information about doing this on different operating systems is widely available on the internet and considering this book is for developers with a little experience, this should not be a problem for you.
The code for this book is split in two projects: personal-records and book-code. The personal-records project follows the evolution of a Spring web application. It was built incrementally and module names were prefixed with a number; if traversed in the ascending order of their prefixes, you will notice that every module contains the code of the previous one and something extra. It simulates the evolution of the configuration, exchanging and adding libraries until the final form of a complete web application is reached, when security and evolved components such as web flows are in place.
Using this study guide you will learn not only how to build Spring web applications, but also how to design a workflow for you and your team and how to design a multi-layered application from scratch.
The code was split in two because some topics such as alternative configurations and alternative view technologies needed to be presented separately without overcrowding the personal-records project. So really small modules covering these were created and wrapped up in a different project called book-code.
For book-code, the name of each module is constructed using the chapter number in which the module is covered and an index number. The modules are referenced in a chapter in ascending order of their indexes.
Both projects are Gradle multi-module projects and are configured in a similar manner. The project structures can be seen side by side in Figure A-1.

Figure A-1. personal-records and book-code project structures in IntelliJ IDEA side by side
Gradle Configuration Explained
project-records and book-code are parent projects that define a set of libraries available for the child modules to use. As the configurations are very similar, from this point on only the configuration of the person-records project will be covered. person-records has the Gradle configuration in a file named build.gradle.
All the modules have the Gradle configuration file named after the module: [module_name].gradle. Also, there’s a closure element in personal-records/settings.gradle that verifies at build time if all modules have their configuration file present.
rootProject.children.each {
  project -> project.buildFileName = "${project.name}.gradle"
  assert project.projectDir.isDirectory()
  assert project.buildFile.exists()
  assert project.buildFile.isFile()
}
This was a development choice; the components of a module are also more visible in an editor this way. Plus, if you want to modify the configuration file for a module you can easily find the file in IDEA using a unique name. Imagine the pain if you use the Command+Shift+N to search for a specific build.gradle file and you have 20+ matches.
Another approach for a multi-modular project would have been to have only one build.gradle file for the whole project and use Gradle-specific closures to customize configuration for each module. But in the spirit of good development practices, I decided to keep configurations for the modules as decoupled as possible and in the same location as the module contents.
After you download the source code you need to import the project in the IntelliJ IDEA editor:
- Select from the IntelliJ IDEA menu File
 New Project From Existing Sources (the menu options are depicted in Figure A-2).
Figure A-2. Project import menu options in IntelliJ IDEA
- A popup window will appear requesting the location of the project (Figure A-3). Select the personal-records directory.

Figure A-3. Project import popup in IntelliJ IDEA
- IntelliJ IDEA can create its own type of project from the selected sources and build it with its internal Java builder, but this option is not useful here as personal-records is a Gradle project. Check the “Import project from external model” radio button and select Gradle from the menu as depicted in Figure A-4.

Figure A-4. Selecting the project type in IntelliJ IDEA
- The last popup will appear and ask for the location of the build.gradle file and the Gradle executable. The options will be already populated for you. If you have Gradle installed you might want to use it (Figure A-5).
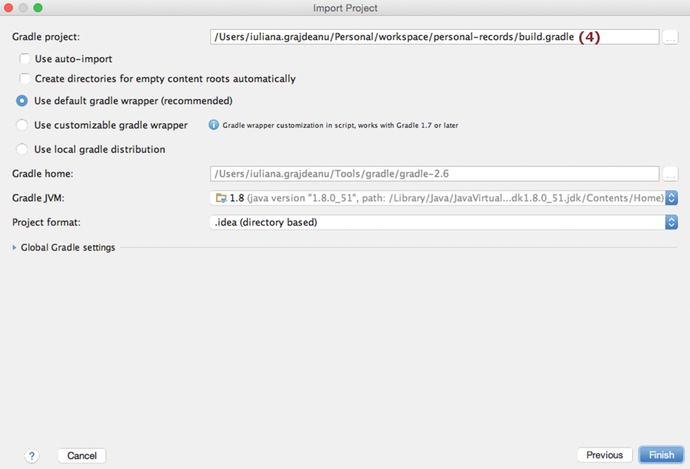
Figure A-5. Last popup for project import in IntelliJ IDEA
Before getting to work you should build the project. This can be done from IntelliJ IDEA by clicking the Refresh button, marked with (1) in in Figure A-6. Clicking this button will cause IntelliJ IDEA to do the following: scan the configuration of the project, resolve any dependencies (this includes downloading missing libraries), and do an internal light build of the project, just enough to remove compile-time errors caused by missing dependencies.
The Gradle build task executes a full build of the project. It can be used in the command line:
.../workspace/personal-records $ gradle build
Alternatively, you can use it in IntelliJ IDEA as depicted in Figure A-6, where the task is marked with (2).

Figure A-6. Gradle tasks in IntelliJ IDEA
It will execute the following set of tasks on every module:
:00-pr-dao:compileJava UP-TO-DATE
:00-pr-dao:processResources UP-TO-DATE
:00-pr-dao:classes UP-TO-DATE
:00-pr-dao:jar UP-TO-DATE
:00-pr-dao:assemble  UP-TO-DATE
:00-pr-dao:compileTestJava  UP-TO-DATE
:00-pr-dao:processTestResources UP-TO-DATE
:00-pr-dao:testClasses  UP-TO-DATE
:00-pr-dao:test  UP-TO-DATE
:00-pr-dao:check UP-TO-DATE
:00-pr-dao:build  UP-TO-DATE
The tasks depicted here are only for the 00-pr-dao module. The Gradle build task will execute all the tasks it depends on. As you can see, it does not run the clean task, so you need to make sure to run this task manually when building a project multiple times, to make sure the most recent versions of the classes are used.
As the project contains incomplete sources that you will have to complete (in modules post fixed with -practice), executing this task will fail. You could just execute tasks clean and compile Java, but there’s a better way. I have created a custom task in the project called allCompile. This task executes the clean and compileJava tasks for all modules. It is marked with (3) in Figure A-6. It is defined in build.gradle and inherited by the child modules, so it can be executed for a module separately.
Every web application in this project is run with the Jetty embedded web server to keep things simple. But there are certain advantages in using an external container such as Apache Tomcat server. Starting the server in debug mode and using breakpoints to debug an application is much easier to do is one advantage. An external container can run multiple applications at a time without the need to stop the server. Plus embedded servers should be used only for testing and educational purposes; in practice application servers are preferred, because of reasons explained in Chapter 8.
Here is what you have to do if you are interested in doing this. First download the latest version of Apache Tomcat 8.x from the official site1 and unpack it somewhere on your system. Then configure an IntelliJ IDEA launcher to start the server and deploy the chosen application. This is quite easy to do, but there are a number of steps to be executed and they are listed below:
- From the runnable configuration menu choose Edit Configurations (1). A popup window will appear listing a set of launchers. Click on the + and select the Tomcat Server option. The menu will expand: select Local (2) because you are using a server installed on your computer. Figure A-7 depicts these menu options.

Figure A-7. Menu options to create a Tomcat launcher in IntelliJ IDEA
- A popup window like the one in Figure A-8 will appear and will request some information.

Figure A-8. Popup to create a Tomcat launcher in IntelliJ IDEA
In the previous figure, some items are numbered and their meaning is explained in following list:
- (1) The launcher name; you can insert a more obvious name in there.
- (2) The Tomcat instance name.
- (3) The button that will open the popup window to insert the Tomcat instance location (Figure A-9).

Figure A-9. Configure Tomcat instance in IntelliJ IDEA
- (4) The URL where the Tomcat server can be accessed.
- (5) The choose artifact button. Unless there is no war set to be deployed to Tomcat, this button will be displayed with the red light bulb icon on it.
- Click the Fix button and select an artifact. IntelliJ IDEA will detect all artifacts available (Figure A-10) and present them to you in a list you can choose from. If you intend to open the server in debug mode and use breakpoints in the code, select an artifact with the name post-fixed with (exploded); this way IntelliJ IDEA manages the contents of the exploded war and can link the actions in the browser with the breakpoints in the code.

Figure A-10. Deployable artifact list in IntelliJ IDEA
- Complete the configuration by clicking the OK button. You can specify a different application context by inserting a new value in the Application Context text field. Choosing a different application context will tell Tomcat to deploy the application under the given name and the application will be accessible via the following URL: http://localhost:8080/[app_context_name]/. In Figure A-11, the application will be accessible via http://localhost:8080/mvc-basic/.

Figure A-11. Inset a new application context in IntelliJ IDEA
Other application servers can be used in a similar way as long as IntelliJ IDEA provides support for them.
IntelliJ IDEA is really flexible and practical and that’s why it was recommended for practicing the exercises in this study guide: launcher configurations can be duplicated, multiple Tomcat instances can be started at the same time as long as they function on different ports, and so on. The Gradle projects can also be imported in Eclipse and other Java editors that support Gradle.
Quiz Answers
The following sections contain answers to the quiz questions for every chapter. Answers to questions that are simple enough to remember after reading the chapter will not be detailed. Extra details will be provided only for questions that could be considered tricky.
Quiz Solution for Chapter 2
- Answer: A, B, C
- Answer: B
- Answer: A, B, D (C, interface-based injection, is not supported in Spring. D, field- based injection, is supported by annotating fields with @Autowired, @Value, or related annotations; JSR-250 @Resource, JSR-330 @Inject.2)
- Answer: A, B, C (as stated in Chapter 2.)
Quiz Solution for Chapter 3
- Answer: C
- Answer: A
- Answer: C
- Answer: A, B, C (D is incorrect because classes implementing WebApplicationInitializer or extending its subclasses do not require any annotations, as stated in Chapter 3.)
- Answer: B, C
- Answer: A.3
- Answer: A, B
- Answer: A, B (Interface ViewConfigurer is not part of any Spring Web library.)
- Answer: A, B, C, D, E
- Answer: A
- Answer: C (B is not correct because multiple view types can be supported using ViewResolver chaining too.)
- Answer: B, C (D is not true, because it is an incomplete answer. Indeed it can be taken into consideration by setting a value for the ignoreAcceptHeader property, but that must be true, which is not mentioned here.)
- Answer: A, B, C, D
- Answer: A, B, C
- Answer: B
- Answer: B (The path variable name (id) is different than the method argument name (number) and in this case the annotation @PathVariable should define in which argument the path variable value should be injected by using the path variable name as an argument: @PathVariable("id").)
- Answer: E (All others are valid return types that can be matched to a view representation. A null value will crash the application.4)
- Answer: B, C (D is incorrect because @ModelAttribute can also be used on methods. Look at the next question option A to see what for.)
- Answer: A, B (C is not true because the statement is ambiguous.)
- Answer: B
- Answer: A, B (C is not true because the two implementations covered by A and B could suffice. If the word "must" is replaced with "might" then this statement would be true too.)
- Answer: A
- Answer: B
- Answer: A, B, D, G (C is used on handler arguments, E is used on validation annotations, and F is used on setter methods to enforce that a dependency is mandatory.)
Quiz Solution for Chapter 5
- Answer: C
- Answer: A, B, D
- Answer: C
- Answer: A
- Answer: A, B, C
- Answer: B
- Answer: A, B(C does not exist)
- Answer: A, C, D
- Answer: D
Quiz Solution for Chapter 6
- Answer: B, C (Ajax is a technique for building interactive applications for the Web and an acronym. It is not a set of standards or technologies and that is why B and D are not valid options.)
- Answer: C
- Answer: A, B, C
- Answer: A
Quiz Solution for Chapter 7
- Answer: A, B, C
- Answer: B
- Answer: A, B, D, E, F
- Answer: A, C
- Answer: B, C
- Answer: A
- Answer: B
- Answer: B
- Answer: A, B
- Answer: A, B, C (Converters are present in the Spring WebFlow environment, but they are not defined explicitly in a flow definition, which is why answer D is not valid. Data is only handled when a flow is executed, which dismisses answer E.)
- Answer: B, C, D, F (A start state is a concept and is the first state that is entered when the flow starts its execution and is always a view state, so answer A is dismissed. There is no such thing as a persistence state type, so answer E can be dismissed. But as an observation, there is a special attribute in the end-state set to persist data in the flow before completion of the flow process. G can be dismissed, too; there is no conversion state type.)
- Answer: C, D
- Answer: A, C
- Answer: A,B (C is false because a decision state does not have a view associated with it.)
- Answer: A, C
- Answer: B, C
- Answer: B
- Answer: B, C
- Answer: B, C
- Answer: B, C
- Answer: A, C
- Answer: B, C
- Answer: A, B, C
- Answer: B
- Answer: A, B, C, D, F, G (E makes no sense: during transition execution, no action can be executed because any result of the action would be lost. F is also invalid because an action can be executed only in the context of a flow execution.)
- Answer: A, C
- Answer: B, C, D
- Answer: A, B, C
- Answer: B
- Answer: A, B, C, D
_______________________________
2http://docs.spring.io/spring/docs/4.2.3.RELEASE/spring-framework-reference/htmlsingle/#beans- annotation-config
3http://docs.spring.io/spring/docs/4.2.3.RELEASE/spring-framework-reference/htmlsingle/#mvc- servlet-special-bean-types
4http://docs.spring.io/spring/docs/4.2.3.RELEASE/spring-framework-reference/htmlsingle/#mvc- ann-return-types