![]()
Extending Azure Active Directory
The Azure Active Directory Story
Chapter 9 introduced Microsoft Azure Active Directory (AAD) as the identity management (IDM) solution for cloud services like Office 365. AAD has continued to evolve to become a fully featured identity as a service (IDaaS) platform.
This chapter introduces the extension of AAD beyond Microsoft Office 365. AAD can be used to incorporate SSO and provisioning/de-provisioning of third-party SaaS offerings. You can unlock these extended capabilities by acquiring Azure Active Directory Premium (AADP) and using its licensing model.
As a SaaS, Office 365 needs an IDM platform. Azure AD is that IDM platform; it allows you to create and manage users in the Cloud. For enterprise customers with on-premises Active Directory (AD), the Office 365 Directory Synchronization (DirSync) tool was provided to replicate on-premises AD accounts to AAD. DirSync was later renamed Azure Active Directory Sync (AAD Sync), thus reflecting more accurately what the tool is designed to do.
Figure 10-1 depicts the process of synchronizing user objects from on-premises IDMs like AD to AAD via AAD Sync or Forefront Identity Manager (FIM).

Figure 10-1. User accounts synchronized with AAD for use in Office 365
![]() Note Microsoft AAD is already in use if an organization is an Office 365 customer. The next version of FIM is called Microsoft Identity Manager (MIM). During this transition process, FIM and MIM are used interchangeably. AADP is the licensing model that unlocks additional AAD capabilities, which are explored in this chapter.
Note Microsoft AAD is already in use if an organization is an Office 365 customer. The next version of FIM is called Microsoft Identity Manager (MIM). During this transition process, FIM and MIM are used interchangeably. AADP is the licensing model that unlocks additional AAD capabilities, which are explored in this chapter.
Single Sign-On (SSO) for Third-Party SaaS
This chapter explores the expansion of SSO through the use of AAD. As covered previously, a common enterprise architecture uses AAD to federate on-premises identities and consume claims-based authentication. Identities in AAD that are designated as federated identities trigger AAD to refer to a trusted claims authentication provider to carry out the actual authentication and consume the claims accordingly. As more and more enterprise customers have adopted Office 365, this has become a very common implementation of AAD and Active Directory Federation Services (AD FS).
CASE STUDY 1: SSO AND USER MANAGEMENT FOR THIRD-PARTY SAAS
In this case study, Adatum Inc. is an Office 365 customer. One of the departments recently selected Salesforce as its customer relationship management (CRM) solution. Adatum Inc. likes the turnkey nature of cloud-based SaaS so that it does not need to add and manage more on-premises infrastructure.
Challenge
Adatum Inc. faced two challenges with this decision. First, IT needed to manage Salesforce users separately in Salesforce. Second, Salesforce users needed to manage their own login credentials and passwords, which are separate from their AD credentials.
Resolution
Adatum Inc. chose to extend AAD to provide SSO for Salesforce. After all, users were already synchronized to AAD, and the company’s SSO infrastructure was already deployed. Using an existing IDM was the best approach in this scenario. Figure 10-2 depicts how AAD will be used for Salesforce for Adatum Inc.
![]() Note Even if an organization is not currently using Office 365, AAD is still a viable IDaaS solution that can be the single IDM for cloud-based and claims-based applications.
Note Even if an organization is not currently using Office 365, AAD is still a viable IDaaS solution that can be the single IDM for cloud-based and claims-based applications.

Figure 10-2. Using AAD for Salesforce
EXTENDING AAD FOR A THIRD-PARTY SAAS
The following exercise walks you through the steps that Adatum Inc. took to extend AAD to Salesforce. This exercise shows the steps of extending AAD for provisioning and authenticating Salesforce accounts. At the time of writing, the new Preview Portal does not include the ability to configure AAD, so this exercise uses the traditional Portal.
In order to configure Salesforce with AAD, you may need to go back and forth between Salesforce and AAD, so it is recommended that you open a separate browser window for the Salesforce configuration. Doing so minimizes confusion and will help you keep track of the configuration process. This exercise also assumes the following:
- AAD and AAD Sync have been configured, if you want to integrate third-party SaaS provisioning as part of your organization’s AD account provisioning and de-provisioning (recommended).
- There is an existing enterprise Salesforce account.
- Your organization already has an Azure Active Directory Premium subscription, or you have signed up for a trial AADP subscription. If you do not have AADP, you may not be able to see some of the options described in the following exercises—for example, self-service password reset (SSPR).
![]() Note You can sign up for the Developer Edition of Salesforce in order to follow this exercise. To do so, visit https://developer.salesforce.com/page/Developer_Edition. Log in to the Azure Management Portal at https://manage.windowsazure.com.
Note You can sign up for the Developer Edition of Salesforce in order to follow this exercise. To do so, visit https://developer.salesforce.com/page/Developer_Edition. Log in to the Azure Management Portal at https://manage.windowsazure.com.
Follow these steps:
- Go to the AAD that will be used for Salesforce authentication, and click Applications, as shown in Figure 10-3.

Figure 10-3. Adding a new third-party SaaS to AAD
- In the pop-up window, select Add An Application From The Gallery, type salesforce in the search window, and click the magnifying glass, as shown in Figure 10-4.

Figure 10-4. Adding Salesforce to AAD from the gallery
- Select Salesforce from the search results, and click the check mark in the lower-right corner of the screen.
- Once Salesforce has been added, under Step 1, click the green Configure Single Sign-On button.
- For this exercise, select Windows Azure AD Single Sign-On, and then click the arrow in the lower-right corner.
 Note In your organization’s actual deployment scenario, select the SSO method that best matches your identity-management scenario.
 - On the Configure App Settings screen, click the Learn More link, and view the configuration instructions, as shown in Figure 10-5. Note that you need to do this each time you add a different SaaS application to AAD, because each application from the gallery has different steps and requirements; read the instructions so you have a better idea of what to expect. This exercise, however, walks you through the entire setup process.

Figure 10-5. Viewing custom instructions to add Salesforce to AAD
- Open a new, separate browser window, and log in to your Salesforce account at https://login.salesforce.com.
- Along the left side of the screen, expand the Domain Management menu, and click My Domain, as shown in Figure 10-6.

Figure 10-6. Registering a Salesforce subdomain
- Enter a subdomain name, and click Check Availability. If the subdomain is available, a green Available notification appears, as shown in Figure 10-6. Read the Terms and Conditions, check the box to agree, and then click Register Domain. Make a note of your subdomain name, which you use in step 10.
- Return to the AAD configuration browser screen, shown in Figure 10-5, and enter the Salesforce subdomain URL you registered in step 9, making sure you prefix the URL with https:// (for example, https://apressdemo-dev-ed.my.salesforce.com). Then click the arrow in the lower corner.
- In the Configure Single Sign-On At Salesforce page, click Download Certificate, as shown in Figure 10-7. Save the certificate to your computer. Make a note of the location and filename, because you will need to upload the certificate to Salesforce later. You can view the Salesforce configuration instructions, but this exercise walks you through the process.

Figure 10-7. Downloading a certificate for Salesforce
- Return to the Salesforce browser window to continue with the Salesforce configuration.
- Expand Security Controls in the menu on the left, and select Single Sign-On Settings, as shown in Figure 10-8.

Figure 10-8. Configuring Salesforce SSO settings
- Click Edit to configure SAML.
- Enable SAML by selecting the SAML Enabled check box. Click Save.
- Click New under SAML Single Sign-On Settings.
- Type in a name for this SAML configuration. Use the name AzureSSO for this exercise.
- Return to the Azure AD configuration browser window, shown in Figure 10-7, and copy the issuer URL to the clipboard by clicking the icon located at the end of the URL, as shown in Figure 10-9.

Figure 10-9. Copying URLs from AAD to paste into the Salesforce configuration
- Return to the Salesforce browser where you’re configuring the Salesforce SSO, and paste the URL into the Issuer field.
- Repeat steps 18 and 19 to copy the remote login URL from AAD and paste it into the Identity Provider Login URL field in Salesforce.
- Again, repeat steps 18 and 19 to copy the remote logout URL from AAD and paste it into the Identity Provider Logout URL field in Salesforce.
- Still in the Salesforce SSO configuration browser, click the Browse button next to Identity Provider Certificate. Navigate to the certificate downloaded in step 11, select the certificate, and click Open.
- In the SAML Identity Type section, select Assertion Sontains User’s salesforce.com Username.
- In the SAML Identity Location section, select Identity Is In The NameIdentifer Element Of The Subject Statement.
- For Service Provider Initiated Request Binding, select HTTP Redirect.
- In the Entity ID field, enter the Salesforce subdomain URL registered in step 10, making sure you prefix the URL with https:// (for example, https://apressdemo-dev-ed.my.salesforce.com).
- Click the Save button on the Salesforce SSO configuration screen to save the settings.
- Click and expand the Domain Management menu in Salesforce, and select My Domain.
- On the My Domain page in the Authentication Configuration section, click the Click Here To Login button.
- After the login completes, make the custom Salesforce domain available by clicking Deploy To Users.
- When you see the warning that the deployment cannot be reversed, click OK.
- In the Authentication Configuration section, click Edit.
- If you have a custom logo, you can choose to upload it to brand your organization’s Salesforce subscription.
- Select Azure SSO as an authentication service. Optionally, you can de-select Login Page if you only want to allow authentication through Azure SSO without the option of preventing a Salesforce-only account from logging in.
- Click Save.
- Return to the AAD configuration browser. You should still be on the Configure Single Sign-On At Salesforce screen. Select the “Confirm that you have configured single sign-on as described above. Checking this will enable the current certificate to start working for this application” check box at the bottom of the screen.
- Click the arrow to advance to the next screen.
- Verify and provide an e-mail address for notification of successful configuration, and then click the check mark at the bottom of the screen to complete the setup.
- Click the Configure User Provisioning option in step 2.
- Enter your Salesforce admin account and password.
- For the User Security Token field, do the following:
- Go to the browser with your Salesforce configuration. Click the down arrow next to your name at upper-right, and select My Settings.
- Expand Personal in menu at left, and select Reset My Security Token.
- Click the blue Reset Security Token button.
- The new security token is e-mailed to you.
- Copy the security token string from the e-mail.
- Return to the Azure SSO User Provisioning configuration screen.
- Ignore the instructions to append the security token to your password. Instead, enter the security token string from the e-mail into the User Security Token field.
- Click the arrow at the bottom of the screen.
- If there are no errors, you see a confirmation screen. Click in the lower-right corner to complete the configuration for user provisioning.
- Once AAD and Salesforce have been configured, you can test authentication to Salesforce through SSO. However, before doing so, you must assign users to the application:
- Click the Assign Users button in the Salesforce application configuration window.
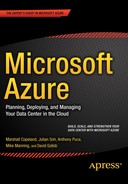
- In the Users And Groups window, select the user or users to whom you want to assign access, and click Assign at the bottom of the screen, as shown in Figure 10-10.
- Select the appropriate Salesforce role for your users, and click the check mark in the lower-right corner.
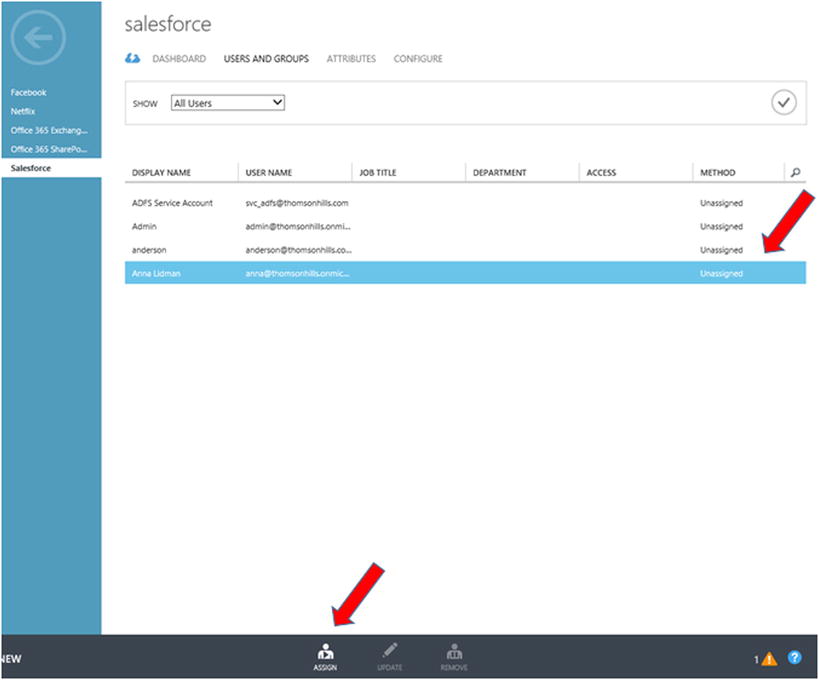
Figure 10-10. Assigning a user to an application
Users can now log in to Salesforce using their Active Directory credentials without being prompted for their user name or password.
End-User Experience
SaaS applications that have been assigned to users can be accessed directly via their respective URLs or via the Azure Access Panel at https://myapps.microsoft.com. The concept of the Access Panel is a single landing page where users can see and launch SaaS apps to which they have access without having to remember or bookmark each SaaS app’s URL. Figure 10-11 shows the Access Panel.

Figure 10-11. The Azure Access Panel, showing all SaaS apps authorized for the user
End-User SSO Experience with a Third-Party SaaS
This exercise demonstrates the user experience when accessing an application from the Access Panel:
- Go to the Access Panel at https://myapps.microsoft.com, and log in when prompted. The user account used to log in displays the icons of applications to which the user has access, similar to the screen shown in Figure 10-11.
- Continuing with the current scenario, click the Salesforce icon to launch Salesforce. The user is redirected to the Salesforce instance for Adatum Inc., as shown in Figure 10-12.
Figure 10-12. Redirected instance of Salesforce with the AzureSSO option
- The user has the option to provide a username and password. Or if the user wants to use their credentials, as is the case in this exercise, click the AzureSSO button as shown in Figure 10-12.
- The current user’s authentication token is evaluated and, if it is still valid, the user is automatically authenticated to Salesforce. This experience is similar to other SaaS apps where AAD can provide SSO.
In this case study, AAD is used to provide SSO to a third-party SaaS, which was already pre-federated with AAD. The administrator for Adatum Inc. only needed to go through the configuration process once and assign users to the application before SSO could be established with Salesforce.
Once authenticated through AAD, there is no need for end users to supply their user credentials again in order to access Salesforce.
For the administrator, users of Salesforce or any third-party SaaS are managed through AD and AAD. There is no need to create, modify, or delete users as separate administrative processes for Salesforce or any SaaS that has been pre-federated with AAD.
CASE STUDY 2: SSO FOR CUSTOM DEVELOPED APPS
SSO for third-party SaaS was introduced in the previous case study. What about the case where in-house custom applications also require SSO?
Challenge
Adatum Inc. has several in-house custom line-of-business (LOB) applications, which are claims-based apps in the demilitarized zone (DMZ). Adatum Inc. would like to allow employees access to these applications from the Access Panel and to experience a SSO experience similar to that of third-party SaaS.
Resolution
The process to extend AAD to provide SSO for in-house custom applications is similar to the steps outlined in Case Study 1 for third-party SaaS. However, instead of selecting Add An Application From The gallery in step 3 of the exercise “Extending AAD for a Third-Party SAAS,” choose the option Add An Application My Organization Is Developing, as shown in Figure 10-13.

Figure 10-13. Adding an in-house custom application to AAD
Adatum Inc.’s developers must make sure custom in-house apps can federate and authenticate with AAD. Therefore, the developers need to understand the concept of claims-based protocols, such as SAML and OAuth, as well as security and access concepts, such as the Service Principal Name of an application. Going into the details about such developer-specific topics is beyond the scope of this book, but there are many good resources on this topic, including this blog post from Vittorio Bertocci, a Microsoft developer: www.cloudidentity.com/blog/2012/07/12/single-sign-on-with-windows-azure-active-directory-a-deep-dive-2.
AAD continues to evolve rapidly. You can keep up to date on all the new and upcoming features of AAD through the AD Team Blog: http://blogs.technet.com/b/ad.
In this case study, AAD is also used for in-house custom LOB applications. This provides SSO for most modern applications and thus provides users with a more seamless experience when accessing applications after the initial authentication. It also provides IT administrators with a single model to provision users through AD and AAD without having to manage disparate IDMs specific to individual applications.
CASE STUDY 3: SELF-SERVICE PASSWORD RESET (SSPR)
Adatum Inc. is exploring options to streamline IT operations by reducing the amount of busywork for IT administrators so that precious IT resources can be put to better use. Adatum Inc. would also like to provide better customer service for employees and 24×7 support for as many IT requests as possible.
Challenge
Adatum Inc. needs to optimize the use of IT resources in order to remain competitive. As a multinational corporation, Adatum Inc. has employees located throughout the world, and it may not be economical to have multiple Help Desks or even a single 24×7 Help Desk to support a global workforce. But whenever IT issues prevent employees from accessing Adatum Inc.’s systems, there is a loss of productivity that impacts revenues.
Resolution
Adatum Inc. discovered that, in addition to SSO for third-party SaaS, AAD also provides users with the self-service capability to reset passwords securely. With this ability, employees around the world can reset their passwords without contacting the Help Desk.
![]() Note In addition to password reset, AAD provides user self-service for group-membership management. Configuring self-service group-membership management is similar to configuring SSPR and just as straightforward. Therefore, this chapter does not cover it in detail.
Note In addition to password reset, AAD provides user self-service for group-membership management. Configuring self-service group-membership management is similar to configuring SSPR and just as straightforward. Therefore, this chapter does not cover it in detail.
ENABLING USER SELF-SERVICE WITH AAD
This exercise demonstrates the steps required to configure user SSPR as well as the end-user experience. It also shows the steps to configure AAD SSPR:
- Go to the Azure Management Portal at https://manage.windowsazure.com.
- Select the desired directory in Azure, and click Configure, as shown in Figure 10-14.

Figure 10-14. Configuring a directory in Azure
- Configure the parameters under User Password Reset Policy, also shown in Figure 10-14. The options are self-explanatory, so it is left to you to finish configuring the password-reset policy based on the organization’s needs.
- Once the self-service password policy has been set, users must be provided with this link in order to be guided through a registration process to provide verification information: http://aka.ms/ssprsetup. This link can be sent via e-mail or placed on the organization’s intranet page. Alternatively, you can turn on the option to require a user to be prompted automatically for the information upon initial login.
End-User Experience with SSPR
This example is based on the automatic verification option. When any one of the four options used to verify a user’s identity is selected, the user is prompted to provide that piece of information when logging in to AAD, as shown in Figure 10-15 and Figure 10-16.

Figure 10-15. The user is prompted to provide verification information upon login when an account does not contain information for a particular verification method

Figure 10-16. The user is presented with information that needs to be verified or provided
In the event that the user needs to reset their AAD password through the self-service process, they select the Can’t Access Your Account link on the Azure login page, as shown in Figure 10-17.

Figure 10-17. The Can’t Access Your Account link for SSPR
Additional Information Regarding SSPR
AAD can also be configured with password write-back to on-premises AD. When this feature is configured, passwords that are reset in AAD are written back to on-premises AD so the user can authenticate through AD or AD FS after a password reset.
Another important point is that AADP or the Enterprise Mobility Suite, of which AADP is a part, also provides the licensing for an on-premises FIM server and user portal. This allows organizations to provide SSPR for users when they are not able to log into their domain-joined computers while on the corporate network. Configuring FIM is beyond the scope of this book, but this deployment guide details the steps to deploy and configure the FIM Portal for SSPR for domain-joined computers: http://www.microsoft.com/en-us/download/details.aspx?id=29959.
Summary
This chapter introduced the key features of AAD. Feature of AAD that were not covered include customizing the login page through branding (https://msdn.microsoft.com/en-us/library/azure/dn532270.aspx), security reports, and usage reports. You can learn about these capabilities of AAD at http://azure.microsoft.com/en-us/pricing/details/active-directory.
Chapter 11 examines a different set of Azure workloads and scenarios: Azure as an infrastructure as a service (IaaS) option for high-availability (HA) and disaster recovery (DR).