![]()
Clusters, Regional VNets, High Availability, and Disaster Recovery
One of the key business features of Microsoft Azure is the ability to create or move virtual machines (VMs) into Azure, back out of Azure, and into another private or partner clouds when it makes sense for your business model, including the licenses you already own. Services create revenue, so the impact can be felt in client activity load, which in a traditional datacenter requires purchasing more hardware, “racking and stacking” systems, and weeks or months of preparation. Adding systems for improved performance or higher availability is built into Azure.
This chapter is about availability. It gives you a deeper understanding of Azure support for making systems highly available through Azure properties, infrastructure as a service (IaaS) in Azure, and other Azure services. Each of the topics covered addresses providing availability or redundancy for explicit business functionality. Specifically, this chapter provides you with guidance to plan for and architect business support using the following:
- Clusters
- Regional VNets
- High availability
- Disaster recovery
Failover Clustering in Microsoft Azure
The first availability service this chapter discusses—failover clustering—addresses the question, “Why would a business need a cluster to failover to the Azure cloud?” The answer is that failover, or availability, is often a business-driven response and not necessarily an IT-only requirement. The Azure cloud is always highly available, so this section looks at the requirements for enabling high availability (HA) services with Azure.
With nearly unlimited services, Azure subscriptions enable customers to scale down the size and cost of traditional on-premises datacenters. Chapter 8 discussed the flexibility of extending your traditional network into Azure IaaS by creating the exact type of IP networks in on-premises datacenters using Azure VNets. Hybrid cloud connectivity saves companies money while providing greater agility to create new business opportunities quickly, because Azure connects company services and systems using the same common tools and skills used with on-premises systems. With IaaS and Azure VNets enabled, you can extend clustering into or out of Azure.
![]() Note One of our customers has offices and a small datacenter that they lease from the building owner. Power is often lost for the entire building, so this customer has architected its Azure subscription as the company’s primary datacenter, with on-premises as the backup.
Note One of our customers has offices and a small datacenter that they lease from the building owner. Power is often lost for the entire building, so this customer has architected its Azure subscription as the company’s primary datacenter, with on-premises as the backup.
In this chapter’s cluster example, Microsoft SQL Server is the database that the business needs to be highly available. Let’s first discuss and walk through the options of the AlwaysOn Failover Cluster Instances feature and then discuss and provide steps for the AlwaysOn Availability Groups feature.
Why Choose Failover Cluster Instances?
Although all data is stored in triple redundancy in Azure, services hosted through Azure are not redundant by default. If an application’s downtime is more expensive to the business than the cost of an additional server, failover cluster instances (FCIs) should be deployed. Your business may choose FCIs in Azure with the AlwaysOn Availability Groups feature because it is a relatively inexpensive and robust clustering solution that offers complete control over all services and databases on the server. One instance of Microsoft SQL server in Azure does not provide fault tolerance. Keeping servers in sync so that data is identical on each node using AlwaysOn FCIs is a great option. Service availability is necessary to keep one server online and responding to client requests if the other service is installed in an Azure upgrade domain while undergoing maintenance. Microsoft provides maintenance on one upgrade domain at a time to minimize disruptions. Fault domains and upgrade domains are discussed in greater detail in the section “High Availability in Microsoft Azure.”
![]() Note A fault domain in Azure is a rack of computers. During deployment of Azure services, you, the owner, cannot control the allocation of a fault domain. An Azure upgrade domain distributes services evenly into multiple upgrade domains so that disruption of services during a platform upgrade is minimal.
Note A fault domain in Azure is a rack of computers. During deployment of Azure services, you, the owner, cannot control the allocation of a fault domain. An Azure upgrade domain distributes services evenly into multiple upgrade domains so that disruption of services during a platform upgrade is minimal.
Failover cluster instances protect the entire instance of the server, system, and MSDB database. Availability groups only protect user-defined databases and not the complete system. There is a limit to the number of availability group worker threads to protect the number of databases.
ENABLING AN ALWAYSON FAILOVER CLUSTER
To successfully create a two- or three-node failover cluster between your on-premises datacenter and Azure, you need to have already configured Azure virtual networks (VNets) in your subscription and created a site-to-site virtual private network (VPN), as explained in Chapter 8. You also need to understand Windows Server 2012 R2 failover clustering, including using Windows Cluster Manager; this topic is outside the scope of this book.
Note Microsoft Virtual Academy has a free class that teachers Windows Server 2012 R2 cluster techniques. It is available at www.microsoftvirtualacademy.com/training-courses/failover-clustering-in-windows-server-2012-r2.
To create a failover cluster, follow these steps:
- Create your VMs and storage in your Azure subscription, as described in Chapters 6 and 7.
- Create a file-share witness for cluster voting, as described in this article: http://blogs.msdn.com/b/clustering/archive/2014/03/31/10512457.aspx.
- Create a cluster, enable failover clustering for each node, and run the validation tests. This will take several minutes to complete. Create the cluster name and access point IP address.
- Enable cluster volume replication.
- Install SQL on the cluster nodes.
- Enable load balancing.
Why Choose AlwaysOn Availability Groups?
Microsoft SQL 2014 enhanced the AlwaysOn Availability Groups feature introduced in Microsoft SQL 2012 by following through on the promise of manageability and a great user experience. AlwaysOn is integrated high availability and, as you see later in this chapter, disaster recovery (DR) in a single datacenter or across multiple datacenters. It would be unfair to think of AlwaysOn as a single feature, because the Microsoft SQL product team provides a suite of capabilities in this one solution.
If you are familiar with traditional database mirroring, then you are well on your way to understanding the HA of SQL Server AlwaysOn Availability Groups. This feature provides automatic or manual failover for a group of databases from one primary database server up to a group of eight secondary SQL replica database servers. With the use of availability groups, the failover to secondary targets provides for easy support for multiple secondary replicas and optional read-only access for backing up secondary databases. Additionally, availability groups no longer required shared storage, such as an expensive storage area network (SAN) or even a less expensive network attached storage (NAS) device, as discussed earlier.
You may be thinking that with the Azure SLA for cloud services uptime guarantee at 99.95% availability and VMs and virtual networks uptime guarantee at 99.9% availability, everyone should architect all business services in Azure and discontinue any on-premises datacenter services. We say not just yet, because of the potential downtime or outage of services of up to 43.2 minutes per month. See Table 11-1, later in this chapter, for details. How do you eliminate downtime completely? Let’s answer that question by revisiting fault domains and upgrade domains, terms briefly discussed earlier in the chapter.
Table 11-1. Azure Service SLAs and Downtimes
|
Azure Service |
SLA |
30-day downtime (minutes) |
|---|---|---|
|
Computing |
99.95% |
21.9 |
|
SQL Databases (Basic, Standard, or Premium) |
99.99% |
4.4 |
|
Storage |
99.9% |
43.8 |
To put things into perspective, the allowable downtime for a single SQL server running in Azure can be up to 43.2 minutes per month, and downtime for one VM (not platform as a service, PaaS), can be up to 21.3 minutes per month. These downtimes are the longest outages possible under the SLA guarantee for Azure services. In a traditional on-premises datacenter, computers are placed into a rack, and AC power is applied to that rack. If power is removed from the rack, or if servers need to be upgraded, there is an outage. You need to install more than one instance on two fault domains.
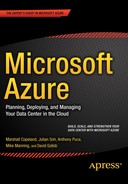
To help you better understand AlwaysOn features, this discussion focuses on availability groups on two instances of Microsoft SQL Server from an on-premises datacenter to Azure, as illustrated in Figure 11-1. AlwaysOn allows services to remain running in order to reply to client requests and take advantage of the Azure 99.9% uptime. This example uses two instances of Microsoft SQL server in two different fault domains to prevent Azure rolling maintenance, or a security patch upgrade of only one upgrade domain at a time. This also provides you with the same 99.9% uptime for your SQL Server applications during required maintenance times, whether planned, or unplanned maintenance. With two different fault domains, you have the ability to maintain applications that provide fault-tolerance.

Figure 11-1. AlwaysOn availability groups from an on-premises datacenter to Azure
ENABLING ALWAYSON AVAILABILITY GROUPS
The prerequisites for enabling availability groups are not complicated, and many businesses realize the value in these features and implement them. To enable the AlwaysOn Availability Groups feature, you need to do the following:
- Configure Windows Server Failover Clustering (WSFC) on the node.
- Make sure your version of SQL Server supports AlwaysOn Availability Groups.
![]() Note The Azure gallery in the new Azure Portal has SQL images that have AlwaysOn Availability Groups already configured in the template from which it is provisioned.
Note The Azure gallery in the new Azure Portal has SQL images that have AlwaysOn Availability Groups already configured in the template from which it is provisioned.
- Enable availability groups on one server instance (node), one at a time.
- Make sure Administrator access to the WSFC cluster is enabled.
Follow these steps:
- On the node you’d like to enable, choose Start
 All Programs Configuration Tools, and click SQL Server Configuration Manager.
 - In SQL Server Configuration Manager, click SQL Server Services, right-click the instance (node), and select Properties.
- Select the AlwaysOn High Availability tab.
- In the field containing the name of the local failover cluster, select the Enable AlwaysOn Availability Groups check box, and then click OK.
Regional VNets in Microsoft Azure
In this chapter, you’ve been introduced to many concepts relating to the deeper logical construction of an Azure datacenter. The racks of computers in an Azure datacenter are grouped to provide specific services like computing, storage, SQL Azure, service buses, and more. The services are arranged across the entire datacenter, and from one datacenter to the next.
When you are enabling services from your Azure Portal, as an IT administrator, you must be careful not to choose a storage account in one country and a hosted service in another country, assuming the datacenter is in another region. This type of configuration would have inherent latencies because of the networking requirement. When building services, conventional thinking says they should remain close—even within the same datacenter. Due to recent architectural improvements, Microsoft has increased the scope of network management to a region. This is achieved by using Azure regional VNets.
Affinity groups are no longer generally recommended for VMs and have been succeeded by regional VNets. You should only use an affinity group when a set of VMs must have the absolute lowest network latency between them. Placing VMs in an affinity group puts them in the same computing cluster or scale unit. It’s important to note that using an affinity group can have two possibly negative consequences:
- The VM size options are limited to the sizes offered by the computing scale unit.
- There is a higher probability of not being able to allocate a new VM. This happens when the specific scale unit for the affinity group is out of capacity.
Regional VNets provide a method of placing services close to each other. This is an important option that, when overlooked, can create unwanted latency. To help you put the size of an Azure datacenter into perspective, the Chicago datacenter is the size of more than 12 football fields. The process of enabling a regional VNet provides guidance to the datacenter fabric controller, to group these services closer together to remove latency. The Azure fabric controller (FC) is the kernel of the Windows Azure platform. The FC provisions, stores, delivers, monitors, and commands the VMs and physical servers that make up Azure. Regional VNets allow the following:
- Lower latency
- Higher throughput
Regional VNets should be generated before you create computing or storage systems. Reserved IP, internal load balancing, and instance-level public IP are all managed at a regional level. If you will need any of these features, they must be deployed into a regional VNet.
ENABLING REGIONAL VNETS IN MICROSOFT AZURE
Now that you understand the value of using Azure regional VNets, the steps to enable them are easy. One of the key elements of planning is the need to use multiple datacenter regions. Then you must create a regional VNet for each region. The regional VNet currently cannot be created through the Portal workflow; this capability will be added in the near future.
To create a regional VNet follow these steps:
- From the Azure Portal, select the Network option at left.
- Select your Azure VNet, export the current network configuration file, and save it to disk.
- Edit the file to add a new VNet, as follows:
<?xmlversion="1.0"encoding="utf-8"?>
<NetworkConfigurationxmlns:xsd="http://www.w3.org/2001/XMLSchema"xmlns:xsi="http://www.w3.org/2001/XMLSchema-instance"xmlns="http://schemas.microsoft.com/ServiceHosting/2011/07/NetworkConfiguration">
 <VirtualNetworkConfiguration>
 <VirtualNetworkSites>
<!– Regional Virtual Network Definition –>
<VirtualNetworkSitename="VNetUSWest"Location="West US">
      <AddressSpace>
        <AddressPrefix>192.168.50.0/24</AddressPrefix>
        <AddressPrefix>192.168.51.0/24</AddressPrefix>
      </AddressSpace>
      <Subnets>
        <Subnetname="frontendsubnet">
          <AddressPrefix>192.168.50.0/24</AddressPrefix>
        </Subnet>
        <Subnetname="backendsubnet">
          <AddressPrefix>192.168.51.0/28</AddressPrefix>
        </Subnet>
        <Subnetname="gatewaysubnet">
          <AddressPrefix>192.168.51.16/28</AddressPrefix>
        </Subnet>
      </Subnets>
    </VirtualNetworkSite>
   </VirtualNetworkSites>
  </VirtualNetworkConfiguration>
</NetworkConfiguration> - Go through the New Virtual Network Creation workflow in the Portal, select the edited file, and click OK. This completes the import process and creates the new regional VNet.
- To do this via PowerShell, do the following:
- Run this:
Get-AzureVNetConfig -ExportToFile "C:UsersusernameDocumentsNetcfg.xml" - Edit and save the file:
Set-AzureVNetConfig –ConfigurationPath "C:UsersusernameDocumentsNetcfg.xml"
- Run this:
This creates the Azure VNet.
Now, when you create VMs or storage services, you have the option to add the VM or storage pool to any regional VNet and enable it to be georedundant (geographically redundant). By enabling the services to support georedundancy, you add durability in case of a major disaster in an Azure region. Two systems are created in two different geographic regions, but note that there is a small up-charge for this availability feature.
![]() Note To gain a better understanding of geographically redundant storage, see http://azure.microsoft.com/en-us/pricing/details/storage.
Note To gain a better understanding of geographically redundant storage, see http://azure.microsoft.com/en-us/pricing/details/storage.
High Availability in Microsoft Azure
Discussions in this chapter and throughout the book provide insights into the physical components of Azure as it relates to creating necessary virtual components. With virtualized networking capabilities to connect and isolate virtual servers for IaaS and PaaS, you should begin to see the economies of scale of using Azure. Many small and some medium-sized businesses do not maintain dedicated staffing for IT due to budgetary constraints, and most do not allocate funding for a primary or (especially) a secondary datacenter. Using the Azure cost model and highly available subsystems, businesses can start to plan, architect, and build a sustainable future, only paying for the IT resources that they need at a fraction of what it would cost to set up the equivalent technology on-premises.
High availability is not a single feature of Azure; it is architected in every service, every component, and every new provision of Azure. If we make the statement, “Microsoft Azure supports 100% high availability,” then it is compelling to begin building your business on a highly available platform.
Microsoft has invested $20 billion US to date in 23 global datacenters. The Azure platform enables applications to be hosted and expanded worldwide, and to support client accessibility from the internet, corporate networks, or both. The Azure platform greatly simplifies, but doesn’t completely remove, the complexity of cloud-only applications or integration of on-premises software with hosted services in your Azure subscription. It is a platform that was planned, architected, and built from the ground up to provide and support customers’ demands for HA. Unfortunately, high availability is often viewed as a feature that can be added after a software application is finished. With Azure, high availability is the top feature required.
Azure IaaS now supports availability groups, as discussed earlier and illustrated in Figure 11-2. Availability groups in Azure provide the following services:
- Availability sets
- Management services
- Notification hubs (IOS, Android, and Microsoft)
- AutoScale (up and down)
- Virtual machines (load balancing)
- SQL Server AlwaysOn (clustering or availability groups)
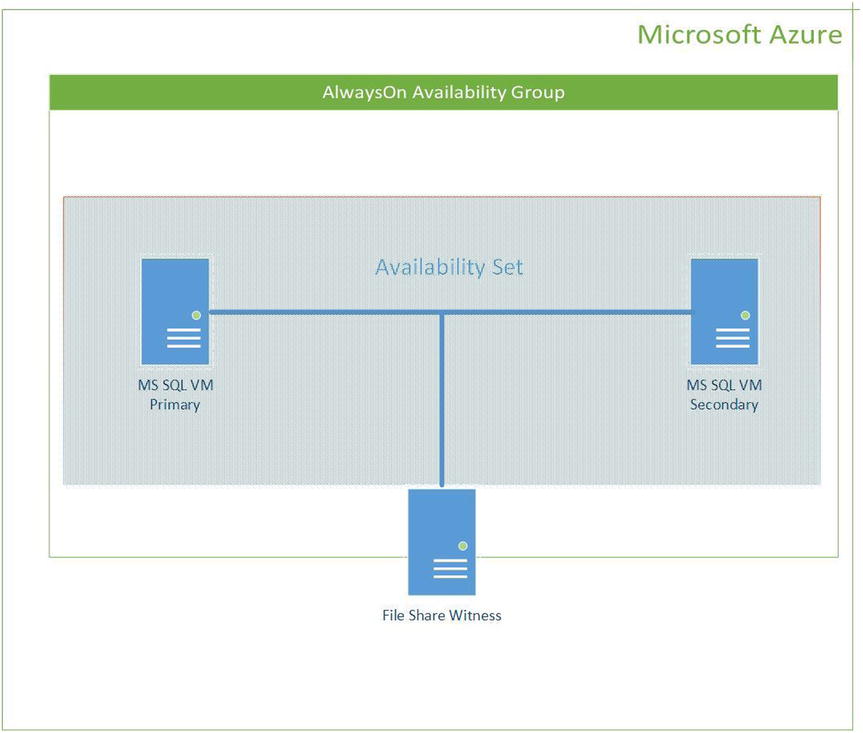
Figure 11-2. Microsoft SQL AlwaysOn availability groups from inside Azure, using an availability set
This section briefly highlights the Azure services that can help your business consume and take advantage of availability groups and then focuses on a detailed example of Microsoft SQL Server using availably groups.
Availability sets let Azure customers place workloads across multiple fault domains—which you can think of as being synonymous with racks—so that the failure of an entire rack does not bring down a service hosted in that rack. Placing VMs, for example, into an availability set, as depicted in Figure 11-2, avoids the possibility of a single outage impacting all the VMs supporting the service. Availability sets guarantee that not all VMs in an availability set will go down at the same time. If you’re concerned about multiple racks going down at the same time, and hence multiple fault domains incurring an outage, georedundancy, covered in Chapter 7 and also discussed earlier in this chapter, and disaster recovery, covered later in this chapter, should be evaluated.
Management services have enhanced features that are supported in the Azure Portal with the ability to enable operation logs and alerts. The logs provide smart parameters that let you view specific log data criteria based on data range, service type, service name, or even statuses such as Failed or Succeeded. Alert notifications can be enabled for subscription owners, business owners who are on call, or any e-mail address, as discussed in Chapter 2.
A Notification Hub is a service that enables personalized, cross-platform broadcast push notifications. These notifications are pushed to Microsoft Windows 8, Windows Phone, IOS, and Android mobile devices. This service uses Azure global scale to enable low-latency push notifications to millions of users. The Notification Hub provides a secure process to relieve your onsite back end to handle platform notification services (PNSs) like WNS, MPNS, Apple PNS, and Google Cloud Messaging Service.
AutoScale is a service that reaches across many Azure services and easily enables automatic scale-up when services are needed and automatic scale-down so that you pay only for what you use. This feature provides configuration for automatically scaling web sites, cloud services, mobile services, and VMs. Chapter 5 introduced you to the Azure Websites feature, which supports automatic scale-up based on time or metrics. For example, you can create a rule to enable another web site from your template and join a number of instances into your web farm every time 75% utilization is realized on one or more web sites. An interesting capability lets you retest the metric or set a specific timeline to scale down automatically by removing web sites or to create a rule to have only three instances running at night.
The Virtual Machines service can use a no-extra-cost, built-in load balancer, as do Cloud Services, Websites, and Mobile Services. The Azure load balancer simply needs to be enabled on the service, and it can be configured to provide either scale or HA. VM balancing of network traffic enables scale-out across many VMs, as well as enabling HA across your applications in the Azure cloud. Chapter 6 introduced you to VMs and provided greater insight into this availability group feature.
The SQL Server AlwaysOn Availability Groups feature supports functionality similar to AlwaysOn failover clustering, discussed earlier in this chapter. Together, these features provide a comprehensive high-availability and disaster-recovery solution. Availability groups provide automatic or manual failover for a group of databases from one primary to a secondary SQL replica database server. With the use of availability groups, the failover provides painless support for multiple secondary replica databases. For more information on configuring Microsoft SQL Server 2012 AlwaysOn FCIs and availability groups, visit https://technet.microsoft.com/en-us/library/jj822357.aspx.
The SLAs listed in Table 11-1 are for three of the many other Azure services: Computing, SQL Databases, and Storage. For a full list of Azure SLAs, visit http://azure.microsoft.com/en-us/support/legal/sla.
FAULT DOMAINS AND UPGRADE DOMAINS
Azure creates and maintains high availability using the logical discernment of fault domains. Hundreds of thousands of physical computers in racks, and millions of virtual servers, are used to build and offer Azure services. Azure datacenters use Microsoft’s Generation 4 datacenter best practices to run consistently at a power usage effectiveness (PUE) of 1.12–1.20 on the road to a PUE of 1.0, which will be possible in the future with Generation 5 datacenter best practices.
The scale of the servers in the Azure datacenter helps bring clarity to the understanding of fault domains and upgrade domains. Picturing a single rack of servers in an Azure datacenter, you can mentally visualize that group of computers as a fault domain. This is not how servers in the Azure Public or Government cloud are identified as a fault domain, but the image is necessary to help simplify your understanding.
When power is lost to a single server in the rack, all the VMs on that server and the applications on them are disrupted. This disruption can occur when the servers need to be updated with security patches and rebooted. The Azure Computer service SLA guarantees the level of connectivity uptime for a deployed service only if two or more instances of each role of a service are deployed.
Azure also uses the concept of an upgrade domain to ensure that applications running on the hundreds of VMs continue to process client requests without disruption. During the Azure service deployment, evenly distributed instances of multiple logical upgrade domains are performed. Then, when maintenance or security patches are required, they are completed one upgrade domain at a time. The upgrade process can be described as stopping instances (VMs) on one upgrade domain, upgrading applications or the physical server, bringing them back online, and then moving to the next upgrade domain. This is the least impactful way to upgrade systems, and it is why a minimum of two server instances are required to support the Azure SLA.
![]() Note The current Azure SLA for most services can be found at http://azure.microsoft.com/en-us/support/legal/sla.
Note The current Azure SLA for most services can be found at http://azure.microsoft.com/en-us/support/legal/sla.
Disaster Recovery in Microsoft Azure
Due to recent global natural disasters, the need to prepare for DR is paramount. Every company realizes that this is a required part of their IT strategy. Many companies don’t have an adequate DR solution in place because of complexity and cost. Azure reduces the complexity and high price of developing and implementing a DR solution with Azure Site Recovery.
Microsoft System Center Data Protection Manager (DPM) uses the Windows Server Volume Shadow Copy Service (VSS) by backing up blocks of data that have changed on the physical or virtual disks and copying that data to Azure BLOB storage. This process removes the need and cost for data tapes, tape drives, and offsite tape storage. Azure Backup has reduced the cost of long-term storage of data and the extreme cost of retrieving a backup set to recover a file or server. You can now architect DR scenarios using Azure’s storage, confirming that disk is the new tape.
Why Choose Disaster Recovery as a Service in Microsoft Azure?
Azure Site Recovery provides DR-as-a-service (DRaaS). This section explores using this feature, which is needed by IT staff to support a customer’s current configuration. As you walk through the different scenarios supported, keep in mind these two important terms related to restoring data and recovering from disaster: recovery time objective (RTO) and recovery point objective (RPO). RTO is the targeted time duration in which a business process must be restored after a disaster; in other words, “How long will it take to restore?” RPO is the maximum-targeted period in which data might be lost from an IT service due to a major incident; in other words, “How much data can we afford to lose?”
Azure Site Recovery (ASR), previously known as Hyper-V Recovery Manager, supports recovery of simple to complex IT infrastructures on-premises, on-premises to Azure, or on-premises to on-premises. ASR simplifies DR by providing comprehensive, automated protection for VMware, Hyper-V, and physical servers in a single management solution. It provides the ability to meet stringent SLAs for availability, the recovery of files, or the need for physical and VM rebuilding. Customers have mixed hypervisors and use different management software suites to maintain availability. Many customers have deployed VMware or Citrix virtual infrastructures; however, they struggle to enable business continuity–disaster recovery (BC/DR) architectures. Most customers lack a BC/DR strategy that supports their business needs because of the high cost of custom or third-party solutions associated with these hypervisors, the limitations of other public cloud providers, and the extremely high cost of maintaining their own secondary datacenter.
Microsoft acquired the company InMage in July 2014. InMage supports BC/DR of VMware VMs between any number of on-premises locations or public clouds without stringent requirements or breaking the businesses’ bank. The integration of InMage enables the use of the InMage Scout technology to support VMware’s proprietary VMDK format for migration to different sites or on-the-fly conversions to Microsoft’s open VHD format. InMage places entire VMs into Azure recovery services. The InMage technology allows Azure Site Recovery to support these sources and destinations:
- Enterprise
- Service provider
The purpose of the recovery vaults that can be enabled include the following:
- Production deployment
- Evaluating Azure Site Recovery
- Browsing Azure functionality
The datacenter environments are categorized in Table 11-2.
ENABLING DISASTER RECOVERY SERVICES
Azure recovery services provide DR support for many different IT datacenter configurations. Let’s walk briefly through some of the options to enable on-premises to on-premises and on-premises to Azure.
The prerequisites for setting up and protecting an on-premises VMM site to Azure includes choosing a recovery target identified in Table 11-2 and creating an Azure storage account to store data replicated to Azure. This account requires that georeplication be enabled and in the same region as the Azure Site Recovery service associated with your subscription.
Table 11-2. Disaster Recovery Sources and Targets with Azure Integration of the InMage Scout Solution
|
Source Environment Type |
Intended Target Environment Types |
|---|---|
|
SCVMM site |
Azure site |
|
VMWare site |
VMWare site |
|
Hyper-V site |
Hyper-V site SCCM site |
This first exercise illustrates protecting an on-premises system running System Center 2012 R2 VMM Server.
Protection of an On-Premises VMM Site to Azure
- Create an Azure Site Recovery vault. Provide a unique name for the site and its region, as shown in Figure 11-3.
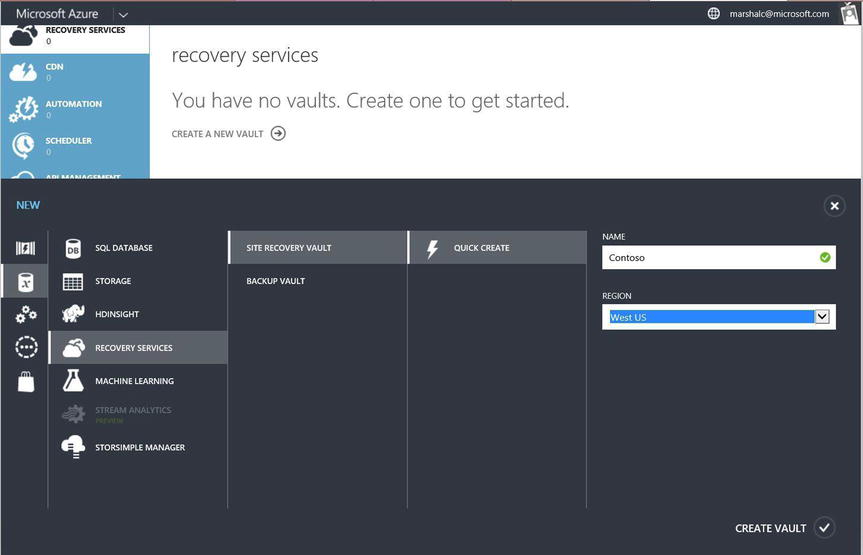
Figure 11-3. Creating a DR site vault for Contoso
- Generate a registration key in the vault pane, and download the setup file. Run the installation program for the provider application on the VMM server on-premises.
- Create the Azure storage account.
- Install the Microsoft Azure Recovery Service agent on each Hyper-V host (each in the VMM cloud).
- Configure the protection settings that are required.
- Enable protection for each VM managed by the VMM cloud.
- Run a test failover for a single VM to validate your recovery plan.
![]() Note For a more detailed version of this exercise, visit https://azure.microsoft.com/en-us/documentation/articles/site-recovery-vmm-to-azure/.
Note For a more detailed version of this exercise, visit https://azure.microsoft.com/en-us/documentation/articles/site-recovery-vmm-to-azure/.
The prerequisites for setting up and protecting a VM with InMage in Azure Site Recovery between an on-premises VMWare site to a second on-premises VMWare site include a new vault name, as described in the first DR exercise.
Protection of a VMWare On-Premises Site to a VMware On-Premises Site
- Download the registration key, as shown in Figure 11-4. This key is needed to install the InMage Scout agent.

Figure 11-4. Download the registration key for use with the InMage Scout agent
- Download the InMage Scout agent, as shown in Figure 11-5, and install it. (It is in a .zip file stored locally, and uncompressing is required.)

Figure 11-5. Download the InMage Scout agent .zip file
- Prepare the Scout components, including the configuration server, Windows, and Linux vContinuum.
- Install and configure the process server, and enable the mobility service on the source server.
- Enable protection for the servers, and finalize the protection and recovery plan.
The prerequisites for setting up and protecting VMs between two on-premises VMM sites using SAN array replication include using System Center 2012 R2 VMM servers in each on-premises site with Hyper-V hosts deployed in the primary and secondary sites. From the VMM console, enable one cloud container from the primary server that you want to protect; also enable one on the secondary VMM server. Configure one of the two SAN arrays as primary and one as secondary. Configure networking between the Hyper-V host servers to support the storage LUNs.
Protection of a VMM On-Premises Site to a VMM On-Premises Site with SAN Array Replication
- After you have created the Azure recovery vault, download the vault credentials, as shown in Figure 11-6.

Figure 11-6. Download the Azure recovery vault credentials needed for the Provider install
- Download the Microsoft Azure Site Recovery Provider, as shown in Figure 11-7, to be installed on the VMM’s servers (install on the primary and secondary VMM servers).

Figure 11-7. Download the Provider to install on the VMM server
- Download the update for VMM 2012 R2 and Update Rollup 5 for Microsoft System Center 2012 R2 VMM. (If you have not run the update before this step, you can find it at http://support.microsoft.com/en-us/kb/2822776.)
- Remember, you registered your VMM clouds as part of the prerequisites for this exercise. Now you need to configure the cloud protection. Enable protection for replication groups and VMs. This completes your recovery plan.
![]() Note For more information on how to use SAN replication, refer to https://azure.microsoft.com/en-us/documentation/articles/site-recovery-vmm-san.
Note For more information on how to use SAN replication, refer to https://azure.microsoft.com/en-us/documentation/articles/site-recovery-vmm-san.
The final exercise involves using Azure recovery services and the backup vault. This DR option provides a simple process to back up Windows servers, Windows essentials, and Windows clients from on-premises into Azure.
Backing Up Servers and Clients On-Premises to the Azure Backup Vault
- Create your Azure recovery backup vault, as shown in Figure 11-8.
Figure 11-8. Create the Azure recovery service Contoso backup vault container
- Download the vault credentials, as shown in Figure 11-9. (As a security precaution, you have two days to install the agent. If you don’t complete the installation, you will need to repeat this step.)

Figure 11-9. Download the Contoso vault credentials with security support; they have a two-day expiration.
- Download and install the Azure Backup Agent on the servers, files, and folders that you want to protect, as shown in Figure 11-10.

Figure 11-10. Download the Contoso Backup Agent installation for on-premises to Azure Backup
- The servers appear in the Register Items view in the Azure Backup view.
Summary
In this chapter, you’ve learned about the support for clusters and AlwaysOn Availability Groups in Microsoft Azure and how to enable systems to respond with more agility using regional VNets. You read about how every building block of Azure is planned, architected, and constructed to support the customer need for HA. Finally, you learned about Azure’s many options for supporting DR plans and backing up from on-premises into Azure.
A final word and recommendation regarding using Azure for DR: with the lower price point of Azure, you can now create a cost-effective DR datacenter or DR site. Don’t stop at creating a recovery scenario—you need to test the recovery of databases in order to ensure that you have the correct processes in place. Continue to use the scalability of Azure and its features to test failover plans and validate that the solution you architected provides the business-recovery results you expect. Nowadays, customers don’t have to worry as much about the budget for geographically distributed datacenters with redundant capacity, because Azure provides the best price point, features, and scalability for DR requirements of businesses of every size.