Whether you have many years’ experience with Chef or just followed the online training material at http://learn.chef.io you will know that one of the first things you need to do when setting up an environment is to bootstrap the machines you are working with. This means installing the Chef client onto the target machines over the network. This chapter introduces the Chef VM Extensions for Azure, a more efficient method of applying the Chef client onto a virtual machine and registering that node with your Chef server.
We’ll start by looking at the mechanics of Azure VM Extensions and discuss the benefits of using the Chef VM Extension in place of the traditional Chef bootstrap process. We will then step through what you need to do to install, configure, and troubleshoot the Chef VM Extensions in your environment.
What Are Azure VM Extensions?
Azure VM Extensionsare lightweight pieces of software that extend VM functionality in some way. They are managed by a process running on each compute resource called the VM Agent, which is installed by default when creating a VM. If you’ve used a Windows virtual machine on Azure and ever had to reset an administrator password through the portal, you’ll have used the features of the VM Agent.
VM Extensions are stored in an Extension Gallery that is accessible to the VM at provisioning time. The gallery is geo-replicated so that it is available in all regions. The VM Agent on each machine is responsible for retrieving the extension to the local VM and then calling an Install, Update, or Uninstall command, which then executes logic contained in scripts within the extension.
During installation and once the Extension has been installed the status of the extension is reported into an area of blob storage alongside the VM. This location can be read by the Resource Manager API (and including the Portal) to give feedback.
VM Extensions are useful because their state can be made visible externally without logging onto the machine; they are also provisioned and de-provisioned independently of the machine itself, all of which mean they lend themselves well to be used in configuration management scenarios. Figure 3-1 shows the components of an Azure VM Extension.
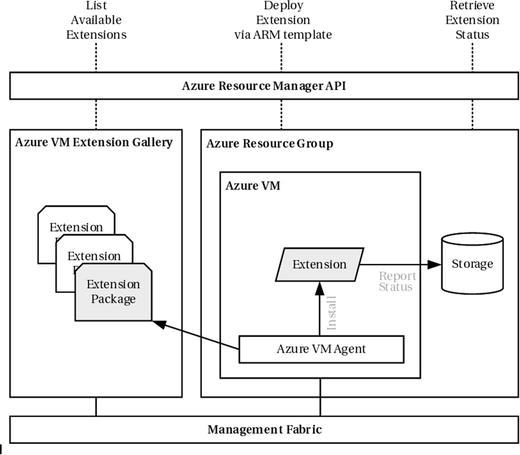
Figure 3-1. Components of Azure VM Extensions
Note
VM extensions can technically be added to any compute (VM) resource including those servicing PaaS roles (such as web and worker processes); however we will focus on adding resource to IaaS resources only.
Introducing Chef VM Extensions
Chef worked with Microsoft to build and certify the Chef VM Extension as a more efficient way of enabling the Chef client on a machine, demonstrating the integration points of Azure with vendor-based solutions such as Chef.
Azure Resource Manager (ARM) allows us to define complete infrastructure stacks and architectures to be provisioned within Azure, including storage, network interfaces, public IP addresses, and load balancers. One assumption that is often made that because the cloud is ‘public’ that all resources created on it are public and therefore the only surface for management is through the front end. This is not the case for many cloud providers - it is also possible to create virtual machines that are not externally accessible with a public IP address.
To bootstrap a VM with a Chef client in Azure the following requirements must be met:
The target machine must have WinRM (Windows) or SSH (Linux) protocol enabled and configured to be listening.
You must be able to route to the machine directly, either over the Internet, VPN, or ExpressRoute.
Firewalls must be opened to allow connections to the target machine from your client on ports TCP/5985-5986 (WinRM) or port TCP/22 (SSH).
The target machine must have access to the Chef Server via HTTPS.
But what if the nodes you wish to bootstrap are not directly accessible to the Internet or via a private (VPN or ExpressRoute) network? We need an alternative approach. The Azure VM Extension is deployed as a resource, so the prerequisites to use the extension are much simpler:
The target machine only requires outbound network connectivity via an Internet gateway to retrieve the installer files (enabled by default).
The target machine must have access to the Chef Server via HTTPS.
Enabling the client is attractive in an automation sense, as we can declare the extension at the machine definition time, making it a time-saving option, too, when you are building many machines in parallel.
To start working with the Chef VM Extension, we first need to find a suitable version from the Extension Gallery so we can provision it.
Chef Azure VM Extension Compatibility
There are three different types of extensions published to the gallery; in fact we are probably only interested in two of them. ChefClient is the name of the extension for Windows and LinuxChefClient is the name of the extension for Linux. CentosChefClient only provides a Chef version 11 client and is not recommended unless you are using a very old Chef server. You can see a list of the version compatibility for the Chef VM Extension in Table 3-1:
Table 3-1. Chef VM Extension compatibility
Extension Name | Supported Operating Systems |
|---|---|
CentosChefClient | CentOS 6.5+ (NB: Installs Chef Client version 11 only) |
ChefClient | Windows Server 2008 (all variants including R2), Windows Server 2012 (all variants including R2), Windows Server 2016 Technical Preview (experimental) |
LinuxChefClient | Ubuntu 12.04+, CentOS 6.5+ |
To get started let’s see which VM Extensions are available to us from the VM Extension Gallery.
Listing the Available Chef VM Extension Versions from the VM Extension Gallery
The easiest way to accomplish this is by using either the Azure command line interface (CLI) or Azure PowerShell cmdlets (see chapter 2 if you have not installed or configured either tool yet). Let’s start with demonstrating how to do this using the Azure-cli .
Azure-cli
First we need to ensure we have a valid session by signing in using the azure login command and following the instructions displayed on the screen:
PS C:UsersStuartPreston> azure login --username [email protected]info: Executing command loginPassword: **********info: Added subscription Microsoft Partner Networkinfo: Added subscription Pendrica Productioninfo: login command OK
Once we have logged in, ensure that you are in ARM mode by using the azure config mode arm command:
PS C:UsersStuartPreston> azure config mode arminfo: New mode is arm
The Azure-cli has a number of commands that relate to VM resource extensions. These can be seen by typing azure vm extension-image at the command line:
PS C:UsersStuartPreston> azure vm extension-imagehelp: Commands to manage VM resource extension imageshelp:help: Lists virtual machine/extension image publishershelp: vm extension-image list-publishers [options] <location>help:help: Lists virtual machine extension image types by a publisherhelp: vm extension-image list-types [options] <location> <publisher>help:help: Lists virtual machine extension image versions by publisher and type inputhelp: vm extension-image list-versions [options] <location> <publisher> <typeName>help:help: Lists virtual machine extension images by publisher, and type inputhelp: vm extension-image list [options] <location> <publisher> <typeName>help:help: Lists virtual machine extension image versions by publisher, type and version inputhelp: vm extension-image show [options] <location> <publisher> <typeName> <version>help:help: Options:help: -h, --help output usage informationhelp:help: Current Mode: arm (Azure Resource Management)
We’re interested first in using the azure vm extension-image list-types command to get a list of the image types that can be assigned to our VM. For this we need to know the datacenter location (e.g., West Europe) and the publisher name, which in our case is Chef.Bootstrap.WindowsAzure:
PS C:UsersStuartPreston> azure vm extension-image list-typesinfo: Executing command vm extension-image list-typesLocation: West EuropePublisher: Chef.Bootstrap.WindowsAzure+ Getting virtual machine extension image types (Publisher: "Chef.Bootstrap.WindowsAzure" Location:"westeurope")data: Publisher Type Locationdata: --------------------------- ---------------- ----------data: Chef.Bootstrap.WindowsAzure CentosChefClient westeuropedata: Chef.Bootstrap.WindowsAzure ChefClient westeuropedata: Chef.Bootstrap.WindowsAzure LinuxChefClient westeuropeinfo: vm extension-image list-types command OK
We can see the three types of VM Extension are available to us; but to use the VM Extension in our ARM templates, we need the version number too. This is retrieved by the use of the azure vm extension-image list-versions command. In addition to the datacenter location and publisher, we also now need to supply the VM extension type name:
PS C:UsersStuartPreston> azure vm extension-image list-versionsinfo: Executing command vm extension-image list-versionsLocation: West EuropePublisher: Chef.Bootstrap.WindowsAzureTypeName: ChefClient- Getting virtual machine extension image verions (Publisher: "Chef.Bootstrap.WindowsAzure" Type:"ChefClient" Location:"westeurope")data: Publisher Type Version Locationdata: --------------------------- ---------- ---------------- ----------data: Chef.Bootstrap.WindowsAzure ChefClient 11.10.4 westeuropedata: Chef.Bootstrap.WindowsAzure ChefClient 11.12.0.0 westeuropedata: Chef.Bootstrap.WindowsAzure ChefClient 11.18.6.2 westeuropedata: Chef.Bootstrap.WindowsAzure ChefClient 1207.12.3.0 westeuropedata: Chef.Bootstrap.WindowsAzure ChefClient 1210.12.100.1000 westeuropedata: Chef.Bootstrap.WindowsAzure ChefClient 1210.12.4.1000 westeuropeinfo: vm extension-image list-versions command OK
PowerShell
For PowerShell , we need to use the combination of the Get-AzureVMImagePublisher, Get-AzureVMExtensionImageType, and Get-AzureVMExtensionImage cmdlets to retrieve a list of valid extension versions:
First of all, we need to ensure we are logged in with the correct account:
PS C:UsersStuartPreston> Login-AzureRmAccount A web page will be presented, allowing you to sign in with your Organizational ID. You should then be logged in, and presented your account information:
Environment : AzureCloudAccount : [email protected]Tenant : 9c117323-abab-abab-abab-9ee430723ba3Subscription : 4801fa9d-cdcd-cdcd-cdcd-b265ff49ce21CurrentStorageAccount :
We can now run the following command to get a list of the available Chef Azure VM Extension versions (you will need to substitute the -Location parameter value with the region you are interested in):
PS C:UsersStuartPreston> Get-AzureRmVMImagePublisher -Location "West Europe" | where PublisherName -eq 'Chef.Bootstrap.WindowsAzure' | Get-AzureRmVMExtensionImageType | Get-AzureRmVmExtensionImage | Select Type, Version | Format-Table -AutoSizeType Version---- -------CentosChefClient 11.12.4.2CentosChefClient 11.14.6.1ChefClient 11.10.4ChefClient 11.12.0.0ChefClient 11.18.6.2ChefClient 1207.12.3.0ChefClient 1210.12.100.1000ChefClient 1210.12.4.1000LinuxChefClient 11.18.6.2LinuxChefClient 1207.12.3.0LinuxChefClient 1210.12.100.1000LinuxChefClient 1210.12.4.2000
Note
If you have been paying close attention, you will see that both Azure-cli and PowerShell approaches return the full version number of the extension (e.g., 1210.12.100.1000). When specifying the version in an ARM template, we need to specify only the Major and Minor versions in the template (e.g., 1210.12).
Adding a Chef VM Extension to an Existing Virtual Machine
The Chef VM extension can be added to machines individually from the command line using either the Azure-cli or PowerShell.
Note
At the time of writing there is no way of achieving this through the management portal.
To add a Chef VM extension to an existing VM from the command line we will need to supply two configuration files, one called publicSettings.config and one called privateSettings.config. The difference between the two files is that privateSettings.config contains values you would like to keep secret - any settings entered here are hidden from all Azure logging and only made available to the target machine.
Hint
Many of the values required for the configuration files can be found in the knife.rb file that you downloaded with the Starter Kit (see chapter 1 for more details).
publicSettings.config
Here is the template that needs to be used for the publicSettings.config file , and the description of each key can be seen in Table 3-2:
Table 3-2. Chef VM Extensions publicSettings.config settings
Key Name | Description | Example Value |
|---|---|---|
chef_node_name | This needs to be set to the name you wish to register with the Chef Server. | VM |
chef_server_url | This is the Chef server URL to register the node with. | |
validation_client_name | This is the name of the validation key (usually the same as the filename without -validator.pem). | myorganization |
runlist | This is the initial runlist to add to the node. This runlist will be deployed when the machine has first run. | recipe[starter::default] |
{"bootstrap_options": {"chef_node_name":"<your node name>","chef_server_url":"<your chef server url>","validation_client_name":"<your chef organization validation client name>"},"runlist":"<your run list>"}
privateSettings.config
Here is the template that needs to be used for the privateSettings.config file , the description of each key can be seen in Table 3-3:
Table 3-3. Chef VM Extensions privateSettings.config settings
Key Name | Description | Example Value |
|---|---|---|
validation_key | This is the extracted text from the organization-validator.pem file. Each line ending should be replaced with “ ” so that it fits into a single string | <see example> |
{"validation_key": "<your chef organization validation key>"}
Converting a Multiline Key to a String Suitable for JSON
The JSON format does not deal well with the concept of multiline strings , so we must convert our key to a single line string that is delimited with “ ”. Ruby offers a quick way of accomplishing this, by using the following snippet. Simply replace cert.pem with the path to the certificate you wish to convert to a single line with explicit line breaks.
PS C:UsersStuartPreston> chef exec ruby -e 'p ARGF.read' cert.pem"-----BEGIN RSA PRIVATE KEY----- MIIEpAIBAAKCAQEAlSvQ/TcQVLHlGAo5im3eS79BbtJJ5j/C0N5aXF7IwjnM0Ltw Msn/i1qdV1mMUTuPrCFkQYaOcK5gIkqld15DXjv7y6tnvxlxkCUHaALfNx23Q9J/ JR2o3INyliGgW9RlBBTSZ916Lm1ur+K35fDn3TmPKszVnPwpPmqn7aWSbjd8MhMc ISlTawIUaYVNadEK6ba4bf6uzt0VekP6RGw6807dOqn0+YFNuuclqyMDoozXrHsc zpd6jNEMvlzGrUTlP+6jhvDAC0QsoNq1sONNdTXsABcec6TmTNy/1REeGiF0AxfT lB1vo3Z2On34oFbmYLUlsqzRhmtdXmAy7MBOgwIDAQABAoIBAF8BhR2A0Hngw1RI TtWHnCkKKpZ2gHKQ8Xct5scl5x8syPG4L4FpfcQ3djaH5gJmuN6cdcn19Qp3ROsS N8iK1MVT1s6k4HKptdZkfw8TpS7pUit0CV6OQVoQrg5IZGWYJK4wxME6IfMn53NG JnHguQwA+Nn9k59kSrBiJYoKBfUDkLq8CzRLKXDFQtfFwxUO+Gei7ClB6dPcUADC bvti/crAK3n/6MXoxTGyRNZvKYdxTwV2ZKd2QWT/2oiAn0zS6Qo4mnTMPQvHT93h bqcm58ELJAEaUkmb/h/7rMdH7mDmKBv4wr8LRyqPIiLDcGF/88UzkdgxxVu/IlO9 g92qnqECgYEAxV1B5ta4LfmNwPhEu9e9JVpYY73ONWteV+TbZHC1pwLZy6SnSLa8 Scgu7t+wcJ/ ZX7nNkwybuNmVOh+iCwQUVN92zb0cytDvRF/0Drzkh/px5RIXqF+pP3pXMbNbyRF OxYpv6JyNo94NJI5h114s4HDTogeyq82A2pm5Bs2YO/iFINJIlW/nyB+OixxM+C5 5sqFWrWmaEulo67tuDTGGXMiArSQYI/ItJdWn7cCgYEAmW36QX5DCFqsvItEw9Lf lB48AK4ZlKW3XhToCZklXoR01D9YXMrSbXlWIxV6kNOLXuXXJXGoIEoVPJgP98N0 GI056HmqQNmiV48yTTitYWG9detxa2LXHCPQLXqwAxAkagmR7G1evGH9JXbGVmWX KLJUWqmvVG2OsNYcg8u4ylECgYBrK7cjKKNQg+v7V6E6rnxHWIDBSwmO/mVv1Srz 8lllMQHwkhSfIxbis3i+UpWLeeIYCXL/Q0tkhcnVRqpCFCwhOji81MclHGhRw7Kb Obg76Ia6MqR60C0WA4Db1teTyUH6hiLyHoK2t56wbhYVD7NEMJb5Sbgw32qI0ZtN y/WDCQKBgQC+adlpc06RQuLEuyxXH9aFQi3FRXBjK3Op+8nN1IlW7kfLNkkkKsez ZII47UkrboVTxaZRmEfTkcJzANNft9gxMz9EjiSJ0X0KG/+v4bNiP1mjUJlIfhlQ 9Tq7asOu8NV5BCds/S6VKiVoznhVCzkSH5mwczJSgoJwMeg4QVAHDw== -----END RSA PRIVATE KEY-----"
You can now copy and paste this single string into the correct location in the privateSetting.config JSON file.
Now that we have our settings files we can use the azure vm extension set command (Azure-cli) or Set-AzureRmVMExtension cmdlet (PowerShell) to add the extension to an existing VM:
Azure-cli
Assuming we have a resource group named chefazure-ch03 and a VM named ch03-vm, then the command to execute to add the Windows ChefClient would look similar to the following:
PS C:UsersStuartPrestonchefazure-ch03> azure vm extension set --public-config-path publicsettings.config --private-config-path privatesettings.config chefazure-ch03 ch03-vm ChefClient Chef.Bootstrap.WindowsAzure 1210.12info: Executing command vm extension set+ Looking up the VM "ch03-vm"+ Installing extension "ChefClient", VM: "ch03-vm"info: vm extension set command OK
PowerShell
To add the Chef VM Extension using PowerShell we use the Set-AzureRmVMExtension cmdlet. Again, with an existing resource group named chefazure-ch03 and a VM named ch03-vm, then the command to execute to add the Windows ChefClient would look similar to the following:
PS C:UsersStuartPrestonchefazure-ch03> $settings = gc .publicSettings.config -rawPS C:UsersStuartPrestonchefazure-ch03> $protectedSettings = gc .privateSettings.config -rawPS C:UsersStuartPrestonchefazure-ch03> Set-AzureRmVMExtension -ResourceGroupName chefazure-ch03 -Name ChefClient -VMName ch03-vm -Publisher Chef.Bootstrap.WindowsAzure -ExtensionType ChefClient -TypeHandlerVersion 1210.12 -Location "West Europe" -SettingString $settings -ProtectedSettingString $protectedSettings
Note that there will be a delay before the result is returned:
Status : SucceededStatusCode : OKRequestId : f2a51388-93a8-4fd7-858d-d30864f3e98bOutput :Error :StartTime : 19/10/2015 21:52:15 +01:00EndTime : 19/10/2015 21:55:08 +01:00TrackingOperationId : cd985541-fec4-4e43-88e2-91825f35f616
Validating a Chef VM Extension is successfully installed at the Command Line
Next you will want to ensure that the Chef VM Extension is successfully installed. There are a variety of ways this can be achieved. First of all, the extension status can be viewed in the portal. From the command line, the azure vm extension command allows us to retrieve properties about a provisioned Chef VM Extension:
Azure Management Portal
If all went well you should be able to navigate via Browse All to your VM, navigate to All Settings and then Extensions to see that the Chef Client extension is installed successfully, as shown in Figure 3-2 below.

Figure 3-2. Viewing the status of VM Extensions in the management portal
To verify that the node has registered itself, we can visit the Hosted Chef management portal in a browser, and the default tab Nodes should be showing the new node. Figure 3-3 shows this.

Figure 3-3. Chef Server showing registered node
There are many more options available in the Chef management portal for configuring your nodes; for example, you may be asking yourself why is Environment set to _default? We will discuss this when we look at productionizing your workloads in chapter 7.
Azure-cli
In order to verify the installation of a Chef VM Extension using Azure-cli we use the azure vm extension get command:
PS C:UsersStuartPrestonchefazure-ch03> azure vm extension get chefazure-ch03 ch03-vminfo: Executing command vm extension get+ Looking up the VM "ch03-vm"data: Publisher Name VersionStatedata: --------------------------- -------------------------------- ------- ---------data: Chef.Bootstrap.WindowsAzure ChefClient 1210.12 Succeededdata: Microsoft.Azure.Diagnostics Microsoft.Insights.VMDiagnosticsSettings 1.2 Succeededinfo: vm extension get command OK
To get more detailed information such as the provisioning state of the extension, we need to use the --json flag, which returns us full details of the resource:
PS C:UsersStuartPrestonchefazure-ch03> azure vm extension get chefazure-ch03 ch03-vm--json[{"tags": {},"publisher": "Chef.Bootstrap.WindowsAzure","extensionType": "ChefClient","typeHandlerVersion": "1210.12","autoUpgradeMinorVersion": false,"settings": {"bootstrap_options": {"chef_node_name": "ch03-vm","chef_server_url": "https://api.chef.io/organizations/pendemowin","validation_client_name": "pendemowin-validator"},"runlist": "recipe[dscdemo::default]"},"provisioningState": "Succeeded","id": "/subscriptions/b6e7eee9-YOUR-GUID-HERE-03ab624df016/resourceGroups/chefazure-ch03/providers/Microsoft.Compute/virtualMachines/ch03-vm/extensions/ChefClient","name": "ChefClient","type": "Microsoft.Compute/virtualMachines/extensions","location": "westeurope"},{"tags": {},"publisher": "Microsoft.Azure.Diagnostics","extensionType": "IaaSDiagnostics","typeHandlerVersion": "1.2","autoUpgradeMinorVersion": false,"settings": {"xmlCfg": "removed for brevity"","storageAccount": "chefazurech033545"},"provisioningState": "Succeeded","id": "/subscriptions/b6e7eee9-YOUR-GUID-HERE-03ab624df016/resourceGroups/chefazure-ch03/providers/Microsoft.Compute/virtualMachines/ch03-vm/extensions/Microsoft.Insights.VMDiagnosticsSettings","name": "Microsoft.Insights.VMDiagnosticsSettings","type": "Microsoft.Compute/virtualMachines/extensions","location": "westeurope"}]
From the output, we are able to validate all the non-protected settings (protected settings are settable only, and not retrievable after deployment). We can identify from the provisioningState key that the deployment of the Chef VM Extensions was successful.
PowerShell
When using PowerShell , we can verify the extension is installed by using the Get-AzureRmVMExtension cmdlet, as follows (again it is assumed the Resource Group Name is chefazure-ch03 and the VM Name is ch03-vm).
PS C:UsersStuartPrestonchefazure-ch03> Get-AzureRmVMExtension -ResourceGroupName chefazure-ch03 -VMName ch03-vm -Name ChefClient | Select Name, TypeHandlerVersion, ProvisioningStateName TypeHandlerVersion ProvisioningState---- ------------------ -----------------ChefClient 1210.12 Succeeded
Removing a Chef VM Extension from a Virtual Machine
Let’s assume that we wish to remove the extension from a VM again. To accomplish this task, we can use either Azure-cli or PowerShell:
Azure-cli
To remove the Chef extension using the Azure-cli we use the azure vm extension set command with the -u parameter:
PS C:UsersStuartPrestonchefazure-ch03> azure vm extension set -u -q chefazure-ch03 ch03-vm ChefClient Chef.Bootstrap.WindowsAzure 1210.12info: Executing command vm extension set+ Looking up the VM "ch03-vm"+ Looking up extension "ChefClient", VM: "ch03-vm"+ Uninstalling extension "ChefClient", VM: "ch03-vm"info: vm extension set command OK
PowerShell
To remove the Chef extension using PowerShell we use the Remove-AzureRmVMExtension cmdlet:
PS C:UsersStuartPrestonchefazure-ch03> Remove-AzureRmVMExtension -ResourceGroupName chefazure-ch03 -VMName ch03-vm -Name ChefClient -Force After a few minutes, this should succeed with the following message:
Status : SucceededStatusCode : OKRequestId : e0202987-d642-4698-9f2a-c6eb0f59c7cdOutput :Error :StartTime : 19/10/2015 22:15:32 +01:00EndTime : 19/10/2015 22:19:22 +01:00TrackingOperationId : 7cd45cf9-702d-437-b314-66ca2cc2e27f
Installing a Chef VM Extension at the Command Line Using Azure Resource Manager Template Language
Although it is relatively simple to deploy the Chef VM Extension from within the management portal, you are more likely to want to automate this from the command line. We can do this by using Azure Resource Manager. Remember that the Chef VM Extension is essentially another resource so we can define it in the JSON and add it to the collection of resources to deploy.
Here’s a template that shows us the options available with the Chef VM Extension:
{"type": "Microsoft.Compute/virtualMachines/extensions","name": "[concat(parameters('vmName'),'/', 'chefExtension')]","apiVersion": "2015-05-01-preview","location": "[parameters('location')]","dependsOn": ["[concat('Microsoft.Compute/virtualMachines/', parameters('vmName'))]"],"properties": {"publisher": "Chef.Bootstrap.WindowsAzure","type": "<configurable>","typeHandlerVersion": "<configurable>","settings": {"bootstrap_options": {"chef_node_name" : "<configurable>","chef_server_url" : "<configurable>","validation_client_name" : "<configurable>"},"runlist": "<configurable>"},"protectedSettings": {"validation_key": "<configurable>"}}}
This fragment of JSON can then be taken and inserted as a resource in a Resource Manager template. The configurable options are shown in Table 3-4:
Table 3-4. Chef VM Extensions configuration options
Key Name | Description | Example Value |
|---|---|---|
type | One of ChefClient, LinuxChefClient, or CentosChefClient depending on whether you use Windows, Ubuntu/Debian, or RedHat/CentOS. | ChefClient |
typeHandlerVersion | This is the version of the extension, just the major and minor parts. | 1210.12 |
chef_node_name | This needs to be set to the name you wish to register with the Chef Server. | VM |
chef_server_url | This is the Chef server URL to register the node with. | |
validation_client_name | This is the name of the validation key (usually the same as the filename without -validator.pem). | myorganization |
runlist | This is the initial runlist to add to the node. This runlist will be deployed when the machine has first run. | recipe[starter::default] |
validation_key | This is the extracted text from the organization-validator.pem file. | <see example> |
You can then use either the Azure-cli or PowerShell or one of the methods shown later in this book to deploy this template. Remember that the Chef VM Extensions install themselves as a service by default on the Windows platform. Chef VM Extensions are used extensively in the Chef Provisioning driver so we will be referring to terminology from this chapter later in the book.
Summary
In this chapter, we showed you how using the Chef VM Extensions can save you time and effort when compared to bootstrapping virtual machines via their public IP address. We demonstrated how to add, verify, and remove the VM Extension from Azure-cli and PowerShell and showed you how to build an ARM resource that adds the extension to an existing VM.