
![]()
Basic Data Mapping Techniques
There are many options to mapping within the Scribe Workbench. This chapter will outline some of the most common and useful methods and objects to use when mapping. There are variables, functions, steps, and execution logic that can be utilized to perform virtually any type of integration needed. Understanding how to incorporate these into your solutions is critical to your mastering of Scribe Insight.
![]() Note While it is possible to perform complex mappings and workflows within a single DTS (Data Translation Specification) package, you should always aim for simplicity. Premapping in SQL, chained single-step DTS packages, and localized lookups are all ways to simplify and optimize your solutions. The simpler your solution, the more advanced your mapping techniques are. See Chapters 4 and 7 for more details.
Note While it is possible to perform complex mappings and workflows within a single DTS (Data Translation Specification) package, you should always aim for simplicity. Premapping in SQL, chained single-step DTS packages, and localized lookups are all ways to simplify and optimize your solutions. The simpler your solution, the more advanced your mapping techniques are. See Chapters 4 and 7 for more details.
Variables
There are several types of variables that can be created, including Calculated, Prompted, and Target Variables. Variables can be created by clicking View in the Workbench menu and selecting User Variables (the window in Figure 3-1 will open). You will utilize variables in almost all of your DTS packages. The list in this chapter includes those that utilize methods that are most critical to your success.
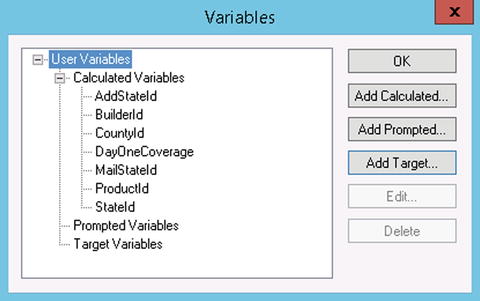
Figure 3-1. Working with variables
The usage of these three types of variables is as follows:
- The most useful of these is the calculated variable, which will be documented in detail in this chapter. This variable type can be set through dozens of methods types, including database lookups, raw SQL, string manipulation, and date conversion.
- The prompted variable is used to allow for user input during package execution. For example, if you had a process that needed to pull source records for a specific start date, you could set this start date within a prompted variable. When the package started to execute, it would prompt for this value.
 Note There is little value in using a prompted variable. Automation is hindered when requiring user input. The best way to deal with changing values is either through a calculated variable (in the case of a start date, you could create logic to determine dynamically what the date should be) or within the source data connection (in the case of SQL, you could add this value to the WHERE clause, and change it when needed).
 - The Target Variable. This variable type can be set based on the output of another variable or a previous step (see the section “Configuring Steps”). For example, if you want to get the final value of the exchangerate field after it has been updated in a previous step, you could create a variable similar to that shown in Figure 3-2. Click the Target Variable button in the Variables window to open this.

Figure 3-2. A target variable
![]() Note While the target variable may be useful when working in DTS files that have multiple steps, you should work to keep your packages simple. Only in rare circumstances would you use a target variable. If you find yourself incorporating these into your solutions, take a step back and reassess your approach. You are most likely building something that is going to be difficult to maintain and troubleshoot.
Note While the target variable may be useful when working in DTS files that have multiple steps, you should work to keep your packages simple. Only in rare circumstances would you use a target variable. If you find yourself incorporating these into your solutions, take a step back and reassess your approach. You are most likely building something that is going to be difficult to maintain and troubleshoot.
The following subsections outline different ways to incorporate calculated variables into your DTS file. Each of these introduces functionality that will prove valuable to you during your development process. These examples use functions provided by Scribe that can be accessed by clicking the View option on the menu, followed by User Variables, as noted previously.
With the window shown in Figure 3-1 open, click the Add Calculated button. In the new window that opens, you can enter formulas on this screen, or you can click the Formula Editor button and open a more robust designer.
The designer (shown in Figure 3-3) lists all of the available functions, along with basic information about how to call them. You can reference your connections, source fields, and other variables from this editor to help you configure the formulas. Most of the formulas should be familiar to you if you have worked with SQL or with any .NET programming language.
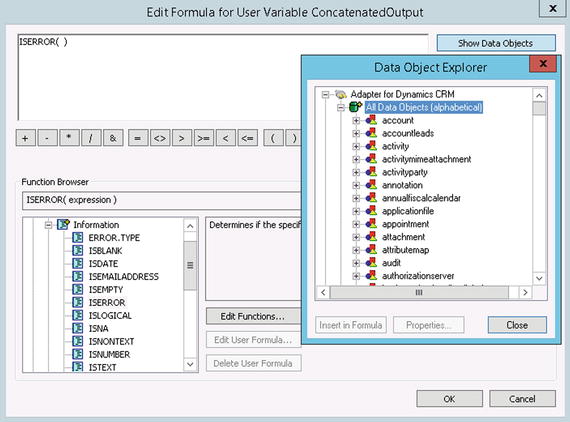
Figure 3-3. The Formula Editor with the Data Object Explorer window open
![]() Note Unfortunately, there is no way to debug your formulas except for trial and error. If you have an error, Scribe will warn you that it is invalid but won’t give much detail as to why. Some formulas, even if they are correct, will throw errors because of their complexity. It is recommended that you keep your formulas as simple as possible, and utilize multiple variables when needing to implement anything of any level of complexity.
Note Unfortunately, there is no way to debug your formulas except for trial and error. If you have an error, Scribe will warn you that it is invalid but won’t give much detail as to why. Some formulas, even if they are correct, will throw errors because of their complexity. It is recommended that you keep your formulas as simple as possible, and utilize multiple variables when needing to implement anything of any level of complexity.
Database Lookups
To illustrate the use of database lookups, assume that you are mapping an account in your SQL database to a Dynamics CRM Online account. One of the fields you are mapping is the parent account, and you need to find out what the ID for that parent account is. One way to do this is by using the DBLOOKUP formula, as shown in Figure 3-4.
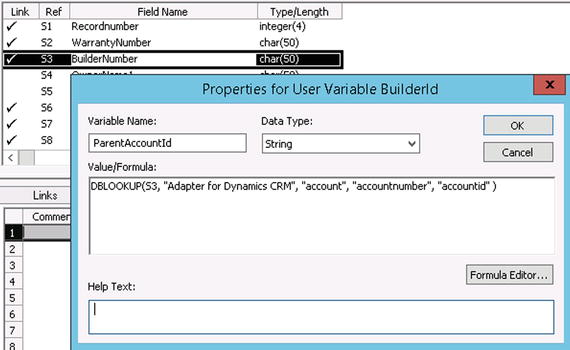
Figure 3-4. Using the DBLOOKUP formula
![]() Note The DBLOOKUP method can be used against standard SQL tables, and also objects within Scribe Adapters. For example, if you are using the CRM Adapter, you can perform a DBLOOKUP on any of the entities, even though you are not hitting the databases directly.
Note The DBLOOKUP method can be used against standard SQL tables, and also objects within Scribe Adapters. For example, if you are using the CRM Adapter, you can perform a DBLOOKUP on any of the entities, even though you are not hitting the databases directly.
There are five input parameters to the DBLookup function. The first is the source data field, which in this case is the value in S3 (the Builder Number). The second is the name of the connection, the third is the entity value, the fourth is the lookup field, and the fifth is the field for which a value is returned.
If a match between BuilderNumber and accountnumber is found, the accountid will be returned. This field can now be used in the parentaccountid field in the target field list. Just double-click the field and type in the variable name (in this case, ParentAccountId), as shown in Figure 3-5.

Figure 3-5. Referencing the variable in a targeted field
You can concatenate as many strings together as you need using the CONCATENATE function. For example, if you want to set a field in your target with a value that is a combination of two fields (e.g., S2 and S3) with a dash between them, your concatenation script would look like the following:
CONCATENATE(S2, "-", S3)
Database Lookups Using Concatenations
The DBLookup method has a sister method called DBLookup2, which allows you to look up a target value with two inputs instead of one. However, there are many cases where you may need to do a lookup using more than two. One example would be finding an ID of a record based on a combination of three fields: the contact name, the state in which the transaction took place, and the date of service. When there are three or more lookups, you must use the SQLQUERY function.
The SQLQUERY allows you to write simple inline SQL using one or two input parameters. In the example outlined, the input parameter will be called ConcatenatedField, which is a combination of the three input fields needed for the lookup (Contact, State, and Date of Transaction). These come from the source data. This concatenated field is then used as a single input to the SQLQUERY function. The SQLQUERY function then does a lookup based on concatenating the lookup fields together and comparing them with the ConcatenatedField variable. Figure 3-6 shows the final value of the SQLQUERY call.
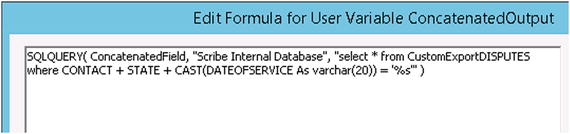
Figure 3-6. Using a concatenated field for multicolumn lookups
Often the source data that you retrieve will need to transform a value into another value. A simple illustration of solving this with a conditional statement within a variable is as follows:
- The source data comes out of the system with a value of “Y,” “N,” or NULL. It needs to be transformed into a Boolean value of 1 (if “Y”) or 0 (if anything other than “Y”).
- Create a variable with the formula shown in Figure 3-7. The Data Type can be String, even though it is being transformed into a number.
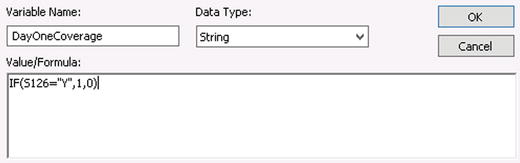
Figure 3-7. Using the IF statement in a variable
- Add the variable as the input to the targeted field.
There are many other functions that you can experiment with, but these are the fundamental techniques you will need to successfully map the majority of your solutions.
![]() Note There are only a handful of functions detailed in this section. This is by design. These functions should represent almost all of the functions you should be using within a Scribe DTS package. If you find that you are utilizing more methods, you are likely creating a solution that is more complex than it should be. Rely heavily on other technologies (such as SQL) to premap your data, so that your DTS packages remain very simple. See Chapters 4 and 7 for more details.
Note There are only a handful of functions detailed in this section. This is by design. These functions should represent almost all of the functions you should be using within a Scribe DTS package. If you find that you are utilizing more methods, you are likely creating a solution that is more complex than it should be. Rely heavily on other technologies (such as SQL) to premap your data, so that your DTS packages remain very simple. See Chapters 4 and 7 for more details.
Configuring Steps
Steps come in basic flavors: insert, update, delete, seek, and variations on these. In general, you will want to create DTS packages that have only a single step. These will be quicker to develop and easier to troubleshoot. That being said, there will be cases where you will need to implement a more complex pattern.
A DTS package can have multiple steps configured within it. A common example of this is the need to first do a lookup to determine if a record exists; if it does exist, then create one type of record; otherwise, create a different type of record. This example consists of three steps. The first step is a Seek, the other two are Inserts. A maximum of two of the three required steps executes during any single process.
To illustrate this example, a DTS package will first do a lookup to see if the record exists. The table that the lookup will be performed against will reside in the SCRIBEINTERNAL database, and it will be called Dev_Record_Lookup. If this record exists, then an entry in a second table called Dev_Record_Exists will be created. If the record does not exist, a record in a third table called Dev_Record_Does_Not_Exist will be created. The second and third are simple table structures, shown in Figure 3-8. Listing 3-1 shows the scripts for all three.
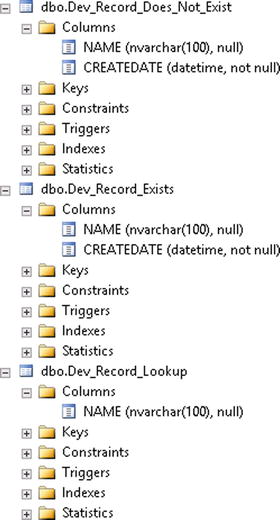
Figure 3-8. Tables used in example
In order to create the three-step process, take the following steps:
- In your DTS file, click the Configure Steps button.
- In the Configure Steps window, click the Scribe Internal Database connection.
- Click the lookup table (in this case, Dev_Record_Lookup) and select Seek in the Operation drop-down.
- Click the Add Seek Step.
- Double-click the newly created step on the right and rename it to Seek Dev_Record_Lookup.
- You will now create an insert step by clicking the Dev_Record_Exists table and selecting Insert Operation.
- Click the Add Insert Step button and rename the newly created step to Insert Dev_Record_Exists.
- Take a similar approach to create the third step. Click the Dev_Record_Does_Not_Exist table, select Insert Operation, and click the Add Insert Step button. Rename the step to Insert Dev_Record_Does_Not_Exist.
Figure 3-9 shows the result of the steps so far.
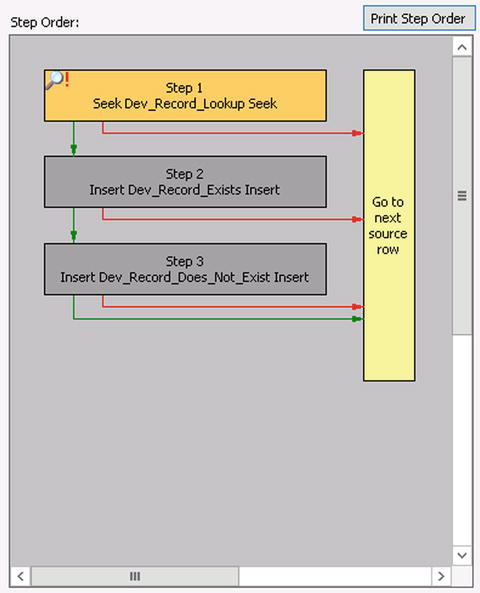
Figure 3-9. Steps created, no mapping in place, no logical flow added
While the three steps currently execute in order, no mapping or logical flow has been implemented. The next set of steps outlines how to implement mapping for each step. The Seek step must have a lookup link defined. This means that a field must be specified to do a lookup against. In this case, there is only a single column in the Dev_Record_Lookup table, which is titled NAME, so the lookup link will be created against this field. The two Insert steps will have Data Links defined, one to set the NAME field and one to set the CREATEDATE field. To perform these mappings, take the following steps:
- Click the Close button to return to the main mapping screen. Under the Configure Steps button there will be a drop-down showing the three steps that were just created. Select the Seek Dev_Record_Lookup step.
- Select the field in the source on the left that will be used to do the lookup. For this example, the source is an ODBC (Open Database Connectivity) connection to a Dbase DBF file that does a SELECT of all of the source data. The NAME field will be used.
- Select the NAME field in the target on the right. With both fields highlighted, click the Lookup Link button. A check will appear next to both of the fields selected (see Figure 3-10).
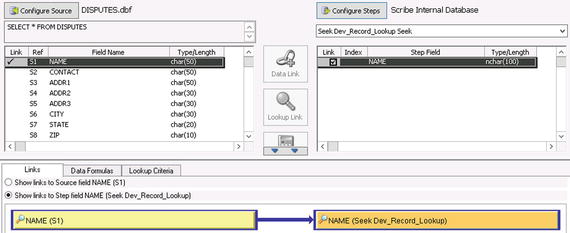
Figure 3-10. Creating the Lookup Link
- Now, do the mapping for the first Insert step. In the drop-down under Configure Steps, select the Insert Dev_Record_Exists step.
- Select the NAME field in the source list on the left, select the NAME field in the target field list on the right, and click the Data Link button. This will create the mapping between the NAME fields.
- Double click the CREATEDATE field in target. This will open the formula editor. Select the NOW function under the Date & Time header. Click OK.
- Take the same steps for the second Insert step. Select the Insert Dev_Record_Does_Not_Exist step from the drop-down, and perform the mapping for NAME and CREATEDATE. The final mapping for all of the three steps will look like that shown in Figure 3-11.
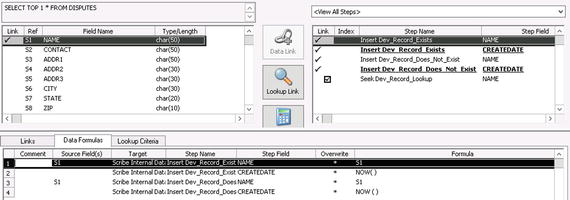
Figure 3-11. Showing all mappings for all steps
You can now run the process (click the Run Job button on the Workbench toolbar). When you run it, you should see records inserted into both of the target tables, since no logic exists. One Seek operation will be performed, followed by an Insert into the first table and an Insert into the second table. If there were one record in your source data, you would see three operations performed, as shown in Figure 3-12.
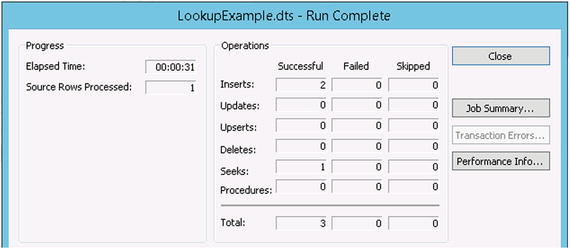
Figure 3-12. Three steps executed for one source record
The next set of steps outlines how to add a logical flow to the process. The goal is to have a process that does the Seek. If the record is found in the lookup table, a record will be inserted into the Dev_Record_Exists table. If no record is found in the lookup, a record will be inserted into Dev_Record_Does_Not_Exist.
- Click Configure Steps and select the Flow Control tab. Make sure you are on the first step of the process.
- Click the Success (0) row. This means that the Seek was successful, but no records were found. In this case, you want a record to insert into the Dev_Record_Does_Not_Exist table, which is step 3. Select the option of Goto Step in the Action drop-down and select 3 in the Step drop-down.
- Click the Success (1) row. This means that the Seek was successful, and one record was found. In this case, you want a record inserted into the Dev_Record_Exists table, which is step 2. Select Goto Step in the Action drop-down and select 2 in the Step drop-down.
- Do the same in Success (>1) as you did with Success (1). This just means the Seek found more than one matching record. Figure 3-13 shows the full configuration for the Seek step.
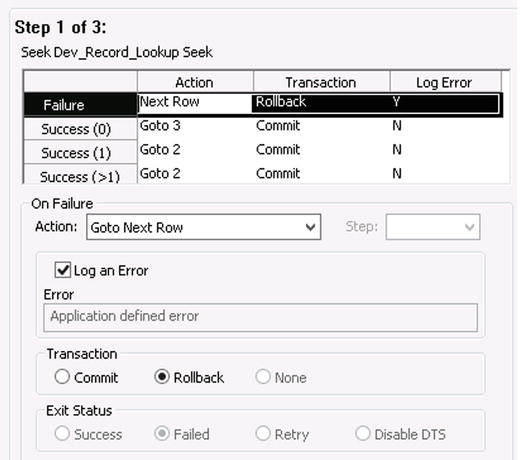
Figure 3-13. Configuring the flow on the first step.
- Now, configure Step 2. Click Step 2 in the right-hand pane of the window. In the case of any type of result from Step 2, the Action should always be Goto Next Row. This means that the flow will stop at Step 2, and move back to Step 1 to process the next record. Nothing will cause Step 3 to ever execute after Step 2. Figure 3-14 shows the configuration for Step 2.
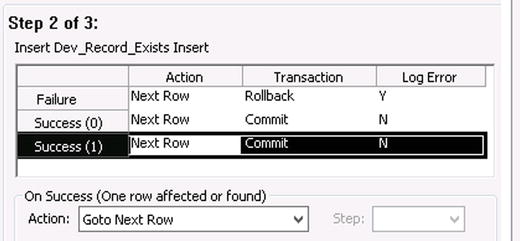
Figure 3-14. Configuring the flow on the second step
- The final step, Step 3, will be configured correctly by default, since it is the last step in the process. Regardless of what occurs, it will move on to the next row after processing (and return to Step 1). Figure 3-15 shows the final result of all configured steps.
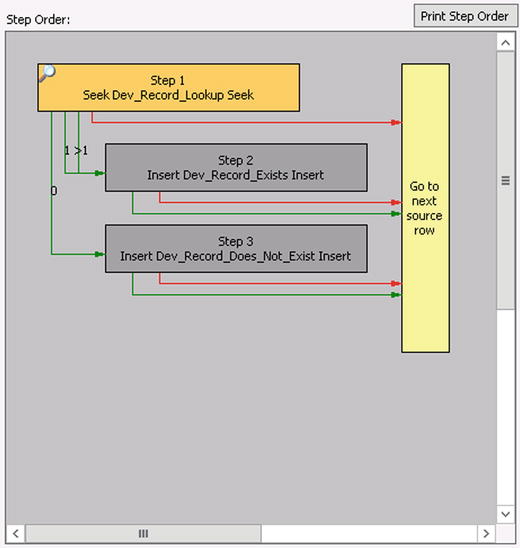
Figure 3-15. The fully configured flow
The process is complete now. Every time the DTS file executes for each record in the source, first the Seek will occur (Step 1). If a record is found, Step 2 will execute. If a record is not found, Step 3 will execute. At no time will more than two steps execute. Now, when you run the process for a single record, you will see that only two operations are performed - one Seek and one Insert (see Figure 3-16). Note that one operation is shown as being skipped.
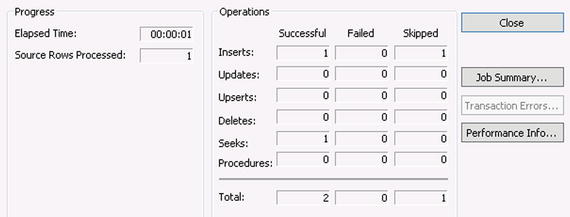
Figure 3-16. Final execution showing only two operations performed
Conclusion
The Scribe Workbench has many options for mapping and workflow processing. The ability to create variables based on a variety of functions, lookups, and parameters is critical for any integration or migration process. The ability to create multiple step flows allows for more intricate solutions to be developed. It has been cautioned throughout this chapter that while there is much functionality available within Scribe Insight, the goal of all implementations should be simplicity. There are many ways to do things in Scribe; you can develop a solution that is 100% self-contained within the DTS package, or you can intelligently leverage all of the external technologies at your disposal (such as SQL Server) to premap your code. The next chapter will outline a number of techniques that will allow you to build advanced solutions without creating complex multistep code within your DTS solutions.