![]()
Advanced Development Techniques
The previous chapter outlined how to work with the most fundamental development components, which are variables and steps. This chapter will introduce a number of topics that will aid you in more advanced development. Topics include the premapping of data to reduce DTS complexity, additional functionality within step configuration, and the linking of DTS packages. The most important item to understand about Scribe DTS development is that utilizing SQL Server is your most powerful tool and will enable you to reduce processing time and DTS complexity.
The premapping of data is one of the most valuable, time-saving, performance-improving options available to you. To illustrate the concept of premapping, this section will describe how to handle mapping option set values to CRM Online using two methods. The first method will be the use of variables and logic within Scribe. The second method will be the use of premapped data in SQL Server.
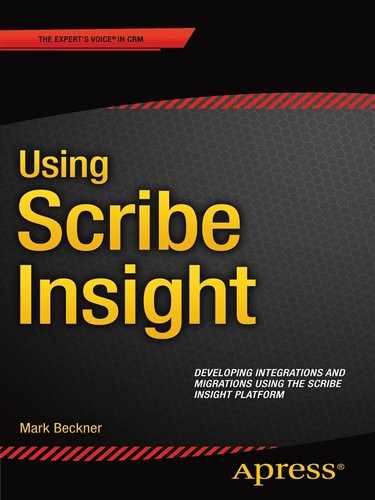
To illustrate the use case, take the following scenario. You are mapping a field called CRT_CODE from a source SQL Server table called Warranty to a target field in CRM called new_certcode in an entity called new_warranty. The field new_certcode is an Option Set, and it has the values shown in Figure 4-1 configured within it (you can see the value for Closed in this figure).
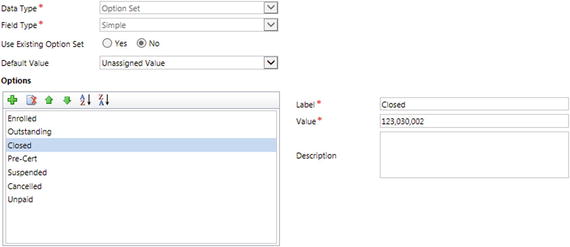
Figure 4-1. The CRM Option Set
Option set values all have long integer equivalents, and when setting a value through the CRM API (application programming interface) using the Scribe Adapter, you must set the integer value for the field. So, in order to set the value of Closed in Scribe, you would need to set the new_warranty field to 123030002. Each of the values has its own unique integer value, as follows:
Enrolled = 123030000
Outstanding = 123030001
Closed = 123030002
Pre-Cert = 123030003
Suspended = 123030004
Cancelled = 123030005
Unpaid = 123030006
The requirement is to set these values in the map. You have two key options to do this. The first is placing the logic into a variable; the second is premapping the data in SQL. We’ll look at both of these options.
![]() Note There is a third option that is technically feasible, but it is complicated and extremely poorly performing. This option is to do a database lookup for each of the values. If you wanted to write a DBLOOKUP or SQLQUERY, you could figure out how to convert the text to an integer directly against the database components that store this data. This would be more challenging for CRM Online than CRM on premise. Both of these would result in multiple lookups for every option set value.
Note There is a third option that is technically feasible, but it is complicated and extremely poorly performing. This option is to do a database lookup for each of the values. If you wanted to write a DBLOOKUP or SQLQUERY, you could figure out how to convert the text to an integer directly against the database components that store this data. This would be more challenging for CRM Online than CRM on premise. Both of these would result in multiple lookups for every option set value.
Approach One: Using Logic Within a Variable
The first option is to build the logic into a variable within your Scribe DTS package. Using the source data values shown in Figure 4-2 from the Warranty table, the pattern shown in Figure 4-3 is valid, and it is your only real choice when developing within the Workbench Formula editor. It uses the IF function that Scribe provides in order to set the value. If the value in the source field is X, set it to an integer value of Y; otherwise, check if it is another value. If it is none of the values, set it to NULL.

Figure 4-2. The distinct values in the source data’s field
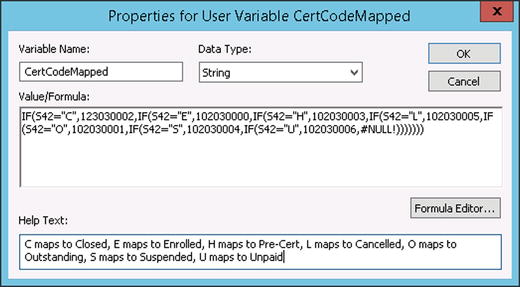
Figure 4-3. Coding a nested IF statement within a Scribe variable
You can see that this option is easy to implement, but it gets extremely difficult to read when there are more than a few option set values. If your DTS package has many option set fields to map to, it can become very unwieldy to update and test. The logic gets hidden within the various calculated variables, and there is no single view into how all of the fields are mapped.
Approach Two: Premapping within SQL
The cleaner, more advanced alternative to the previous approach is to premap your data. The concept is the same, but it is done where you can easily write, change, and test the functionality. Doing this in SQL, as shown in Figure 4-4, allows you to keep your SQL in the Configure Source configuration in Scribe, and it enables you to test all of your logic within a SQL query window.
Figure 4-4. Using a CASE statement to premap the data
By having your code in SQL, your ability to troubleshoot and fix data issues is immediate, as you can copy the SQL from your source, paste it into the query window, and update and test the code on the fly. When adding new values, or making modifications to how the fields are mapped, there is no need to retest your Scribe DTS package, because nothing is changing except for the source SQL, all of which you can pretest in the SQL query window, completely outside Scribe.
When you are dealing with many option sets (such as those shown in Figure 4-5), there is no contest between these two approaches. While the Scribe variable approach would take five different calculated fields each with its own nested IF statement, the SQL approach simply requires adding a CASE statement to an already existing SQL statement. In the second option, there is no change at all to the DTS logic, only to the source SQL.
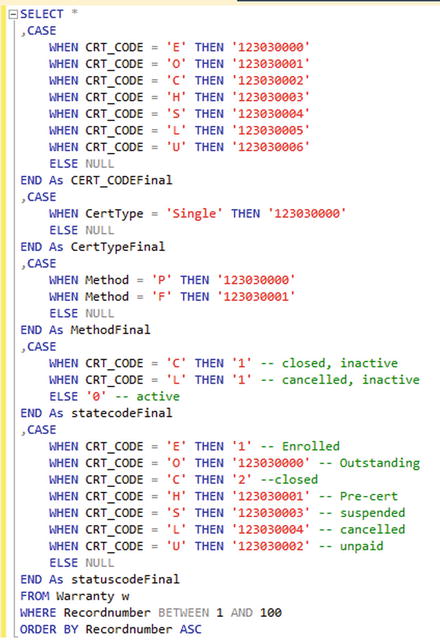
Figure 4-5. When there are many translations, SQL outperforms variables
Premapping Non-SQL Server Source Data
The previous section focused on premapping within the context of SQL Server. Premapping can be done for virtually any type of data, but you have to get creative about how you work with that data. In this section, you will look at working with a DBASE file. We’ll use this DBASE file to represent a file that cannot be worked with easily, directly through some application or tool within your environment (for example, you don’t have DBASE knowledge, or you don’t have an application that can open DBASE files).
The first step is to make the connection. You can create an ODBC (Open Database Connectivity) connection to a DBASE file with a configuration similar to that shown in Figure 4-6.
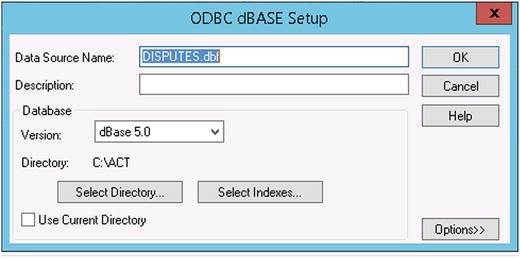
Figure 4-6. Configuring an ODBC connection to a DBASE file
Once you have the connection created, you can query against any table in the database. For example, if you know that there is a table called DISPUTES in the database, then you can write a simple query like SELECT * FROM DISPUTES and place it in the source connection configuration. This will bring back all of the data. If you leave it like this, though, you will have to do all of your field transformations within the DTS package. You can do some premapping of data in your SQL statement, but DBASE does not support all of the extended programming functionality that SQL Server does. And, if you don’t know how to work with it, it can be time consuming to translate your work into something that is compatible.
Instead of dealing with this data in Scribe, or trying to figure out how to write translations in a language you are unfamiliar with, you can simply copy all the data to an intermediary SQL table. Thus, your process would look like that shown in Figure 4-7. No logic or mapping would be done in the first DTS package. All premapping of data would occur on the source connection of the second DTS package and would be done with standard SQL as outlined in the section “Premapping Data.”

Figure 4-7. Getting data into an intermediary database
![]() Note It may seem like extra work to build an intermediary, but the labor it will save you in coding transformations and testing code is immense.
Note It may seem like extra work to build an intermediary, but the labor it will save you in coding transformations and testing code is immense.
You can plan to implement this pattern for virtually every type of data source that is not easy to work within its native form and doesn’t allow for simple premapping of data. Even Excel (which Scribe can integrate with through one of its connectors) should be loaded into a SQL table for ease of data manipulation, mapping, and processing. The more you can put into native SQL format, the easier your solution will be to develop, troubleshoot, and maintain.
Staging Tables and Custom Stored Procedures
You will often have the need to create custom tables and procedures for your DTS solutions. In the section "Premapping Non-SQL Server Source Data,” you looked at creating an intermediary table. In some of your more advanced solutions, you will likely have stored procedures that need to preprocess some data before your DTS package executes (see Chapter 5 for more information on preprocessing data). In both cases, you will need to store these database objects somewhere.
Your SCRIBEINTERNAL database is the most logical place to keep custom tables and other database objects. While you could create a separate custom database somewhere on your SQL infrastructure, the value to keeping everything in the SCRIBEINTERNAL database is that all of your DTS packages already have connections configured to SCRIBEINTERNAL. Your processing time will be reduced by reusing this existing connection.
Figure 4-8 shows several custom stored procedures housed in the SCRIBEINTERNAL database.
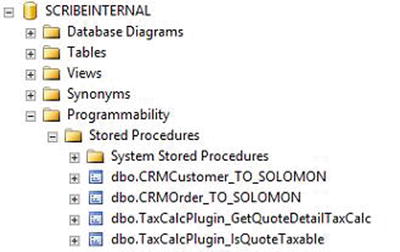
Figure 4-8. Store custom SQL objects in the SCRIBEINTERNAL database
![]() Note Making changes to objects in connection that a DTS is using while you are developing in the Workbench won’t always be seen by the Workbench. You may have to open your connection and refresh it, or in many cases simply close your DTS and reopen it.
Note Making changes to objects in connection that a DTS is using while you are developing in the Workbench won’t always be seen by the Workbench. You may have to open your connection and refresh it, or in many cases simply close your DTS and reopen it.
You looked at the basic functionality available within step configurations in Chapter 3. This chapter introduces some additional functionality that will aid in more advanced scenarios. All this functionality is available within the Configure Steps window which opens when you click the Configure Steps button in the upper right of the main screen within the Workbench.
On Insert, Update, and other operations, you can enable bulk mode by checking the Use Bulk mode option on the Operation tab (see Figure 4-9). This will allow you to set the number of records that should be included in a single transaction (anywhere between 10 and 1,000). Using this will reduce the overall workload by processing all the records in as few transactions as possible. Different adapters will handle bulk records differently, but in general the number of connections made to the target will be reduced.
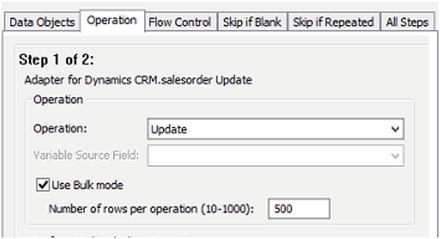
Figure 4-9. The Use Bulk mode setting
Try experimenting with using the bulk mode setting and comparing the performance with not using it. In some cases, with some adapters, your performance will be greatly improved by using it.
Perform Update/Delete Operation
You can control whether an update or delete takes place based on the value of a single field in the target. Under the Perform Update/Delete Operation on the Operation tab, you will see two options. By default the Always option is selected, which means under normal circumstances no logical check is made against any values in the target record. The second option (shown selected in Figure 4-10) allows you to select which field you wish to check in the target, and what you wish to check against.
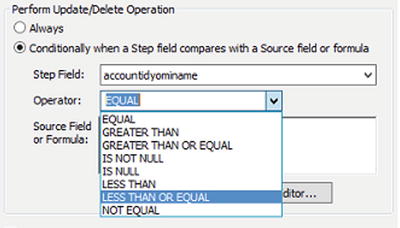
Figure 4-10. Performing a check on the target field’s value
![]() Note There is overhead associated with doing a lookup against the value of a field in the target record. If you are dealing with a small amount of data, then this overhead is irrelevant, but larger data sets will perform poorly if this setting is used. Premapping of data is recommended.
Note There is overhead associated with doing a lookup against the value of a field in the target record. If you are dealing with a small amount of data, then this overhead is irrelevant, but larger data sets will perform poorly if this setting is used. Premapping of data is recommended.
Using a Pre-Operation Step Flow Control
At the bottom of the Flow Control tab, you will see a box called Pre-Operation Step Flow Control Formula, with a button next to it titled Formula Editor. You can control the flow of your steps to some extent by entering formulas into this box. The most common use of this process is determining whether or not to skip a step. For example, if you have a three-step process, and you want to skip the second step if there is invalid data in your source data, then you can use a statement similar to that shown in Figure 4-11.
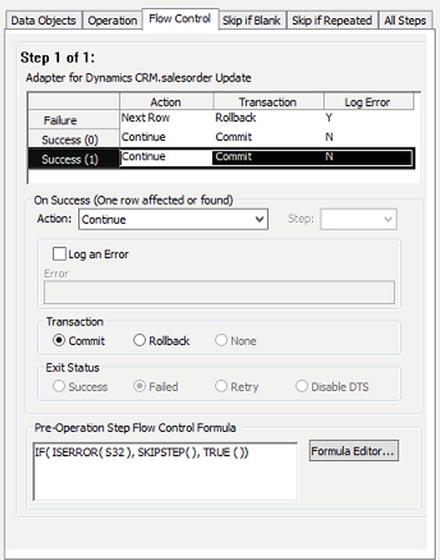
Figure 4-11. The Pre-Operation Step Flow Control
The statement can be deconstructed as follows:
If the value in S32 is invalid (such as an EMPTY string), ISERROR will return TRUE. This means that the IF statement will process SKIPSTEP. SKIPSTEP is used only for the purposes of skipping a step in the flow. If the ISERROR method returns FALSE (which means the data is valid), then the IF statement will process TRUE (the third parameter in the IF statement), and the step will execute.
Skip if Blank
The Skip if Blank tab lists all of the fields available in the current step. You can force the step to be skipped if the source data in any of the fields is blank. Do this by selecting the field(s) that you want to monitor for a blank value and press the space bar. This will add a check box next to the field you are configuring. Figure 4-12 shows the billto_line1 field with a check box next to it, which means if this field is blank in the source data for the current row being processed, the current step will be skipped.
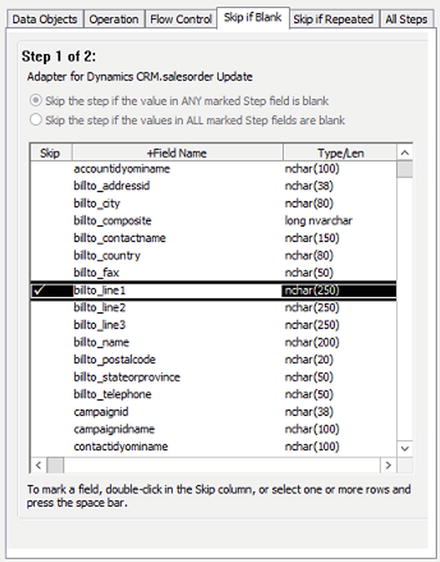
Figure 4-12. Skipping the step if the billto_line1 field is blank
Only Update if Changed
On the All Steps tab, there is an option title Compare fields on updates (only update if changed). Selecting this option ensures that a record will only be updated in the target if at least one of the fields being updated has changed. This is valuable in systems where audit trails are kept. For example, if you are using Dynamics CRM, and you have auditing turned on, every time a record is updated a log entry will be made in the audit log. Now, assume you have a process that updates all records on a daily basis. After a week you would have seven updates for every record, even if none of the data had changed. By selecting this field, you would now have an entry only if one of the fields changed in that record, and the audit log would show only those updates.
![]() Note This option is most valuable when you do not have the ability to see what was updated in your source data. If you have a "modified date" or some other flag in your source that allows you to filter out data that has not changed, then it is best to pre-filter your data. If you do use this field, understand that it will increase your processing time, as it first must do a comparison with the current record in the target to determine whether or not the data has changed. When dealing with a small number of records, this is not an issue, but when dealing with large volumes of data, you will need to come up with alternative plans for processing (see Chapter 7 for more ideas on optimized solutions).
Note This option is most valuable when you do not have the ability to see what was updated in your source data. If you have a "modified date" or some other flag in your source that allows you to filter out data that has not changed, then it is best to pre-filter your data. If you do use this field, understand that it will increase your processing time, as it first must do a comparison with the current record in the target to determine whether or not the data has changed. When dealing with a small number of records, this is not an issue, but when dealing with large volumes of data, you will need to come up with alternative plans for processing (see Chapter 7 for more ideas on optimized solutions).
Linking Multiple DTS Files
Keeping your DTS packages simple, with single steps, is a priority, and has been emphasized elsewhere in this book. However, keeping DTS packages as single-step solutions does not mean that you cannot have a number of steps executing within your overall process. Insight allows you to link multiple DTS files together, so that they execute in sequential order. When the first DTS package completes, the second one kicks off. When the second one completes, the third one kicks off.
In order to link your DTS files, take the following steps:
- Click Run and then Edit Settings in the Workbench toolbar.
- On the Next Job tab, browse to the DTS file that should execute after the current DTS has completed (as shown in Figure 4-13).

Figure 4-13. Linking a job in the DTS Settings
- You can also specify whether to stop execution of this linked job if the current DTS produces no results or if it runs into errors. Simply check the box next to the appropriate statement, and configure the total percentage of records as needed.
- Click OK. Your files are now linked.
When determining whether to add multiple steps to a single DTS package or to split up your process among multiple linked DTS files, the primary thing to consider is this: are you taking multiple steps off the same source data, or are you taking multiple steps off multiple sources?
If you are taking multiple steps off the same source data, then you can make a case that you should have multiple steps within a single DTS. This is because the overhead of querying the same source multiple times in different DTS packages would be high. See the left-hand side of Figure 4-14.
If, conversely, you require multiple sources but you are updating a single target, then you should split this across two DTS files. The source queries are different, so the overhead is the same. The mapping is different, so combining them into a single package can get confusing. See the right-hand side of Figure 4-14.

Figure 4-14. Determining when to use Single DTS vs. Linked DTS
Additionally, if you have a single source that performs operations against multiple targets, and the mapping or workflow logic is complex with these targets, it would be best to split into multiple files. You may have to call the exact same query more than once to get back the source data, but your individual packages will be much simpler to develop and maintain and will take less time to execute.
You must weigh the cost of the query against the cost of development, maintainability, and execution time of the DTS file. If you are querying a few thousand records or less, the query performance is going to be irrelevant compared to the costs associated with the other factors, so multiple DTS files and requerying of the same data make sense. If you are querying millions of records, then the expense of performing this query more than once is very high.
![]() Note If you are dealing with queries that have many tens of thousands of records (or more), you are going to have some challenges in your development. Rather than dealing with these huge payloads in single queries, you should think about splitting them up. Perhaps you do something as simple as add a WHERE clause that states that you only want 50,000 records at a time, or perhaps you chunk the records out into multiple intermediary tables. Regardless, you will need to be creative in your handling. Please see Chapter 7 for more ideas.
Note If you are dealing with queries that have many tens of thousands of records (or more), you are going to have some challenges in your development. Rather than dealing with these huge payloads in single queries, you should think about splitting them up. Perhaps you do something as simple as add a WHERE clause that states that you only want 50,000 records at a time, or perhaps you chunk the records out into multiple intermediary tables. Regardless, you will need to be creative in your handling. Please see Chapter 7 for more ideas.
There is a report available that allows you to have a single view into your full DTS package configuration. For files that have complex mappings, it can be invaluable to have access to this report. At times, it becomes difficult to recall what has been configured, what various variables are doing, and what steps are set up to execute in what order. You can access this single view into your DTS by clicking Reports on the main toolbar of the Workbench and selecting DTS Report. A report similar to that shown in Figure 4-15 will open.

Figure 4-15. The DTS Report provides a single view into your DTS file
Conclusion
Advanced development for Scribe integrations and migrations means utilizing surrounding technologies such as SQL Server for premapping and processing of data. If you are building all your logic into a DTS file, you are likely making things more complex than they need to be. Your ability to use all of the tools at your disposal will set you and your Scribe development apart from others and lead you down a path that will result in solutions that are quicker to develop and more easy to troubleshoot, maintain, and extend.