![]()
Adapters, Publishers, and Queues
This chapter outlines how to work with the CRM Adapter, how to interact with SQL scripts before and after a connection executes, how to build out a publisher to push data to a queue, and how to pull data off that queue and process it via a DTS (Data Translation Specification) package. All these concepts are integral to Scribe development.
Every connection made in Scribe uses an Adapter, database, or ODBC (Open Database Connectivity) data source. There are the native databases (such as SQL) that are core to the functionality of Insight and required for all solutions. These are non-configurable, aside from the core connection information (server, credentials, etc.) There are ODBC connections, which allow for options in connecting to non-native data sources. Finally, there are custom adapters, which are specialized for specific enterprise systems and have a number of unique configurations.
![]() Note There are a number of adapters that can be installed with Scribe, including Dynamics AX, Dynamics GP, Dynamics NAV, Salesforce, and SalesLogix. This chapter outlines the adapter for Dynamics CRM only.
Note There are a number of adapters that can be installed with Scribe, including Dynamics AX, Dynamics GP, Dynamics NAV, Salesforce, and SalesLogix. This chapter outlines the adapter for Dynamics CRM only.
The Adapter for Microsoft Dynamics CRM
Many developers using Scribe are using it to migrate or integrate with Microsoft Dynamics CRM. The adapter allows for communications with CRM using the CRM API (application programming interface), which is completely hidden from the Scribe developer. In order to access the CRM Adapter, take the following steps:
- Click View and then Connections from the toolbar in the Scribe Workbench.
- Click New on the Connection Manager window.
- Under Data Sources/Adapters, double-click Microsoft Dynamics CRM.
- Set the configuration information for the CRM connection. You can use this adapter to connect to both CRM Online and CRM On-Premise. See Chapter 2 for a discussion on configuring these settings. Note that the organization ID for an online instance can be found in the Developer Resources section within Customizations.
- Click OK and return to the main Connection Manager screen. The adapter for Dynamics CRM should now show. Click Edit.
- In the Connection Settings window that opens, click the DTS Connection Settings tab.
- Click the Adapter Settings button on the DTS Connection Settings tab.
You now have access to all the adapter-specific settings for this specific adapter type. There are a number of settings that you will want to use during your development. You will want to tailor these settings based on the type of work the DTS is performing using the adapter. Each connection uses a different instance of the adapter settings, so the settings are specific to an individual connection.
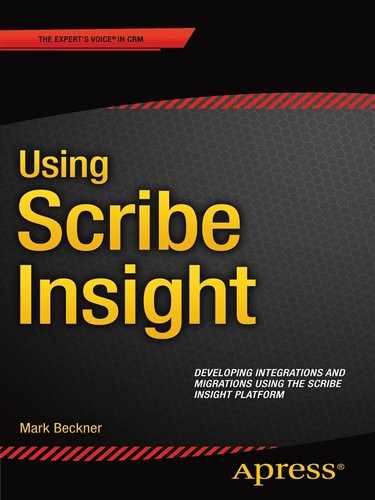
There are two tabs that have properties that can be configured. The General Settings tab (shown in Figure 6-1) and the User/Owner tab (shown in Figure 6-2). Details about these properties are as follows:
- Query batch size. This is used only for the querying of data from CRM. Increasing or decreasing this may improve performance, but it depends on the type of entity being queried (size) and the horsepower of the server on which you are running the query. If you are getting poor query performance, try altering this setting; otherwise leave it at the default setting.
- Validate Dynamics CRM picklist fields. Setting this will force a pre-validation of the picklist value that you are pushing up to CRM. For example, by default, you may send through a statuscode value that is not valid. The Scribe operation would call CRM with this value, and CRM would return an error. By using this field, the validation will occur before the transaction takes place. If you are dealing with a large record set that has the potential for invalid picklist values in it, using this pre-validation setting may improve performance.
- Truncate data to fit. This is a useful setting. Often, your source data has longer string fields than your target. You want to migrate the data, even if it means the fields will get truncated. Doing this without using this flag means that you have to add methods to each of your string fields that truncate the data as it is being mapped (or else you will get an error when posting to CRM). Using this flag automatically truncates anything going across, which will reduce processing time (the individual string functions would not need to execute) and development time (no need to write the string truncation functions on each field).
- Bulk processing. The settings here can be experimented with. The thread count can be altered, but ultimately it depends on your server and the target CRM environment. For example, you can set 64 threads on this property, but if you are integrating with CRM Online, it will limit the actual number of simultaneous connections (somewhere around 8). The setting for the CRM Bulk API will allow some records to be sent across in bulk instead of individual transactions (this overlaps with the bulk setting that can be found in the Configure Steps settings of the DTS). Both of these settings may improve performance.
- Skip pre-seek when the primary key is provided. If you are dealing solely with data that already has a primary key set, enable this setting. It can greatly improve the performance of your CRM operations.
- Enable Run As User. This allows the process to run under a specific user account instead of the generic account configured when setting up the connection to CRM. You may have workflows and security settings in CRM that execute depending on the role a user is part of.
- Default owner for owned objects. In your mapping, you can set the owner of most records. By default, however, the owner will be set to the account that you are connecting to CRM with. You can override this default user here.
- Time zone. You can override the time zone for created records.
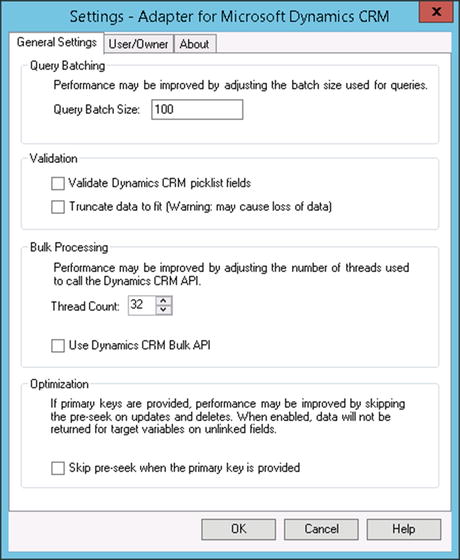
Figure 6-1. General settings of the Dynamics CRM Adapter
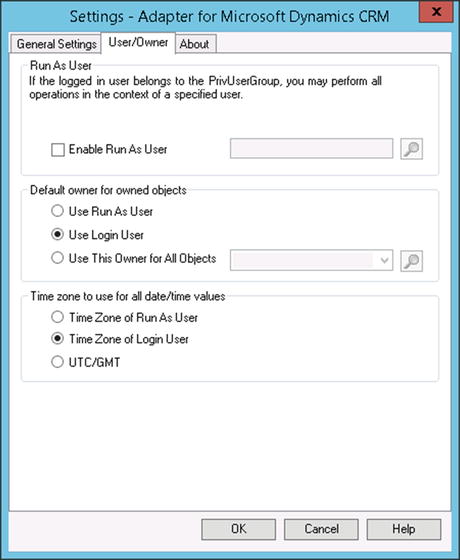
Figure 6-2. The User/Owner tab
Pre-Executing SQL within an Adapter Connection
An easily overlooked but highly useful piece of functionality related to adapters is the ability to execute SQL before or after a connection has been initialized. All connections operate using Scribe Adapters. Adapters that utilize SQL can be configured to execute SQL before, after, or both before and after a DTS file runs. The SQL script must reside in the same folder as the DTS file that is executing it.
Figure 6-3 outlines an example of using a script before and after execution. In this example, the pre-script will set all records to “Ready to Process.” Any records that come into the table after the script runs will not be set to this value and will be processed the next time the DTS file runs. After the DTS file has processed all the “Ready to Process” records, it will execute the post-execution SQL script. This will set all the records that were just processed to “Processed.” Any data that arrived in this table during the time the DTS is running will not be touched until the next DTS run.
Figure 6-3. A sample DTS flow using pre- and post-execution SQL scripts
![]() Note Try to keep your SQL script files very simple, with callouts to stored procedures. All your logic should be in a centralized set of stored procedures whenever possible. Since the scripts must be in the same directory as the DTS, code reusability of inline SQL within the scripts is an issue.
Note Try to keep your SQL script files very simple, with callouts to stored procedures. All your logic should be in a centralized set of stored procedures whenever possible. Since the scripts must be in the same directory as the DTS, code reusability of inline SQL within the scripts is an issue.
In order to set a SQL script to run before or after a DTS connection executes, take the following steps:
- On the toolbar in the Workbench, click View and then select Connections.
- In the Connection Manager window that opens, click a connection that uses a SQL-based adapter. Click the Edit button.
- In the Connection Settings window that opens, click the DTS Connection Settings tab. If your connection/adapter is SQL based, you will see two fields related to the SQL scripts that can be executed, as shown in Figure 6-4.
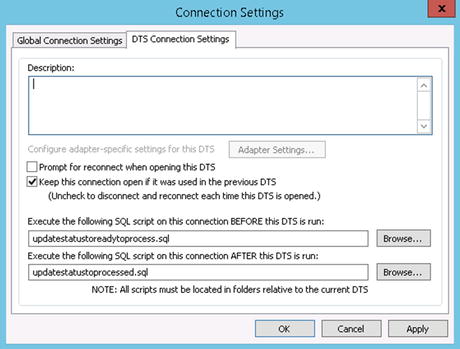
Figure 6-4. Setting SQL scripts in the Connection Settings window
- Click Browse to select the SQL script(s) that will be called.
![]() Note If you have multiple SQL-based connections in your DTS, you can set pre- and post-execution SQL scripts for each of them.
Note If you have multiple SQL-based connections in your DTS, you can set pre- and post-execution SQL scripts for each of them.
Publishers are used when you want to pull data from a source and publish that data to an MSMQ (Microsoft Message Queuing) (as shown in Figure 6-5). There are several types of publishers that are available (including those for most adapter types). This section will cover the Query Publisher. The Query Publisher allows you to create a SQL query that will run against a SQL-based source connection. The results of that query will be published to the MSMQ on the Scribe server, where they can then be consumed by DTS packages.
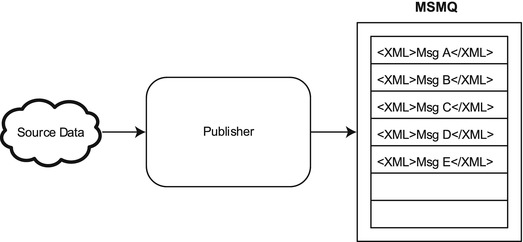
Figure 6-5. Publishers pick up from a source and deliver to a queue
The requirement of picking up data and publishing it to a queue can be set up in several ways. Chapter 7 outlines how to optimize performance of DTS solution with large record sets and uses a DTS package to pick up the source data. The use of a publisher will allow for this same functionality without the creation of a DTS package.
![]() Note In order to set up a publisher, you must have queues installed and configured. See Chapter 1 on installing MSMQ and configuring it within the Scribe Console.
Note In order to set up a publisher, you must have queues installed and configured. See Chapter 1 on installing MSMQ and configuring it within the Scribe Console.
The steps to create a Query Publisher are as follows:
- In the Scribe Console, click Publishers and Bridges below the Integration Server folder.
- Click ADD on the Publisher toolbar.
- Click Step 1. Select the Query Publisher as the Publisher/Bridge type. You can also set the Name and Comments properties with descriptive text. See Figure 6-6.
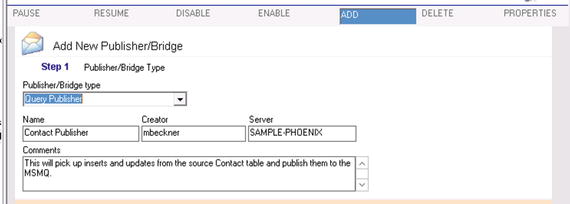
Figure 6-6. Step 1 configuration of a Query Publisher
- Click Step 2 and click the button titled Source Connect. You can select from a variety of options as your source. For this demonstration, the Scribe Internal Database option will be used. This will allow any table, view, or stored procedure to be queried on the SCRIBEINTERNAL database. This is generally where all custom objects used for any Scribe integration will be stored. See Figure 6-7.
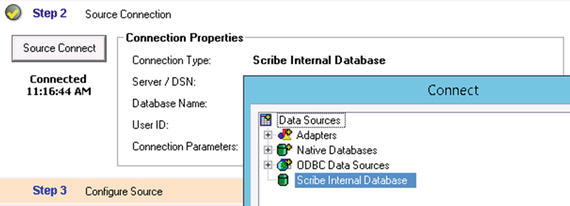
Figure 6-7. Step 2 configuration of a Query Publisher
- Click Step 3 and click the Configure Source button. This will pop up the window shown in Figure 6-8.
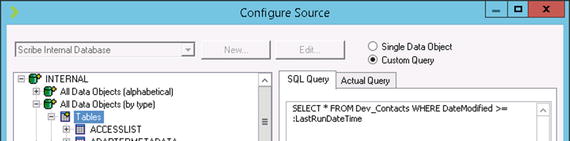
Figure 6-8. Step 3: the Configure Source window
- Select the database object that you will use as your source from the left-hand pane, or create a custom query in the right-hand pane. For this demonstration, a table called Dev_Contacts will be used (see Figure 6-9 for this table).
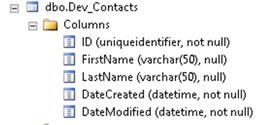
Figure 6-9. The Dev_Contacts table used as a source for this demo
- Click the Custom Query radio button option in the upper-right-hand corner of the window.
- Type in a query in the SQL Query window, such as that shown in Figure 6-10. For a publisher, which will run on a recurring basis, you will usually only want to query for records that have changed since the last time the publisher has run. You can use the LastRunDateTime, ThisRunDateTime, and several other Scribe internal parameters to limit the result set.

Figure 6-10. Step 3 fully configured
 Note The LastRunDateTime, ThisRunDateTime, and a number of other parameters can be used in publishers, DTS packages, and elsewhere. The LastRunDateTime is a timestamp of the last time the current object ran. The ThisRunDateTime is a timestamp of the current run of the current object. These values can be found in the EXECUTIONLOG table of the SCRIBEINTERNAL database. If you ever need to reset these values (for example, clear out the time of the last run), you can delete the row from the table.
Remember to pre-fix these parameters with a colon (:) when using them within a query.
The next set of steps pertains to Step 4 of the Query Publisher configuration. There are some important elements of this portion of the configuration that will prove valuable elsewhere. The most interesting is the creation of an XDR, or schema. A schema defines the structure of an XML document. In this case, the XDR is the definition of the structure of the source data set that will be published to the MSMQ.
Scribe will automatically create a schema based on the structure of the source query used in your publisher. This XDR will then be used as the source structure for the data being pulled from the queue when incorporated into a DTS file. Since queues only allow for data in an XML format, an XDR/schema must be used to define this structure.
- Click Step 4. Set the Root Element Name, Message Label, and Scribe Label to values that describe the data you are publishing. You can keep this simple and name all three of them the same, as shown in Figure 6-11. The values you put here will be used when filtering what data a subscribing DTS package will pick up from the MSMQ. You must keep these values unique across all of your XDRs/schemas.
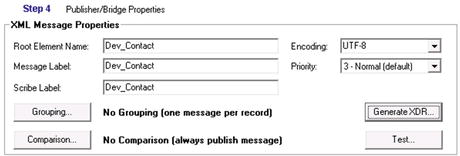
Figure 6-11. Step 4 of the Query Publisher configuration
- Click the Generate XDR button. This will allow you to generate the XDR/schema for the XML being published. Listing 6-1 shows the autogenerated structure that Scribe will create. You will need to save the output to a file directory. You can click the Test button to see what the XML will look like when it arrives in the queue.
- Now click Step 5. You can configure the activation of this Query Publisher here. Figure 6-12 shows the properties.
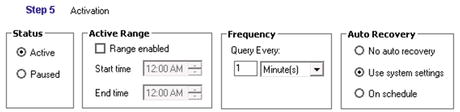
Figure 6-12. The properties for Step 5 of the Query Publisher
- Set the status to Active. You can pause a publisher once it has been started.
- Leave the Active Range to its default setting, unless you want to specify the hours during which the publisher can execute.
- The Frequency can be set to whatever value you want. For this demo, it will be set to the default 1 minute. You may want to decrease this time if you need “real time” integrations, and increase it if you are only interested in changes on a less frequent (such as daily) basis.
- Leave the Auto Recovery set to its default.
- Once all settings have been set, click the Finish button in the bottom right corner of the window. This will cause the publisher to appear in the main Publishers and Bridges window, as shown in Figure 6-13.

Figure 6-13. The Query Publisher, fully configured and running
Now that data will be published to the queue, you can create a DTS file to pull this data down and process it. The DTS, as noted previously, will use the XDR structure as its source, pull the XML off the queue, and map it to the appropriate target. The next section details the use of incorporating queues into your solutions and configuring DTS solutions to pull from the queue.
Queues
The use of MSMQ is critical to your ability to build multithreaded solutions that can handle large numbers of records (as outlined in Chapter 7). It is also the only location that a publisher (described in the previous section) can publish to. Scribe relies heavily on queues, and you must incorporate them into your solutions in order to maximize the processing potential of your DTS packages.
When queuing is configured on your Scribe server, you will see the three queues shown in Figure 6-14. You can access these by clicking the Queue Browser in the Scribe Console, located under the Integration Server folder.
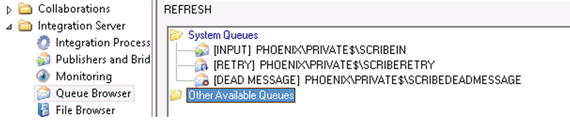
Figure 6-14. The Queue Browser
![]() Note If you do not see queues in your Scribe Console, click Security under the Administration tab in the Console. In the panel that opens, click the Message Queues tab. You can select the queues to provide access to on this tab. Select each of them and move them to the right-hand window using the options available in the user interface. Once all three have been added, click the SAVE button.
Note If you do not see queues in your Scribe Console, click Security under the Administration tab in the Console. In the panel that opens, click the Message Queues tab. You can select the queues to provide access to on this tab. Select each of them and move them to the right-hand window using the options available in the user interface. Once all three have been added, click the SAVE button.
When the publisher in the previous section executes, it will publish data to the SCRIBEIN queue. The message will remain available on the queue until it is picked up by a subscribing DTS process. You can view what is on the queue by clicking the queue. All XML documents that are in the queue will be shown in the lower window. You can right-click any of these to view or save the XML. Figure 6-15 shows an example of the XML that will appear in the queue based on the publisher and XDR in the previous section.
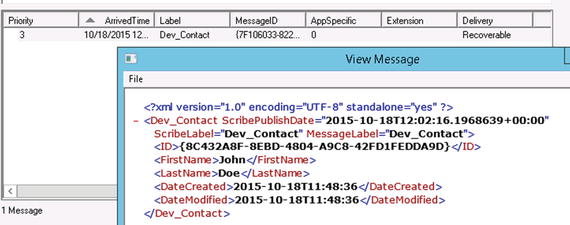
Figure 6-15. Viewing an XML message on the queue
![]() Note By default, there are three queues. The first queue is SCRIBEIN, which is where all valid messages are published and remain until picked up by a subscribing DTS. The second queue is SCRIBERETRY, which is where messages will temporarily reside while they await reprocessing after encountering an error. The third queue, SCRIBEDEADMESSAGE, is where messages that ran into errors even after being retried will end up.
Note By default, there are three queues. The first queue is SCRIBEIN, which is where all valid messages are published and remain until picked up by a subscribing DTS. The second queue is SCRIBERETRY, which is where messages will temporarily reside while they await reprocessing after encountering an error. The third queue, SCRIBEDEADMESSAGE, is where messages that ran into errors even after being retried will end up.
You can perform several operations on items in the three queues. By right-clicking the message, you will see that you can Cut, Copy, or Delete the message. If you want to move the message from the SCRIBEDEADMESSAGE queue in order to reprocess it, you can right-click it and select Cut. Then, right-click the SCRIBEIN queue and select Paste. Scribe will now reprocess the XML message that had ended up in the dead message queue.
![]() Note To delete everything from a queue, right-click the queue and select Purge. This is often used on the SCRIBEDEADMESSAGE queue to remove old failed messages that are no longer needed. See Chapter 8 on troubleshooting messages and processes that interact with MSMQ.
Note To delete everything from a queue, right-click the queue and select Purge. This is often used on the SCRIBEDEADMESSAGE queue to remove old failed messages that are no longer needed. See Chapter 8 on troubleshooting messages and processes that interact with MSMQ.
Messages that sit in the SCRIBEIN queue are awaiting a DTS process to pick them up. The DTS in this case is acting as a subscriber to the queue, and it will automatically pick messages up as they arrive in the queue. To configure a DTS package to subscribe to messages arriving in the queue, take the following steps:
- Using Scribe Workbench, open your DTS and click connections to add a new connection. In the Add a Connection window, double-click the XML option (as shown in Figure 6-16).
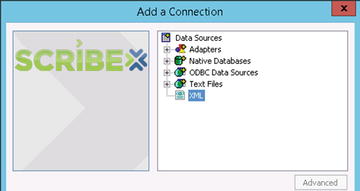
Figure 6-16. Adding an XML connection
- In the Connection Wizard that opens, click Next to bypass the first screen. Click the Use as Target option (see Figure 6-17) and click Next again.
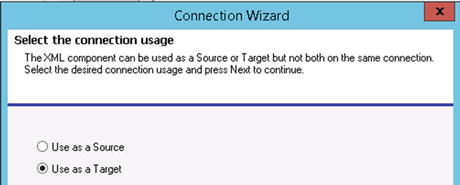
Figure 6-17. XML will be used as a target in order to post to MSMQ
- Select the Message Queue option as the target, as shown in Figure 6-18, and click Next.
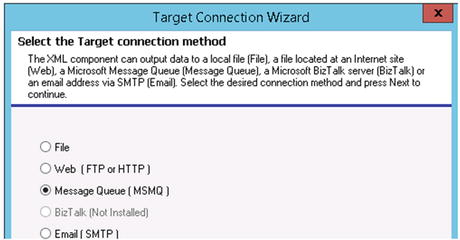
Figure 6-18. The target will be the Message Queue
- The next screen will require you to browse to a schema file or URL. You can create a schema using the publisher, as outlined in the previous section. Assuming you will subscribe to the same document structure that was used in the demo of the publisher, you can browse to that file here (see Listing 6-1 for this structure). See Figure 6-19, where the Dev_Contact.xdr file is used as the definition for the target. Click Next when complete.
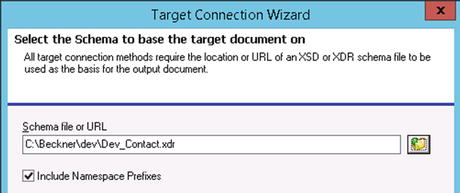
Figure 6-19. Specifying an XDR
- Now you can specify the target queue. You must type in the full queue name (which can be found in the Queue Browser as shown in Figure 6-14), in the format shown in Figure 6-20. The MessageLabel should be set to the value of what is in the XML data that will be in the queue. In this case, set it to Dev_Contact. Click Next when complete.
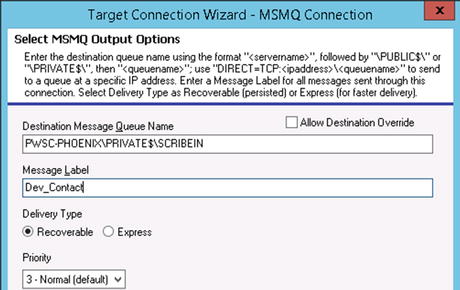
Figure 6-20. Specifying the target queue and message label to subscribe to
Note The Message Label must be set to the value that the XML documents in the queue will have in the MessageLabel attribute. For example, in Figure 6-15, the MessageLabel has a value of Dev_Contact. This value was specified in the configuration of Step 5 of the publisher configuration, outlined in the previous section. If you are publishing to the queue from another DTS file, then the value for this field would be specified as part of the mapping for that DTS. - On the final screen of the Connection Wizard, you will be able to test your connection. Clicking the Test Target Connection button will publish a test message to the SCRIBEIN queue. Assuming everything was configured correctly, you can click Finish. By clicking Finish, the connection will now be available within your DTS package. You can set this connection up as a source, and map data from this source connection (which will be the fields that are available in the XDR).
![]() Note When you use an MSMQ as a source within your DTS, you will not be able to test it from the Workbench. You will have to deploy your DTS package to the Console in order to test. During development, you will probably want to first set the source to a file version of a valid instance of the XML so that you can test mappings. Once your DTS is fully unit testing, you can swap the connection to a source MSMQ and deploy it via the Console. See Chapter 5 for details on deploying DTS solutions to the Console.
Note When you use an MSMQ as a source within your DTS, you will not be able to test it from the Workbench. You will have to deploy your DTS package to the Console in order to test. During development, you will probably want to first set the source to a file version of a valid instance of the XML so that you can test mappings. Once your DTS is fully unit testing, you can swap the connection to a source MSMQ and deploy it via the Console. See Chapter 5 for details on deploying DTS solutions to the Console.
Conclusion
Understanding adapters, publishers, and queues is essential to your Scribe development. While not every solution will require all of these components, understanding when and how to incorporate them will ensure that you can architect and build solutions that are capable of utilizing all of the functionality available within Scribe. Most important, as outlined in Chapter 7, you will be able to create multithreaded and optimized solutions that can handle large record sets.