
This chapter serves as a crash course in sewing and working with fabric. If you have never learned how to sew or need a refresher, consider this chapter a guidebook for the projects in the remainder of the book. You will need to acquire a basic sewing set, which is described in the next section, and some fabric. These materials can be found at most craft stores or at a fabric store, if there is one local to your area. You could also cut up an old article of clothing as scrap fabric to practice with.
By the end of this chapter, you will learn how to sew different stitches, follow a pattern, and sew a button onto an article of clothing. These skills will be useful for repairing clothing, replacing a missing button, or patching a pair of pants. The chapter covers basic sewing terminology and techniques, which you can explore further in media dedicated to sewing and textile techniques.
A Sewing Kit
The first step is gathering your sewing toolbox. A simple sewing toolkit can be found in any general store, craft store, or pharmacy. Depending on the store, the kit will be more or less complete, but it will include basic tools. The sewing tools needed for the tutorials in this book are listed in Table 4-1. Some of them may require a more specialized sewing store or can be ordered online.
Table 4-1. Contents of a Beginner’s Sewing Kit
Tool | Use |
|---|---|
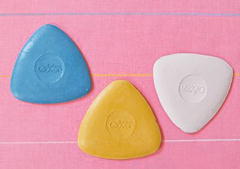
Tailor’s chalk
| This soft, chalk-like material leaves traces on fabric that can gently be brushed or washed off. A thin bar of soap works as a substitute. |
Colored thread
| A basic sewing kit comes with colored spools of thread. It is good to have a rainbow of colors, with more specific colors for specific jobs. For example, when mending a light gray pair of pants, you will want to find the closest shade of gray thread. |
Pins and pincushion
| Pins come in many different shapes and sizes. They are used to hold fabric in a desired shape before sewing. It is also useful to have a pincushion to collect you pins and needles. You can easily make a pincushion by folding a piece of fabric into a ball shape or sewing a small pillow (as described later in this chapter). |
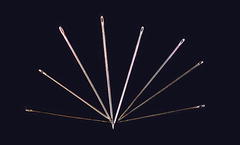
Sewing needles
| Sewing needles are the integral part of the sewing kit; they are necessary for learning how to sew. Sewing needles come in many different size and shapes particular to the fabric they need to go through. For example, embroidery needles are thicker and blunt, because they are used with thick thread to go through porous canvas. Try to find a variety pack, with several different kinds of needles. |
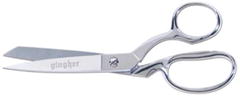
Shears
| Sewing shears are different than regular scissors and an important part of your toolbox. They are designed to make long, smooth cuts in different fabrics and stay sharp for a long time. If they become dull, they should be sharpened with special sharpening instruments. |
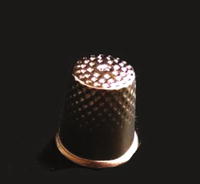
Thimble
| This is a useful tool when you’re learning how to sew, because it can protect your fingers and help you push a needle through thick fabrics. It is worn on your thumb or index finger. |
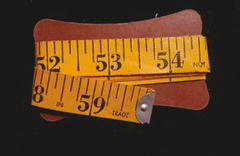
Tape measure
| This flexible ruler is great for measuring along curved edges and perimeters. Tape measures are most commonly used for taking measurements during fittings: the distance around a person’s waist or chest, down a leg, and so on. |
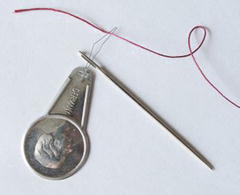
Needle threader
| This tool is used to help thread a needle and is handy piece of a beginner toolset, especially when you are experimenting with different needles and threads. |


A typical hobby sewing set may also include a few buttons, safety pins, and snaps. A more advanced set may include a seam ripper, which as its name suggests is used to rip apart seams of a piece of clothing.
Additional Materials
In addition to the tools described, there are some materials that are always good to have in your sewing kit. For starters , scrap fabric is a must. Velcro may be useful when making something where you don’t want to use buttons. Similarly, a zipper is a good alternative and may be more appropriate for some projects, such as sewing a coin purse. As you explore different projects and techniques , you may also find that you need some ribbon to add to a trim, or some elastic to make a flexible waistband for a skirt or a pair of shorts. Every tailor’s sewing kit is full of unique remnants from past projects that only get more interesting with time.
Another material that is good to have in stock, especially for electronics sewing projects, is interfacing. Interfacing is a material used to add stiffness to a fabric. As you learn in Chapter 7, some conductive fabrics are not very thick, and attaching interfacing makes them easier to work with. There are two different type of interfacing: nonwoven interfacing does not have a grain and works in most cases, whereas woven interfacingdoes have a grain and is preferable when using stretch fabrics. Fusible interfacing has one side that is fusible and another side that is smooth and not fusible. The fusible side contains a heat-activated adhesive that can be glued to the fabric using an iron; the other side can be sewn on.
Stitches and Seams
In this section, you learn how to make two basic hand stitches —running stitch and whipstitch —and how to sew on a button. These three things will take you a long way. Although they may seem simple and straightforward, they will be awkward at first; you should practice each of them until the motions feel natural. Using a thimble is optional for these tutorials, but it is common practice to wear a thimble on your finger to help push the needle through fabric.
For each of these techniques , the first step is threading a needle and knotting the thread. Threading a needle can be very frustrating, especially when you’re just learning, but tools like a needle threader make it easier. One factor is the size of the eye of the needle. The eye is the hole on one end of the needle that the thread passes through. The larger the eye, the easier it is to thread the needle. Another factor is the thickness of the thread. The thicker the thread, the more likely that it will fray and be difficult to pass through the eye. In order to prevent the thread from fraying, I recommend that you cut the tip of the thread at an angle with your shears, to create a point. Another common practice is to wet the end so that the thread stays together. It is best to start with a shorter, more manageable amount of thread; 20–24" is a good length to work with. If the thread is very long, it is more likely to get tangled and caught while sewing.
First prepare your thread as just described. If you don’t want to use a needle threader, then all you have to do is hold up your needle so you can see the eye, and pass the end of the thread through the eye.
If you’d like to use the threader, follow the steps diagrammed in Figure 4-1:
Take the needle in one hand and the needle threader in the other. Insert the wire loop of the needle threader through the eye of the needle. The loop is made of very thin wire that should be able to pass through the eye, even if it is small.
Hold the needle and the threader in one hand, making sure the loop is still sticking through the eye of the needle, and take the end of the thread in your other hand. Stick the thread through the loop of the needle threader, and fold it over to meet the remaining thread, as shown in part 3 of the diagram.
Keep your hand on the thread, and pull the loop of the threader completely through the eye of the needle. Now, release the thread, and pull the loose end all the way through so that there is only one strand passing through the eye.
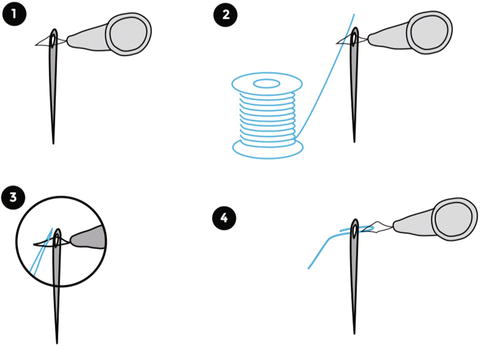
Figure 4-1. Threading a needle, steps 1–4
You must tie a knot at the other end of the thread to hold it in place. You can tie the knot on one end of the thread, or double the thread so that both ends meet, and tie a knot as shown in Figure 4-2.
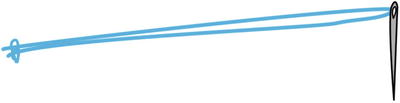
Figure 4-2. Tying a knot at the end of the thread
Running Stitch
This is the most basic stitch and results in an even, straight seam. Start with a threaded needle and a piece of fabric. The steps are diagramed in Figure 4-3:
Start with the needle underneath the fabric. Poke the needle through the fabric, and pull it all the way through so that the knot is taut on one end, as shown in part 1 of the diagram.
Flip the needle, and poke it through the top of the fabric about a quarter of an inch to the right of the first hole. Pull the needle through the back of the fabric until it is taut. You’ve made your first stitch!
Flip the needle again, poke up through the back of the fabric about a quarter of an inch to the right of where you made the last hole, and pull the needle up through the top.
Continue going through the fabric, alternating sides, in a straight line until you either (almost) run out of thread or reach the end of the material. The stitch should look like part 5 of the diagram.
To make a knot, draw the needle through the last stitch, making a loop, stick the needle through this loop, and then pull taut, as shown in part 6. Repeat a few times until the knot feels sturdy, and then cut the thread.
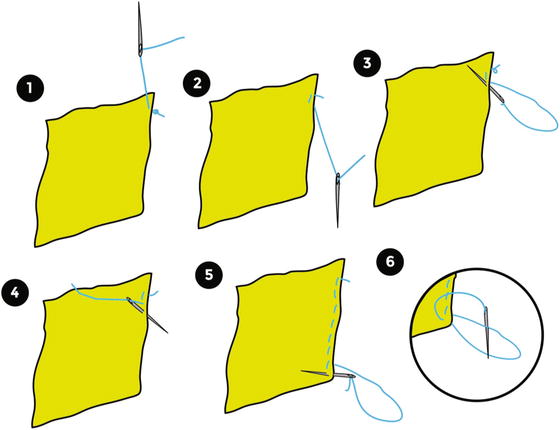
Figure 4-3. Sewing a running stitch
Whipstitch
Whipstitch is useful for sewing around the edge of a piece of fabric. For this tutorial, let’s sew a patch onto another piece of fabric. The steps are diagramed in Figure 4-4:
Poke your threaded needle through the base layer fabric and then through the edge of the patch, or top layer, about a quarter of an inch from the edge of the patch. Pull the needle all the way through so that the knot is taut on the back of the bottom layer.
Flip the needle, and stick it over the edge of the fabric so that it only goes though the bottom layer, as shown in part 2, and pull all the way through. This should result in a stitch that is perpendicular to the edge of the patch.
Poke the needle up through the base fabric and patch, close to where the first stitch started, to create another perpendicular stitch next to the first one. Continue this all around the edges of the patch until it is secured to the base layer of fabric.
Once the patch is secure, knot and cut the thread as described in step 5 of the running stitch tutorial.
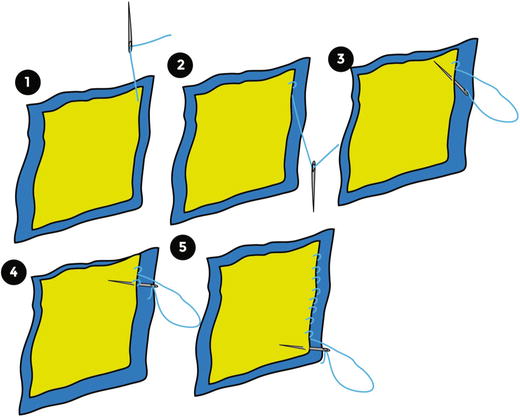
Figure 4-4. Sewing a whipstitch
Sewing a Button
This technique is used when you need to sew a button or snap onto a piece of fabric. Start with the threaded needle, a button, and a piece of fabric. The steps are diagramed in Figure 4-5:
Decide where the button will be placed on the fabric, and mark it with your tailor’s chalk. Note the holes in the center of the button; there should be at least two holes, but there may be four.
Stick the needle through the middle of where the button will go on the fabric. Before pulling the needle through, place the button over the fabric, and pull the needle though one hole of the button as shown in part 1. Pull the needle through the fabric and the button, holding the button in place.
Flip the needle back toward the fabric, stick the needle through another hole on the button and the fabric, and pull it taut on the back of the fabric, as shown in part 2. If your button has four holes, try to go for the hole that is diagonal to the one you first anchored.
Go through each of the holes, in and out through both sides of the fabric, two or three times, until the button feels secure on the fabric; it should look like part 4.
When you finish sewing the button onto the fabric, pull the thread to the back side of the fabric and tie a knot as described earlier.
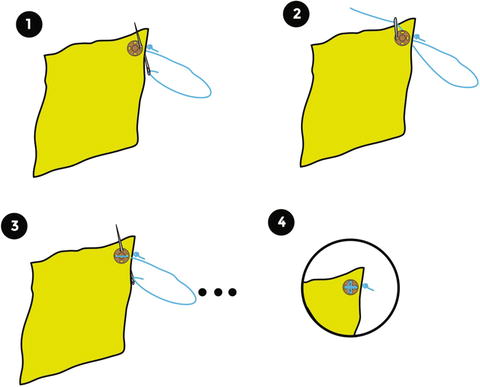
Figure 4-5. Sewing a button
Cutting fabric
In order to cut fabric with a smooth edge , there are some basic guidelines to follow:
The fabric must be flat, clean, and wrinkle free, so wash and iron it if necessary.
Place the fabric on a flat surface, and smooth it out; a large table works well.
Draw the shape you’d like to cut with the tailor’s chalk. If necessary, use a flat edge or ruler while drawing.
Begin to cut through the fabric with your sewing shears. Open the scissors completely, and make long, fluid strokes through the fabric. Hold the scissors very steadily; a slight shake could result in an uneven cut. You can also use a rotary fabric cutter if you have one.
If cutting a straight line, you may want to lay a ruler or other straight edge on the fabric to help guide you. One method is to line up the fabric with the edge of a surface and cut parallel to the surface.
Do not use these scissors to cut anything other than fabric. They are designed to cut through fabric and risk falling out of alignment or becoming dull if misused .
Making a Pillow
To practice these stitches, making a simple pillow is a great first project. You need the following tools and materials:
Some scrap fabric (or other fabric if you would like)
Needle
Pins
Thread
Scissors
Cotton or foam to stuff the pillow
Follow these steps to make your pillow, as diagrammed in Figure 4-6:
Cut two square pieces of fabric equal in size out of your fabric, and thread your needle with the desired color of thread.
Pin all four edges of the pillow together, as shown in part 1.
Sew together three edges of the pillow using a running stitch, about half an inch from the edge of the fabric. Try to make your seams even.
Take the pins out of the fourth side of the pillow, reach in, and turn the pillow inside out to hide the seams of the three edges.
Stuff the pillow with the desired amount of stuffing material, and close the fourth edge with some pins.
For the last edge of the pillow, use a whipstitch to attach the two pieces of fabric together.
Congratulations! You have put together your first pillow!
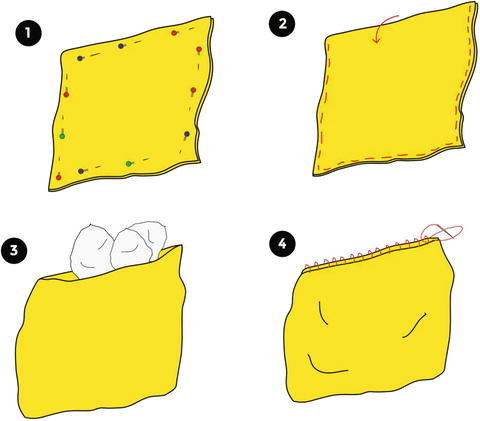
Figure 4-6. Sewing a pillow
Following a Pattern
After learning how to sew, cut fabric, and make a pillow, a good next project would be to make a garment from a pattern. For your first garment project, choose a simple pattern. When you find a pattern that you like, check whether there is a labeled size; if so, make sure it is your size. Some patterns have multiple sizes printed on the pattern, which can be confusing to follow. If this is the case, it may be useful to outline the size you are following with a dark- or bright-colored marker. Before making the garment out of your desired fabric, it’s a good idea to make a sample, also called a muslin.
Note
The term muslinalso refers to untreated cotton fabric, but for this chapter it refers to a different definition given below.
A muslinis a mock-up version of a pattern made from a plain fabric. Muslins are useful for making a first draft of the garment that can be revised and changed, before making the final version out of the desired fabric. Follow these steps:
Read the instructions printed on the pattern or on the accompanying guide. The guide includes tips on how to cut out the pattern tissue, how to construct the garment or item, the best way to select sizing, and so on.
Check to see if the pattern allows for seams. If it does not, you will need to add them in when cutting out the pattern later.
Find the grain lines. These are the long, straight lines on the pattern with arrowheads at one or both ends. This arrow tells you which direction the paper pattern pieces should sit with respect to the grain of the fabric. To find the grain lines of the fabric, find the selvage edge: this is the edge where the pattern ends and is sometimes white. The grain lines are the same direction.
Take note of the following markings on the pattern: notches, shortening lines, button holes, darts, and dots.
You are ready to cut out the pattern. The cut lines are the solid lines surrounding the dashed lines. If there are no dashed lines, this means the sewing line is not marked on the pattern; in this case, it is safe to assume that the sewing line is about half an inch inside the cut line. When cutting out the pattern, use normal paper scissors. Cut along the cutline very carefully; if you make a mistake, just try to match the cut back to the line.
Trace the pattern on the scrap fabric you are using to make a muslin, and cut it out of this fabric. It may help to pin the pattern to the muslin while cutting it out to hold it in place. When pinning fabric that you are going to sew, it is easiest to place the pins perpendicular to the direction the seams will go, so that you can easily sew through them.
Assemble the pattern from the fabric pieces according to the guide. Use pins to hold the pieces together by pinning the pattern together along the edges.
If you have experience with a sewing machine, you may want to use one instead of hand sewing. Otherwise it is better to hand-stitch the pieces together so that it can easily be mended. Try on the muslin and note the areas where the form is ill-fitting. Be sure to cut out the pattern from the final fabric with these changes in mind.
Using a Sewing Machine
Sewing machines are preferable for making sturdier, even stitches, and they get the job done much more quickly than sewing by hand. They can produce several different types of stitches from straight, to zigzag, to a more intricate, curvy seam. Sewing machines use a slightly different mechanism than hand sewing: for one thing, the eye of the needle is on the other end, near the sharp point. This needle does not go up through the fabric one way and down another—instead, it just pokes through the surface of the fabric at set increments. Also, there is a second spool of thread beneath the needle plate, called the bobbin. What happens when the needle goes under the needle plate? Refer to Figure 4-7 to see how the machine locks in each stich.
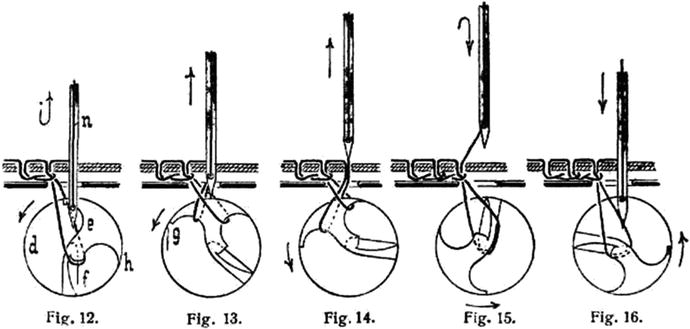
Figure 4-7. A diagram of the stitching mechanism of a basic sewing machine (from the 1904 Lexikon der gesamten Technik (dictionary of technology) by Otto Lueger
The needle is affixed to the needle bar and is driven up and down by a motor and gearbox . When the tip of the needle passes through the fabric, it pulls a small loop of thread through with it. A hook mechanism under the needle plate pulls this loop and wraps it around another piece of thread, which is reeled from the bobbin. The two threads interlock around the fabric, forming a stitch, and the needle is pushed up and slightly forward before it goes through the fabric again.
A basic sewing machine is fairly inexpensive and can even be found at a thrift store or a secondhand marketplace like Craigslist. When learning how to use a sewing machine, an electric pedal–powered machine is easiest. You will have to learn how to thread the machine and get a feel for the pedal power. This is perhaps the most important part, because steady control of the pedal determines the evenness of the stitch. The other important factor in evenness is the ability to hold the fabric in place and feed it through the machine. It is important to tinker a bit with the sewing machine until you really get a feel for these things before attempting a more advanced project.
Summary
After completing the tutorials in this chapter, you should have confidence in your basic sewing skills . If you are looking to take them even further, there are some resources listed in the appendix. Additionally, you have now gained perspective about what goes into assembling a wearable. Of course, when produced at a mass scale, automated machines do several of the steps covered here, but a considerable amount of work still needs to be performed by skilled workers. The next chapter provides you with a basic overview of electronics and teaches you how to combine your sewing skills with circuits to create embedded wearables.