A bot is an application that is able to interact with users conversationally [1]. It can be a very simple application that supports dialog and basic questions, or it can be sophisticated, capable of understanding language. In Microsoft Azure, it is possible to create a bot in C# or Node.js. You can create a bot using .NET SDK [2] and test it via such tools as Emulator [3]. In addition, some bot components help you to add more features [4]. In this chapter, a very simple bot using an Azure component will be presented. First, how to create a bot service in Azure will be shown, then how to create a simple bot for questions and answers will be presented, as well as a more complex one.
Bot Creation in Azure
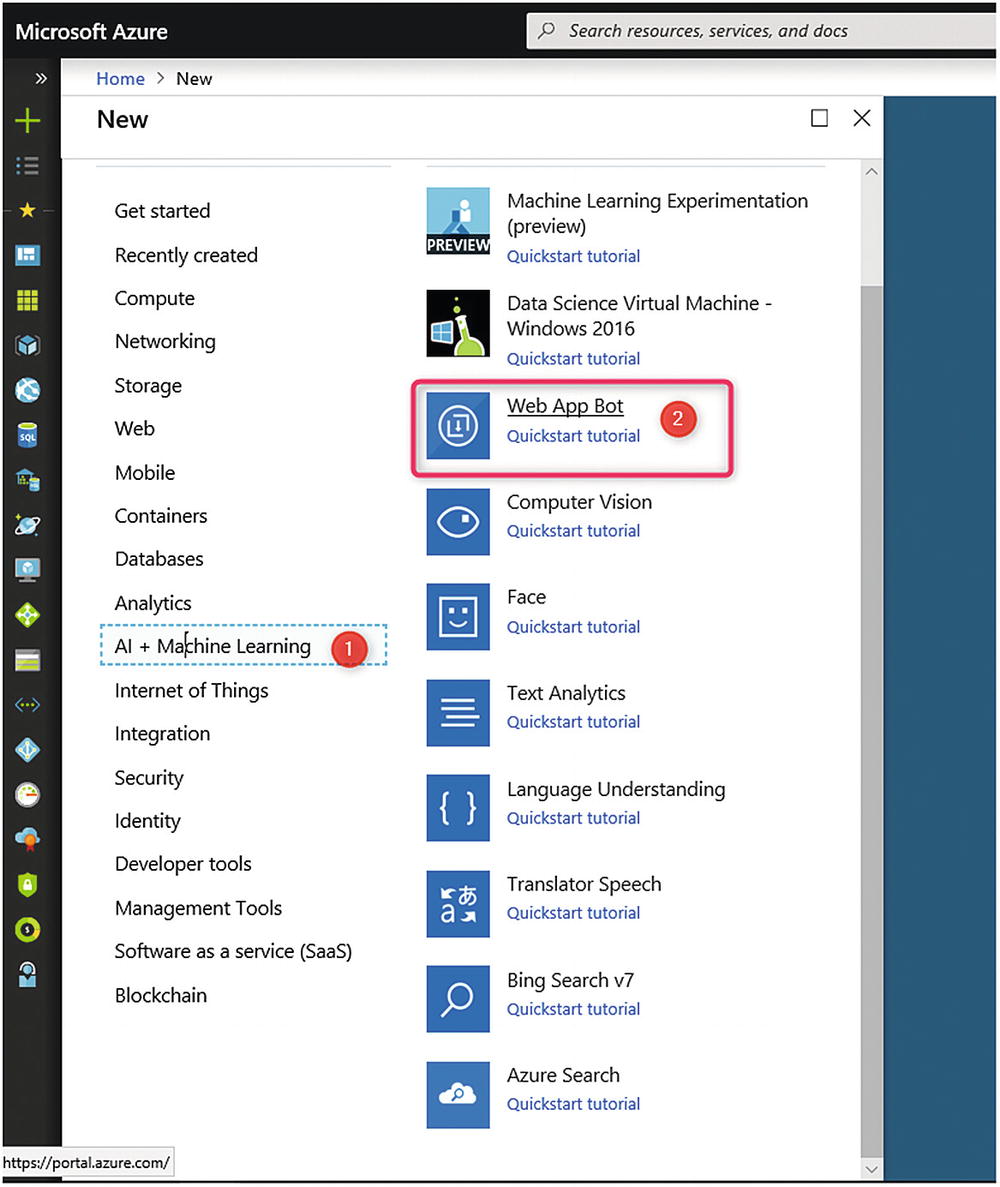
Log in to your Azure account and create a new service name: Web App Bot (Figure 19-1).
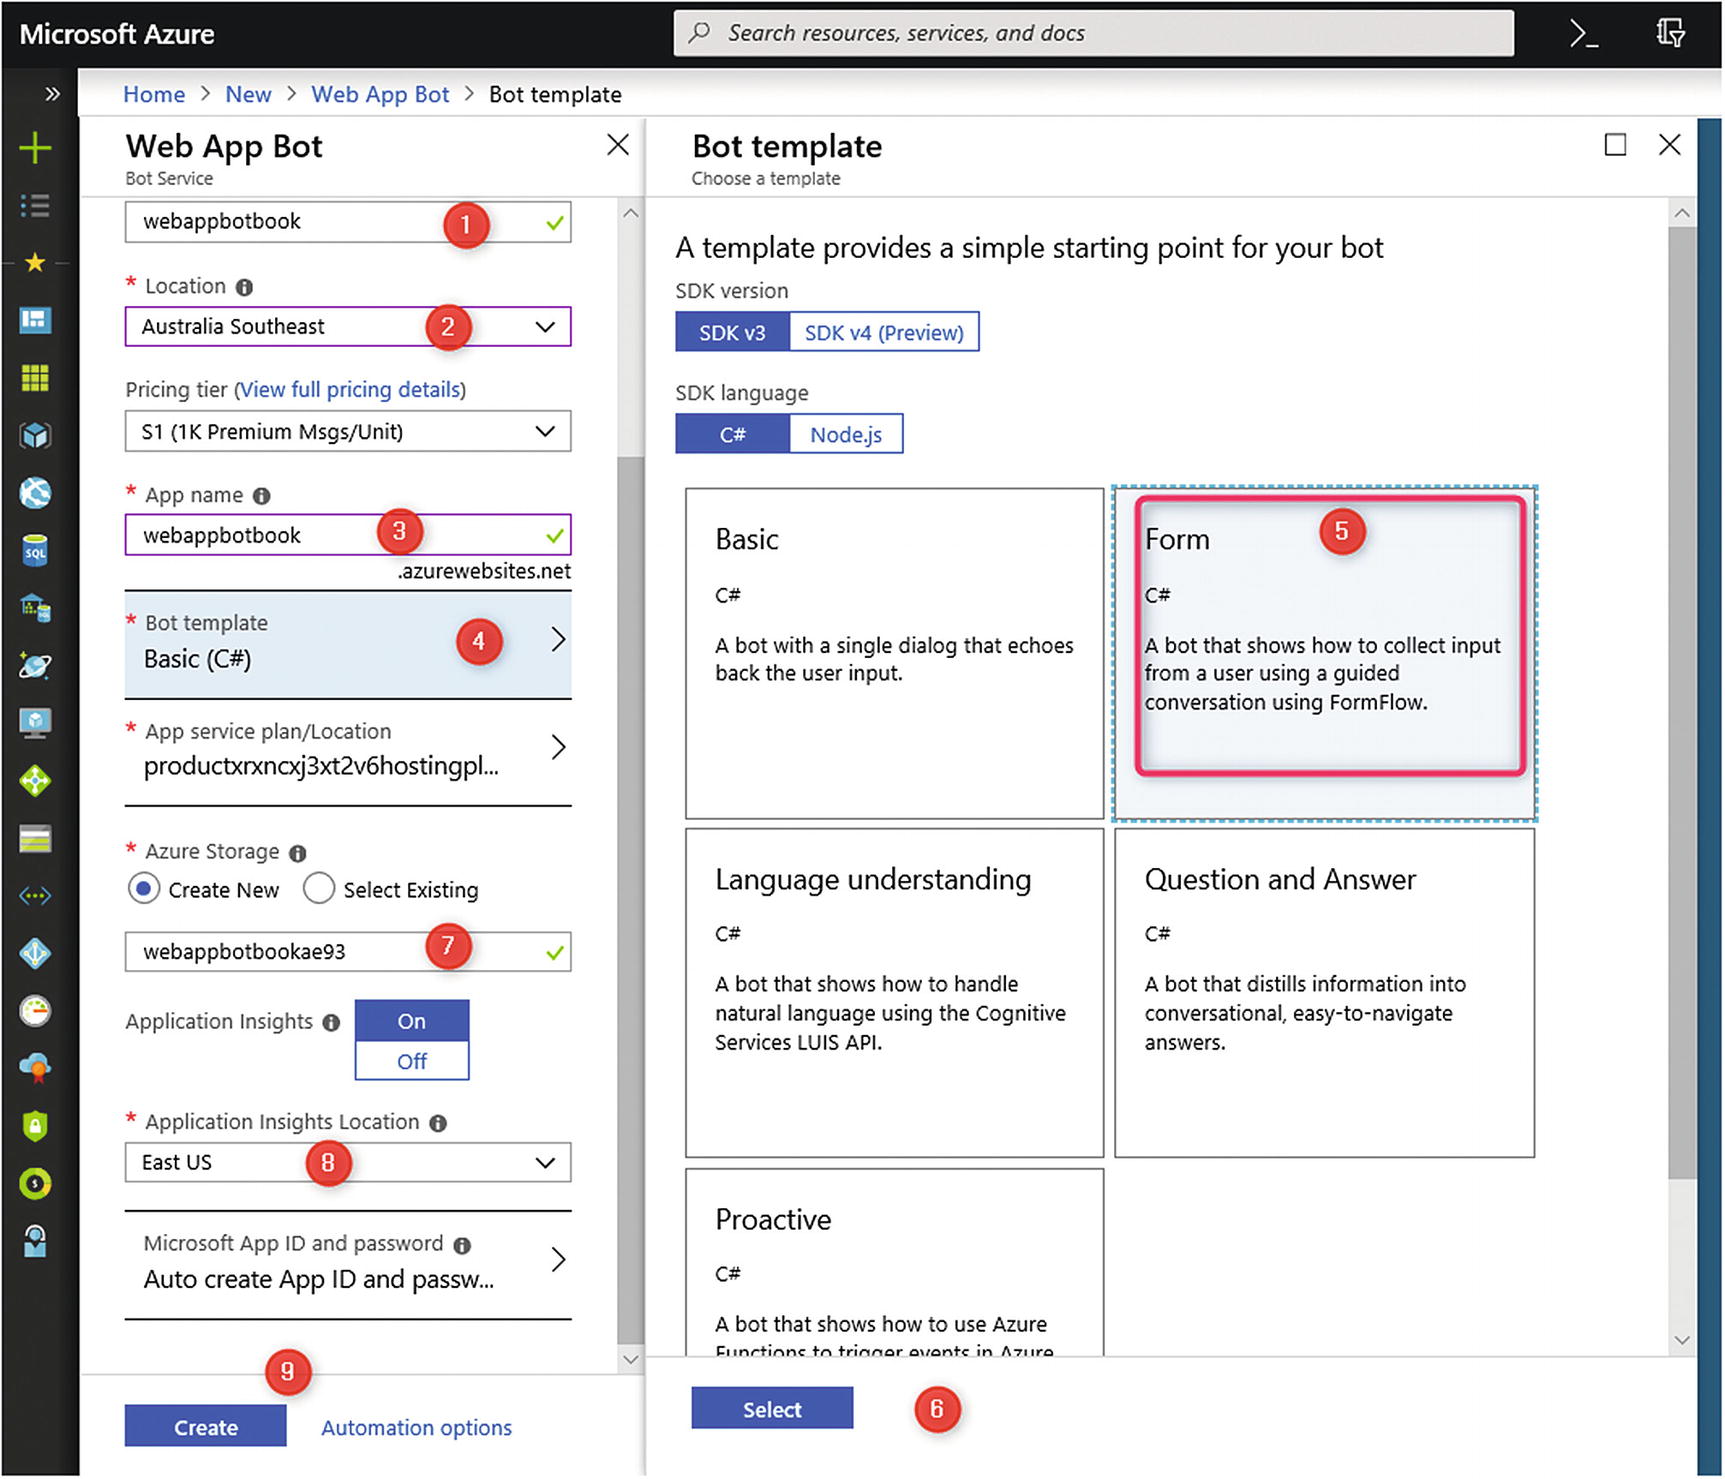
On creating a new Bot service, you must provide some information, such as a bot name, subscription, resource group, location, and so forth. One of the main fields that you have to choose at the start is Bot template. The default option is Basic (C#). In our scenario, we are going to change the default option to Form, which helps us to create a bot application to guide end users.
Figure 19-1
Web App Bot service in Azure
As you can see in Figure 19-2, the Form option should be selected.
Figure 19-2
Bot Framework for questions and answers
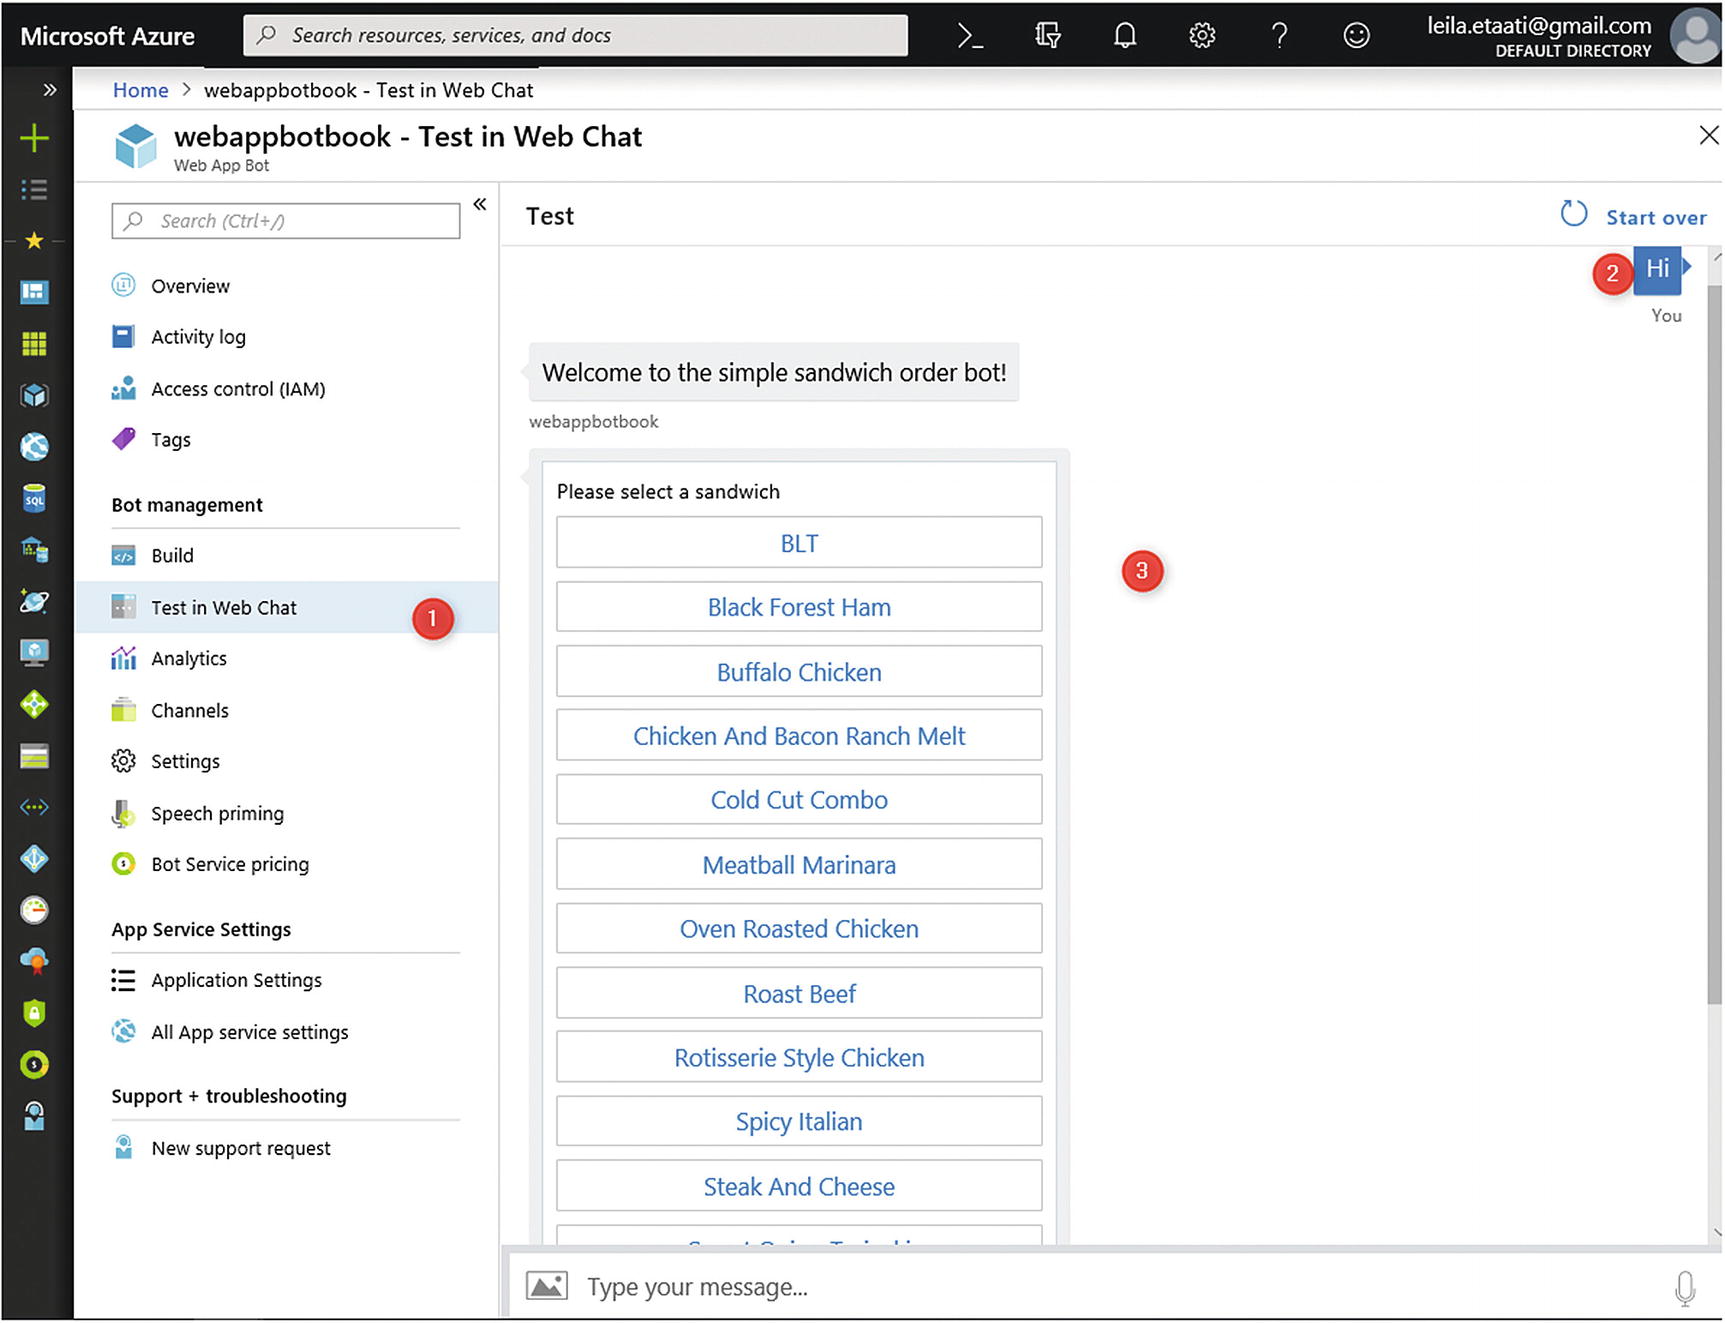
After completing the bot application, the resulting services have three main categories: Bot Management, App Service Setting, and Support and Troubleshooting. First, check the output of the created bot. Go to Bot Management ➤ Test in Web Chat.
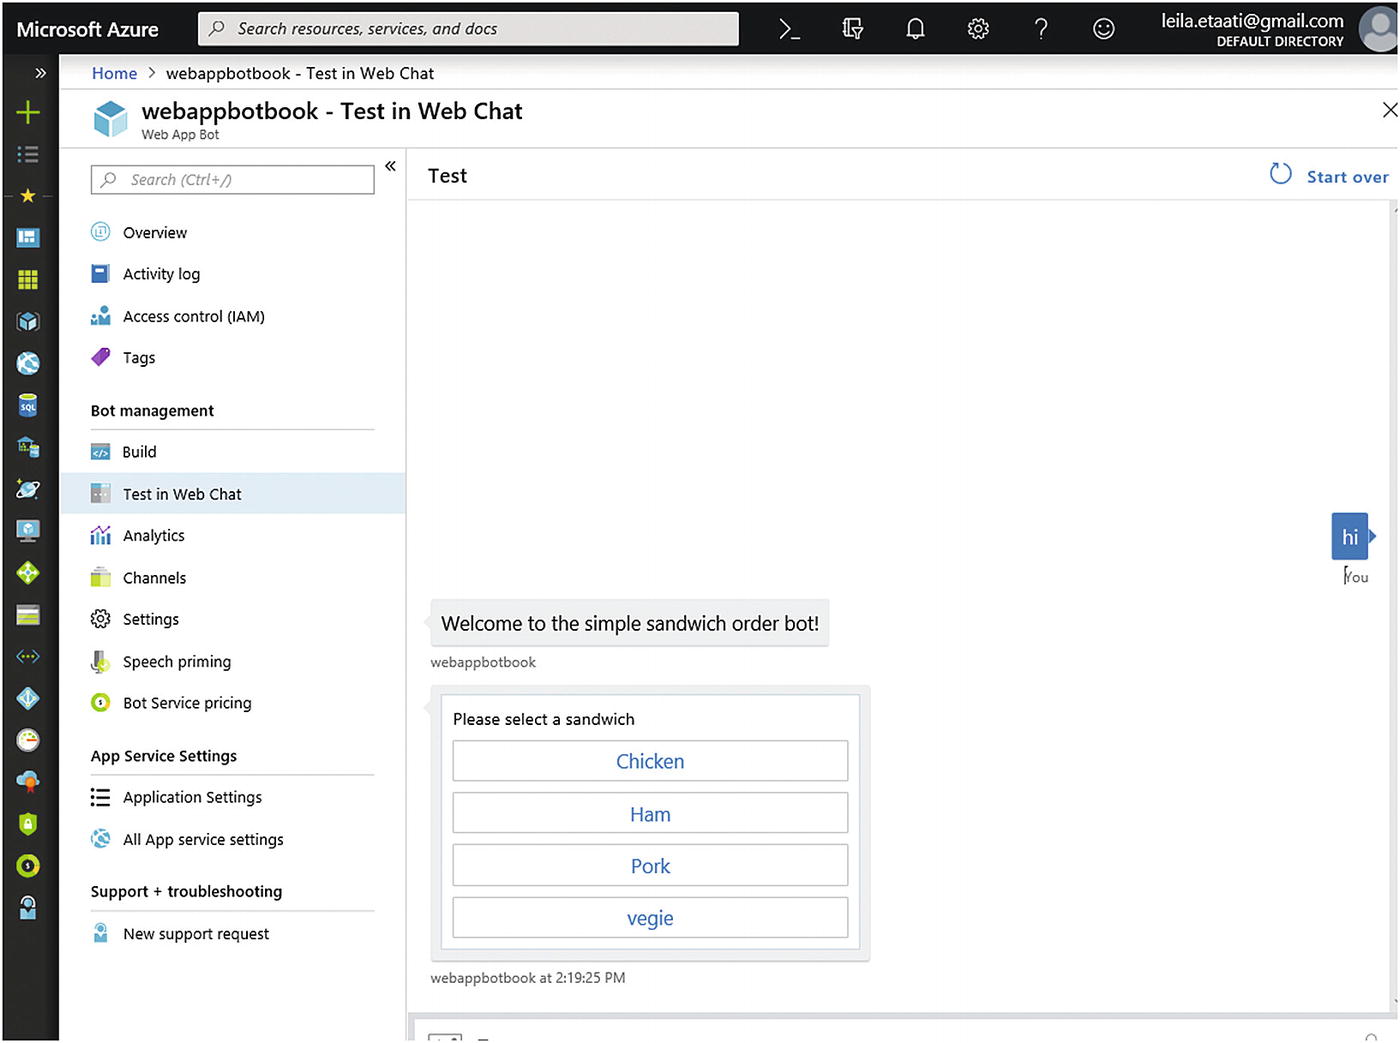
To see the default result of Bot Framework, click Test in Web Chat and write Hi. The result will be shown as “Welcome to the simple sandwich order bot!” Then list the sandwich option (Figure 19-3).
Figure 19-3
Bot Framework test
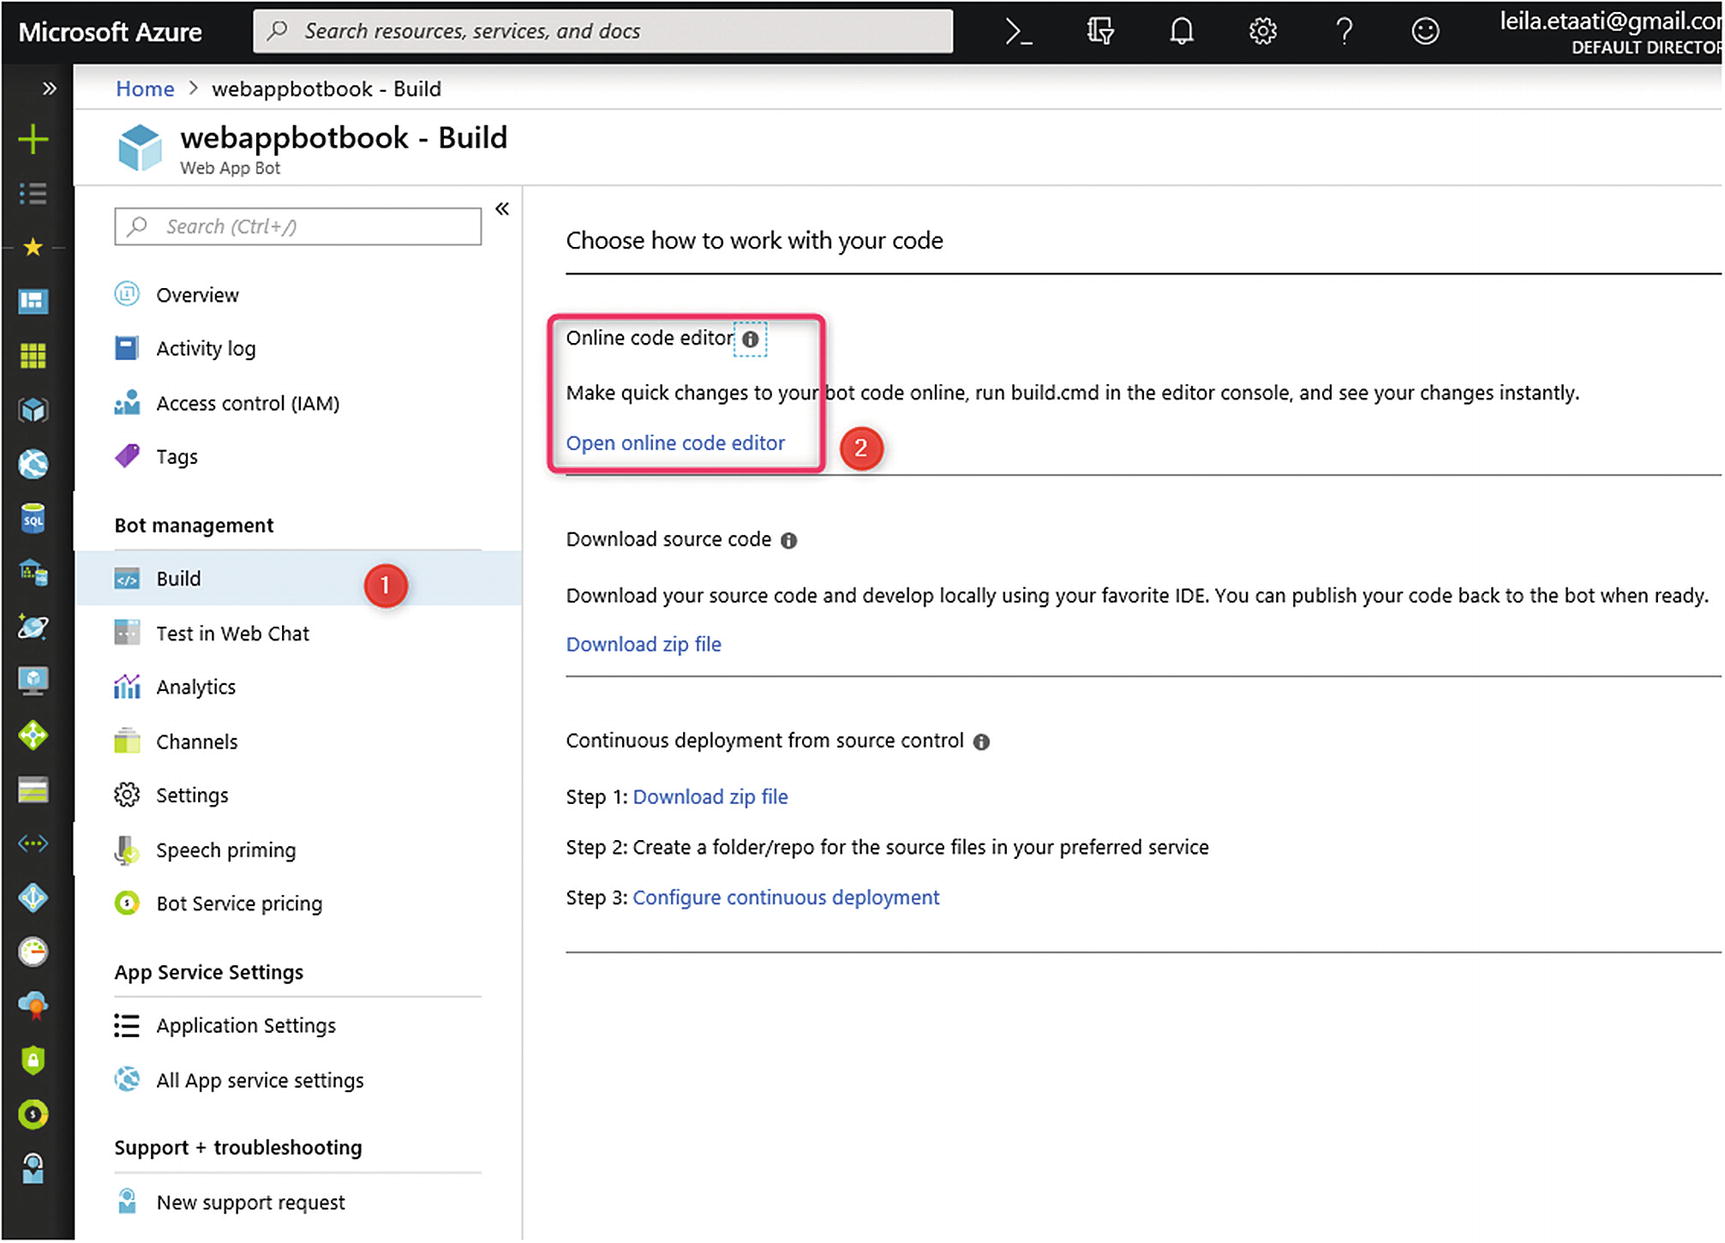
Under the Bot management section, the first option is Build, which provides all the source code for creating a bot framework. The first option is Open Online Code Editor. Using this option, developers are able to see code in the online code editor.
As you can see in Figure 19-4, under Online code editor, the code behind the bot is shown.
Figure 19-4
Build section of Bot Framework
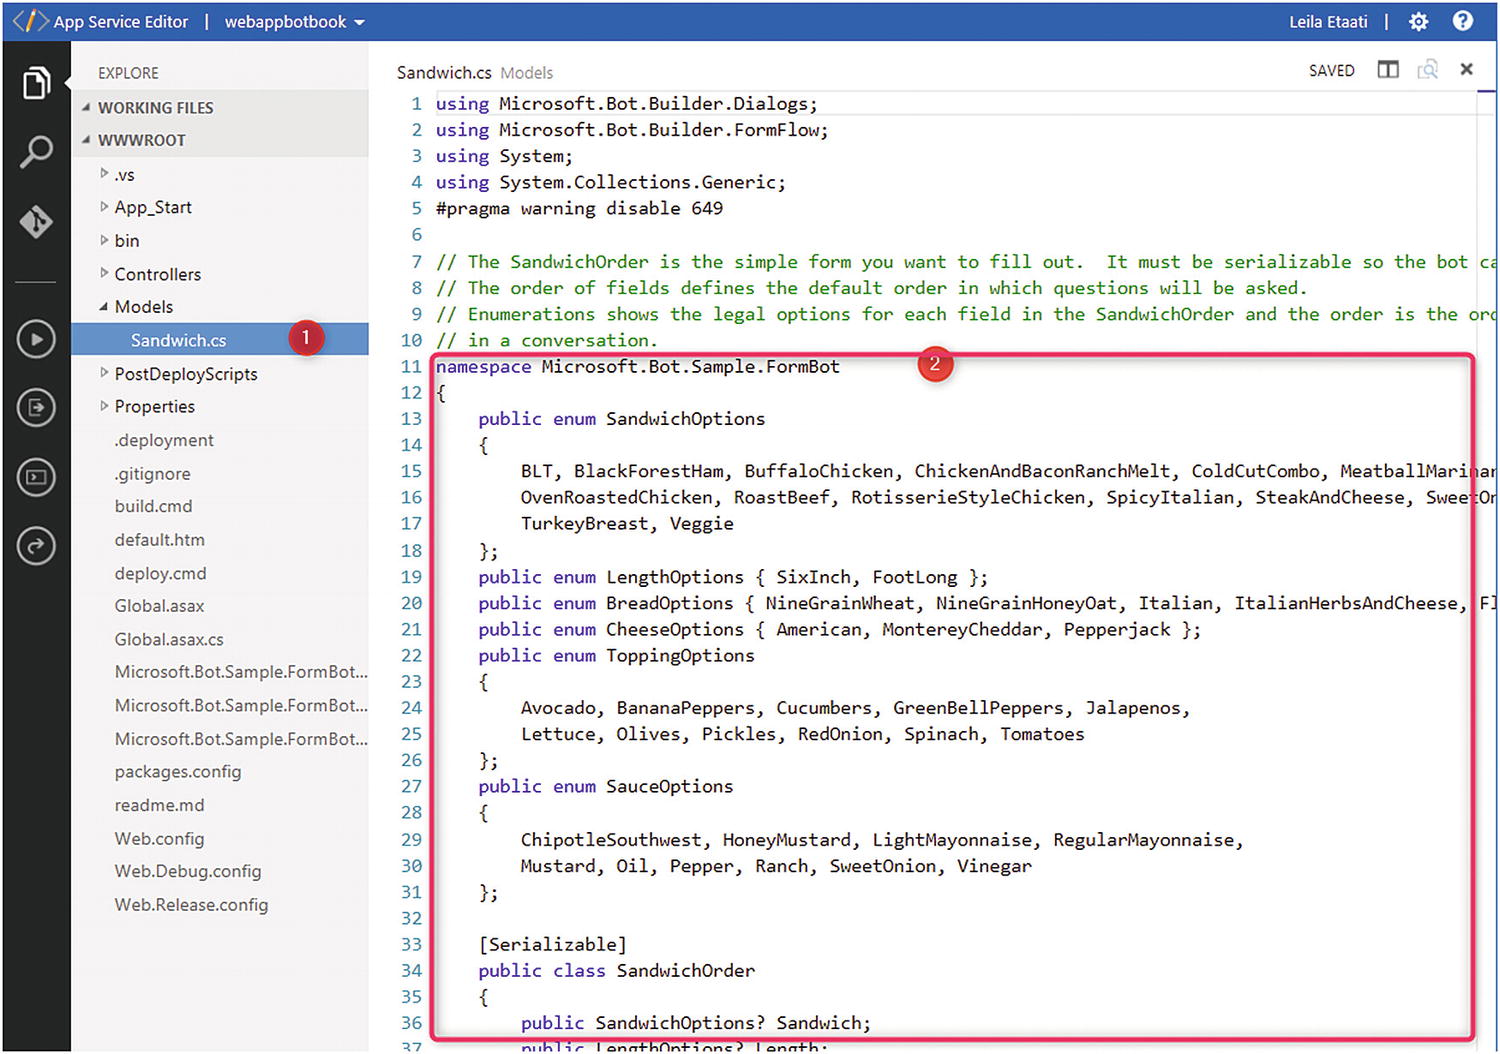
To see the code, click Open online code editor. The code for the Web App bot framework will be shown (Figure 19-5). As you can see in Figure 19-5, under the Model folder, in the Sandwiches file, the list of the dialog that users may ask is shown.
In addition in Figure 19-5, each of the questions and possibilities has been represented following an enumeration data structure. Each enumeration defines different questions that may occur in a dialog with end users. You can change online the questions and types of offerings in code. For example, you can change the Sandwiches option to Chicken, Ham, Lamb, Pork, or Veggie.
Figure 19-5
Online editor for dialog bot framework
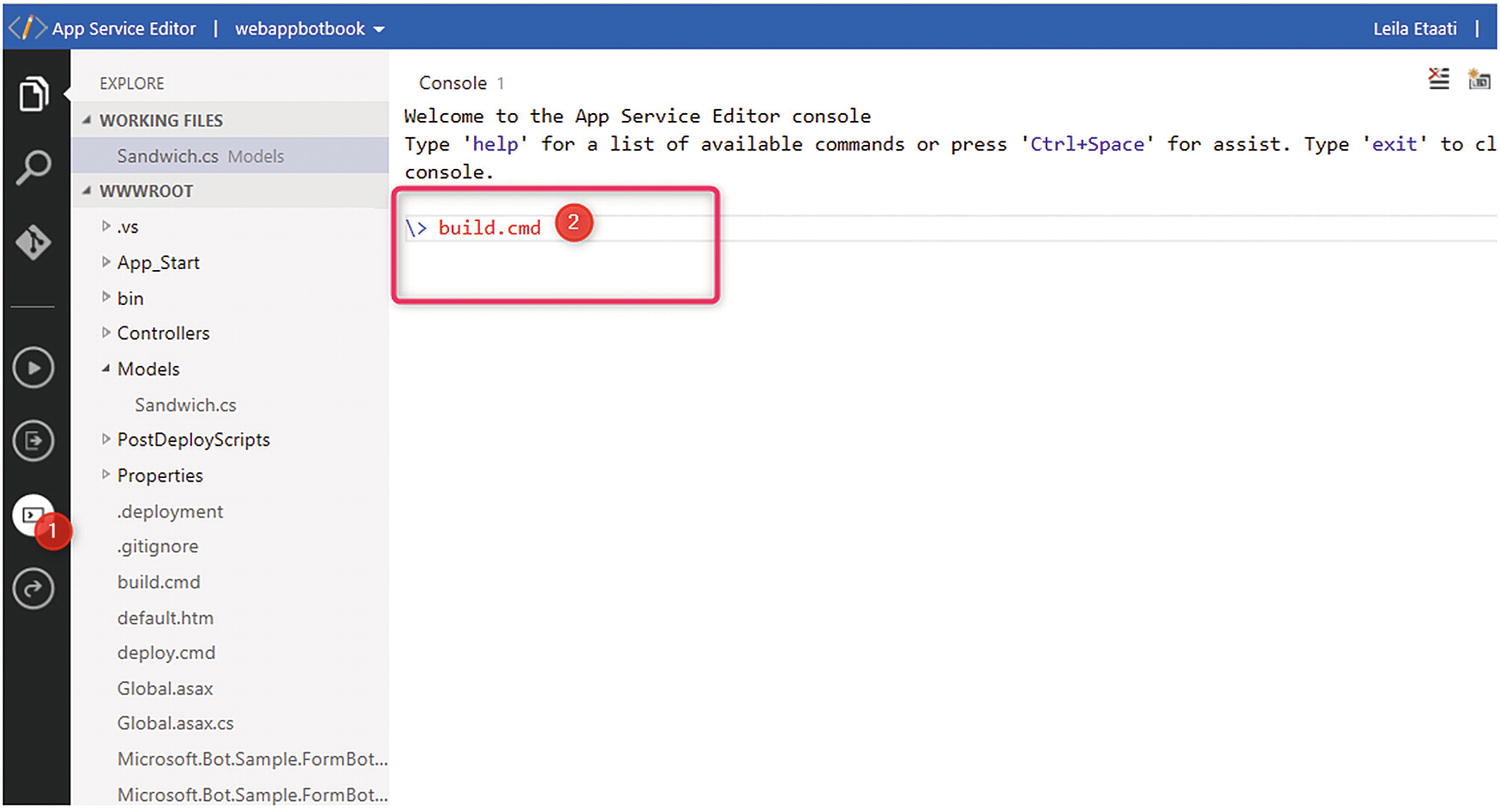
Changes to the file will be saved. You must build and compile them in a .NET application. To build the file, click Open Console and type “build.cmd” (Figure 19-6).
Figure 19-6
Building the Bot online editor
Now we have to test and check the changes in Test in Web Chat. Type “Hi” for the first time, after building the framework. As you can see in Figure 19-7, the first option regarding the sandwich type has been changed.
Figure 19-7
The result of changes in the bot framework
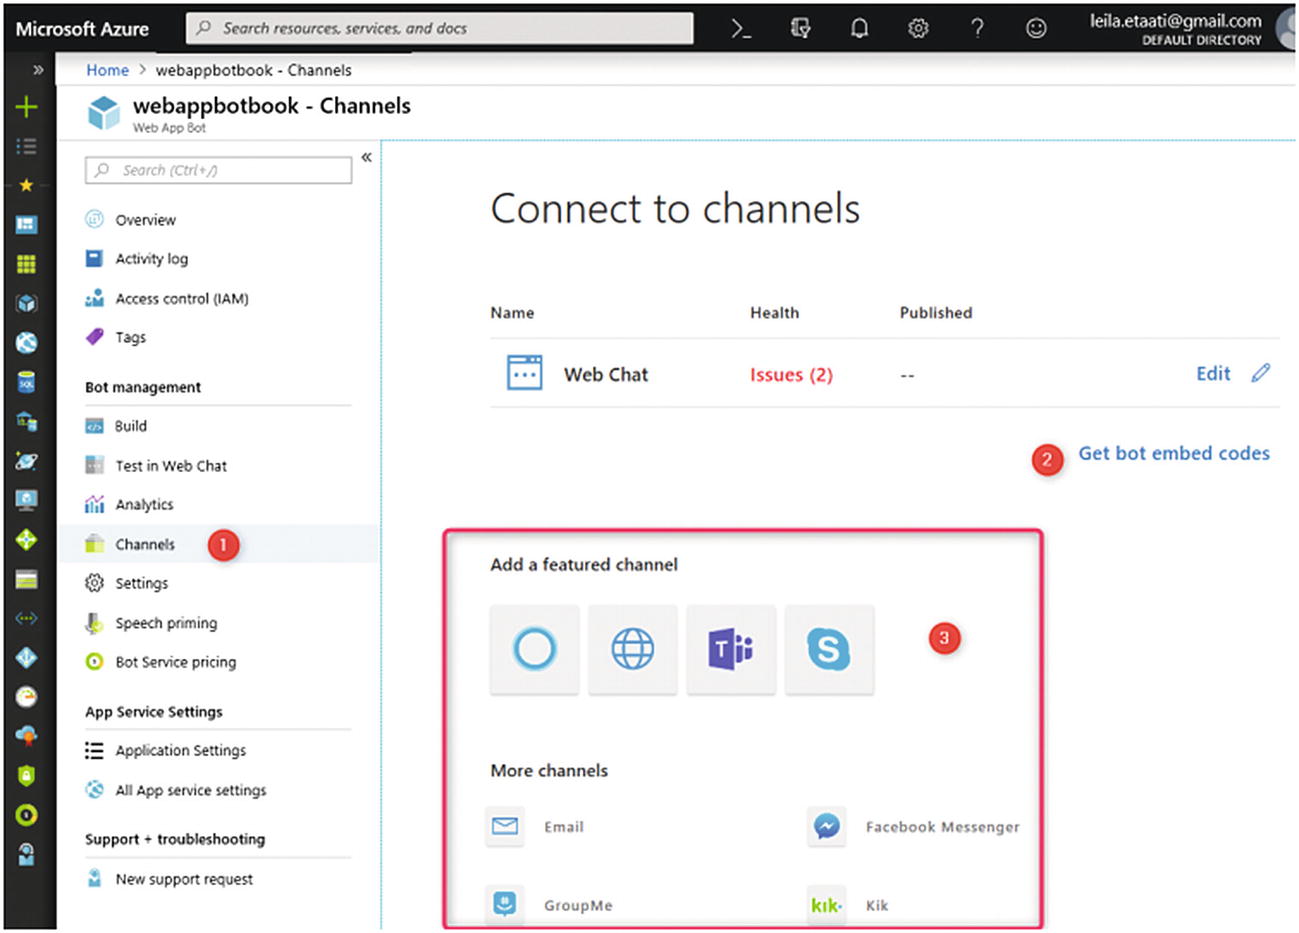
Now, when you choose the Ham option, the next sandwich option will be shown, which is a question about selecting the sandwich length. It is possible to embed the code in a channel, such as Facebook, Telegram, Skype, and so forth (Figure 19-8).
Figure 19-8
Channels in chatbot
Click Channels and note the different ways to embed the bot in different channels. One of the ways is embed the bot in a web application is to use Get Bot Embed Codes. If you want to embed the code in an HTML page, you must copy the embed code and replace the secret code with the secret key shown in the windows above (Figure 19-9).
Figure 19-9
Embed code in Channel
Now you have a code, as follows, using Secret keys.
Now you can embed the code in any web site. In the following section I will show how to create a question-and-answer chatbot and embed it in another web site.
Question-and-Answer Chatbot
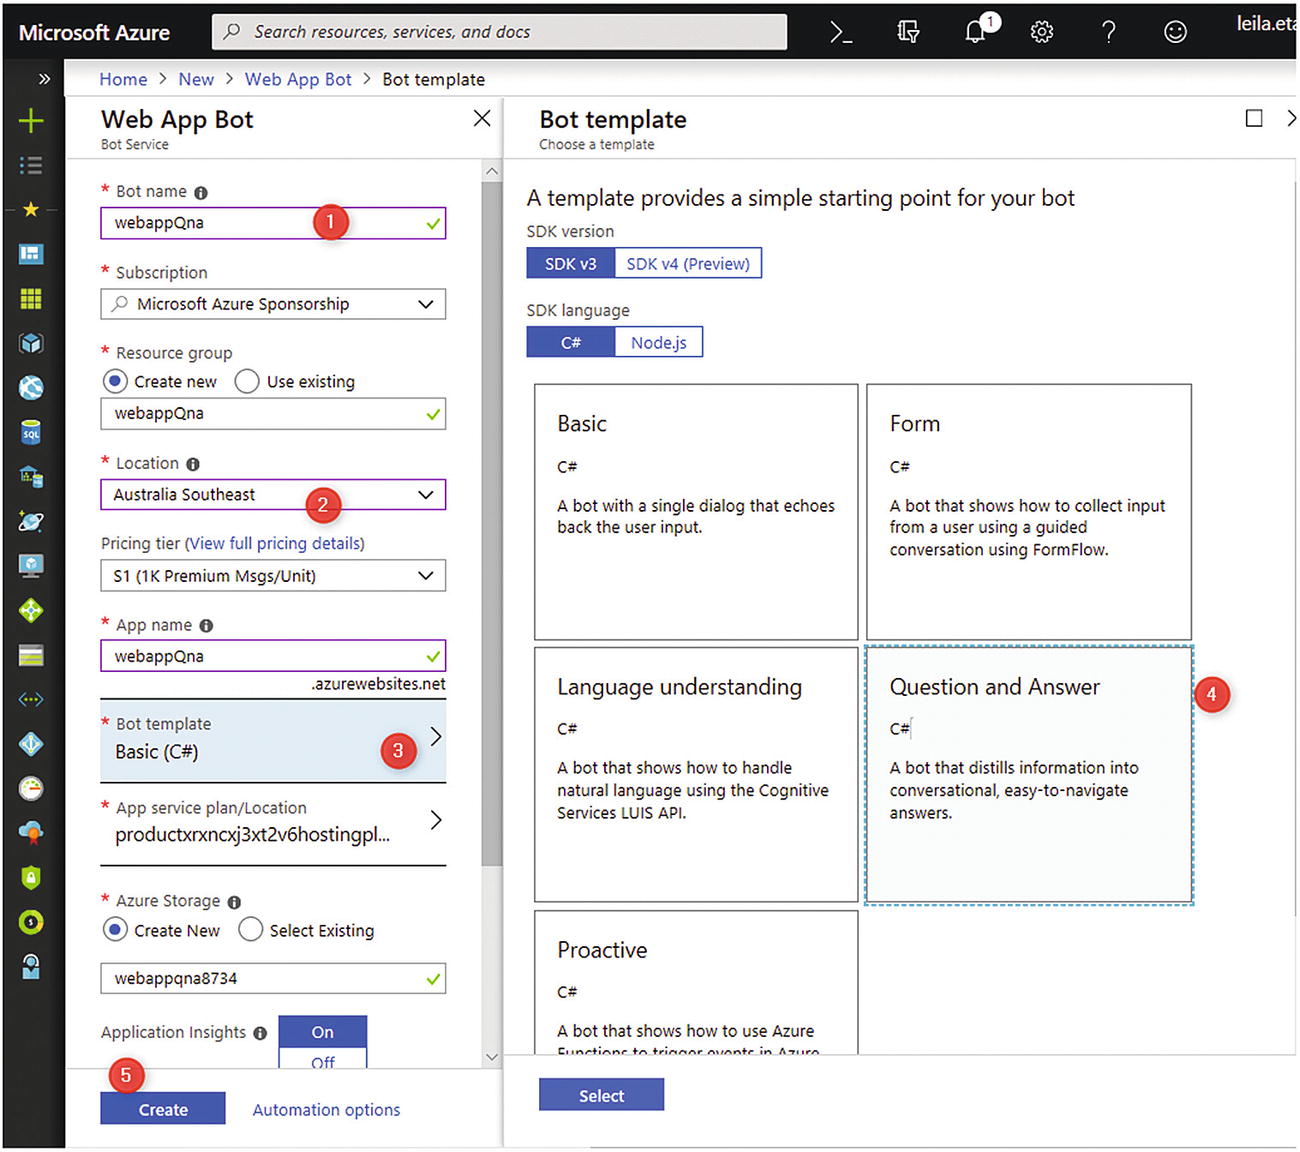
A question-and-answer (QnA) chatbot can be used for any web site, to guide users. The procedure for creating a chatbot is the same as that followed in the previous section. First, we create a Web App Bot service and choose the Question and Answer bot template (Figure 19-10).
Figure 19-10
Web App Bot for QnA chatbot
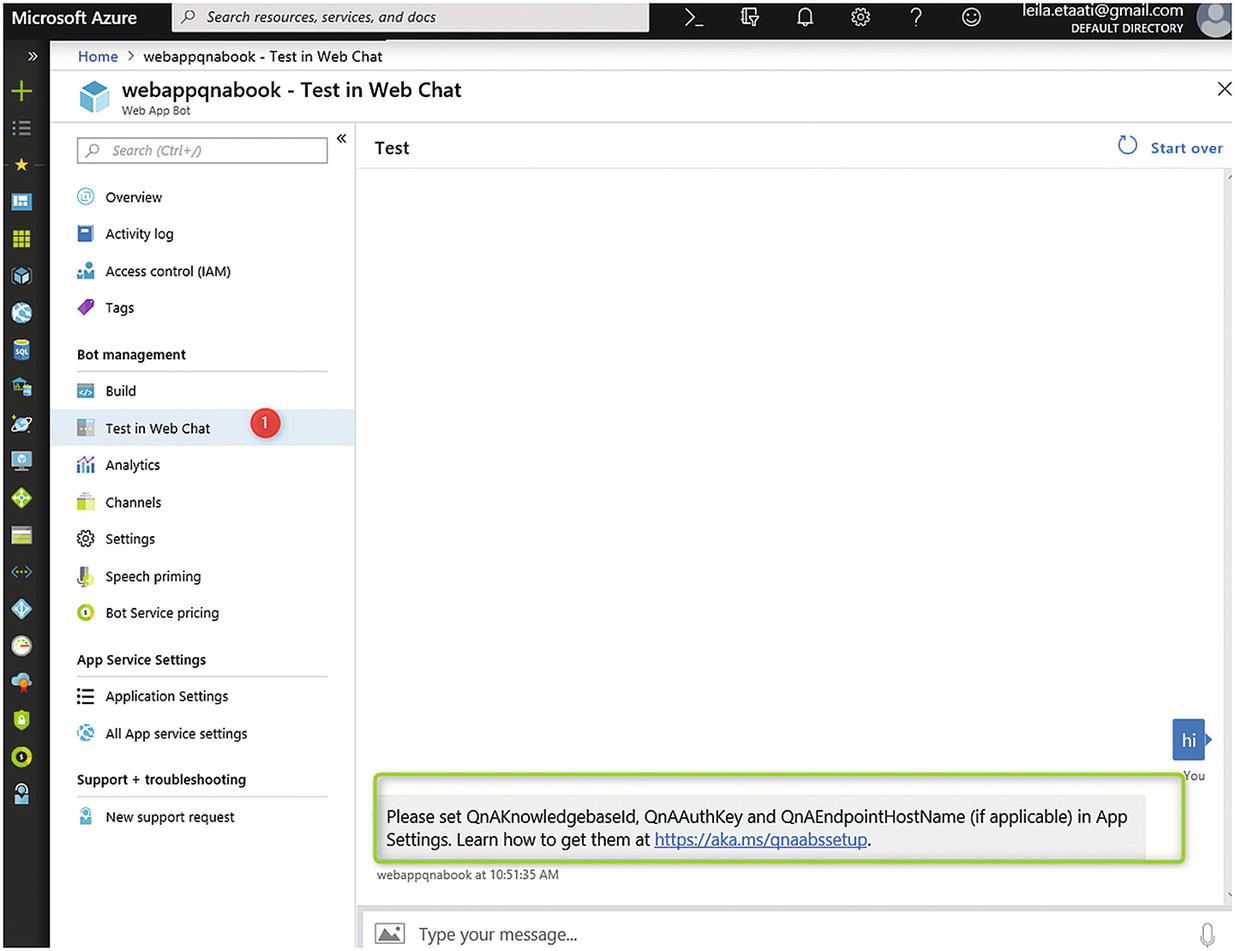
By creating the QnA chatbot, as shown in Figure 19-10, we must test itin Test in Web Chat. By testing the chatbot, you will receive an error message (Figure 19-11) asking you to set up some parameters, such as QnAKnowledgebaseId, QnAAuthKey, and QnAEndpointHostName.
Figure 19-11
Testing a web QnA chatbot
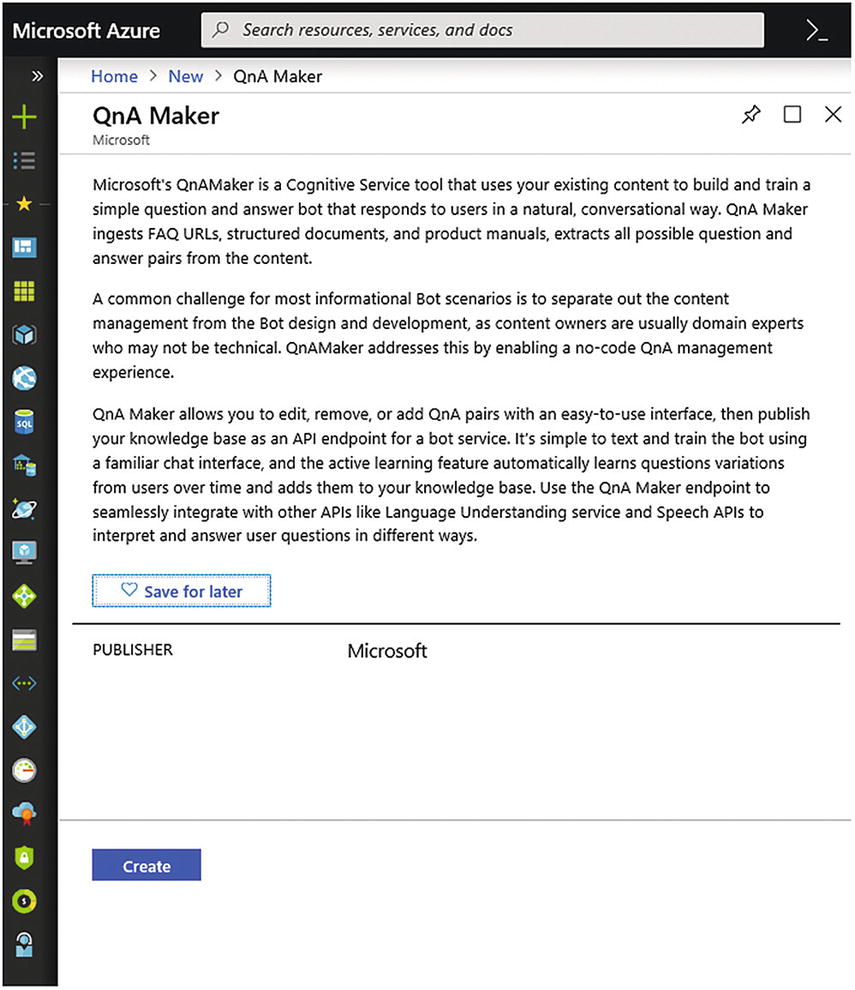
To set up these parameters, we must create a QnA Maker service in Azure. In your Azure account, set up the QnA Maker service (Figure 19-12).
Figure 19-12
QnA Maker
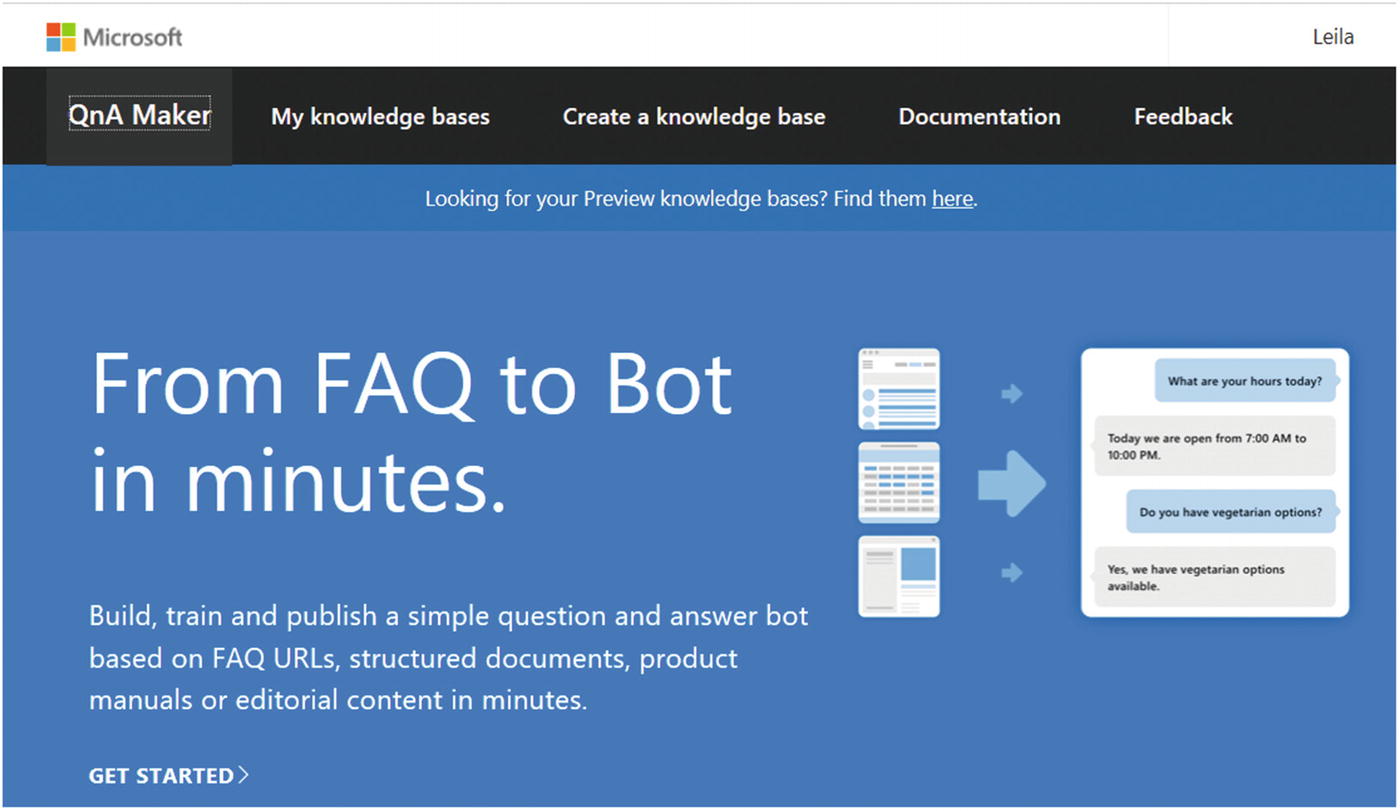
After creating QnA Maker in Azure, you must set up a knowledge database [5]. Using your Azure account, log in to the qnmaker.ai web site (Figure 19-13).
Figure 19-13
QnA Maker web site
Click the Create a Knowledge Base at the top of the page (Figure 19-13). The first step is to create a QnA service (as = in the last section). The second step is to connect the knowledge service to the QnA component in Azure. The third step is to choose the related Azure Directory ID, Azure Subscription Name, and Azure QnA Service. Then you must choose a name for the knowledge base (Figure 19-14).
Figure 19-14
Connecting the knowledge base (KB) with Azure
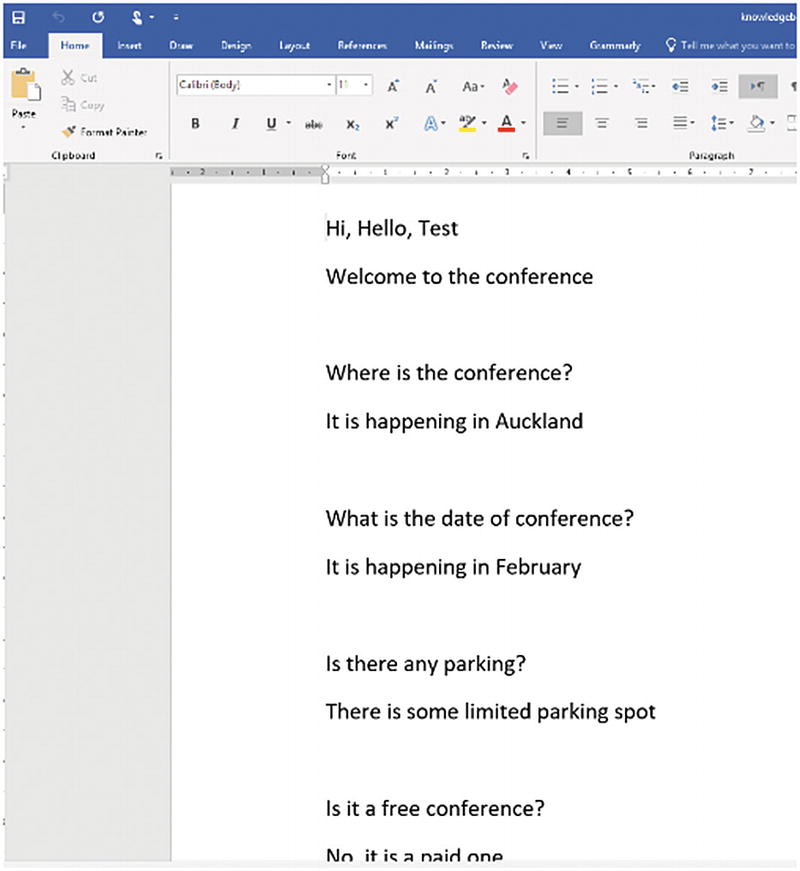
Next, we have to upload some knowledge base as a URL or in a file format (.et, .pdf, .doc, .docx, .xlsx). The file contains some frequently asked questions (FAQ). I have created a word file that contains some FAQs for a conference (Figure 19-15).
Figure 19-15
FAQs
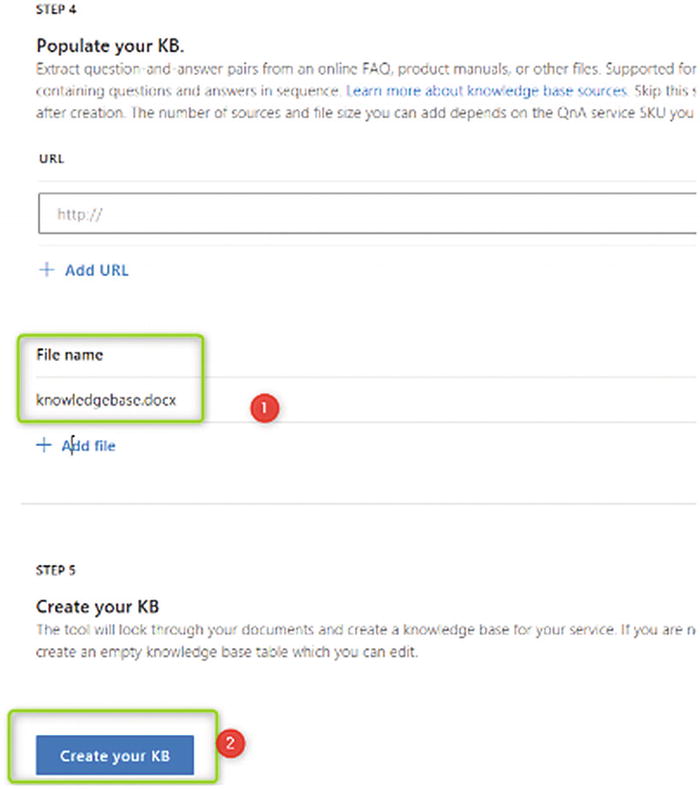
Now you must upload the file to the web site and create the knowledge base (Figure 19-16).
Figure 19-16
Creating a knowledge base
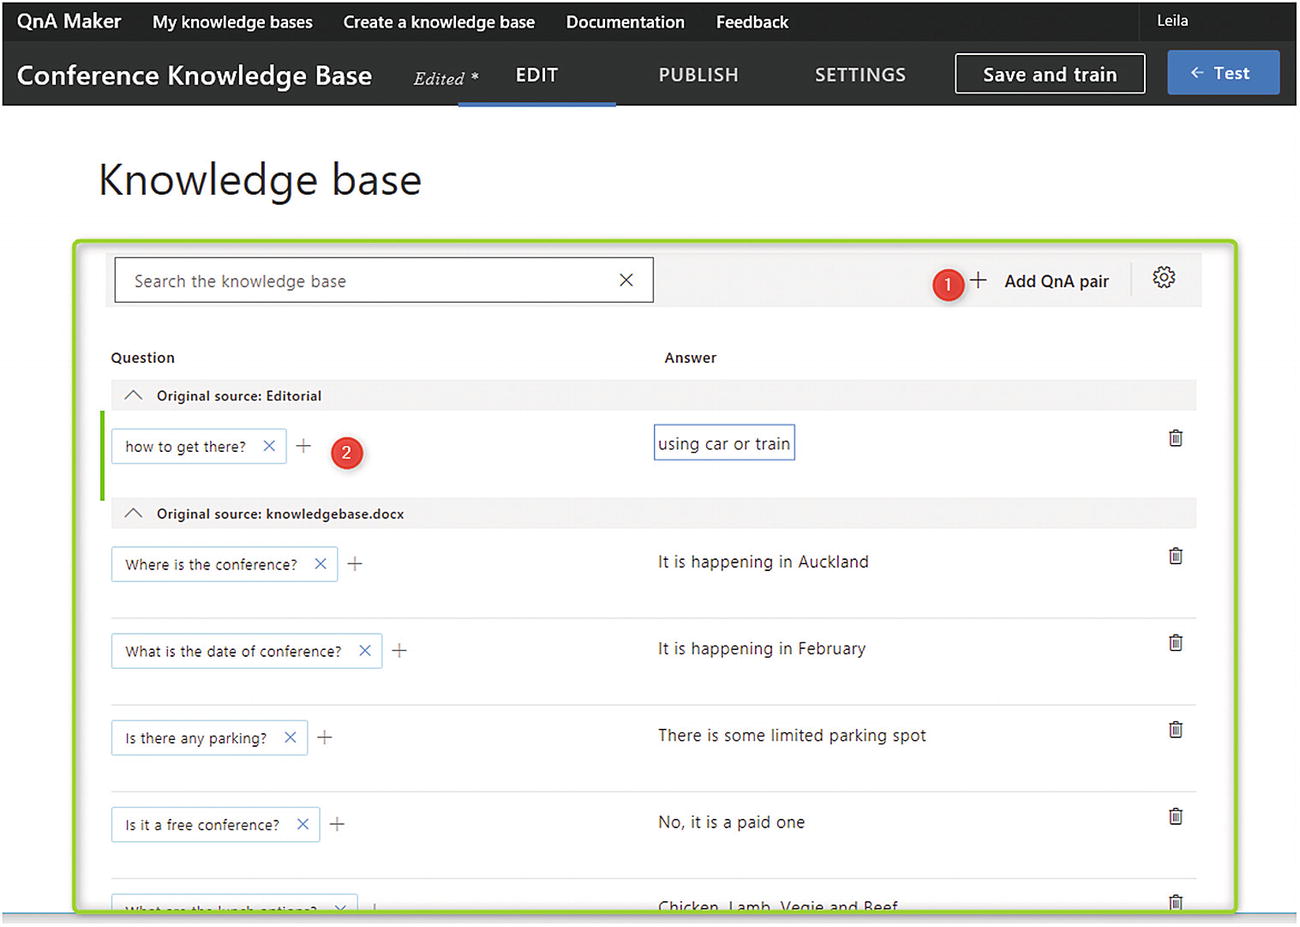
After creating the knowledge base, you can extend the knowledge base questions, by clicking AddQnA Pair (Figure 19-17). In addition, it is possible to add more questions and more answers.
Figure 19-17
Adding a QnA pair
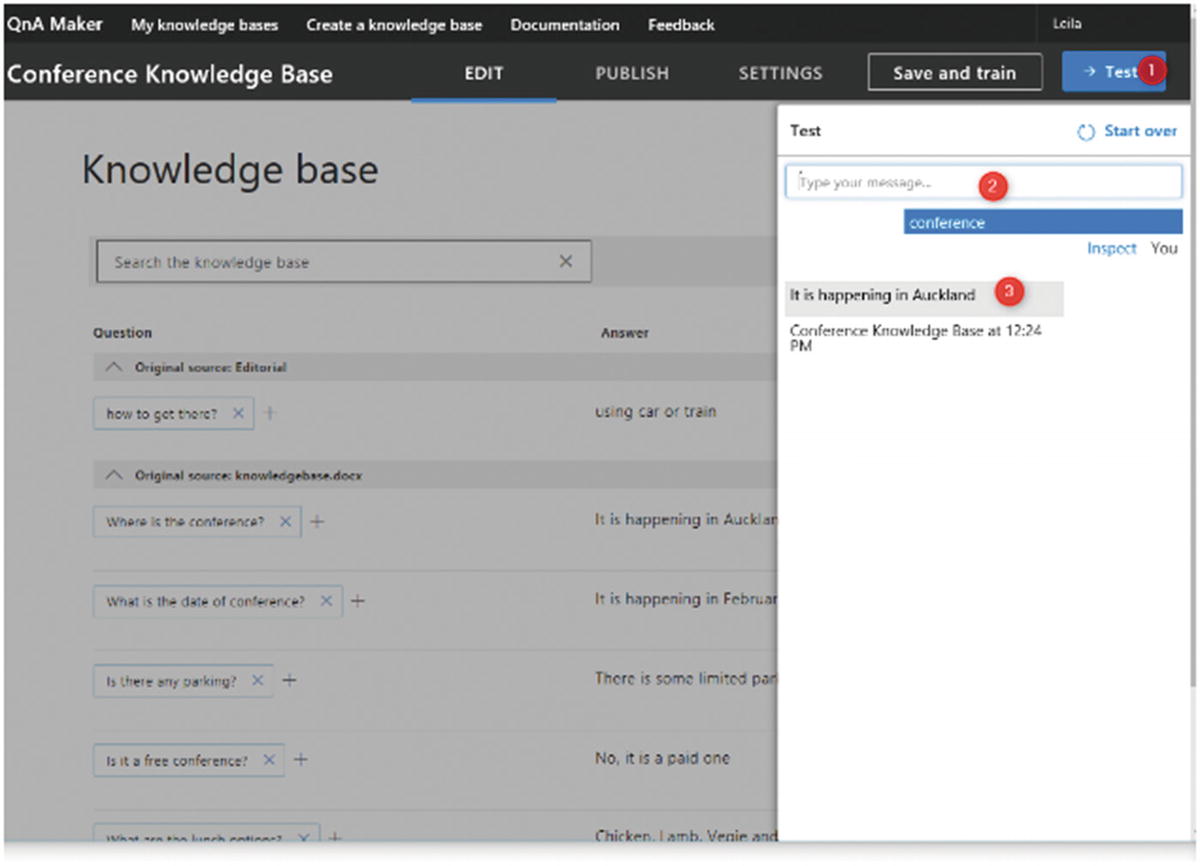
After uploading and adding the question, you must “Save and train” the knowledge base. After training the model, click Test. Type “Conference,” and the knowledge base returns the result (Figure 19-18).
Figure 19-18
Testing the knowledge base
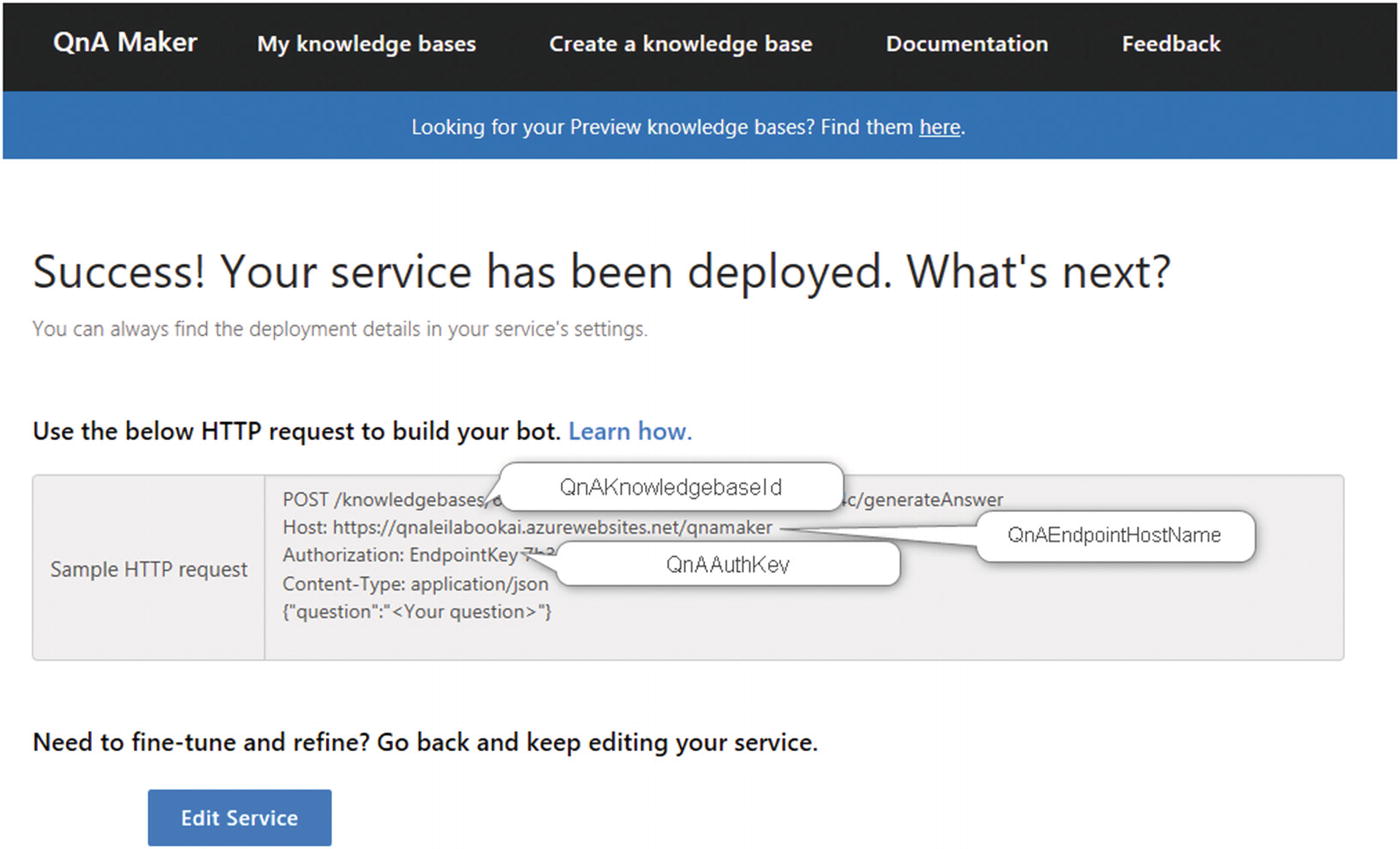
After testing the knowledge base, we must publish it. After publishing the knowledge base, an HTTP request will build. The created request contains all the required information, such as the knowledge base ID, end point link, and authentication key (Figure 19-19).
Figure 19-19
Creating an HTTP request
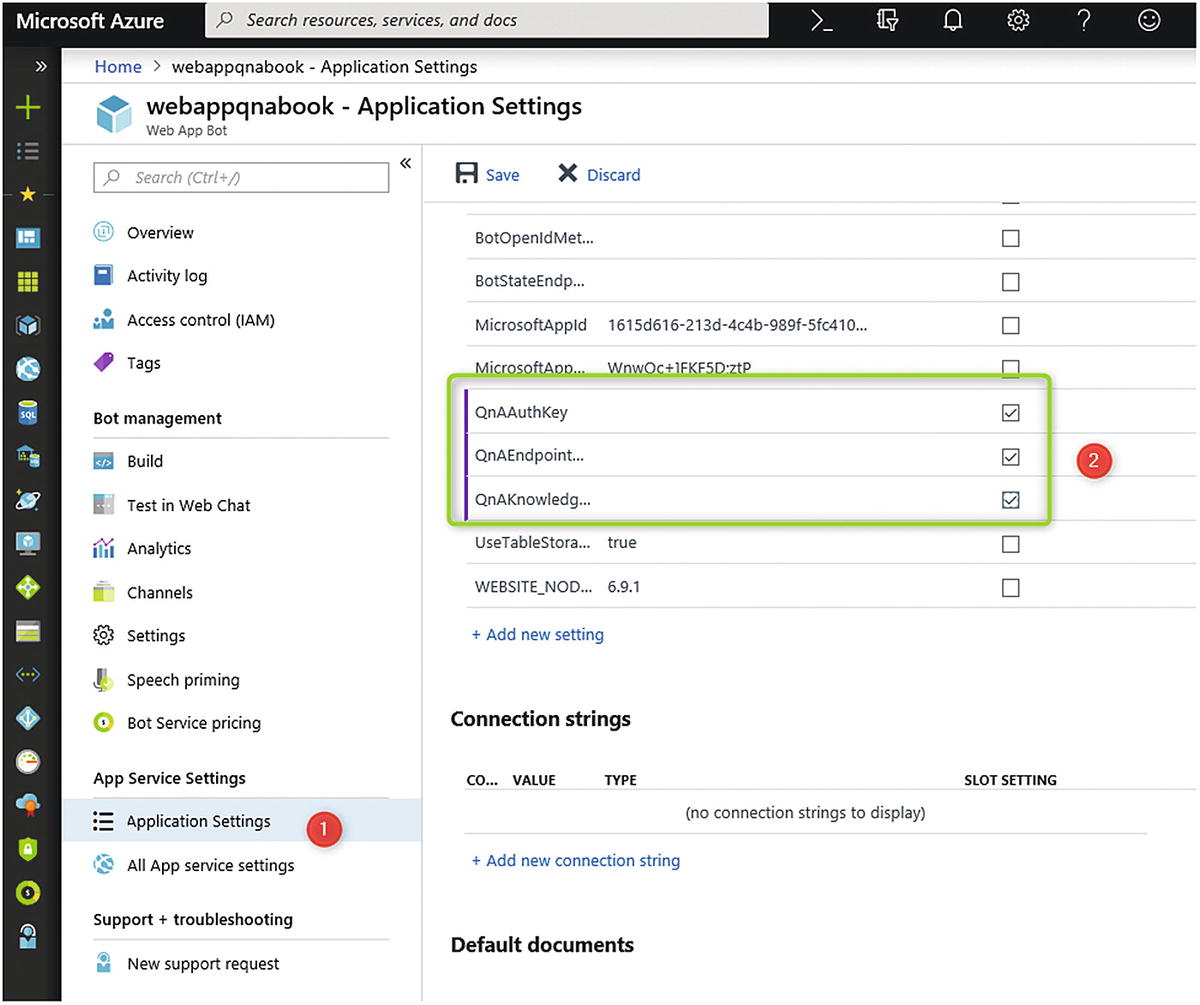
These parameters can be viewed in Figure 19-11. In webappqnabook (Figure 19-20), click Application Settings and fill the parameters with HTTP Request parameters (Figure 19-20).
Figure 19-20
Application Setting Parameters
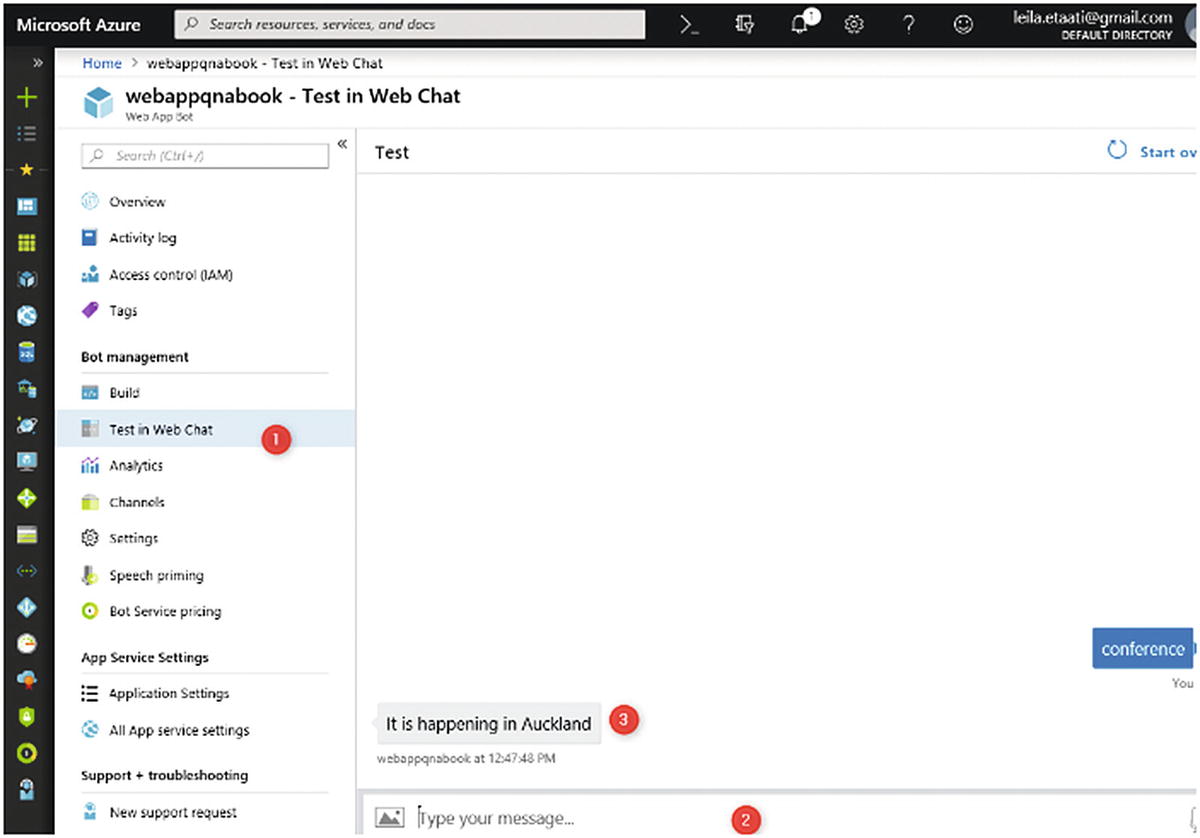
Now we have to test the chatbot. Click Test in Web Chat and type “Conference.” The output will be displayed in the test window (Figure 19-21).
Figure 19-21
Testing the chatbot
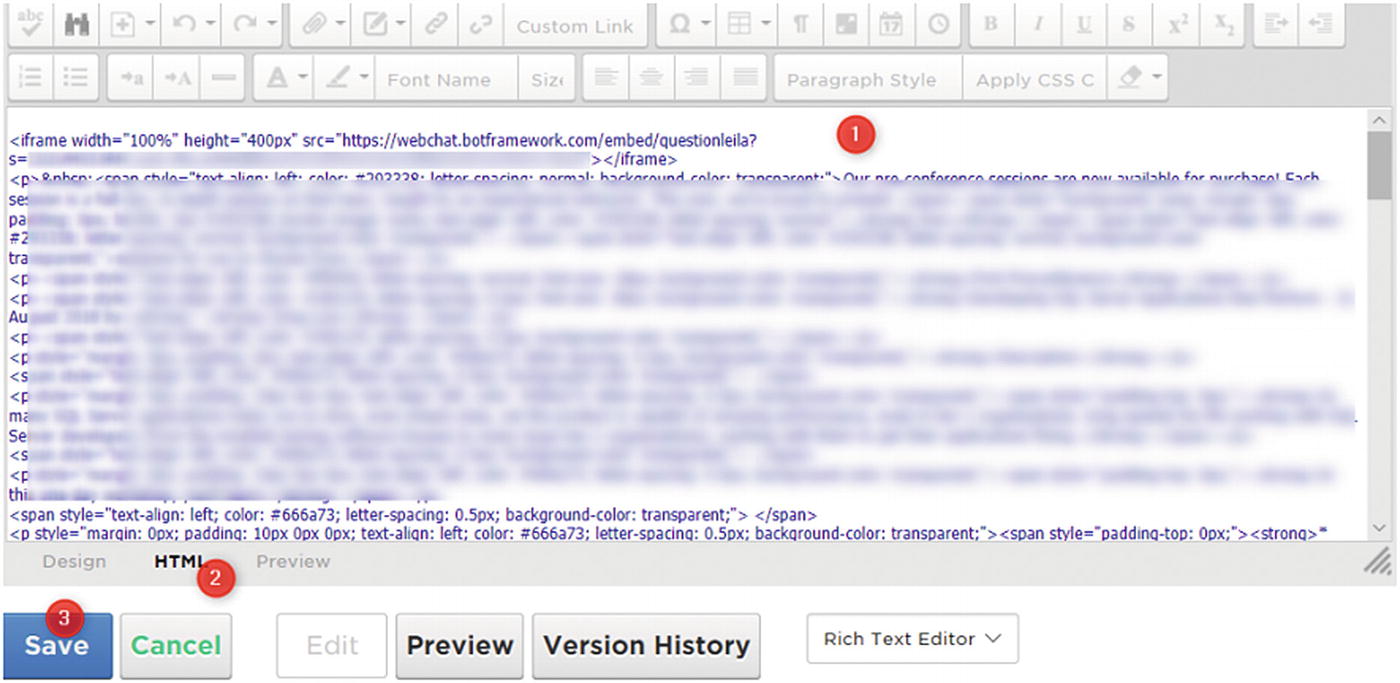
You can embed the questions and answers on any page and channel. In this example, this chatbot has been embedded in the conference web site, to guide users. To embed the chatbot in the web site, we must get the embed code. To get the embed code, follow the same procedure related to Figure 19-9.
Next, copy the code and put it in the web page (Figure 19-22).