© Leila Etaati 2019
Leila EtaatiMachine Learning with Microsoft Technologieshttps://doi.org/10.1007/978-1-4842-3658-1_18

18. Cognitive Services Toolkit

Leila Etaati1 
(1)
Aukland, Auckland, New Zealand
 

Microsoft Cognitive Services are collections of APIs and services that help developers create smarter applications and reports. By using Cognitive Services, developers can add such intelligent features as face recognition, emotion recognition, text analytics, and so forth, to their applications. This chapter first presents an overview of Cognitive Services and then explains how to use them for text analytics in Power BI Report. Finally, how to use Cognitive Services in a Windows application is explored briefly.

Overview of Cognitive Services

There are different Cognitive Services that you can use by receiving a web service URL and a key. To check out the available services, you must navigate to the Cognitive Services web site [1]. As you can see in Figure 18-1, there are five main categories for solving business problems: Vision, Knowledge, Language, Speech, and Search.
../images/463840_1_En_18_Chapter/463840_1_En_18_Fig1_HTML.jpg
Figure 18-1

Main Cognitive Services categories

As you can see in Figure 18-2, there are five different APIs for business language problems. Text Analytics is one of the most popular features for language detection, identifying main keywords in text, topic extraction, and checking how much text is positive or negative in context (sentiment analysis).
../images/463840_1_En_18_Chapter/463840_1_En_18_Fig2_HTML.jpg
Figure 18-2

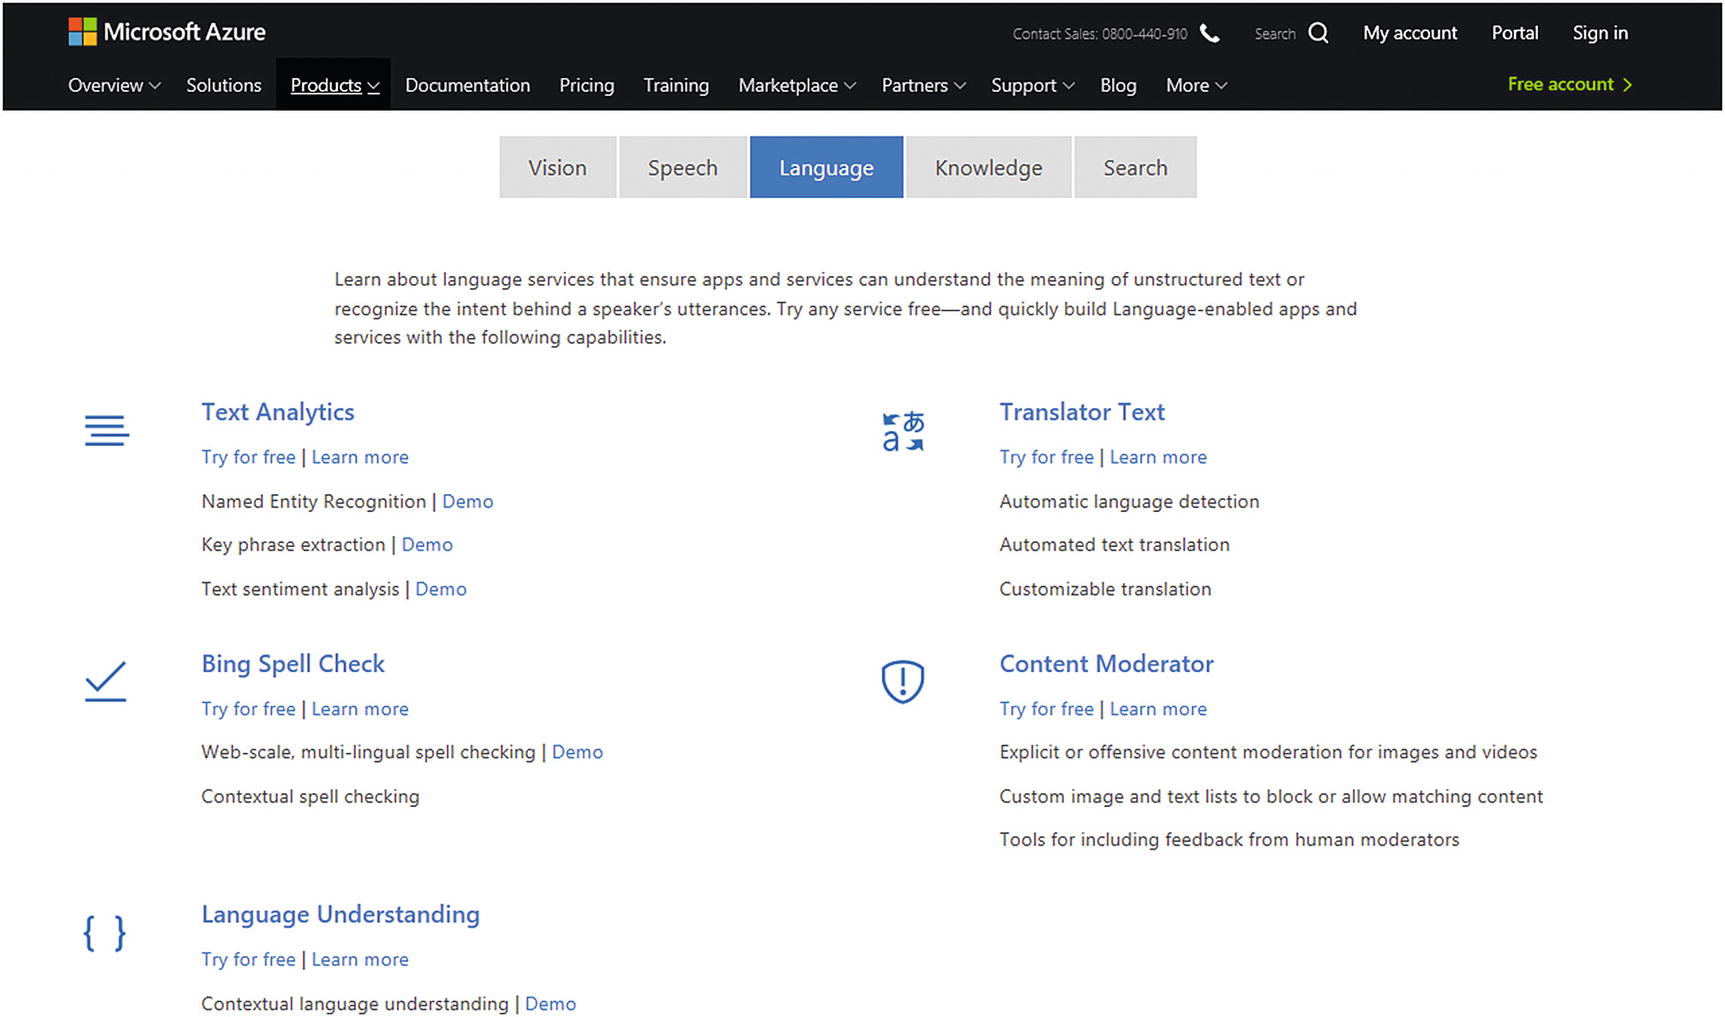
Language category in Cognitive Services

The other services in the Language category are about translating a text, identifying the primary intent, and objectives in conversations and texts.

These features can be combined. For example, it is possible to integrate the Language Understanding service with the Speech service, for instant speech-to-intent processing, and, with a Bot application (Chapter 19), to develop a more sophisticated application.

In this chapter, you will see how you can perform text analytics for the purpose of detecting main keywords in customer feedback, how much of the feedback is positive, detecting the language in Power BI, by using Text Analytics services.

First, we must set up the environment in which to use Cognitive Services. To use Cognitive Services, you can sign up for a free trial. The trial services are free for seven days and do not require a credit card. The other way to access Cognitive Services is to use a free Azure account for a month, which provides a $280 credit on Azure, and all data and customization will be saved. The final approach is to use an existing Azure account (Figure 18-3).
../images/463840_1_En_18_Chapter/463840_1_En_18_Fig3_HTML.jpg
Figure 18-3

Different Cognitive Services accounts

To set up Cognitive Services in Azure, you must log in to your Azure account and search for the services you want. After logging in to the Azure portal, you must create a Text Analytics service. To create a Text Analytics service, you must create a new service in Azure, by clicking the top left of the page. In the New page, the main service categories will be shown (Figure 18-4). AI + Machine Learning is one of the main services in Azure. Click it to see the available options. As you can see in Figure 18-4, Computer Vision, Face (recognition), Text Analytics, Language Understanding, Translator Speech, Bing Search, and Azure Search are among the main topics under AI + Machine Learning.
../images/463840_1_En_18_Chapter/463840_1_En_18_Fig4_HTML.jpg
Figure 18-4

Different Cognitive Services features

Text Analytics Services

Not all collected data is about numbers and structured data. To gain a more holistic perspective about a customer, products, and so forth, collecting and analyzing the text can be used, to enhance company performance. Text Analytics is the process of converting unstructured text data into meaningful data, to understand customer needs and feedback [2].

In this section, a case study will be presented that explains the process of using the Text Analytics API in Power BI and is applied to customer feedback.

The first step is to set up a Text Analytics service in the Azure portal (Figure 18-5).
../images/463840_1_En_18_Chapter/463840_1_En_18_Fig5_HTML.jpg
Figure 18-5

Setting Up Text Analytics in the Azure portal

There are different pricing tiers for this service. The first is a free tier that allows users to apply the Text Analytics service on 5K rows of data a month (Figure 18-6).
../images/463840_1_En_18_Chapter/463840_1_En_18_Fig6_HTML.jpg
Figure 18-6

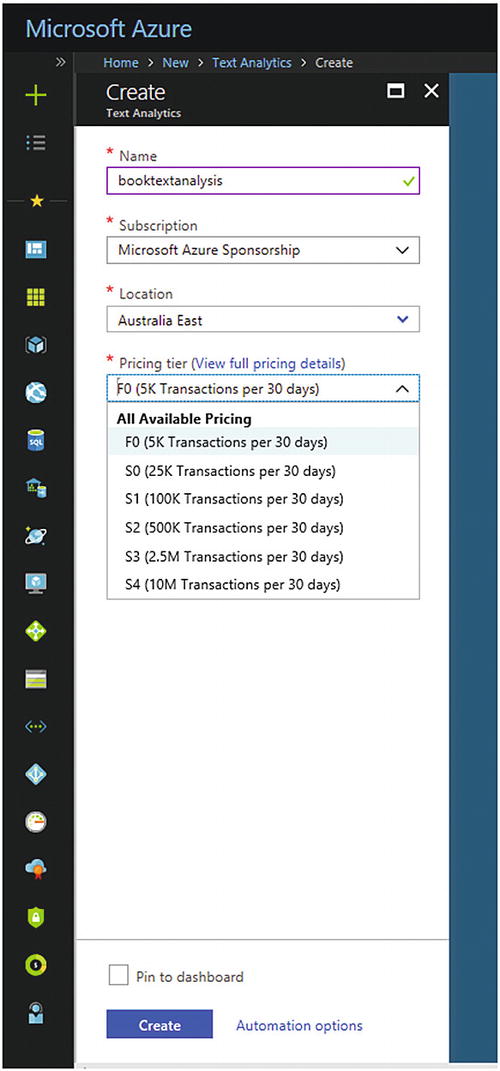
Pricing tiers for Text Analytics

After creating the Text Analytics service, we get the API URL and key access from the created service. Figure 18-7 shows how to access the URL and the access key in the Text Analytics service.
../images/463840_1_En_18_Chapter/463840_1_En_18_Fig7_HTML.jpg
Figure 18-7

Accessing the URL and key

After creating the service from the Azure portal, we must call it inside the Power BI Desktop and apply it on the available data there.

Data Set

Fabrikam is a mock production company. It has received e-mails from customers regarding shipping, tech support, and other concerns. The business intelligence (BI) manager wants to perform some analytics on the e-mail the company is receiving from customers, to better understand the main points of customers’ e-mails and to determine whether they are satisfied with the company’s services. You can download the data set from https://github.com/Kaiqb/KaiqbRepo0731190208/blob/master/CognitiveServices/TextAnalytics/FabrikamComments.csv [3].

The first step is to open Power BI Desktop and load the data set, as a Text/CSV file, into Power BI (Figure 18-8).
../images/463840_1_En_18_Chapter/463840_1_En_18_Fig8_HTML.jpg
Figure 18-8

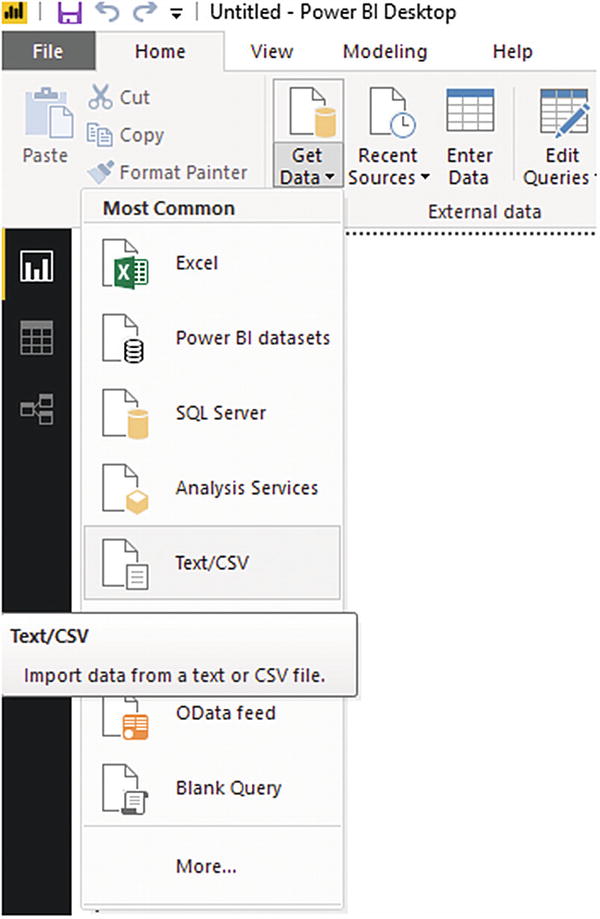
Getting a CSV file from Power BI

Then, instead of loading the data, click the Edit option to navigate to the Power Query environment for data transformation (Figure 18-9). As you can see in Figure 18-9, an overview of the data set is shown. There are about 20 rows of data about customer e-mails, names and IDs, e-mail subjects, and comments.
../images/463840_1_En_18_Chapter/463840_1_En_18_Fig9_HTML.jpg
Figure 18-9

Editing data in Power Query

First, we are going to combine the Subject and Comment columns in Power Query, using Merge Columns under the Add Column tab. The general procedure is shown in Figure 18-10.
../images/463840_1_En_18_Chapter/463840_1_En_18_Fig10_HTML.jpg
Figure 18-10

Merging Subject and Comment columns

After creating a new column, we must rename it to Customer Feedback.

Create a Text Analytics Function

It is possible to create a function in Power Query that applies Text Analytics to a specific column in Power Query. To create a function, we must click the whitespace in a query, at the left side of the main page, and choose the Blank Query option (Figure 18-11).
../images/463840_1_En_18_Chapter/463840_1_En_18_Fig11_HTML.jpg
Figure 18-11

Creating a blank query

Rename the created query Sentiment Analytics. The next step is to convert the blank query to a function. To do that, we must access the M Query behind the created query, by clicking on the Home tab, then Advanced Editor (Figure 18-12). Here there is an editor that we are going to use to write some M scripts and change the query to a function.
../images/463840_1_En_18_Chapter/463840_1_En_18_Fig12_HTML.jpg
Figure 18-12

Power BI Query Editor

The next step is to add the following code:
(text) => let
    apikey      = "<API Key>",
    endpoint    = "https://<Location of Your Azure>.api.cognitive.microsoft.com/text/analytics/v2.0/sentiment",
    jsontext    = Text.FromBinary(Json.FromValue(Text.Start(Text.Trim(text), 5000))),
    jsonbody    = "{ documents: [ { language: ""en"", id: ""0"", text: " & jsontext & " } ] }",
    bytesbody   = Text.ToBinary(jsonbody),
    headers     = [#"Ocp-Apim-Subscription-Key" = apikey],
    bytesresp   = Web.Contents(endpoint, [Headers=headers, Content=bytesbody]),
    jsonresp    = Json.Document(bytesresp),
    sentiment   = jsonresp[documents]{0}[score]
in  sentiment

As you can see in the preceding code, the first line is about the function input which is text. In line 2, the API key collected from Azure Service must be pasted here. In line 3, the required URL for connecting to the API must be provided. As you can see at the end of the URL, the service that we are going to use from Cognitive Services is shown. In this example, we are using sentiment analysis. Lines 4 to 11 indicate the required code for connecting to Cognitive Services and getting the result in JSON format. The last line is the result column that shows the sentiment score for each comment.

Now, replace the preceding code with the previous one and click OK. The blank query will change to a function type, and a page with a text box will appear. You can test it by writing a sentence, such as “the weather is so nice today,” and click the Invoke button, to see the result.

As you can see in Figure 18-13, the result of sentiment analysis is 0.92.
../images/463840_1_En_18_Chapter/463840_1_En_18_Fig13_HTML.jpg
Figure 18-13

Text Analytics function test in Power Query

The output of the sentiment analysis is a number from 0 to 1. A number closer to 1 means that the comment is positive, one closer to 0 means the feedback is negative.

For a final step, we can apply the function to the customer feedback (Comments) column. Click the Fabrikam data set, the Add Column tab, and then Invoke Custom Function. On a new page, choose an appropriate name for the new column, then choose the function in the drop-down. From the last drop-down item, choose the column you want to apply the function to (Figure 18-14).
../images/463840_1_En_18_Chapter/463840_1_En_18_Fig14_HTML.jpg
Figure 18-14

Invoke a custom function for sentiment analysis

A new column will be shown at the end of the data set overview that shows the numeric result for sentiment analysis. As you can see in Figure 18-15, the number varies from 0 to 1. You can click the Home tab and Close and Apply to see the result in Power BI Desktop.
../images/463840_1_En_18_Chapter/463840_1_En_18_Fig15_HTML.jpg
Figure 18-15

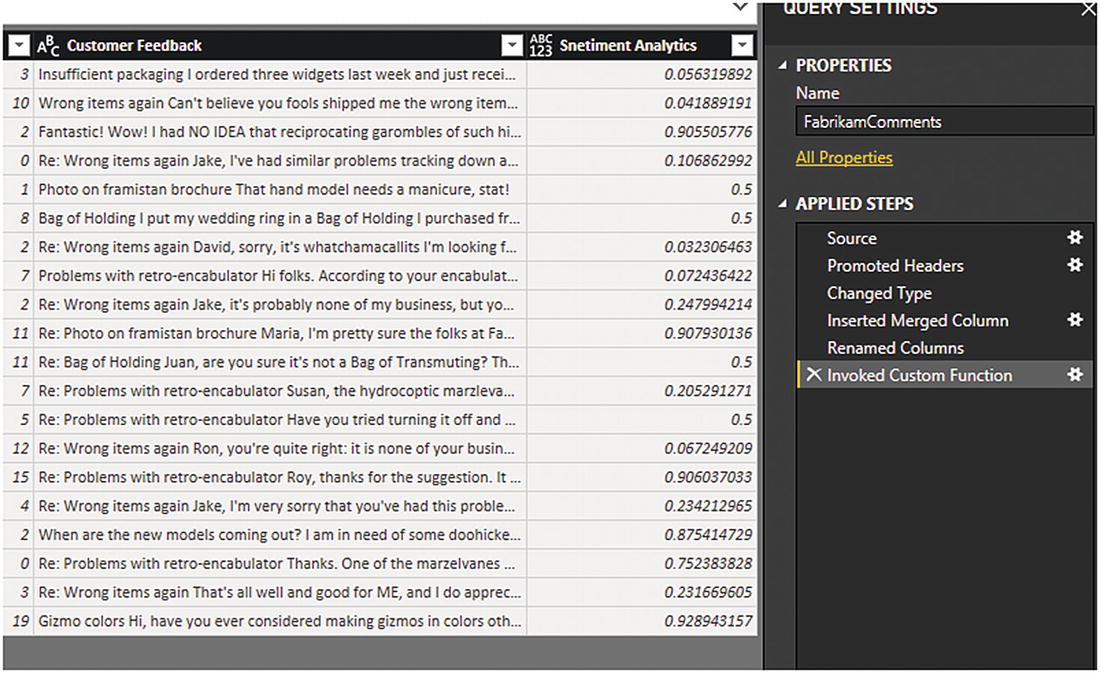
Sentiment analysis result in Power BI Desktop

The process of using the other features, such as language detection and key phrase extraction, is the same. Only the URL end point will change slightly. For language detection, the end point URL will change as follows:
    endpoint    = "https://<Location of Your Azure>.api.cognitive.microsoft.com/text/analytics/v2.0/languages",
For key phrase extraction, the end point URL would be
endpoint    = "https://<Location of You Azure>.api.cognitive.microsoft.com/text/analytics/v2.0/keyPhrases"
In addition, the last line of code will change to show a different variable. For language detection, this would be as follows:
    language    = jsonresp[documents]{0}[detectedLanguages]{0}[name]
in  language
For the key phrase, it would be as follows:
    keyphrases  = Text.Lower(Text.Combine(jsonresp[documents]{0}[keyPhrases], ", "))
in  keyphrases

The preceding example was about using Cognitive Services in Power BI. In the next section, I will show you how to use the Face (that is, face recognition) service in a Windows application.

Intelligence Application, Face Recognition Services

Another feature in Cognitive Services is the Face (facial recognition) API. This API performs face detection from an image, in addition to emotion detection and finding similar facial features of faces from two images.

It is possible to try the Face API before using it in an application. To see a demo, navigate to the Cognitive Services web site, then to the Vision category (Figure 18-16). Under the Vision category, click the Emotion recognition in images demo. To test the API, browse to a picture and then submit it. After uploading the image, click the Submit button.
../images/463840_1_En_18_Chapter/463840_1_En_18_Fig16_HTML.jpg
Figure 18-16

Cognitive Service Face Recognition

As you can see in Figure 18-17, after uploading the image, the API shows the emotion, such as anger, contempt, disgust, fear, happiness, neutral, sadness, and surprise, indicated by a number between 0 to 1. As you can see in Figure 18-17, the only measure that has a higher number is for happiness, and the person in the picture is smiling.
../images/463840_1_En_18_Chapter/463840_1_En_18_Fig17_HTML.jpg
Figure 18-17

Image emotion detection demo

We are going to create a Windows application that is able to detect the image using the Face API in Cognitive Services.

The process of creating the Face API is like that for Text Analytics. First, we must log in to the Azure portal, then search for the Face API under AI + Machine Learning (Figure 18-18) .
../images/463840_1_En_18_Chapter/463840_1_En_18_Fig18_HTML.jpg
Figure 18-18

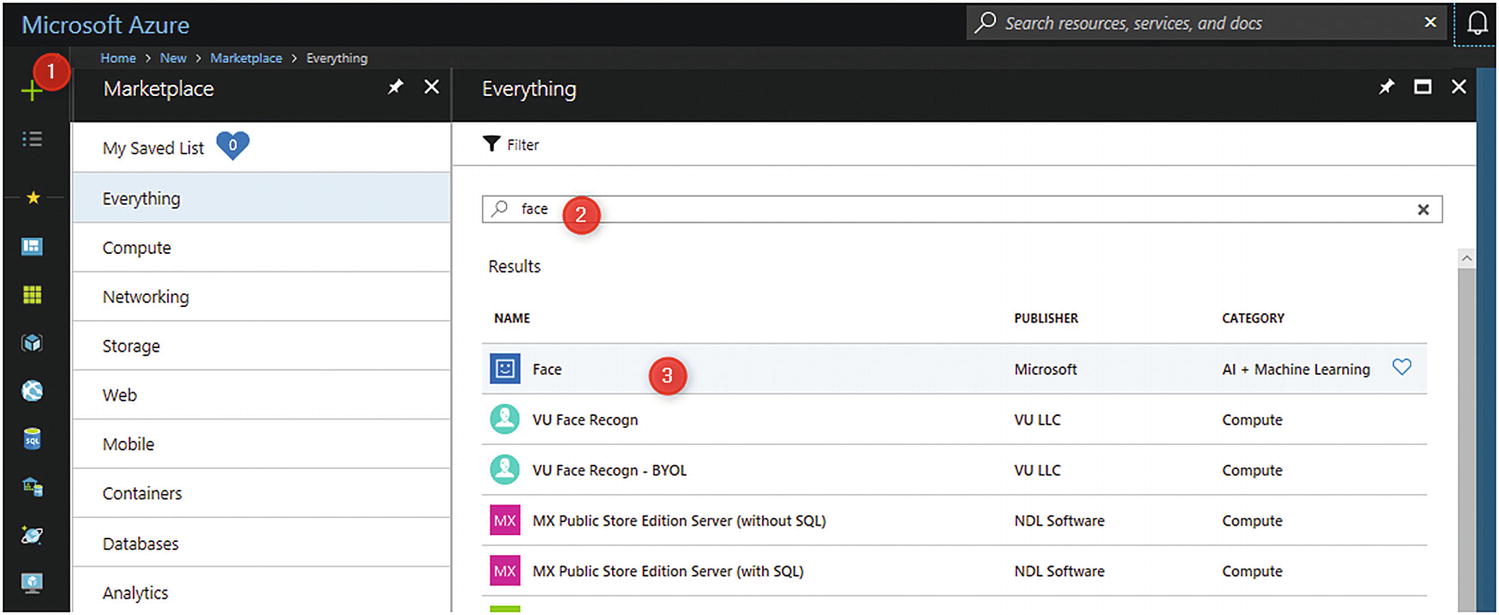
Face recognition feature in Azure

After creating the service, click the Key tab at the left side of the page and grab the key (Figure 18-19).
../images/463840_1_En_18_Chapter/463840_1_En_18_Fig19_HTML.jpg
Figure 18-19

Collecting the Face API key

We are going to create a Windows application that employs face recognition [4]. To write the code, you must first download one of the free versions of Visual Studio 2015 or 2017 [5]. Then you must create a Windows application (Figure 18-20). For this case study, I am using Visual Studio 2015.
../images/463840_1_En_18_Chapter/463840_1_En_18_Fig20_HTML.jpg
Figure 18-20

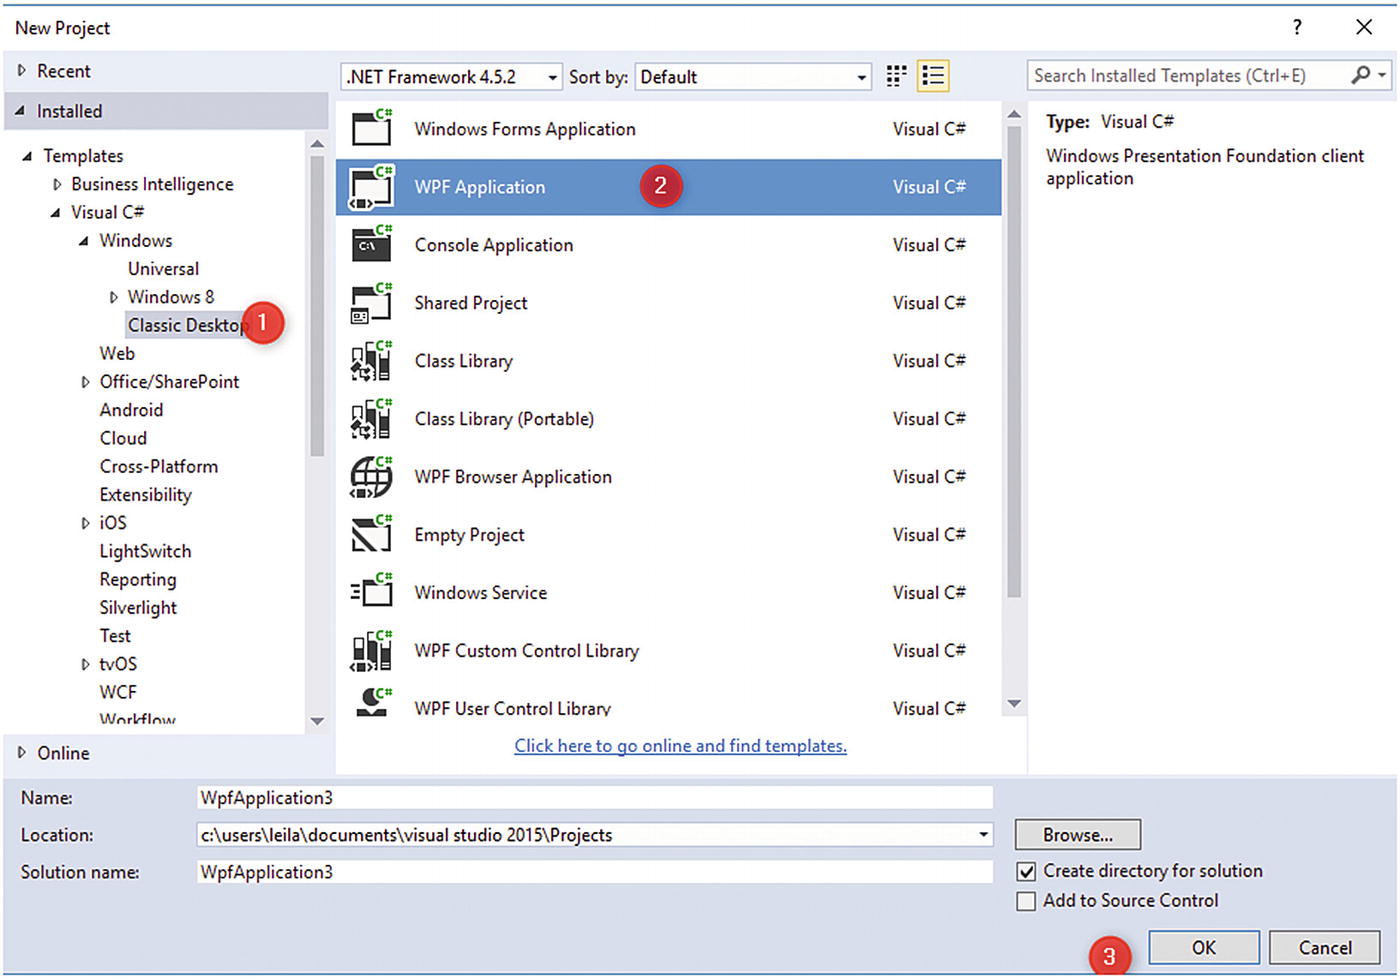
Create a Windows Application

The next step is to install the Microsoft Azure Cognitive Service Face API in a Windows application. To install it, we must navigate to the Tools tab, then navigate to NuGet Package Manager, and choose the Package Manager Console. Next, we must type in the following code in the console editor (Figure 18-21).
Install-Package Microsoft.Azure.CognitiveServices.Vision.Face -Version 2.0.0-preview
../images/463840_1_En_18_Chapter/463840_1_En_18_Fig21_HTML.jpg
Figure 18-21

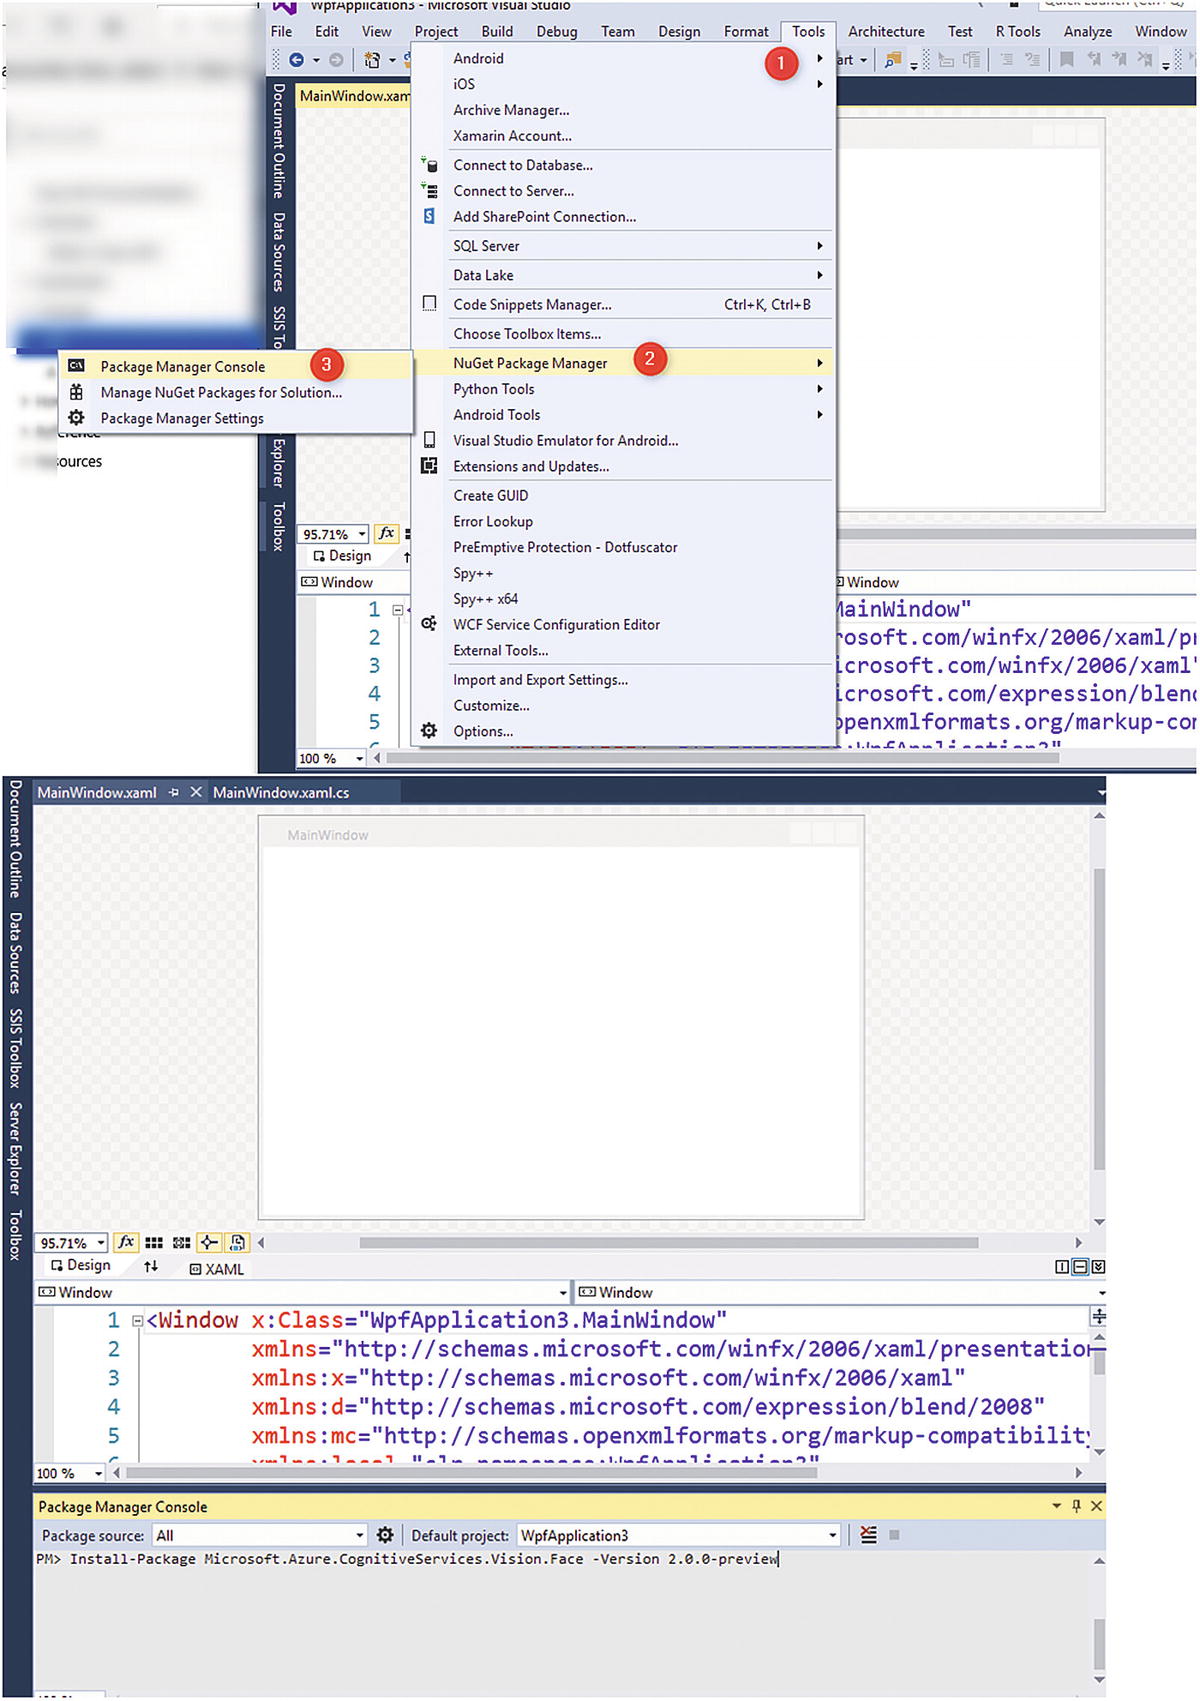
Installing the Face API in Windows

Then we must create the interface for the application. We have to add a button to the screen. To do that, we change the code. Right-click the MainWindow.xaml page, choose View Designer, and change the code to the following (Figure 18-22):
../images/463840_1_En_18_Chapter/463840_1_En_18_Fig22_HTML.jpg
Figure 18-22

Changing the code

<Window x:Class="FaceTutorial.MainWindow" xmlns:="http://schemas.microsoft.com/winfx/2006/xaml/presentation" xmlns:x="http://schemas.microsoft.com/winfx/2006/xaml" Title="MainWindow" Height="700" Width="960"> <Grid x:Name="BackPanel"> <Image x:Name="FacePhoto" Stretch="Uniform" Margin="0,0,0,50" MouseMove="FacePhoto_MouseMove" /> <DockPanel DockPanel.Dock="Bottom"> <Button x:Name="BrowseButton" Width="72" Height="20" VerticalAlignment="Bottom" HorizontalAlignment="Left" Content="Browse..." Click="BrowseButton_Click" /> <StatusBar VerticalAlignment="Bottom"> <StatusBarItem> <TextBlock Name="faceDescriptionStatusBar" /> </StatusBarItem> </StatusBar> </DockPanel> </Grid> </Window>
After changing the code, the visualization will change. We must change the C# code to access the Face API. First, a reference to Azure Cognitive Services for FACE API has to be added.
using Microsoft.Azure.CognitiveServices.Vision.Face;
using Microsoft.Azure.CognitiveServices.Vision.Face.Models;
To change the code, click MainWindows.xaml.cs, then add the preceding code to the reference part (Figure 18-23).
../images/463840_1_En_18_Chapter/463840_1_En_18_Fig23_HTML.jpg
Figure 18-23

Add Libraray for Face Recognition

We must now change the code, as follows:
namespace FaceTutorial
{
    public partial class MainWindow : Window
    {
        private const string subscriptionKey = "<SubscriptionKey>";
        private const string baseUri =
            "https://<Local>.api.cognitive.microsoft.com/face/v1.0";
        private readonly IFaceClient faceClient = new FaceClient(
            new ApiKeyServiceClientCredentials(subscriptionKey),
            new System.Net.Http.DelegatingHandler[] { });
        IList<DetectedFace> faceList;   // The list of detected faces.
        String[] faceDescriptions;      // The list of descriptions for the detected faces.
        double resizeFactor;            // The resize factor for the displayed image.
        public MainWindow()
        {
            InitializeComponent();
            if (Uri.IsWellFormedUriString(baseUri, UriKind.Absolute))
            {
                faceClient.BaseUri = new Uri(baseUri);
            }
            else
            {
                MessageBox.Show(baseUri,
                    "Invalid URI", MessageBoxButton.OK, MessageBoxImage.Error);
                Environment.Exit(0);
            }
        }
        // Displays the image and calls UploadAndDetectFaces.
        private async void BrowseButton_Click(object sender, RoutedEventArgs e)
        {
            // Get the image file to scan from the user.
            var openDlg = new Microsoft.Win32.OpenFileDialog();
            openDlg.Filter = "JPEG Image(∗.jpg)|∗.jpg";
            bool? result = openDlg.ShowDialog(this);
            // Return if canceled.
            if (!(bool)result)
            {
                return;
            }
            // Display the image file.
            string filePath = openDlg.FileName;
            Uri fileUri = new Uri(filePath);
            BitmapImage bitmapSource = new BitmapImage();
            bitmapSource.BeginInit();
            bitmapSource.CacheOption = BitmapCacheOption.None;
            bitmapSource.UriSource = fileUri;
            bitmapSource.EndInit();
            FacePhoto.Source = bitmapSource;
        }
        // Displays the face description when the mouse is over a face rectangle.
        private void FacePhoto_MouseMove(object sender, MouseEventArgs e)
        {
        }
    }
}
We must now change the subscription key and the location of the API. To detect and upload the image, we write a function, as follows:
private async Task<IList<DetectedFace>> UploadAndDetectFaces(string imageFilePath)
{
    // The list of Face attributes to return.
    IList<FaceAttributeType> faceAttributes =
        new FaceAttributeType[]
        {
            FaceAttributeType.Gender, FaceAttributeType.Age,
            FaceAttributeType.Smile, FaceAttributeType.Emotion,
            FaceAttributeType.Glasses, FaceAttributeType.Hair
        };
    // Call the Face API.
    try
    {
        using (Stream imageFileStream = File.OpenRead(imageFilePath))
        {
            // The second argument specifies to return the faceId, while
            // the third argument specifies not to return face landmarks.
            IList<DetectedFace> faceList =
                await faceClient.Face.DetectWithStreamAsync(
                    imageFileStream, true, false, faceAttributes);
            return faceList;
        }
    }
    // Catch and display Face API errors.
    catch (APIErrorException f)
    {
        MessageBox.Show(f.Message);
        return new List<DetectedFace>();
    }
    // Catch and display all other errors.
    catch (Exception e)
    {
        MessageBox.Show(e.Message, "Error");
        return new List<DetectedFace>();
    }
}
We can draw a rectangle around the face of each person in the picture. In the BrowseButton function , write the following code:
Title = "Detecting...";
faceList = await UploadAndDetectFaces(filePath);
Title = String.Format(
    "Detection Finished. {0} face(s) detected", faceList.Count);
if (faceList.Count > 0)
{
    // Prepare to draw rectangles around the faces.
    DrawingVisual visual = new DrawingVisual();
    DrawingContext drawingContext = visual.RenderOpen();
    drawingContext.DrawImage(bitmapSource,
        new Rect(0, 0, bitmapSource.Width, bitmapSource.Height));
    double dpi = bitmapSource.DpiX;
    resizeFactor = (dpi > 0) ? 96 / dpi : 1;
    faceDescriptions = new String[faceList.Count];
    for (int i = 0; i < faceList.Count; ++i)
    {
        DetectedFace face = faceList[i];
        // Draw a rectangle on the face.
        drawingContext.DrawRectangle(
            Brushes.Transparent,
            new Pen(Brushes.Red, 2),
            new Rect(
                face.FaceRectangle.Left ∗ resizeFactor,
                face.FaceRectangle.Top ∗ resizeFactor,
                face.FaceRectangle.Width ∗ resizeFactor,
                face.FaceRectangle.Height ∗ resizeFactor
                )
        );
        // Store the face description.
        faceDescriptions[i] = FaceDescription(face);
    }
    drawingContext.Close();
    // Display the image with the rectangle around the face.
    RenderTargetBitmap faceWithRectBitmap = new RenderTargetBitmap(
        (int)(bitmapSource.PixelWidth ∗ resizeFactor),
        (int)(bitmapSource.PixelHeight ∗ resizeFactor),
        96,
        96,
        PixelFormats.Pbgra32);
    faceWithRectBitmap.Render(visual);
    FacePhoto.Source = faceWithRectBitmap;
    // Set the status bar text.
    faceDescriptionStatusBar.Text =
        "Place the mouse pointer over a face to see the face description.";
}
The description of the face must be shown at the bottom of the image. By using the following function, you can show the face description, such as by different emotions, at the bottom of the page.
private string FaceDescription(DetectedFace face)
{
    StringBuilder sb = new StringBuilder();
    sb.Append("Face: ");
    // Add the gender, age, and smile.
    sb.Append(face.FaceAttributes.Gender);
    sb.Append(", ");
    sb.Append(face.FaceAttributes.Age);
    sb.Append(", ");
    sb.Append(String.Format("smile {0:F1}%, ", face.FaceAttributes.Smile ∗ 100));
    // Add the emotions. Display all emotions over 10%.
    sb.Append("Emotion: ");
    Emotion emotionScores = face.FaceAttributes.Emotion;
    if (emotionScores.Anger >= 0.1f)
        sb.Append(String.Format("anger {0:F1}%, ", emotionScores.Anger ∗ 100));
    if (emotionScores.Contempt >= 0.1f)
        sb.Append(String.Format("contempt {0:F1}%, ", emotionScores.Contempt ∗ 100));
    if (emotionScores.Disgust >= 0.1f)
        sb.Append(String.Format("disgust {0:F1}%, ", emotionScores.Disgust ∗ 100));
    if (emotionScores.Fear >= 0.1f)
        sb.Append(String.Format("fear {0:F1}%, ", emotionScores.Fear ∗ 100));
    if (emotionScores.Happiness >= 0.1f)
        sb.Append(String.Format("happiness {0:F1}%, ", emotionScores.Happiness ∗ 100));
    if (emotionScores.Neutral >= 0.1f)
        sb.Append(String.Format("neutral {0:F1}%, ", emotionScores.Neutral ∗ 100));
    if (emotionScores.Sadness >= 0.1f)
        sb.Append(String.Format("sadness {0:F1}%, ", emotionScores.Sadness ∗ 100));
    if (emotionScores.Surprise >= 0.1f)
        sb.Append(String.Format("surprise {0:F1}%, ", emotionScores.Surprise ∗ 100));
    // Add glasses.
    sb.Append(face.FaceAttributes.Glasses);
    sb.Append(", ");
    // Add hair.
    sb.Append("Hair: ");
    // Display baldness confidence if over 1%.
    if (face.FaceAttributes.Hair.Bald >= 0.01f)
        sb.Append(String.Format("bald {0:F1}% ", face.FaceAttributes.Hair.Bald ∗ 100));
    // Display all hair color attributes over 10%.
    IList<HairColor> hairColors = face.FaceAttributes.Hair.HairColor;
    foreach (HairColor hairColor in hairColors)
    {
        if (hairColor.Confidence >= 0.1f)
        {
            sb.Append(hairColor.Color.ToString());
            sb.Append(String.Format(" {0:F1}% ", hairColor.Confidence ∗ 100));
        }
    }
    // Return the built string.
    return sb.ToString();
}
The last code is about showing the description of the face when hovering a mouse over the picture.
private void FacePhoto_MouseMove(object sender, MouseEventArgs e)
{
    // If the REST call has not completed, return.
    if (faceList == null)
        return;
    // Find the mouse position relative to the image.
    Point mouseXY = e.GetPosition(FacePhoto);
    ImageSource imageSource = FacePhoto.Source;
    BitmapSource bitmapSource = (BitmapSource)imageSource;
    // Scale adjustment between the actual size and displayed size.
    var scale = FacePhoto.ActualWidth / (bitmapSource.PixelWidth / resizeFactor);
    // Check if this mouse position is over a face rectangle.
    bool mouseOverFace = false;
    for (int i = 0; i < faceList.Count; ++i)
    {
        FaceRectangle fr = faceList[i].FaceRectangle;
        double left = fr.Left ∗ scale;
        double top = fr.Top ∗ scale;
        double width = fr.Width ∗ scale;
        double height = fr.Height ∗ scale;
        // Display the face description if the mouse is over this face rectangle.
        if (mouseXY.X >= left && mouseXY.X <= left + width &&
            mouseXY.Y >= top  && mouseXY.Y <= top + height)
        {
            faceDescriptionStatusBar.Text = faceDescriptions[i];
            mouseOverFace = true;
            break;
        }
    }
    // String to display when the mouse is not over a face rectangle.
    if (!mouseOverFace)
        faceDescriptionStatusBar.Text =
            "Place the mouse pointer over a face to see the face description.";
}

If you ensure that all libraries and reference work are in order, you will gain proper access to the Azure Cognitive Service Library inside the .NET application.

Now you must run the code, by clicking the Start button, then click the Browse button and import a picture, to see the description of the image at the bottom of the page (Figure 18-24). As you can see, the software provides a description, such as my age, emotion, hair color, and so forth.
../images/463840_1_En_18_Chapter/463840_1_En_18_Fig24_HTML.jpg
Figure 18-24

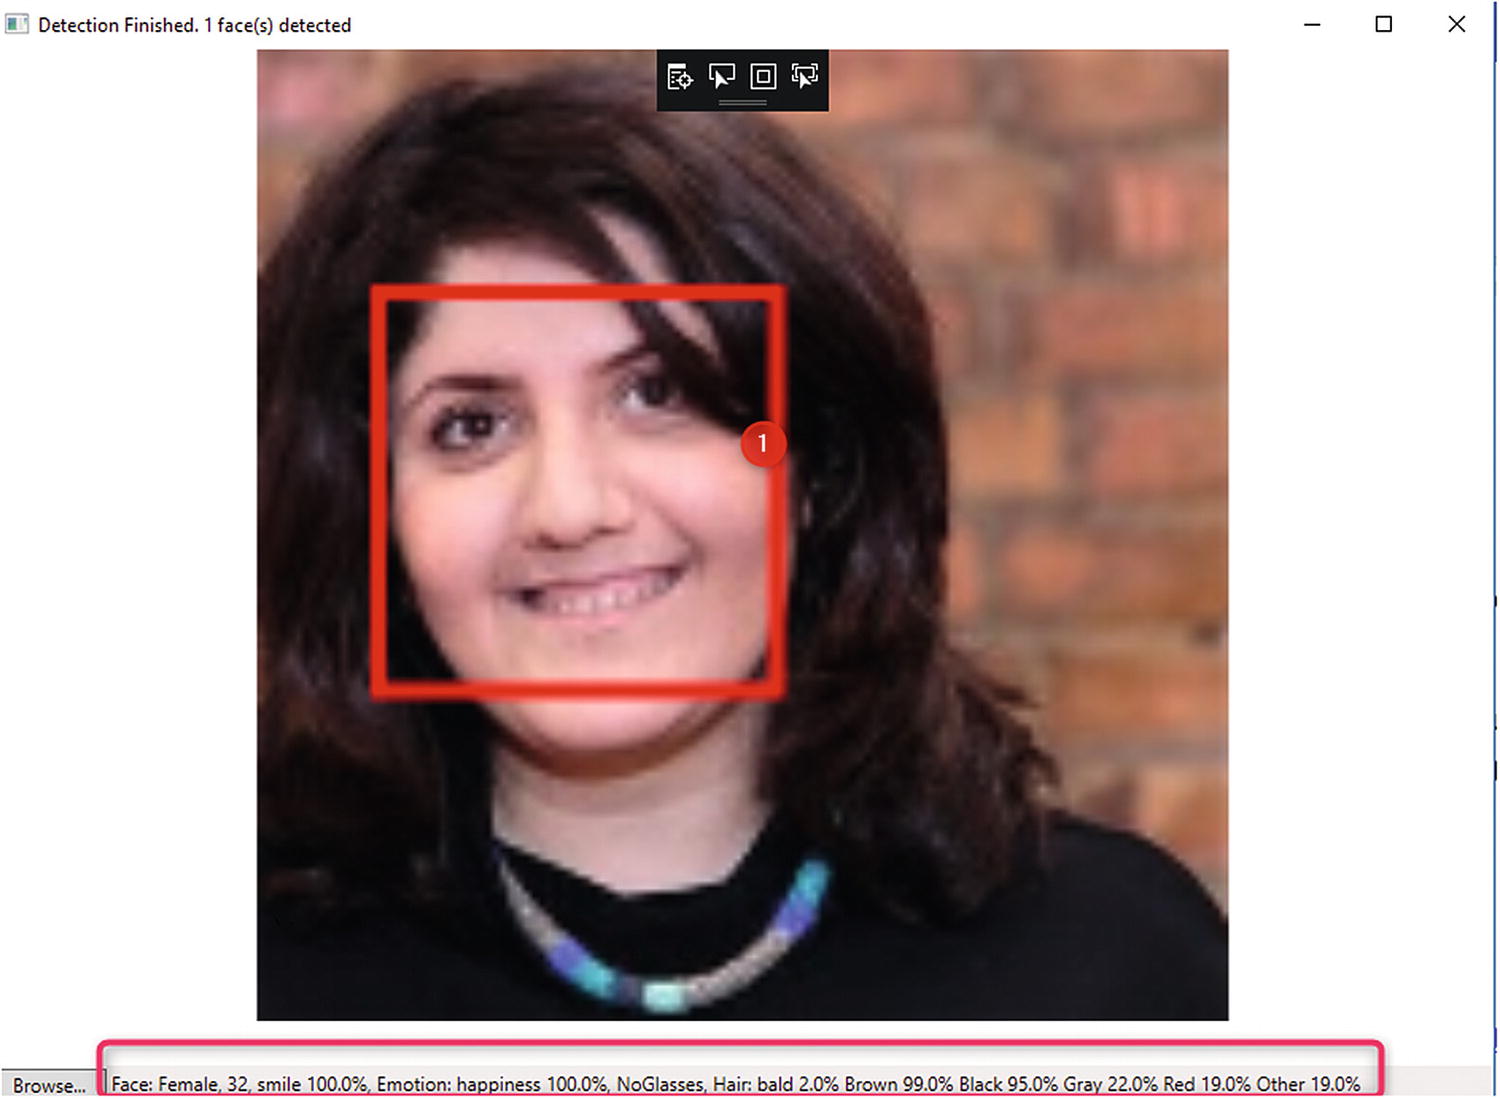
Face emotion detection

Summary

This chapter presented a brief introduction to the easy-to-use AI tools available in Microsoft Cognitive Services. A brief description of Cognitive Services and how they can be accessed was provided. Then how to use Cognitive Services Text Analytics API in some other Microsoft tools, such as Power BI, was explained. Next, the process of using Cognitive APIs in a Windows application was discussed, and all related codes were shown. In the next chapter, Bot Framework, another tool for creating smart applications, will be explored.

References

  1. [1]

    Microsoft Azure, “Cognitive Services,” https://azure.microsoft.com/en-us/services/cognitive-services/ , 2019.

     
  2. [2]

    PAT Research, “What is Text Analytics,” www.predictiveanalyticstoday.com/text-analytics/ .

     
  3. [3]
     
  4. [4]

    Patrick Farley et al., “Tutorial: Create a WPF app to display face data in an image,” Microsoft Azure, https://docs.microsoft.com/en-us/azure/cognitive-services/face/tutorials/faceapiincsharptutorial , February 5, 2019.

     
  5. [5]

    Microsoft Visual Studio, “Visual Studio 2019,” Downloads https://visualstudio.microsoft.com/downloads/ , 2019.

     
..................Content has been hidden....................

You can't read the all page of ebook, please click here login for view all page.
Reset
18.222.191.8