Fedora Software Information and Sites
Internet Site | Description |
|---|---|
Fedora distribution disks, download links for all formats | |
RPM Fusion repository for third-party multimedia and driver Fedora-compliant software (Fedora Project extension) | |
Packages not included in the main Fedora software repository | |
Information on multimedia packages available for Fedora | |
Negativo17.org repository for third-party multimedia and driver Fedora-compliant software |
Software applications, with all the needed programs, configuration files, and supporting library binaries, are combined into packages by the RPM Package Manager that will install all the components into the appropriate system folders. DNF manages all these RPM packages for your system, keeping track of updates and what collection of packages belong to different systems and collections such as your desktop or office suite. It also keeps track of dependencies, such as what supporting software an application may need. Multimedia applications may need sound support. To easily manage DNF operations you can use desktop frontends, such as GNOME Software, PackageKit, and DnfDragora. GNOME Software lets you manage software by topic, whereas Packages searches for particular RPM packages. DnfDragora does both.
Fedora provides only open source applications in its own repository. For proprietary applications such as NVIDIA’s own graphics drivers, or multimedia applications that may have patent issues, you must use a third-party repository like RPM Fusion. The list of forbidden items for the official Fedora repository can be found at https://www.fedoraproject.org/wiki/ForbiddenItems . The list includes such items as the NVIDIA graphics drivers.
Software Repositories
Fedora and Fedora-Compliant Software Repositories
Internet Site | Description |
|---|---|
Links are provided to the best available mirror. | |
Fedora applications not included with the distribution, due to licensing and other restrictions, are provided. Go to the Configuration page to download the DNF configuration files. | |
Negativo17.org repository for third-party multimedia and driver Fedora-compliant software. | |
The Adobe repository. Select the Linux for YUM to download the Adobe YUM configuration file. Select YUM for Linux from the drop-down menu. | |
Provides Google repositories for accessing Google software. |
Most software is now located on the Internet-connected repositories. With the integration of DNF into your Fedora system, you can now think of that software as an easily installed extension of your current collection. You can find out more about how DNF is used on “Fedora Software Management Guide”.
You could also browse many of these repositories and download packages individually, although this is not recommended, as you would lose the automatic updating support provided by DNF.
Fedora Software Repositories
The Fedora Linux distribution provides a comprehensive selection of software, ranging from office and multimedia applications to Internet servers and administration services. The complete set is available on the Fedora repository. During installation, DNF is configured on your system, to access the Fedora repository. Some third-party applications with licensing issues are not included, though Fedora-compliant versions are provided on associated software repositories.
For Fedora, you can update to the latest software from the Fedora DNF repository using GNOME Software or PackageKit's Package Updater. They are already configured to access the Fedora repositories.
RPM Fusion
Due to licensing restrictions, multimedia support for popular operations such as MP3, DVD, and DivX is not included with Fedora distributions. The Fedora Project associated site, RPM Fusion ( https://rpmfusion.org ), does provide support for these functions. Here, you can download support for MP3, DVD, and DivX software. This repository integrates support previously provided by Livna, Freshrpms, and Dribble. Fedora does include the generic X.org NVIDIA drivers, which will provide all the capabilities most people need. You do not have to use the NVIDIA proprietary drivers.
The Fedora-compliant repositories, such as RPM Fusion, will have Fedora-compliant DNF configuration files that you can download and install as an RPM package. You can then use the GNOME Software, PackageKit (Packages), DnfDragora, or the dnf command to select, download, and install software from the associated repository directly.
Adobe and Livna
Two smaller additional third-party repositories are often configured for desktop users: the Adobe repository and the Livna repository. The Adobe repository holds packages for the Linux version of the Adobe Flash software. (Two alternative Flash-compatible open source versions are already available, swfdec and gnash.) The Livna repository provides the commercial DVD video codec, libdvdcss. The repository contains only this one package. If you want to play commercial DVD video disks, you have to configure access to this repository so that you can install the codec.
Third-Party Linux Software Archives
Though almost all applications should be included in the Fedora software repository or its associated repositories, such as https://rpmfusion.org , you could download and install software from third-party software archives. Always check to see if the software you want is already in the Fedora or Fedora-associated repositories. If it is not available, you can download it from a third-party online site.
Third-Party Linux Software Archives
URL | Internet Site |
|---|---|
SourceForge, open source software development site for Linux applications | |
Linux software repository | |
GNU archive | |
Linux games | |
Licensed multimedia codecs for Linux, including free MP3 code |
Updating Fedora: GNOME Software and Software Update
New updates are continually being prepared for particular software packages. These are posted as updates that you can download from software repositories and install on your system. They include new versions of applications, servers, and even the kernel. Such updates may range from single software packages to whole components.
Updating your Linux system has become a very simple procedure, using the automatic update tools. For Fedora, you can update your system by accessing software repositories supporting the DNF (Dandified YUM) update methods. DNF uses RPM headers to determine which packages need to be updated.
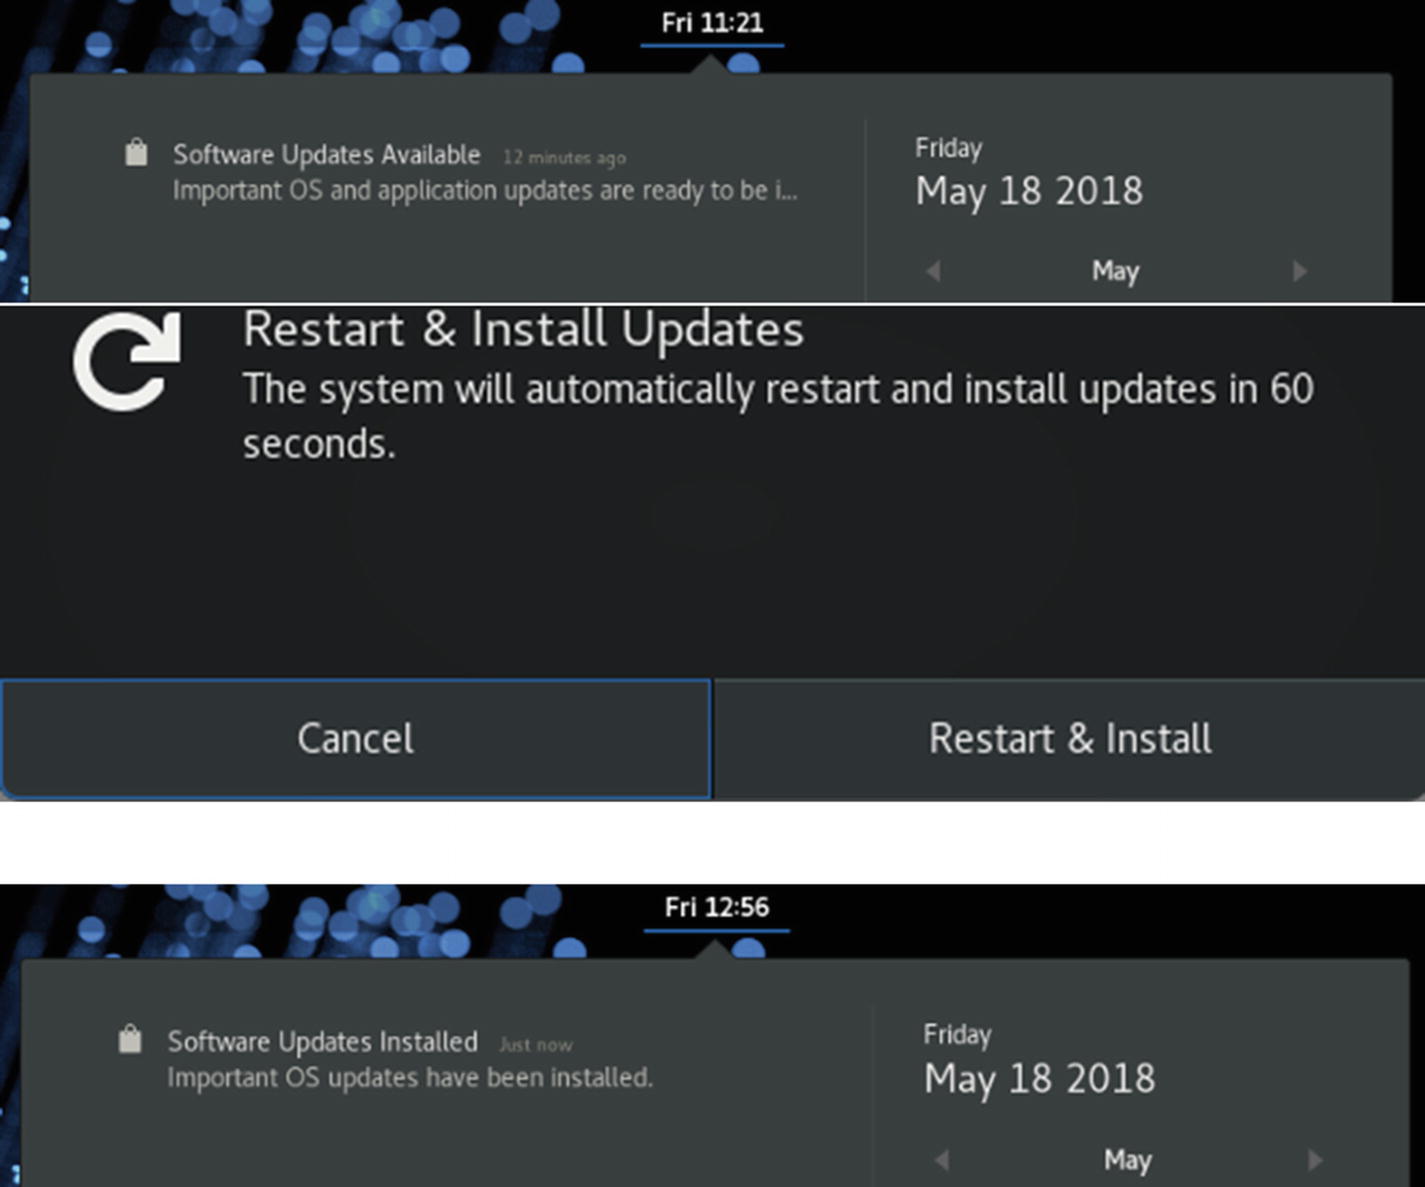
Update notification message and icon
To perform manual updates, you can use either GNOME Software to perform updates (the default), or you can use the older Package Updater. Package Updater is a graphical update interface for DNF (part of PackageKit), which performs all updates from the desktop. From a command line, you can perform updates using the dnf upgrade command.
Updating Fedora with GNOME Software Update
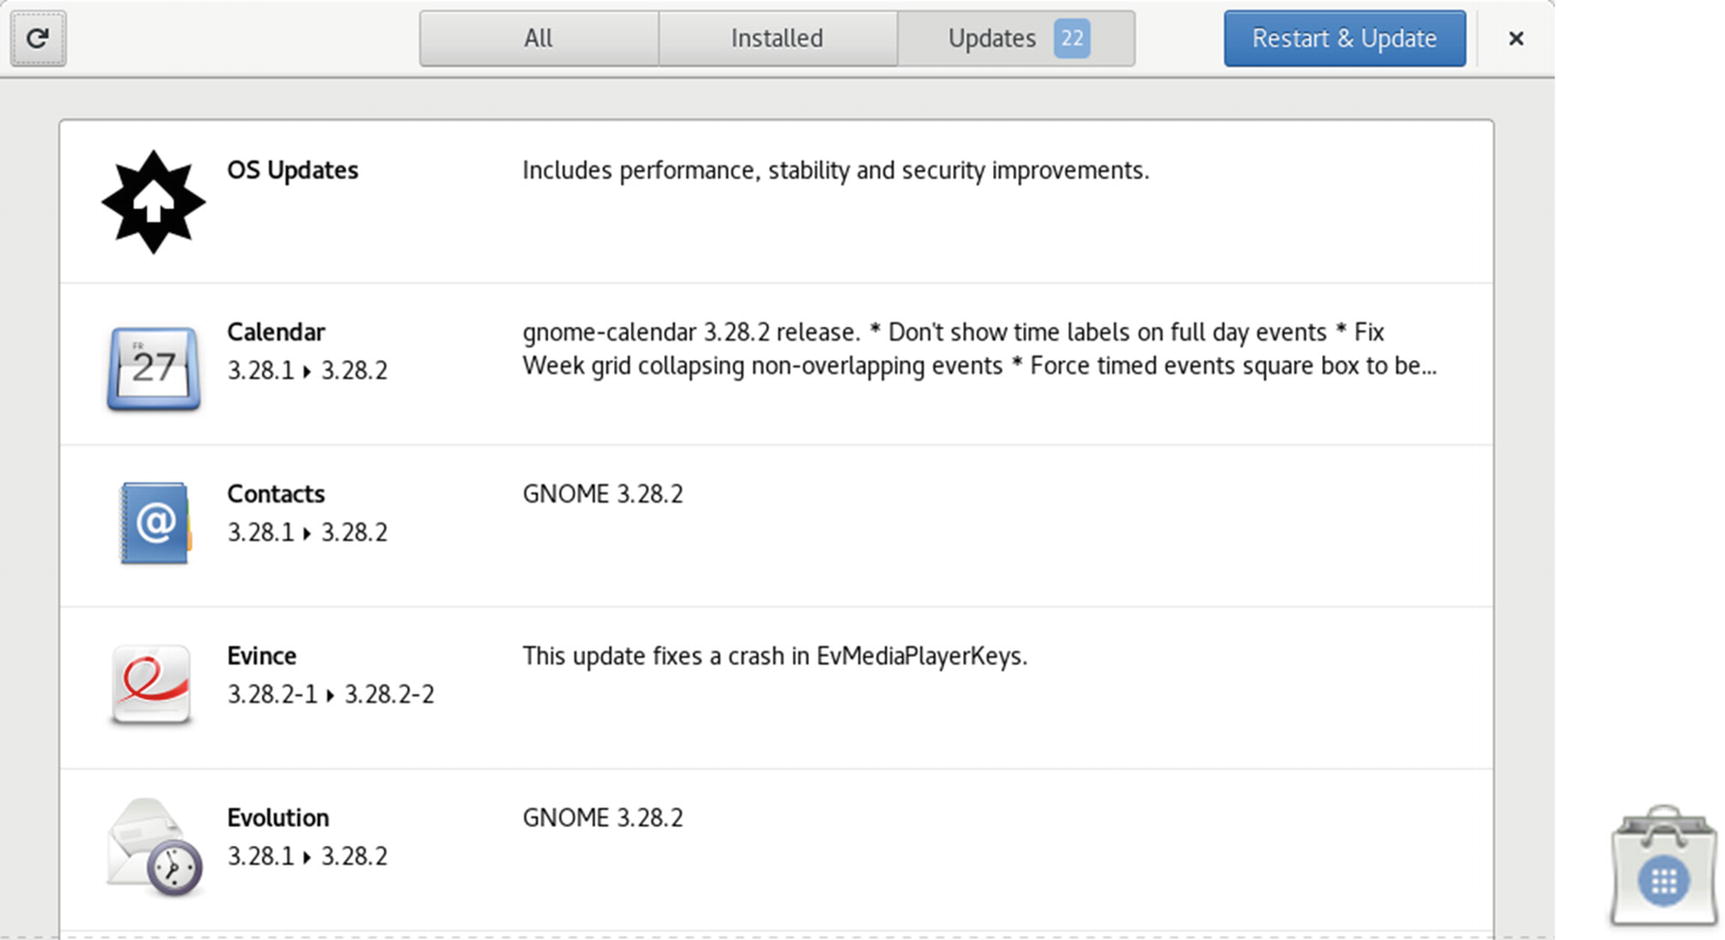
GNOME Software Updates tab
GNOME Software: Update information dialog
Updating Fedora with Package Updater (PackageKit)
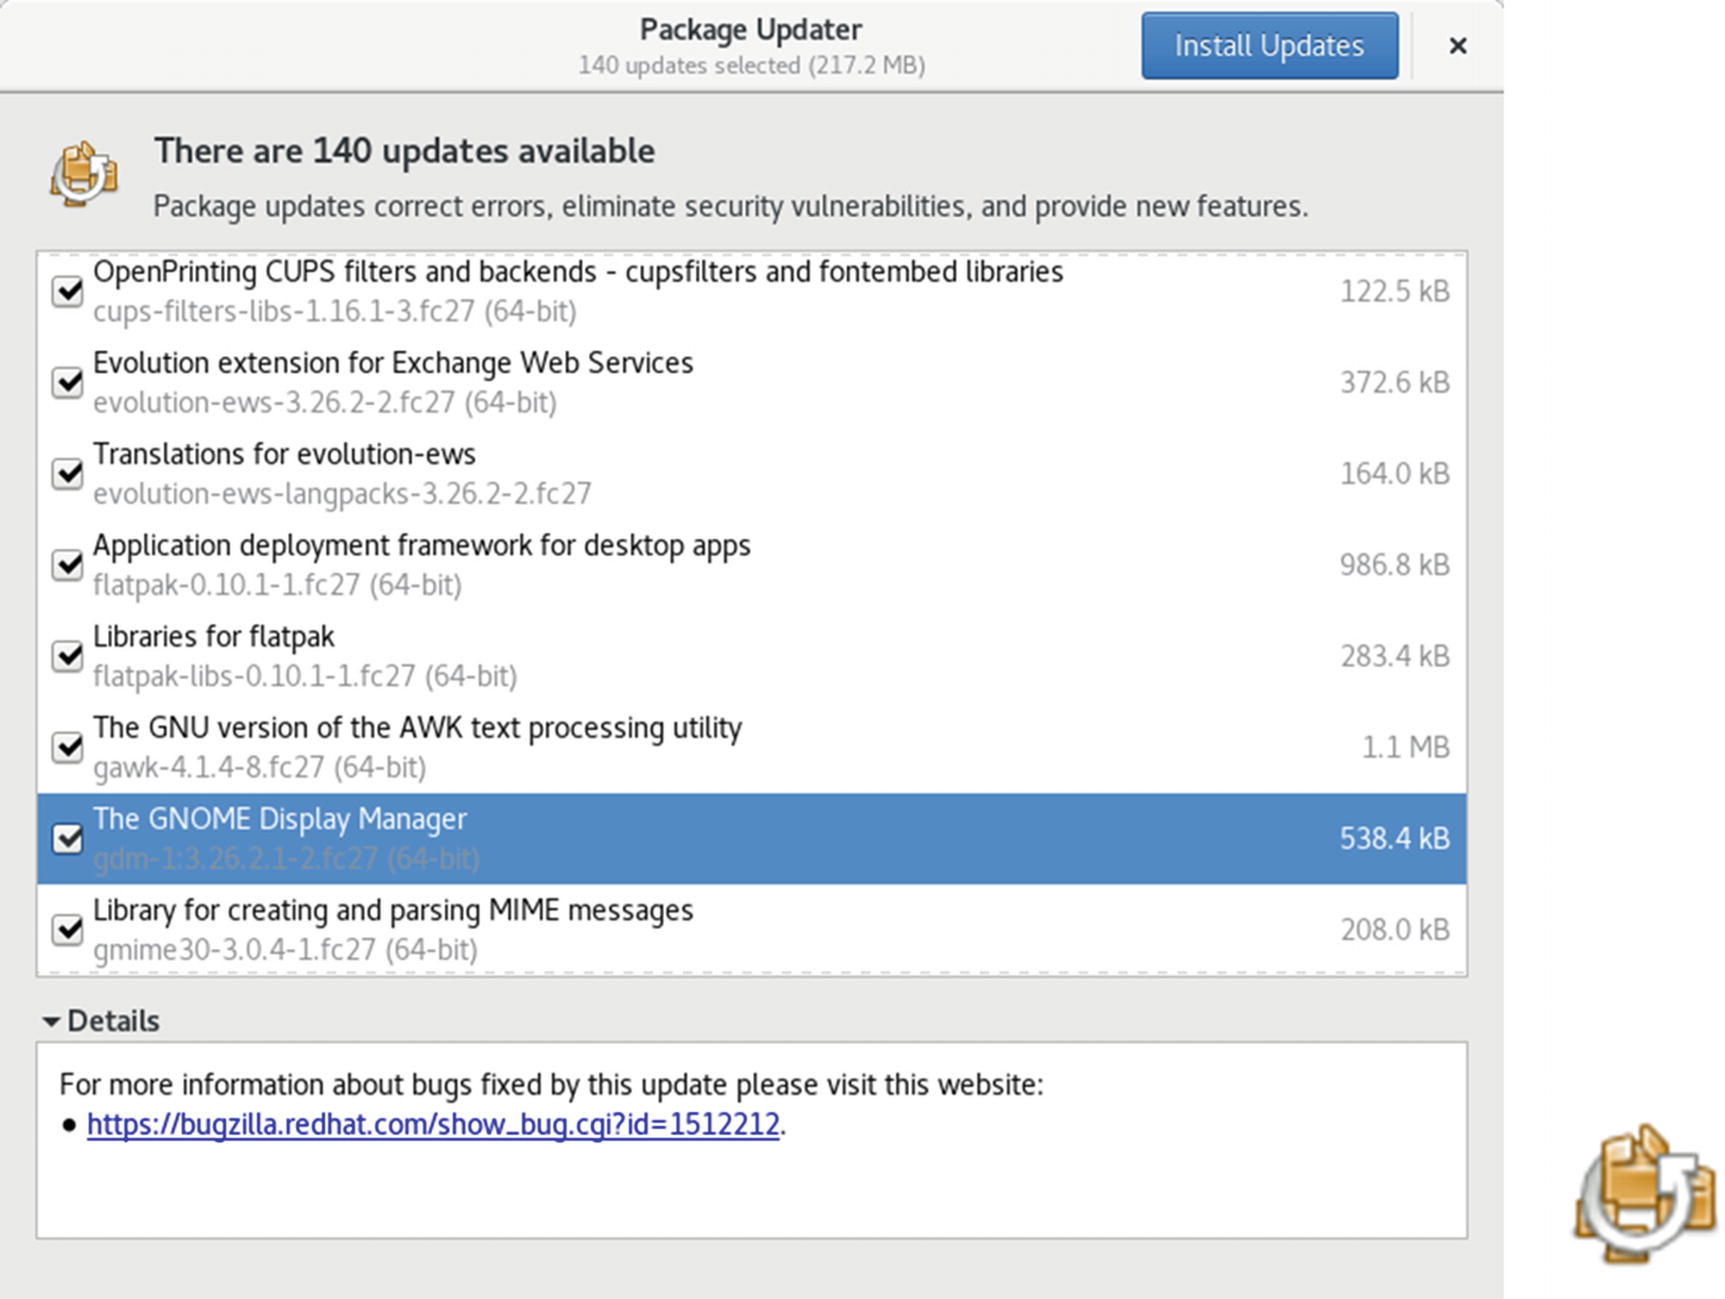
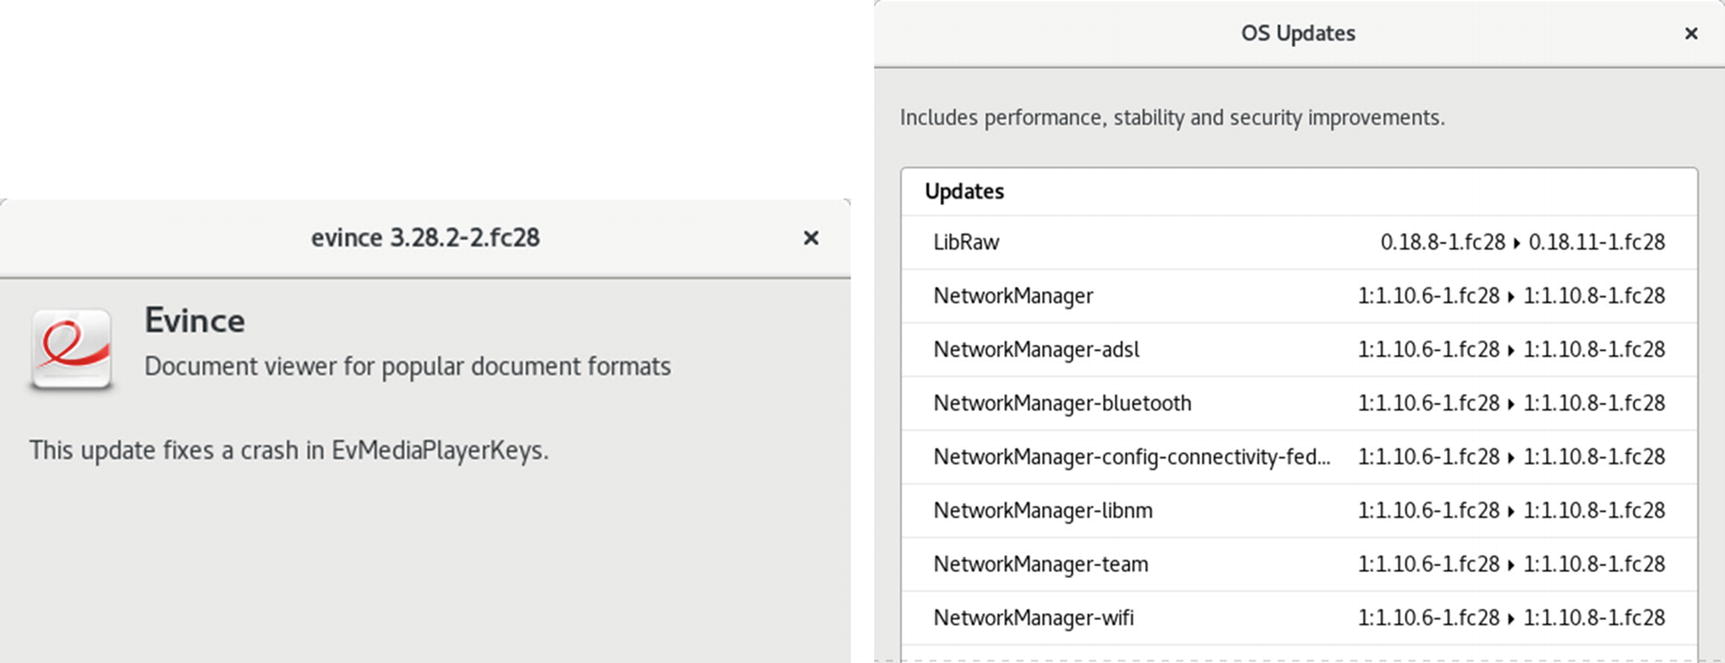
Software Update: Selected package with displayed description
The number of updates is shown at the top, along with Install Updates button on the right side of the title bar. To perform the updates, click the Install Updates button. If you want to review the updates and perhaps deselect certain updates, you scroll through the list of updates, selecting the ones you want more information on. All needed updates are selected automatically when Software Update starts up. The check boxes for each entry let you deselect particular packages you may not want to update. At the bottom of the dialog is an expandable entry name Details. This entry becomes active when you select a package. Expanding the Details entry display information about this package's update. The displayed information includes features such as the version and repository.
Click the Install Updates button to start updating. During the update, a status message is displayed at the bottom of the dialog for the different update stages along with a progress bar.
Update with the dnf Command
Automatic DNF Updates with dnf-automatic
Configuration for dnf-automatic is held in the /etc/dnf/automatic.conf file. The default entries for updates, download_updates and apply_updates, are overridden by the timer you have enabled. You can customize other entries such as those for email. Check the man page for dnf.automatic for configuration details.
Installing Software Packages
Installing software is an administrative function performed by a user with administrative access. Unless you chose to install all your packages during your installation, only some of the many applications and utilities available to Linux users were installed on your system. On Fedora, you can install or remove software from your system with the GNOME Software software manager or the dnf install command. You could also use the PackageKit (Packages) and DnfDragora package managers (not installed by default). Alternatively, you can install software as individual packages, with the rpm command or by downloading and compiling its source code. The procedure for installing software using its source code has been simplified to just a few commands, though you have a great deal of flexibility in tailoring an application to your specific system.
The dnf command remains the best way to access all available packages. GNOME Software and PackageKit do not detect and display all the packages available, such as the server software. They focus primarily on desktop applications.
An RPM software package operates like its own installation program for a software application. A Linux software application often consists of several files that must be installed in different directories. The program is most likely placed in a directory called /usr/bin; online manual files go in another directory; and library files go in yet another directory. In addition, the installation may require modification of certain configuration files on your system. The RPM software packages perform all these tasks for you. Also, if you later decide you don’t want a specific application, you can uninstall packages to remove all the files and configuration information from your system.
The software packages on your install disk, as extensive as they are, represent only some of the software packages available for Fedora Linux. Most reside on the Fedora Software repository, a repository whose packages are available for automatic download using the GNOME Software application. Many additional multimedia applications and support libraries can be found at the RPM Fusion repository ( https://rpmfusion.org ) and, once configured, downloaded directly with DNF and GNOME Software. Table 4-2 lists several Fedora software repositories. Fedora and RPM Fusion are DNF-supported, meaning that a simple DNF configuration enables you to directly download and install software from those sites using the dnf command, GNOME Software, and any other software manager that supports DNF, such as PackageKit and DnfDragora. Fedora repository configuration was performed during the installation of your Fedora system. PackageKit and DnfDragora include repository configuration when installed. RPM Fusion provides DNF configuration files that you download and install manually from its website.
Managing Software with DNF
Downloading Fedora software or software from any Fedora repository is a simple matter of using the Dandified YUM (DNF) package manager ( http://fedoraproject.org/wiki/Features/DNF ). DNF uses many of the same commands and options as YUM, which it replaces. GNOME Software and Packages (PackageKit) provide desktop interfaces for the DNF package manager.
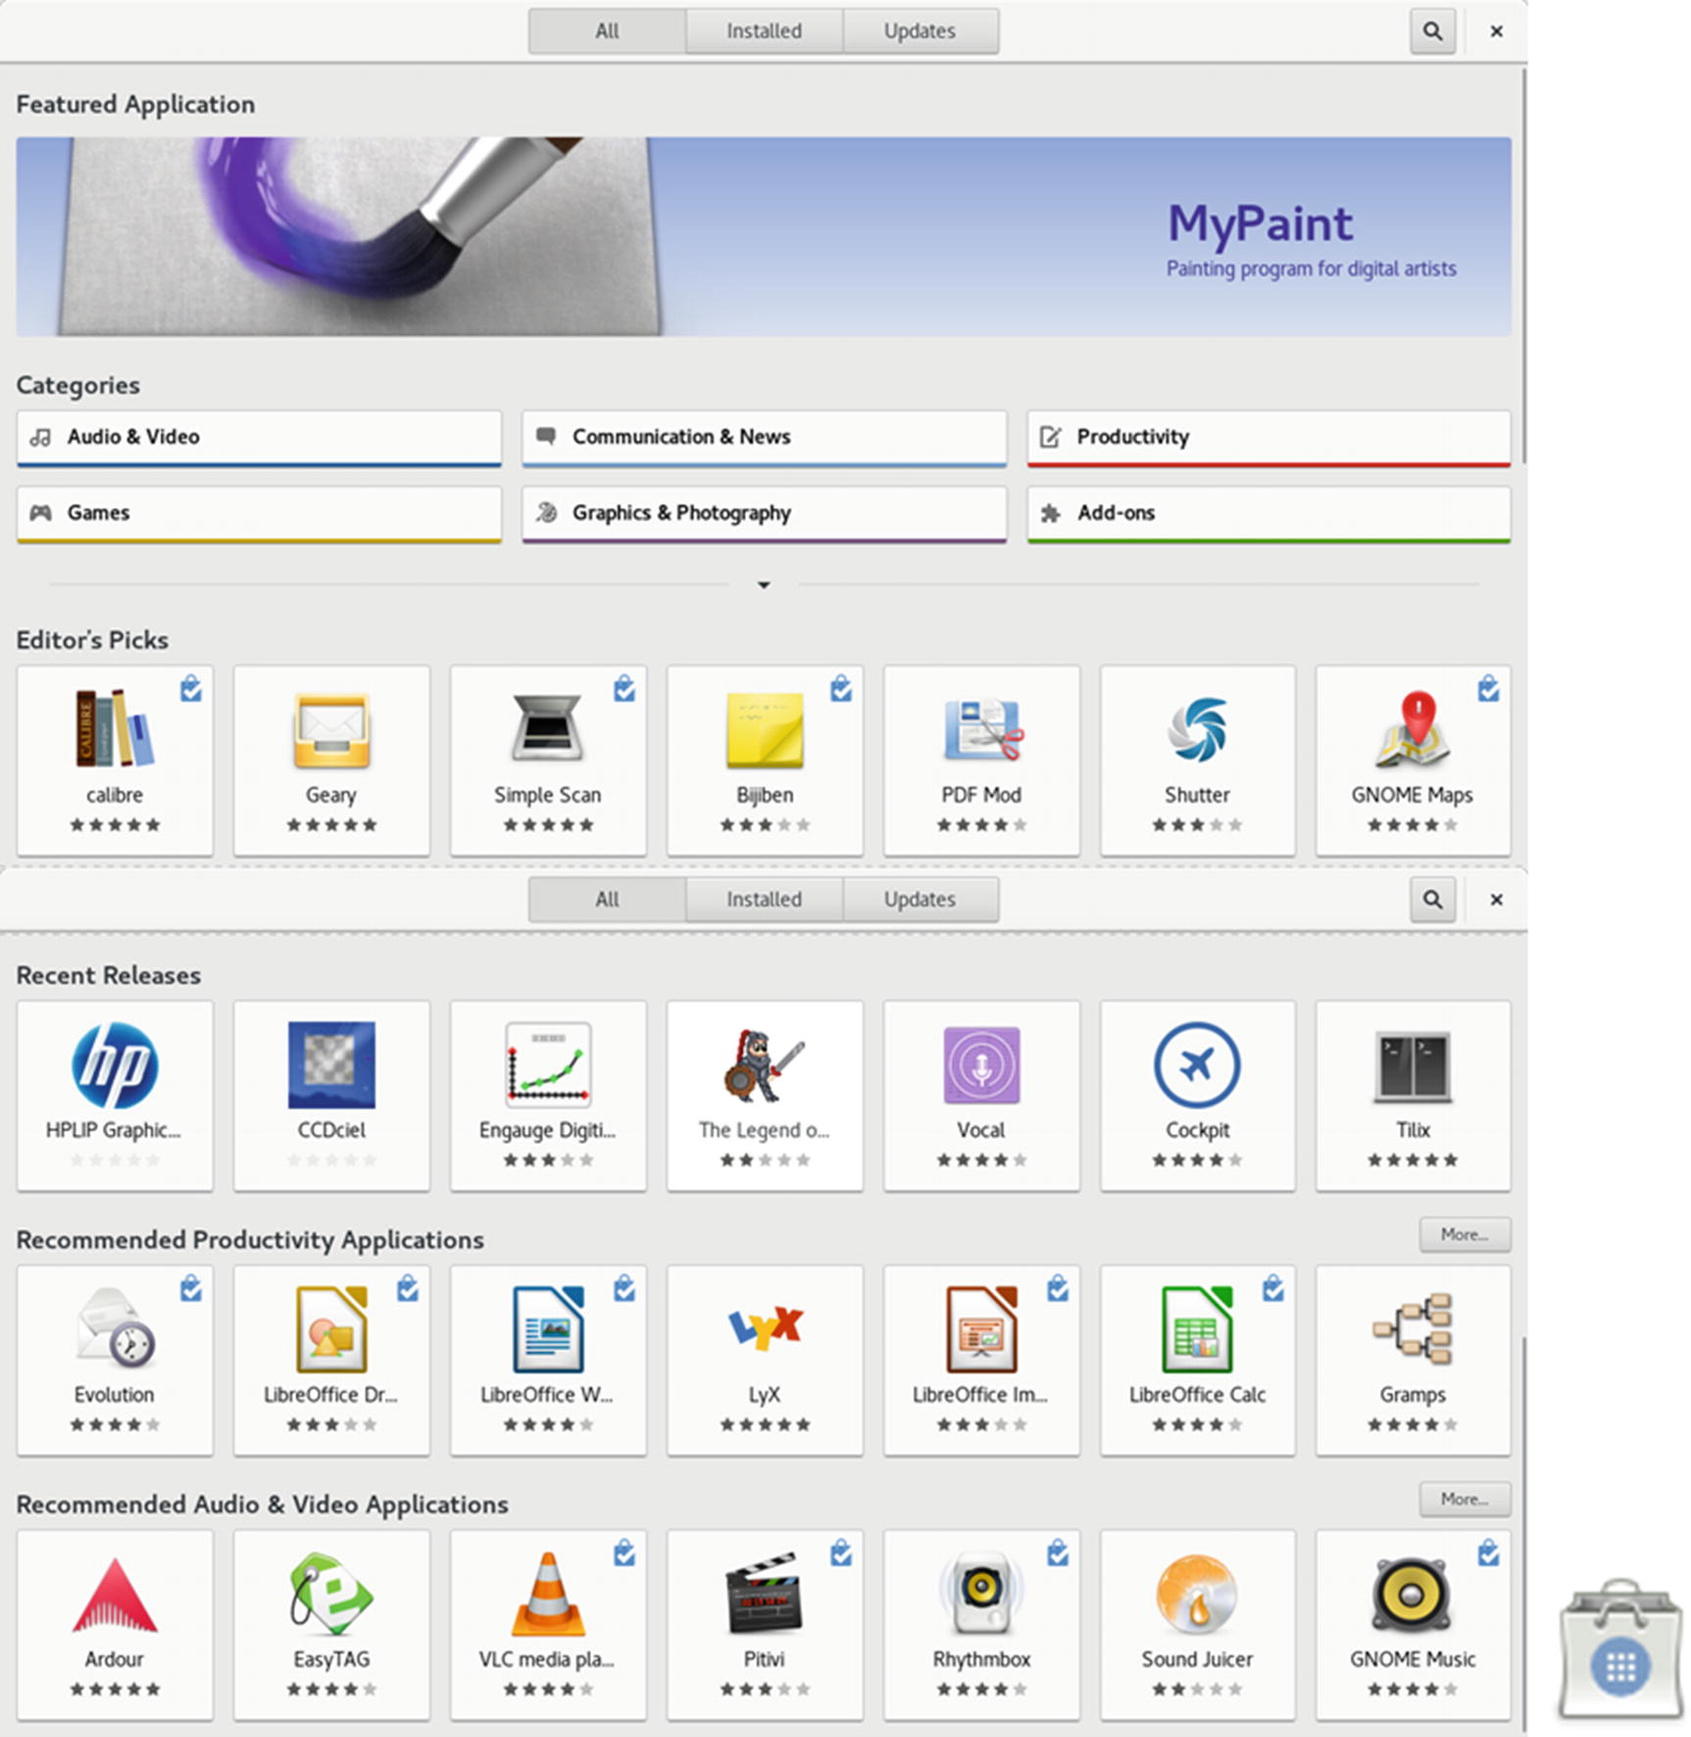
GNOME Software (Software)
GNOME Software is the GNOME software management frontend for DNF. It is designed to be a cross-distribution package manager that can be used on any DNF-supported Linux distribution. GNOME Software performs a variety of different software tasks, including installation, removal, updating of software, as well as the management of system add-ons such as codecs, fonts, drivers, and desktop (shell) extensions. See https://fedoraproject.org/wiki/Changes/AppInstaller for more information.
GNOME Software is currently designed to install client and system applications. It does not install server software, such as the DNS name server or the Apache Web server. It also does not install many of the older system configuration tools, such as system-config-samba. To manage such software, you will have to install using the dnf command in a terminal.
GNOME Software
The category buttons are Audio & Video, Games, Communication & News, Graphics & Photography, Productivity, and Add-ons. Click on any category button to open a dialog with subcategories. The Add-ons category covers enhancements to your desktop, such as codecs, fonts, drivers, and desktop (shell) extensions.
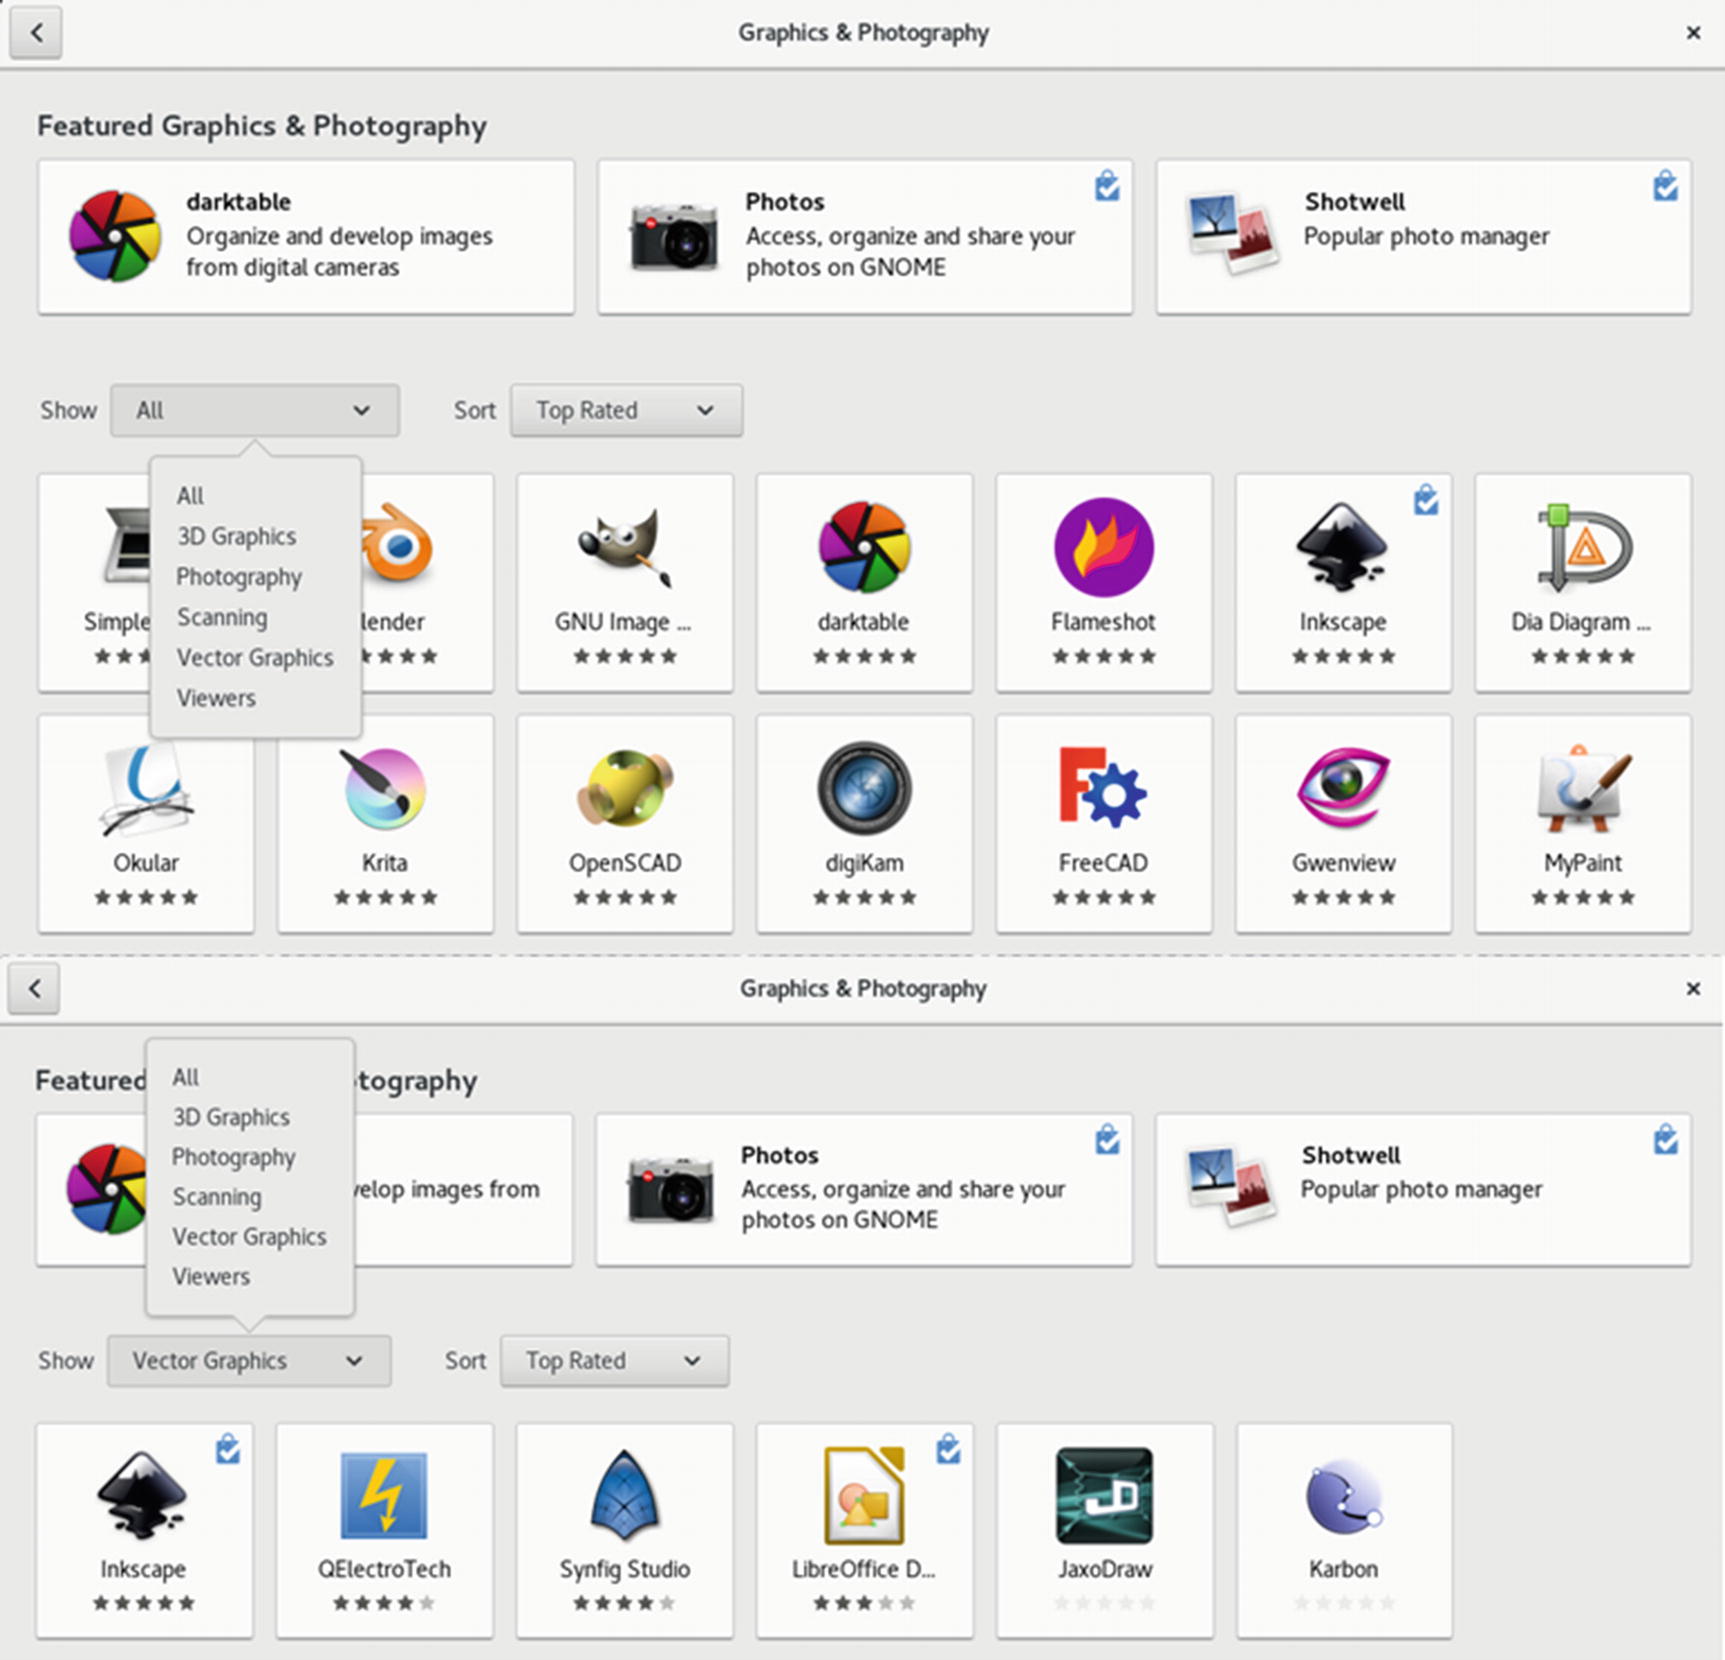
GNOME Software: Graphics category
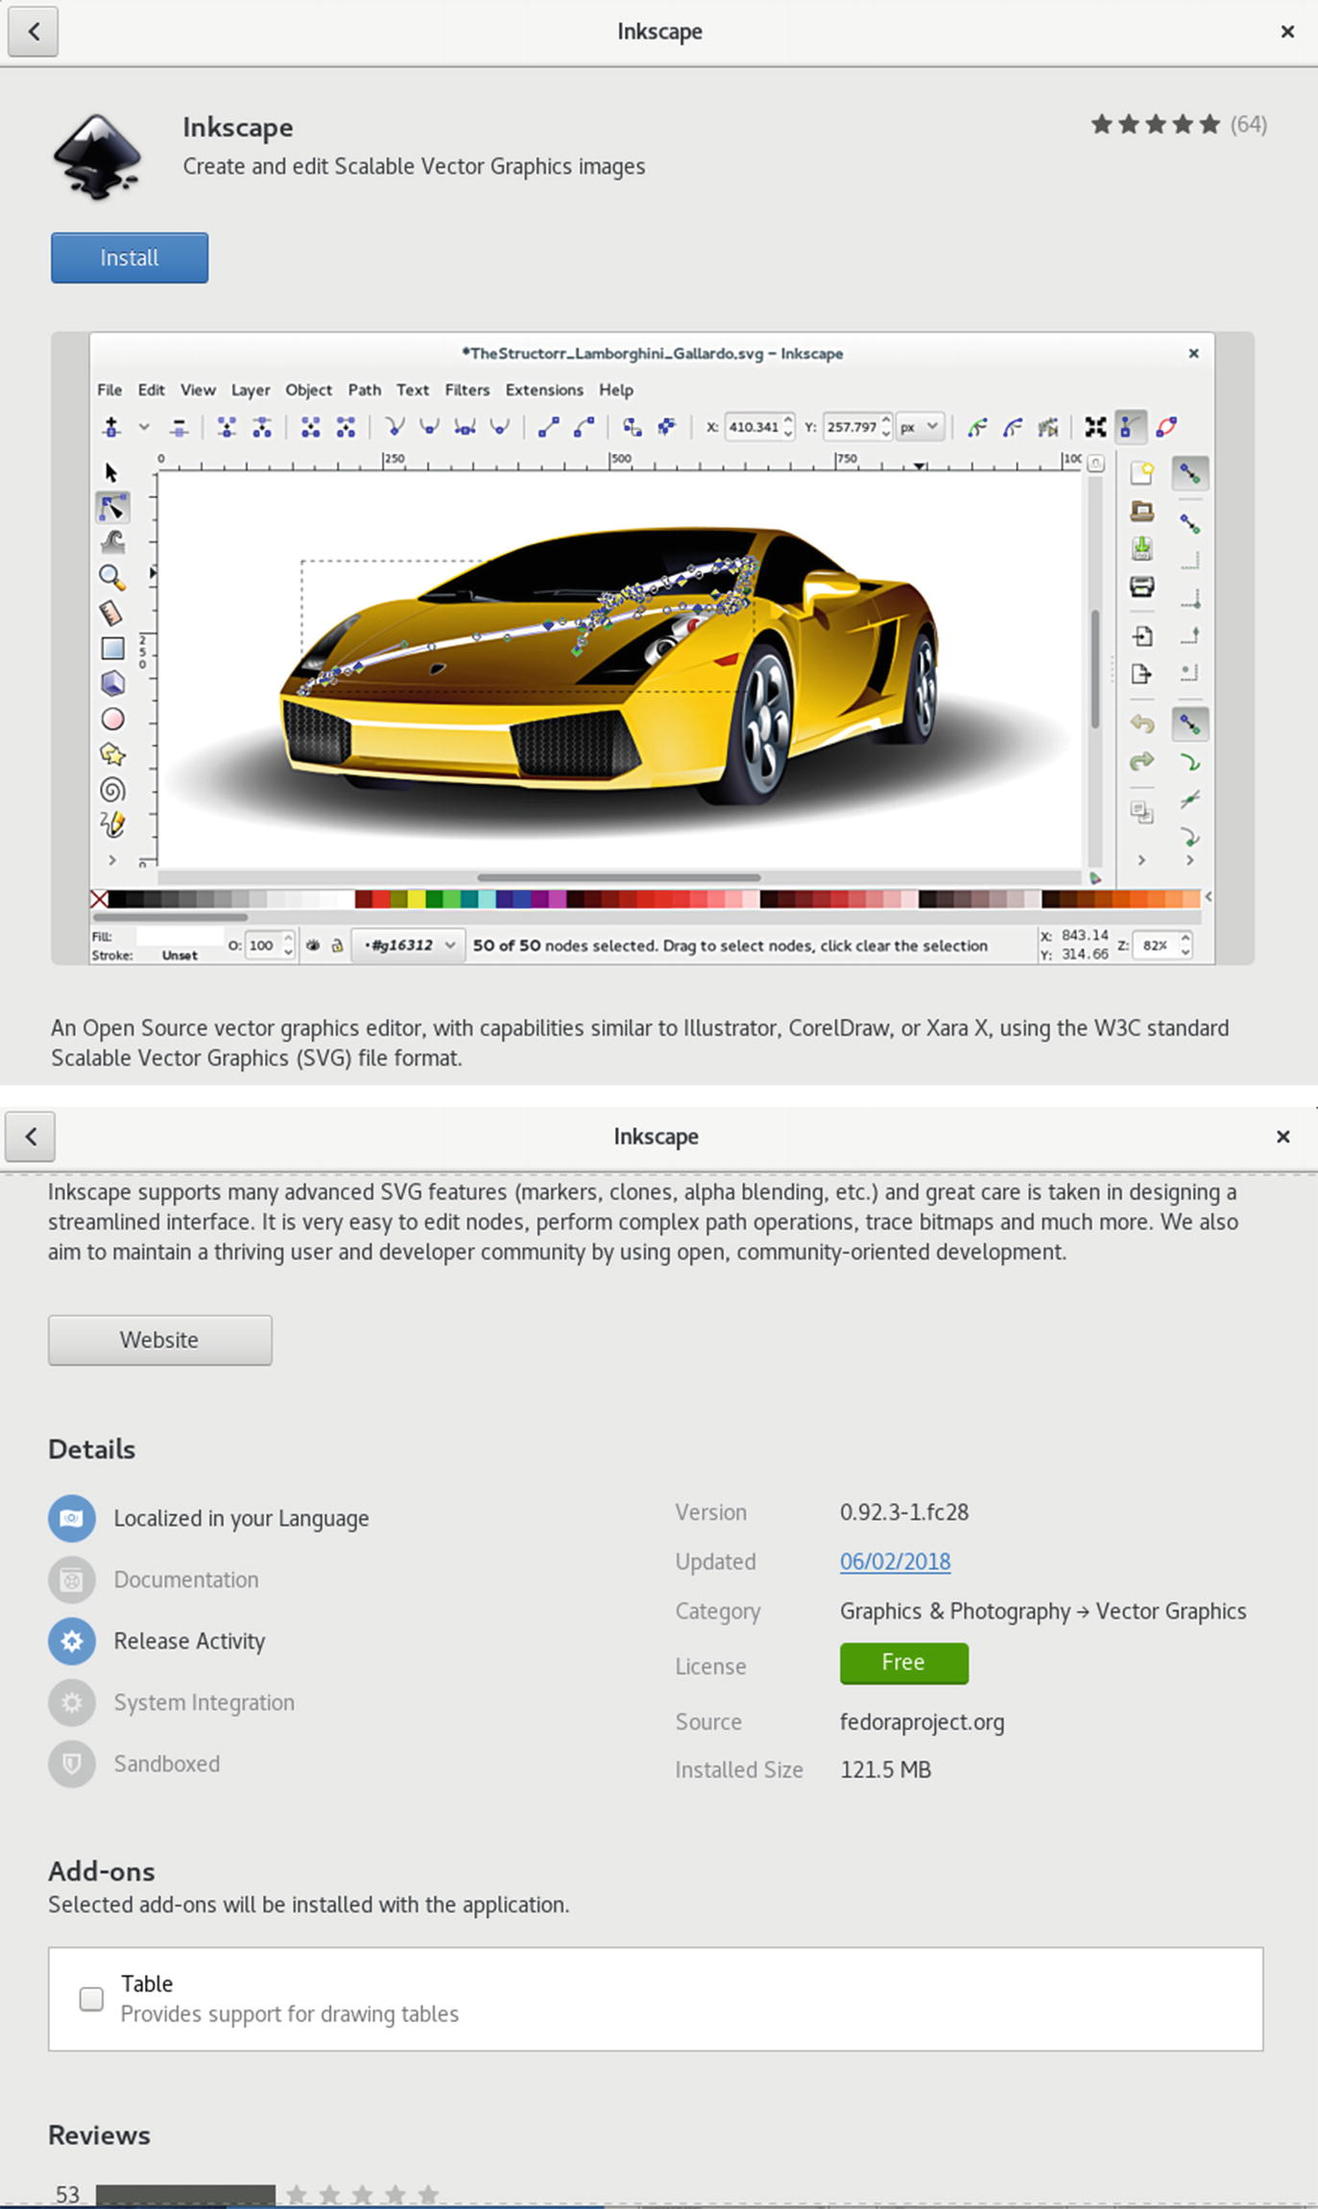
GNOME Software: Software descriptor page
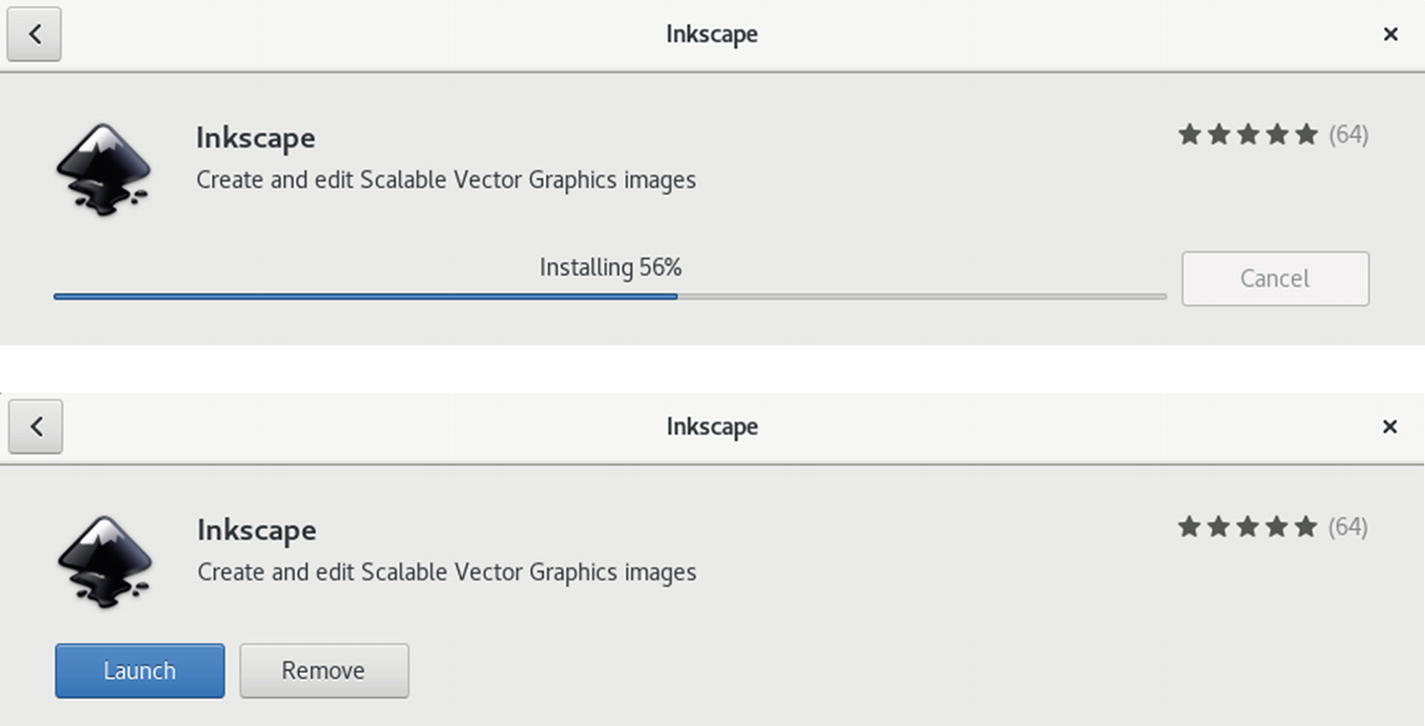
GNOME Software: Installing software
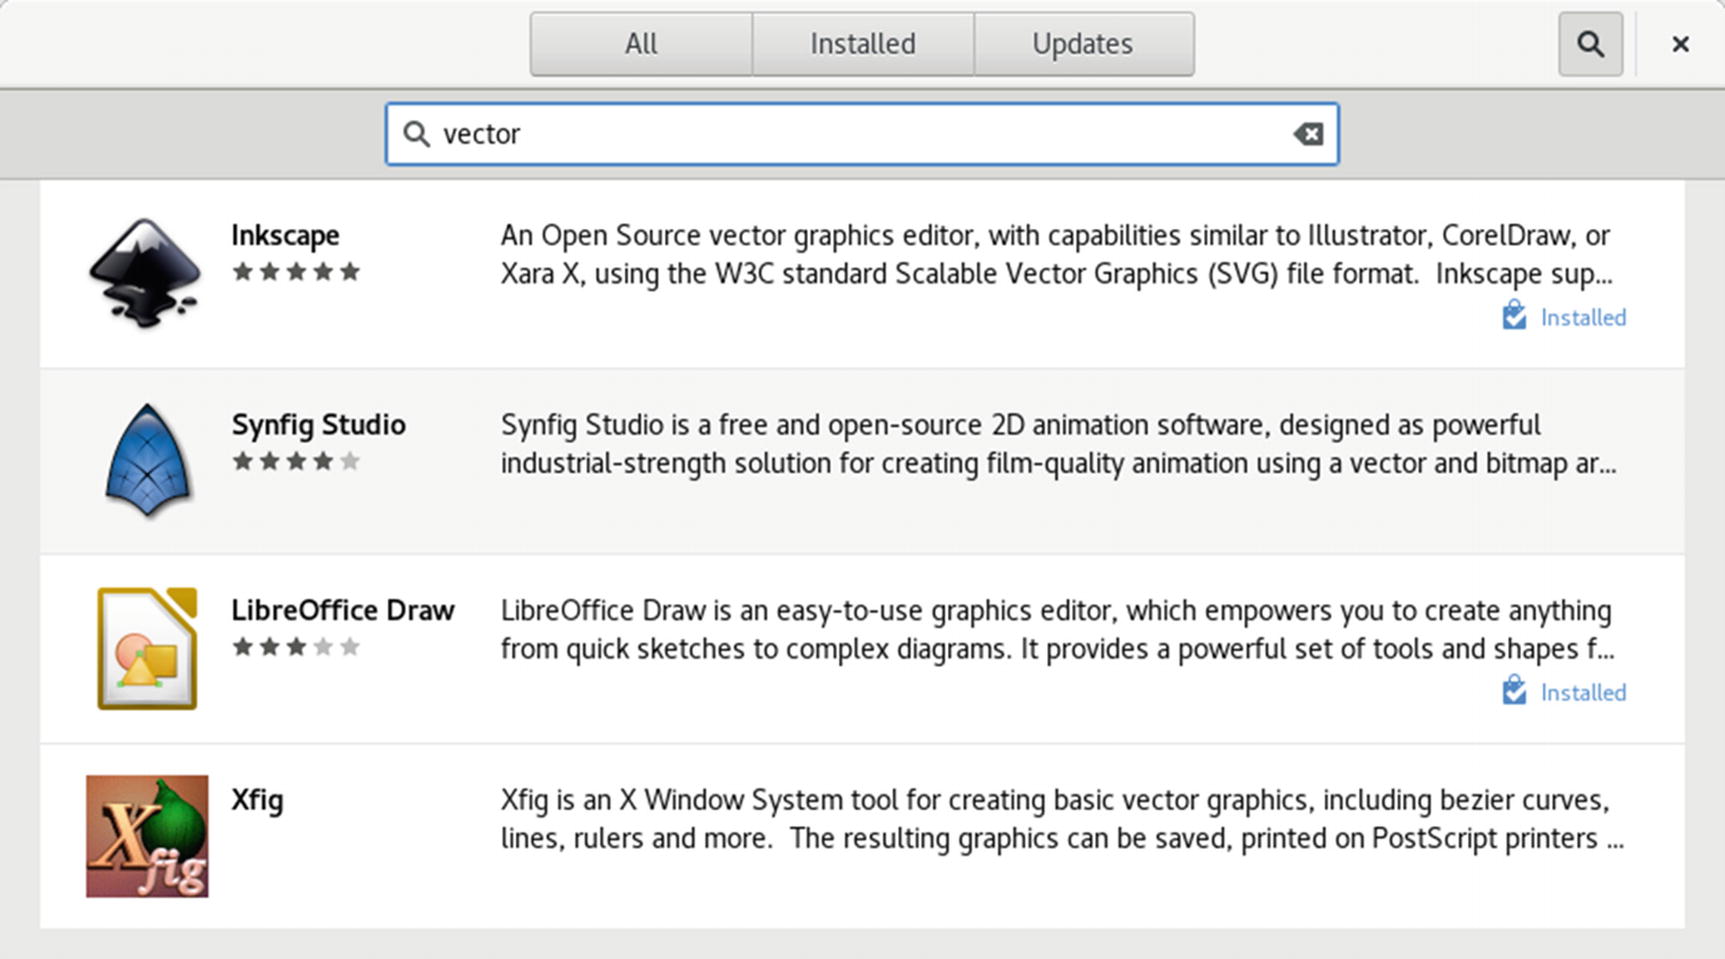
GNOME Software: using the search box

GNOME Software: Installed tab
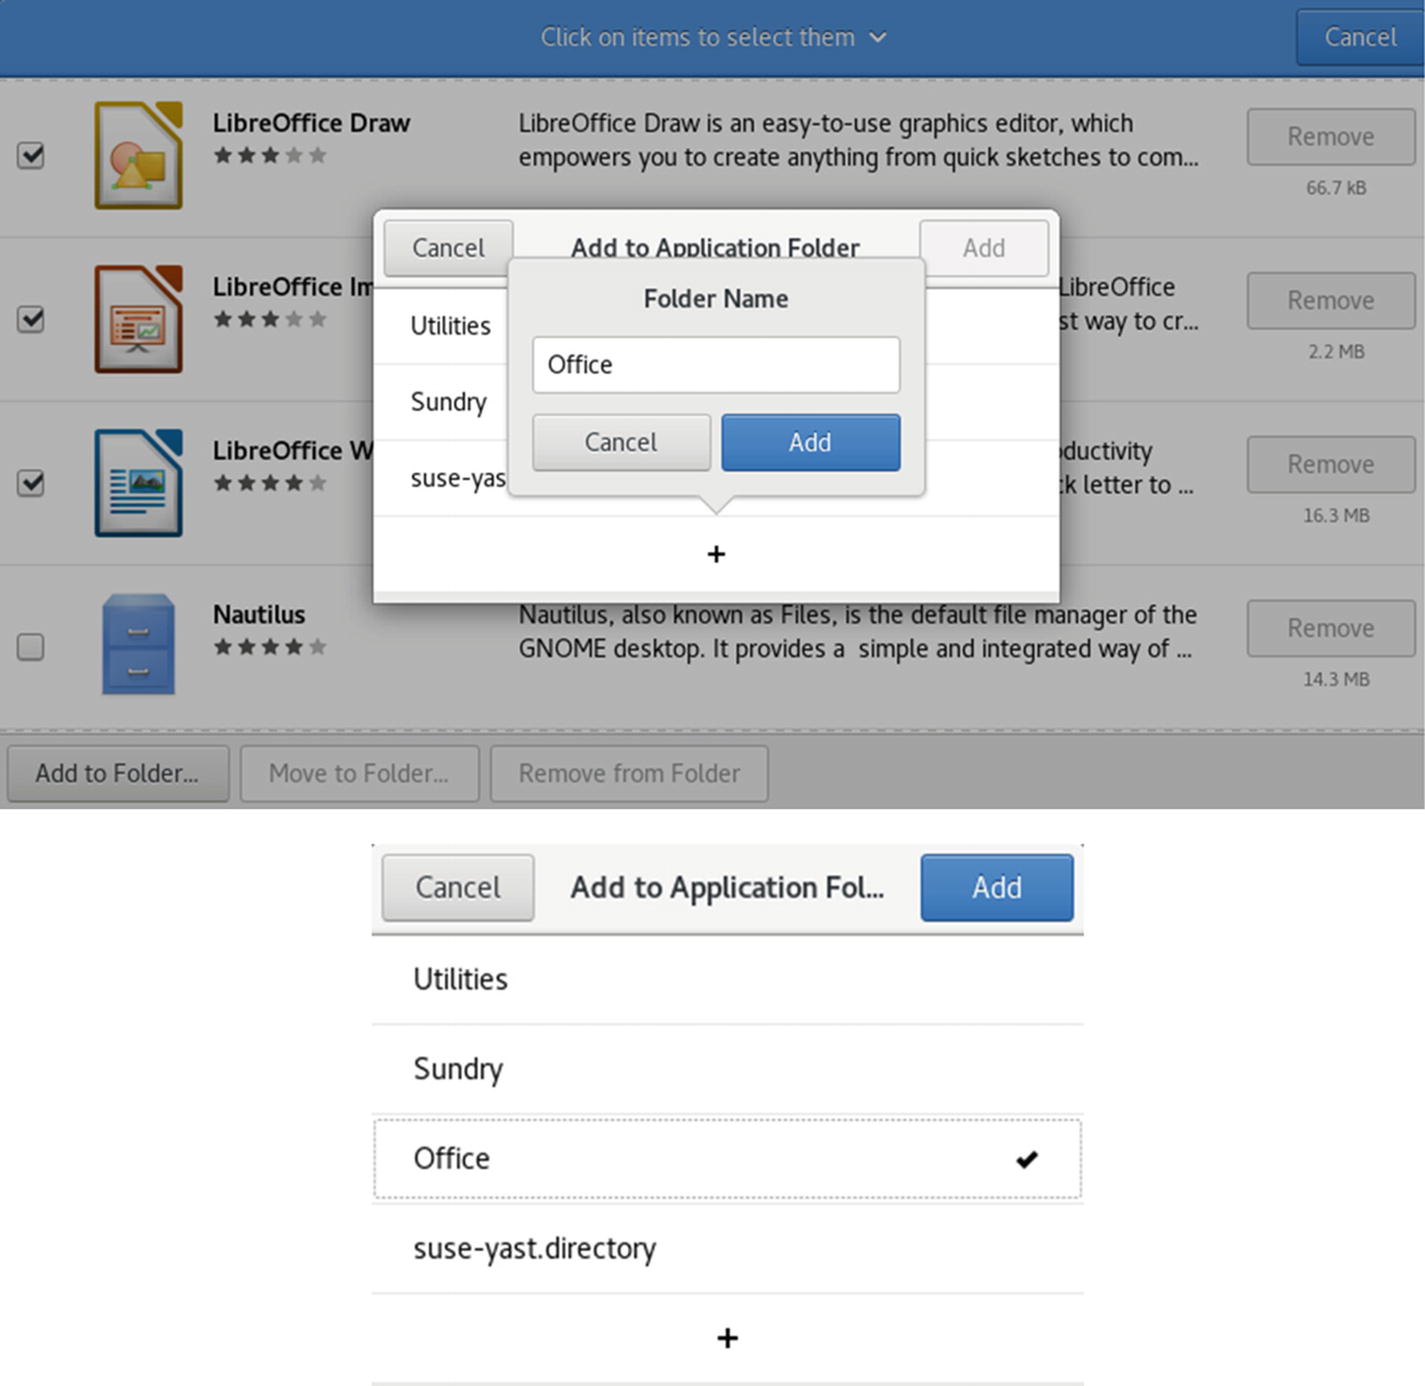
GNOME Software: Installed tab, organize applications overview
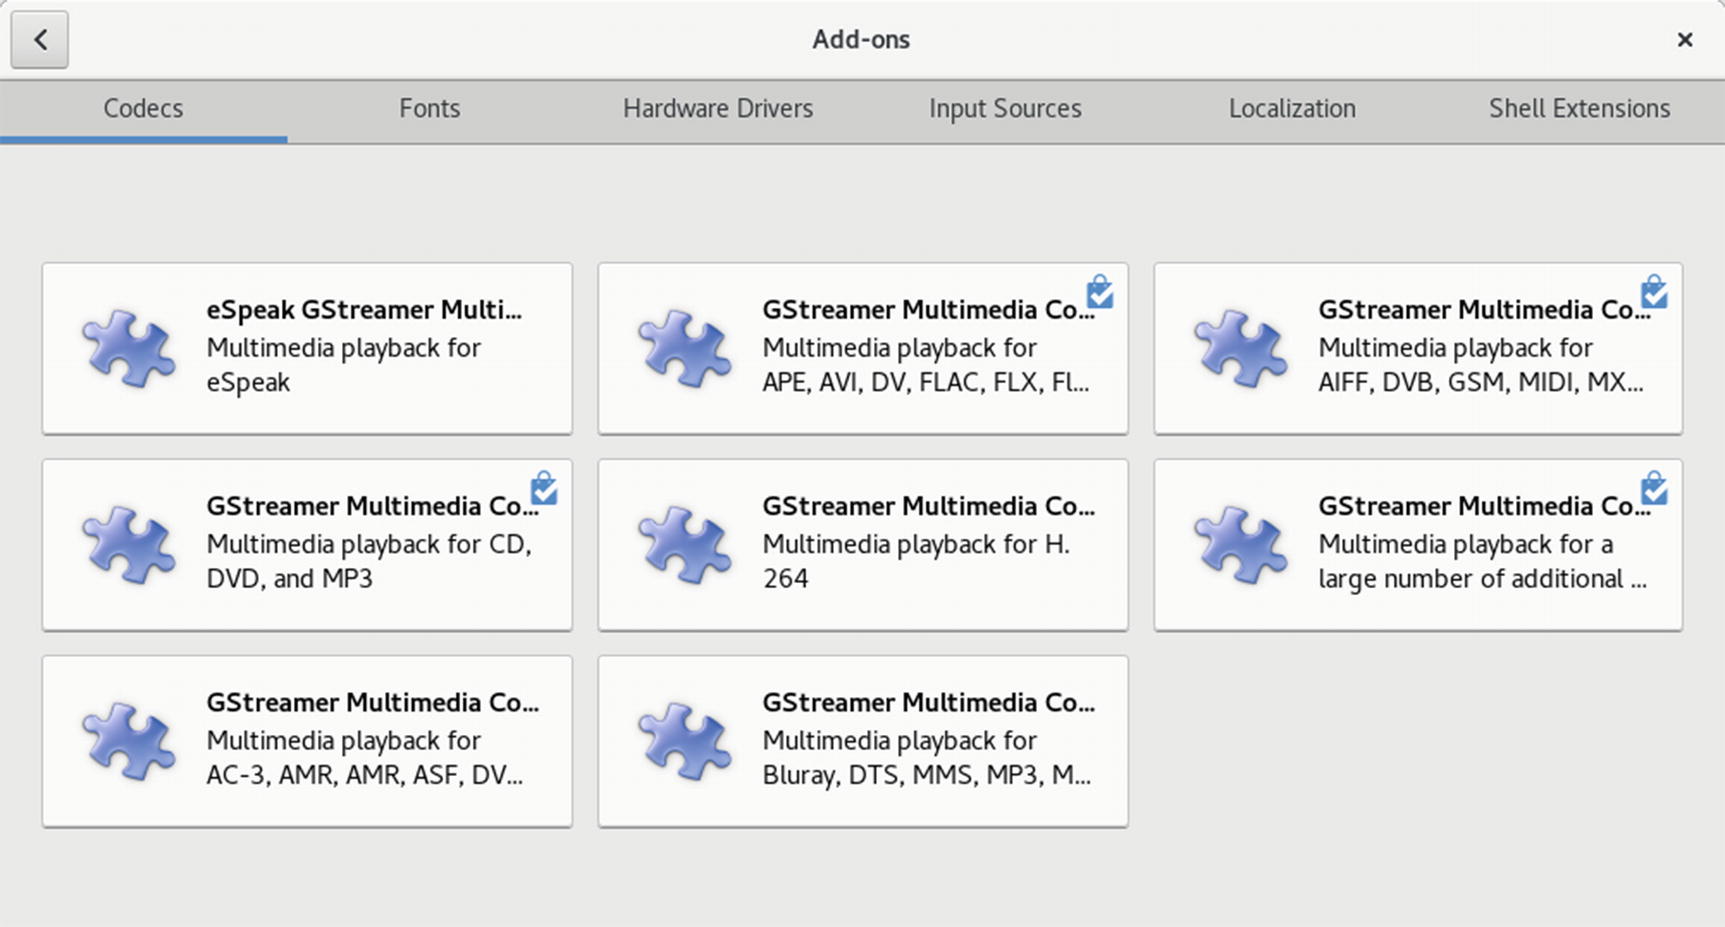
GNOME Software: Add-ons tab
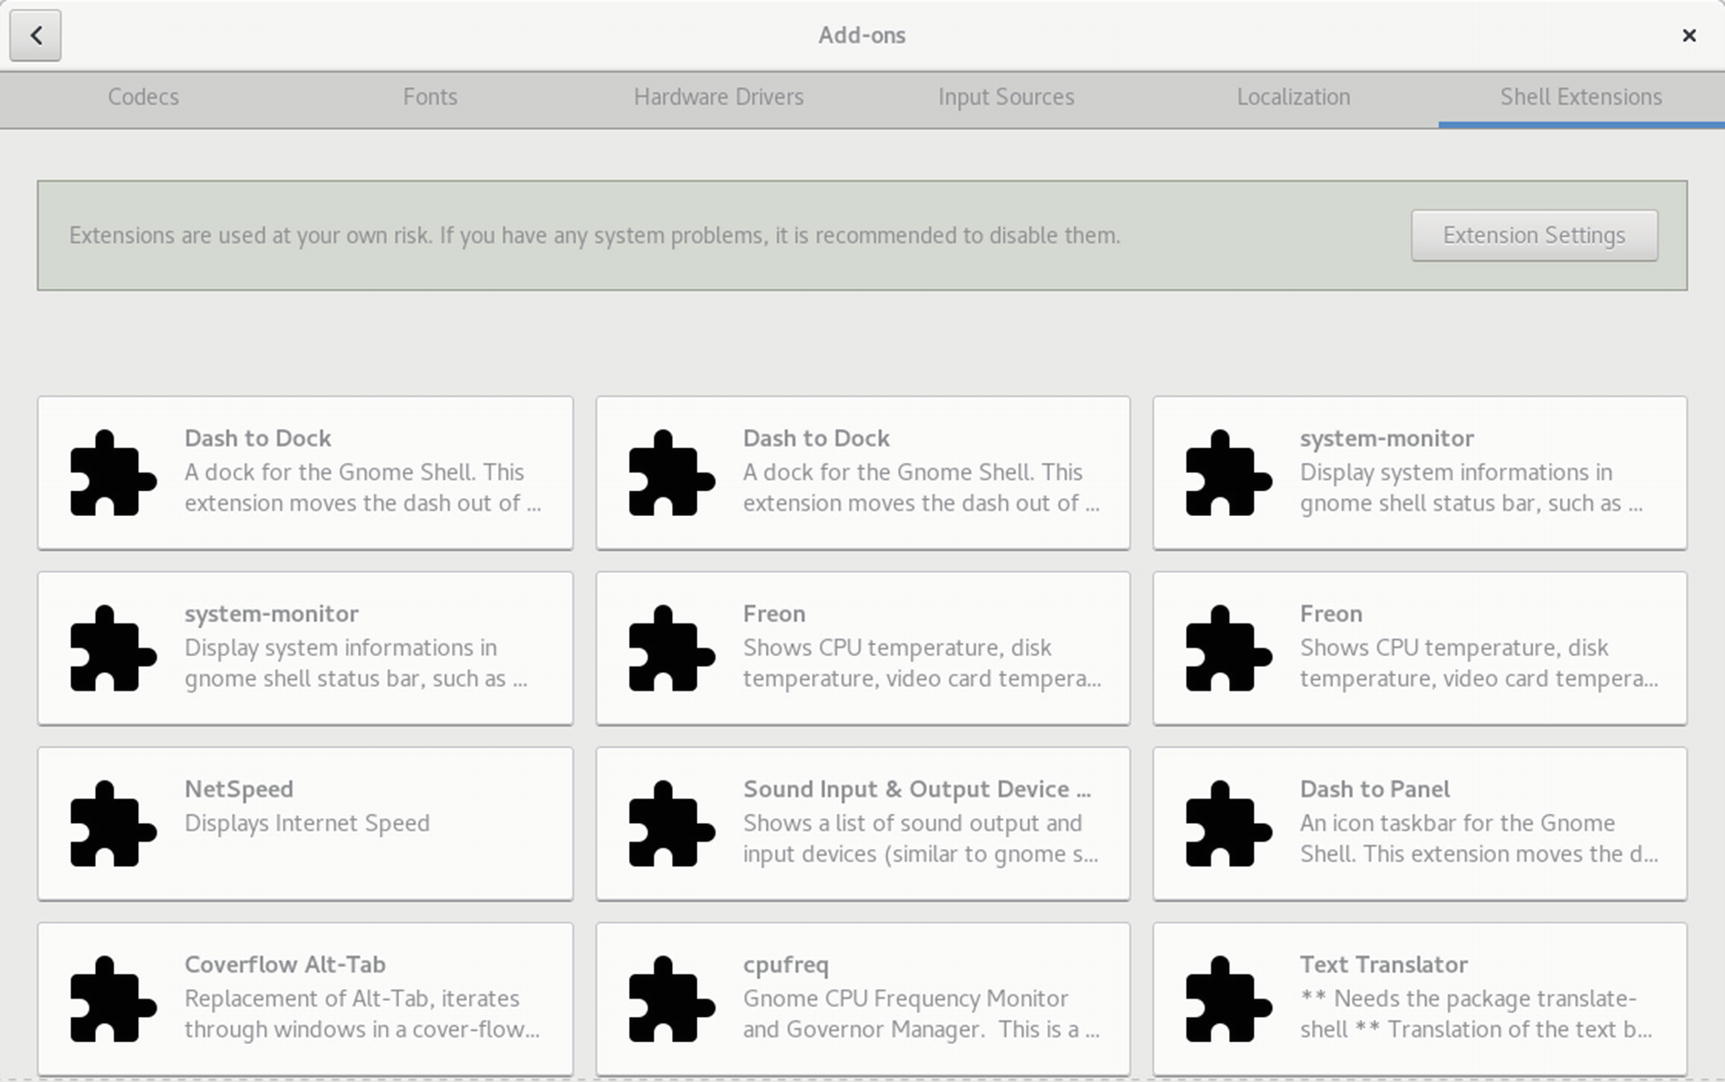
GNOME Software: Add-ons tab, Shell Extensions

GNOME Software: Installed shell extension management
GNOME Software: Installed Shell Extension Configuration
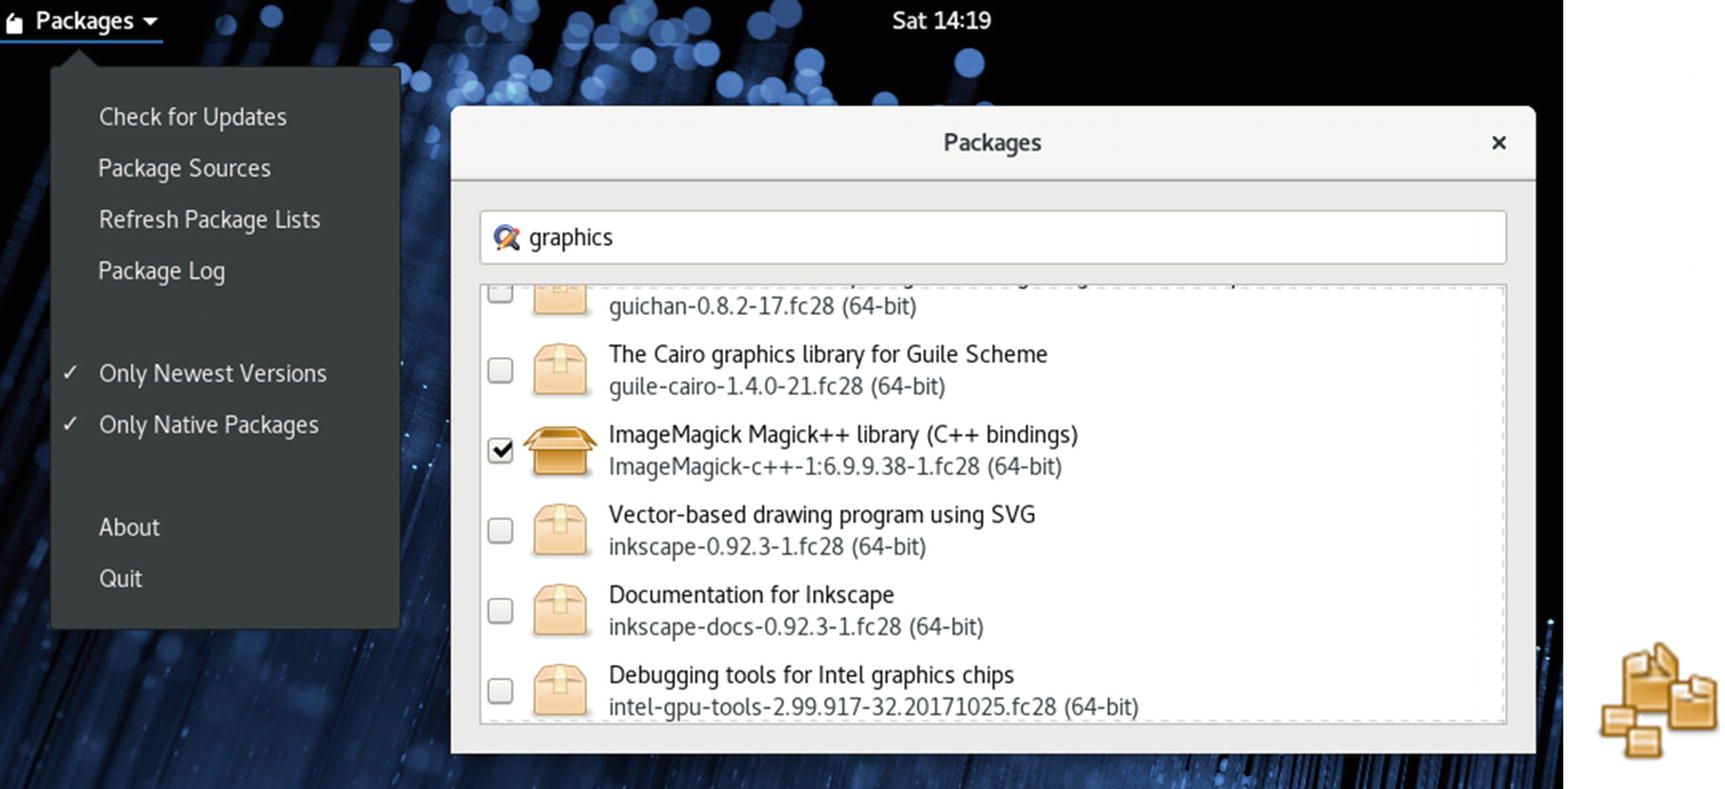
PackageKit (Packages)
PackageKit Applications
Application | Description |
|---|---|
gpk-application | Packages |
gpk-update-viewer | Updates your system with Package Updater |
gpk-prefs | Configures repositories with Package Sources |
gpk-log | Views history of updates and installs |
PackageKit (Packages)
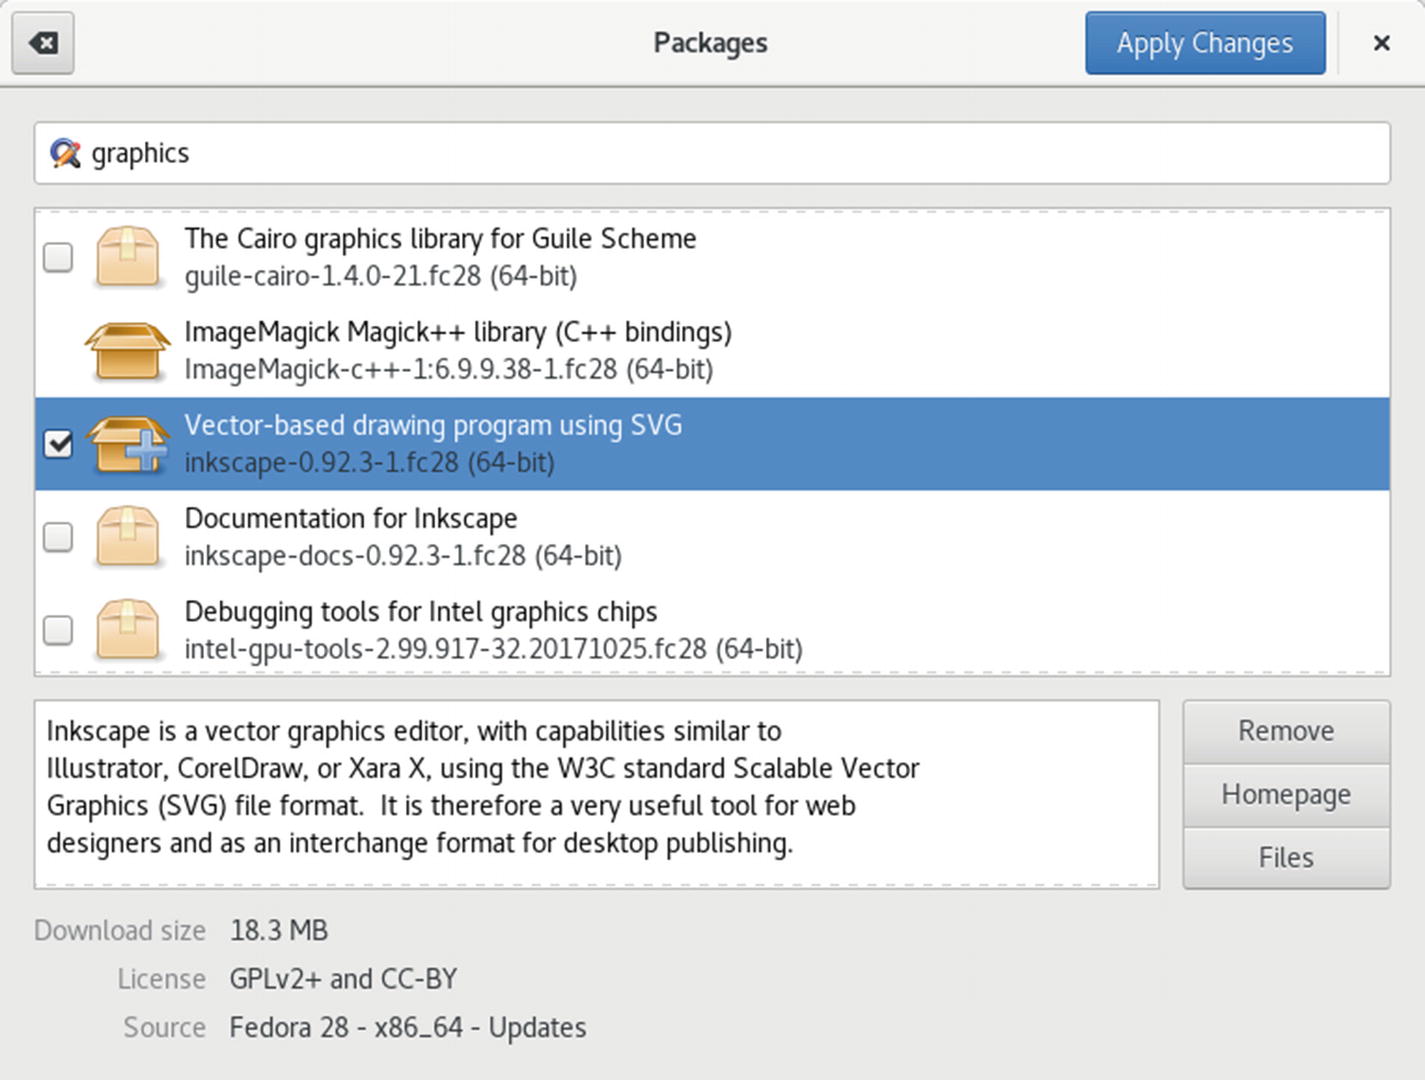
Search for packages by entering the package name or descriptive term in the search box. Packages searches package descriptions, not just the filename. Uninstalled packages have faded package icons with an empty check box, and installed packages have a solid color with a checkmark in the check box.
To access information about a particular package, select it. A pane then opens at the bottom and displays a description of the software and a button bar to the right, with buttons to install the package (or remove if already installed),for the software’s website (Homepage), and a list of installed files (Files). The Homepage button opens your browser to the package home page where you can find more detailed information about it. The Files button opens a window that lists all the files the package installs. This can be helpful for tracking down the command names and location of the configuration files.
Package information
If you choose to remove an installed package, click its check box. The check box becomes empty, and a wastebasket image is displayed on the package icon. Then click Apply Changes to uninstall. Once the package is removed, the package icon color becomes faded. You could also just select it and click the Remove button in its description.
Instead of showing all your available packages, both installed and uninstalled, you can filter the package listings. Two filter options are available from the PackageKit GNOME applications menu. You can filter by newest versions and native packages. Native packages are those for your system architecture, such as 64-bit (x86_64) or 32-bit (i686).
Managing Repositories
DNF is the primary package-management tool . When you install a package, DNF is invoked and automatically selects and downloads the package from the appropriate repository. After having installed your system, when you then want to install additional packages, GNOME Software and Packages will use DNF to install from a repository. This will include all active DNF online repositories you have configured, such as sites like https://rpmfusion.org , not just the Fedora and update repositories configured during installation. You can manage your repositories, enabling or disabling them, with GNOME Software, Packages, DnfDragora, and the dnf command.
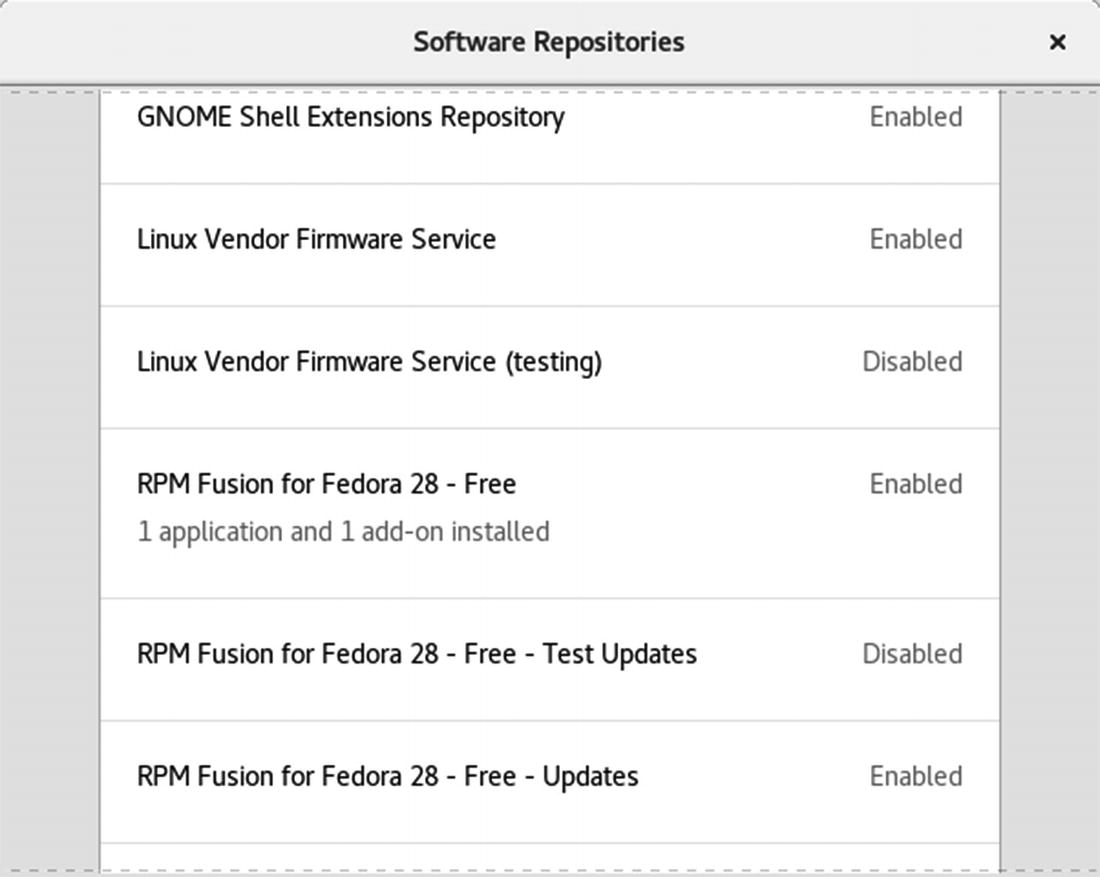
Software Repositories: Configured software repositories (GNOME Software)
The repositories listed have DNF configuration files in the /etc/yum.repos.d directory, holding information such as URLs, GPG keys , and descriptions. The Fedora repository names include the release number and the platform, such as x86_64 for the 64-bit version. Fedora and Fedora Update repositories will be enabled. If you want to see the package from just one repository, you can deactivate the others. For example, if you wanted to see only the RPM Fusion repository, you could deactivate all others, including Fedora. You can reactivate the other repositories later.
On GNOME Software's Software Sources dialog, all configured repositories are listed along with their status, disabled or enabled. To enable a disabled repository, click on its entry to display an Enable button, which you can click to enable the repository. For enabled repositories, a Disable button is shown, when their entry is clicked. Also, when you click a repository entry, the URL of its repository is displayed.
Repositories also have specialized repositories for development, debugging, and source code files. Here you find applications under development that may be useful, as well as the latest revisions. Some will have testing repositories for applications not yet completely validated for the current release. These applications might not work well. Source, Test, and Debug repositories will normally be disabled. Test is the development repository for a future release currently under development. The source repositories hold source code packages.
Fedora Linux designated certain repositories as third-party repositories, as listed at:
https://fedoraproject.org/wiki/Workstation/Third_Party_Software_Repositories
These include PyCharm (Python development environment), Google Chrome, the RPM Fusion NVIDIA graphics driver repository, and the RPM Fusion Steam client repository. When you first start GNOME Software, a notice asks you if you want to enable these repositories, as shown here.

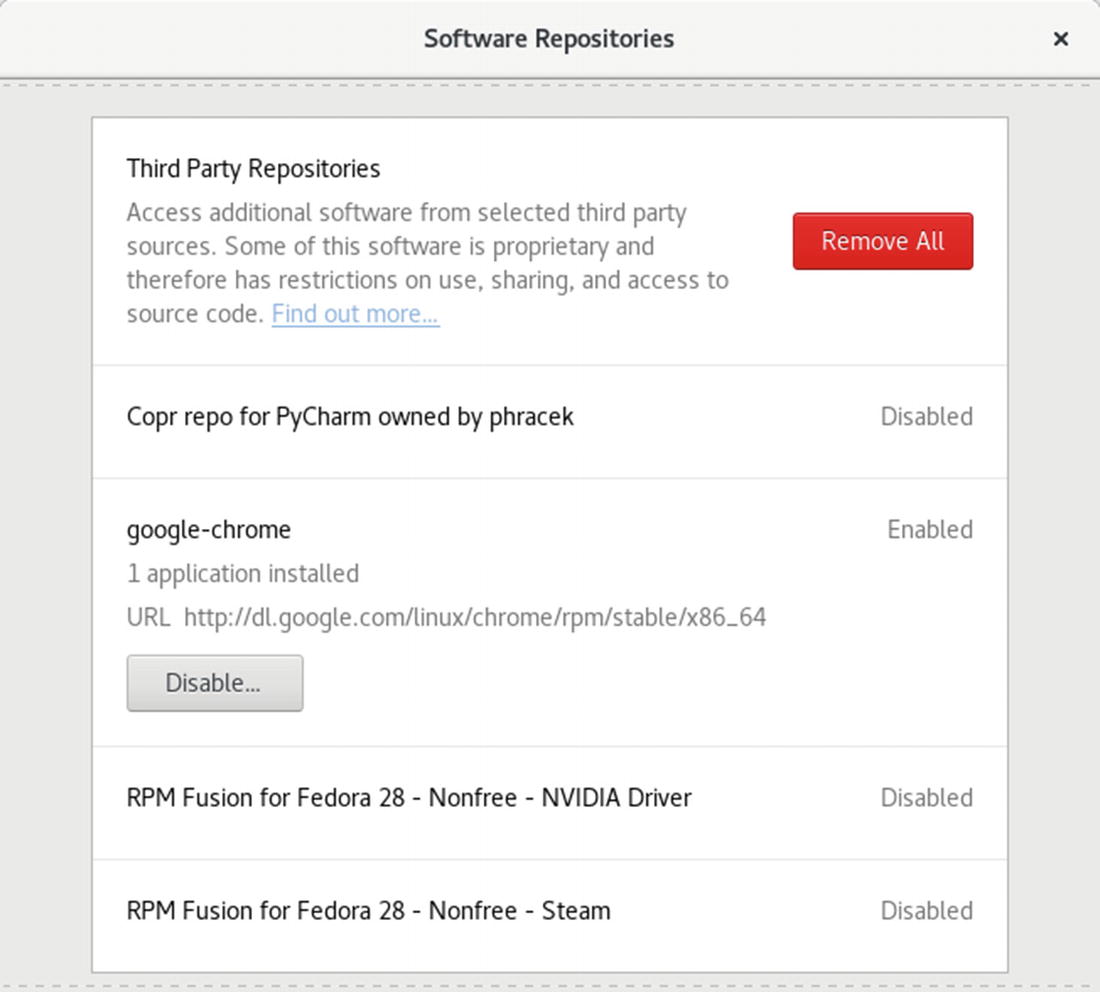
Software repositories: Third-party repositories (GNOME Software)
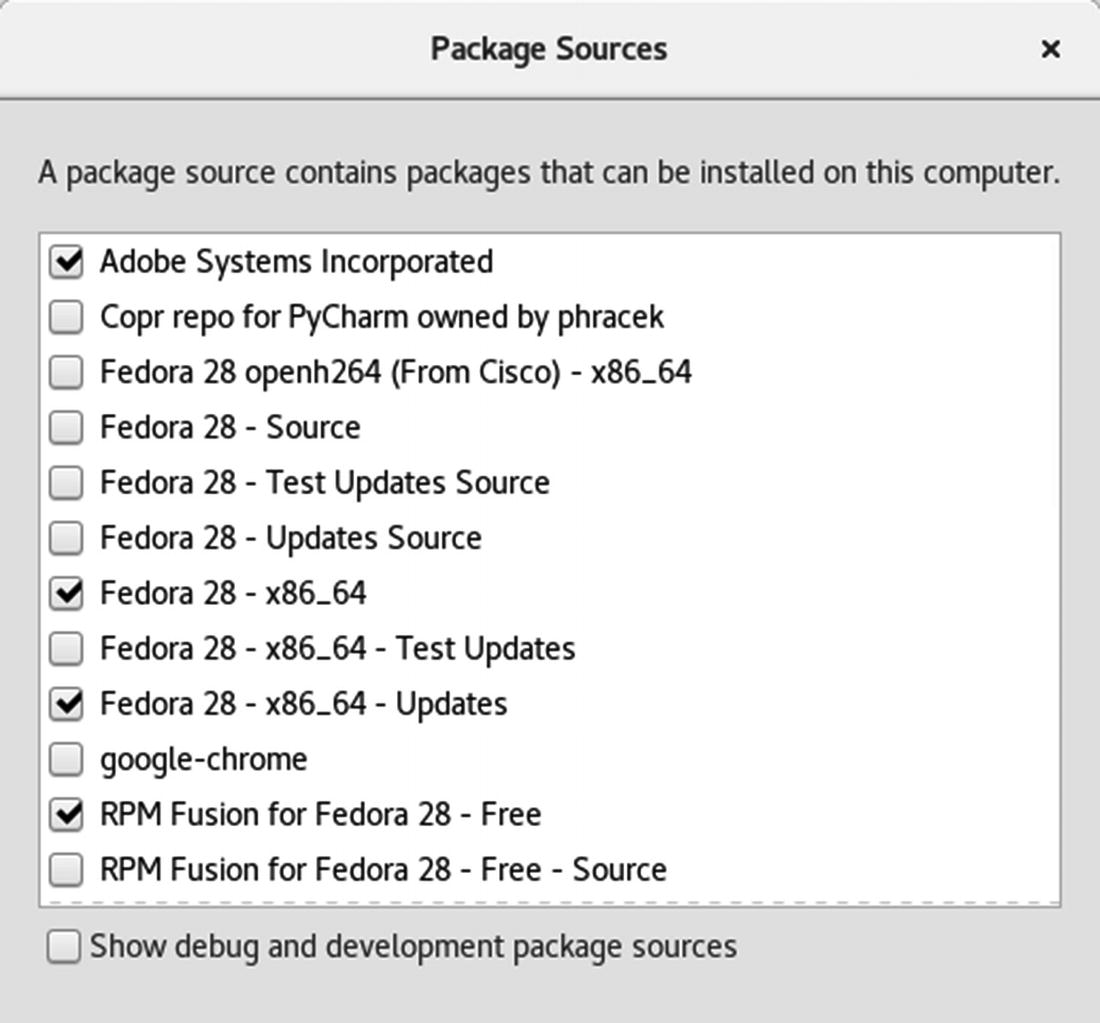
Package Sources: Configured software repositories (Packages)
To remove a repository, use the dnf remove command. This is a permanent removal.
Using the RPM Fusion Repository
The RPM Fusion repository ( https://rpmfusion.org ) holds popular third-party drivers and codecs. These include the vendor graphics drivers for Linux, when they become available, such as those provided by NVIDIA. Also included are multimedia codecs with licensing issues, such as MP3, AC3, and MPEG2 codecs, as well as MPEG4 and DivX (Xvid).
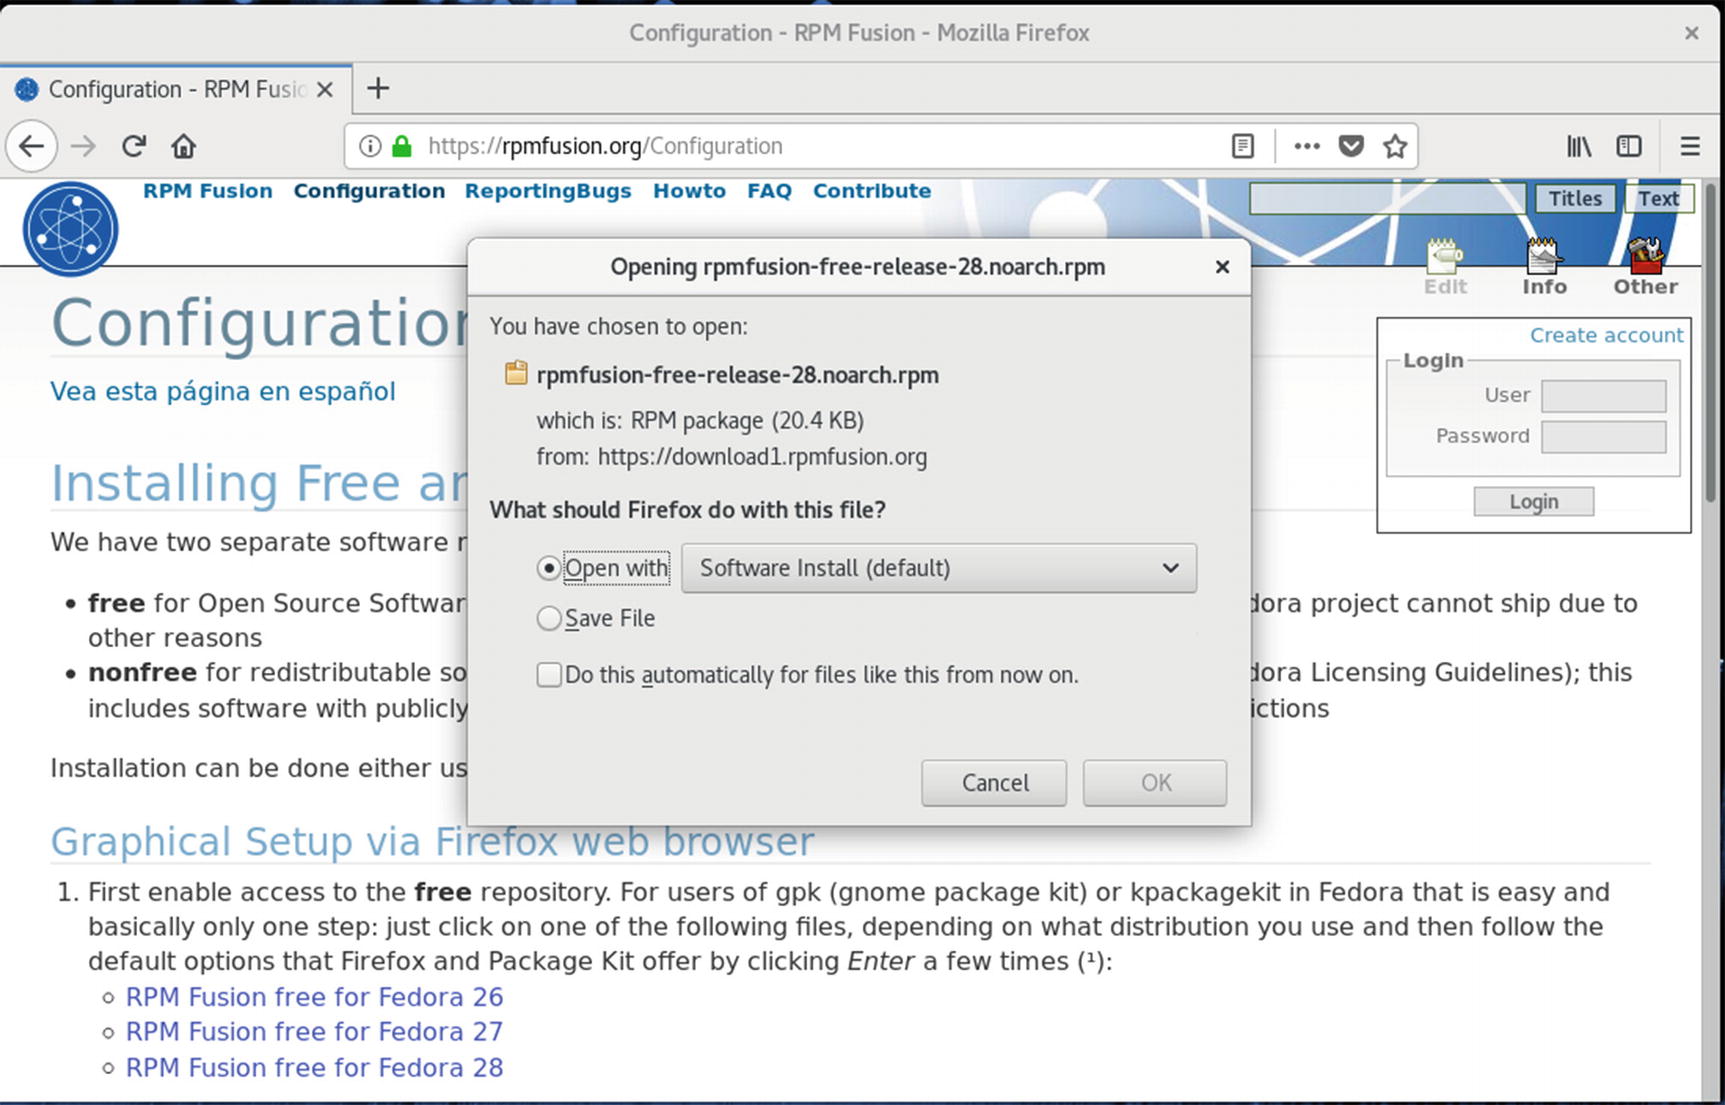
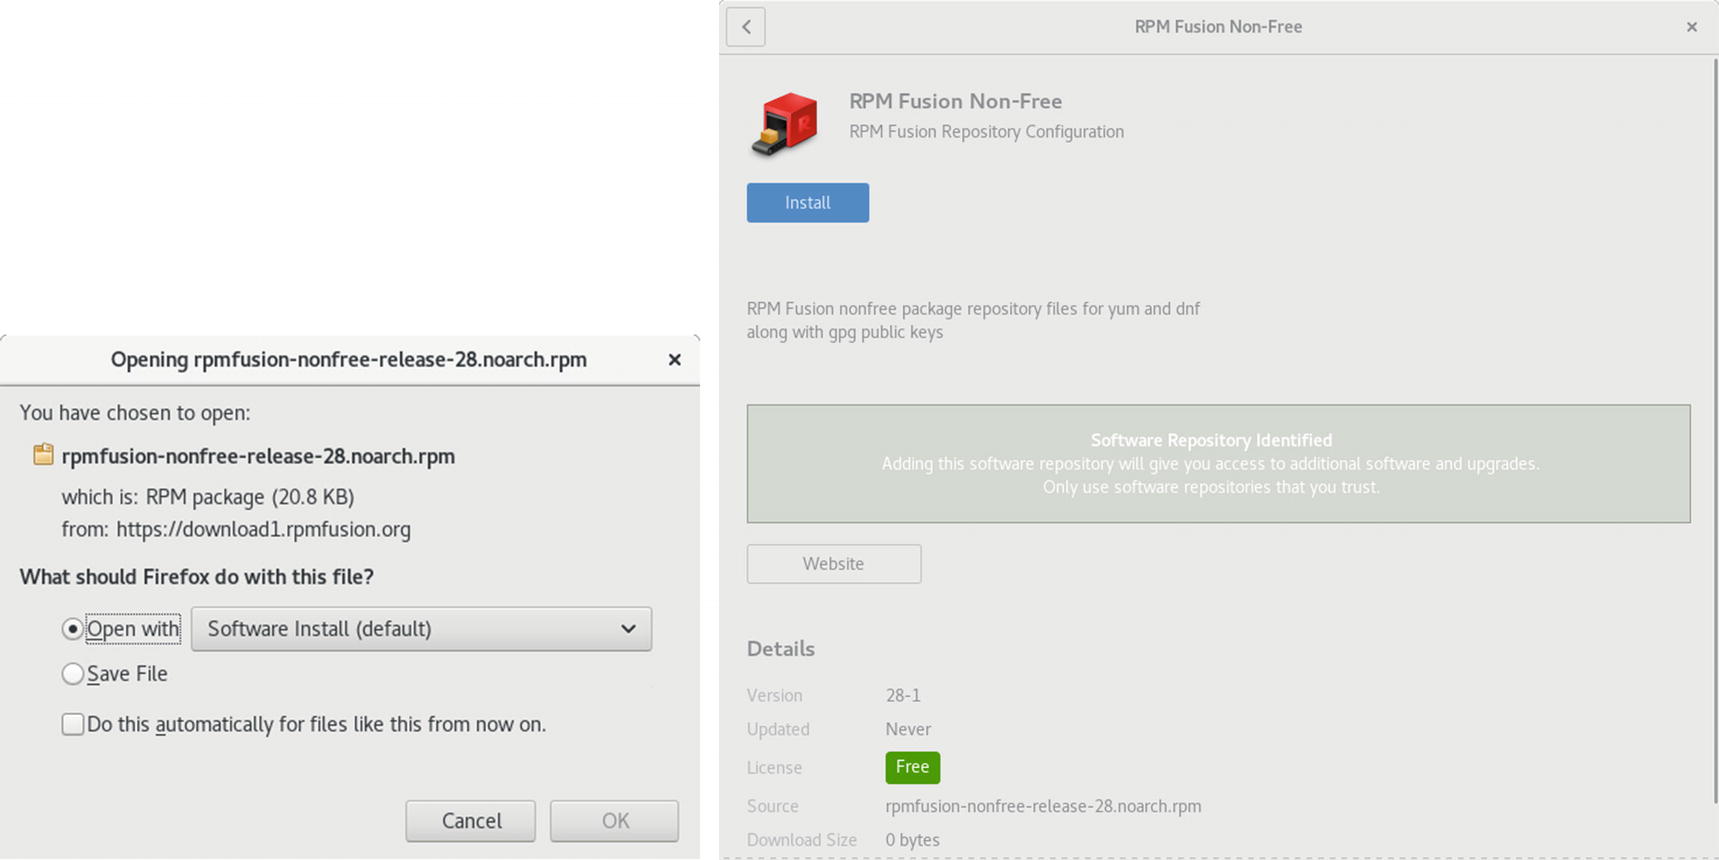
RPM Fusion repository configuration file downloaded from rpmfusion.org
After installing the free package, you can install the non-free package if you wish. Click the link labeled RPM Fusion Nonfree for Fedora28, listed under the second paragraph in the Graphical Setup section, then proceed with the install.
The page also tells you how to perform an installation of both free and non-free RPM Fusion configuration packages from the command line using the dnf command. The command is extensive and, instead of typing it on a command line in a terminal window, you can copy and paste the entire command from the web page to a terminal window. Click and drag the command on the web page to select it, then press Ctrl+c to copy it to the clipboard. Open a terminal window and press Ctrl+Shift+v to paste the command to the current command line. Then press Enter to run the command.
Once the repository is installed, you can open Software Sources to check that the RPM Fusion repository is enabled. On GNOME Software, select Software Repositories from its application menu to open the Software Repositories dialog and scroll down to the RPM Fusion for Fedora 28 entries. The ones for free and non-free should be enabled. On Packages, select Package Sources from its applications menu to open the Package Sources dialog, which should have the entries for Fedora 28 checked, both free and non-free.
With the RPM Fusion repository now enabled, you can use GNOME Software and Packages to search, select, and install any packages on its repository. Both RPM Fusion and the Fedora repositories have their packages intertwined on the GNOME Software and Packages software listings. When you first install the repository configuration, be sure to update your Packages package lists so that the new repository packages will be listed. From the Packages Applications menu, select Refresh Package Lists.
DnfDragora
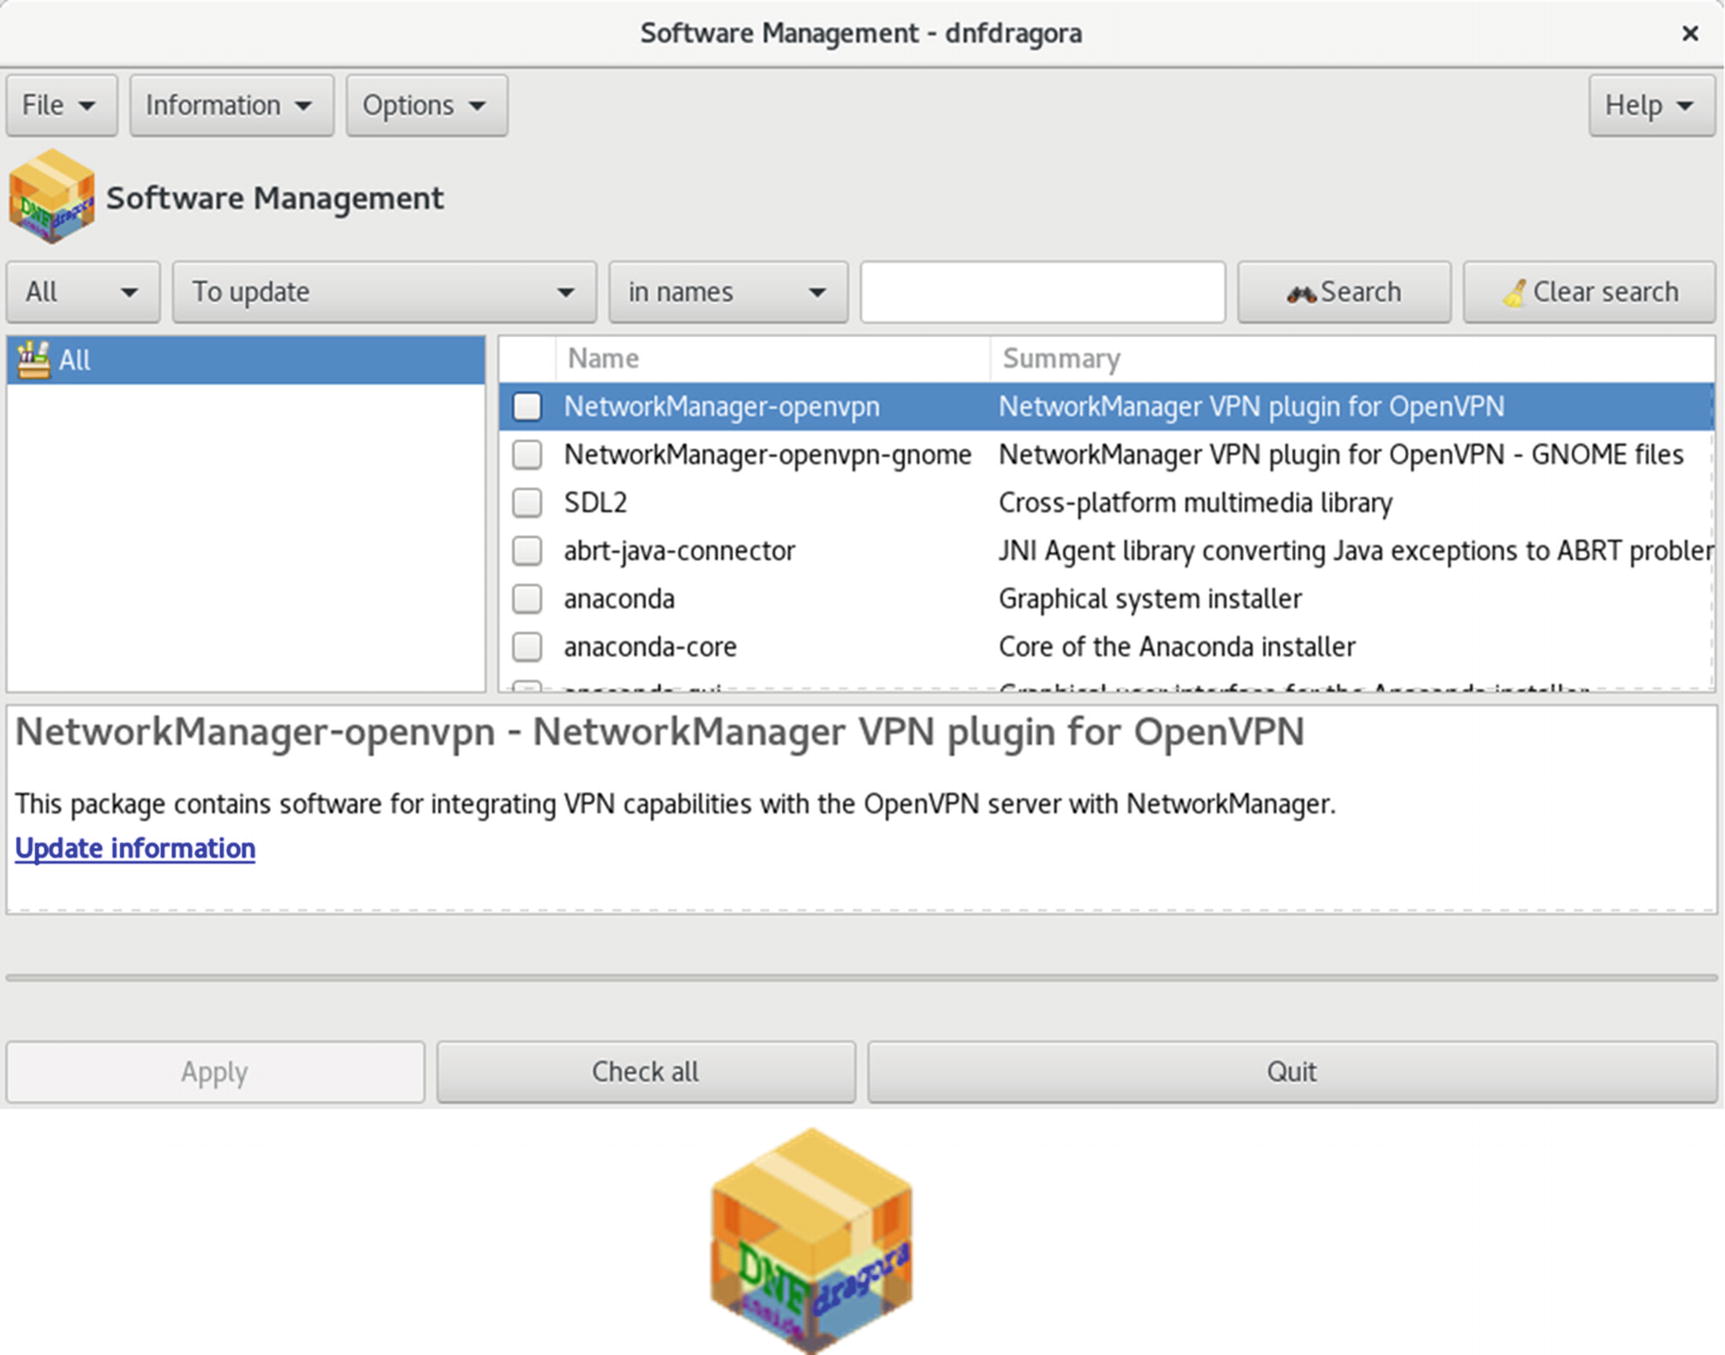
DnfDragora (dnfdragora)

DnfDragora groups

DnfDragora Repository Management
Installing Individual Packages with Your Browser
Web browser package install
On a GNOME desktop, packages that have already been downloaded can be installed with a simple right-click, then choose the install selection from the menu invoking GNOME Software, to perform the installation (gnome-software). As with the browser download, you are prompted to install the package.
Installing Some Popular Third-Party Software
For most third-party multimedia packages, you first install the DNF configuration file for a repository that carries them. Once configured, installation is a simple matter of using Software to search for and install packages. DNF downloads the package and performs the installation. It will also be careful to select the package for your architecture, such as x86_64 for 64-bit or i686 for 32-bit. DNF will ask for confirmation before installing, listing any dependent packages that will also have to be installed.
Multimedia Packages
For your third-party packages, you can use RPM Fusion, which carries collections of multimedia packages, including GStreamer and MPlayer. DVD/MPEG video players you might want include Xine, MPlayer, and VideoLAN. All support DVD, DVB, HDTV, H264, and MP3, provided the needed codecs are installed.
Tip
For information on multimedia applications available for Fedora, go to https://fedoraproject.org/wiki/Multimedia .
Many of the following packages are automatically selected and installed for you as dependents when you install MPlayer . It may be simpler to just install one of these, rather than try to install all the added packages separately.
a52dec | HDTV audio (ATSC A/52, AC3) |
faad2 | MPEG2/4 AAC audio decoding, high quality |
faac | MPEG2/4 AAC sound encoding and decoding |
libdca | DTS Coherent Acoustics playback capability |
lame | MPEG1 and MPEG2 audio decoding |
libdvbpsi | MPEG TS stream (DVB and PSI) decoding and encoding |
vlc | DVD video playback capability, VideoLAN project |
libdvdnav | DVD video menu navigation |
libdvdcss | DVD video commercial decoding, Livna repo ( http://rpm.livna.org ) |
x264 | H264/AVC decoding and encoding (high-definition media) |
gstreamer-plugins-bad | Not fully reliable codecs and tools for GStreamer, some with possible licensing issues |
gstreamer-plugins-ugly | Reliable video and audio codecs for GStreamer that may have licensing issues |
The Win32 codecs are not available on the Fedora repositories. Keep in mind that wmv files and Win32 codecs are already supported by the ffmpeg Linux codecs and will play on Totem and Dragon Player. You can download the Win32 codecs separately from the MPlayer website ( www.mplayerhq.hu/MPlayer/releases/codecs ).
Vendor Video Driver Support
You can obtain the NVIDIA vendor graphics drivers from RPM Fusion (the non-free repository). You can download and install them with DNF. RPM Fusion is the best repository for specialized kernel drivers and modules. Keep in mind, however, that due to open sourcing of some of the NVIDIA vendor driver software, the X.org and Nouveau open source versions are becoming almost as effective, especially for 2D display support. For normal usage, you might not need vendor driver support.
Installing the NVIDIA drivers can be a complex operation depending on what graphics card you have. The drivers are located on the RPM Fusion repository, not on Fedora. Check the RPM Fusion site for instructions on installing the NVIDIA drivers.
https://rpmfusion.org/Howto/Nvidia

Video Drivers install: GNOME Software Add-ons Hardware Drivers tab and install dialog
Using Repositories
A few repositories provide much of the software you will normally require. The main Fedora software repository will most likely contain the software you want. Always check this repository first, before trying a third-party repository. Some specialized applications, such as vendor-supplied graphics drivers, as well as third-party multimedia support, can be located at http://rpmfusion.org and at https://negativo17.org . These repositories make up a set of software sites that you can use to provide most of the functionality users expect from a desktop system. All are DNF-compliant, with DNF configuration files designed for specific Fedora releases.
To see what packages are available, you can use your web browser to access the sites. Fedora and RPM Fusion provide repodata directories for detailed listings.
To use DNF on a software repository, DNF has to be configured to access them. This is a simple matter of listing the site’s URL, both its web address and directory location. Configurations for repositories are placed in repo files located in the /etc/yum.repos.d directory on your Linux system. The repo files for Fedora are already installed. You must add repo files for RPM Fusion before you can access them with DNF. RPM Fusion provides RPM packages, free and non-free collections, named rpmfusion-free-release-28.noarch.rpm and rpmfusion-nonfree-release-28.noarch.rpm, on their website. When these are installed, they automatically set up the DNF configuration files. For RPM Fusion, these are rpmfusion-free.repo and rpmfusion-nonfree.repo, with corresponding update and development repo files.
The Fedora Repository, mirror link: Fedora-compliant software, fedora.repo | |
RPM Fusion: Repository for driver, multimedia, and other Fedora packages, rpmfusion-free.repo and rpmfusion-nonfree.repo | |
negativo17.org : Repository for driver, multimedia, and other Fedora packages, fedora-negativo17.repo |
Repository Repo Package Files
When you are installing packages, PackageKit , Yumex, and the dnf command automatically use the repo files to check your enabled repositories. One important exception to this rule is the initial install of the repository configuration files from third-party repositories. These configuration files (repo files) are usually contained in their own RPM packages. You download and install a repo package directly from the repository website, using your web browser. For example, the repo package for the RPM Fusion third-party Fedora DNF repository is rpmfusion-free-release-28.noarch.rpm. You download and install this package directly, using a web browser. Repository configuration files are located in the /etc/yum.repos.d directory and have the extension .repo.
Fedora Repository
The Fedora repository is already configured for use by DNF. To download any Fedora package, simply use GNOME Software, Packages, or enter the dnf command with the install option on a command line. The package will be detected, along with any dependent software, and you will be asked to confirm installation. The download and installation will be automatic. The first time you install a package from the Fedora repository, you are prompted to install the Fedora GPG key, used to authenticate the packages. Just click Yes to install the key.
RPM Fusion
The https://rpmfusion.org site provides access to popular software for many software applications, including multimedia applications such as MPlayer, as well as those not included with Fedora, due to licensing issues. Several of the more popular packages include the vendor NVIDIA graphics drivers (when available). RPM Fusion specializes in configuring sometimes difficult drivers for compatibility with Fedora. For example, you can download the NVIDIA Linux driver directly from the NVIDIA website and try to install it on your Fedora system. But there can be complications, and the driver could require additional configuration. As an alternative, RPM Fusion provides a version of the driver that has already been configured for Fedora.
To configure DNF on your system to access https://rpmfusion.org , just install the rpmfusion-free-release and rpmfusion-nonfree-release packages for your version of Fedora. These will install the rpmfusion-free.repo and rpmfusion-nonfree.repo configuration files in the /etc/yum.repos.d directory, as well as download the RPM Fusion GPG key. You can install the GPG manually or just wait until you install a package from RPM Fusion, in which case, DNF will install it for you, after prompting for approval. Check the RPM Fusion configuration page at http://rpmfusion.org for details. The name of the package will be something like rpmfusion-free-release.
You can download and install the package directly with the rpm command from within a terminal window. Use a preceding sudo command for administrative access. The RPM Fusion site’s configuration page provides a detailed example.
The GPG keys are included in the packages and installed automatically in the /etc/pki/rpm-gpg directory. They are named RPM-GPG-Key-rpmfusion-free-fedora and RPM-GPG-Key-rpmfusion-nonfree-fedora.
To see which packages are available on RPM Fusion, use your web browser to go to https://download1.rpmfusion.org . Here, you will find a listing of directories for each supported release. After selecting your release directory, you then choose your architecture, such as i386 (32-bit) or x86_64 (64-bit). Here, you will see a simple file listing of all available packages. Alternatively, on PackageKit, you could deselect all software sources except RPM Fusion, so that only the RPM Fusion packages are listed in the Software window.
Livna (dvdcss)
Adobe (Flash)
The Adobe repository provides access to the Adobe proprietary version of the Adobe Flash player for Linux. Adobe provides 32- and 64-bit software. The Fedora project Flash wiki explains the procedure in detail (see https://fedoraproject.org/wiki/Flash ).
First, download the RPM package for the repository configuration. Select YUM for Linux.
https://get.adobe.com/flashplayer/
Software Sources will list the repository as Adobe Systems Incorporated. You can then use GNOME Software and Packages to search for Flash and select the Flash package for installation. The Flash plugin package is flash-plugin and has the title “Adobe Flash Player”.
The first time you install any package from the Adobe repository, you will be prompted to install its package key. A dialog will be displayed with the message “Do You Trust the Source of the Packages?”. Click Yes to install the Adobe repository package key.
Restart Firefox to enable your Flash plugin. On the Tools ➤ Add-ons Plug-ins tab, you will find an entry for Flash.
For Linux-compatible Google applications , you should configure access to the Google repository, which allows you to install applications such as Picasa from PackageKit. Google installs a separate repository file for each major application. Google Chrome has a google-chrome.repo file, and Google Earth has a google-earth.repo file. The signing key is installed automatically. Follow the instructions for the RPM at: https://www.google.com/linuxrepositories/ .
DNF Configuration
DNF options are configured in the /etc/dnf/dnf.conf file, and the /etc/yum.repos.d directory holds repository (repo) files that list accessible DNF repositories. The repository files have the extension .repo. Check the dnf.conf man page for a listing of the different DNF options, along with entry formats. The dnf.conf file consists of different segments separated by bracket-encased headers, the first of which is always the main segment. Segments for different DNF server repositories can follow, beginning with the repository label encased in brackets. On Fedora, however, these are currently placed in separate repository files in the /etc/yum.repos.d directory. In addition to dnf.conf, DNF also supports an /etc/dnf directory that can hold additional configuration information.
/etc/dnf/dnf.conf
gpgcheck is a repository option that is set globally for the repo files. It checks for GPG software signatures. The installonly_limit option limits the number of packages that can be installed concurrently. The clean_requirements_on_remove option checks for and removes unused dependent packages (packages installed only as dependencies).
There are also general DNF options, such as logdir, which lists the location of DNF logs, and pluginspath, which specifies the location of DNF plugins. You can elect to keep the downloaded packages with keepcache.
Repository Files: /etc/yum.repos.d
The repository entries in the repo files begin with a bracket-enclosed server ID, a single-word unique name. Repository-specific options govern the access of software repositories. These include gpgcheck, which checks for GPG software signatures; gpgkey, which specifies the location of the signature; metalink, which references fast links from a mirror list; and mirrorlist, which references a URL holding mirror sites. The repository-specific name option provides a name for the repository. The URL reference is then assigned to the baseurl option. There should be only one baseurl option, but you can list several URLs for it, each on its own line. With the mirrorlist option, you can just list a URL for a list of mirrors, instead of listing each mirror separately in the baseurl option. The URL entries often use special variables, releasever and basearch. The releasever obtains the release information from the distroverpkg option set in the main segment. The basearch variable specifies the architecture you are using, as determined by DNF, such as i386. The enabled option actually turns on access to the repository. By setting it to 0, you choose not to access a specific repository. The gpgcheck option specifies that you should perform a GPG authentication check to make sure the download is intact. The enabled option will enable a repository, allowing DNF to use it. You can set the enable bit to 0 or 1 to turn off or on access to the repository.
The gpgkey option provides an authentication check on the package to make sure you have downloaded the appropriate version. Downloads can sometimes be intercepted and viruses inserted. The GPG key check protects against such attacks. It can also check to make sure the download is not corrupt or incomplete. The Fedora public GPG key may already be installed on your system. If you have already used DNF, you have already downloaded it. The Fedora GPG key allows you to access Fedora packages. The RPM Fusion free and non-free repositories use their own public keys, referenced with the gpgkey option in their repos files. The keys for all these repositories will be installed in the /etc/pki/rpmgpg directory.
Managing DNF Caches
With the keepcache option enabled, DNF will keep its downloaded packages in the /var/cache/dnf directory. Should you want to save or copy any particular packages, you can locate them there. Caching lets you easily uninstall and reinstall packages without having to download them again. The package is retained in the cache. If caching is disabled, the packages are automatically deleted after they are installed.
Manually Installing Packages with rpm
You can use the rpm command to install individual RPM packages that are not part of a DNF repository. Keep in mind that most software resides on DNF-supported, Fedora-compliant repositories. For such software, you use the dnf command or the Packages frontend. DNF has the advantage of automatically installing any dependent packages, whereas the rpm command, although it will detect needed packages, will not install them. Using only the rpm command, you would have to separately install any dependent packages in the correct order.
The rpm command is useful for packages that are not part of any DNF-supported repository, such as custom-made packages, and that have few or no dependent packages. You can also use the rpm command to bypass DNF, forcing installation of a particular package, instead of from DNF repositories.
The rpm command performs installation, removal, and verification of software packages. An RPM package is an archive of software files. Each archive has a name that ends with .rpm, indicating it is a software package that can be installed by the Red Hat Package Manager.
rpm Command Options
Option | Action |
|---|---|
-U | Updates a package |
-i | Installs a package |
-e | Removes a package |
-qi | Displays information for an installed package |
-ql | Displays a file list for an installed package |
-qpi | Displays information from an RPM package file (used for uninstalled packages) |
-qpl | Displays the file list from an RPM package file (used for uninstalled packages) |
-K | Authenticates and performs an integrity check on a package |
Package Security Check
DNF automatically performs integrity and authentication checks on all software downloaded from Fedora-compliant repositories, confirming that the package was obtained from a valid source, and that it has not been modified. Each repository configuration file in the /etc/yum.repos.d directory will have its gpgcheck option set to 1. Should you want to turn off this check for a particular repository, you can set its gpgcheck option to 0.
For packages not downloaded from a DNF repository, you may want to manually check their integrity and authentication. To authenticate a package, you check its digital signature. Packages are signed with encrypted digital keys that can be decrypted using the public key provided by the author of the package. This public key has to be downloaded and installed on the encryption tool used on your system. Fedora, along with most Linux distributions, uses the GNU Privacy Guard (GPG) encryption tool. To use a public key to authenticate an RPM package, you first must install it in the RPM key database. For all RPM packages that are part of the Fedora distribution, you can use the Fedora public key, placed during installation in the /etc/pki/rpm-gpg/ directory. Here, you will find the RPM GPG keys for all your configured repositories, including RPM Fusion.
The Fedora key is RPM-GPG-KEY-fedora-28-primary. Several keys are links to this key, such as RPM-GPG-KEY-28-fedora and RPM-GPG-KEY-fedora-28-x86_64. The RPM Fusion keys will have the same structure, with a primary key, such as RPM-GPG-KEY-rpmfusion-free-fedora-28-primary, and links to it, such as RPM-GPG-KEY-rpmfusion-free-fedora-28.
If you have downloaded an RPM package from another site, you can also download and install its public key, with which you can authenticate that package. For example, there are public keys for both the RPM Fusion free and non-free Fedora DNF repositories. These are included in the RPM Fusion DNF configuration files, which you can download and install, such as rpmfusion-free-release-28.noarch.rpm for RPM Fusion repositories. The keys will be automatically installed with the configuration.
Installing Source Code Applications
Some applications are available for Linux in source code format. These programs are stored in a compressed archive that you have to decompress and then extract. The resulting source code can then be configured, compiled, and installed on your system. Always check the README and INSTALL files that come with the source code to check the appropriate method for creating and installing that software. Be sure that you have installed all development packages onto your system. Development packages contain the key components, such as the compiler, GNOME and KDE headers and libraries, and preprocessors. You cannot compile the source code software without them.
Extracting the Archive: Archive Manager (File Roller)
From the desktop, you can extract compressed archives with Archive Manager. Archive Manager is the Fileroller application. Archive Manager displays the top-level contents of the archive, which you can browse if you want, even reading such text files as README and INSTALL. You also can see which files will be installed. To extract the archive, click Extract.
Configure, Compile, and Install
Extracting the archive creates a directory with the name of the software , in this case, freeciv-2.3.4. Once it is extracted, you must configure, compile, and install the software, using command-line commands (terminal window).