Oracle installations of the past can be large, complex, and cumbersome. The Oracle database administrator (DBA) plans and performs the installation because he or she knows how to troubleshoot and address problems as they arise through the steps. There are several configuration and installation options that need to be reviewed, so installing the Oracle software (binaries) is a task that requires proficiency by every DBA. Now with Oracle 18c and even with 12c, Oracle software installations have become more automated, but understanding the steps and configurations of installing is going to be important for the DBA. The installation of the Oracle binaries should be repeatable for large environments, and the DBA needs to set up the installs to be able to provision databases on-demand and consistently.
Tip
DBA tasks are changing and in cloud environments, the DBA tasks might be preparing self-service databases or not even needing to install Oracle binaries. Also, if you’re fairly new to Oracle, some of the overwhelming parts of Oracle installation have been simplified. Chances are that another DBA has probably already installed the Oracle binaries, and databases will just need to be created as needed. However, it is valuable to understand the component of the installation and the next section, “Understanding the Optimal Flexible Architecture.”
Many DBAs don’t use techniques for automating installations. Some are unaware of these methods; others perceive them as unreliable. Therefore, most DBAs typically use the graphical mode of the Oracle Universal Installer (OUI). Although the graphical installer is a good tool, it doesn’t lend itself to repeatability and automation. Running the graphical installer is a manual process during which you’re presented with options to choose from on multiple screens. Even if you know which options to select, you may still inadvertently click an undesired choice.
The graphical installer can also be problematic when you’re performing remote installations, and the network bandwidth is insufficient. In these situations, you can find yourself waiting for dozens of minutes for a screen to repaint itself on your local screen. You need a different technique for efficient installation on remote servers.
This chapter focuses on techniques for installing Oracle in an efficient and repeatable manner. This includes silent installations, which rely on a response file. A response file is a text file in which you assign values to variables that govern the installation. DBAs often don’t realize the powerful repeatability and efficiency that can be achieved by using response files.
Note
This chapter only covers installing the Oracle software. The task of creating a database is covered in Chapter 2. The cloud also changes the tasks and viewpoints of software and database creation, which will be discussed later in this chapter under the section, “Installing in the Cloud and Responsibilities of the DBA.”
Understanding the OFA
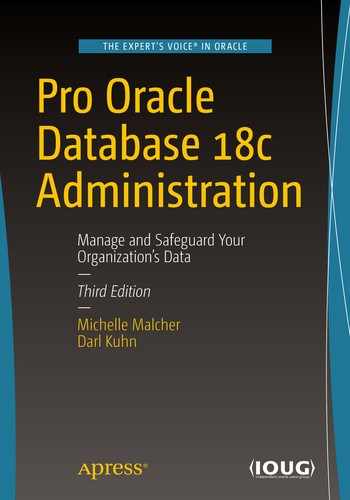
Before you install Oracle and start creating databases, you must understand Oracle’s Optimal Flexible Architecture (OFA) standard. This standard is widely employed for specifying consistent directory structures and also the file-naming conventions used when installing and creating Oracle databases.
Note
One irony of this ubiquitous OFA “standard” is that almost every DBA, in some manner, customizes it to fit the unique requirements of his or her environment.
The OFA standard provides ways to understand where log files are available on a consistent basis. If standards are followed, security, migrations, and automations are going to be easier to implement because of consistency across the environments. The consistent locations of the log files allow for the files to be used by other tools as well as being secured. The ORACLE_BASE directory in 18c provides a way to separate the ORACLE_HOME directories for read-only directories and have the writable files in the ORACLE_BASE. Read-only ORACLE_HOME directories allow for implementing separation of installation and configuration, which is important for the cloud and securing the environment. This simplifies patching as one image can be used for a mass rollout and distribute a patch to many servers and reduces downtime for patching and updating of the Oracle software.
Oracle’s OFA standard
Oracle inventory directory
Oracle base directory (ORACLE_BASE)
Oracle home directory (ORACLE_HOME)
Oracle network files directory (TNS_ADMIN)
Automatic Diagnostic Repository (ADR_HOME)
These directories are discussed in the following sections.
Oracle Inventory Directory
Oracle Base Directory
Typical names for the mount point include /u01, /ora01, /oracle, and /oracle01. You can name the mount point according to whatever your standard is for your environment. I prefer to use a mount-point name such as /ora01. It is short, and when I look at the mount points on a database server, I can immediately tell which are used for the Oracle database. Also, a short mount-point name is easier to use when you’re querying the data dictionary to report on the physical aspects of your database. Additionally, a shorter mount-point name makes for less typing when you’re navigating through directories via OS commands.
Oracle Home Directory
Note
Some DBAs dislike the db1 string on the end of the ORACLE_HOME directory and see no need for it. The reason for the db1 is that you may have two separate installations of binaries: a development installation and a test installation. If you don’t require that configuration in your environment, feel free to drop the extra string (db1).
Oracle Network Files Directory
Some Oracle utilities use the value TNS_ADMIN to locate network configuration files. This directory is defined as ORACLE_HOME/network/admin. It typically contains the tnsnames.ora and listener.ora Oracle Net files. The listener.ora files are now typically with the Oracle Grid installation and not in the database home. The listeners are normally maintained by the system that manages the grid, cluster, and ASM software. The tnsnames provide ways to connect to other databases so these files are part of the centralized directory or part of the database network files.
Tip
Sometimes DBAs will set TNS_ADMIN to point at one central directory location (such as /etc or /var/opt/oracle). This allows them to maintain one set of Oracle network files (instead of one for each ORACLE_HOME). This approach also has the advantage of not requiring the copying or moving of files when a database upgrade occurs, potentially changing the location of ORACLE_HOME.
Automatic Diagnostic Repository
Starting with Oracle Database 11g, the ADR_HOME directory specifies the location of the diagnostic files related to Oracle. These files are crucial for troubleshooting problems with the Oracle database. This directory is defined as ORACLE_BASE/diag/rdbms/lower(db_unique_name)/instance_name. You can query the V$PARAMETER view to get the values of db_unique_name and instance_name.
Now that you understand the OFA standard, you’ll next see how it’s used when installing the Oracle binaries. For instance, you’ll need to specify directory values for the ORACLE_BASE and ORACLE_HOME directories when running the Oracle installer.
Tip
See the Oracle Database Installation Guide for full details on OFA. This document can be freely downloaded from the Technology Network area of the Oracle web site ( http://otn.oracle.com ).
Installing Oracle
Suppose you’re new on the job, and your manager asks you how long it will take to install a new set of Oracle Database 18c software on a server. You reply that it will take less than an hour. Your boss is incredulous and states that previous DBAs always estimated at least a day to install the Oracle binaries on a new server. You reply, “Actually, it’s not that complicated, but DBAs do tend to overestimate installations, because it’s hard to predict everything that could go wrong.”
- 1.
Create the appropriate OS groups. In Oracle Database 18c, there are several OS groups that you can form and use to manage the level of granularity of SYSDBA permissions. Minimally, you’ll need to create an OS dba group and the OS oracle user.
- 2.
Ensure that the OS is configured adequately for an Oracle database.
- 3.
Obtain the database installation software from Oracle.
- 4.
Unzip the database installation software.
- 5.
If using the silent installer when first installing Oracle software on the box, create an oraInst.loc file. This step only needs to be done once per server. Subsequent installations do not require this step to be performed.
- 6.
Configure the response file and run the Oracle silent installer.
- 7.
Troubleshoot any issues.
- 8.
Apply any additional patches.
These steps are detailed in the following sections.
Note
Any version of the database that Oracle designates as a base release (10.1.0.2, 10.2.0.1, 11.1.0.6, 11.2.0.1, 12.1.0.1, 18.1.0.1, and so on) can be freely downloaded from the Technology Network area of the Oracle web site ( http://otn.oracle.com ). However, be aware that any subsequent patch downloads require a purchased license. In other words, downloading base software requires an Oracle Technology Network (OTN) login (free), whereas downloading a patch set requires a My Oracle Support account (for fee).
Step 1. Create the OS Groups and User
If you work in a shop with a system administrator (SA), then steps 1 and 2 usually are performed by the SA. If you don’t have a SA, then you have to perform these steps yourself (this is often the case in small shops, where you may be required to perform many different job functions). You need root access to accomplish these steps.
In the old days, a typical Oracle installation would contain one OS group (dba) and one OS user (oracle). You can still install the Oracle software, using this minimalistic, one-group, one-user approach; it works fine. If there is just one DBA in your shop, and you don’t need a more granular division of privileges among team members, then go ahead, and create only the dba group and the oracle OS user. There is nothing wrong with this method.
Mapping of OS Groups to Privileges Related to Backup and Recovery
OS Group | Database System Privilege | Authorized Operations | Where Referenced |
|---|---|---|---|
oinstall | none | OS privileges to install and upgrade Oracle binaries | inst_group variable in oraInst.loc file; also defined by UNIX_GROUP_NAME variable in response file |
dba | sysdba | All database privileges: start up, shut down, alter database, create and drop database, toggle archivelog mode, back up, and recover database | DBA_GROUP variable in response file or when prompted by OUI graphical installer |
oper | sysoper | Start up, shut down, alter database, toggle archivelog mode, back up, and recover database | OPER_GROUP variable in response file or when prompted by OUI graphical installer |
asmdba | sysdba for asm | Administrative privileges to Oracle automatic storage management (ASM) instances | n/a |
asmoper | sysoper for asm | Starting up and stopping the Oracle ASM instance | n/a |
asmadmin | sysasm | Mounting and dismounting of disk groups and other storage administration | n/a |
backupdba | sysbackup | New in 12c; privilege allowing user to start up, shut down, and perform all backup and recovery operations | BACKUPDBA_GROUP in response file or when prompted by OUI graphical installer |
dgdba | sysdg | New in 12c; associated with privileges related to managing Data Guard environments | DGDBA_GROUP variable in response file or when prompted by OUI graphical installer |
kmdba | syskm | New in 12c; associated with privileges related to encryption management | KMDBA_GROUP variable in response file or when prompted by OUI graphical installer |
Table 1-1 contains recommended group names. You don’t have to use the group names listed; you can adjust per your requirements. For example, if you have two separate groups using the same server, you may want to create two separate Oracle installations, each managed by different DBAs; the development DBA group might create and install the Oracle binaries with a group named dbadev, whereas a test group using the same box might install a separate set of Oracle binaries managed with a group named dbatest. Each group would have permissions to manipulate only its set of binaries. Or, as mentioned earlier, you may decide to use just one group (dba) for everything. It all depends on your environment.
If you need to modify a group, as root, use the groupmod command . If, for any reason, you need to remove a group (as root) use the groupdel command .
Step 2. Ensure That the OS Is Adequately Configured
Memory and swap space
System architecture (processor)
Free disk space (Oracle now takes almost 5GB of space to install)
Operating system version and kernel
Operating system software (required packages and patches)
Again, database server requirements vary quite a bit by OS and database version. You can download the specific installation manual from the Documentation page of the Oracle web site ( www.oracle.com/documentation ).
Note
The OUI displays any deficiencies in OS software and hardware. Running the installer is covered in step 6.
Step 3. Obtain the Oracle Installation Software
Usually, the easiest way to obtain the Oracle software is to download it from the Oracle web site. Navigate to the software download page ( www.oracle.com/technology/software ), and download the Oracle database version that is appropriate for the type of OS and hardware on which you want to install it (Linux, Solaris, Windows, and so on).
Step 4. Unzip the Files
For previous versions, it was recommended to unzip the files in a standard directory where you can place the Oracle installation media. Now with Oracle 18c, there are different ways that the media is presented, imaged based or by RPM. The image software must now be extracted in the directory of the ORACLE_HOME. The zipped file can be placed in a temporary directory but extracted to the ORACLE_HOME. The runInstaller will run from the ORACLE_HOME directory for installation.
The zip files can be downloaded or copied over to a temporary directory such as /tmp or /home/oracle.
Tip
On some installations of previous versions of Oracle, you may find that the distribution file is provided as a compressed cpio file. You can uncompress and unbundle the file with one command, as follows: $ cat 10gr2_db_sol.cpio.gz | gunzip | cpio -idvm
Step 5. Creating oraInst.loc File
If an oraInst.loc file already exists on your server, then you can skip this step. Creating the oraInst.loc file only needs to be performed the first time you install binaries on a server, using the silent install method. If you’re using the OUI graphical installer, then the oraInst.loc file is created automatically for you.
Oracle inventory directory path
Name of OS group that has permissions for installing and upgrading Oracle software
The Oracle inventory directory path is the location of files associated with managing Oracle installations and upgrades. Typically, there is one Oracle inventory per host. Within this directory structure is the inventory.xml file, which contains a record of where various versions of Oracle have been installed on the server.
The Oracle inventory OS group has the OS permissions required for installing and upgrading Oracle software. Oracle recommends that you name this group oinstall. You’ll find that sometimes DBAs assign the inventory group to the dba group. If your environment doesn’t require a separate group (such as oinstall), then using the dba group is fine.
Step 6. Configure the Response File, and Run the Installer
Silent installs don’t require the availability of X Window System software.
You avoid performance issues with remote graphical installs, which can be extremely slow when trying to paint screens locally.
Silent installs can be scripted and automated. This means that every install can be performed with the same, consistent standards, regardless of which team member is performing the install (I even have the SA install the Oracle binaries this way).
The key to performing a silent install is to use a response file.
Depending on the version of Oracle and the OS platform, the names and number of response files that you find may be quite different. The next two sections show two scenarios: an Oracle Database 12c Release 1 silent install and an Oracle Database 18c Release 1 silent install.
Keep in mind that the format of response files can differ quite a bit, depending on the Oracle database version. For example, there are major differences between Oracle Database 11g and 12c even between release 2 of these versions. When you install a new release, you must inspect the response file and determine which parameters must be set. Be sure to modify the appropriate parameters for your environment. If you’re unsure what to set the ORACLE_HOME and ORACLE_BASE values to, see the section “Understanding the Optimal Flexible Architecture,” earlier in this chapter, for a description of the OFA standard directories.
If you don’t set DECLINE_SECURITY_UPDATES to TRUE, then you will be expected to provide your MOS login information. Failure to do so will cause the installation to fail. After you’ve configured your response file, you can run the Oracle installer in silent mode. Note that you have to enter the entire directory path for the location of your response file.
Note
On Windows the setup.exe command is equivalent to the Linux/Unix runInstaller command .
Oracle Database 12c Release 1 Scenario
Be sure to modify the appropriate parameters for your environment. If you’re unsure what to set the ORACLE_HOME and ORACLE_BASE values to, see the section “Understanding the Optimal Flexible Architecture,” earlier in this chapter, for a description of the OFA standard directories.
The previous command is entered on two lines. The first line is continued to the second line via the backward slash ().
Run the root.sh script as the root OS user. Then, you should be able to create an Oracle database (database creation is covered in Chapter 2).
Oracle Database 18c Release 1 Scenario
Be sure to modify the appropriate parameters for your environment. If you’re unsure what to set the ORACLE_HOME and ORACLE_BASE values to, see the section “Understanding the Optimal Flexible Architecture,” earlier in this chapter, for a description of the OFA standard directories.
The previous command is entered on two lines. The first line is continued to the second line via the backward slash ().
Run the root.sh script as the root OS user. Then, you should be able to create an Oracle database (database creation is covered in Chapter 2). The configuration assistants can run in the response file or silent mode to run the Net Configuration and Database Configuration Assistant.
Step 7. Troubleshoot Any Issues
Also, be sure to provide the correct command-line syntax when running a response file. If you incorrectly specify or misspell an option, you may receive a misleading error message, such as DISPLAY not set. When using a response file, you don’t need to have your DISPLAY variable set. This message is confusing because, in this scenario, the error is caused by an incorrectly specified command-line option and has nothing to do with the DISPLAY variable. Check all options entered from the command line and ensure that you haven’t misspelled an option.
Check your inventory.xml file (in the oraInventory/ContentsXML directory), and make sure there isn’t a conflict with an already existing Oracle home name.
Useful Files for Troubleshooting Oracle Installation Issues
File name | Directory Location | Contents |
|---|---|---|
oraInst.loc | The location of this file varies by OS. On Linux the file is in /etc; on Solaris, it’s in /var/opt/oracle. | oraInventory directory location and installation OS group |
inst.loc | \HKEY_LOCAL_MACHINE\SoftwareOracle (Windows registry) | Inventory information |
inventory.xml | oraInventory/ContentsXML/inventory.xml | Oracle home names and corresponding directory location |
.log files | oraInventory/logs | Installation log files, which are extremely useful for troubleshooting |
Step 8. Apply Any Additional Patches
As already stated before the first step, the Oracle software is available in the base releases. However, if there are additional releases, patch sets, and security patches available, these should all be applied before rolling out a new set of Oracle binaries. The installation is going to be for a different reason on the server or in the environment, and the installation should be the same as the other environments with a possible exception of security patching.
Sections later in this chapter, “Upgrading Oracle Software” and “Applying Interim Patches,” have the details to apply the patches, but it is important to have this step here to get to the latest version of the software before releasing it for use. Right after the install of the binaries is a good time to make sure everything has been updated and ready for the database to be created.
Installing with a Copy of an Existing Installation
DBAs sometimes install Oracle software by using a utility such as tar to copy an existing installation of the Oracle binaries to a different server (or a different location on the same server). This approach is fast and simple (especially compared with downloading and running the Oracle installer). This technique allows DBAs to easily install the Oracle software on multiple servers, while ensuring that each installation is identical.
The new ways of delivering the media files provide ways to unzip in the ORACLE_HOME directory, or just run the rpm package that will run the installation. The advantage of using this method is be able to copy over a patched set of the binaries. There cannot be any databases running during this time or Oracle processes during this time of copying the files to provide a static copy of the files.
- 1.
Copy the binaries, using an OS utility.
- 2.
Attach the Oracle home.
These steps are detailed in the next two sections.
Tip
See MOS note 300062.1 for instructions on how to clone an existing Oracle installation.
Step 1. Copy the Binaries, Using an OS Utility
When the tar command db_1 directory beneath the /u01/app/oracle/product/18.1.0.1 directory. directory.
Tip
Use the tar -tvf <tarfile_name> command to preview which directories and files are restored without restoring them.
Absolute Paths vs. Relative Paths
Specifying an absolute path with non-GNU versions of tar can be dangerous. These older versions of tar restore the contents with the same directories and file names from which they were copied. This means that any directories and file names that previously existed on disk are overwritten.
The previous example uses the relative pathname.
You don’t have to worry about absolute vs. relative paths on most Linux systems. This is because these systems use the GNU version of tar. This version strips off the forward slash (/) and restores files relative to where your current working directory is located.
Use the man tar command if you’re not sure whether you have a GNU version of the tar utility. You can also use the tar -tvf <tarfile name> command to preview which directories and files are restored to what locations.
Step 2. Attach the Oracle Home
One issue with using a copy of an existing installation to install the Oracle software is that if you later attempt to upgrade the software, the upgrade process will throw an error and abort. This is because a copied installation isn’t registered in oraInventory. Before you upgrade a set of binaries installed via a copy, you must first register the Oracle home so that it appears in the inventory.xml file. This is called attaching an Oracle home.
To attach an Oracle home, you need to know the location of your oraInst.loc file on your server. On Linux servers this file is usually located in the /etc directory. On Solaris this file can generally be found in the /var/opt/oracle directory.
Installing Read-Only Oracle Home
A new feature of Oracle 18c is to have a read-only Oracle Home for the binaries. The database tools and processes will be under the ORACLE_BASE path instead of ORACLE_HOME path. The ORACLE_HOME directory will have the database configurations and logs for the databases created.
A read-only Oracle binary home will separate the software from the database information and allows for sharing the software across different deployments. This enables seamless patching and updating of the binaries to minimize database downtime and allows for applying patches to one image in order to distribute to several servers. This separation also simplifies the provisioning because the focus can be on the database configuration.
There are now additional environment variables that will contain the directory path for the Oracle Home, ORACLE_BASE_HOME, ORACLE_BASE_CONFIG.
If a directory is returned, the Oracle home is in read-only.
Upgrading Oracle Software
You can also upgrade a version of the Oracle software, using the silent installation method. Begin by downloading the upgrade version from the MOS web site ( http://support.oracle.com ) (you need a valid support contract to do this). Read the upgrade documentation that comes with the new software. The upgrade procedure can vary quite a bit, depending on what version of Oracle you’re using.
For the most recent upgrades that I’ve performed, the procedure was much like installing a new set of Oracle binaries. You can use the OUI in either graphical or silent mode to install the software. See the section “Installing Oracle,” earlier in this chapter, for information on using the silent mode installation method.
Database migrations to new version are successful using the Database Upgrade Assistant (DBUA). This will perform a migration to the latest version of the database and upgrade the services. New with 18c the services must be upgraded with this method, install the latest version of the software and then to complete the migration run the DBUA.
Note
Upgrading the Oracle software isn’t the same as upgrading an Oracle database. This section only deals with using the silent install method for upgrading the Oracle software. Additional steps are involved for upgrading a database. See MOS note 730365.1 for instructions on how to upgrade a database.
- 1.
Shut down any databases using the Oracle home to be upgraded.
- 2.
Upgrade the Oracle home binaries.
- 3.
Start up the database and run any required upgrade scripts.
- 1.
Leave the existing Oracle home as it is—don’t upgrade it.
- 2.
Install a new Oracle home that is the same version as the old Oracle home.
- 3.
Upgrade the new Oracle home to the desired version.
- 4.
When you’re ready, shut down the database using the old Oracle home; set the OS variables to point to the new, upgraded Oracle home; start up the database; and run any required upgrade scripts.
Which of the two previous scenarios is better? Scenario B has the advantage of leaving the old Oracle home as it is; therefore, if, for any reason, you need to switch back to the old Oracle home, you have those binaries available. Scenario B has the disadvantage of requiring extra disk space to contain two installations of Oracle home. This usually isn’t an issue, because after the upgrade is complete, you can delete the old Oracle home when it’s convenient.
Databases can also be upgraded to a new container database in a multitenant environment. This will be discussed more in Chapter 22, but the pluggable databases can be moved to a container database that has already been upgraded.
Tip
Consider using the Database Upgrade Assistant (DBUA) to upgrade an Oracle database.
Reinstalling After Failed Installation
Files in the ORACLE_HOME directory are specified in the response file.
An existing Oracle home and location in your oraInventory/ContentsXML/inventory.xml file match what you have specified in the response file.
Then, edit the inventory.xml file with an OS utility (such as vi), and remove the line that contains the Oracle home information of your previously failed installation. You can now attempt to execute the runInstaller utility again.
Applying Interim Patches
- 1.
Obtain the patch from MOS (requires a valid support contract).
- 2.
Unzip the patch file.
- 3.
Carefully read the README.txt file for special instructions.
- 4.
Shut down any databases and processes using the Oracle home to which the patch is being applied.
- 5.
Apply the patch.
- 6.
Verify that the patch was installed successfully.
Tip
See MOS note 242993.1 for more information regarding the opatch utility.
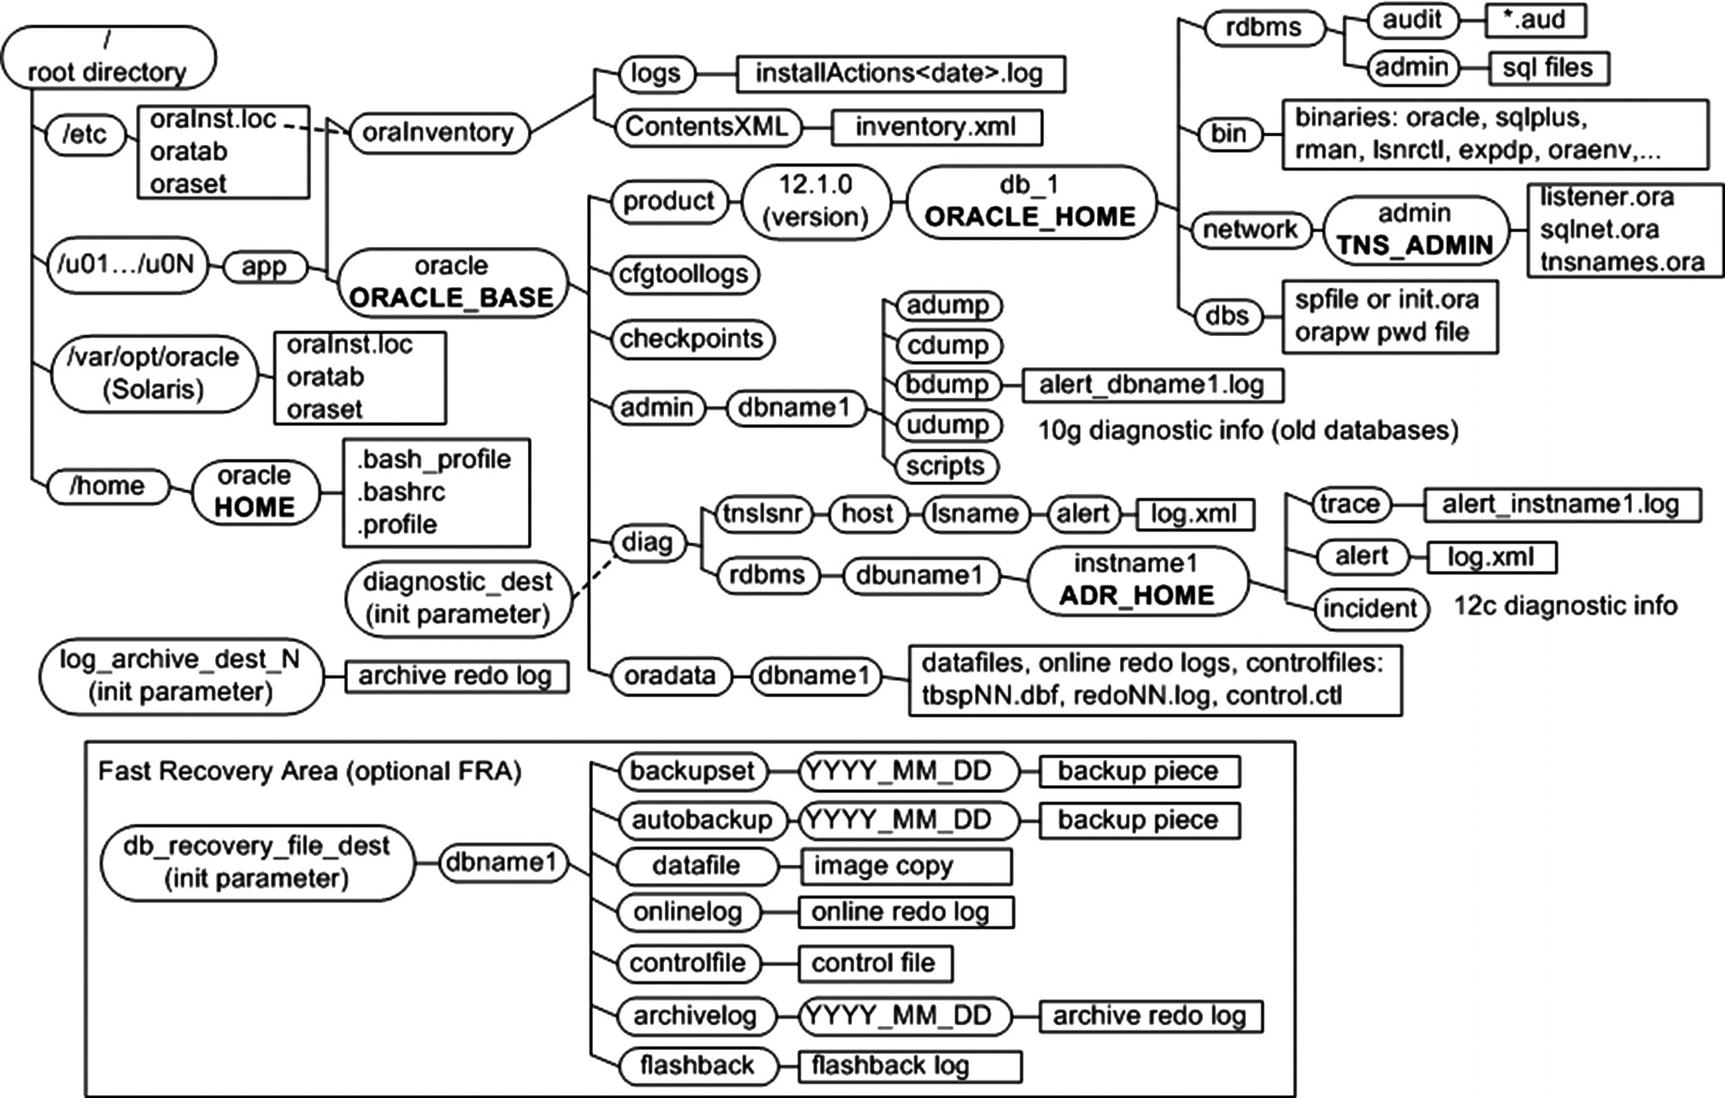
Installing Remotely with the Graphical Installer
The installation can be performed once using the GUI for a Read-Only Oracle Home. In today’s global environment, DBAs often find themselves tasked with installing Oracle software on remote Linux/Unix servers. In these situations, I strongly suggest that you use the silent installation mode with a response file (as mentioned earlier). However, if you want to install Oracle on a remote server via the graphical installer, this section of the chapter describes the required steps.
Note
If you’re in a Windows-based environment, use the Remote Desktop Connection or Virtual Network Computing (VNC) to install software remotely.
Components needed for a remote Oracle graphical installation
- 1.
Install software on the local computer that allows for X Window System emulation and secure networking.
- 2.
Start an X session on the local computer and issue the startx command .
- 3.
Copy the Oracle installation files to the remote server.
- 4.
Run the xhost command.
- 5.
Log in to the remote computer from an X terminal.
- 6.
Ensure that the DISPLAY variable is set correctly on the remote computer.
- 7.
Execute the runInstaller utility on the remote server.
- 8.
Troubleshoot.
These steps are explained in the following sections.
Step 1. Install X Software and Networking Utilities on the Local PC
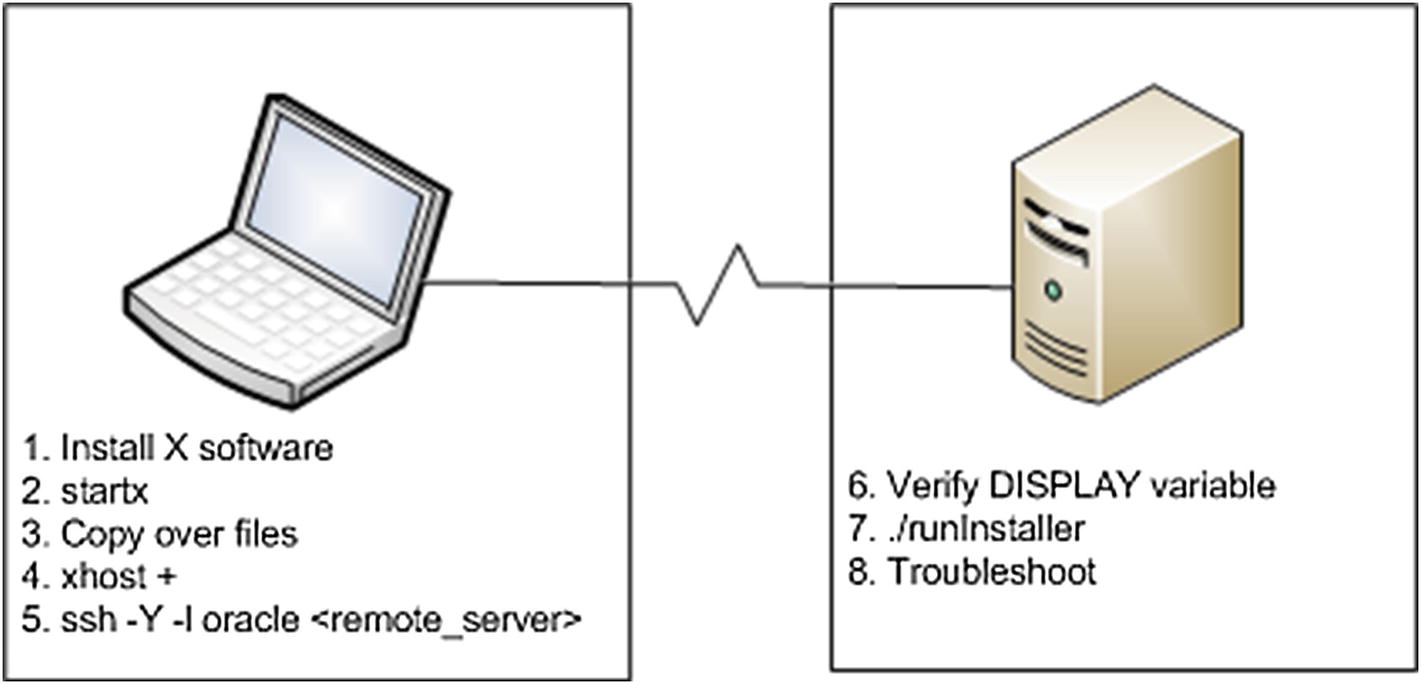
If you’re installing Oracle on a remote server, and you’re using your home personal computer (PC), then you first need to install software on your PC that allows you to run X Window System software and to run commands such as ssh (secure shell) and scp (secure copy). Several free tools are available that provide this functionality. One such tool is Cygwin, which you can download from the Cygwin web site ( http://x.cygwin.com ). Be sure to install the packages that provide the X emulation and secure networking utilities, such as ssh and scp.
Step 2. Start an X Session on the Local Computer
Running xeyes utility on a local computer
If you can’t get a utility such as xeyes to execute, stop at this step until you get it working. You must have correctly functioning X software before you can remotely install Oracle, using the graphical installer.
Step 3. Copy the Oracle Installation Media to the Remote Server
Step 4. Run the xhost Command
Step 5. Log In to the Remote Computer from X
Step 6. Ensure that the DISPLAY Variable Is Set Correctly on the Remote Computer
If your DISPLAY variable is set to localhost:10.0, then proceed to the next step. Otherwise, follow the next set of recommendations.
Tip
If you don’t know your local home computer name, on Windows you can look in the Control Panel, then System, then reference the Computer name.
Step 7. Execute the runInstaller Utility
If everything goes well, you should see a screen appear in order to walk through the steps of the installation.
From here, you can point and click your way through an Oracle installation of the software. Many DBAs are more comfortable installing the software through a graphical screen. This is a particularly good method if you aren’t familiar with Oracle’s installation process and want to be prompted for input and presented with reasonable default values.
Step 8. Troubleshoot
Setting the DISPLAY OS variable on the remote server is also crucial. This allows you to log in to another host remotely and display an X application back to your local computer. The DISPLAY variable must be set on the remote database server to contain information that points it to the local computer on which you want the graphical screen displayed.
Installation in the Cloud
Oracle 18c is a database released for the cloud first. Oracle 18c for server installation became available several months after the use in the cloud and being able to perform installs in the cloud. Oracle provides a couple of different options for databases in the cloud, and a common one is Infrastructure as a Service (IaaS). IaaS provides the infrastructure, server, OS, and users that are needed to be able to install your own software and then create databases. Database provisioning is another option, Platform as a Service (PaaS) can provide the Oracle binaries, and just the databases will need to be created on that cloud service.
Since we have been discussing the software installation on a server and existing OS, this will be an install on IaaS in the cloud. The database binaries would walk through the same steps as described throughout this chapter. Configuration of the cloud service provided would be based on the amount of storage, CPU, and memory requested. There is flexibility of numbers of CPUs and memory that can be requested and then expanded for future needs quickly and efficiently in the cloud.
Oracle is also available in AWS where it can be selected as an AMI from the store and installed. Along with this option in other platforms, Oracle can be installed as part of an IaaS. IaaS is available in the different cloud offerings, AWS, and others, but some of the server configurations are going to be optimized on the Oracle Cloud and different options of the licensing might be available. These are discussions with the Oracle sales team to get licenses and requirements planned, but a decision to go to the cloud needs to be discussed with the business and decide if the flexible resources and the time to deployment are going to be of value.
In the Oracle Cloud, the database deployment is chosen, with an available Domain and shape of the bare-metal machines based on the CPU and other resources for the IaaS server. The software edition is the next choice, which is also the same with non-cloud installations of the binary. Using IaaS in the cloud, their ssh keys, root access, and other access such as SYS that is just for the customer and not accessible by the Oracle cloud provider. This is just for the server that has been requested. The configuration assistants can be run later after the binary install or select to run immediately after the binaries are installed.
After these basic choices, the installation happens in the cloud. The server is then ready for use to create databases and set up for management and monitoring. These steps will be discussed later in the following chapters to include how to also manage the databases in the cloud.
Summary
This chapter detailed techniques for efficiently installing the Oracle binaries. Oracle 18c provides new ways to deploy the Oracle binaries including a Read-Only Oracle Home. These methods are especially useful if you work in environments in which you are geographically separated from the database servers. The Oracle silent installation method is efficient because it doesn’t require graphical software and uses a response file that helps enforce consistency from one installation to the next. When working in chaotic and constantly changing environments, you should benefit from the installation tips and procedures described here.
The Oracle binaries are installed in cloud environments when using Infrastructure as a Service (IaaS), and this makes provisioning of servers and databases very efficient. IaaS allow for the DBAs to have full access of the provisioned server to perform database creation, but the installation of the database binaries is simplified and similar to a response file install. Many DBAs feel more comfortable using Oracle’s graphical installer for installing the database software. However, the graphical installer can be troublesome when the server is in a remote location or embedded deeply within a secure network. A slow network or a security feature can greatly impede the graphical installation process. In these situations, make sure you correctly configure the required X software and OS variables (such as DISPLAY).
It’s critical as a DBA to be an expert in Oracle installation procedures. If the Oracle installation software isn’t correctly installed, you won’t be able to successfully create a database. Once you have properly installed Oracle, you can go on to the next step of starting the background processes and creating a database. The topics of starting Oracle and issuing and creating a database are discussed next, in Chapter 2.