Sometimes, DBAs and developers do not grasp the utility of external tables. The Oracle external table feature enables you to perform a few operations:
Transparently select information from OS files that has delimited or fixed fields into the database.
Create platform-independent dump files that can be used to transfer data. You can also create these files as compressed and encrypt them for efficient and secure data transportation.
Allow SQL to be run inline against the file data without creating an external table in the database.
Tip
Comma Separated files (CSV) files are a type of flat files and may be referred to as just flat files.
One common use of an external table is the selection of data from an OS flat file via SQL*Plus. Simply put, external tables allow for reading data in the database from flat files without having to load the data into a table first. This will allow for transformations to be done against the files while loading the needed data into the database. Using the external table can simplify or enhance ETL processes (Extract Transformation and Loading). When using an external table in this mode, you must specify the type of data in the file and how the data are organized. You can select from an external table but are not permitted to modify the contents (no inserts, updates, or deletes).
You can also use an external table feature that enables you to select data from the database and write that information to a binary dump file. The definition of the external table determines what tables and columns will be used to unload data. Using an external table in this mode provides a method for extracting large amounts of data to a platform-independent file that you can later load into a different database.
All that is required to enable external tables is to first create a database directory object that specifies the location of the OS file. Then, you use the CREATE TABLE...ORGANIZATION EXTERNAL statement to make the database aware of OS files that can be used as sources or targets of data.
This chapter starts by comparing using SQL*Loader—Oracle’s traditional data-loading utility—with external tables for the loading of data into the database. Several examples illustrate the flexibility and power of using external tables as a loading and data-transformation tool. The chapter finishes with an external table example of how to unload data into a dump file.
SQL*Loader vs. External Tables
One general use of an external table is to employ SQL to load data from an OS file into a regular database table. This facilitates the loading of large amounts of data from flat files into the database. In older versions of Oracle, this type of loading was performed via SQL*Loader or through custom Pro*C programs.
Almost anything you can do with SQL*Loader, you can achieve with external tables. An important difference is that SQL*Loader loads data into a table, and external tables do not need to do this. External tables are more flexible and intuitive than SQL*Loader. Additionally, you can obtain very good performance when loading data with external tables by using direct path and parallel features.
A quick comparison of how data are loaded into the database via SQL*Loader and external tables highlights the usage. Listed next are the steps that you use to load and transform data with SQL*Loader:
1.
Create a parameter file that SQL*Loader uses to interpret the format of the data in the OS file.
2.
Create a regular database table into which SQL*Loader will insert records. The data will be staged here until they can be further processed.
3.
Run the SQL*Loader sqlldr utility to load data from the OS file into the database table (created in step 2). When loading data, SQL*Loader has some features that allow you to transform data. This step is sometimes frustrating because it can take several trial-and-error runs to correctly map the parameter file to the table and corresponding columns.
4.
Create another table that will contain the completely transformed data.
5.
Run SQL to extract the data from the staging table (created in step 2), and then transform and insert the data into the production table (created in step 4).
Compare the previous SQL*Loader list to the following steps for loading and transforming data, using external tables:
1.
Execute a CREATE TABLE...ORGANIZATION EXTERNAL script that maps the structure of the OS file to table columns. After this script is run, you can directly use SQL to query the contents of the OS file.
2.
Create a regular table to hold the completely transformed data.
3.
Run SQL statements to load and fully transform the data from the external table (created in step 1) into the table created in step 2.
For many shops, SQL*Loader underpins large data-loading operations. It continues to be a good tool for that task. However, you may want to investigate using external tables. External tables have the following advantages:
Loading data with external tables is more straightforward and requires fewer steps.
The interface for creating and loading from external tables is SQL*Plus. Many DBAs/developers find SQL*Plus more intuitive and powerful than SQL*Loader’s parameter file interface.
You can view data (via SQL) in an external table before they’re loaded into a database table.
You can load, transform, and aggregate the data without an intermediate staging table. For large amounts of data, this can be a huge space savings.
The next several sections contain examples of using external tables to read from OS files.
Loading CSV Files into the Database
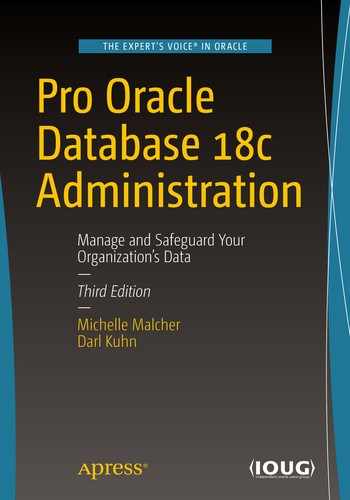
You can load small or very large CSV flat files into the database, using external tables and SQL. Figure 14-1 shows the architectural components involved with using an external table to view and load data from an OS file. A directory object is required that specifies the location of the OS file. The CREATE TABLE...ORGANIZATION EXTERNAL statement creates a database object that SQL*Plus can use to directly select from the OS file.
Figure 14-1
Architectural components of an external table used to read a flat file
Here are the steps for using an external table to access an OS flat file:
1.
Create a database directory object that points to the location of the CSV file.
2.
Grant read and write privileges on the directory object to the user creating the external table. (Even though it is easier to use a DBA-privileged account, with various security options, access to the tables and data might not be available to the account. Permissions need to be verified and granted as needed.)
3.
Run the CREATE TABLE...ORGANIZATION EXTERNAL statement.
4.
Use SQL*Plus to access the contents of the CSV file.
In this example, the flat file is named ex.csv and is located in the /u01/et directory. It contains the following data:
5|2|0|0|12/04/2011|Half
6|1|0|1|09/06/2012|Quarter
7|4|0|1|08/10/2012|Full
8|1|1|0|06/15/2012|Quarter
Note
Some of the delimited file examples in this chapter are separated by characters other than a comma, such as a pipe (|). The character used depends on the data and the user supplying the flat file. A comma is not always useful as the delimiter, as the data being loaded may contain commas as valid characters within the data. Fixed field length can also be used instead of using a delimiter.
Creating a Directory Object and Granting Access
First, create a directory object that points to the location of the flat file on disk:
SQL> create directory exa_dir as '/u01/et';
This example uses a database account that has the DBA role granted to it; therefore, you don’t need to grant READ and WRITE on the directory object to the user (your account) that is accessing the directory object. If you are not using a DBA account to read from the directory object, then grant these privileges to the account, using this object:
SQL> grant read, write on directory exa_dir to reg_user;
Creating an External Table
Then, fashion the script that creates the external table that will reference the flat file. The CREATE TABLE...ORGANIZATION EXTERNAL statement provides the database with the following information:
How to interpret data in the flat file and a mapping of data in file to column definitions in the database
A DEFAULT DIRECTORY clause that identifies the directory object, which in turn specifies the directory of the flat file on disk
The LOCATION clause, which identifies the name of the flat file
The next statement creates a database object that looks like a table but that is able to retrieve data directly from the flat file:
SQL> create table exadata_et(
exa_id NUMBER
,machine_count NUMBER
,hide_flag NUMBER
,oracle NUMBER
,ship_date DATE
,rack_type VARCHAR2(32)
)
organization external (
type oracle_loader
default directory exa_dir
access parameters
(
records delimited by newline
fields terminated by '|'
missing field values are null
(exa_id
,machine_count
,hide_flag
,oracle
,ship_date char date_format date mask "mm/dd/yyyy"
,rack_type)
)
location ('ex.csv')
)
reject limit unlimited;
An external table named EXADATA_ET is created when you execute this script. Now, use SQL*Plus to view the contents of the flat file:
If you are currently working with SQL*Loader and want to convert to using external tables, you can use SQL*Loader to generate the SQL required to create the external table, using the EXTERNAL_TABLE option. A small example will help demonstrate this process. Suppose you have the following table DDL:
SQL> create table books
(book_id number,
book_desc varchar2(30));
In this situation, you want to load the following data from a CSV file into the BOOKS table. The data are in a file named books.dat and are as follows:
1|RMAN Recipes
2|Linux for DBAs
3|SQL Recipes
You also have a books.ctl SQL*Loader control file that contains the following data:
load data
INFILE 'books.dat'
INTO TABLE books
APPEND
FIELDS TERMINATED BY '|'
(book_id,
book_desc)
You can use SQL*Loader with the EXTERNAL_TABLE=GENERATE_ONLY clause to generate the SQL required to create an external table; for example,
The prior line of code does not load any data. Rather it creates a file, named books.log, that contains the SQL required to create an external table. Here is a partial listing of the code generated:
CREATE TABLE "SYS_SQLLDR_X_EXT_BOOKS"
(
"BOOK_ID" NUMBER,
"BOOK_DESC" VARCHAR2(30)
)
ORGANIZATION external
(
TYPE oracle_loader
DEFAULT DIRECTORY SYS_SQLLDR_XT_TMPDIR_00000
ACCESS PARAMETERS
(
RECORDS DELIMITED BY NEWLINE CHARACTERSET US7ASCII
BADFILE 'SYS_SQLLDR_XT_TMPDIR_00000':'books.bad'
LOGFILE 'books.log_xt'
READSIZE 1048576
FIELDS TERMINATED BY "|" LDRTRIM
REJECT ROWS WITH ALL NULL FIELDS
(
"BOOK_ID" CHAR(255)
TERMINATED BY "|",
"BOOK_DESC" CHAR(255)
TERMINATED BY "|"
)
)
location
(
'books.dat'
)
)REJECT LIMIT UNLIMITED;
Before you run the prior code, create a directory that points to the location of the books.dat file; for example,
SQL> create or replace directory SYS_SQLLDR_XT_TMPDIR_00000
as '/u01/sqlldr';
Now, if you run the SQL code generated by SQL*Loader, you should be able to view the data in the SYS_SQLLDR_X_EXT_BOOKS table:
SQL> select * from SYS_SQLLDR_X_EXT_BOOKS;
Here is the expected output:
BOOK_ID BOOK_DESC
---------- ------------------------------
1 RMAN Recipes
2 Linux for DBAs
3 SQL Recipes
This is a powerful technique, especially if you already have existing SQL*Loader control files and want to ensure that you have the correct syntax when converting to external tables.
Viewing External Table Metadata
At this point, you can also view metadata regarding the external table. Query the DBA_EXTERNAL_TABLES view for details:
Additionally, you can select from the DBA_EXTERNAL_LOCATIONS table for information regarding any flat files referenced in an external table:
SQL> select
owner
,table_name
,location
from dba_external_locations;
Here is some sample output:
OWNER TABLE_NAME LOCATION
---------- --------------- --------------------
SYS EXADATA_ET ex.csv
Loading a Regular Table from the External Table
Now, you can load data contained in the external table into a regular database table. When you do this, you can take advantage of Oracle’s direct-path loading and parallel features. This example creates a regular database table that will be loaded with data from the external table:
SQL> create table exa_info(
exa_id NUMBER
,machine_count NUMBER
,hide_flag NUMBER
,oracle NUMBER
,ship_date DATE
,rack_type VARCHAR2(32)
) nologging parallel 2;
You can direct-path load this regular table (via the APPEND hint) from the contents of the external table, as follows:
SQL> insert /*+ APPEND */ into exa_info select * from exadata_et;
You can verify that the table was direct-path loaded by attempting to select from it before you commit the data:
SQL> select * from exa_info;
Here is the expected error:
ORA-12838: cannot read/modify an object after modifying it in parallel
After you commit the data, you can select from the table:
SQL> commit;
SQL> select * from exa_info;
Note
Conversion errors may appear when reading or writing data with external tables. Conversion of numbers to dates or to character fields should be recognized, but when receiving these errors, it is possible to explicitly create the conversion in the statements. Using TO_NUMBER, TO_DATE, and TO_CHAR will help to avoid these issues if the conversion is not made implicitly.
The other way to direct-path load a table is to use the CREATE TABLE AS SELECT (CTAS) statement. A CTAS statement automatically attempts to do a direct-path load. In this example, the EXA_INFO table is created and loaded in one statement:
SQL> create table exa_info nologging parallel 2 as select * from exadata_et;
By using direct-path loading and parallelism, you can achieve loading performance similar to that of SQL*Loader. The advantage of using SQL to create a table from an external table is that you can perform complex data transformations using standard SQL*Plus features when building your regular database table (EXA_INFO, in this example).
Any CTAS statements automatically process with the degree of parallelism that has been defined for the underlying table. However, when you use INSERT AS SELECT statements, you need to enable parallelism for the session:
SQL> alter session enable parallel dml;
As a last step, you should generate statistics for any table that has been loaded with a large amount of data. Here is an example:
SQL> exec dbms_stats.gather_table_stats(-
ownname=>'SYS',-
tabname=>'EXA_INFO',-
estimate_percent => 20, -
cascade=>true);
Performing Advanced Transformations
Oracle provides sophisticated techniques for transforming data. This section details how to use a pipelined function to transform data in an external table. Listed next are the steps for doing this:
1.
Create an external table.
2.
Create a record type that maps to the columns in the external table.
3.
Create a table, based on the record type created in step 2.
4.
Create a pipelined function that is used to inspect each row as it is loaded and to transform data, based on business requirements.
5.
Use an INSERT statement that selects from the external table and that uses the pipelined function to transform data as they are loaded.
This example uses the same external table and CSV file created in the section, “Loading CSV Files into the Database,” earlier in this chapter. Recall that the external table name is EXADATA_ET and that the CSV file name is ex.csv. After you create the external table, then create a record type that maps to the column names in the external table:
SQL> create or replace type rec_exa_type is object
(
exa_id number
,machine_count number
,hide_flag number
,oracle_flag number
,ship_date date
,rack_type varchar2(32)
);
Next, create a table based on the previous record type:
SQL> create or replace type table_exa_type is table of rec_exa_type;
Oracle PL/SQL allows you to use functions as a row source for SQL operations. This feature is known as pipelining. It lets you use complex transformation logic, combined with the power of SQL*Plus. For this example, you create a pipelined function to transform selected column data as they are loaded. Specifically, this function randomly generates a number for the ORACLE_FLAG column:
SQL> create or replace function exa_trans
return table_exa_type pipelined is
begin
for r1 in
(select rec_exa_type(
exa_id, machine_count, hide_flag
,oracle_flag, ship_date, rack_type
) exa_rec
from exadata_et) loop
if (r1.exa_rec.hide_flag = 1) then
r1.exa_rec.oracle_flag := dbms_random.value(low => 1, high => 100);
end if;
pipe row (r1.exa_rec);
end loop;
return;
end;
/
Now, you can use this function to load data into a regular database table. For reference, here is the CREATE TABLE statement that instantiates the table to be loaded:
SQL> create table exa_info(
exa_id NUMBER
,machine_count NUMBER
,hide_flag NUMBER
,oracle_flag NUMBER
,ship_date DATE
,rack_type VARCHAR2(32)
) nologging parallel 2;
Next, use the pipelined function to transform data selected from the external table and insert them into the regular database table, in one step:
SQL> insert into exa_info select * from table(exa_trans);
Here is the data that are loaded into the EXA_INFO table for this example:
SQL> select * from exa_info;
Here is some sample output, showing the rows with a random value in the ORACLE_FLAG column:
Although the example in this section is simple, you can use the technique to apply any level of transformational logic. This technique allows you to embed the transformation requirements in a pipelined PL/SQL function that modifies data as each row is loaded.
Viewing Text Files from SQL
External tables allow you to use SQL SELECT statements to retrieve information from OS flat files. For example, say you want to report on the contents of the alert log file. First, create a directory object that points to the location of the alert log:
SQL> select value from v$diag_info where name = 'Diag Trace';
Here is the output for this example:
/ora01/app/oracle/diag/rdbms/o18c/o18c/trace
Next, create a directory object that points to the diagnostic trace directory:
SQL> create directory t_loc as '/ora01/app/oracle/diag/rdbms/o18c/o18c/trace';
Now, create an external table that maps to the database alert log OS file. In this example, the database name is o18c, and thus the alert log file name is alert_o18c.log:
SQL> create table alert_log_file(
alert_text varchar2(4000))
organization external
( type oracle_loader
default directory t_loc
access parameters (
records delimited by newline
nobadfile
nologfile
nodiscardfile
fields terminated by '#$~=ui$X'
missing field values are null
(alert_text)
)
location ('alert_o18c.log')
)
reject limit unlimited;
You can query the table via SQL queries; for example,
SQL> select * from alert_log_file where alert_text like 'ORA-%';
This allows you to use SQL to view and report on the contents of the alert log. You may find this a convenient way to provide SQL access to otherwise inaccessible OS files.
The ACCESS PARAMETERS clause of an external table’s ORACLE_LOADER access driver may look familiar if you have previously worked with SQL*Loader. Table 14-1 describes some of the more commonly used access parameters. See the Oracle Database Utilities Guide, which can be freely downloaded from the Technology Network area of the Oracle web site (http://otn.oracle.com), for a full list of access parameters.
Table 14-1
Selected Access Parameters for the ORACLE_LOADER Driver
Access Parameter
Description
DELIMITED BY
Indicates which character delimits the fields
TERMINATED BY
Indicates how a field is terminated
FIXED
Specifies the size of records having a fixed length
BADFILE
Name of the file that stores records that can’t be loaded because of an error
NOBADFILE
Specifies that a file shouldn’t be created to hold records that can’t be loaded because of errors
LOGFILE
Name of the file in which general messages are recorded when creating an external table
NOLOGFILE
Specifies that no log file should be created
DISCARDFILE
Names the file to which records are written that fail the LOAD WHEN clause
NODISCARDFILE
Specifies that no discard file should be created
SKIP
Skips the specified number of records in the file before loading
PREPROCESSOR
Specifies the user-named program that runs and modifies the contents of the file before Oracle loads the data
MISSING FIELD VALUES ARE NULL
Loads fields that have no data as NULL values
Unloading and Loading Data Using an External Table
External tables may also be used to select data from a regular database table and create a binary dump file. This is known as unloading data. The advantage of this technique is that the dump file is platform independent and can be used to move large amounts of data between servers of different platforms.
You can also encrypt or compress data, or both, when creating the dump file. Doing so provides you with an efficient and secure way of transporting databases between database servers.
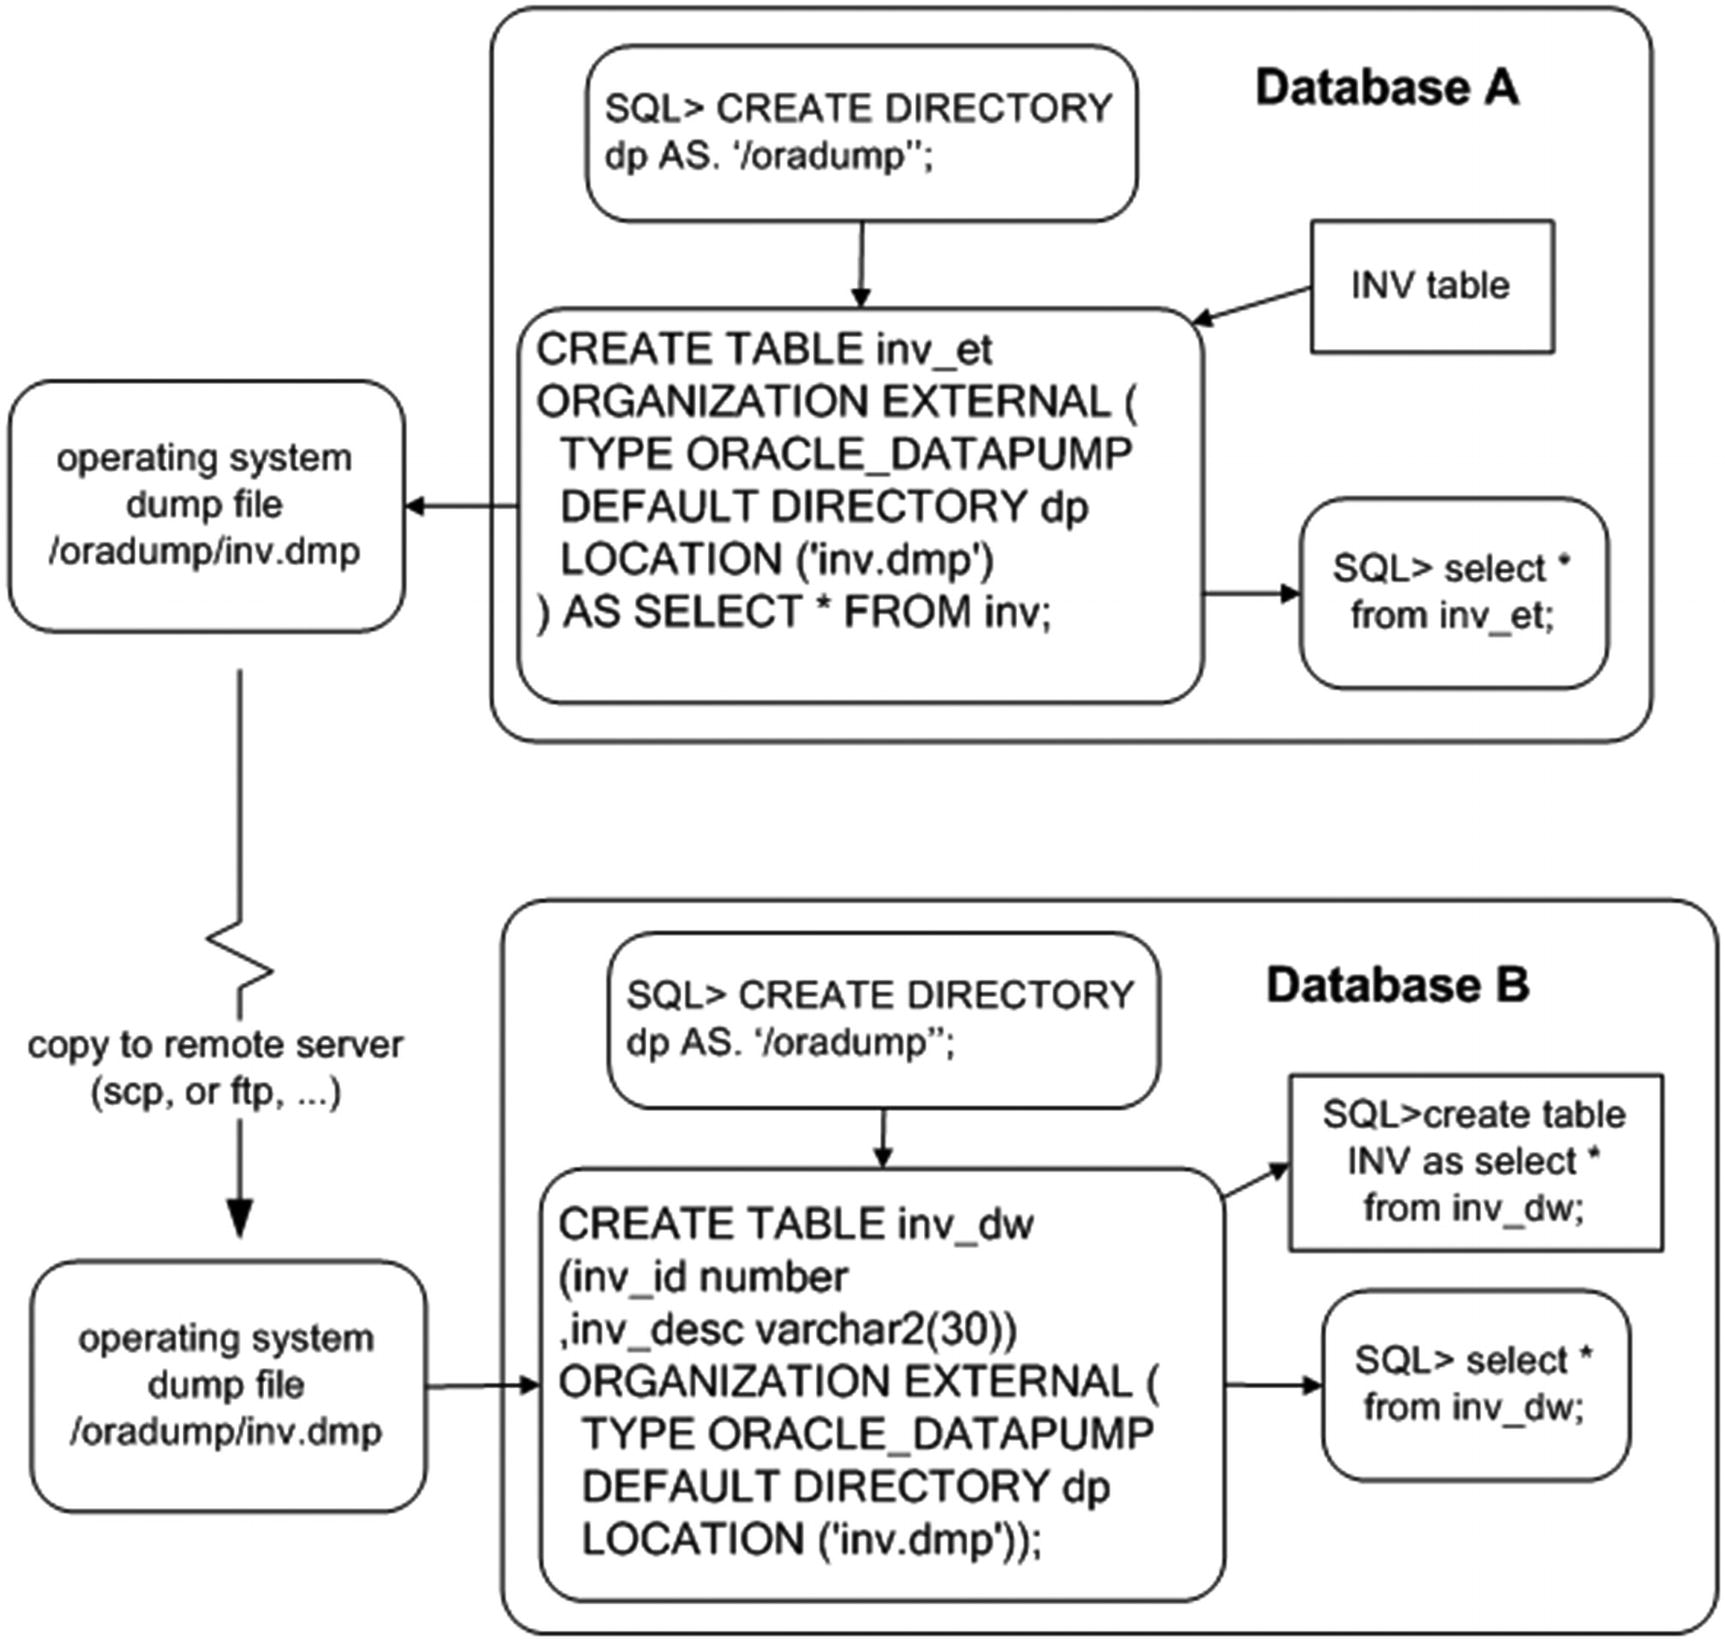
Figure 14-2 illustrates the components in using an external table to unload and load data. On the source database (database A), you create a dump file, using an external table that selects data from a table named INV. After it is created, you copy the dump file to a destination server (database B) and subsequently load the file into the database, using an external table. using an external table.
Figure 14-2
Using external tables to unload and load data
A small example illustrates the technique of using an external table to unload data. Here are the steps required:
1.
Create a directory object that specifies where you want the dump file placed on disk. If you are not using a DBA account, then grant read and write access to the directory object to the database user that needs access.
2.
Use the CREATE TABLE...ORGANIZATION EXTERNAL...AS SELECT statement to unload data from the database into the dump file.
First, create a directory object. The next bit of code creates a directory object, named DP, that points to the /oradump directory:
SQL> create directory dp as '/oradump';
If you are not using a user with DBA privileges, then explicitly grant access to the directory object to the required user:
SQL> grant read, write on directory dp to larry;
This example depends on a table named INV; for reference, here is the DDL for the INV table:
SQL> CREATE TABLE inv
(inv_id NUMBER,
inv_desc VARCHAR2(30));
To create a dump file, use the ORACLE_DATAPUMP access driver of the CREATE TABLE...ORGANIZATION EXTERNAL statement. This example unloads the INV table’s contents into the inv.dmp file:
SQL> CREATE TABLE inv_et
ORGANIZATION EXTERNAL (
TYPE ORACLE_DATAPUMP
DEFAULT DIRECTORY dp
LOCATION ('inv.dmp')
)
AS SELECT * FROM inv;
The previous command creates two things:
An external table named INV_ET, based on the structure and data within the INV table
A platform-independent dump file named inv.dmp
Now, you can copy the inv.dmp file to a separate database server and base an external table on this dump file. The remote server (to which you copy the dump file) can be a platform different from the server on which you created the file. For example, you can create a dump file on a Windows box, copy to a Unix/Linus server, and select from the dump file via an external table. In this example the external table is named INV_DW:
SQL> CREATE TABLE inv_dw
(inv_id number
,inv_desc varchar2(30))
ORGANIZATION EXTERNAL (
TYPE ORACLE_DATAPUMP
DEFAULT DIRECTORY dp
LOCATION ('inv.dmp')
);
After it’s created, you can access the external table data from SQL*Plus:
SQL> select * from inv_dw;
You can also create and load data into regular tables, using the dump file:
SQL> create table inv as select * from inv_dw;
This provides a simple and efficient mechanism for transporting data from one platform to another.
Enabling Parallelism to Reduce Elapsed Time
To maximize the unload performance when you create a dump file via an external table, use the PARALLEL clause. This example creates two dump files, in parallel:
SQL> CREATE TABLE inv_et
ORGANIZATION EXTERNAL (
TYPE ORACLE_DATAPUMP
DEFAULT DIRECTORY dp
LOCATION ('inv1.dmp','inv2.dmp')
)
PARALLEL 2
AS SELECT * FROM inv;
To access the data in the dump files, create a different external table that references the two dump files:
SQL> CREATE TABLE inv_dw
(inv_id number
,inv_desc varchar2(30))
ORGANIZATION EXTERNAL (
TYPE ORACLE_DATAPUMP
DEFAULT DIRECTORY dp
LOCATION ('inv1.dmp','inv2.dmp')
);
You can now use this external table to select data from the dump files:
SQL> select * from inv_dw;
Compressing a Dump File
You can create a compressed dump file via an external table. For example, use the COMPRESS option of the ACCESS PARAMETERS clause:
SQL> CREATE TABLE inv_et
ORGANIZATION EXTERNAL (
TYPE ORACLE_DATAPUMP
DEFAULT DIRECTORY dp
ACCESS PARAMETERS (COMPRESSION ENABLED BASIC)
LOCATION ('inv1.dmp')
)
AS SELECT * FROM inv;
You should see quite good compression ratios when using this option. In my testing, the output dump file was 10 to 20 times smaller when compressed. Your mileage may vary, depending on the type data being compressed.
Starting with Oracle Database 12c, there are four levels of compression: BASIC, LOW, MEDIUM, and HIGH. Before using compression, ensure that the COMPATIBLE initialization parameter is set to 12.0.0 or higher.
Note
Using compression requires the Oracle Enterprise Edition, along with the Advanced Compression option.
Encrypting a Dump File
You can also create an encrypted dump file, using an external table. This example uses the ENCRYPTION option of the ACCESS PARAMETERS clause:
SQL> CREATE TABLE inv_et
ORGANIZATION EXTERNAL (
TYPE ORACLE_DATAPUMP
DEFAULT DIRECTORY dp
ACCESS PARAMETERS
(ENCRYPTION ENABLED)
LOCATION ('inv1.dmp')
)
AS SELECT * FROM inv;
For this example to work, you need to have a security wallet in place and open for your database.
Note
Using encryption requires the Oracle Enterprise Edition along with the Advanced Security option.
Enabling an Oracle Wallet
An Oracle Wallet is the mechanism Oracle uses to enable encryption. The wallet is an OS file that contains encryption keys. The wallet is enabled via the following steps:
1.
Modify the SQLNET.ORA file to contain the location of the wallet:
Create the wallet file (ewallet.p12) with the ALTER SYSTEM command:
SQL> alter system set encryption key identified by foo;
3.
Enable encryption:
SQL> alter system set encryption wallet open identified by foo;
See the Oracle Advanced Security Administrator’s Guide, which can be freely downloaded from the Technology Network area of the Oracle web site (http://otn.oracle.com), for full details on implementing encryption.
You enable compression and encryption via the ACCESS PARAMETERS clause. Table 14-2 contains a listing of all access parameters available with the ORACLE_DATAPUMP access driver.
Table 14-2
Parameters of the ORACLE_DATAPUMP Access Driver
Access Parameter
Description
COMPRESSION
Compresses the dump file; DISABLED is the default value.
ENCRYPTION
Encrypts the dump file; DISABLED is the default value.
NOLOGFILE
Suppresses the generation of a log file
LOGFILE=[directory_object:]logfile_name
Allows you to name a log file
VERSION
Specifies the minimum version of Oracle that can read the dump file
Inline SQL from External Table
With Oracle 18c, it is possible to select directly from the file with the use of EXTERNAL without actually creating an external table in the data dictionary. This allows for external data to be part of a subquery, virtual view, or another transformation type of process.
Here is an example of how this works.
SELECT columns FROM EXTERNAL ((column definitions) TYPE [ access_driver_type] external_table_properties [REJECT LIMIT clause])
SQL> SELECT first_name, last_name, hiredate, department_name from EXTERNAL(
The empbydep_external table is not actually created as an external table, and this data is available to query and specify any of the columns or filter by a different selection in the WHERE CLAUSE. This is also possible with json and useful when accessing data APIs that are provided in the json format. This does not load the data into the table but can be queried and used in several different methods for views, reference data that is available by API to complete data sets in data integrations. Here is the example of the json file:
SQL> select * from external ((json_document CLOB)
TYPE ORACLE_LOADER
DEFAULT DIRECTORY EXT_DATA
ACCESS PARAMETERS (
RECORDS DELIMITED BY 0x'0A' FIELDS (json_document CHAR(5000)) )
SQL*Loader is a useful utility for all types of data-loading tasks, and external tables are useful for data transformations in the process of loading or querying the data. Almost anything you can do with SQL*Loader, you can also do with an external table. The external table approach is advantageous because there are fewer moving parts and because the interface is SQL*Plus. Most DBAs and developers find SQL*Plus easier to use than a SQL*Loader control file.
You can easily use an external table to enable SQL*Plus access to OS flat files. You simply have to define the structure of the flat file in your CREATE TABLE...ORGANIZATION EXTERNAL statement. After the external table is created, you can select directly from the flat file, as if it were a database table. You can select from an external table, but you cannot insert, update, or delete.
When you create an external table, if required, you can then create regular database tables by using CREATE TABLE AS SELECT from the external table or use a view based on the external table for use in other queries. Doing so provides a fast and effective way to load data stored in external OS files.
The external table feature also allows you to select data from a table and write them to a binary dump file. The external table CREATE TABLE...ORGANIZATION EXTERNAL statement defines which tables and columns are used to unload the data. A dump file created in this manner is platform independent, meaning you can copy it to a server using a different OS and seamlessly load the data. Additionally, the dump file can be encrypted and compressed for secure and efficient transportation. You can also use parallel features to reduce the amount of time it takes to create the dump file.
External table design allows you to also query data directly from the file. This is also very useful for the json format, which is the format of which many data APIs might be available. Filtering of the data or a simplified way to load data into other tables is extremely useful for data integrations and ETL processes.
The next chapter deals with materialized views. These database objects provide you with a flexible, maintainable, and scalable mechanism for aggregating and replicating data.