Search is a very important part of SharePoint, and many companies rely on the strong SharePoint Search Engine to find documents and information for their day-to-day jobs.
In this chapter, you will learn the architecture of the SharePoint Search Service Application, as well as how to configure it from both Central Administration and PowerShell.
SharePoint Search Service Application Architecture
Before starting to configure the Search Service Application, we will need to better understand the architecture and how it works internally. The SharePoint 2019 Search Engine is built on the FAST Search Engine that Microsoft acquired in 2008 from a Norwegian company then called Fast Search & Transfer ASA and has fully integrated in SharePoint since SharePoint 2013. The SharePoint Search Service Engine is broken up into six different components:
1.
Crawl Component
The Crawl Component is responsible for crawling different types of content such as Local SharePoint Sites, Remote SharePoint Sites, File Shares, and more. We call those Content Sources.
2.
Content Processing Component
The Content Processing component receives data from the Crawl component and breaks it down into artifacts that can be included in the Index. Some Search customizations such as Custom Entity Extractions are done by the Content Processing Component.
3.
Index Component
The Index Component is a logical representation of an index file. The Index component receives items from the Content Processing Component and writes them into an index file. For systems where there are a lot of crawled items, the Index can be split into different Index Partitions, a logical portion of the entire search index.
4.
Query Component
The Query Processing Component is the component that interacts with the SharePoint Front End. The Query Processing Component gets the queries done by users, analyzes it and submits it to the Index Components. The Index component will then return the relevant results to the Query component, which will then return the results to the end user. The Query Component is also responsible for the Security Trimming on the search results.
5.
Analytics Processing Component
The Analytics Processing Component creates search analytics as well as usage analytics. Those analytics are used for search relevance, generate recommendations as well as create search reports.
6.
Search Administration Component
The Search Administration Component runs the administration tasks as well as provisioning the other Search Components.
All those components work together to offer the end-to-end search experience for your users. Unlike most Service Applications, which only have one database, the Search Service application has four different types of databases, and you can have more than one of each type in your Search Service Application, depending on your requirements. We will cover those cases and when and how to scale out your Search Service Application a bit later into this chapter. The different types of databases that you will find in the Search Service Application are as follows:
1.
Crawl Database
The Crawl Database contains tracking and historical information about crawled items as well as information about the last crawl times, types of crawls and durations.
2.
Search Admin Database
The Search Admin Database stores configuration data such as the topology, managed properties, query, and crawl rules.
3.
The Link Database
The Link Database stores information extracted by the Content Processing component as well as information about search clicks and popularity.
4.
The Analytics Reporting Database
The Analytics Reporting database stores statistics information and analytics results.
There is another data storage location, which is not a database, but log files on the server that hosts the analytics processing component. This is called the Event Store. The Event store holds usage events such as the number of items an item is viewed. Now that we know the components of a Search Service Application, let’s see how we can create it.
It’s important to remember that the Index Component is also stored on the file system and not in the database. Therefore, it’s important to plan extra disk space for the servers running the Index Component.
All those search components must be hosted on a SharePoint Server that is configured as a “Search” or “Application and Search” MinRole server, or “Custom” MinRole server with the Search Services started.
Search Service Application Limitations
When planning our Search Service Application topology, we need to respect both the business requirements as well as the software boundaries of SharePoint Server 2019. Business requirements might be around index freshness as well as separation between the indexes of two different clients hosted on the same SharePoint farm. The number of items that you plan to crawl using the SharePoint Search Service application might require you to add multiple servers to your Search Topology to get around the software boundaries in SharePoint.
The Search Service Application can be created both from the SharePoint User Interface and from the SharePoint Management Shell. When creating the Search Service Application via Central Administration, the Search databases will have a GUID appended to them, unlike when creating the Search Service Application via PowerShell, where you have control over the database naming convention. It’s also important to know that while it’s possible to create the Search Service Application with Central Administration, the Search Service Application Topology can only be modified via PowerShell. Search Service Applications created with the Central Administration will host all components on a single server. For those reasons, we strongly recommend using PowerShell to create your Search Service Application. We will still cover both options of creating the Search Service Application in this chapter.
Creating a Search Service Application from Central Administration
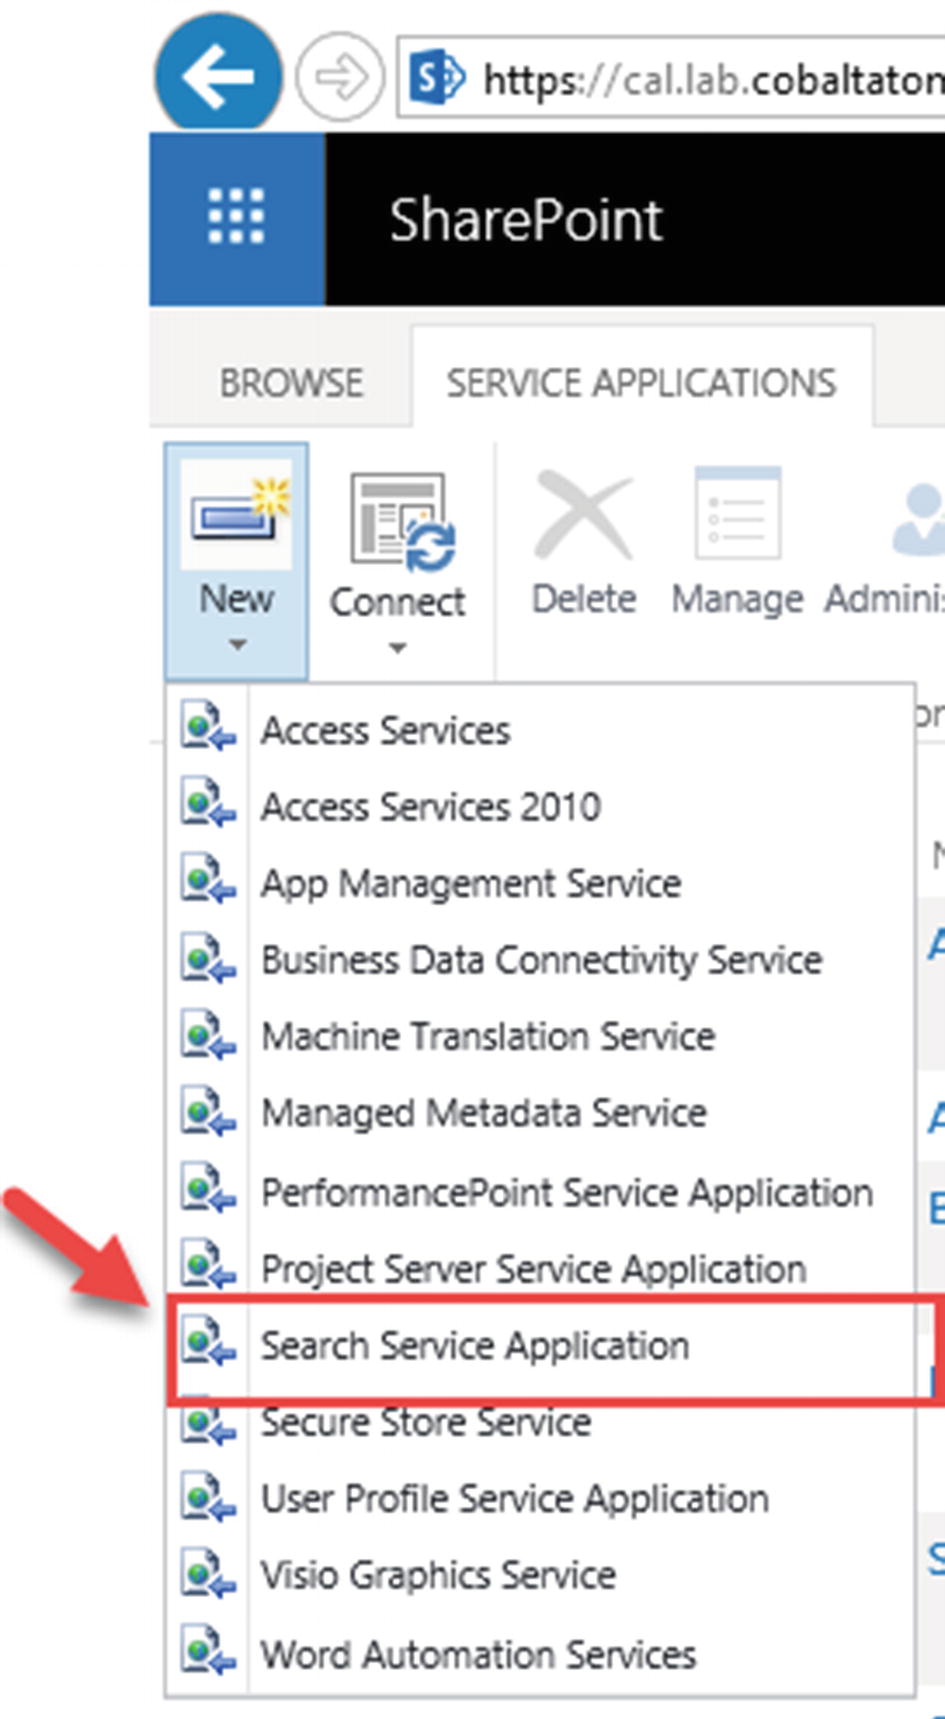
To create a Search Service Application from the User Interface, from the Manage Service Applications page in the Central Administration, click New, and select Search Service Application as seen in Figure 6-1.
Figure 6-1
New Search Service Application from the User Interface
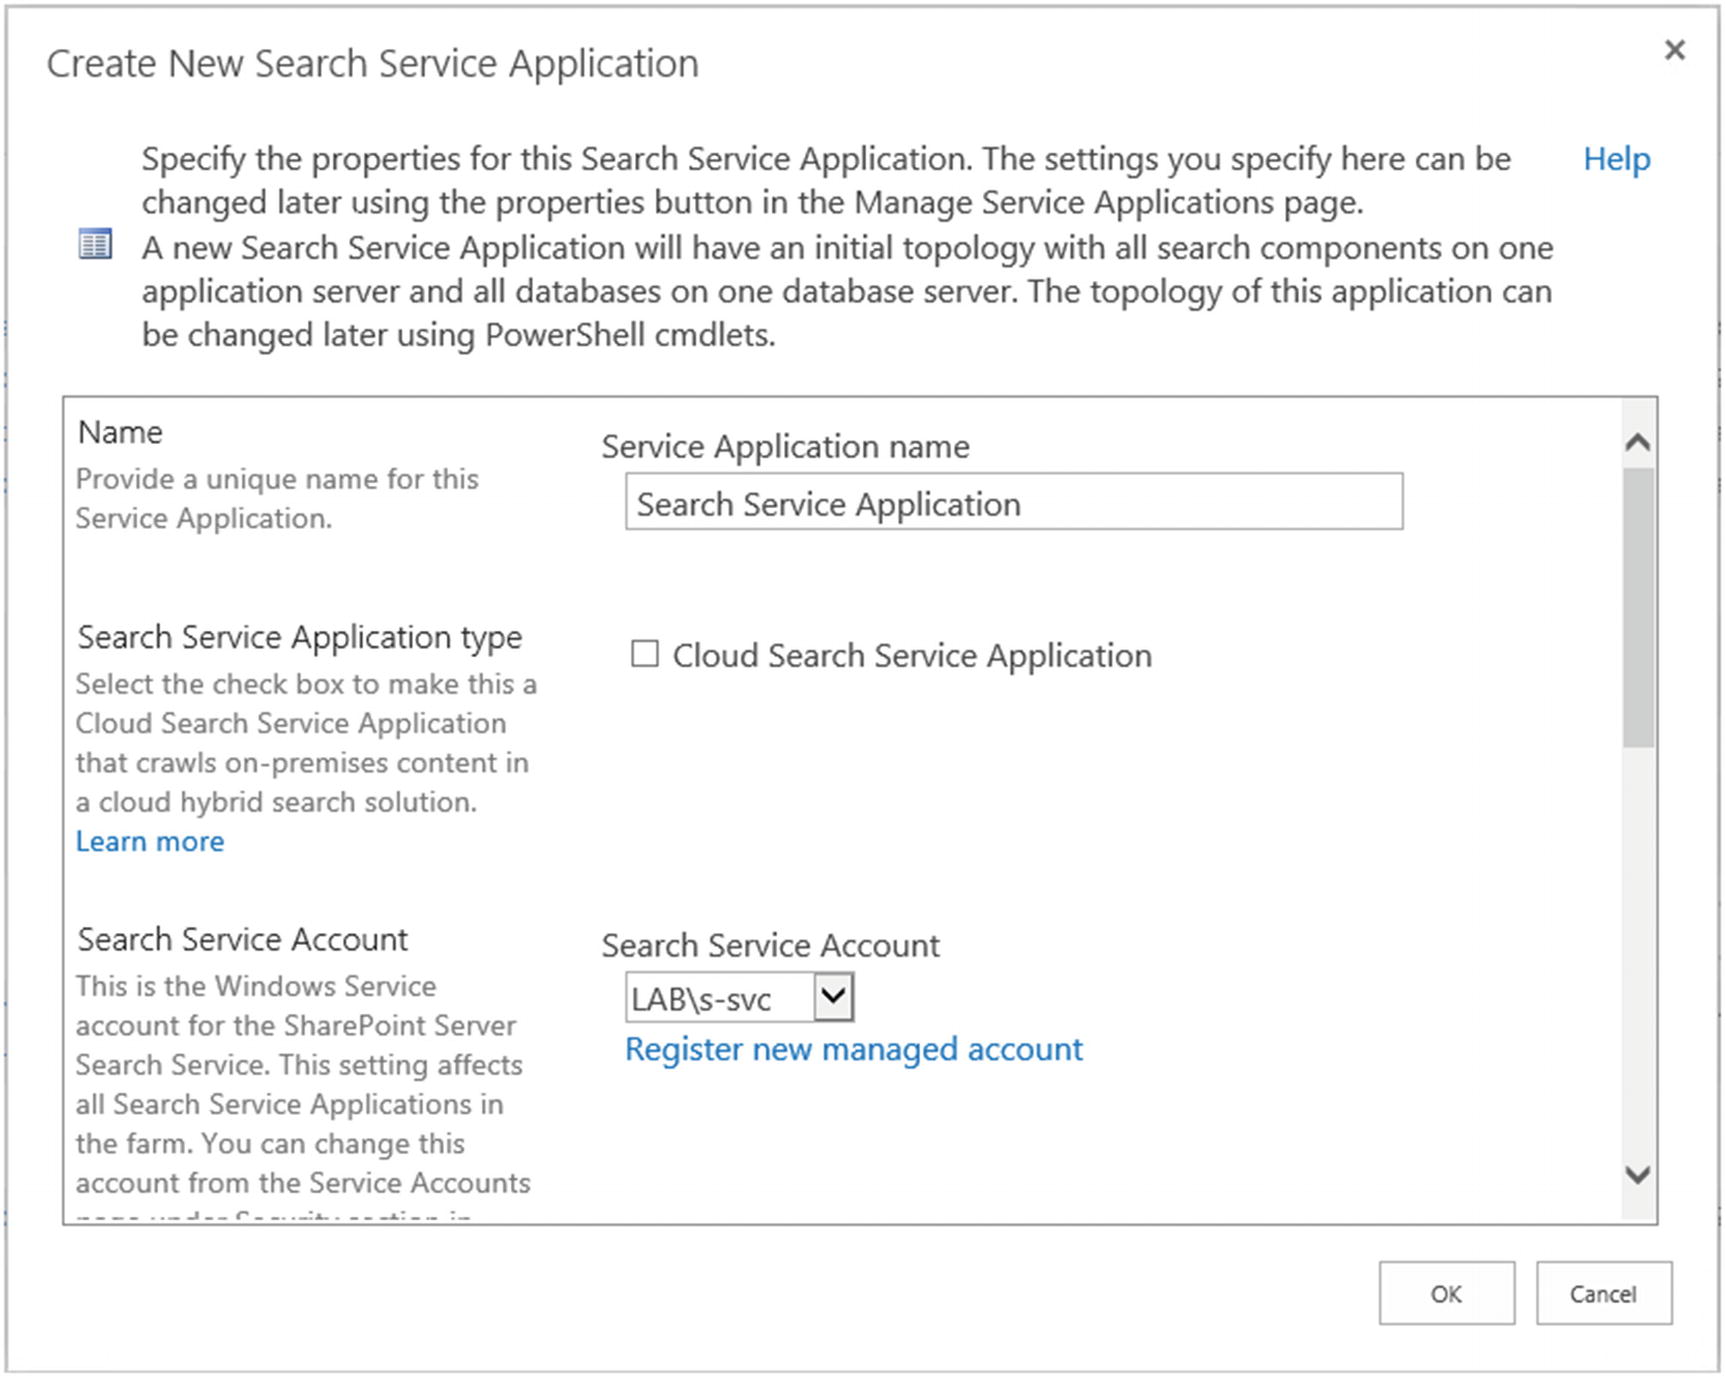
In the new Create New Search Service Application window seen in Figure 6-2, we will first have to give it a name, select if it’s a normal Search Service Application or a Cloud Search Service Application, and give it the Service account that will run the Windows Search Service. In this chapter, we will not cover the Cloud Search Service Application, as this will be covered in Chapter 14. While it’s possible to set a dedicated Search Service account for an extra layer of security, we recommend using the same account that runs the other services, which in our case is Labs-svc.
Figure 6-2
New Search Service Application Window
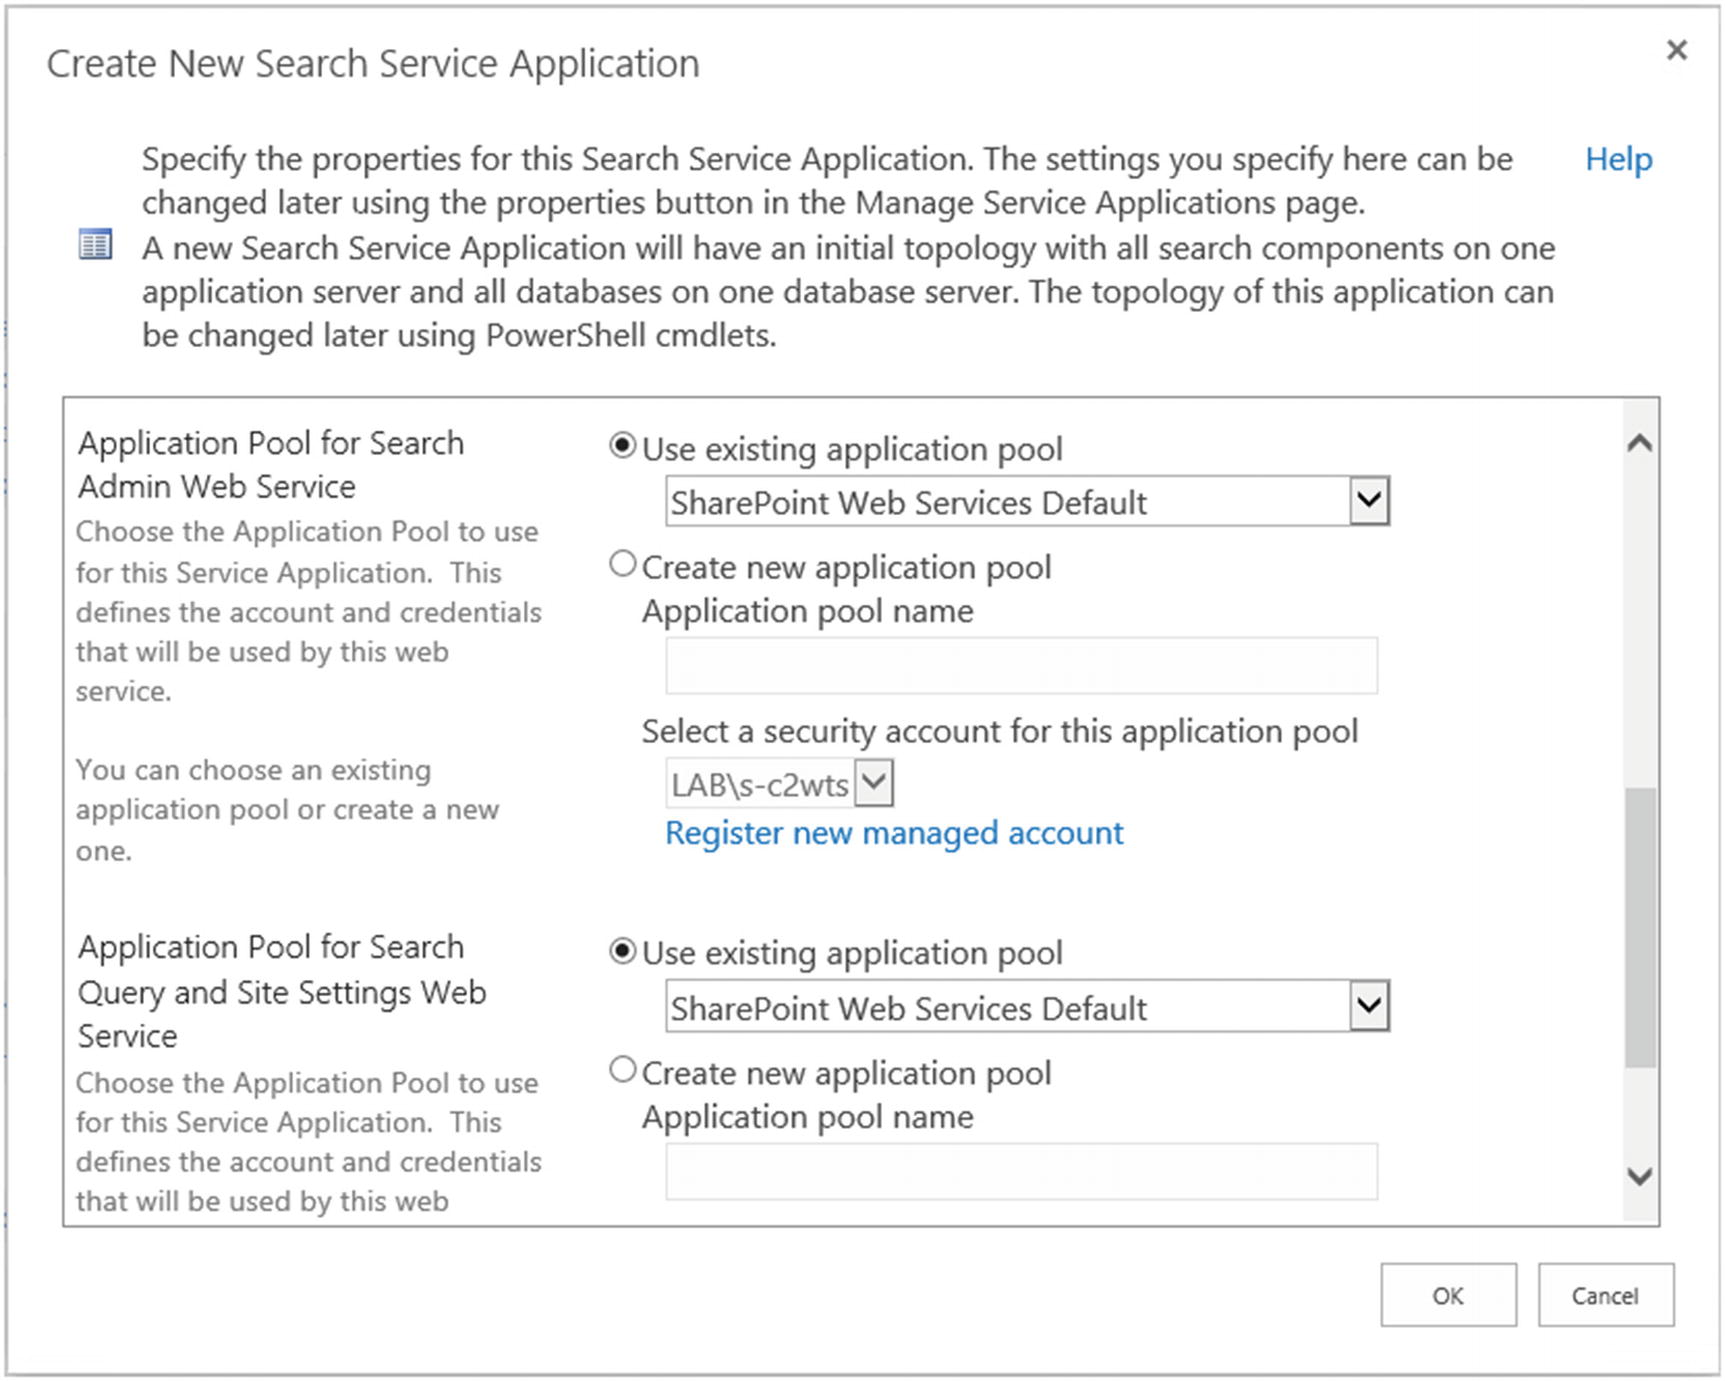
On the second part of the Create New Search Service Application Window seen in Figure 6-3, we need to select if we want to create new Service Application Pools for the Search Admin Web Service and Query and Site Settings Web Service, or use an existing one. While creating new ones could increase the isolation of the Search Service Applications, it will result in additional resources being used on your servers. In this book we recommend using the same Application Pool as the rest of your service applications, in this case “SharePoint Web Services Default”, unless you have specific business or security requirements to isolate this Service Application from the other Service Applications.
Figure 6-3
New Search Service Application Window
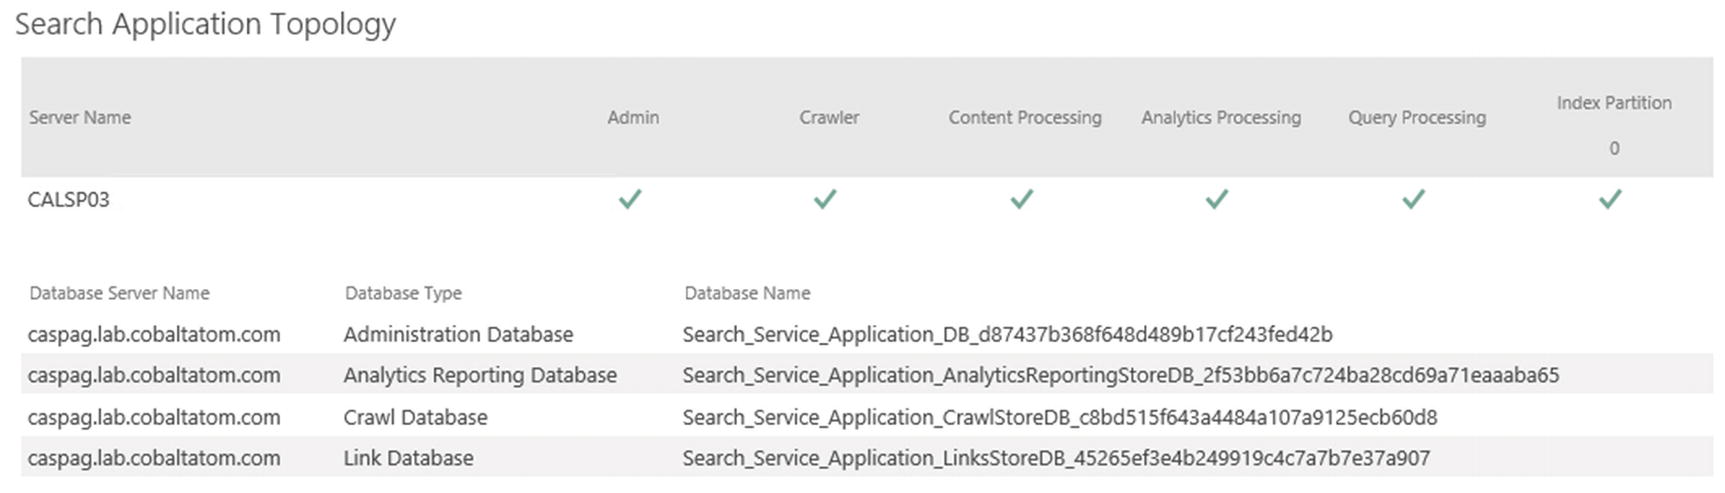
You can then click OK to create the Search Service Application. Once created, the Search Administration Page seen in Figure 6-4 will show the Search Server on which the Search Service Application activated the six components, as well as the Database Names, which have GUIDs in them because we have created this Service Application by using the user interface.
Figure 6-4
Search Application Topology with GUID in Database Names
With the Service Application created from the User Interface, let’s learn how to create it from PowerShell as well.
Creating a Search Service Application by Using PowerShell
Creating a Search Service Application by using PowerShell gives the SharePoint Administrator more control. To create a new Search Service Application, you need to open the SharePoint Management Shell as an Administrator and use the New-SPEnterpriseSearchServiceApplication PowerShell cmdlet. The cmdlets will have to be run from a server that is configured in the Search MinRole, or a server that runs the Custom MinRole. Note that when creating a Search Service Application via PowerShell, it will not have an initial topology as it did when creating it by the User Interface, so it will not be usable until we modify the Search Service Application Topology, which we will cover a bit later in this chapter.
$sa = New-SPEnterpriseSearchServiceApplication -Name "<Service Application Name>" -DatabaseName "<Search Database Name Prefix>" -ApplicationPool "<Name of existing Service Application Pool>" -AdminApplicationPool "<Name of existing Service Application Pool>"
In order to create a Service Application with the same settings as we did through the User Interface a bit earlier in the chapter, we would run the following PowerShell cmdlet:
$sa = New-SPEnterpriseSearchServiceApplication -Name "Search Service Application 1" -DatabaseName "SearchDB" -ApplicationPool "SharePoint Web Services Default" -AdminApplicationPool "SharePoint Web Services Default"
After the Search Service Application is created, we need to create the Search Service Application proxy by running the New-SPEnterpriseSearchServiceApplicationProxy cmdlet. In the following cmdlet we will create a proxy named “Search Service Application Proxy” for the Search Service Application we created previously, that we saved a reference to in the $sa variable.
New-SPEnterpriseSearchServiceApplicationProxy -Name "Search Service Application Proxy" -SearchApplication $sa
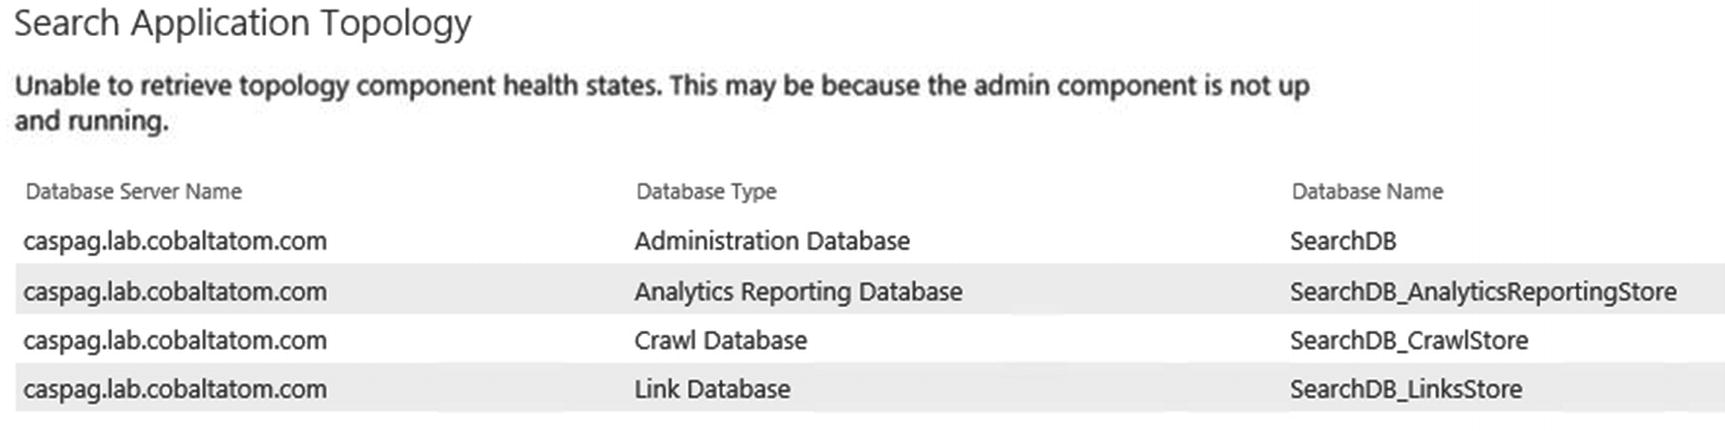
After both cmdlets finish running, we can navigate in our new Search Service Application via the User Interface, and you will notice that the Database Names do not have GUIDs in them anymore. However, since creating a Search Service Application by PowerShell does not also create an initial topology, the Search Application Topology is unable to be displayed as seen in Figure 6-5.
Figure 6-5
Search Service Application created by PowerShell
With the Service Application created, we will need to modify the Search Service Application topology to fit our needs.
Modifying the Search Service Application Topology
Modifying the Search Service Application topology can be done in a number of cases. You will need to do it when first creating your Search Service Application, as well as any time you need to change what components run on each server. Something to be aware of when modifying the Search Service Application topology using the following method is that the Index needs to be empty when changing the Search Service Application Topology. Later in this section we will learn how to change the Search Service Application Topology in a Service Application that already has items in the index. To change the Search Topology, we first need to get the Search Service Application and save it into a variable.
$sa = Get-SPEnterpriseSearchServiceApplication
Next, we need to get the Search Service Instance of our first Search Server, called CALSP03, and save it into a variable.
If you want to use a server running the Custom MinRole to host one of the Search Components, you will first have to start the Enterprise Search Service Instance. This is done by running the Start-SPEnterpriseSearchServiceInstance cmdlet. To start the instance, we would run the following cmdlet:
You will then need to validate that the Service Instance is online by running the Get-SPEnterpriseSearchServiceInstance cmdlet. When running the following cmdlet and replacing CALSP03 with your server name, the status should be “Online”.
We then need to create a new variable, which will be a clone of the current Active Topology in our Search Service Application. The Search Service Application can have multiple topologies; however, only one of them can be active. When modifying our topology, we will first create a clone of the active one, and after we specify its properties, we will set it to Active.
$clone = $sa.ActiveTopology.Clone()
We can then decide what components we want to enable on our first server. Here are the cmdlets for each Search Service Application Component:
For all the components, we will need to give a SearchTopology parameter, which specifies the search topology we want to add this component to; in our case, it will be the search topology that is currently in the $clone variable. We also need to give it a Search Instance, specifying on what server we want to enable this Search Component. In our case, we will specify the $SI variable in which we saved the Search Service Instance of server CALSP03. To add all the components on Search Server CALSP03, we would run the following PowerShell code:
Note that by default, the Index location is on the C drive at C:Program FilesMicrosoft Office Servers16.0DataOffice ServerApplications.
Note
The default location might have been changed during the binary Installation.
This may impact performance as Search can have a significant Disk I/O requirement. An additional impact may be the size of the index, which has the potential to cause the disk to run out of available space. In order to create your index file on a different drive, you need to specify the RootDirectory parameter to the New-SPEnterpriseSearchIndexComponent cmdlet, like we will do in the following. The folder must be empty as the cmdlet will fail otherwise.
We have added all the Search components on our first Search Server, so now it’s time to add them on our second Search Server. The first thing we need to do is get the Search Service Instance of the second server and save it into a variable called $si2.
Lastly, we need to set the $clone topology, as the active topology in order to see the results in our Search Service Application. This is done with the following PowerShell cmdlet:
$clone.Activate()
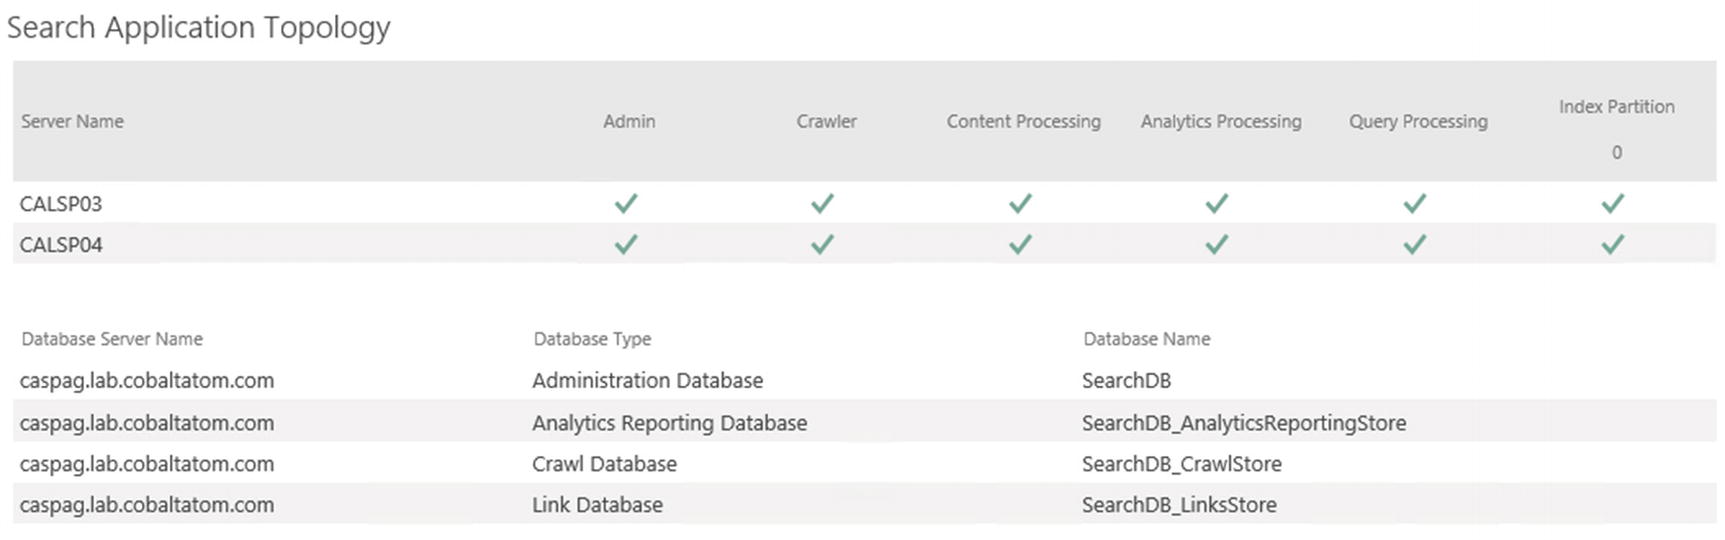
After the clone finishes activating, when navigating to the Search Administration page the topology will show all components on both servers with a green checkbox, meaning they are healthy as seen in Figure 6-6.
Figure 6-6
Search Service Application Topology
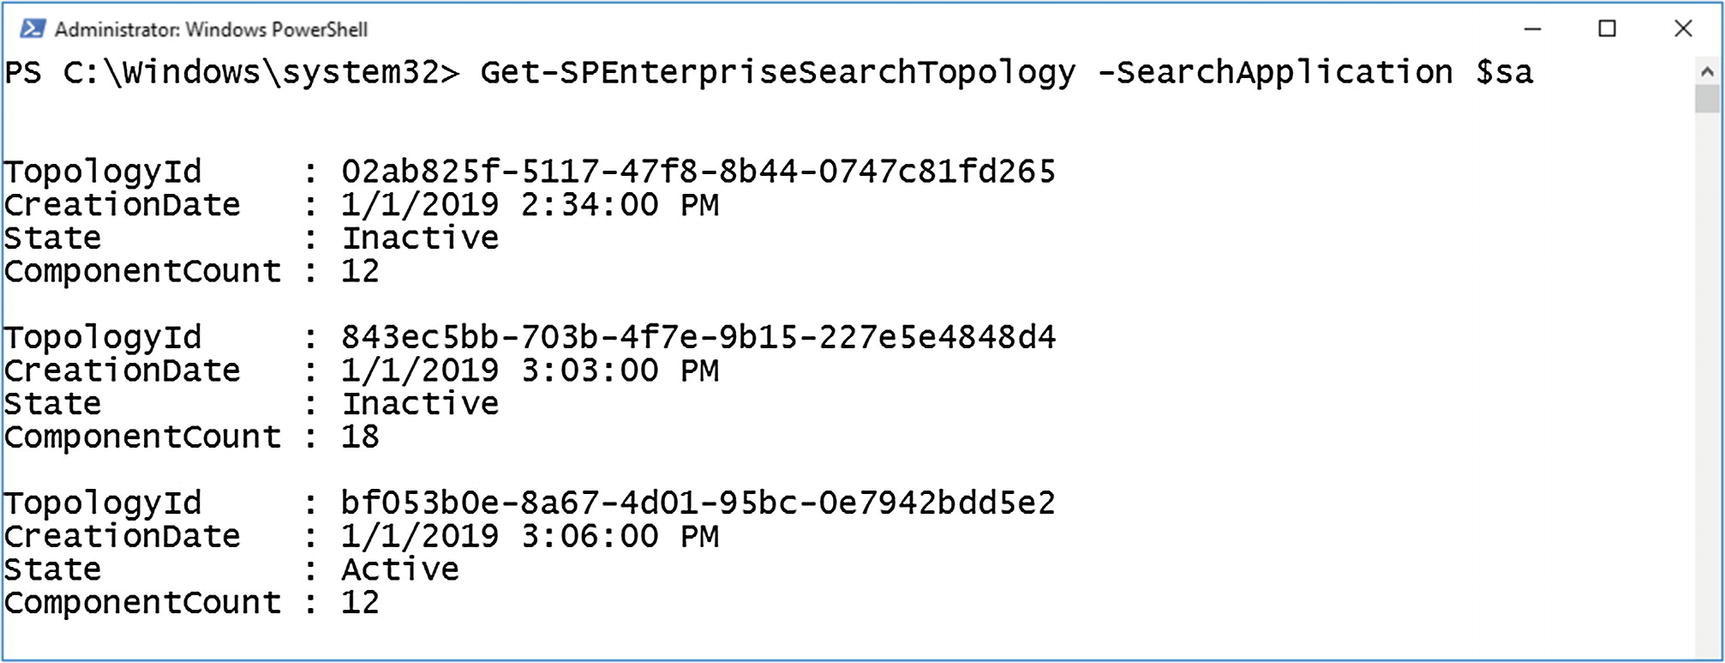
As your search topology changes with your usage of the environment, the Search Service Application keeps a history of those topologies as Inactive. You can view them by running the following PowerShell cmdlet:
And as seen in Figure 6-7, our current Service Application has three topologies.
Figure 6-7
Multiple Search Topologies in our Search Service Application
This can cause confusion when trying to manage the Search Service application later on, so we can run the following PowerShell cmdlet that will loop through all the existing topologies and will delete all the inactive ones:
foreach($topo in (Get-SPEnterpriseSearchTopology -SearchApplication $sa |
When modifying a topology that already has items in the index, we need to be a bit more careful. To move your index component to another server, you first need to add the second index component to your topology, wait for the index to be replicated to the new server, and then remove the old index component. To remove a component of the Search Service Application topology, we first need to get the active topology and create a clone by using the New-SPEnterpriseSearchTopology cmdlet. The following is an example of the cmdlets:
We then need to find out the ComponentId of the Search Component that we want to remove. To see all the Component IDs, we need to run the following cmdlet:
PowerShell will output a list of all the components, and all the components will have a ComponentId. In the following example, the IndexComponent2 running on server CALSP04 has the ComponentId “8bae00ce-2ca3-428d-b0bd-6356d806a23d”:
Now that we know the ID, we can run the Remove-SPEnterpriseSearchComponent cmdlet and then activate our new topology. Remove the component that we targeted previously, we would run the following PowerShell cmdlets:
The Index Component from server CALSP04 will then be removed from the topology. You can then run the PowerShell cmdlets we saw earlier in this chapter to clean up the inactive Search Topologies.
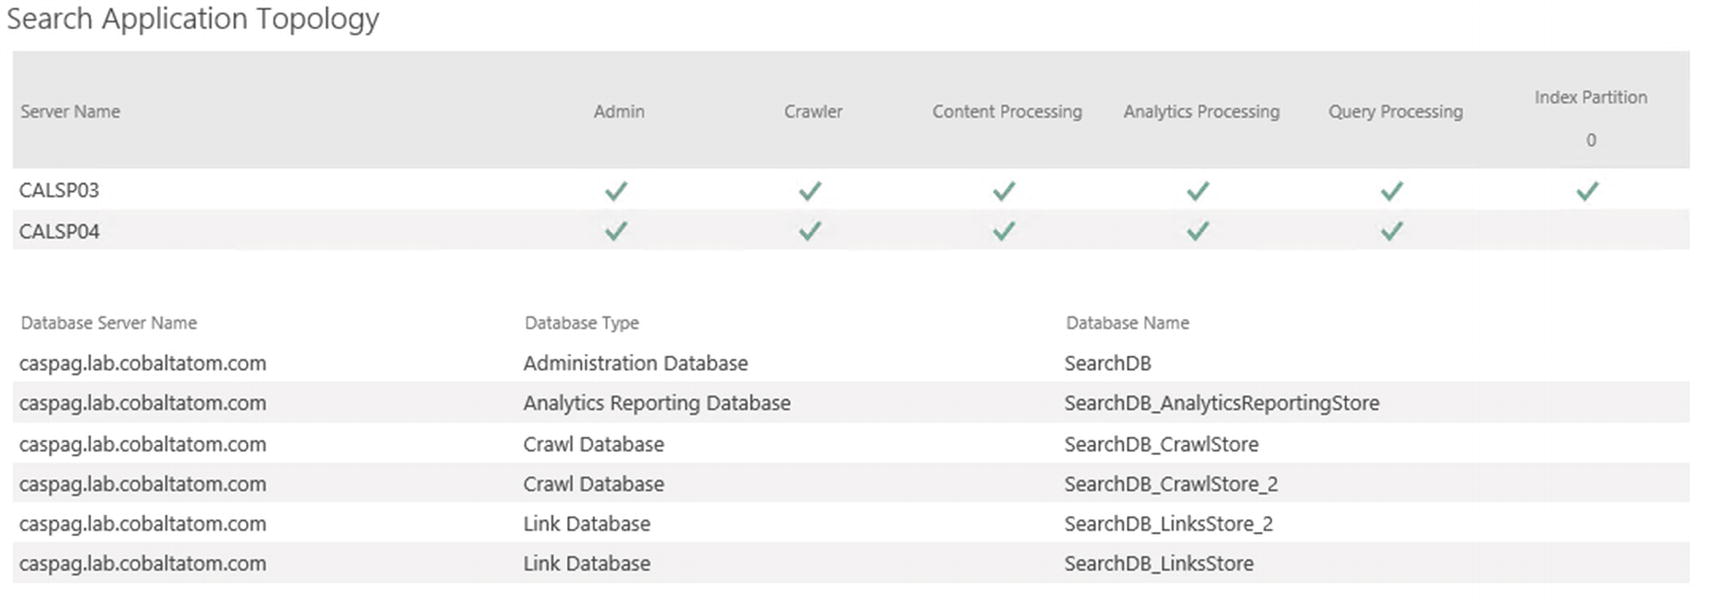
To further scale out your Search Service Application, you might also want to add extra Crawl or Link databases. If we want to add another Crawl Database, we can use the New-SPEnterpriseSearchCrawlDatabase cmdlet and give it the Search Application and name for the new database.
We could also add extra Link databases using the New-SPEnterpriseSearchLinksDatabase cmdlet and giving the same set of parameters as we did for the crawl database.
Those databases will then appear on the on the Search Administration page on Central Administration, under the topology as seen in Figure 6-8.
Figure 6-8
Multiple databases in our Search Service Topology
With our topology and databases all created, it’s now time to configure the Search Service Application Settings.
Configuring Search Settings
The possibilities to customize your Search Service Application to your needs are endless. In this section we will focus on the settings that you need to do when first creating your Search Service Application.
Configuring the Default Content Access Account
The first thing you need to do after creating your Search Service Application is to configure your Search default content access account. This is the service account that the Crawl Component will use to access SharePoint content. This crawl account will have read access to all your SharePoint Web Applications, so it is important to keep the credentials in a safe location. By default, when creating the Search Service Application, SharePoint will set the default content access account to the service that runs the SharePoint Search Windows Service. In order to change it, simply click the username currently in the Default Content Access account row, as seen in Figure 6-9. A window will open prompting for the username and password of this account.
Figure 6-9
Change Default Content Access Account
The default content access account can also be configured via PowerShell with the following cmdlet:
Where Labs-crawl is the account you want to use as default content access account. Since this account has read access to all the SharePoint content, we recommend having a dedicated service account for this purpose stated in Chapter 2.
As mentioned previously, the account will be added in the User Policy of the Web Application with Full Read permissions as seen in Figure 6-10.
Figure 6-10
Search Crawling Account Web Application Policy
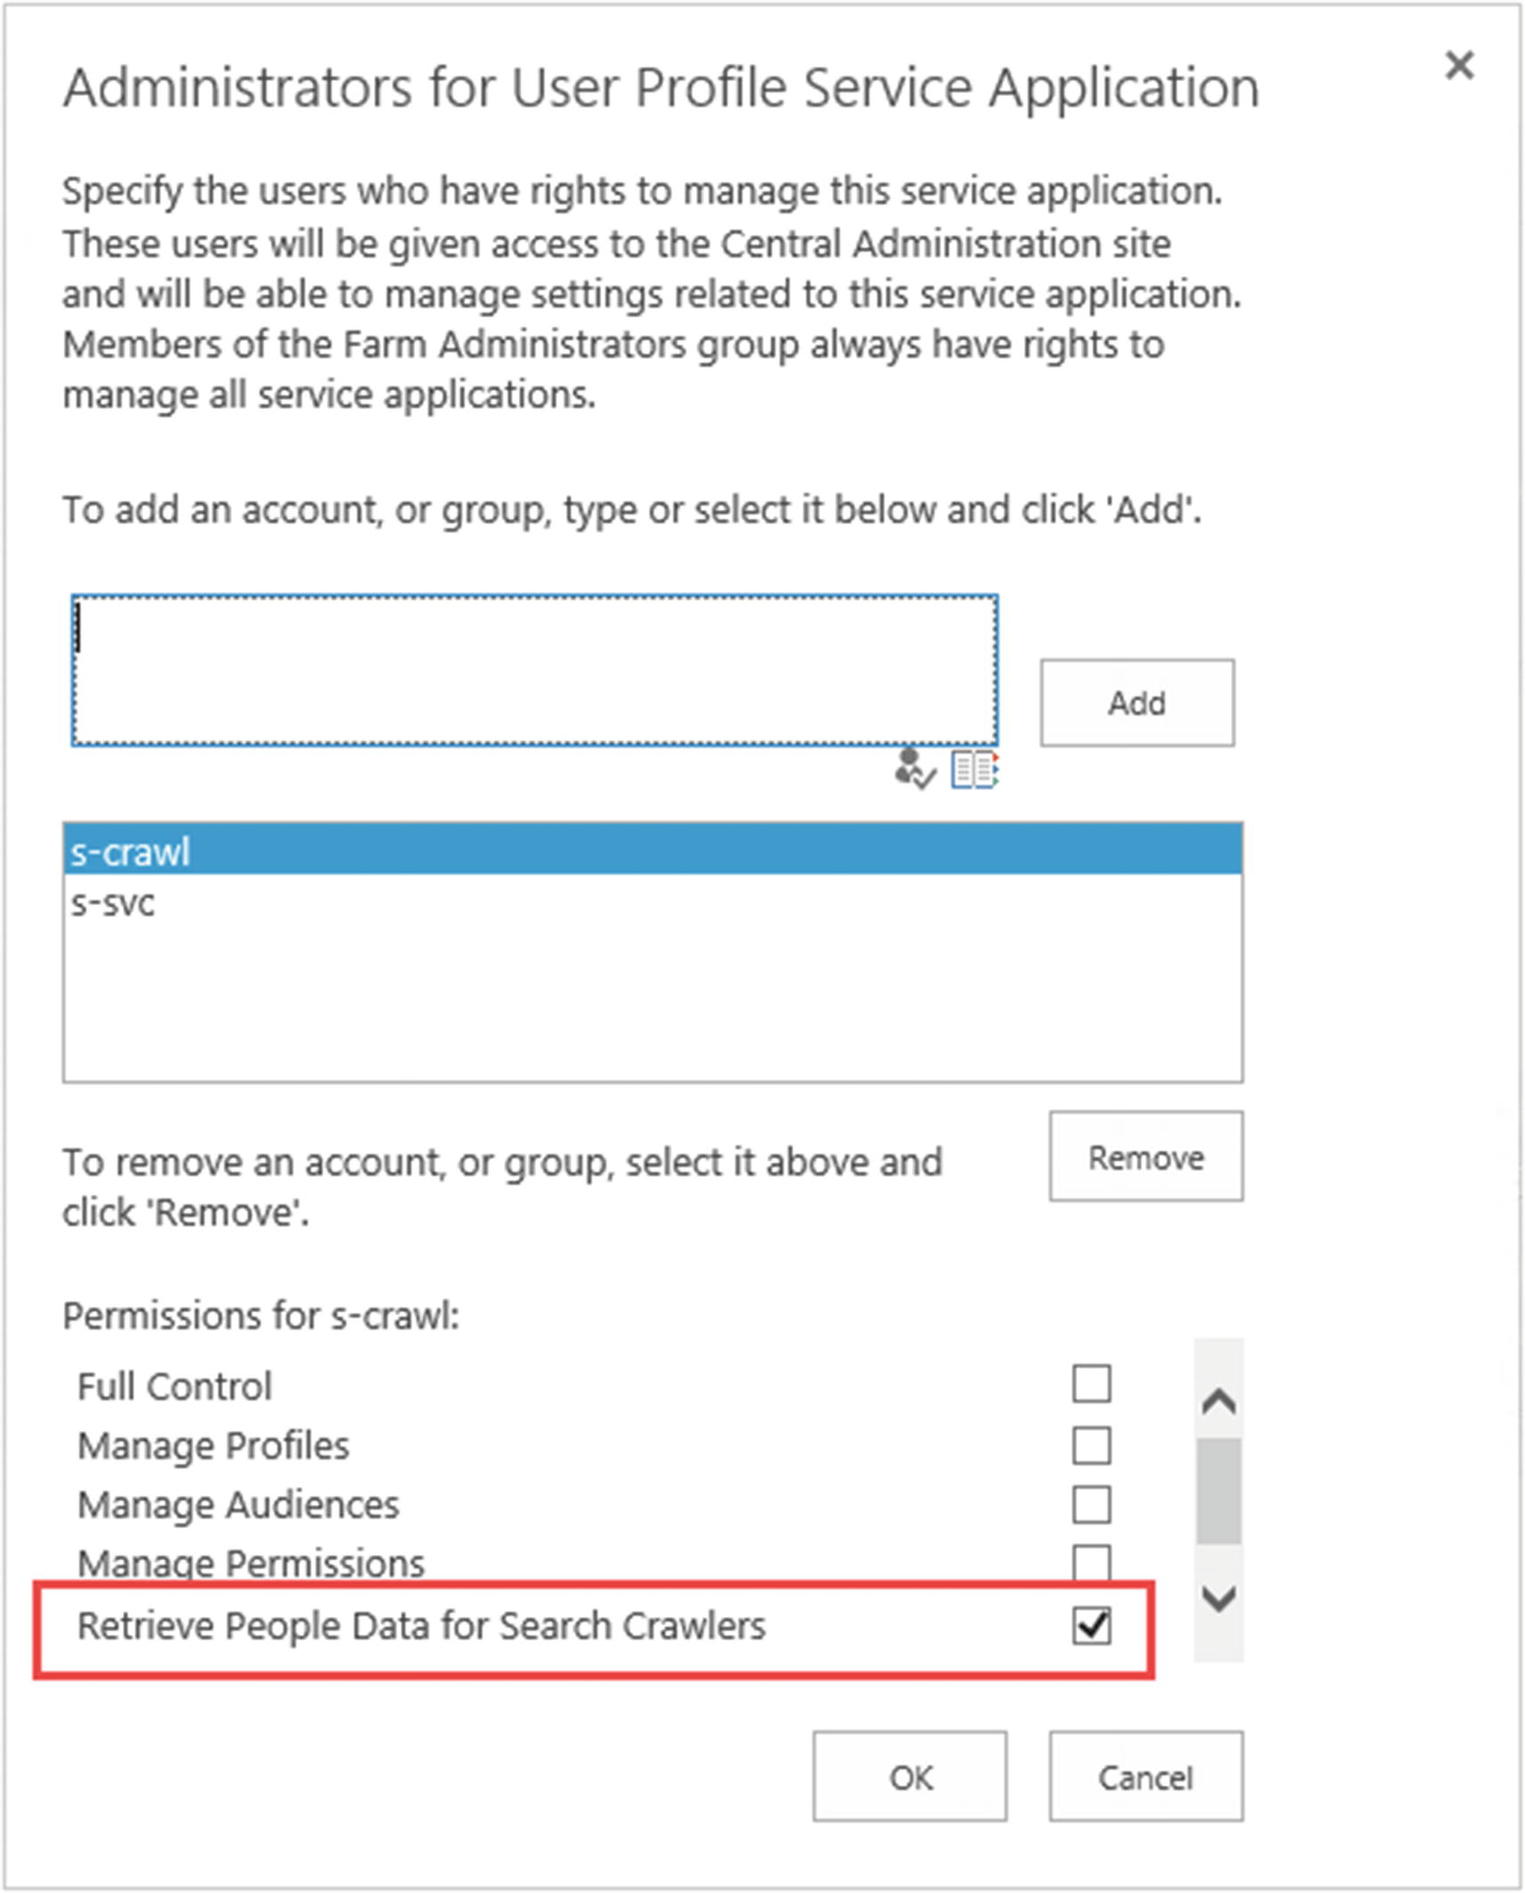
The default content access account must also have the “Retrieve People Data for Search Crawlers” right on the User Profile Service Application, as seen in Figure 6-11. To get to the “Administrators for User Profile Service Application” page, from the Manage Service Applications page, select the User Profile Service Application, and click the Administrators button in the ribbon. This will allow the crawl account to crawl the user profiles and return this information in search.
Figure 6-11
Retrieve People Data for Search Crawlers permissions
With the default content access account configured, it’s now time to create our Content Sources.
Creating Content Sources
The next step to get our Search Service Application up and running is to create our content sources. When creating a Search Service Application, SharePoint creates a content source called Local SharePoint sites which contains all the Web Applications in our farm as seen in Figure 6-12.
Figure 6-12
Local SharePoint Sites Content Source
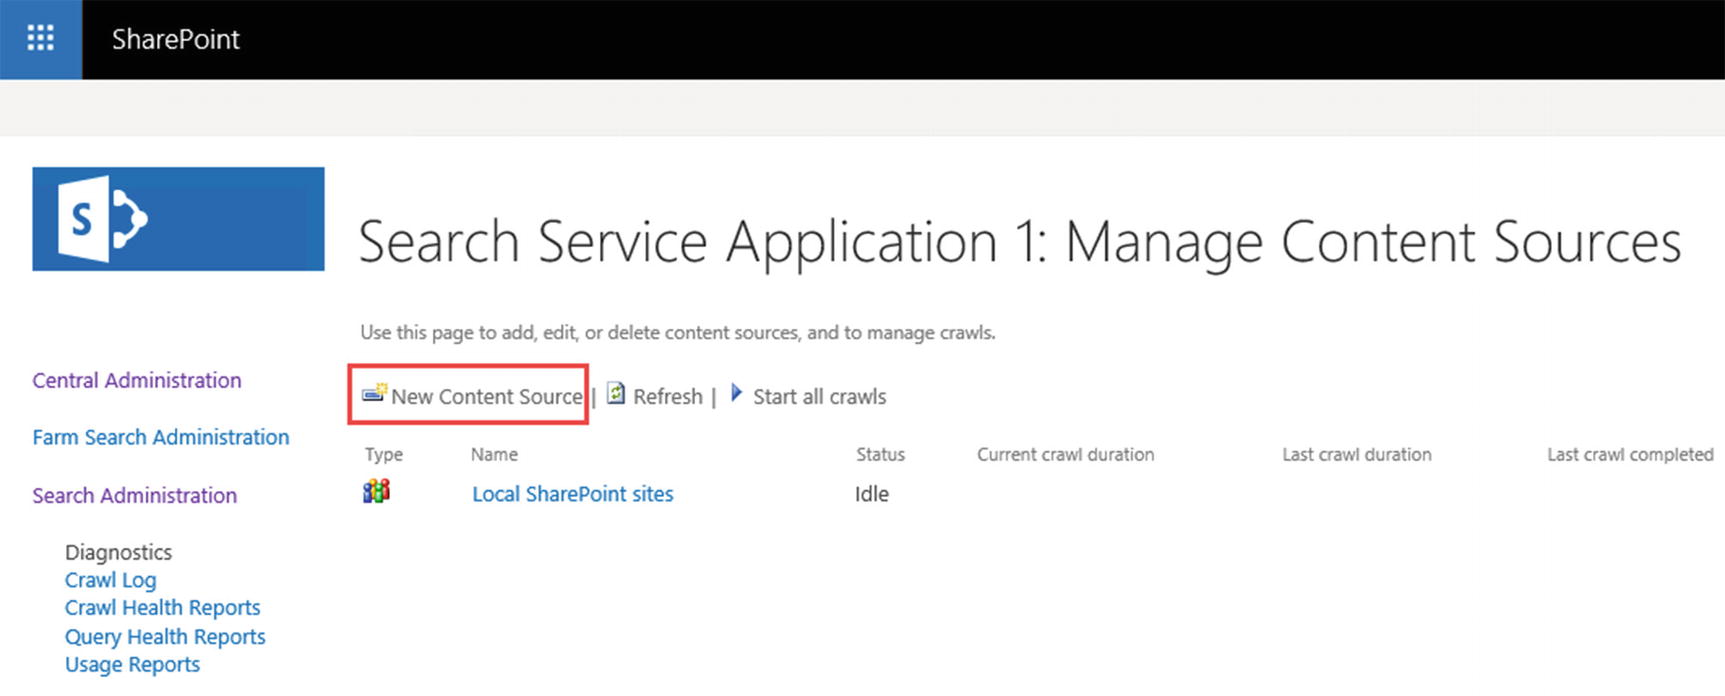
You might want to split those Web Applications into different Content Sources if you want to set different crawl schedules, or create custom results based on only one Web Application. To create a Content Source, navigate to the Search Administration Page in the Central Administration and afterward in the Content Sources settings page. From the Manage Content Sources page, click the “New Content Source” page seen in Figure 6-13.
Figure 6-13
Manage Content Sources page
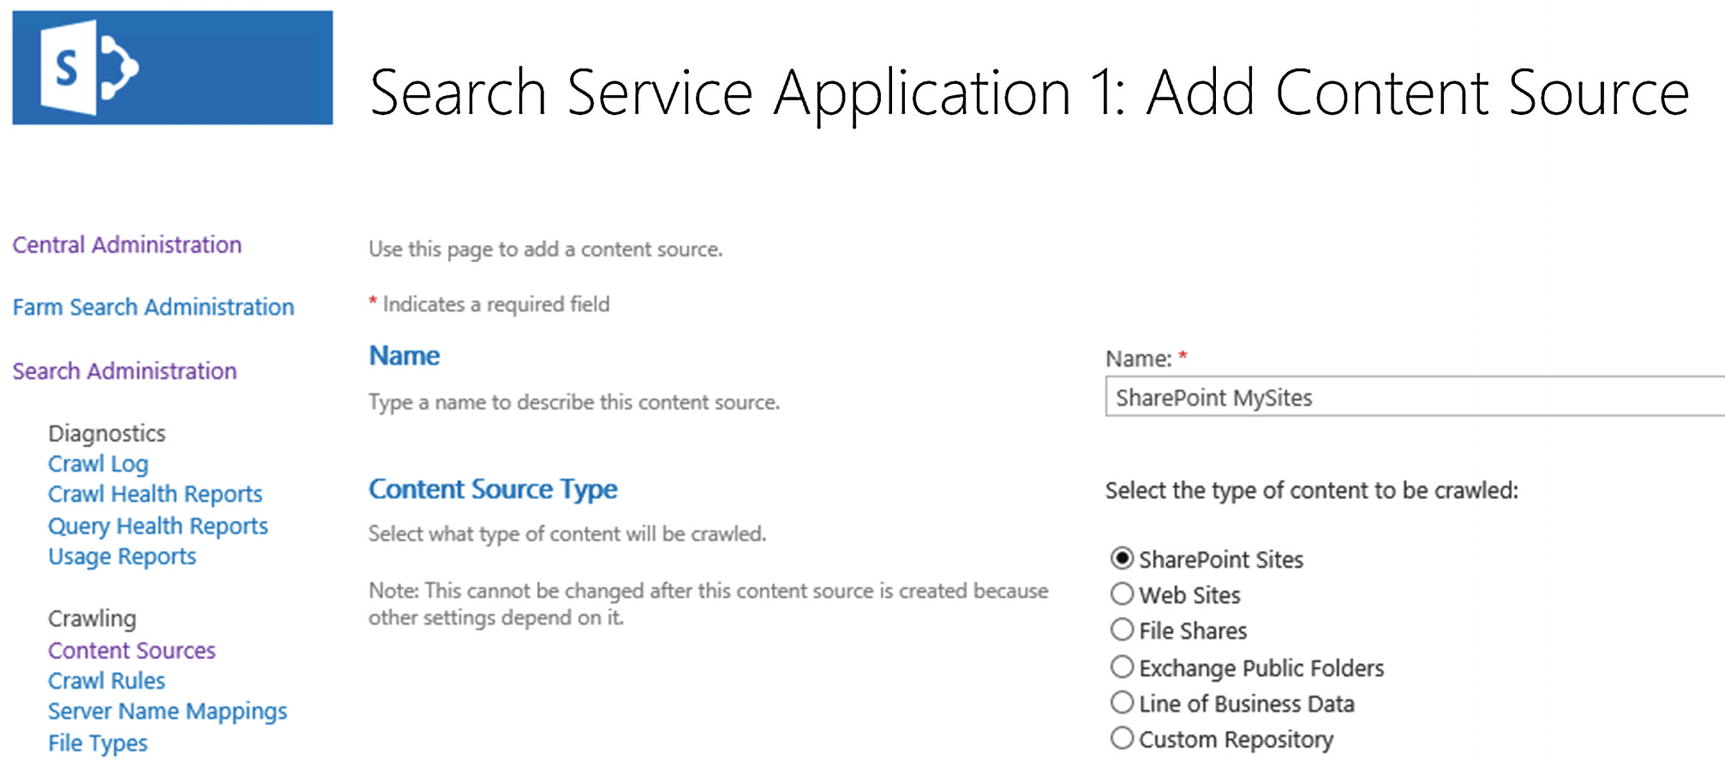
A window will open in which you can specify all the settings for the content source. First you will need to enter a name, in our example seen in Figure 6-14, the name is “SharePoint MySites.” Next, we need to select what type of content is included in this Content Source. Depending on the choice of content, the available configurations later in the process will be different. Since the type of item we want to crawl in this Content Source is a SharePoint site, we have selected “SharePoint Sites.”
Figure 6-14
Add a Content Source
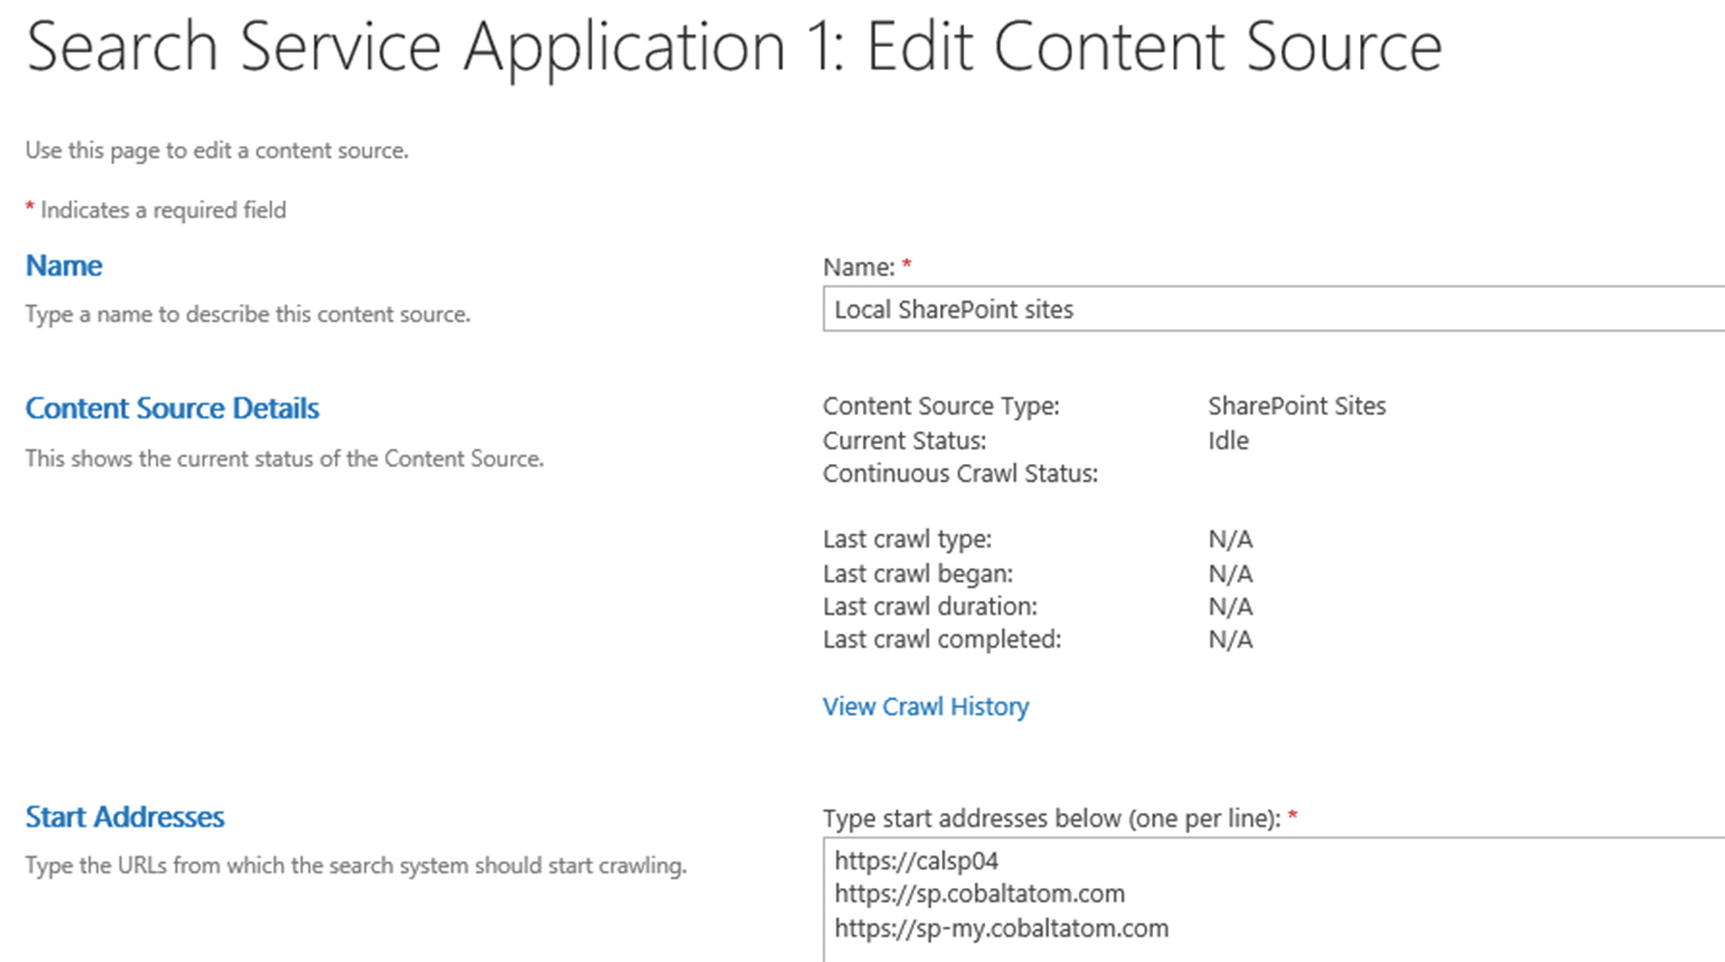
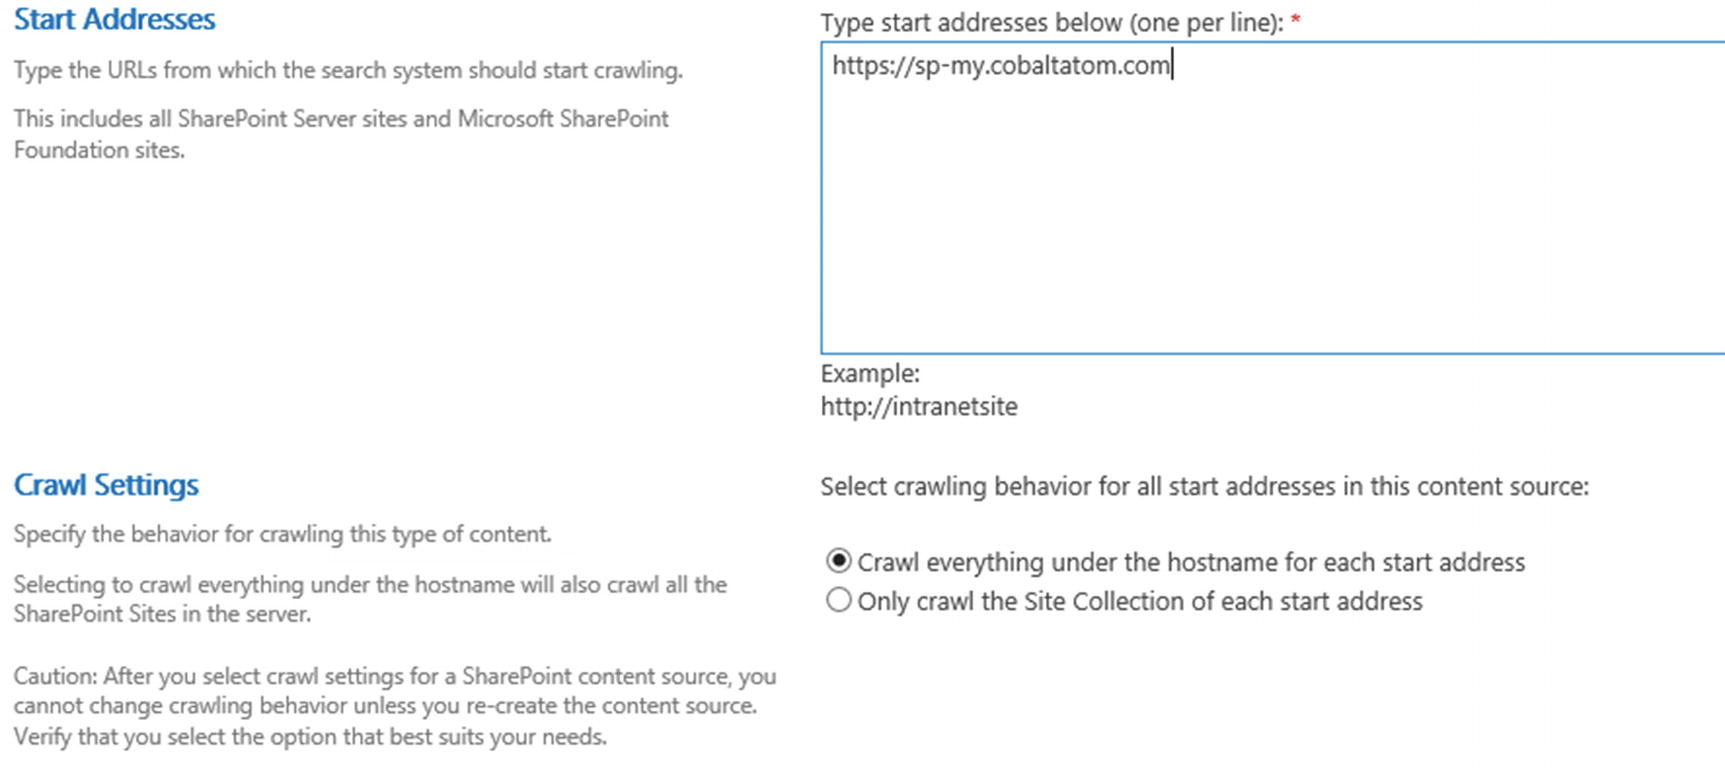
The content you enter in the Start Address will depend on the crawl Settings you select in the following checkbox. The easiest to manage solution is to enter the root of the Web Application in the Start Address and select “Crawl everything under the hostname for each start address” as we did in Figure 6-15. This way, SharePoint will crawl all the Site Collections in that Web Application, and as new Site Collections get added, they will get automatically included in this content source. If you are using Host Named Site Collections, you only need to include the root Site Collection of the Web Application and SharePoint will be able to identify the other Site Collections in the same Web Applications. We will learn more about Host Named Site Collections in Chapter 13.
Figure 6-15
Content Source Start Addresses and Crawl Settings
If you want to have different Crawl Schedules between Site Collections in the same Web Application, you need to select “Only crawl the Site Collection of each start address” in the Crawl Settings and manually enter each Site Collection URL in the Start Addresses.
Lastly, you will have the options to select your crawl schedule for this content source. Your crawl schedule will depend on your business requirements as well as your search capabilities. There are two different types of schedule for your content. The first one which has been there for the last few SharePoint versions is the Incremental and Full Crawl. The second type of crawl schedule is the Continuous Crawl, which was introduced in SharePoint Server 2013. Let’s look at the different types of crawls:
Full Crawl
The Full Crawl is a crawl that will crawl the entire content of your content source whether the item already exists in the index or not. The Full Crawl will not only crawl content, but also process any changes in Managed Properties, iFilters, as well as the Content Enrichment Web Service, which is a Search Feature that developers can use to customize SharePoint Search. Because the Full Crawl crawls all the content of a content source, it takes longer to finish, and it’s usually run less often than the Incremental Crawl. A Full Crawl might never be scheduled and only run manually to process changes to the preceding customizations. You can minimize the number of times a Full Crawl is needed by using the built-in “Reindex Site” functionality, available in the Site Settings page of every site, under Search and Offline Availability. This will run a full crawl only on that specific site, and not on your whole content source, and can be useful when simply needing to update your Managed Properties or mapping of Crawled Properties.
Incremental Crawl
The Incremental Crawl is a crawl that will only index the contents that have been modified since the last time a crawl was done. The length of this crawl will directly depend on how many items were modified since you last did a crawl and is usually a lot shorter in duration than a full crawl. This crawl is usually scheduled multiple times during a day, and can also be manually started.
Continuous Crawl
Continuous Crawl is a type of that aims to keep the content as fresh as possible. Similar to the Incremental Crawl, the Continuous Crawl will only crawl items that have changed since the last crawl is finished. The main difference between Continuous Crawl and Incremental Crawl is that in Continuous Crawl mode, a crawl will start every 15 minutes, even if the last Crawl did not finish. If you want, you could customize the 15-minute crawl interval by running the following PowerShell cmdlet:
Where <TimeInMinutes> is the interval, in minutes, of how often crawls should be started. Be aware that Continuous Crawl, even with the default 15-minute delay can place a very big load on your SharePoint Infrastructure. Continuous Crawl is often used for search-based sites, where the activity of the site is highly dependent on a fresh index.
For the Content Source we created in this example, we have selected to use Continious Crawl as seen in Figure 6-16.
Figure 6-16
Crawl Schedules
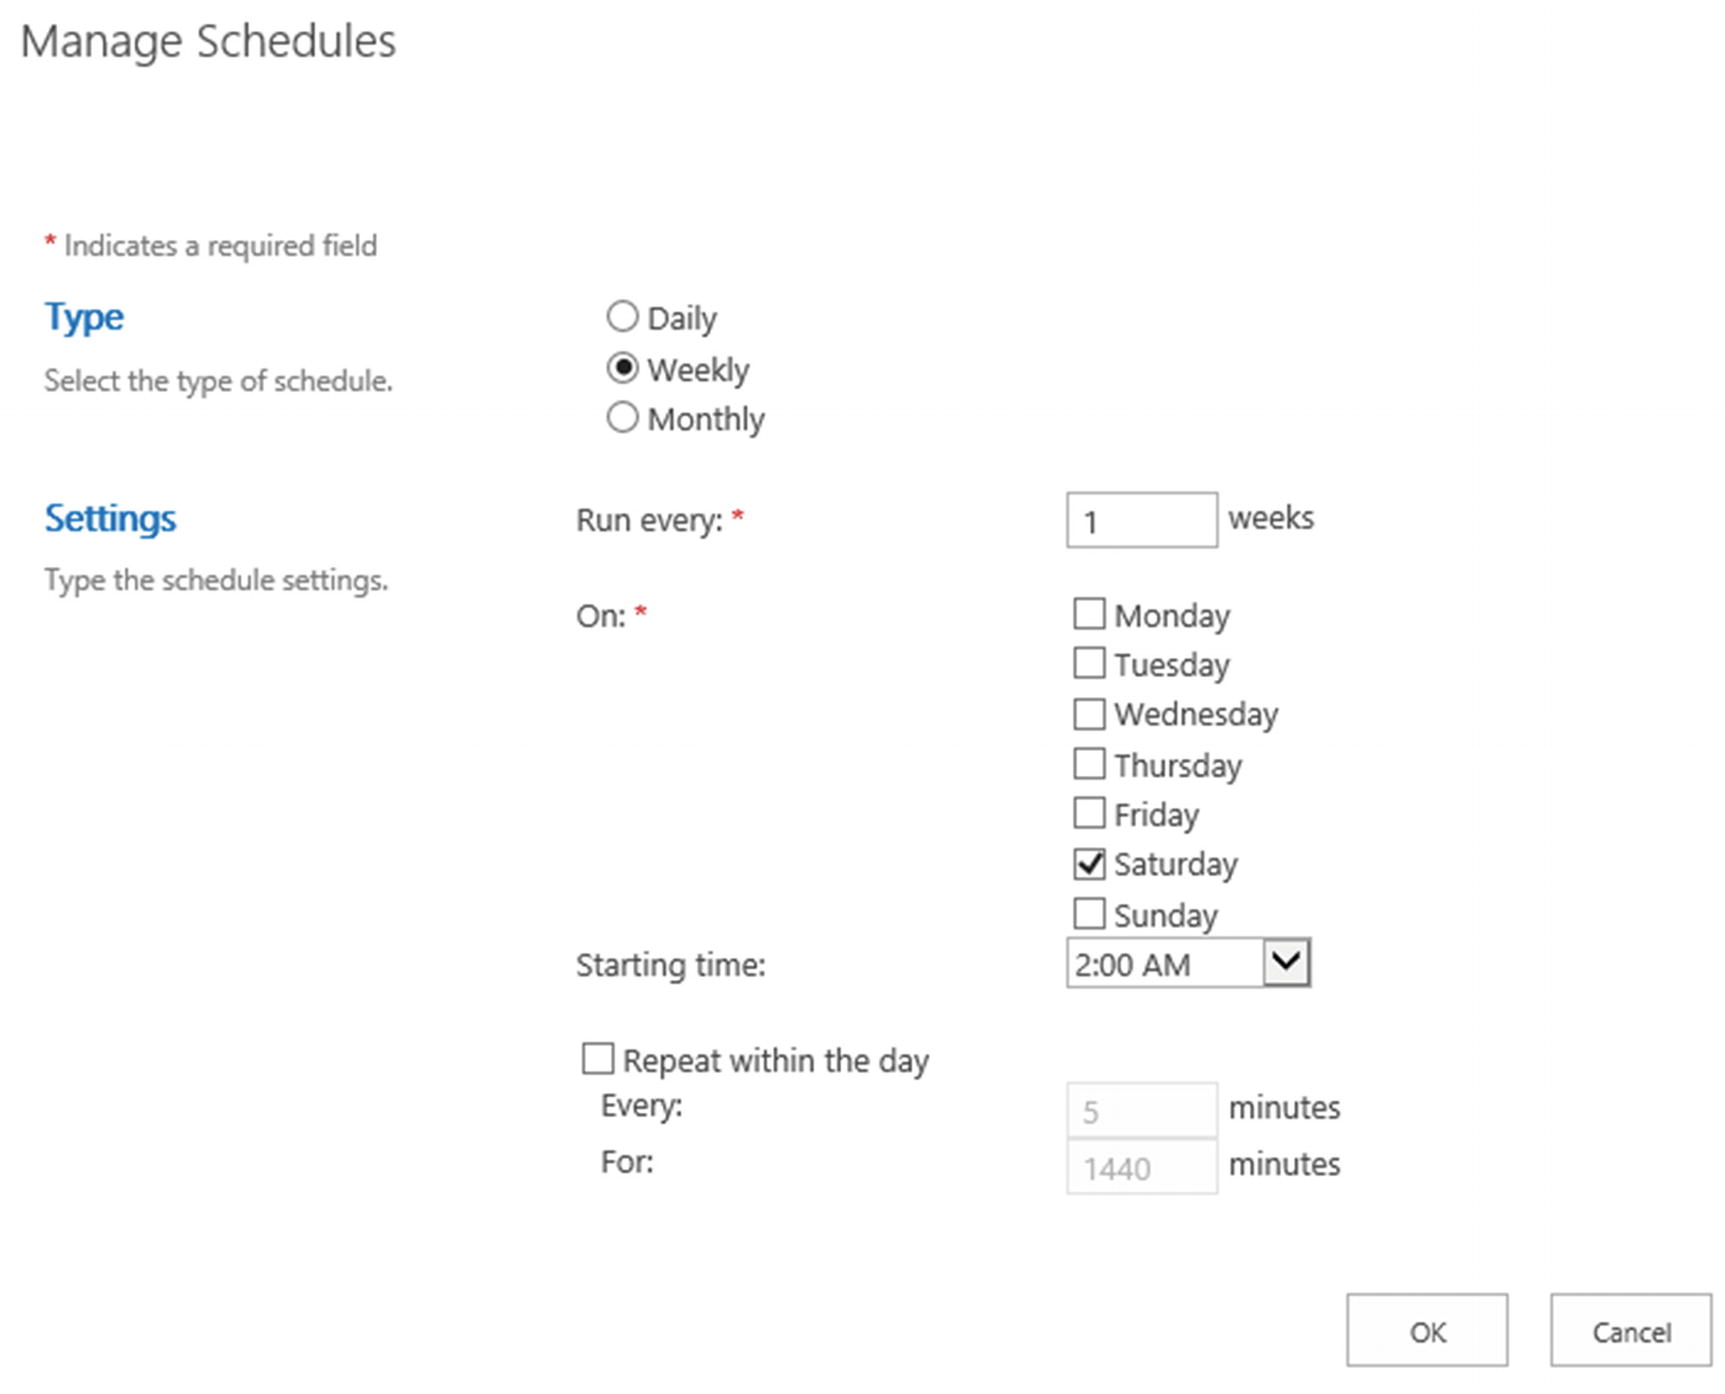
To create a schedule for the Full Crawl, click the Create Schedule link under the dropbox, and a pop-up window will open allowing you to create a new schedule. As an example, we have created a schedule in Figure 6-17, where the full crawl will happen every Saturday at 2 AM.
Figure 6-17
Full Crawl Schedule
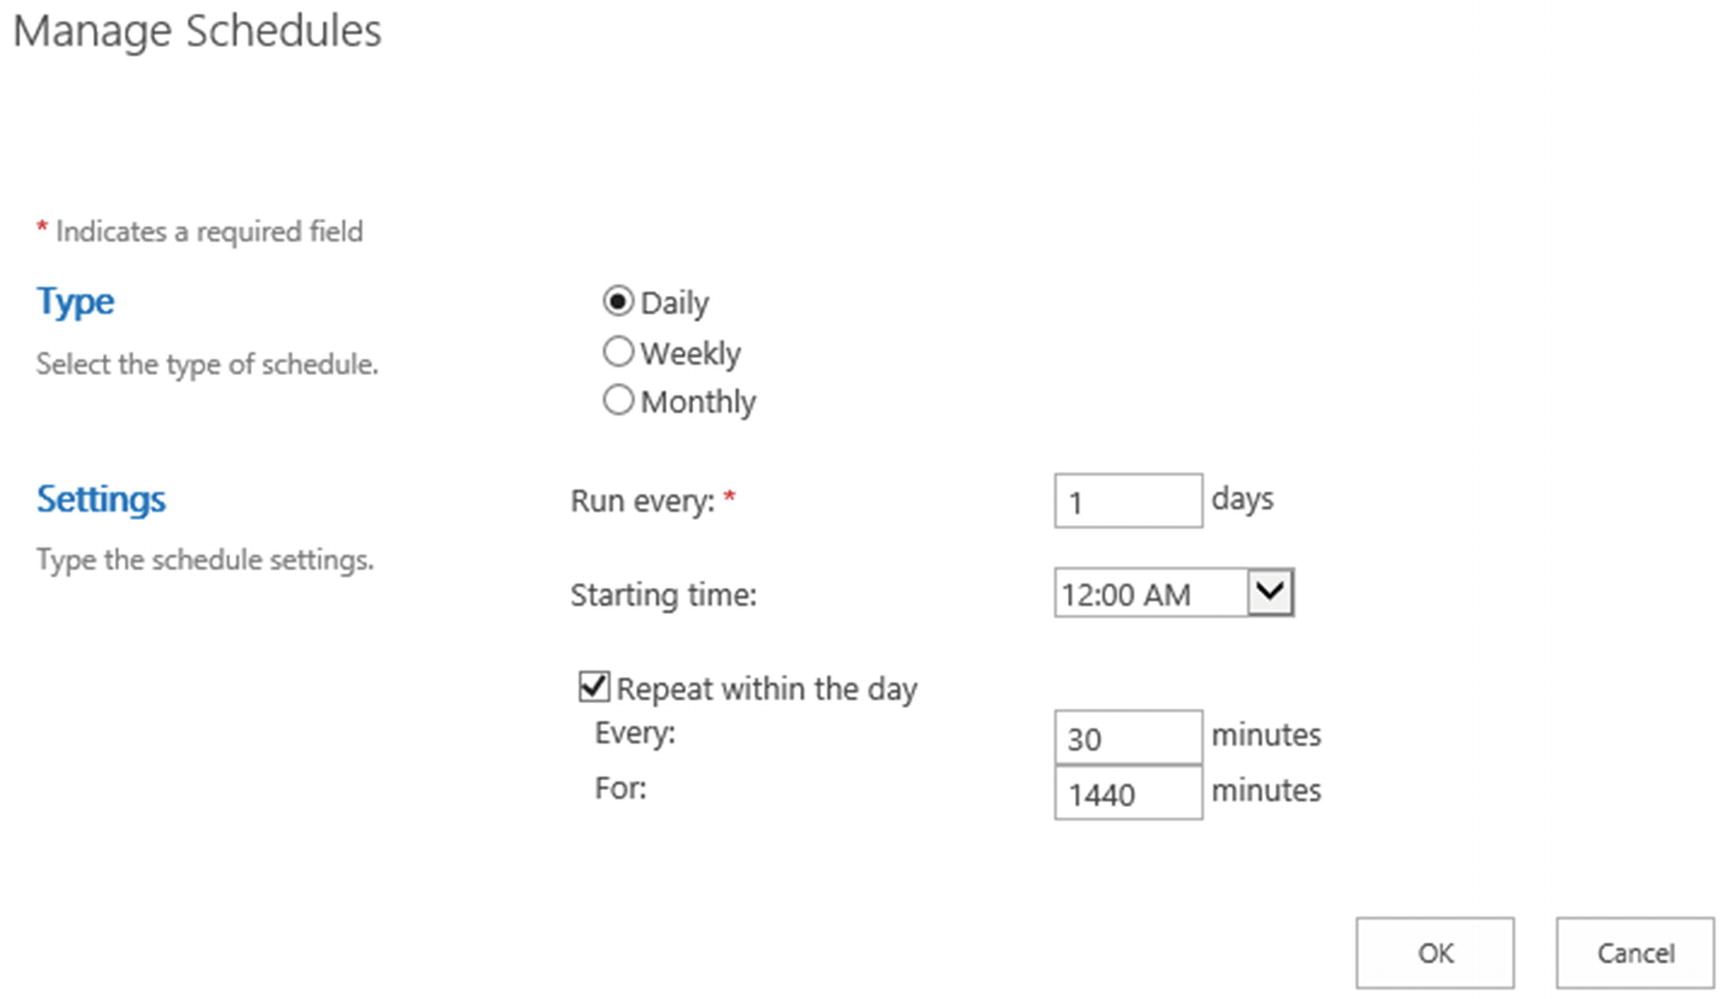
While most Full Crawls only run very rarely, Incremental crawls probably run multiple times every day. To set a crawl schedule to repeat during the day, you need to check the “Repeat within the day” checkbox. You will then need to enter how often the crawl must be repeated and for how long. In the example in Figure 6-18, we start a crawl every 30 minutes, for 1440 minutes (24 h). Therefore, every day the crawl will run every 30 minutes.
Figure 6-18
Incremental Schedule every 30 minutes
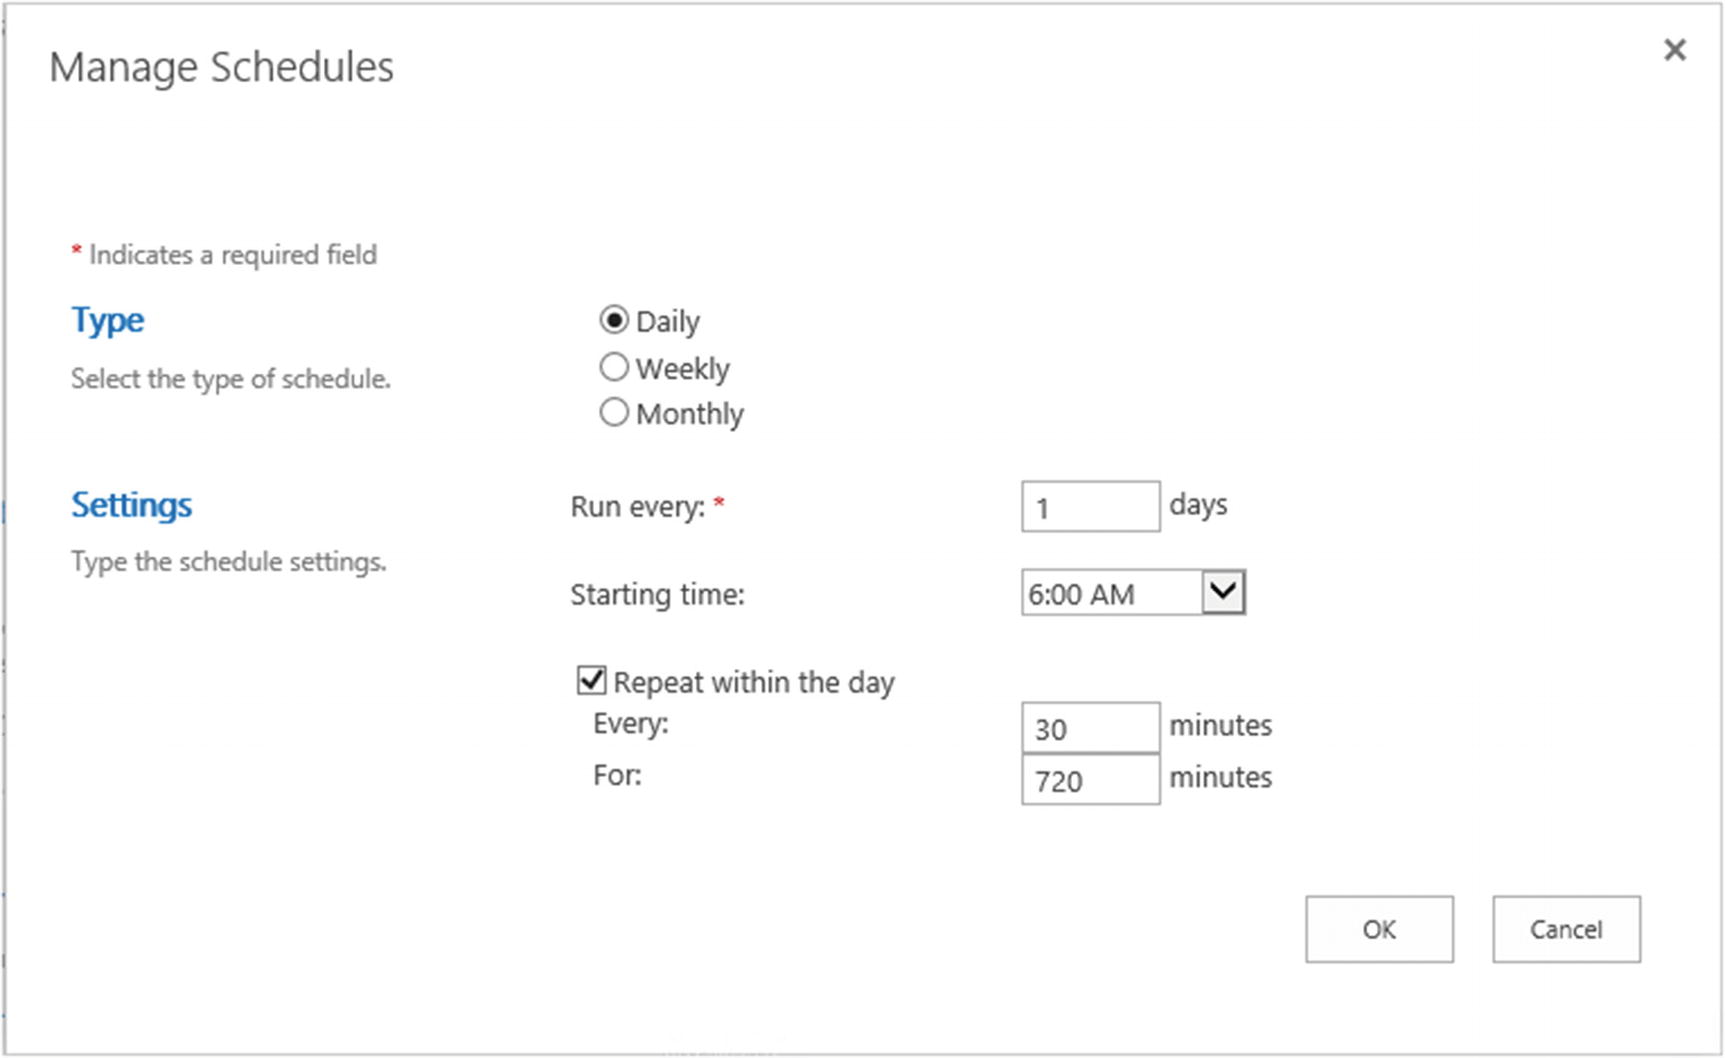
Some companies that are located on only one time zone might only want the incremental crawls to happen during business hours, since there is usually no activity during off-hours. By changing the Start time and duration, you could set your Incremental Crawls to run every 30 minutes, from 6 AM to 6 PM, as seen in Figure 6-19. By setting the For field at 720 minutes (12 hours), no crawl will start after 6 PM, and the next incremental crawl will start at 6 AM the following day.
Figure 6-19
Incremental Crawl Schedule between 6 AM and 6 PM
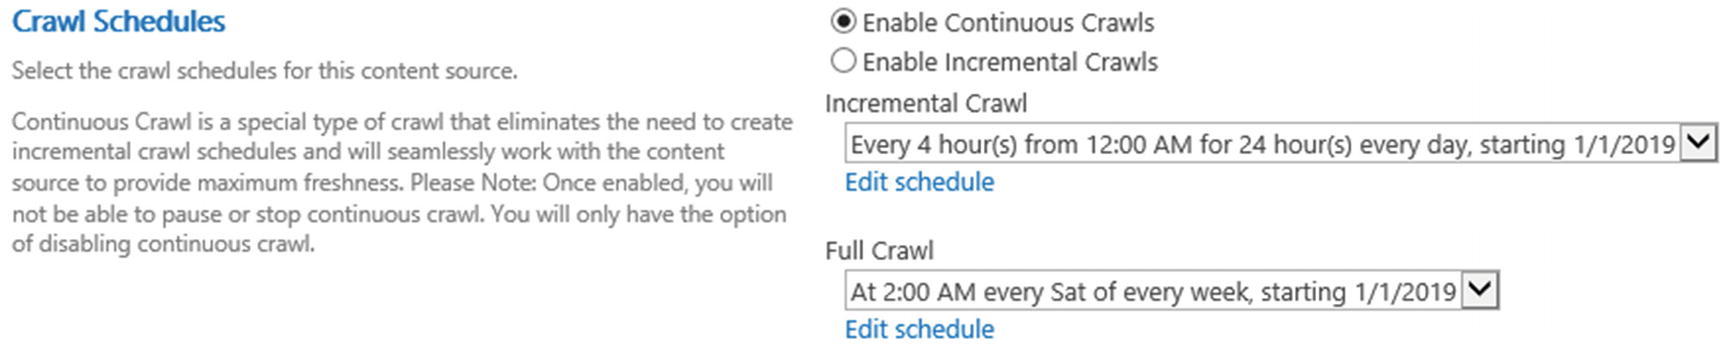
In our example in Figure 6-20, we have chosen to enable continuous crawl, and do a full crawl every Saturday, starting at 2 AM.
Figure 6-20
Crawl Schedule
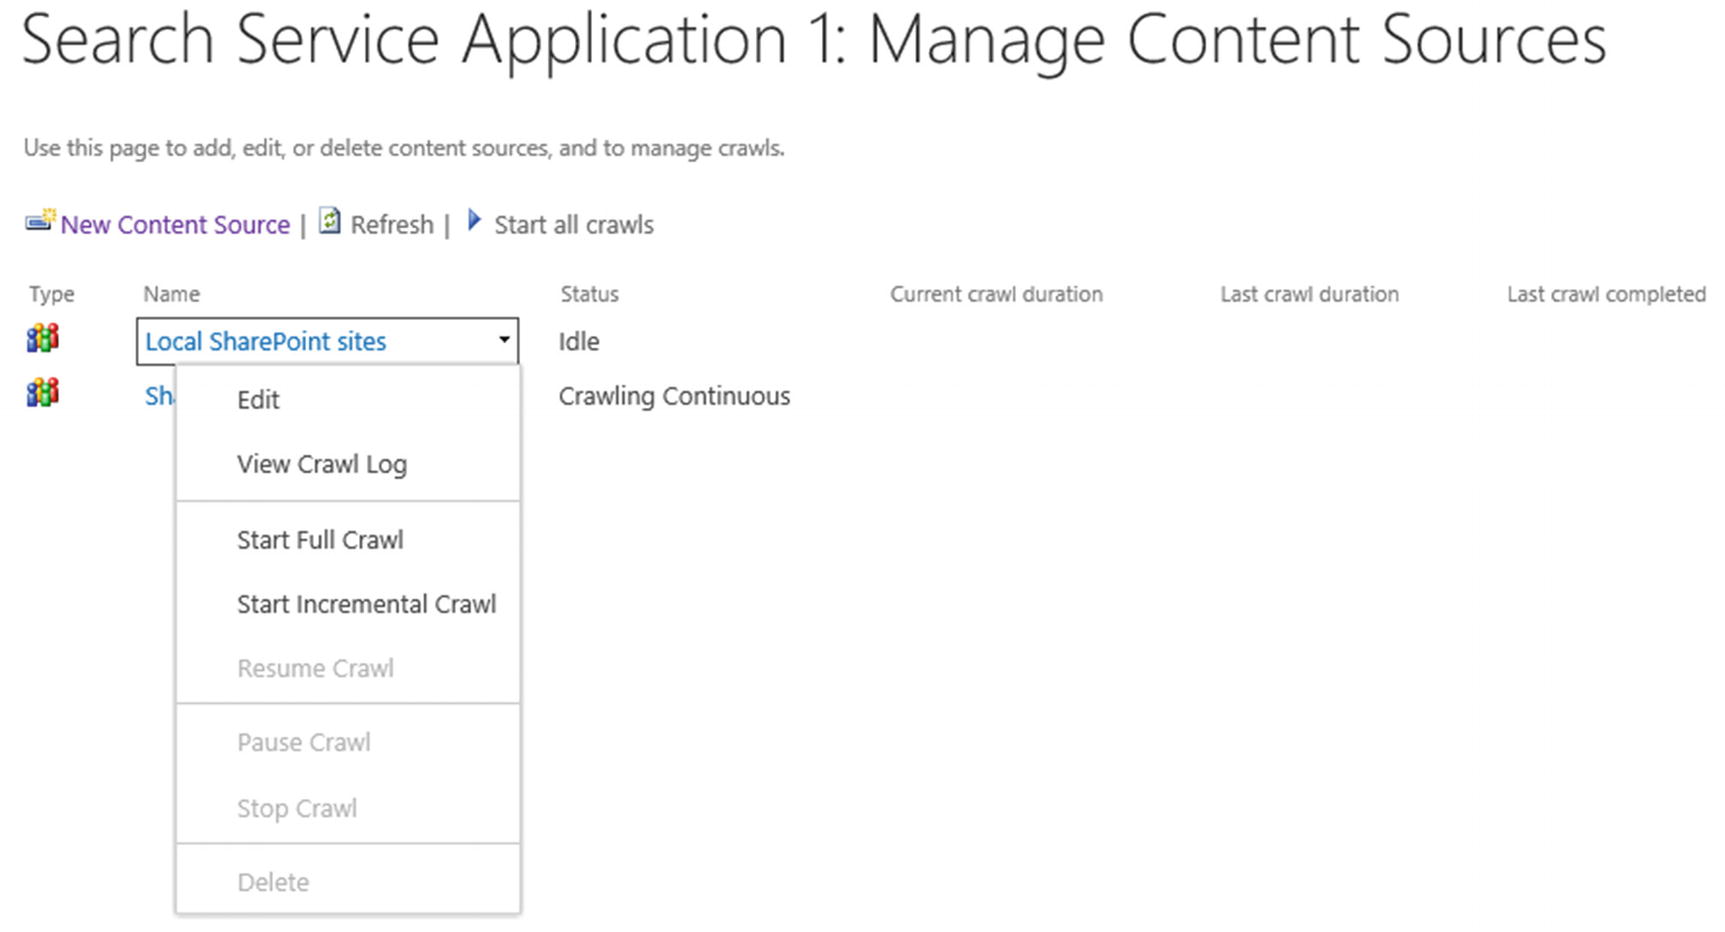
After the crawl schedule is configured, simply press on OK and your new Content Source will be created. If you chose to enable Continuous Crawl, the crawl will start right away, and if you chose Incremental and Full, the crawl will start in the next scheduled period. You can always manually start the crawl from the Content Source menu as seen in Figure 6-21.
Figure 6-21
Content Source Menu
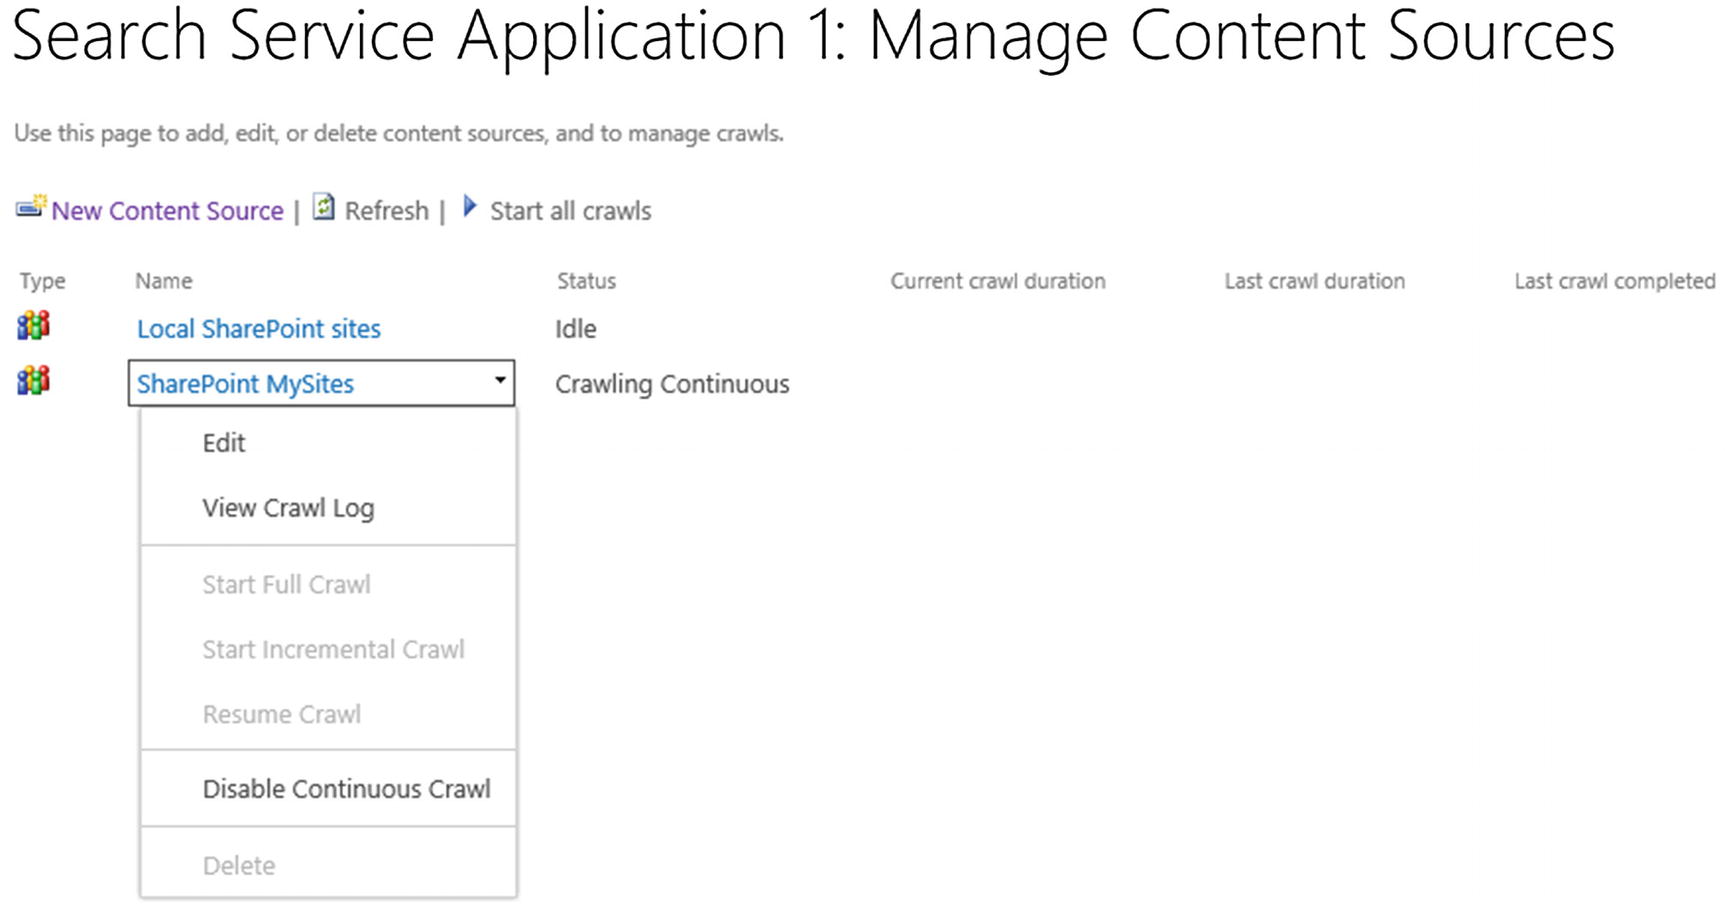
If Continuous Crawl is enabled, the menu will only allow you to disable Continuous crawl as seen in Figure 6-22. You will not be able to manually trigger incremental or full crawls.
Figure 6-22
Content Source Menu with Continuous Crawl enabled
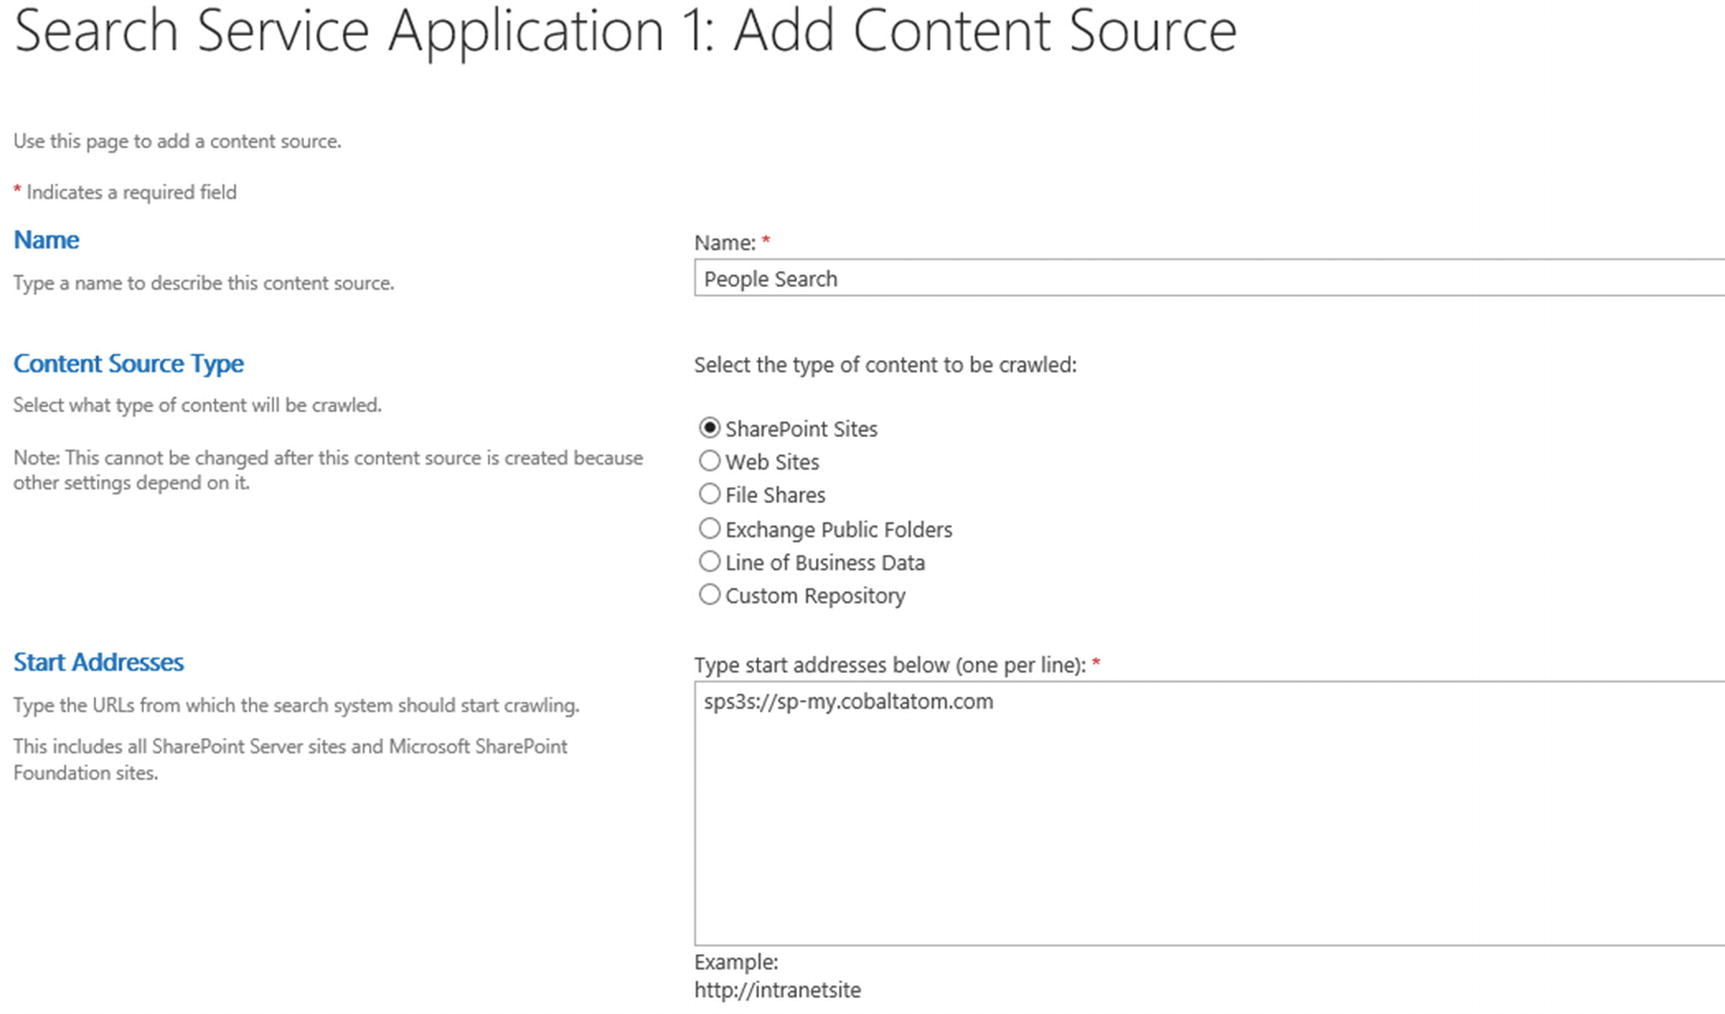
Another popular type of content source you might want to create is a content source to crawl the User Profiles of users, that way important information such as names, departments, skills, and past projects will show up in the search. We have already given permission to the crawl account on the User Profile Service; we now need to create a content source to crawl People data. The content source type will still be “SharePoint Sites” as the previous example; however, what is a bit different is the Start Address we must enter. The Start Address for People Search needs to be under the following format:
sps3://<MySites URL>
Where <MySites URL> is the URL of your MySites host. If your MySites host Web Application runs on HTTPS, you will need to start it with sps3s instead of sps3 as seen in the following:
sps3s://<MySites URL>
In both cases, you do not have to enter the http:// or https:// in front of the host name.
In the environment for this book, we would enter sps3s://sp-my.cobaltatom.com as our Start Address as seen in Figure 6-23.
Figure 6-23
Configuring People Search
With our content sources created, it’s recommended to create an Enterprise Search Center where users can search across the whole SharePoint farm.
SharePoint Security and Search Performance
SharePoint Security and Search are highly connected because SharePoint search results are security trimmed. This means that users will only see search results that they are allowed to access and will not see any search results that they do not have permissions to. Whenever permissions change on an item, the SharePoint search engine will have to perform a crawl of that item in order to process the new permissions and calculate the Access Control List (ACL) of that item.
There are two major strategies of assigning permissions to a SharePoint site. The first one is by adding each user individually in a SharePoint group when they need access, and the second way is giving access to an Active Directory Security Group directly to the site, or placing it in a SharePoint group that has permissions on the site.
The big difference in search performance is that, each time you add a user directly to a SharePoint group, the crawler will have to do a security crawl on all the items that group has access to in order to recalculate the ACL of the site.
The first time you add an Active Directory group to a SharePoint Site, the behavior will be the same; however, when adding other users to that Active Directory group, SharePoint will not have to recalculate the ACL, since no users have been added directly in the SharePoint site. By not having to recrawl every item to recalculate the ACL, your crawls will take shorter and increase index freshness.
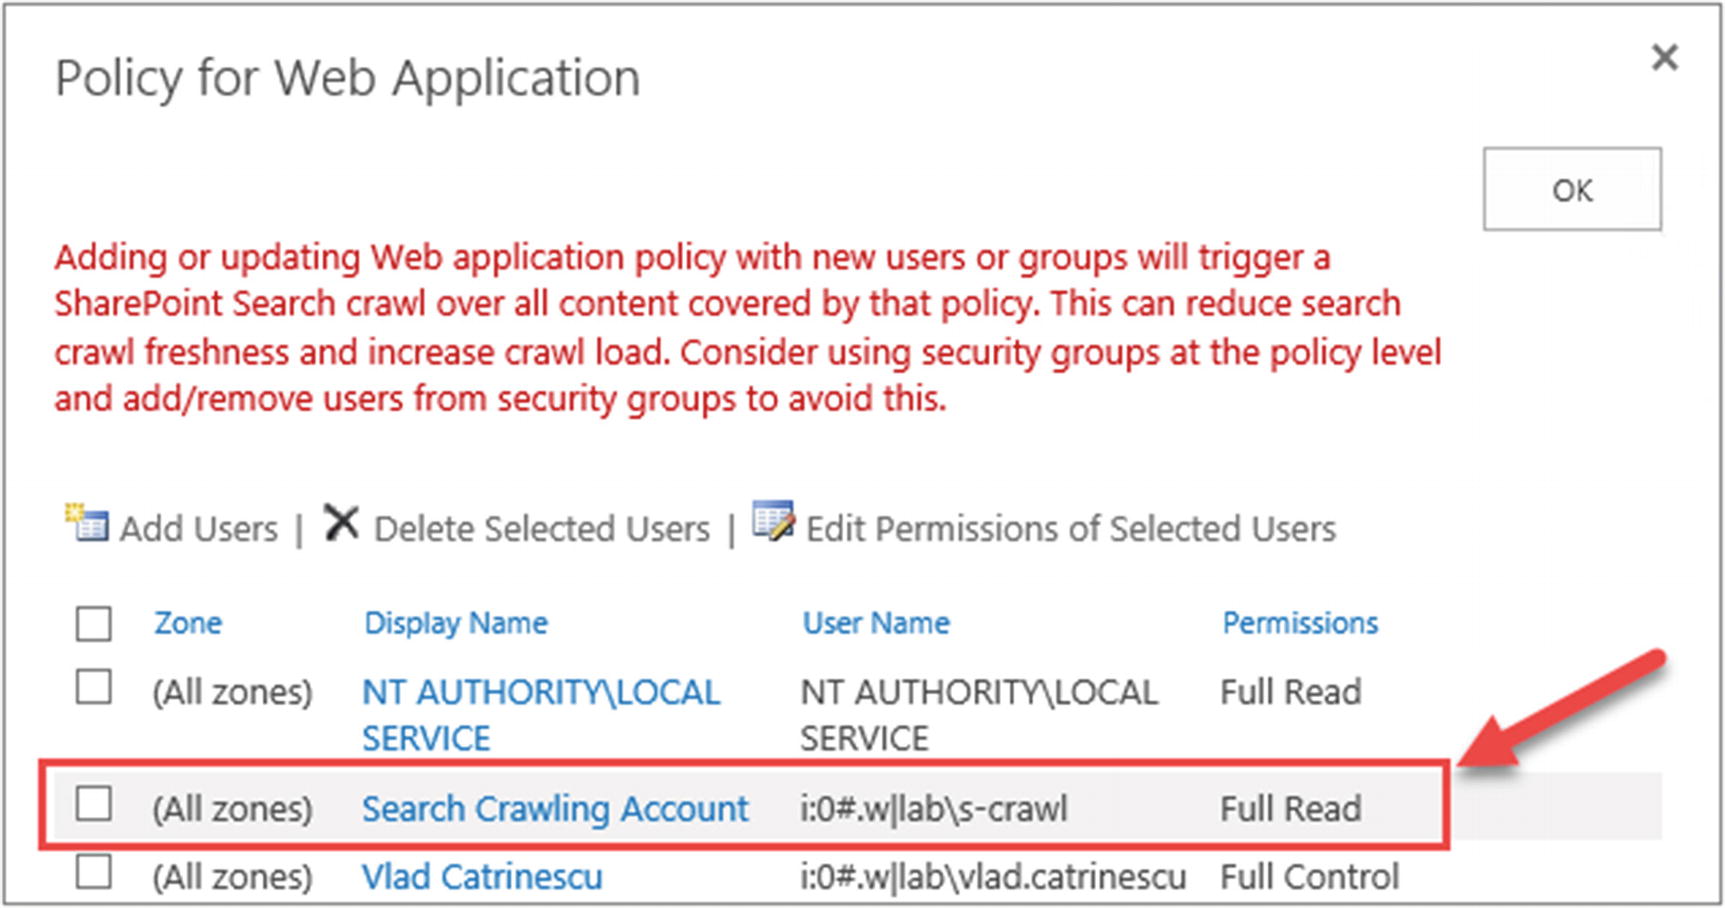
Lastly, when changing User Polices at the Web Application level, all the content in that Web Application will have to be recrawled for the preceding reasons. This is indicated at the top of the Policy for Web Application page seen in Figure 6-24.
Figure 6-24
Updating Web Application Policy will trigger a SharePoint Search Crawl
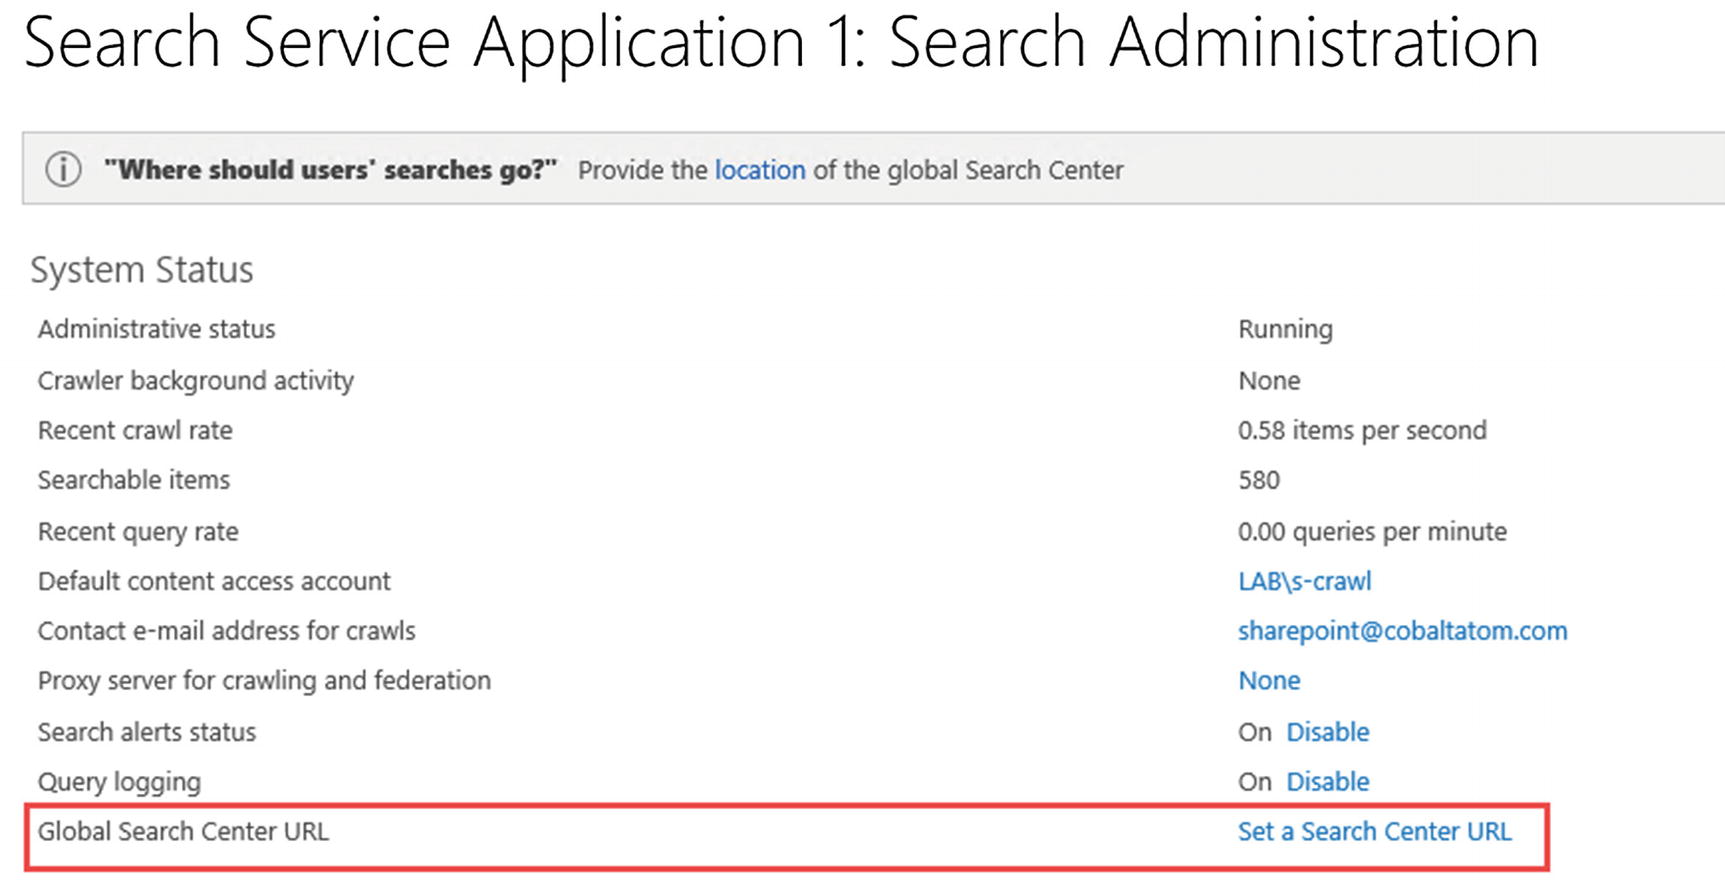
Selecting the Search Center
Before selecting an Enterprise Search Center, you first need to create a Site Collection with the template “Enterprise Search Center,” or if you create it by PowerShell, the SRCHCEN#0 template. Once that Site Collection is created, navigate to the Search Service Application Admin page and from the System Status click “Set a Search Center URL” as seen in Figure 6-25.
Figure 6-25
Set a Search Center URL link
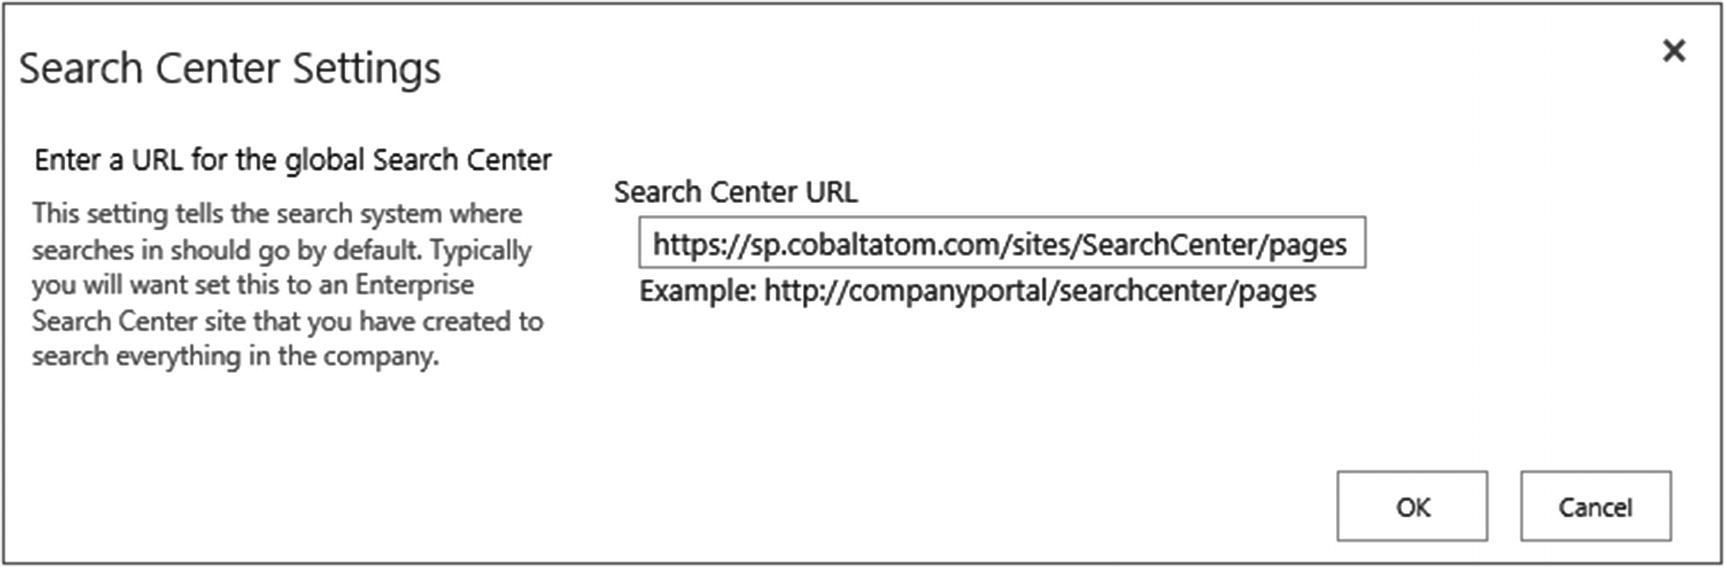
A pop-up window will open similar to Figure 6-26, in which you have to enter the URL of your Enterprise Search Center Site collection that you created earlier and add /pages at the end.
Figure 6-26
Search Center URL
You can also set the search center URL by using PowerShell and running the following cmdlet:
$ssa = Get-SPEnterpriseSearchServiceApplication
$ssa.SearchCenterUrl = "<Search Center URL>/pages"
$ssa.Update()
where “<Search Center URL>” is the URL to your Site Collection using the Enterprise Search Center template.
With the Search Service Application configured, let’s look at how to view what was crawled, and if there were any errors while crawling content.
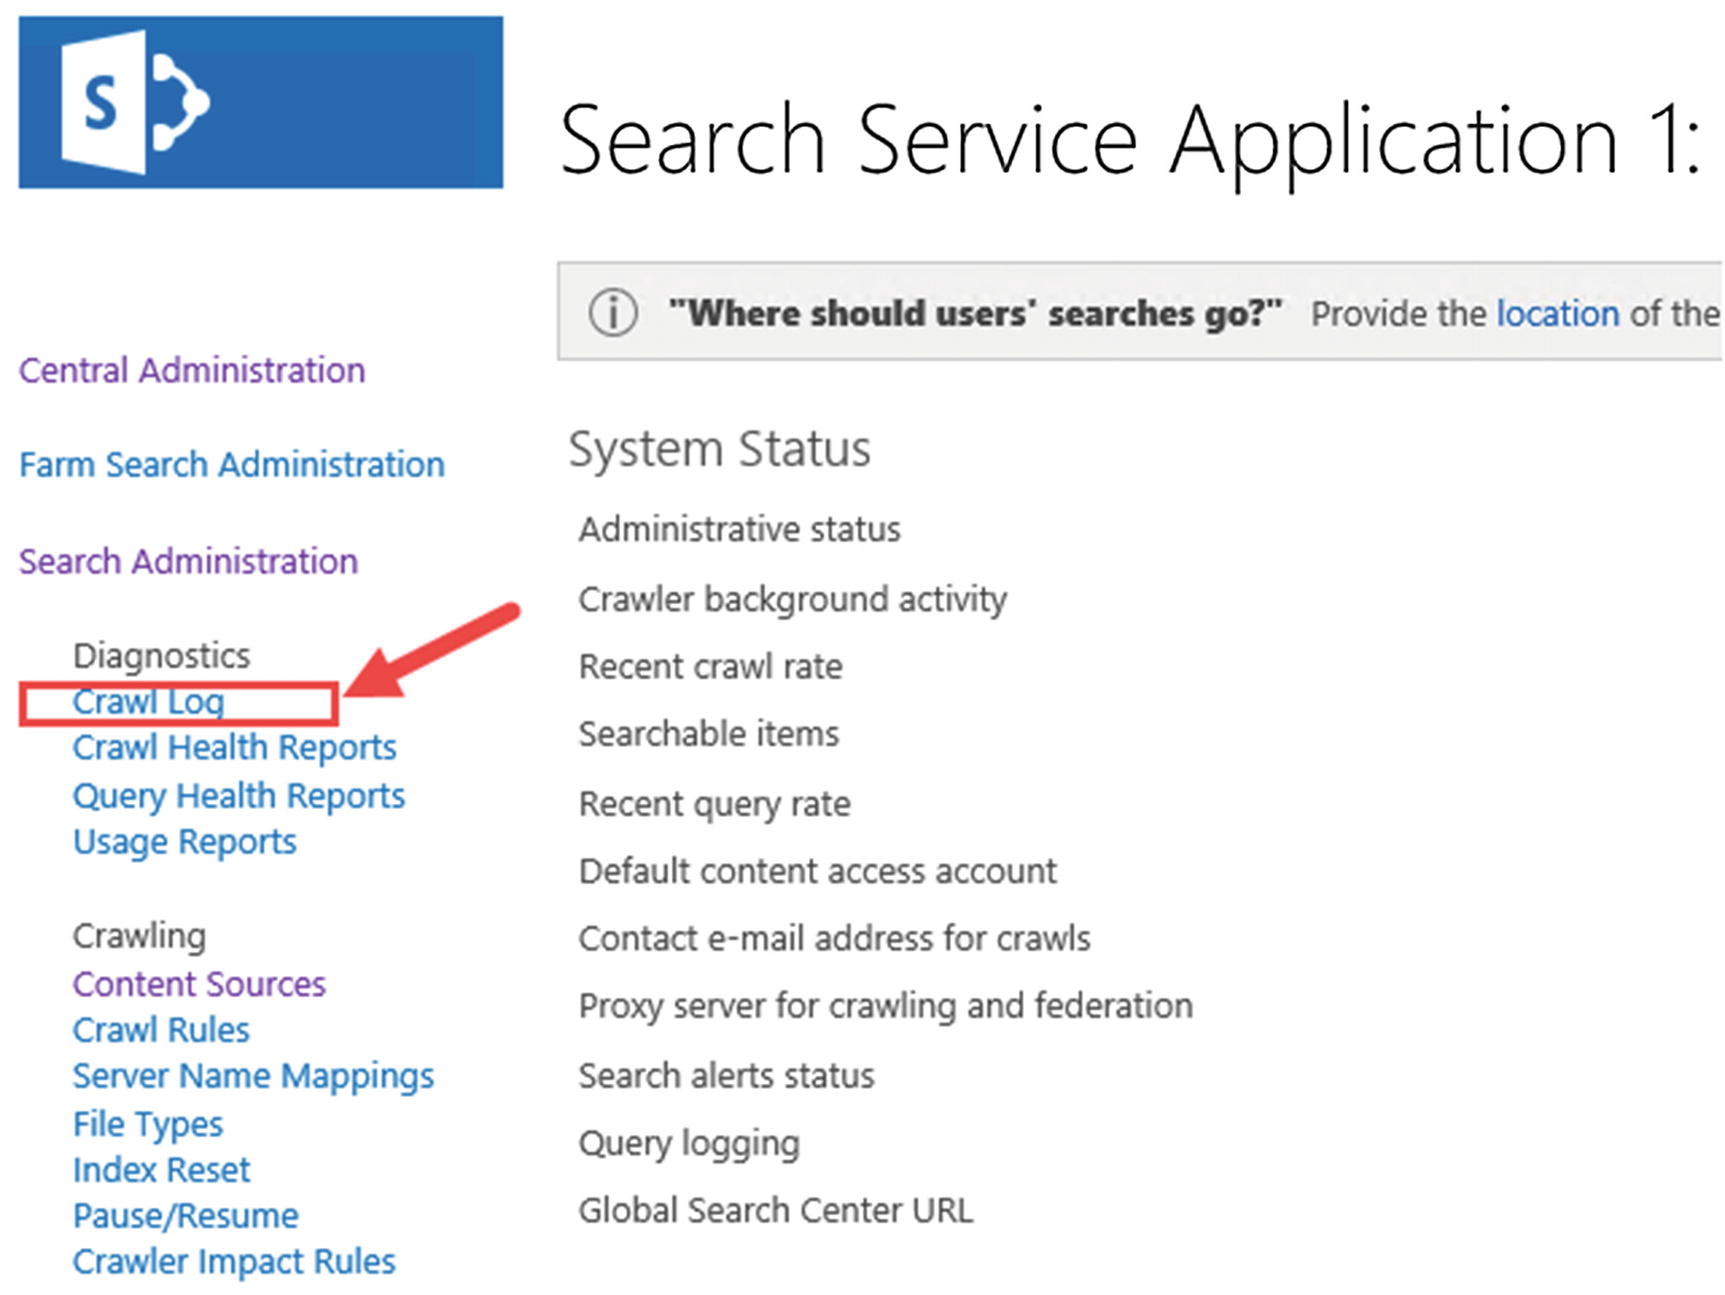
Analyzing Crawl Logs
The Search Service Application displays the Crawl Logs directly in the Central Administration, allowing us to see if the Search can successfully crawl our content sources and any errors that might stop content from getting to the index. This will be useful not only when setting up your Search Service Application the first time, but also as a check during regular maintenance. The Crawl logs can be accessed from the Search Administration page left navigation menu, in the Diagnostics category as seen in Figure 6-27.
Figure 6-27
Accessing the Crawl Log in the Search Administration Page
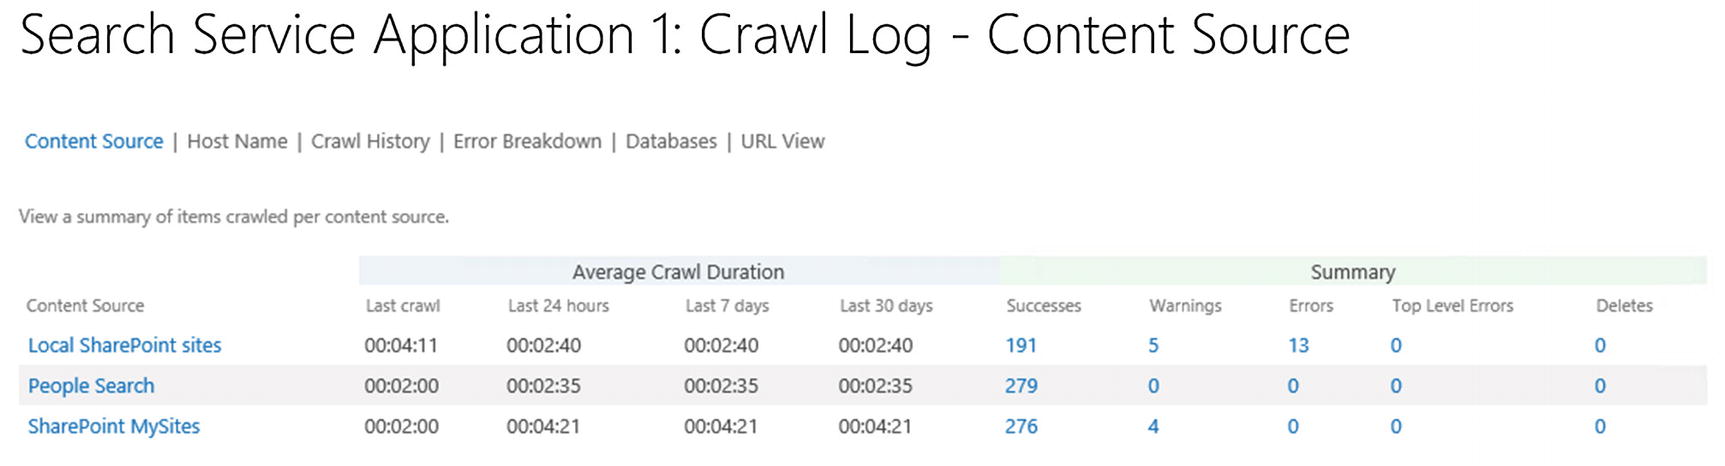
The Crawl Log settings page default view seen in Figure 6-28 gives us a high-level overview of our Content Sources and the Successes and Warnings. The Successes are the number of items that have been successfully crawled, and moved to the index, while Warnings are items that could not be crawled, or were crawled, but due to certain reasons not placed in the index. The Error column includes how many individual items could not be placed in the index, while the Top Level Error column is only for critical errors that stop the crawl component from reaching an entire Content Source.
Figure 6-28
Crawl Logs page
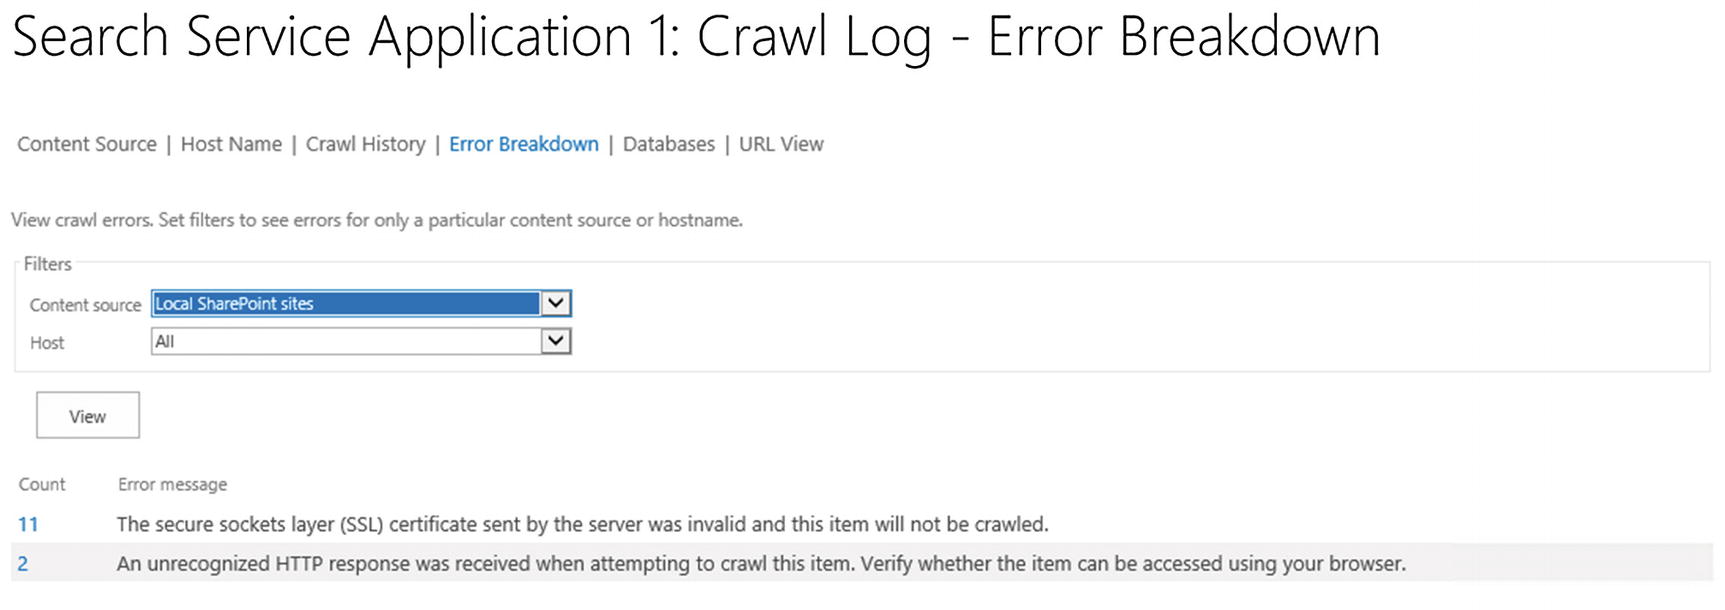
When clicking any of the numbers, SharePoint will show the message as well as URL for the items within that category. In Figure 6-29, we can see the three errors that we have in the SharePoint MySites content type and how many items were affected by each error. This will allow us to easily fix errors and get items in the index on the next crawl.
Figure 6-29
Crawl Log – Error Breakdown for the SharePoint MySites content source
Accumulating many errors over time will increase the size of your crawl database, since all those errors will be stored inside.
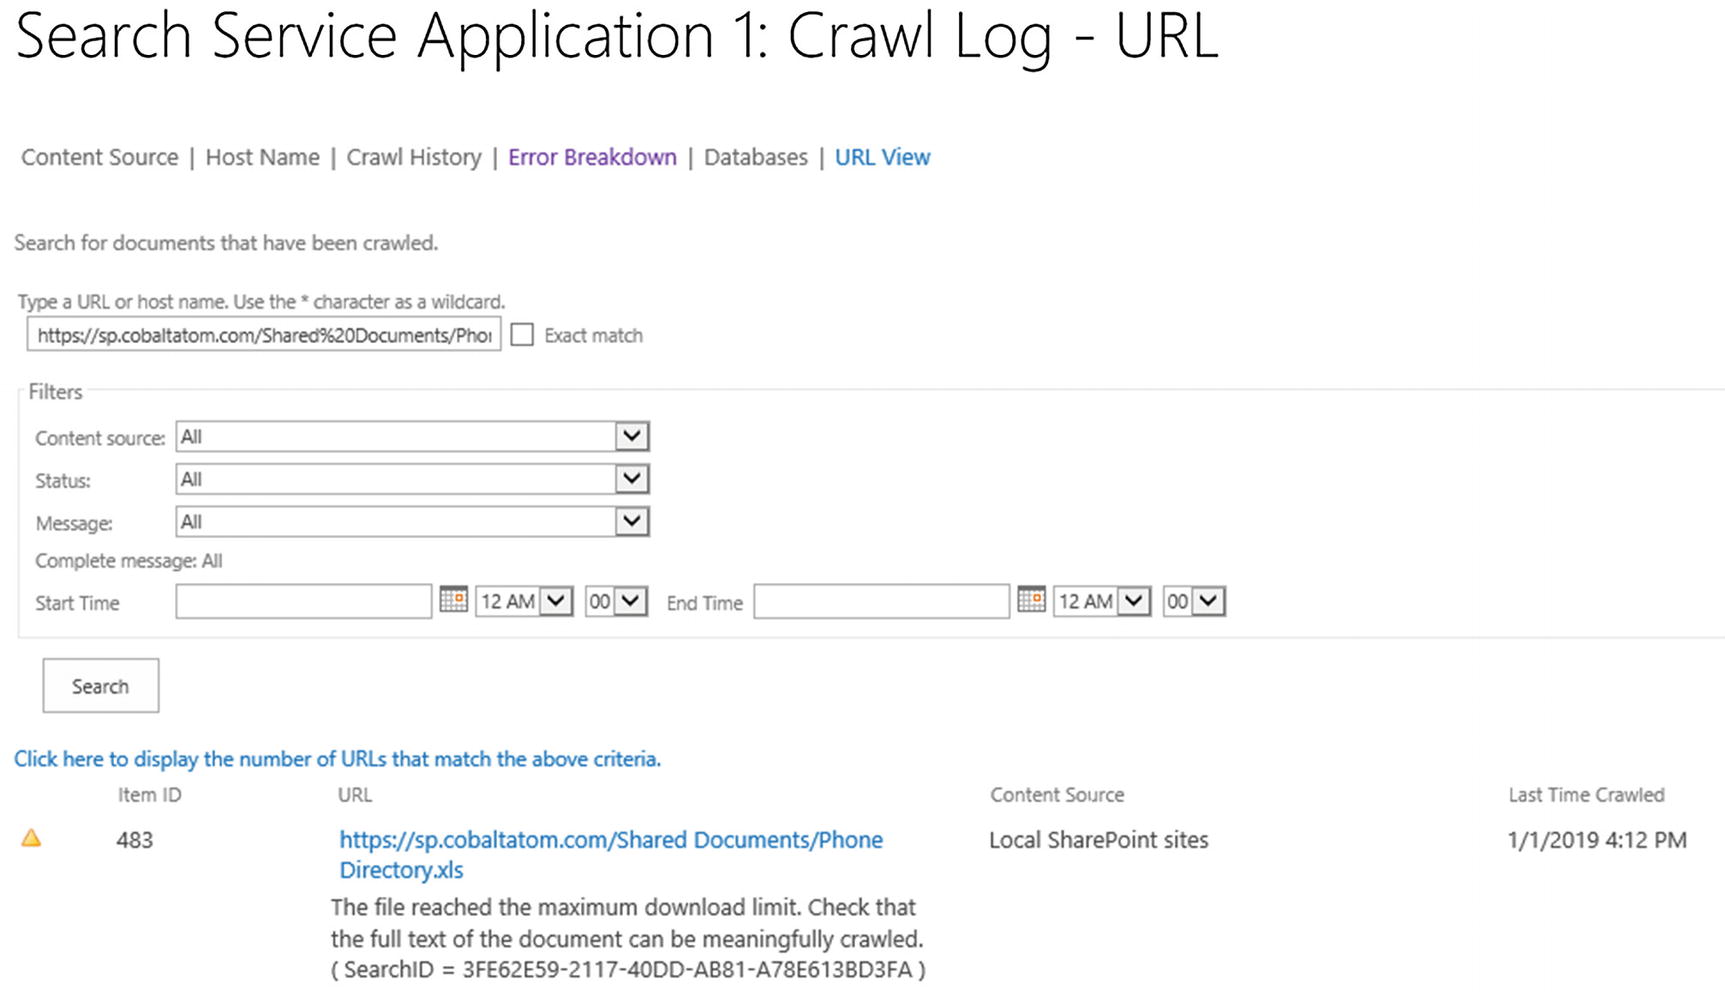
From the Crawl Logs page in the Central Administration, we can also search for specific items to find out if they have been crawled or not. This is useful when users report that their documents do not appear in search results, even if they uploaded them before the last crawl. To search the Crawl Logs, from the Crawl Log page, navigate to “URL View” in the top bar. From the URL View page, we can type an URL or hostname in the top bar and use wildcards to help us find the item we’re looking for. Furthermore, we can use filters to only find the documents we are looking for. As you see in Figure 6-30, a Document in the library we searched for had a warning, and that could explain why it wouldn’t appear in the search results.
Figure 6-30
Search Service Application Crawl Logs – URL View
In some circumstances, to refresh our Search Results or to fix an error, we need to perform an Index Reset.
Resetting the Index
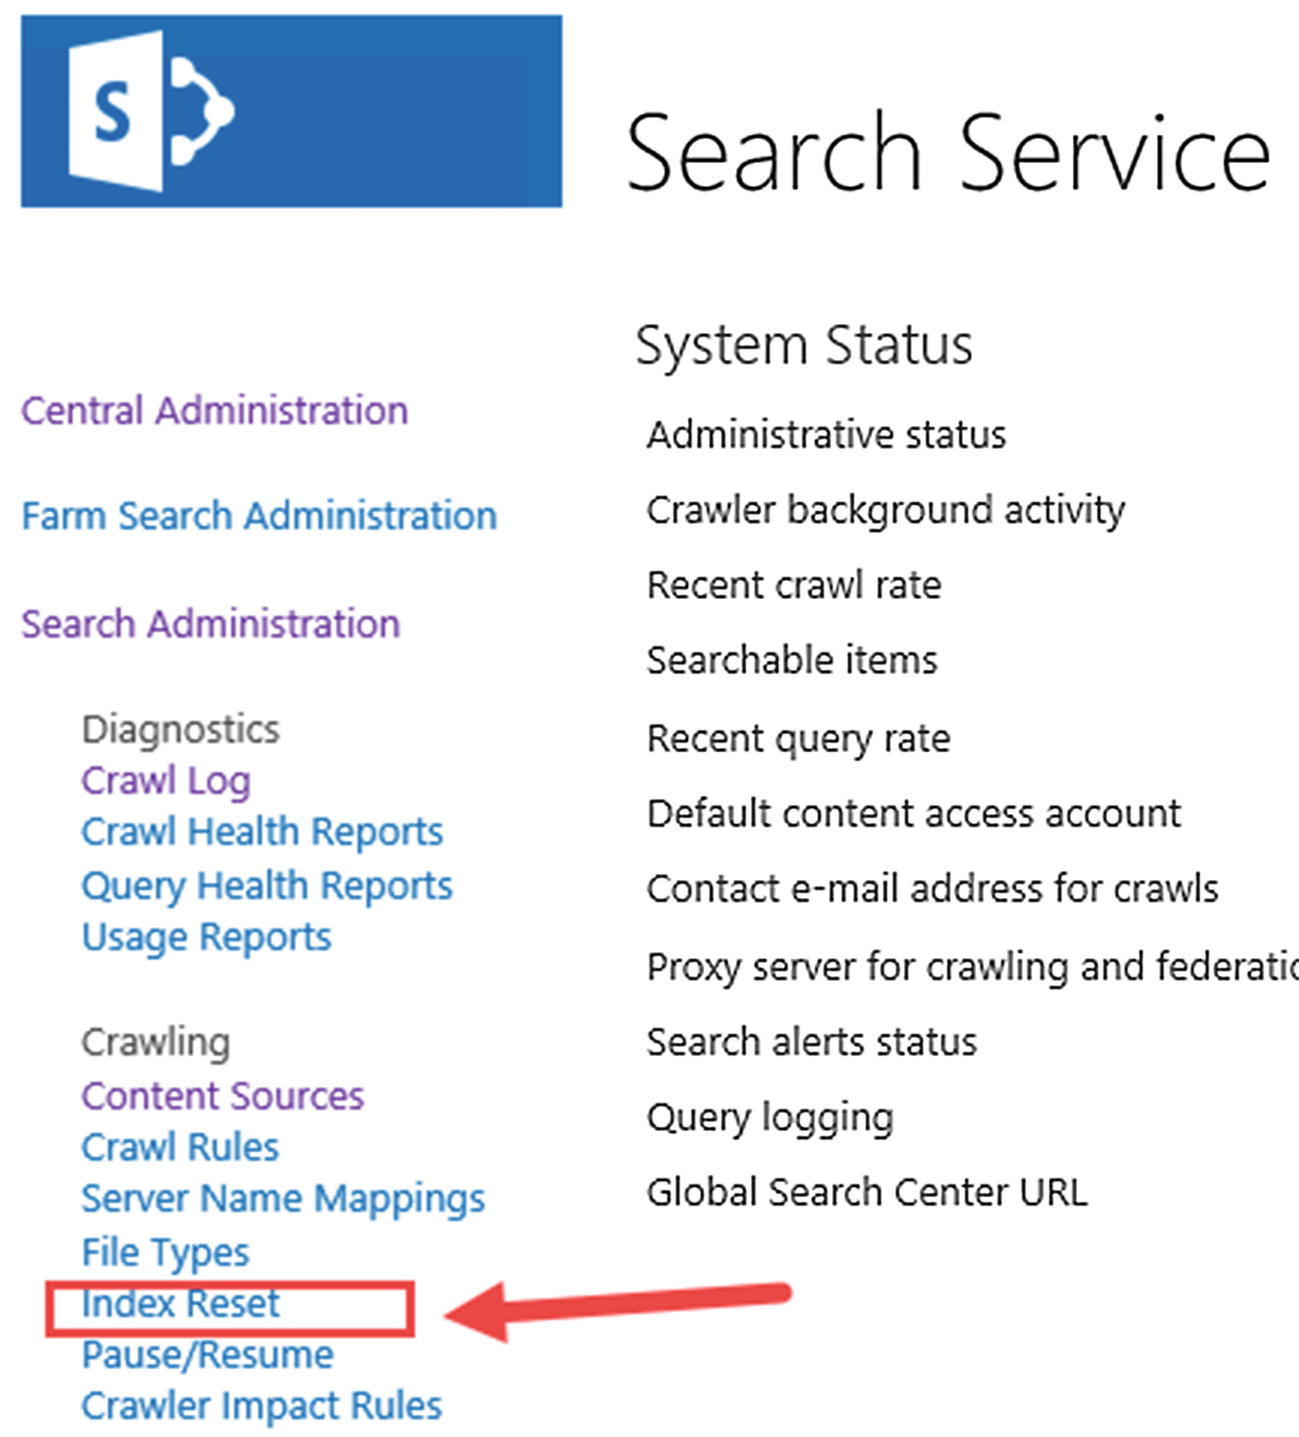
In some cases, the only way to “reset” our Search Service Application is to delete all the items in the index and recrawl all the content sources. This is called an Index reset. To do an Index Reset, navigate to the Search Administration page, and from the left navigation menu click Index Reset as seen in Figure 6-31.
Figure 6-31
Index Reset button
After resetting the index, no search results will be available until those items have been recrawled; therefore, if you have a lot of content, or you have search-dependent sites, preferably run this during off-hours. Before resetting the index, you will have the option to disable Search Alerts, in order to not send alerts to your users because new items are added to the index. If you decide to disable Search Alerts during the recrawl, remember to manually activate them after the first Full Crawl is done.
When managing a large index, resetting the index trough the User Interface can cause it to time out. The easiest way to avoid a timeout is to do an index reset by using PowerShell. An index reset can be done with the following cmdlets:
$sa = Get-SPEnterpriseSearchServiceApplication
$sa.reset($true, $true)
Where the first $true parameter is to disable Alerts, and the second $true parameter is to ignore a timeout error.
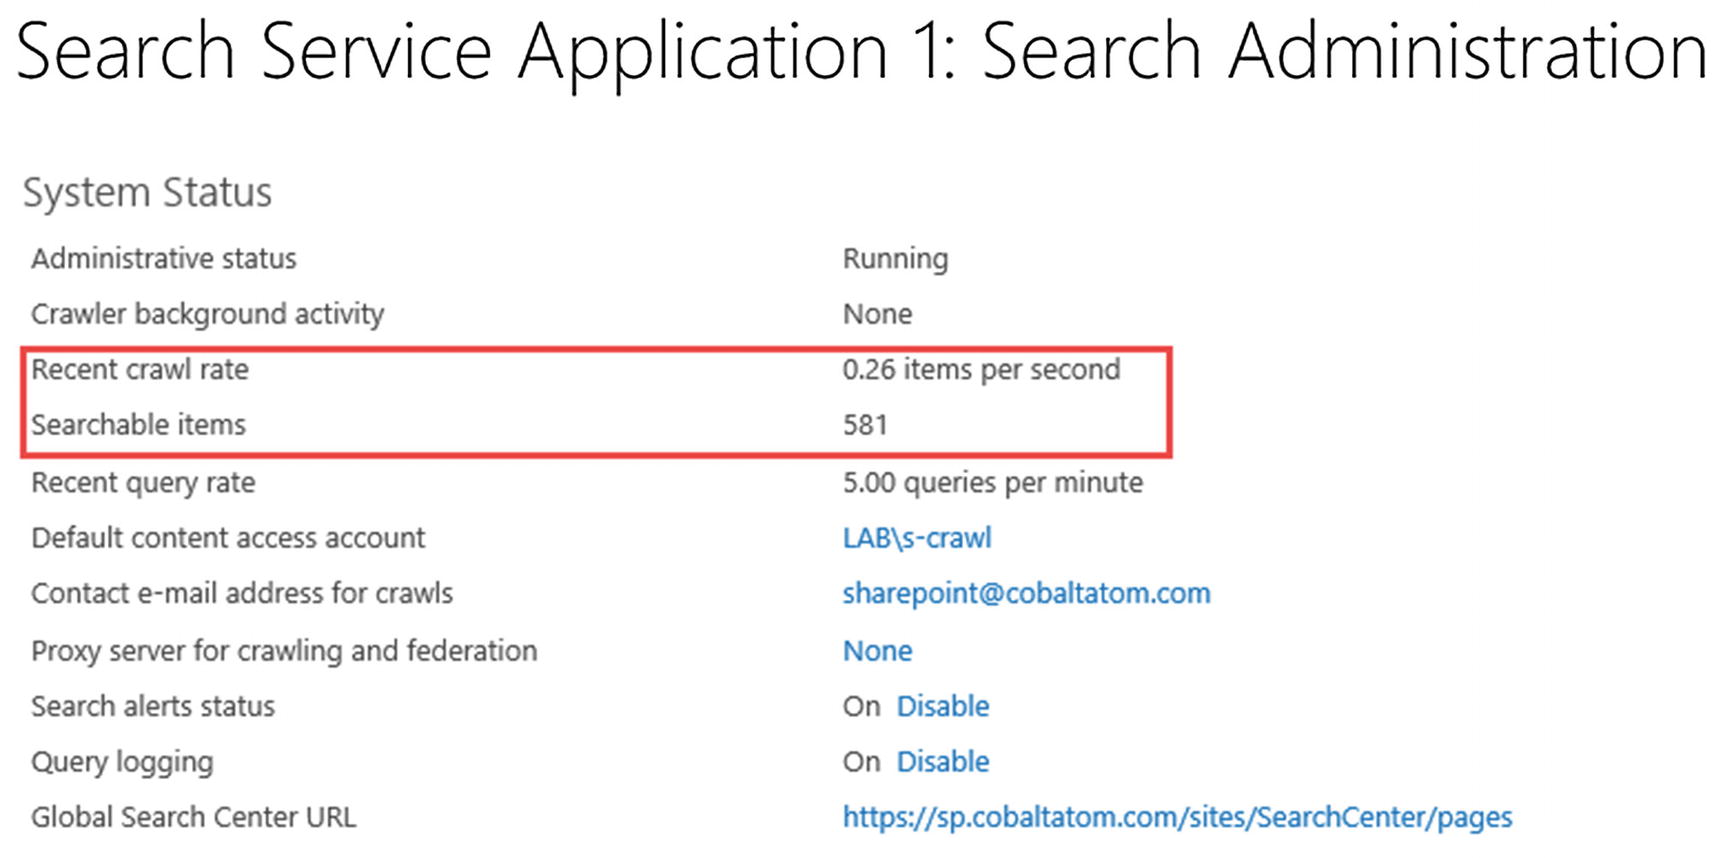
To estimate how long the Full Crawl is going to take, you could calculate the Number of Items in your index (Searchable Items) divided by Recent Crawl Rate. While this won’t be an exact measure, it’s a good estimate. In Figure 6-32, we have 581 items in our index and a Recent Crawl Rate of 0.26 items per second.
Figure 6-32
Calculating Full Crawl Time
Next Steps
With the Search Service Application created and our content crawled, in the next chapter we will learn how to configure the User Profile Service application.