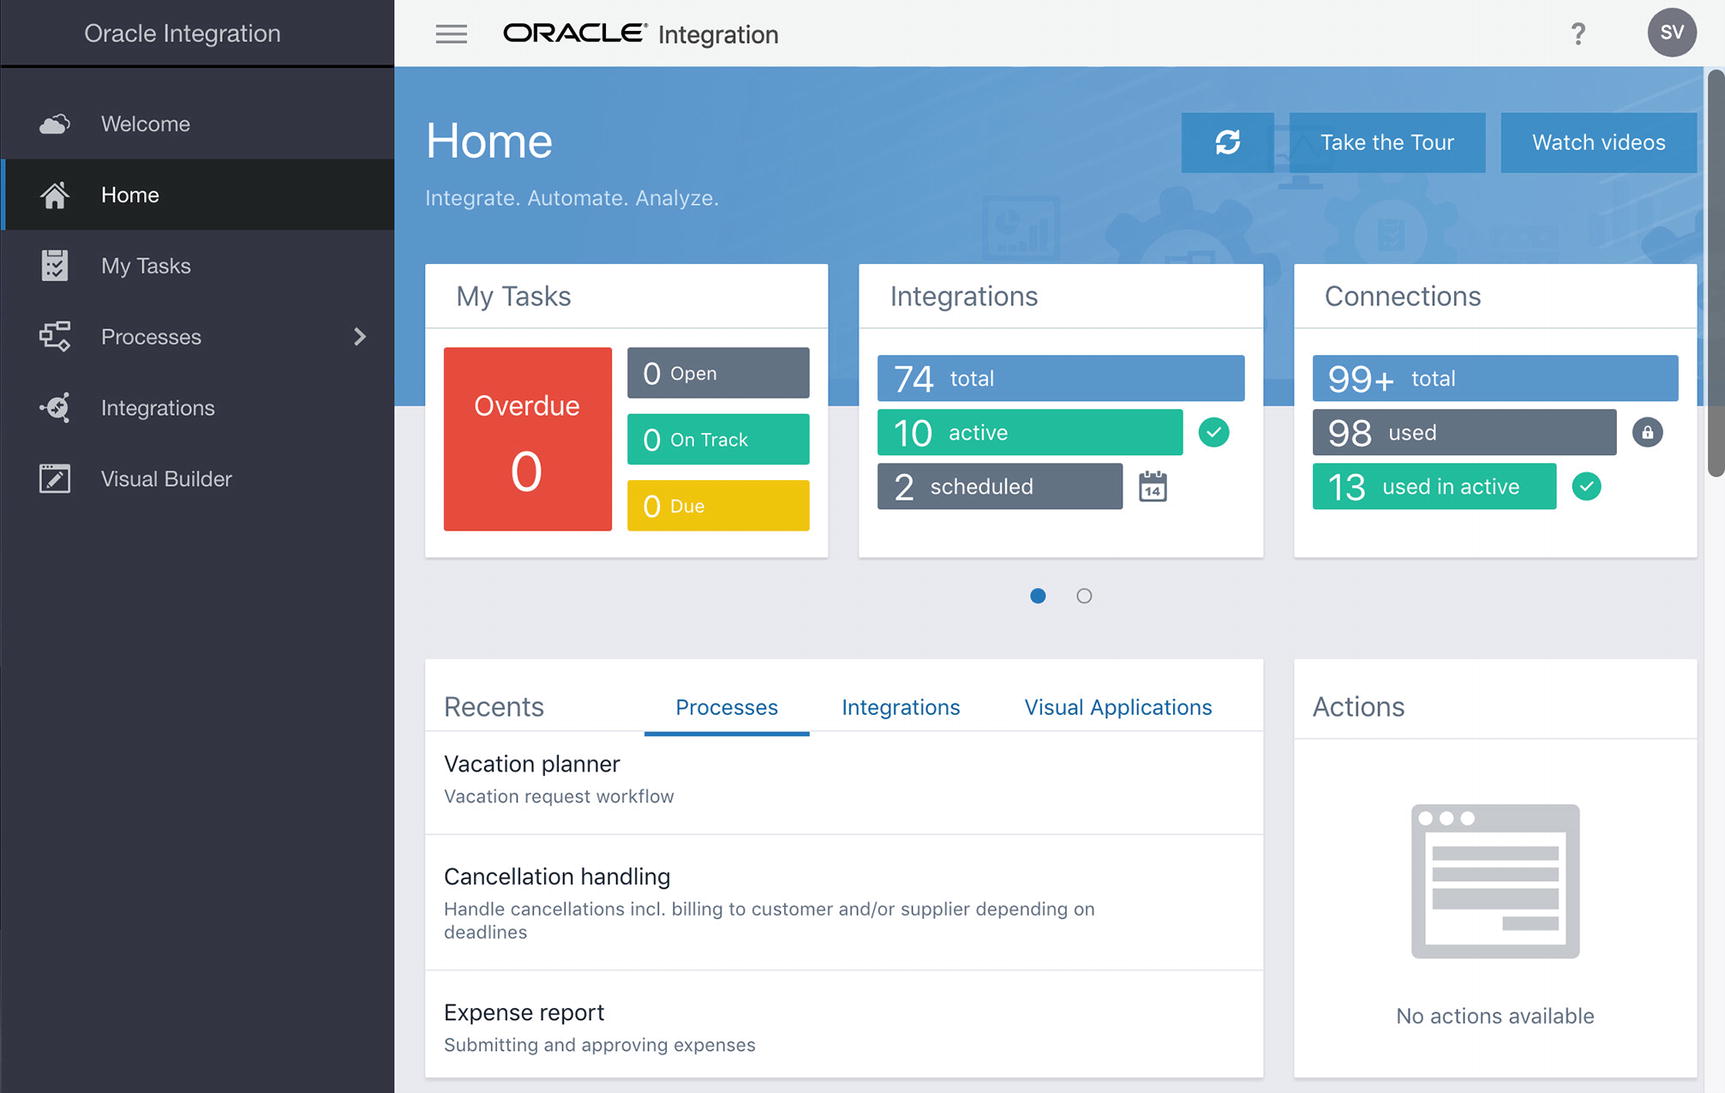
Visual Builder Cloud Service is only one of many cloud services that Oracle offers. Another handy service is Process Cloud Service (PCS), which allows you to manage long-running processes that involve multiple steps and possibly multiple different people. If you have the Oracle Integration Cloud product, you have both VBCS and PCS as shown in Figure 13-1.
Figure 13-1
Oracle Integration Cloud home page
It is easy to integrate VBCS and PCS, allowing your VBCS application to interact with the processes managed by PCS.
About Process Cloud Service
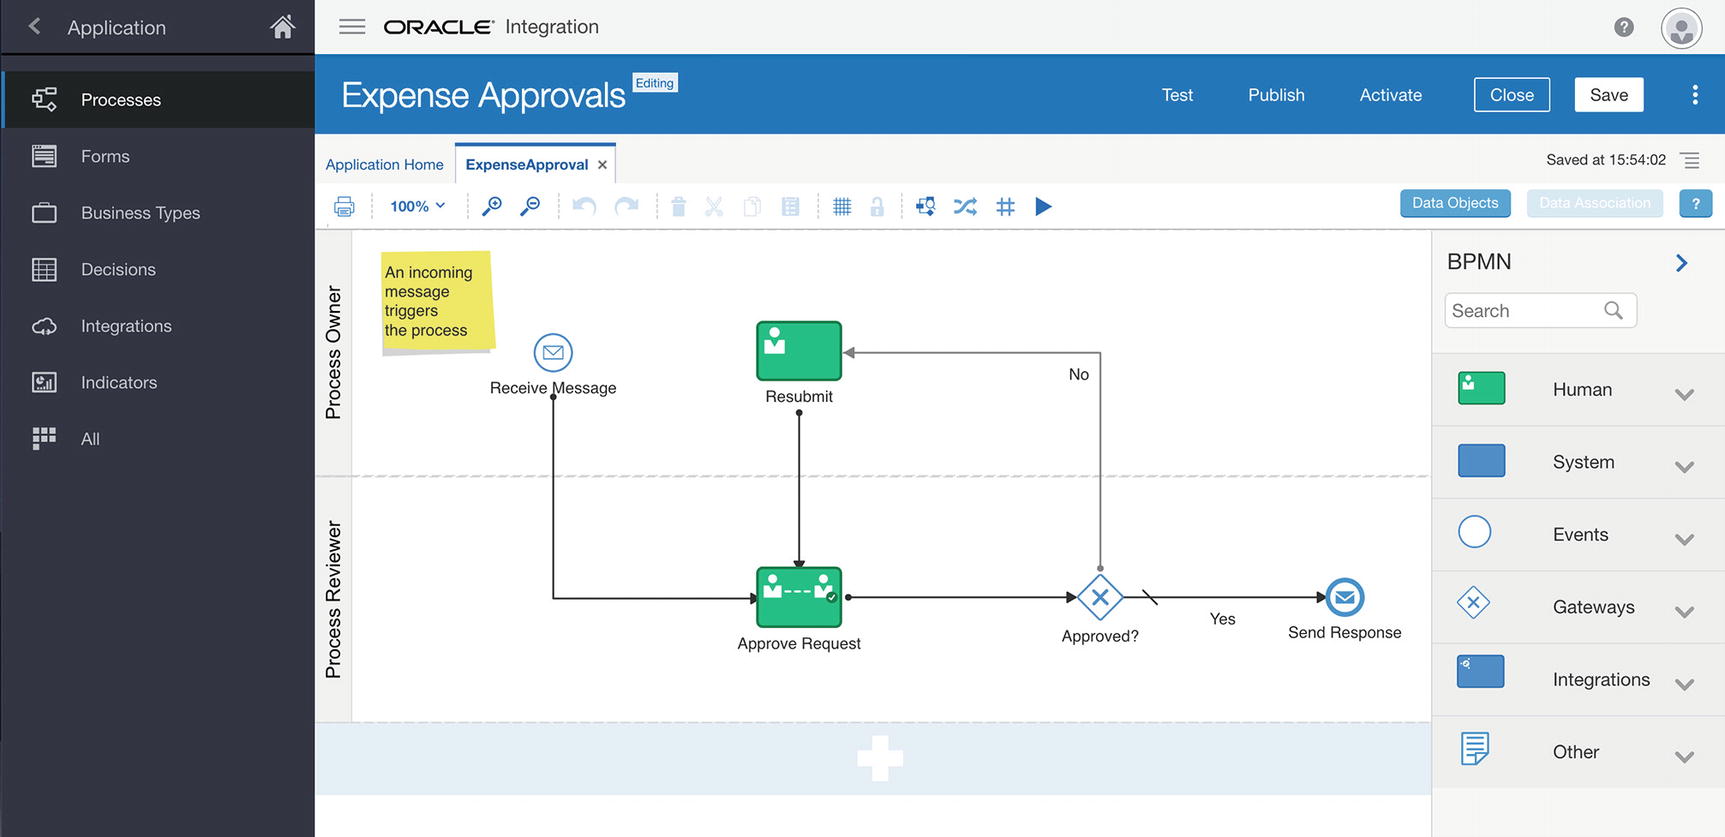
You can consider Process Cloud Service a workflow engine. A developer develops process applications containing processes. Each process consists of a number of steps that can include both human and system tasks, including interactions with other systems as shown in Figure 13-2.
Figure 13-2
A Process Cloud Service workflow
Similar to VBCS applications, processes are developed, released to test, and finally deployed.
When a process is started, PCS creates a process instance. There can be many instances of a process, and each instance has its own data and its own state. For example, there might be eight expense approval processes waiting for approval, and three waiting for the submitter to provide more information and resubmit.
Connecting VBCS to PCS
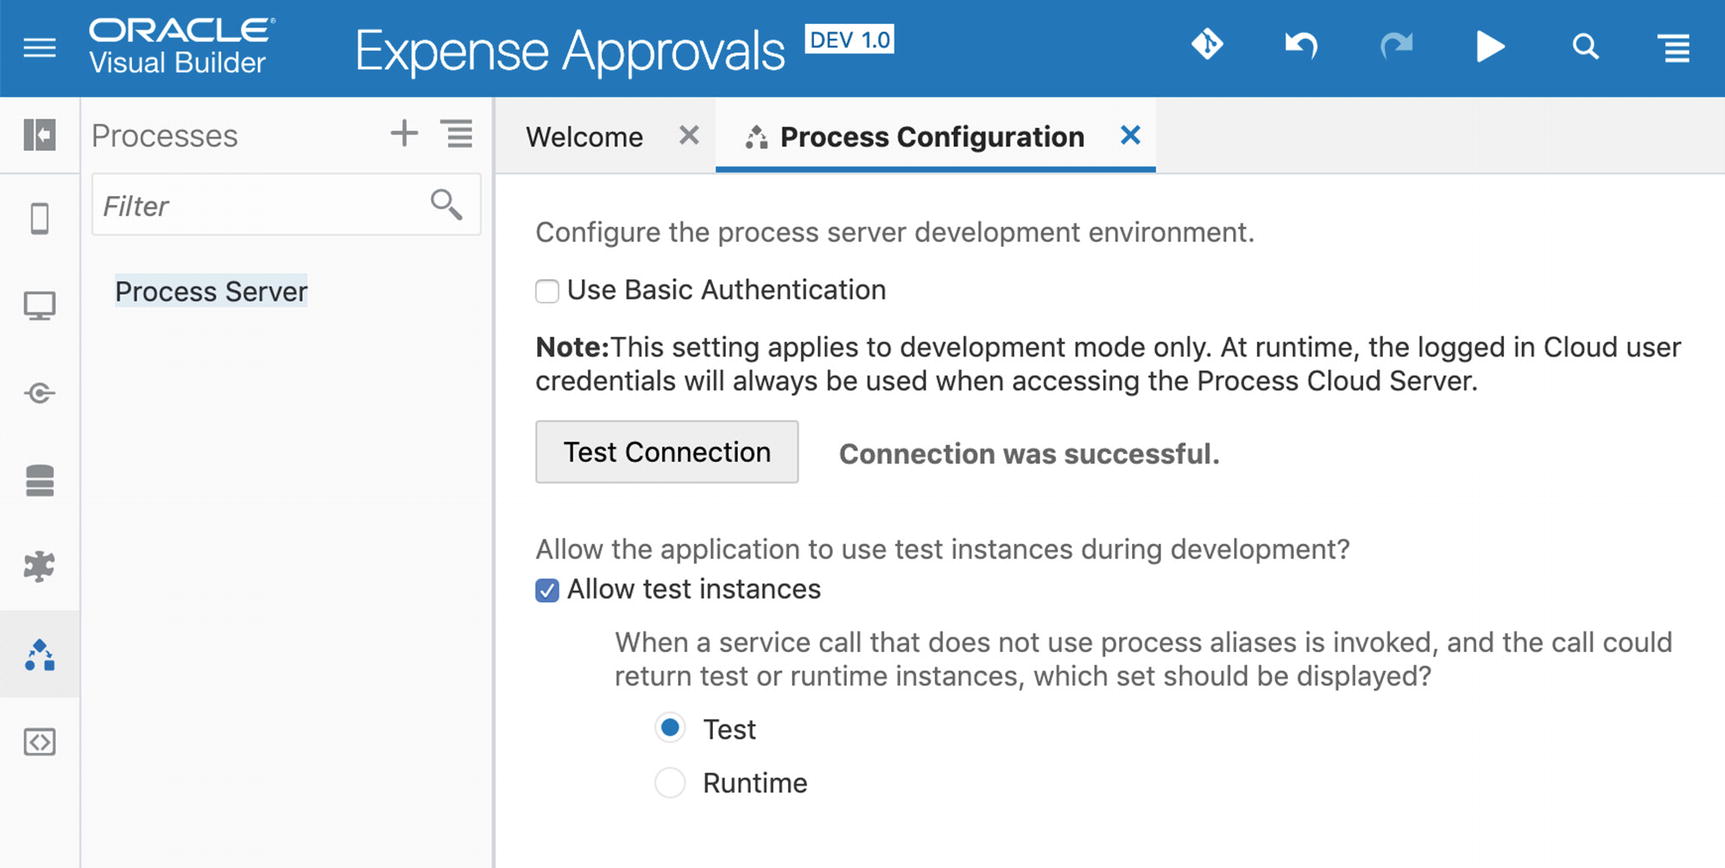
If you have a default Oracle Integration Cloud instance, you have VBCS, PCS, and other services. They should already be integrated, shown by the fact that you have a process server connection on the Processes tab in your VBCS applications as shown in Figure 13-3.
Figure 13-3
Process Configuration
You can click Test Connection and should receive the message Connection was successful.
Note
If you don’t see a process server, you need to get your Oracle Cloud administrator to set up the connection between VBCS and PCS.
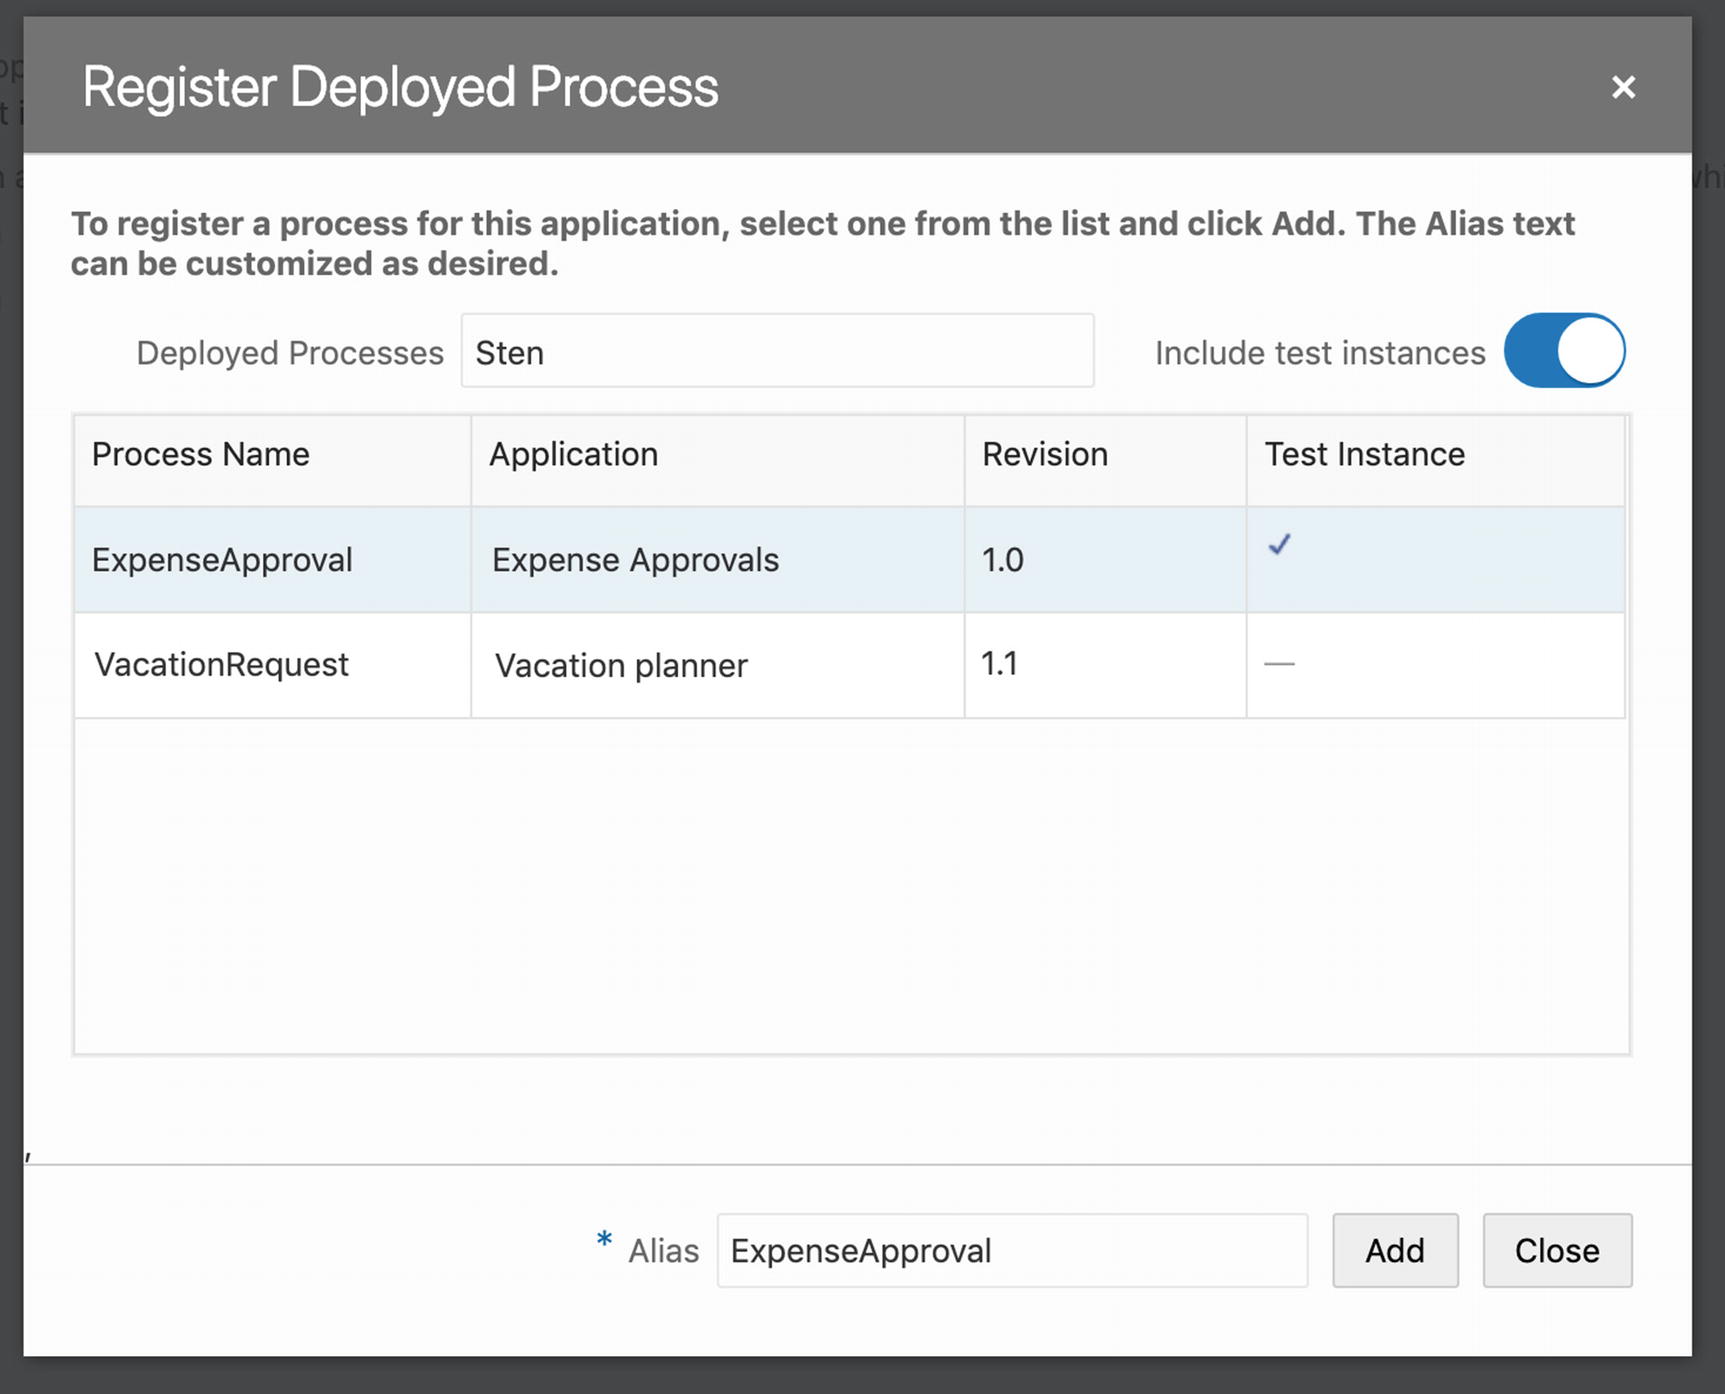
A VBCS application works with specific processes inside process applications. To establish a connection to a PCS process, you click the + sign next to the Processes header and select the process from the Register Deployed Process dialog shown in Figure 13-4.
Figure 13-4
Registering a process in VBCS
You provide an alias, which is the connection to PCS. To connect a VBCS application to another process, you can remove the alias and register another process with that alias.
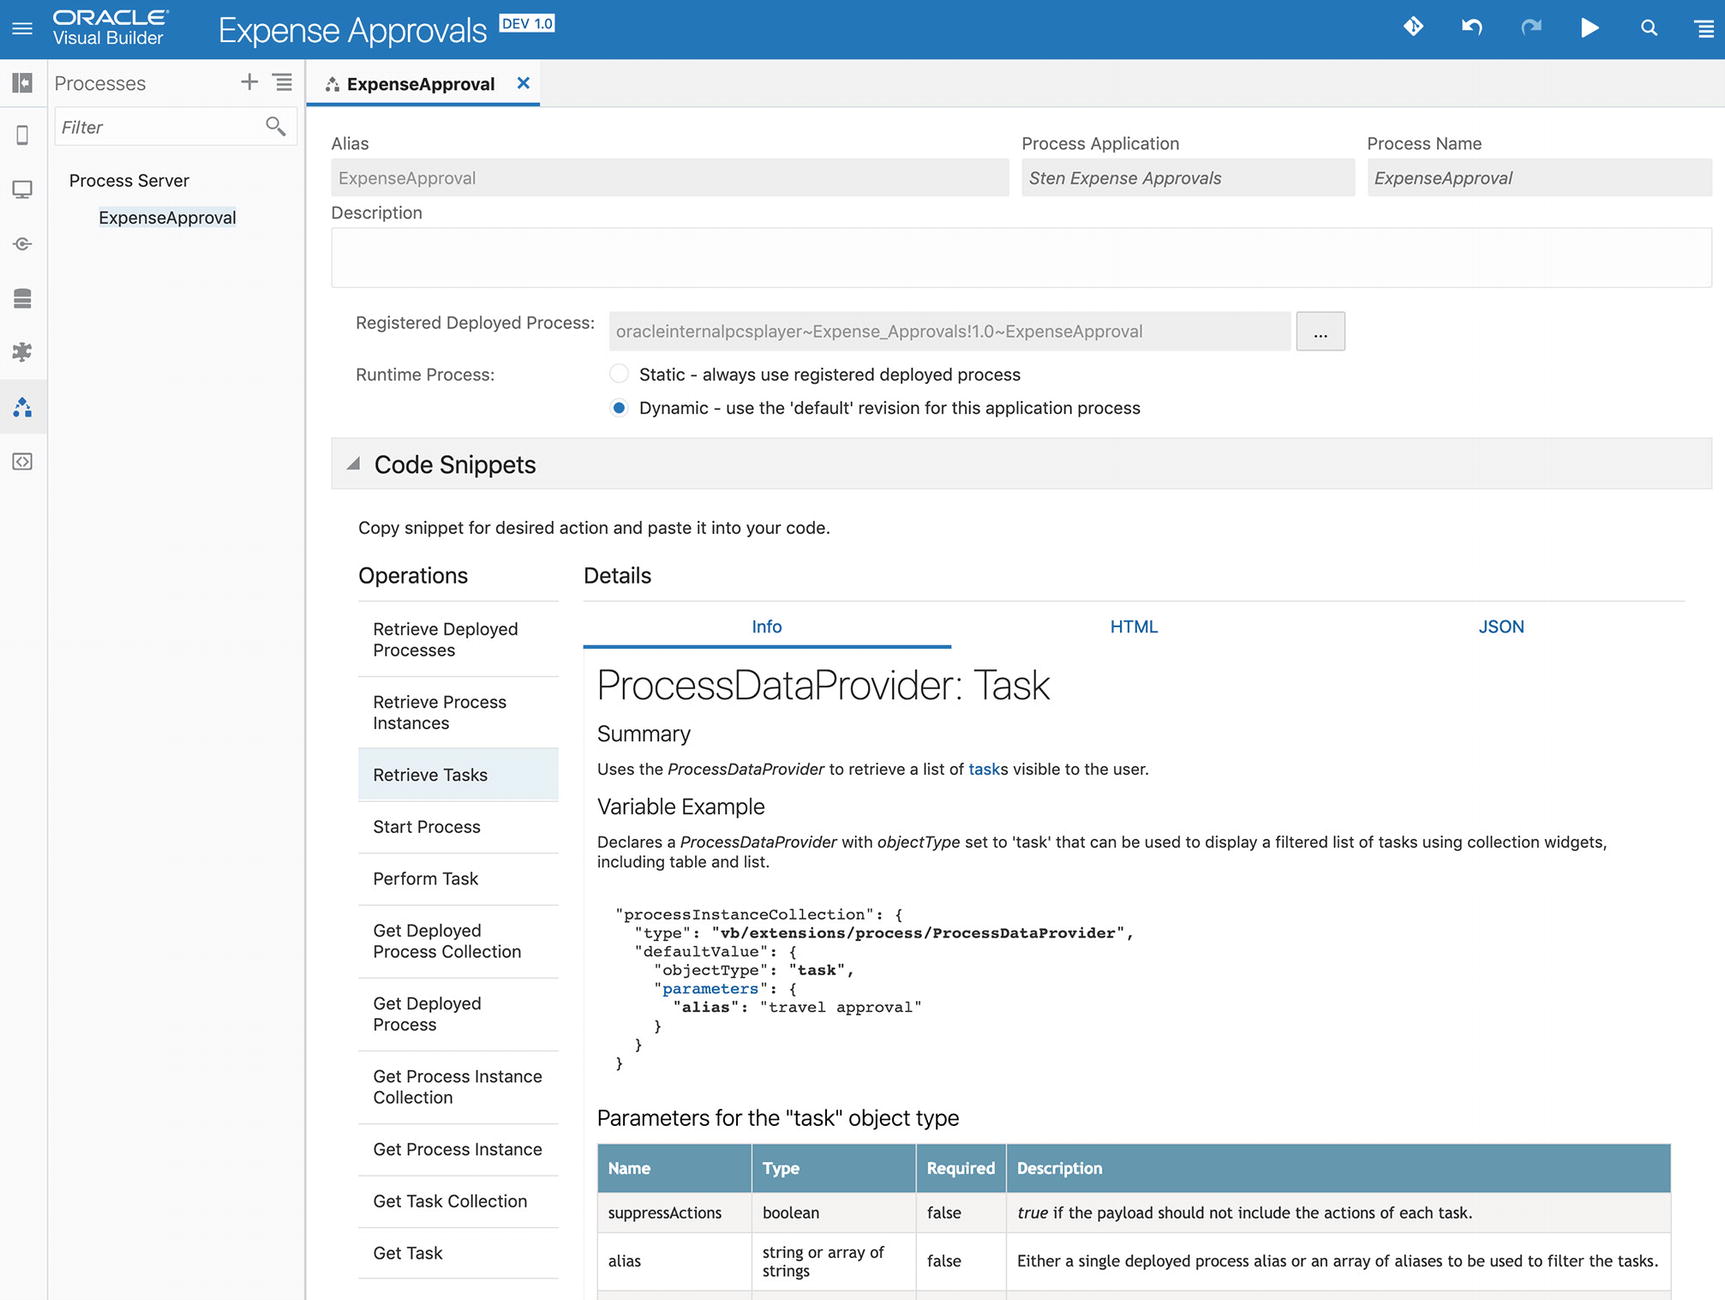
Once you have registered a connection, it opens in a new tab in the VBCS work area as shown in Figure 13-5.
Figure 13-5
A registered process tab
Notice the Code Snippets part. Here, you can get information about various operations and copy the HTML and JSON you need to use that operation in a VBCS application. Code snippets are available to handle the following PCS operations:
Retrieve Deployed Processes
Retrieve Process Instances
Retrieve Tasks
Start Process
Perform Task
Get Deployed Process Collection
Get Deployed Process
Get Process Instance Collection
Get Process Instance
Get Task Collection
Get Task
We will see how this works at the end of this chapter.
Starting a Process from VBCS
You can start a process from within Visual Builder Cloud Service using the code snippets described earlier, but it is easier to do from the visual logic builders in VBCS. You can start a process both from a user interface action chain and from a business component trigger.
Starting from User Interface
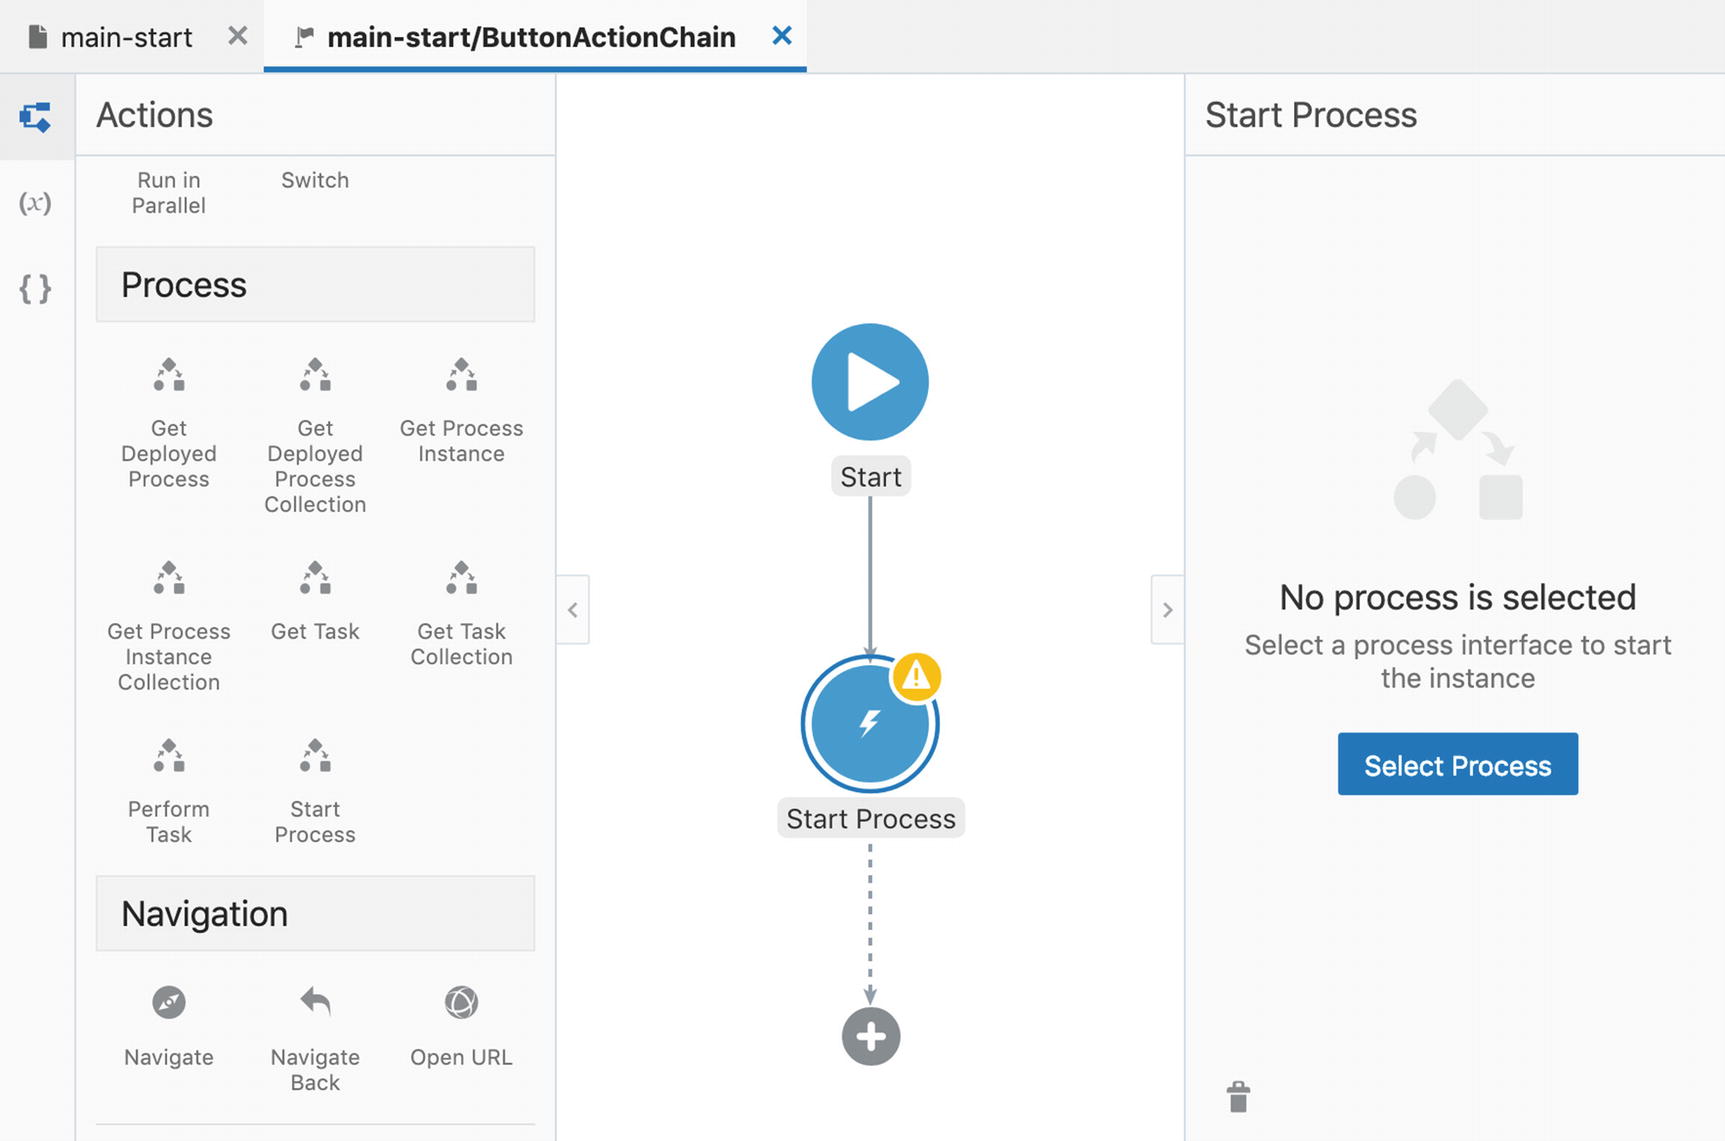
As you saw in Chapter 7, business logic in the user interface is defined in action chains connected to some user interface event (e.g., a click on a Button). In that action chain, you place a Start Process action in an action chain as shown in Figure 13-6. Note that the Process header to the left of the action chain work area contains some other process-related actions you can place in your action chain.
Figure 13-6
A Start Process action in an action chain
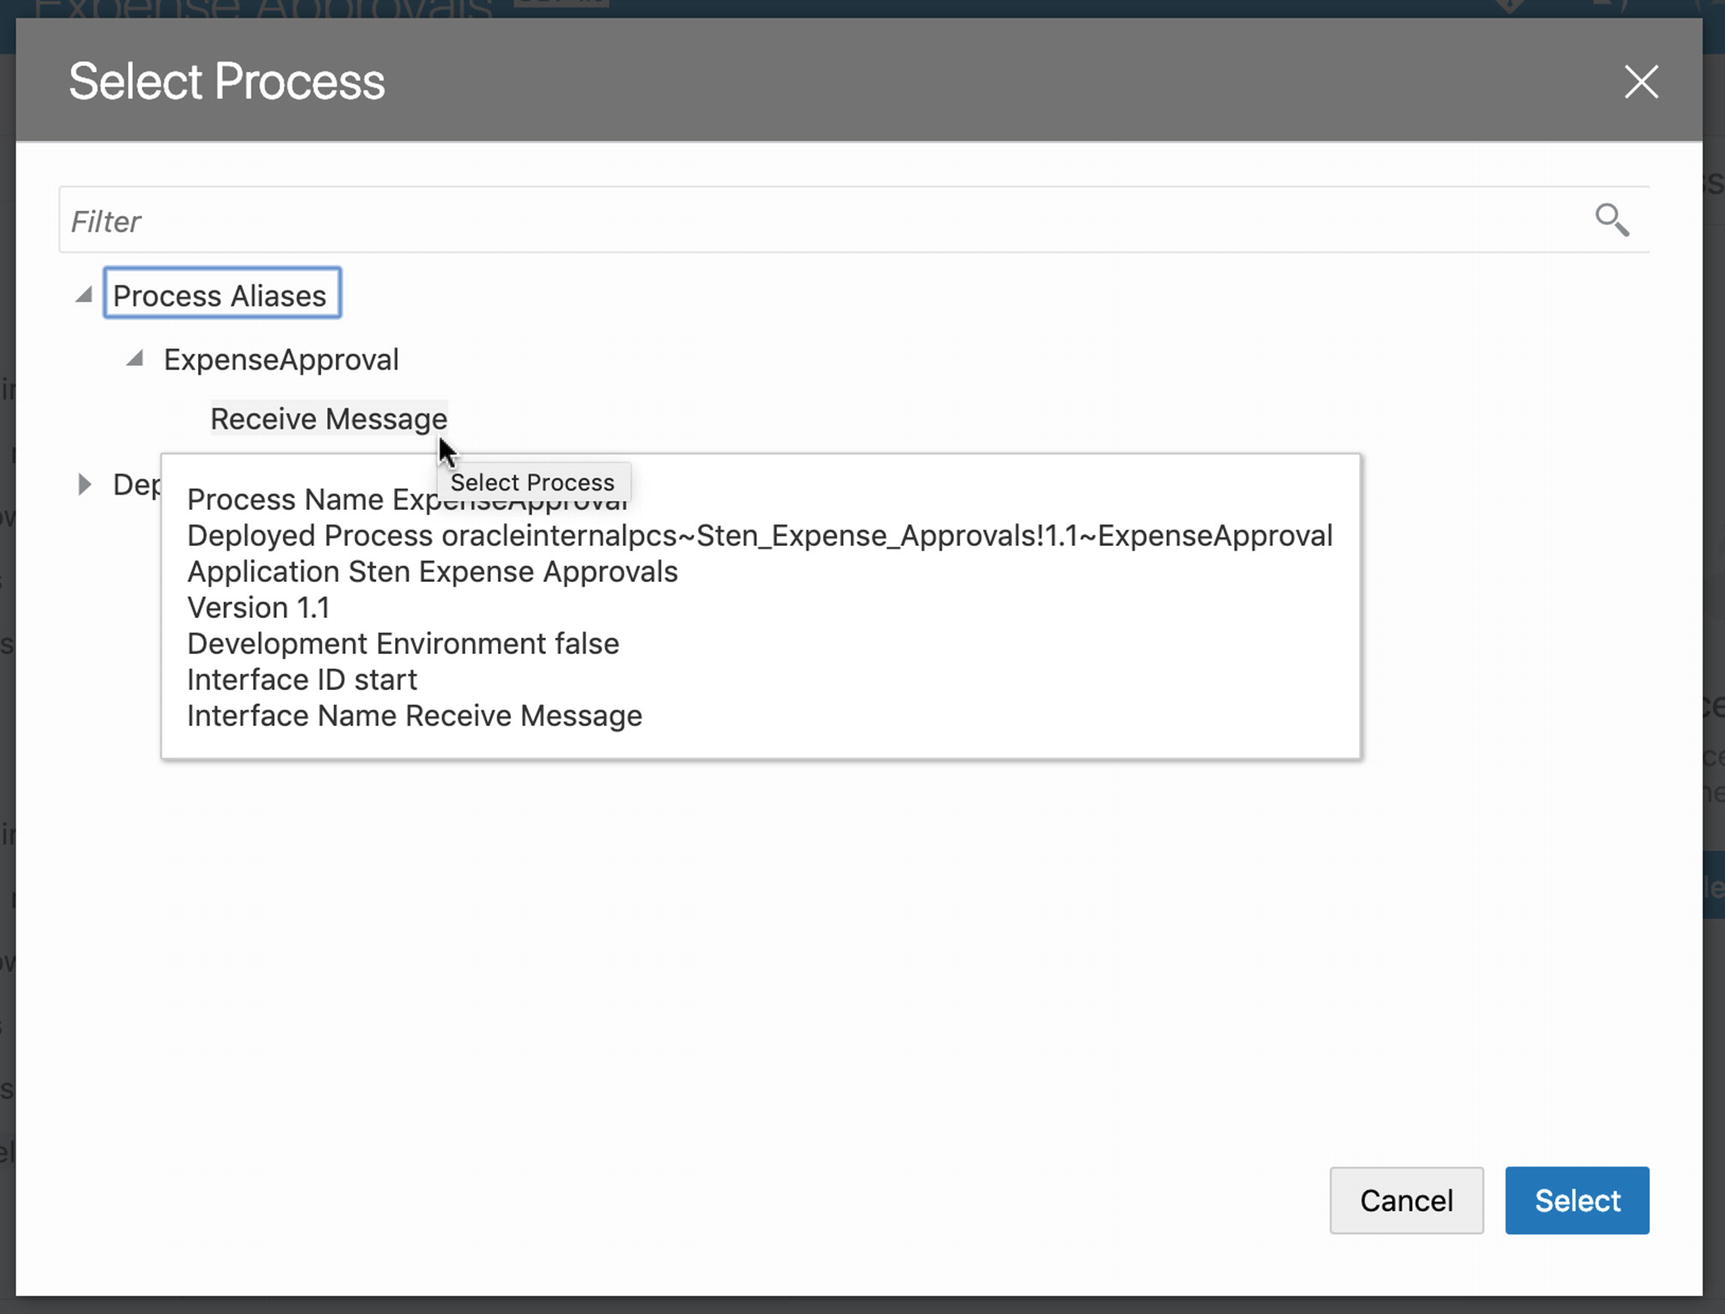
Then you click the Select Process button to map the action to a specific action. You select from all the available actions in the associated process server as shown in Figure 13-7.
Figure 13-7
Selecting a process for an action chain
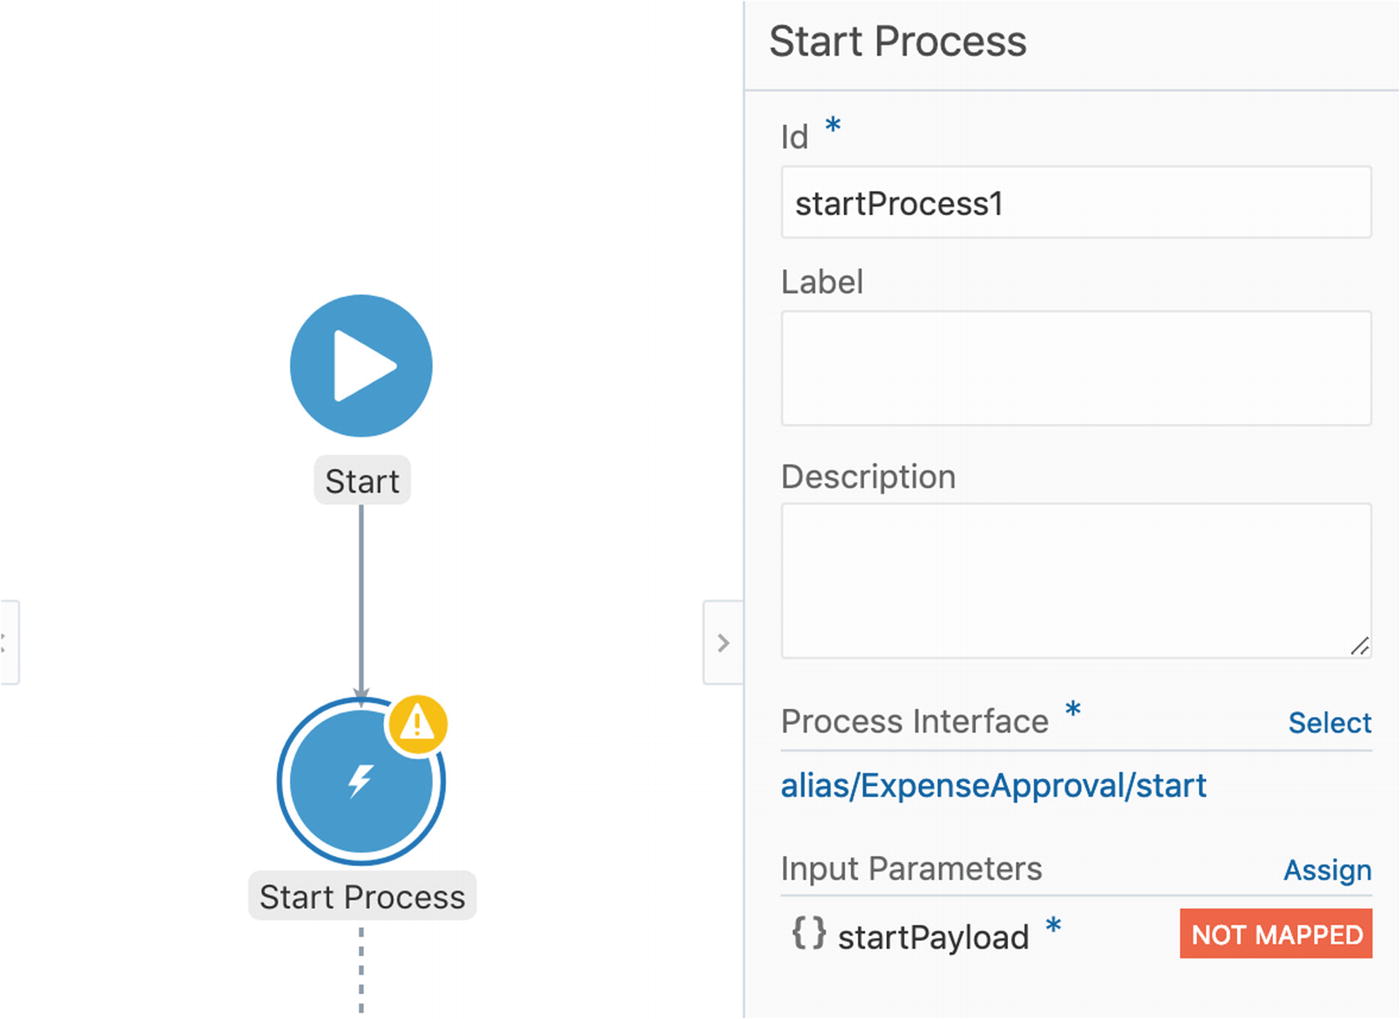
You select an entry point to the process – in the preceding figure, the process only has one entry point called Receive Message. When you have selected it, the input parameters will show up as NOT MAPPED as shown in Figure 13-8.
Figure 13-8
A Start Process action with a process interface selected
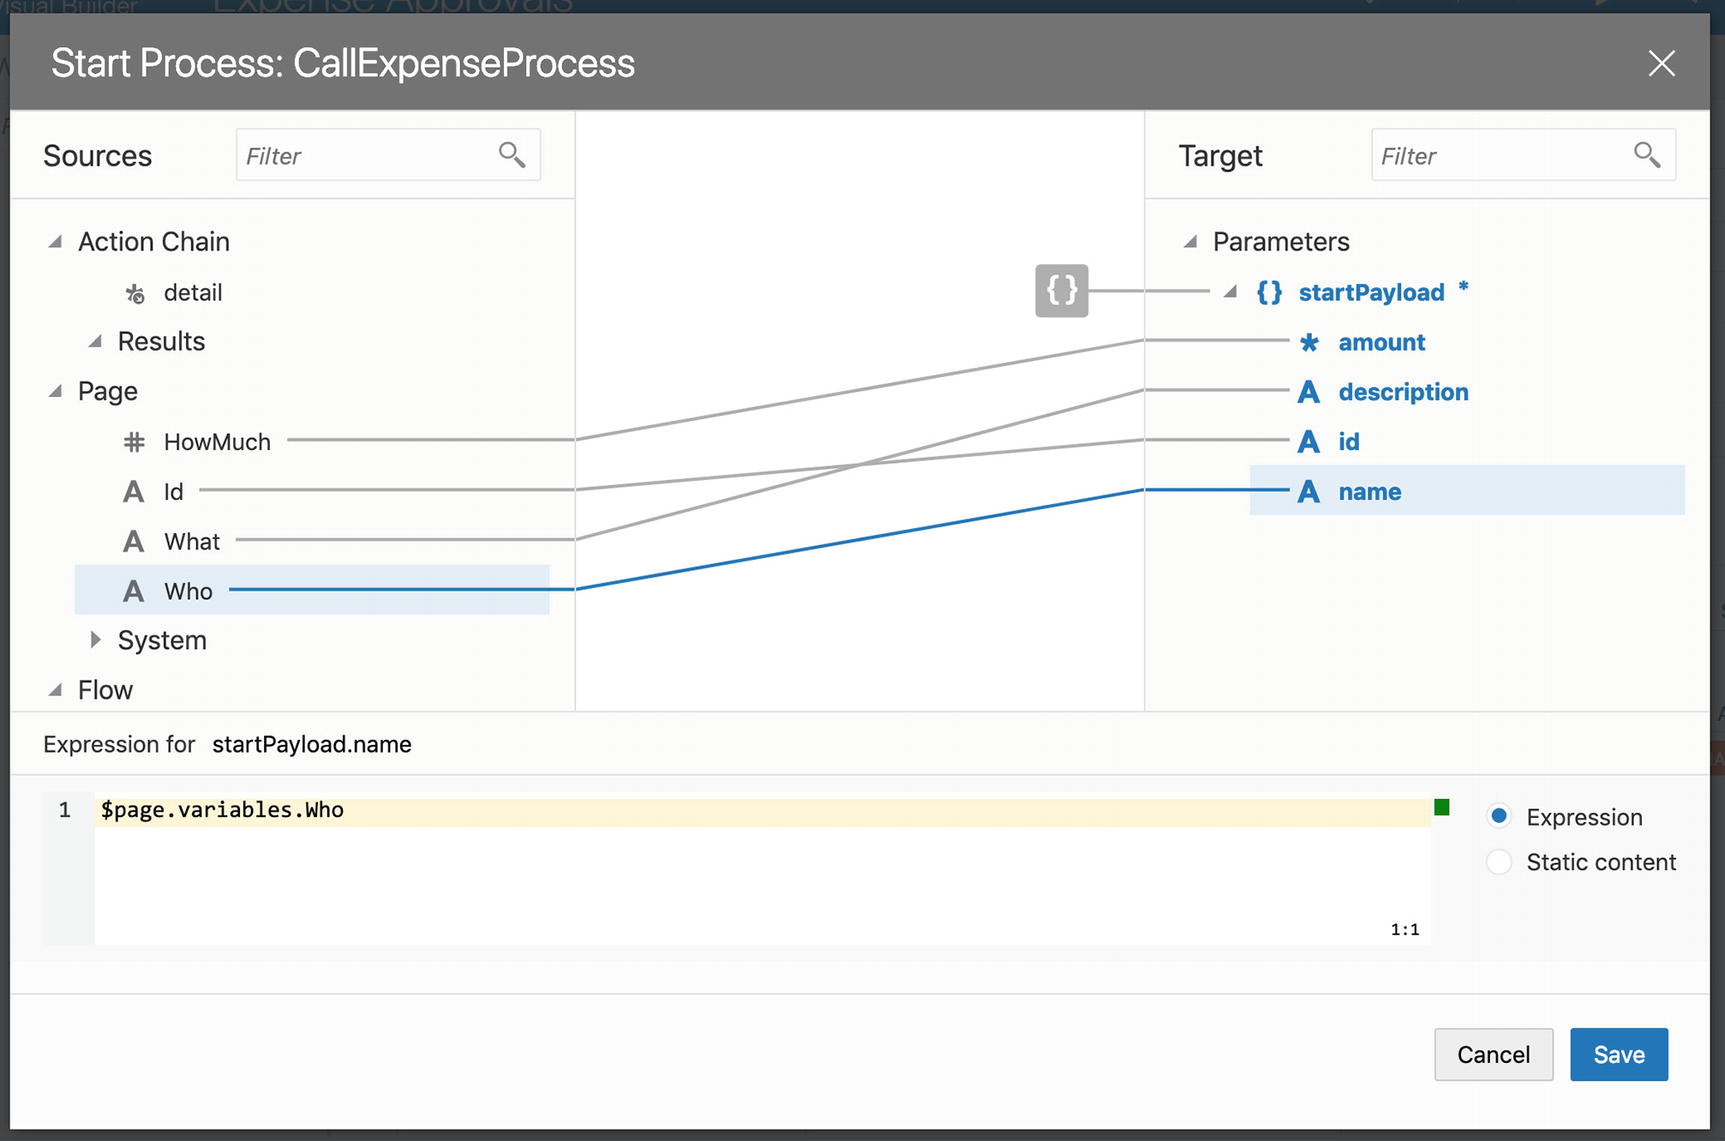
When you click the Assign link for Input Parameters, you can then use drag and drop to map existing variables to the input parameter to the process as shown in Figure 13-9.
Figure 13-9
Mapping input parameters to a process
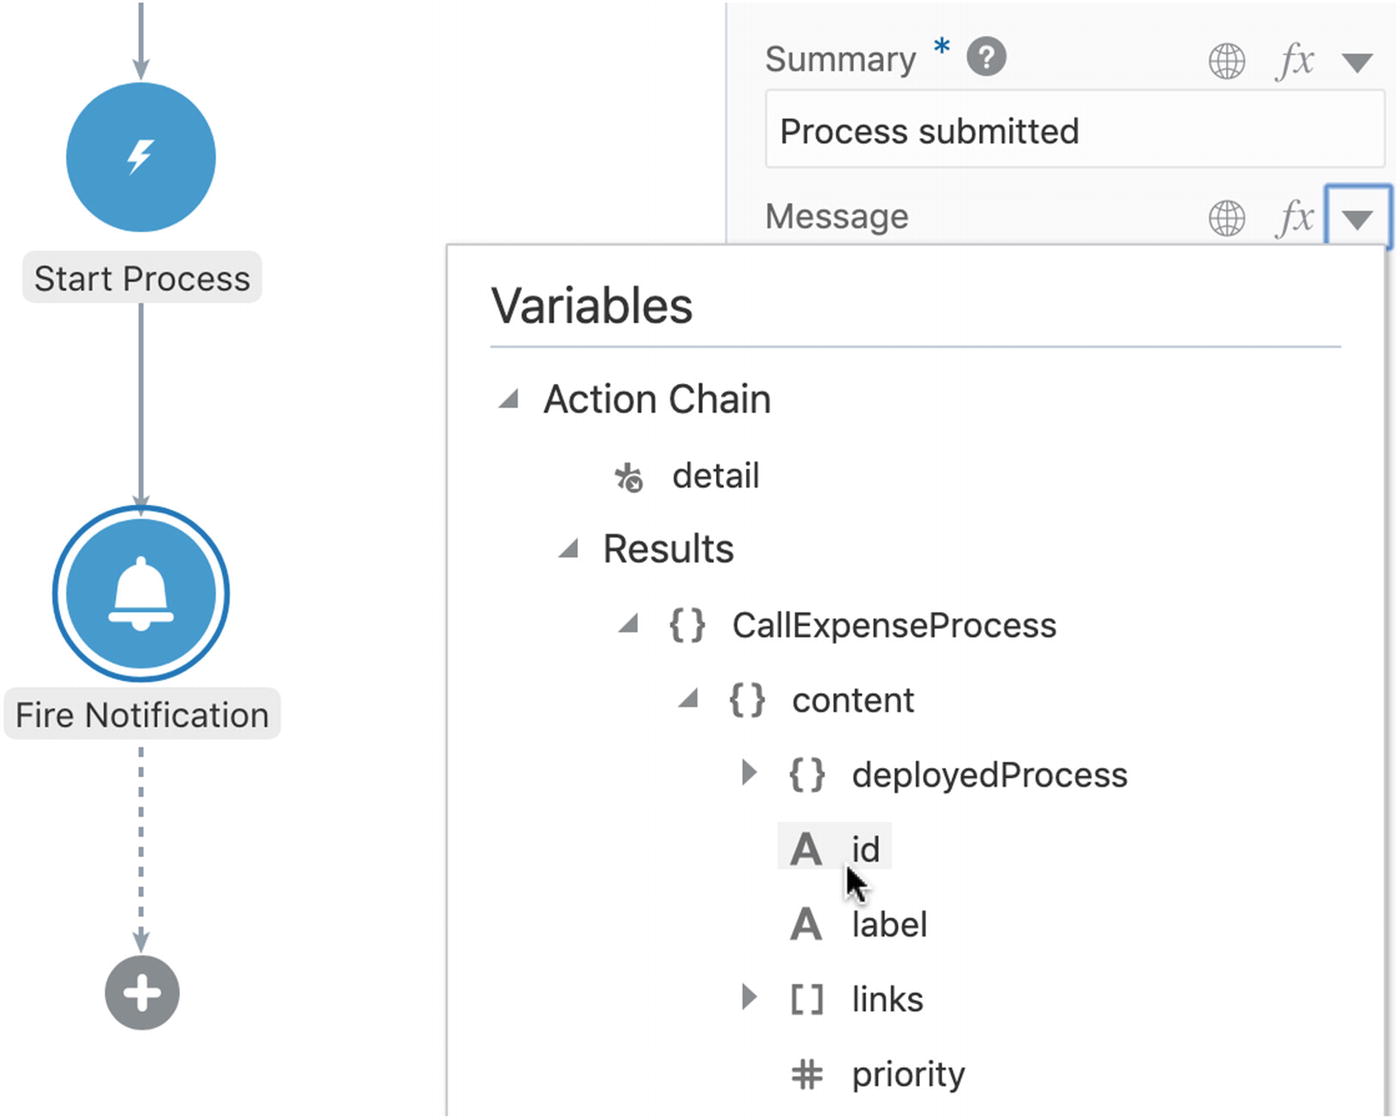
After the Start Process action, you might have success and failure branches. You can access the result from the start process under the Result node in the variables selector as shown in Figure 13-10.
Figure 13-10
Retrieving the ID of a process instance
Starting from Business Component
As you saw in Chapter 6, you can also add logic to your business components on the Business Rules tab. For example, you can create an object trigger that is activated by a Before Insert event. That brings up the visual business object logic designer shown in Figure 13-11.
Figure 13-11
Adding an object trigger to a business object
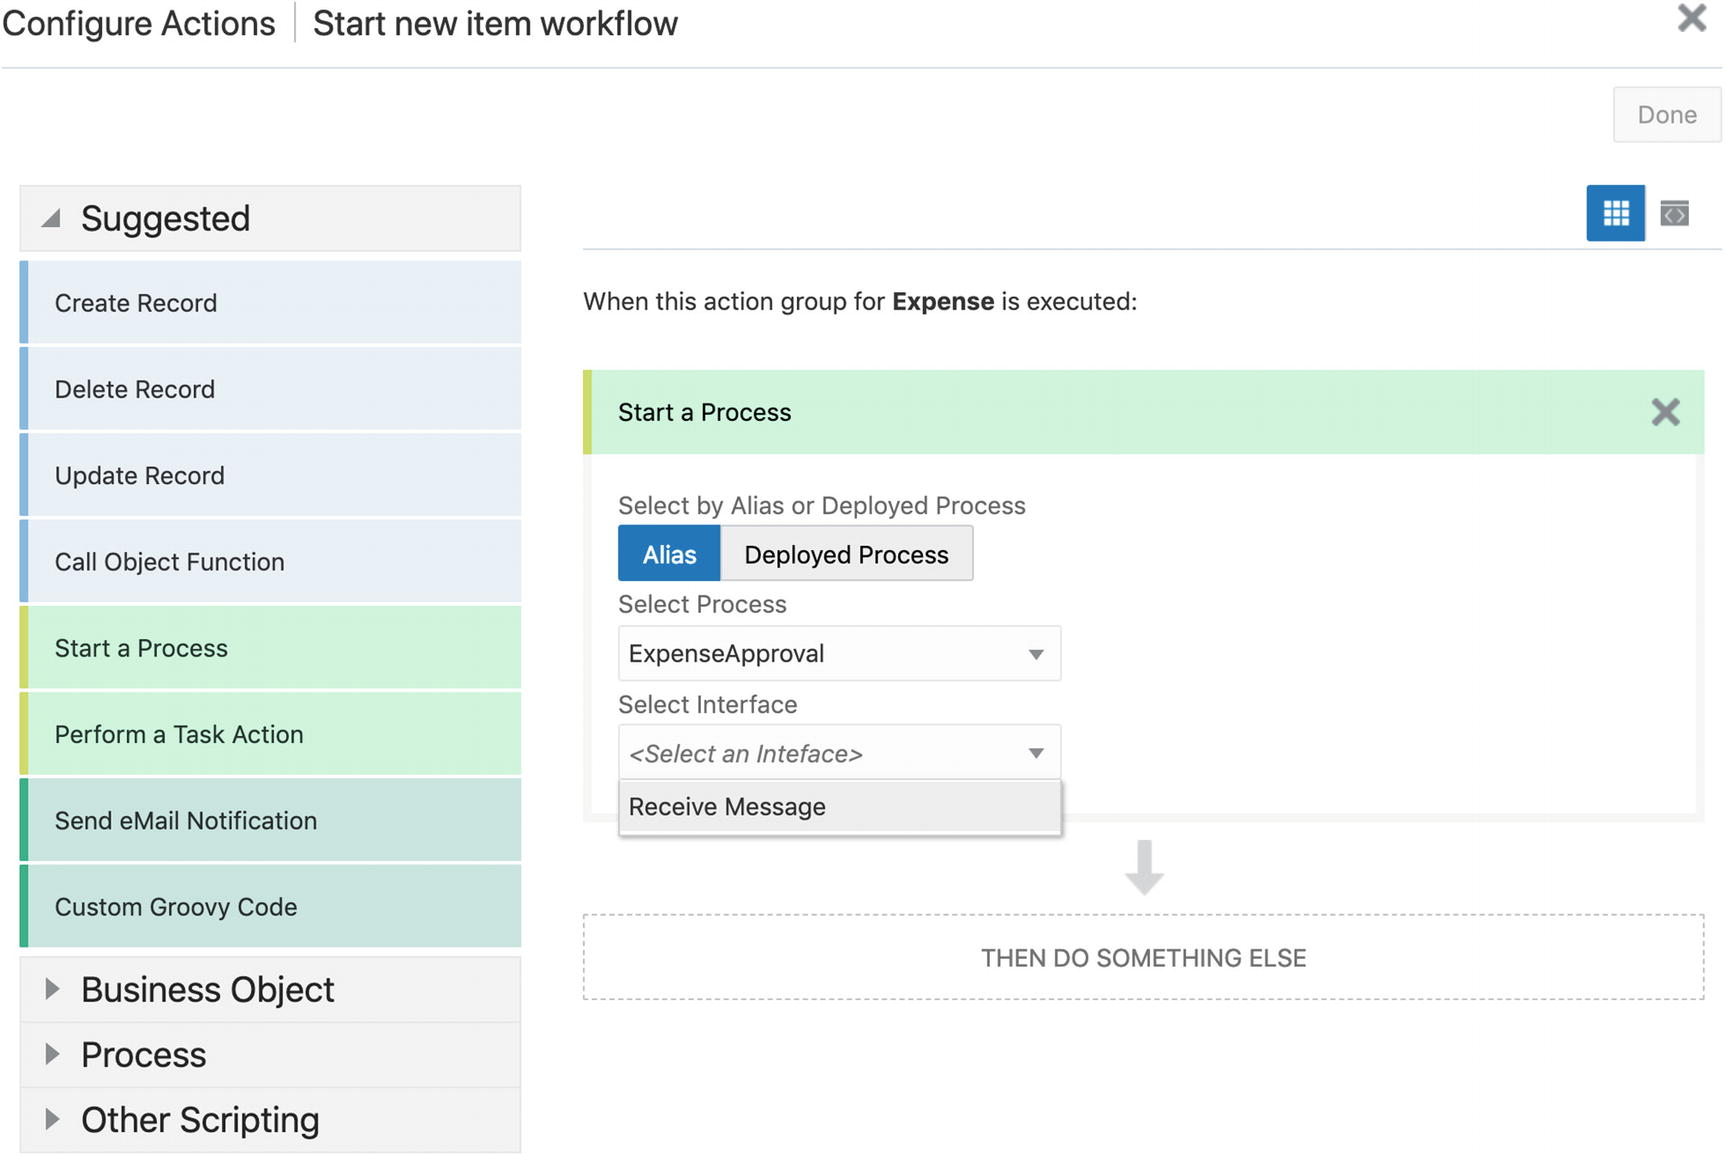
When you add actions to triggers and validators, one of the options is to Start a Process as shown in Figure 13-12.
Figure 13-12
Starting a process from an object trigger
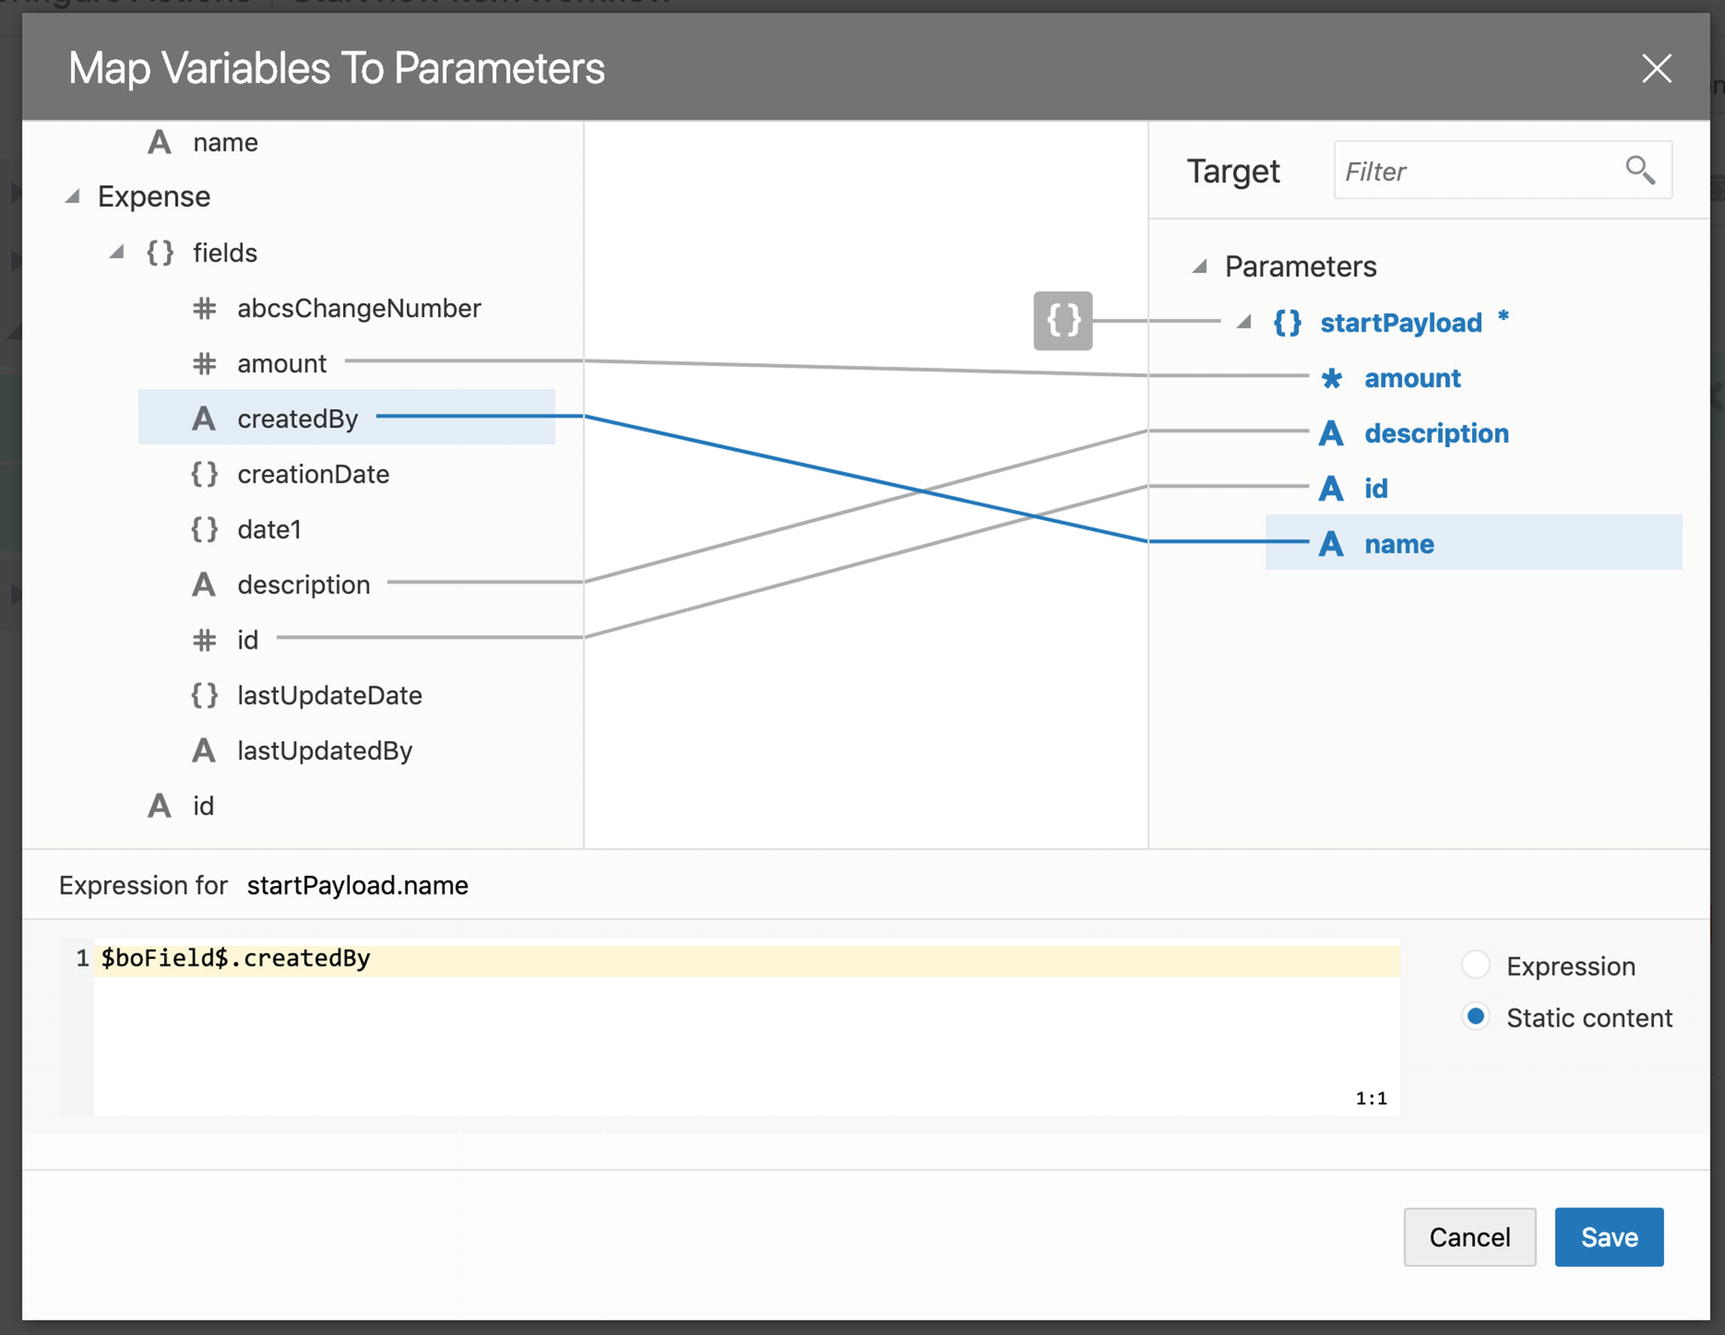
In this action, you can select an alias, a process, and an interface to trigger. After you have selected the process interface, you will have to map any parameters that interface uses, just like you would do in an action chain. In this case, you have access to the fields in the business object and not the components on the screen. The mapping could look as shown in Figure 13-13.
Figure 13-13
Mapping process parameters in an object trigger
Working with PCS Tasks
The typical reason to automate a process with Process Cloud Service is to make sure that system actions and human actions happen in the right order. When a process instance reaches a human task, processing stops and that task becomes available on the task list of the process for a user to take action on.
Building a Task List
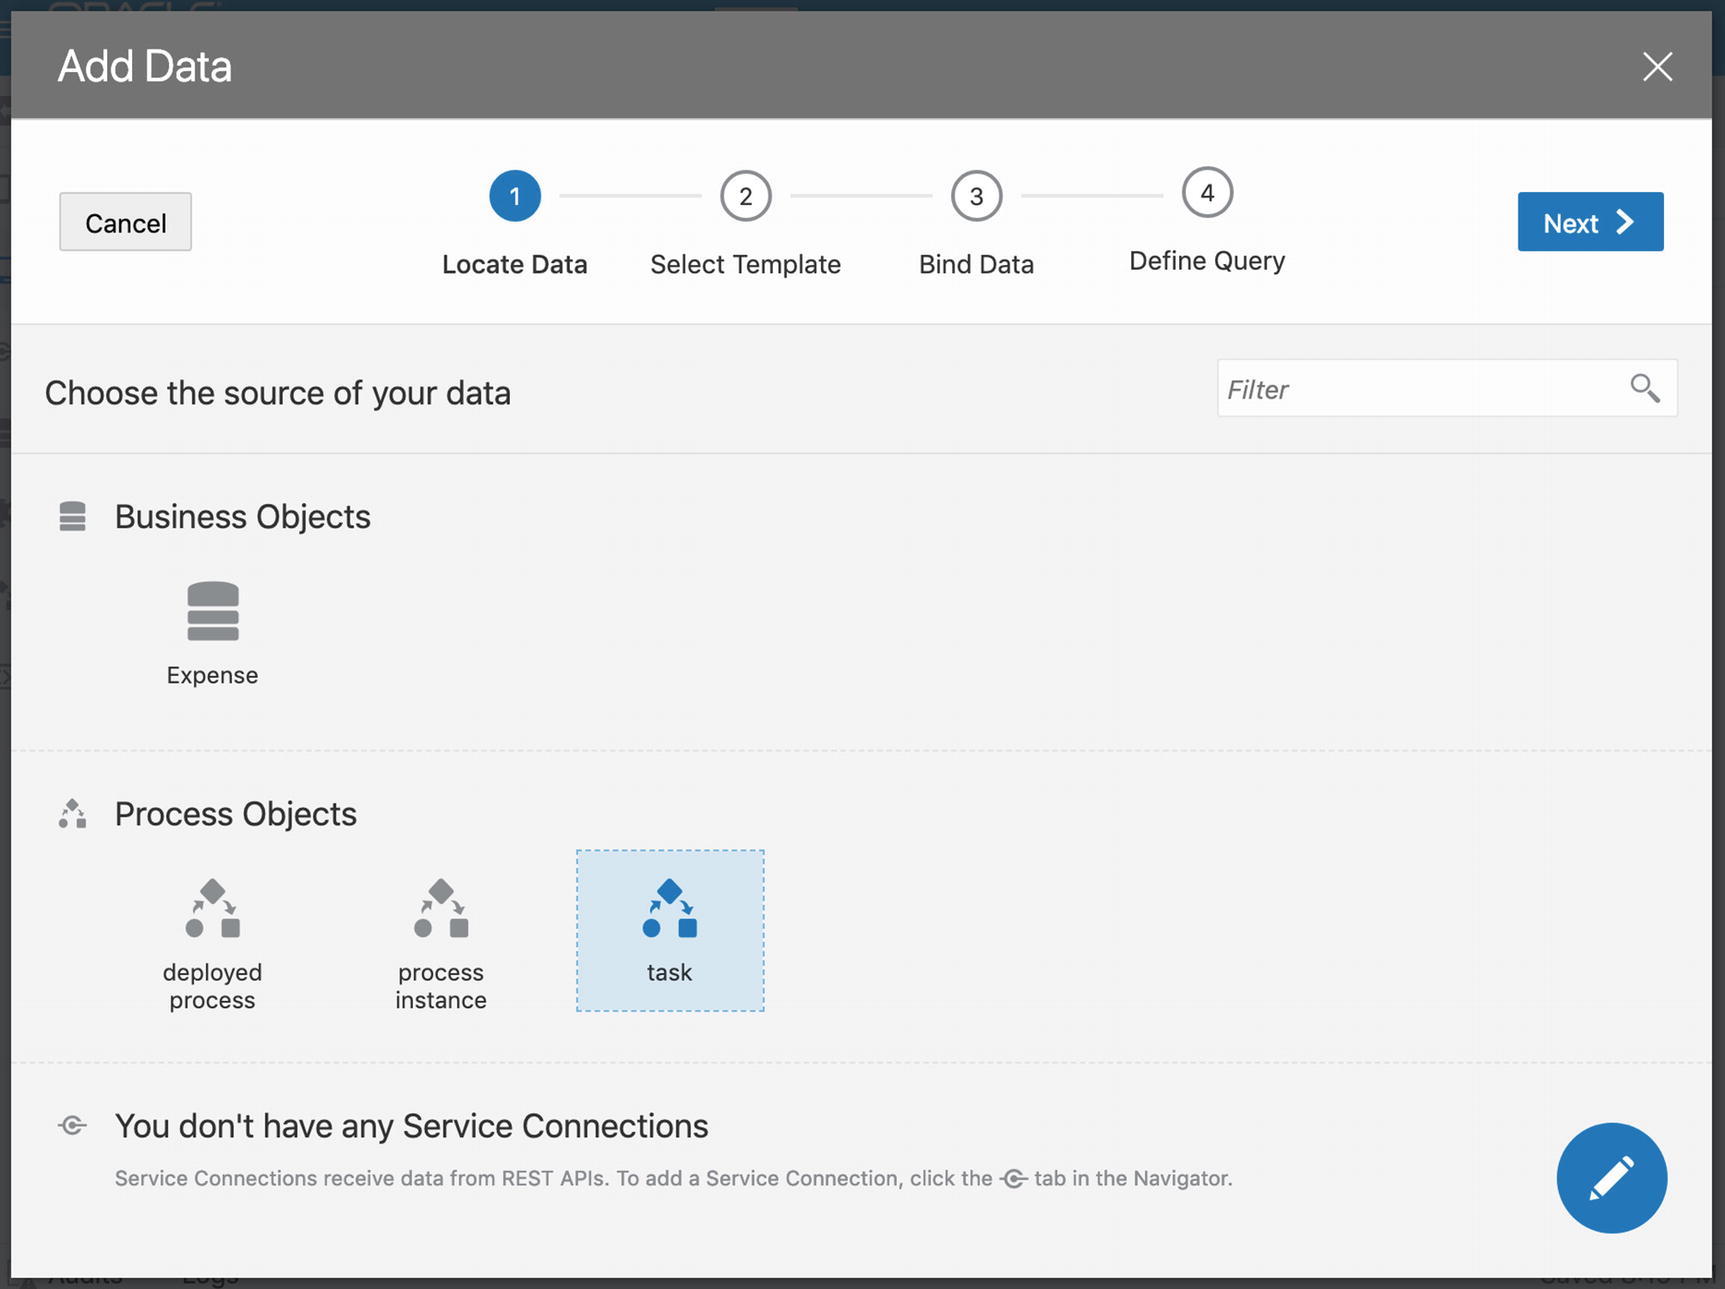
To create a list of tasks assigned to the current user, you can use a collection component like a Table or a List View on a page. When you run the Add Data quick start, notice that you have the option to connect the collection component to several process objects. The task object selected in Figure 13-14 presents you with a collection of tasks.
Figure 13-14
Adding process data to a collection component
In step 3 of the wizard, you bind data elements from the task to your VBCS components. The process developer determines the content of the task fields.
Note
In the Define Query step, you need to set the alias parameter to the getTaskCollection operation to the value of your process alias.
Working with Task Actions
Another aspect of the task defined by the process developer is the possible actions a user can take on a task (e.g., Approve and Reject).
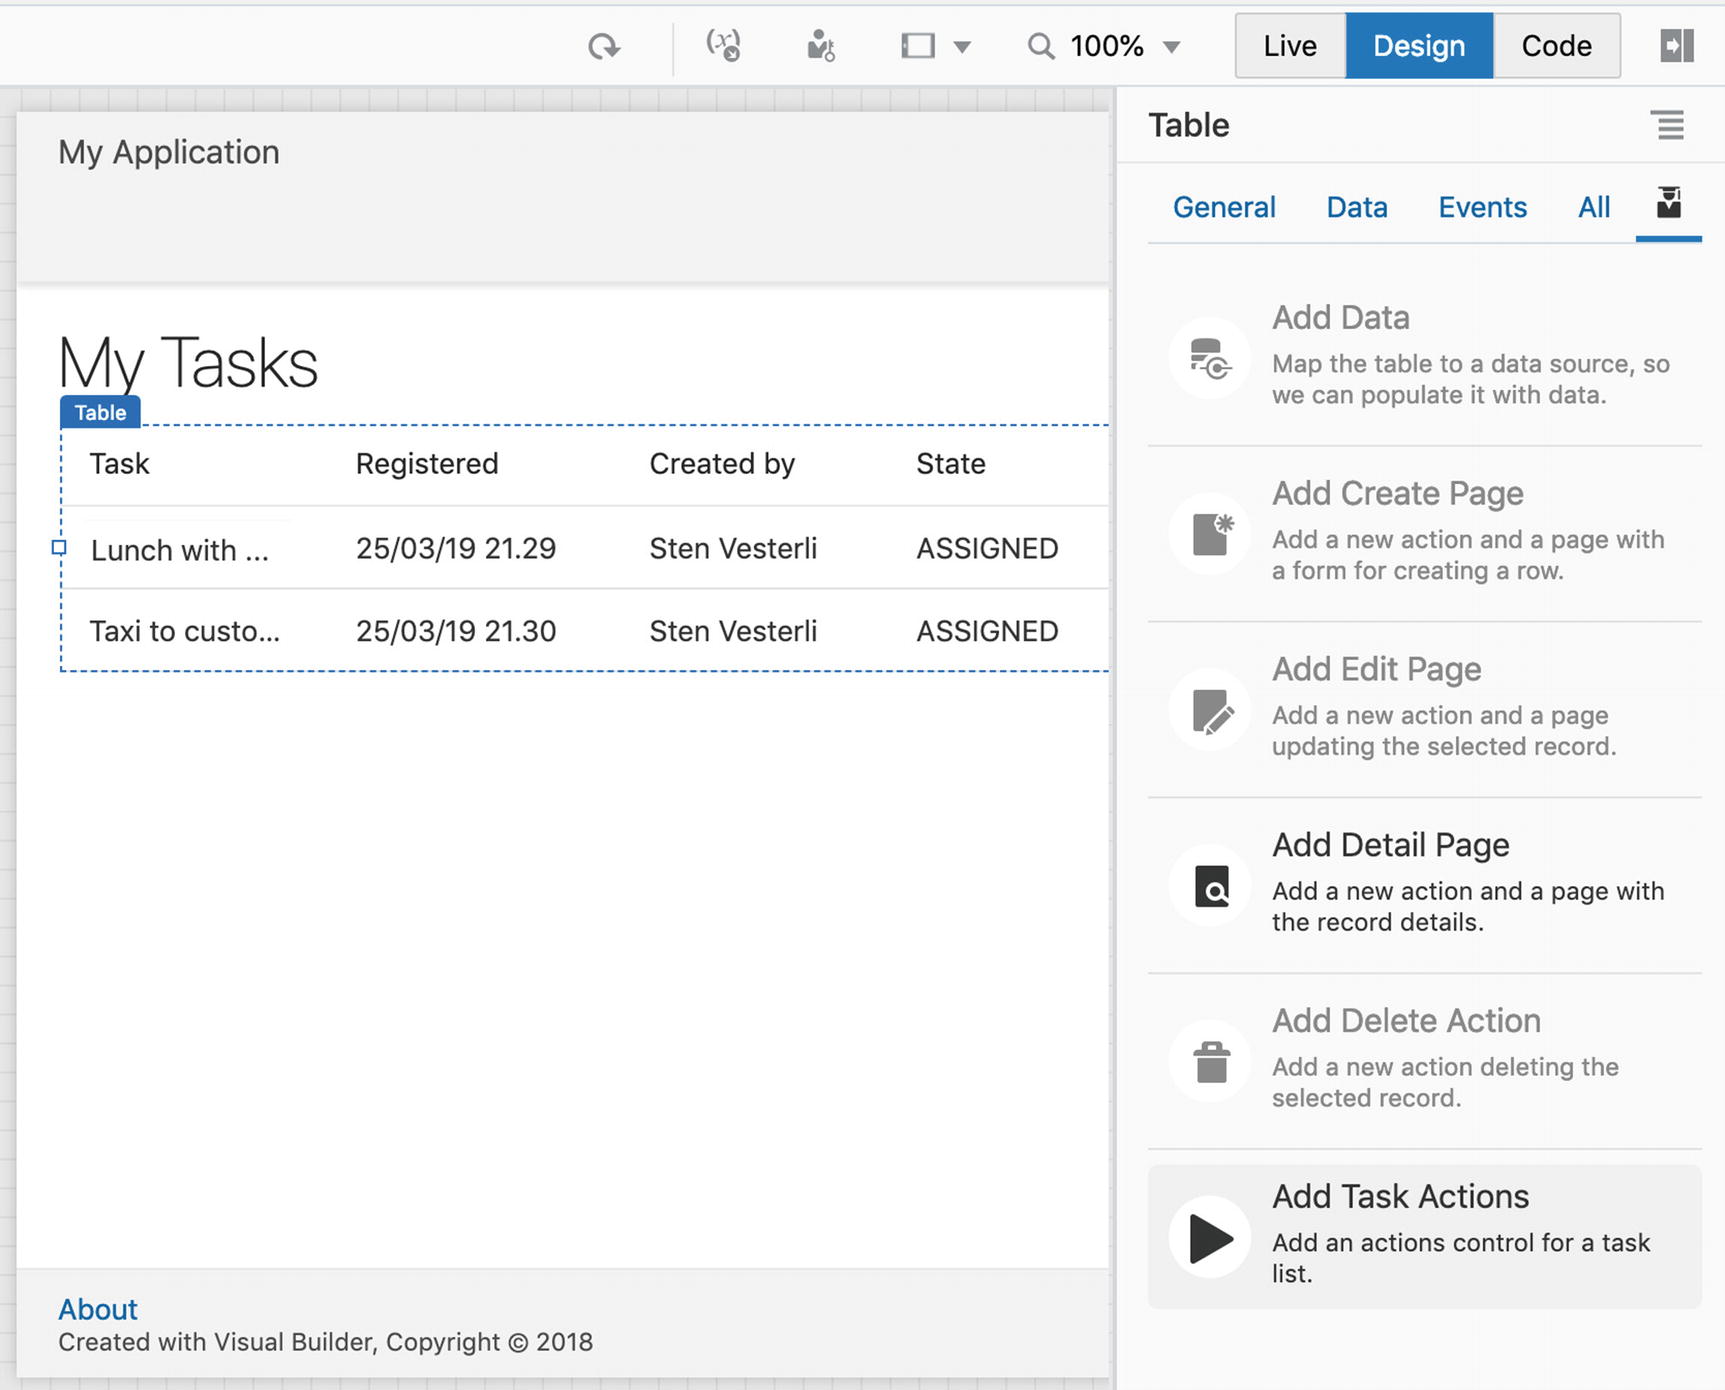
When you have a collection of tasks selected in Design mode, you will notice that you find an Add Task Actions quick start at the bottom of the quick start list as shown in Figure 13-15.
Figure 13-15
Adding Task Actions with the quick start
This quick start adds a single-select drop-down list Choose an Action above the list of tasks, showing the options the process developer has defined, and a Submit button. With this, you can select a task from the list, select one of the options, and submit your task. You will receive a notification that the action was successful, and the task disappears from the list (because the process has moved on).
If you want to tweak this flow a little, you can examine and modify the variable and the action chain the quick start has built for you.
Showing Process Instances
As an example of how to use the code samples you get when you connect a process with VBCS, let’s have a look at a page showing deployed processes. These are all the processes the process developer has made available for VBCS developers to connect to.
In the Code Snippets section, you select the operation you want to use and then copy everything on the HTML tab. For Retrieve Deployed Processes, the HTML starts like this:
<div class="oj-flex">
<div class="oj-flex-item">
<h2>Retrieve Deployed Processes</h2>
<p>Uses the <i>ProcessDataProvider</i> to retrieve deployed
On the page where you want this operation, you select the Code mode (top right, next to Live and Design). Replace everything on this tab with the HTML code you copied.
Similarly, select everything on the JSON tab under Code Snippets. For Retrieve Deployed Processes, the JSON code starts like this:
{
"pageModelVersion": "18.2.3",
"description": "A page that shows the deployed processes visible
to the current user",
"title": "Retrieve Deployed Processes",
"variables": {
"options": {
"type": "string[]",
"defaultValue": [
"extended"
]
},
"selectedAliases": {
"type": "string[]",
"defaultValue": []
},
...
On the page where you want the operation, select the Metadata tab in the tab ribbon along the left edge of the tab showing your page (the bottom-most one, below the JS icon for Functions). Replace everything on this tab with the JSON code from the service process.
When you run this code, you will see something like Figure 13-16.
Figure 13-16
Code snippet page showing deployed processes
Of course, you can modify the HTML code to get a different layout.
Conclusion
In this final chapter, you learned how to integrate Visual Builder Cloud Service with Process Cloud Service. These two cloud services supplement each other well – PCS is suitable for handling long-running work processes, and VBCS is useful for creating attractive pages for the necessary user interaction.
You now have all the information you need to put Visual Builder Cloud Service to work in your organization. With VBCS, you can rapidly build the applications the organization needs to innovate and thrive. Enjoy!