
The purpose of Oracle Visual Builder Cloud Service (VBCS) is to allow you to build applications quickly – not quickly as “in a few weeks,” but quickly as “in a few hours.”
In this chapter, we will do just that.
Visual Builder Cloud Service Architecture
As the name implies, Visual Builder Cloud Service is cloud-based. Your application is developed in the Oracle Cloud, and the default runtime environment is the cloud. Your data can be stored anywhere, as long as you can access them via a REST web service.
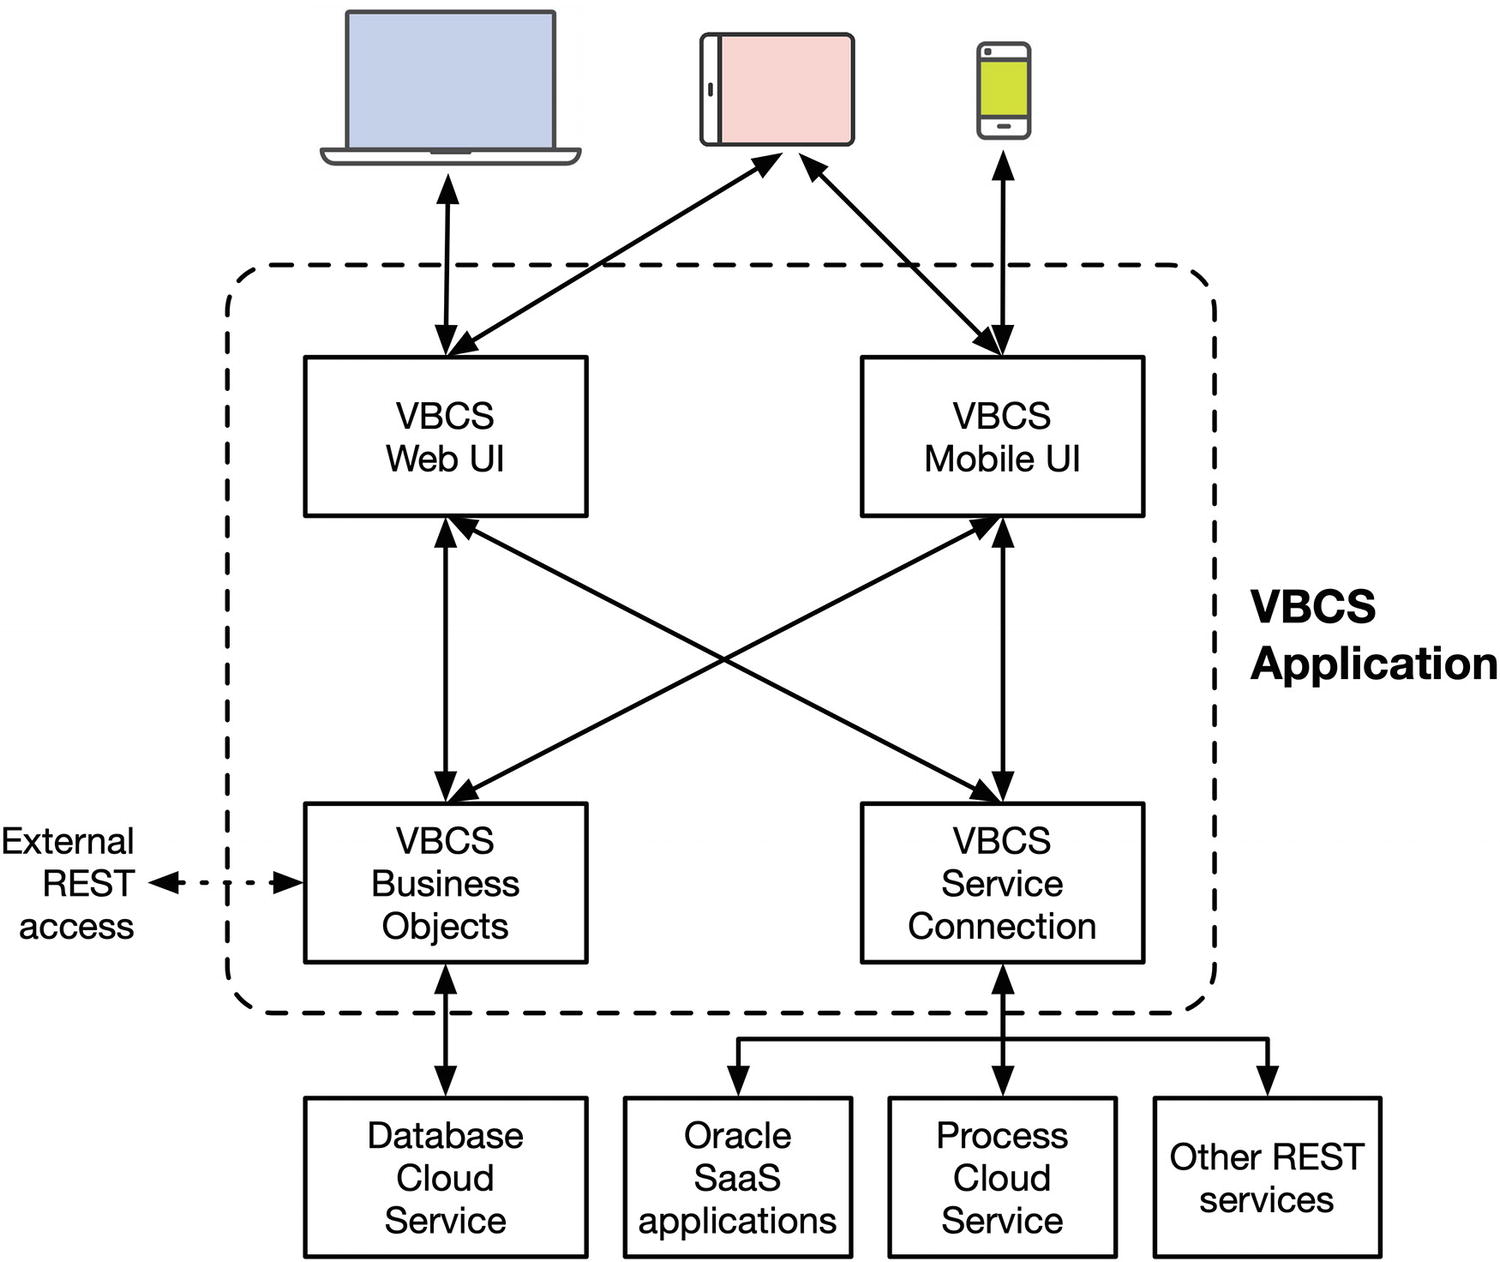
Visual Builder Cloud Service architecture
The Front End
The front end of a VBCS web application is JavaScript and HTML, using open source Oracle JET JavaScript components. The declarative approach and the wizards in VBCS make it very fast to build basic applications, saving time for even experienced developers. If necessary, these applications can then be extended and improved with hand-crafted JavaScript and HTML.
Tip
It is even possible to move the JavaScript and HTML out of VBCS and host it on your own server. You lose a few services that the VBCS runtime environment normally provides you with, like integration with Identity Cloud Service and use of the VBCS proxy for external REST calls. We’ll discuss this in a later chapter.
The mobile applications you build with VBCS are real on-device iOS and Android mobile apps that use Apache Cordova for access to device features. The VBCS development tool makes it easy to access features like camera and location, and you can add Cordova plug-ins for additional functionality.
The Back End
The VBCS business objects and service connections provide a uniform interface for your web application and/or mobile application to connect to.
In the simple case, you just define your own VBCS Business Objects. VBCS will automatically store them in the Database Cloud Service associated with your Visual Builder Cloud Service instance without you having to worry about creating tables and indexes or defining storage parameters. The tables in the database will be presented to your VBCS application as REST services.
Tip
You can even expose your VBCS business objects as REST services to external applications. We’ll return to that in Chapter 2.
You can also use VBCS Service Connections to connect to Oracle Software-as-a-Service (SaaS) applications, Oracle Process Cloud Service (PCS) instances, or any standard REST services.
VBCS is a great tool for building small additional applications on top of Oracle SaaS applications like Finance Cloud, HCM Cloud, or CRM Cloud. These applications offer a number of REST APIs you can invoke, and VBCS offers a catalog to make it really easy to use them.
To connect to PCS, you access the process data PCS makes available through REST interfaces that VBCS understands how to connect to.
Finally, you can access data using standard REST calls, no matter where in the world your data is located. This enables you to call third-party services if necessary and even allows you to use data stored on-premise in your own data center if you expose them to properly authenticated and authorized external users.
The Use Case
In this chapter, we create a simple web application for an “incoming” travel agency to handle tasks. The company might need to provide transfer busses from the airport to a hotel, restaurant meals, sightseeing tours, or other services for visitors arriving in the company’s home city or country.
To manage passengers, vehicles, and services, we will create a list of tasks with a start and end time and place, a description, number of passengers, and a service to be provided. Since many of the services will be provided by subcontractors, we also need the ability to select a subcontractor from a list, and for many services it is also relevant to select equipment like a vehicle of a certain capacity.
Creating a VBCS Instance
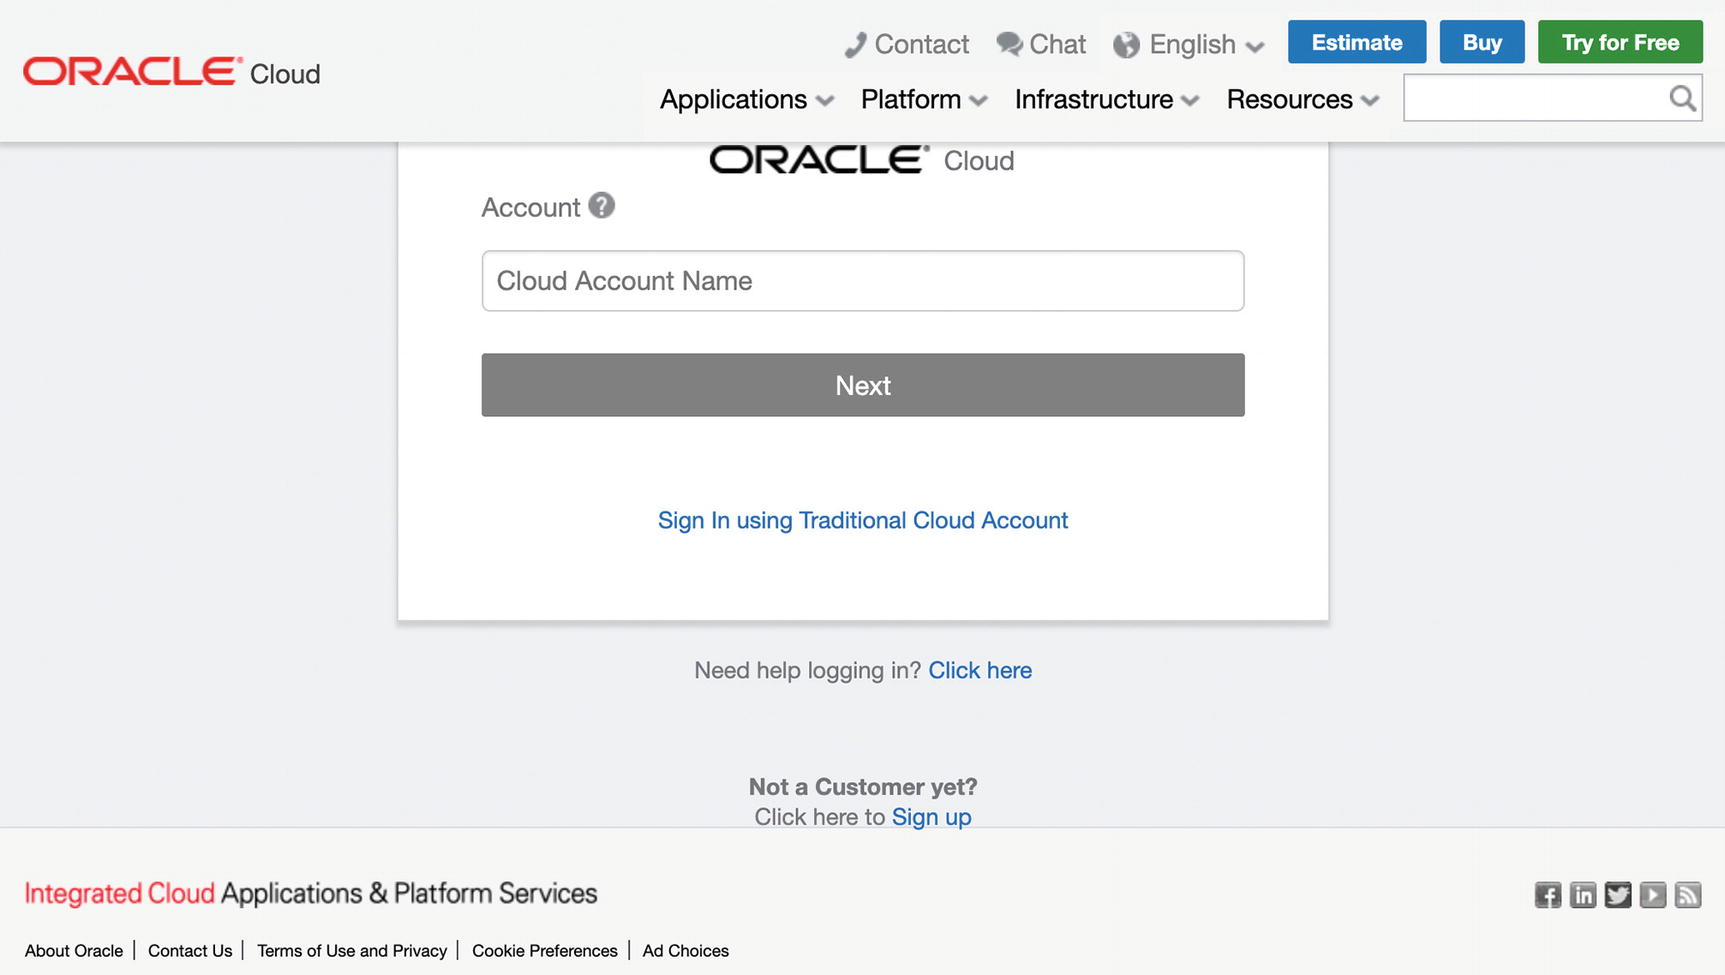
The Oracle Cloud sign in page
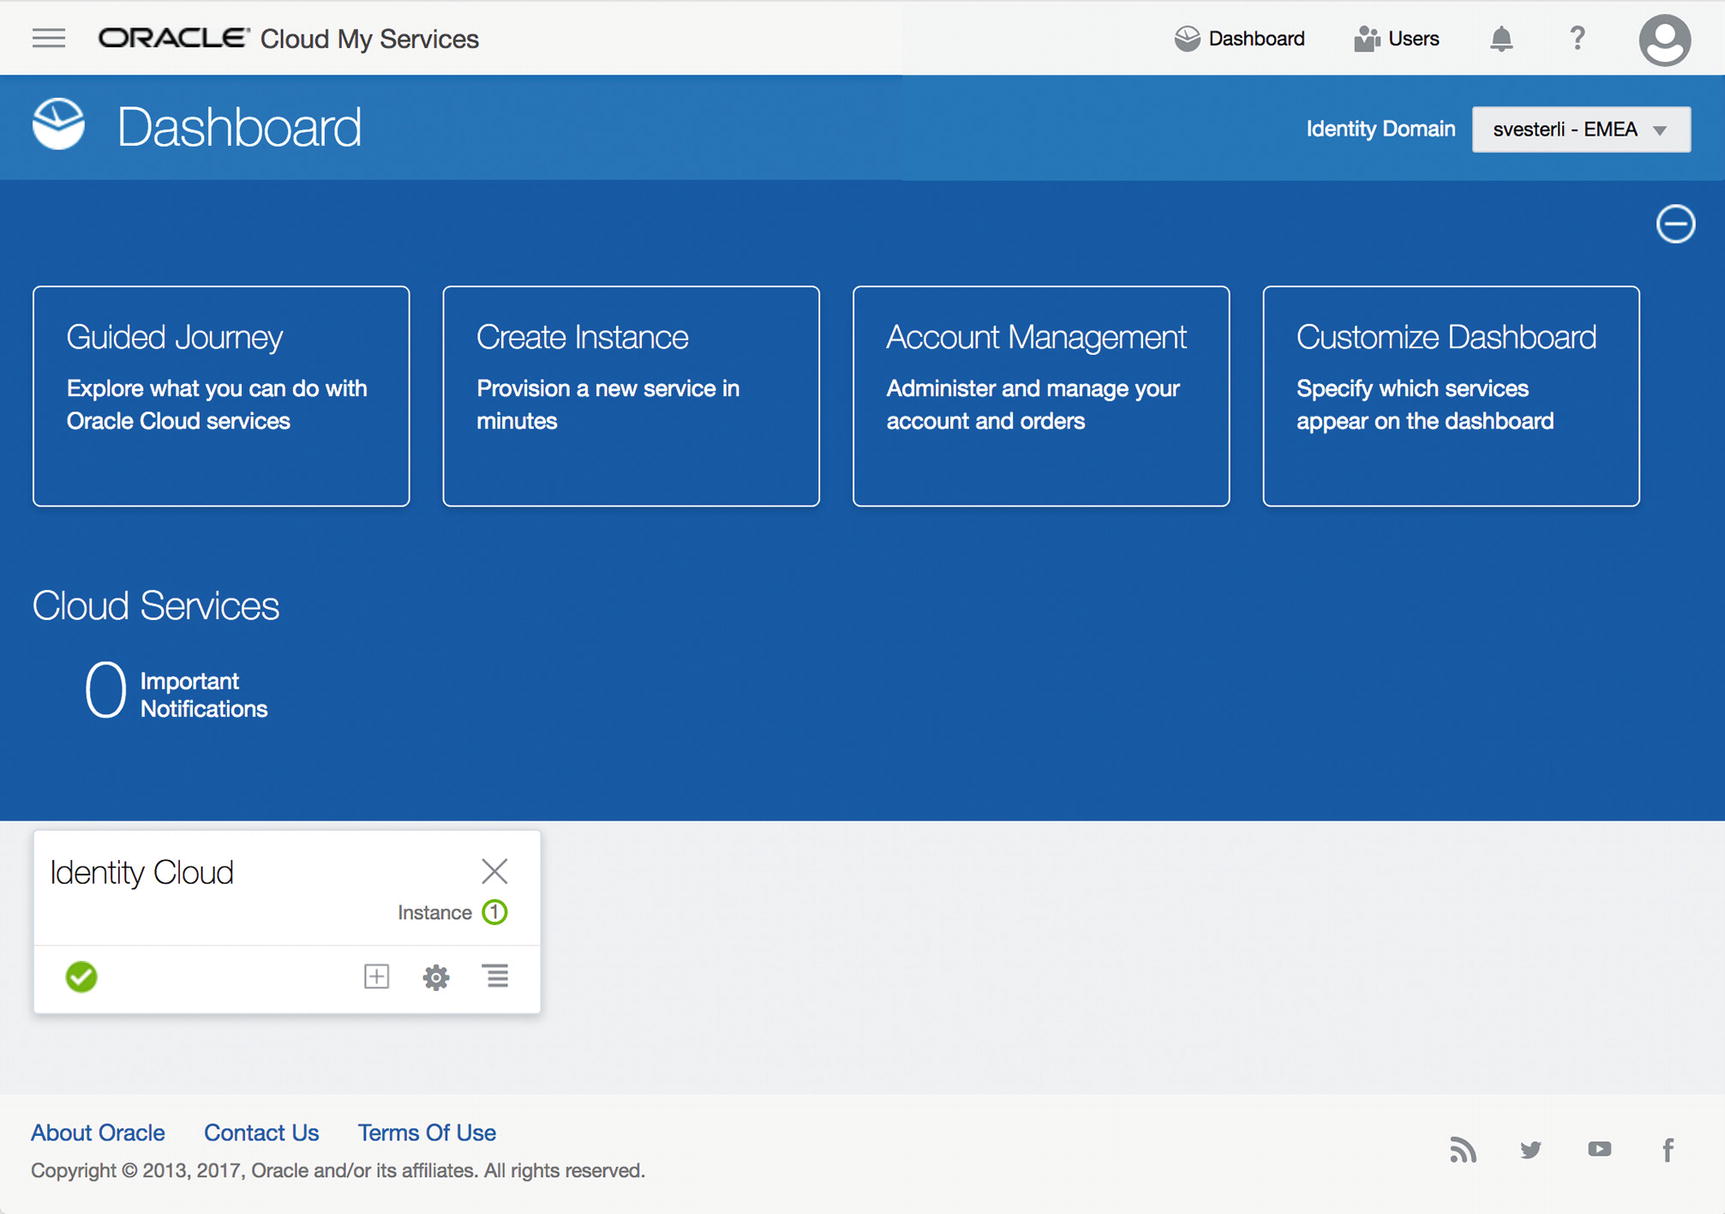
Oracle Cloud My Services Dashboard, initial
This dashboard shows your existing cloud service instances, and you can create new ones. When the first user logs on to your cloud account for the very first time, the dashboard will probably only show an Identity Cloud instance. If you have already used other Oracle Cloud Services before, these will also be shown.
Tip
You can configure which services are shown by clicking Customize Dashboard.
In order to get started with Visual Builder Cloud Service, you need to create an instance of VBCS. If somebody has already created one, it will show up on the dashboard and you can use that. If not, you will have to create one.
Using a Quick Start
Using an Oracle Cloud stack template
The Quick Start instance uses default settings and needs nothing more from you than an instance name. This is the option to choose for a developer who wants to get started quickly with VBCS and see what it can do for the organization.
For a production instance, you probably want your cloud administrator to make an explicit decision on the various parameters you can set for a VBCS instance. The cloud administrator should use an Oracle Cloud stack template. Oracle provides default templates which will configure all the necessary services (Visual Builder, Database Cloud, Storage Cloud), and the cloud administrator can download and edit these templates to produce an environment that is appropriate for the organization and the intended use.
Refer to Chapter 3 of the Administering Oracle Autonomous Visual Builder Cloud Service manual for a more detailed description of how to set up a VBCS instance.
Caution
The Quick Start instance does not include database backup.
Creating a Quick Start Instance

Creating a Visual Builder instance
Caution
Choose Visual Builder, not Visual Builder Classic. The “Classic” instances are only for organizations that have applications built with an earlier version of VBCS.
The default Create Instance window only allows you to define the name of your VBCS instance. At the bottom of the window, it tells you what it will create for you. This includes two nodes of Visual Builder Cloud Service, Oracle managed, and a database.

Downloading the provisioning REST payload
This can be useful if you want to automate the creation of VBCS instances using Oracle Cloud provisioning REST services.
Note that a Quick Start instance does not include database backup. If you want database backup (e.g., if you are creating a production instance), you should use a stack template.
When you click Create, the instance creation starts. The Oracle Visual Builder Cloud Service console window appears, showing your new instance with status Creating service … It used to take several hours for your instance to be created, but recently I have experienced create times of less than 15 minutes. However, I have also experienced instances that weren’t created after 6 hours and have had to contact Oracle Support to find out what went wrong. Your mileage will vary.

The cloud dashboard with Visual Builder and Database instances
Creating a Stack Template Instance
To create a VBCS instance using a cloud stack template, you use the navigation menu at the top left corner of the dashboard window. Expand the Services node, scroll to the very bottom (past Visual Builder and Visual Builder Classic), and choose Cloud Stack.
Oracle Visual Builder Cloud Service (Oracle-VISUALBUILDERAUTO-OM-Template), which creates an autonomous (Oracle-managed) instance
Oracle-VisualBuilder-CM-Template, which creates a customer-managed instance

Topology of a cloud stack template
You can click Export to download the template YAML file, edit it to match your needs, and then Import it back into the Oracle Cloud Stack window.
It is a task for your cloud administrator to define the right topology, number of nodes, backup policy, and so on.
To start creating an instance from a stack template, you click the little cloud icon with a plus sign. This will call up the Instance Details screen where you define the service name, provide an SSH key, set database password, and more. When you have provided all the necessary information, click Next, verify everything on the confirmation page, and click Create.
Building the Application
As discussed in the section on Visual Builder Cloud Service architecture, a VBCS application uses business objects that need a data source in the form of REST web services. If you already have REST web services to create, retrieve, update, and delete data, you’re ready to jump straight to building the user interface. In this section, we will build a simple application from scratch, that is, we will build both business objects for the data and a user interface for the user to work with.
Getting to the Home Page
To create a VBCS application, you start from the Visual Builder Cloud Service home page. You can have several VBCS instances in your cloud account, and each of these will have its own home page and its own applications.

The Visual Builder Console
From here, you click the navigation icon to the right of a VBCS instance and choose Open Visual Builder Cloud Service Home Page. In the preceding figure, there is only one instance and one navigation icon, but you could have several.
Note
Each instance requires its own resources. Thus, there is an additional cost if you are running more instances.

The Visual Applications tab
This is where you should be building your applications.
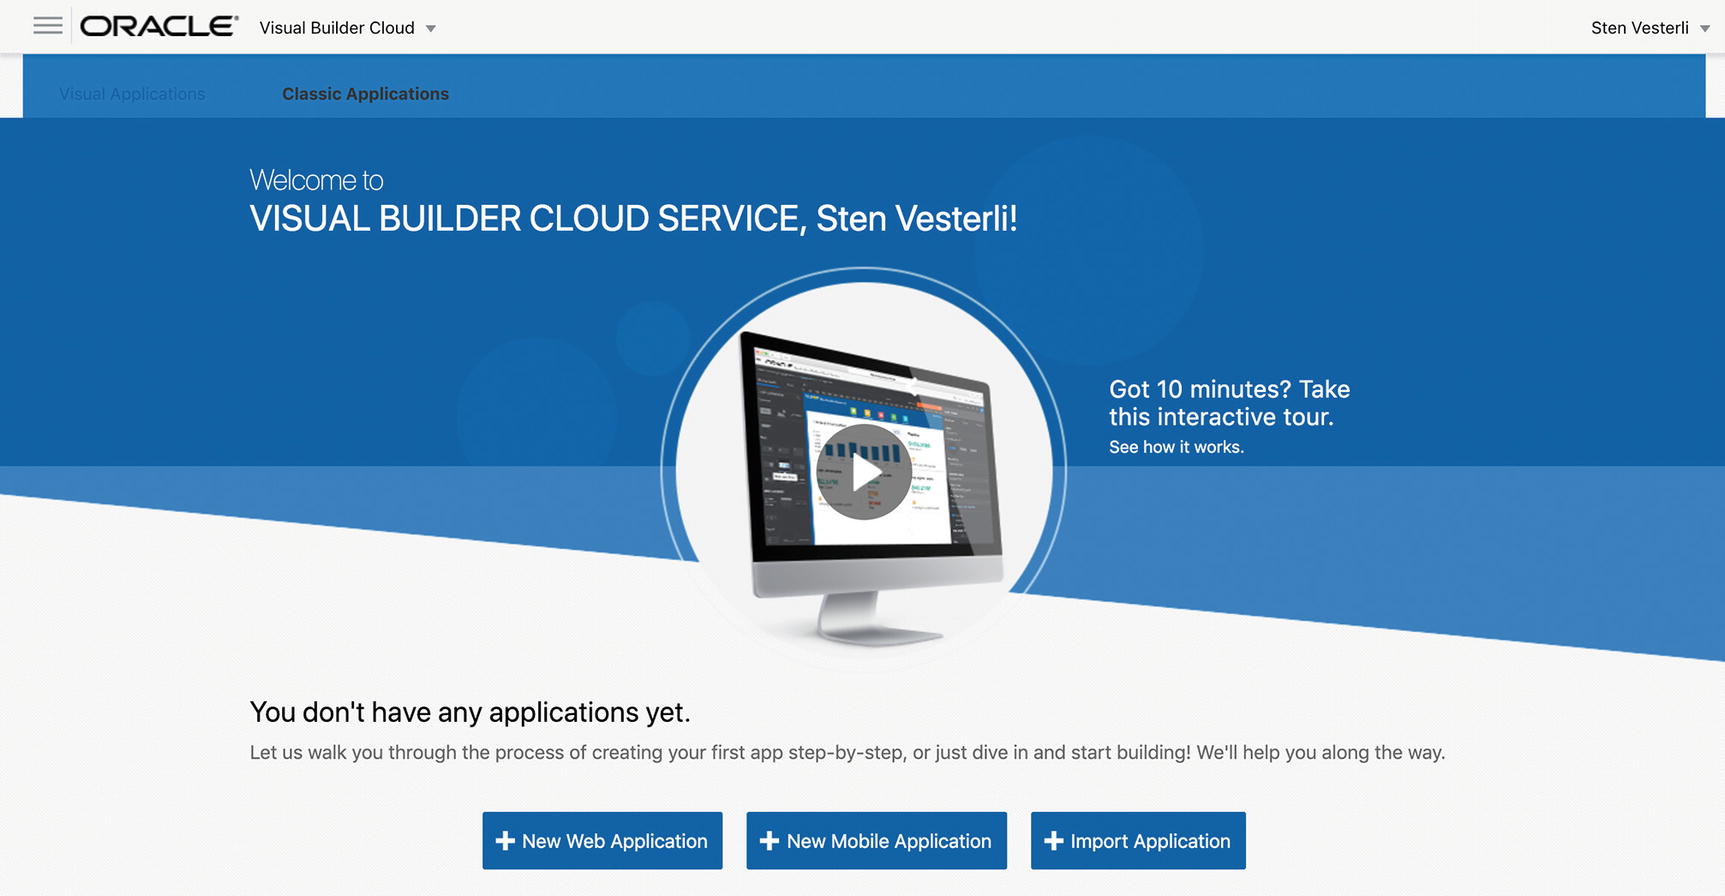
The Classic Applications view
Caution
You should not build new “Classic” applications. This view is retained for backward compatibility with earlier VBCS versions, and any application you build from the Classic Applications view will be of the older type without access to the latest features.
Creating the Application
Application name (which will be shown in all the screens to manage the application).
Application ID (which becomes part of the URL to your application).
Optionally, a description. Make it a habit to provide a description – once you start working with VBCS in earnest, you are likely to be building a lot of applications.
You can also choose a template. The default Empty Application template creates a simple application without any extra features.

The Visual Builder main user interface
Mobile Applications
Web Applications
Service Connections
Business Objects
Components
Processes
Source View
In this chapter, we will be building a simple web application, so we will only be using the Business Objects and Web Applications areas.
Creating the Business Object
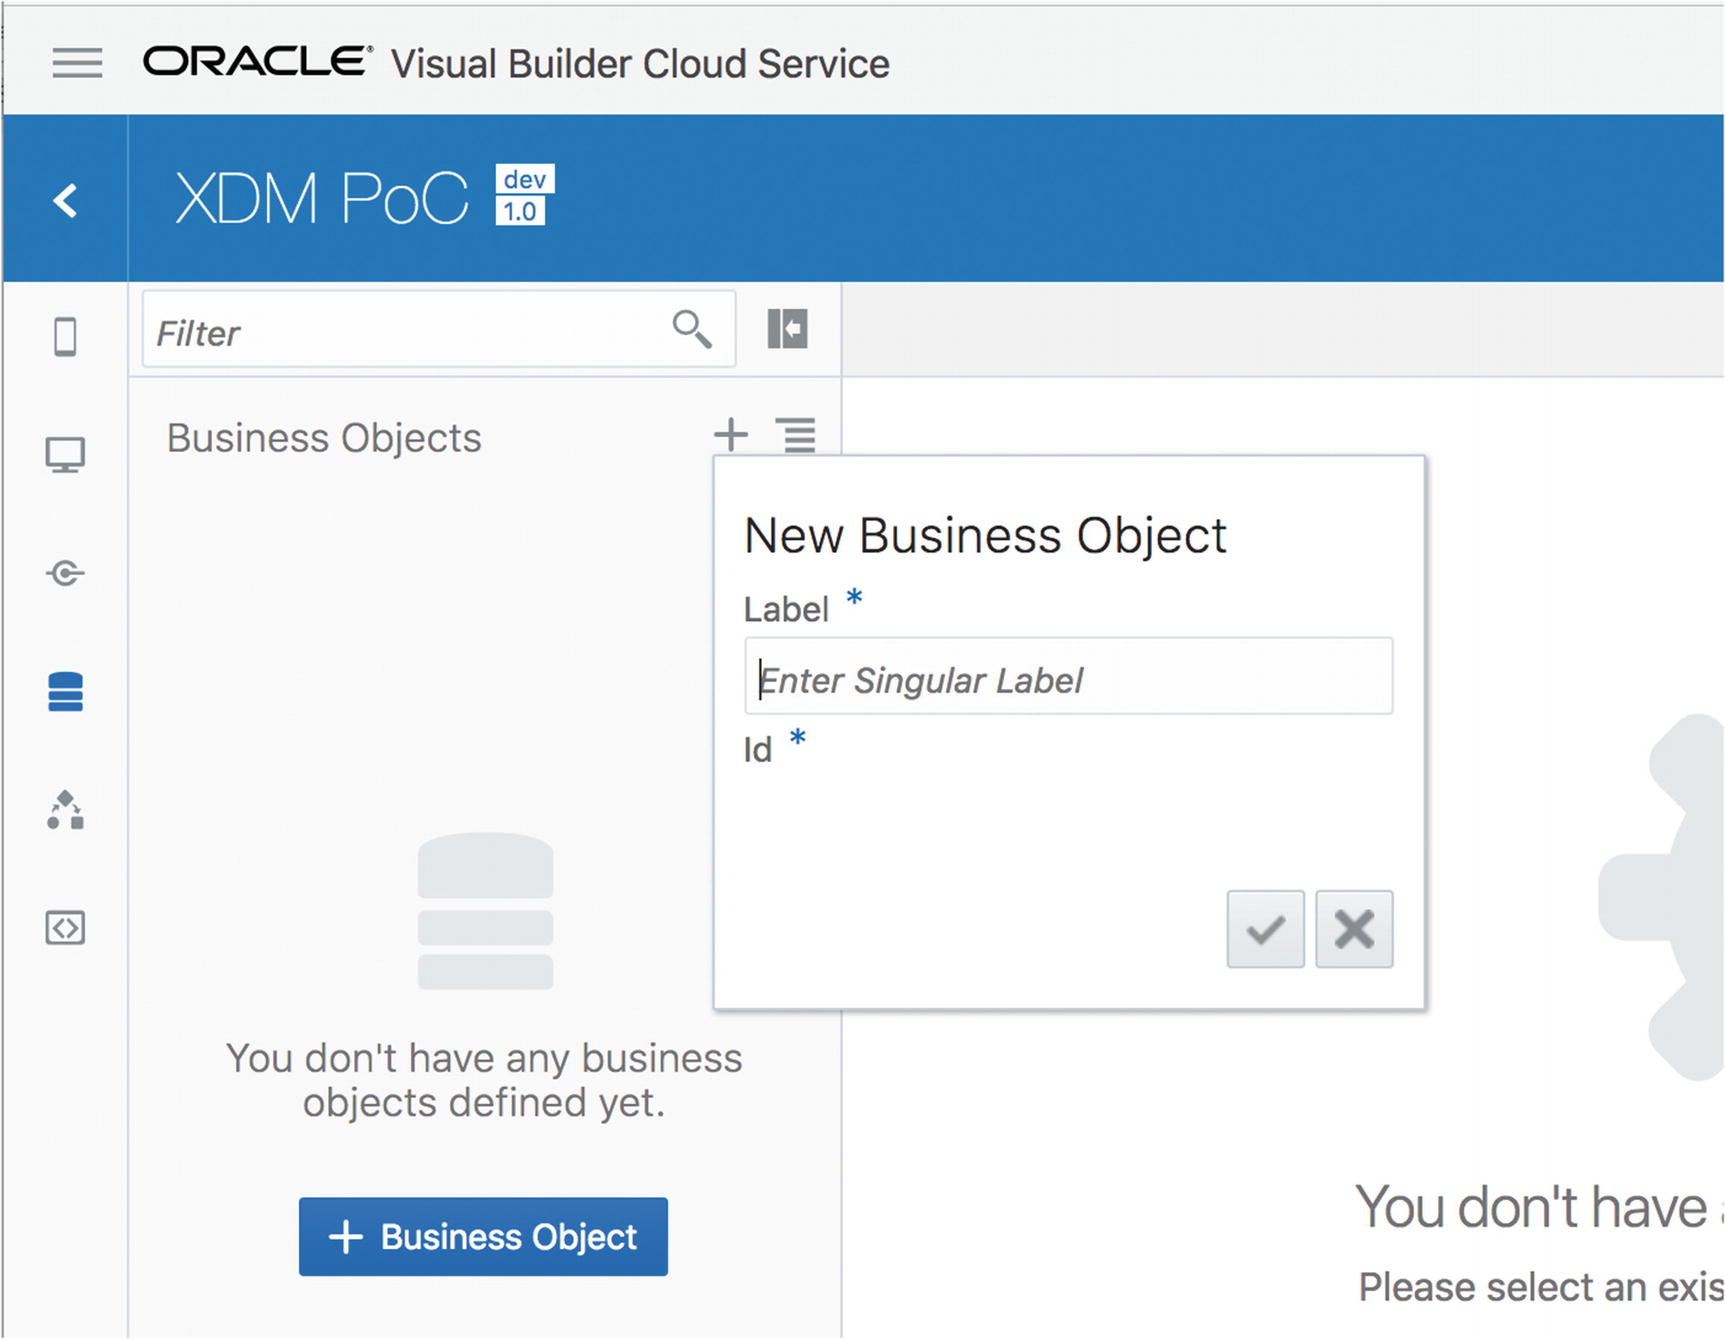
The New Business Object dialog
Once you provide a label and click the Create (checkmark) icon, your new business object is opened in a separate tab in the work area. We’ll discuss all the options here in later chapters, but in this chapter, we focus on quickly creating a simple VBCS application. To add custom fields to your newly created business object, choose the Fields tab. You will see that VBCS has already created an ID field and some fields for recording the history of an object. These are standard in all VBCS business objects.
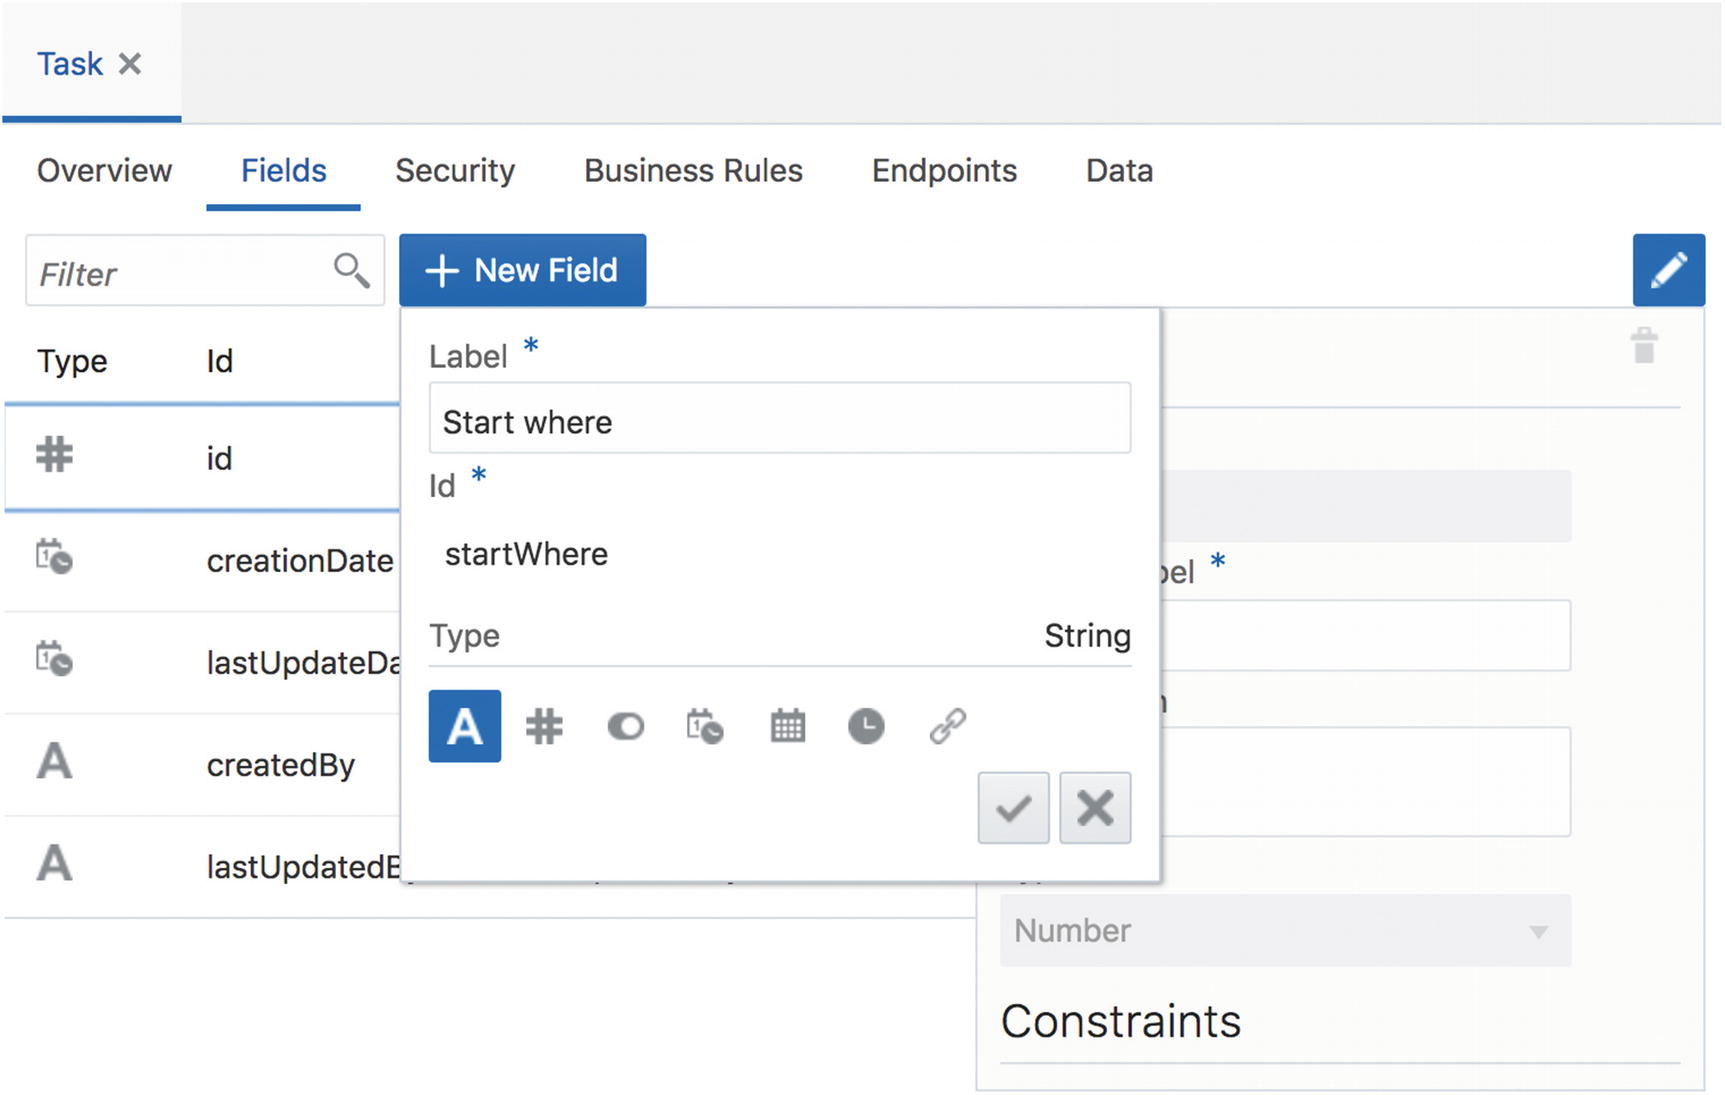
Creating fields in business objects
Date (type Date)
Start where (type String)
Start when (type Time)
Description (type String)
End where (type String)
End when (type Time)
Pax (type Number)
The word Pax is widely used in the travel industry as shorthand for Passenger.
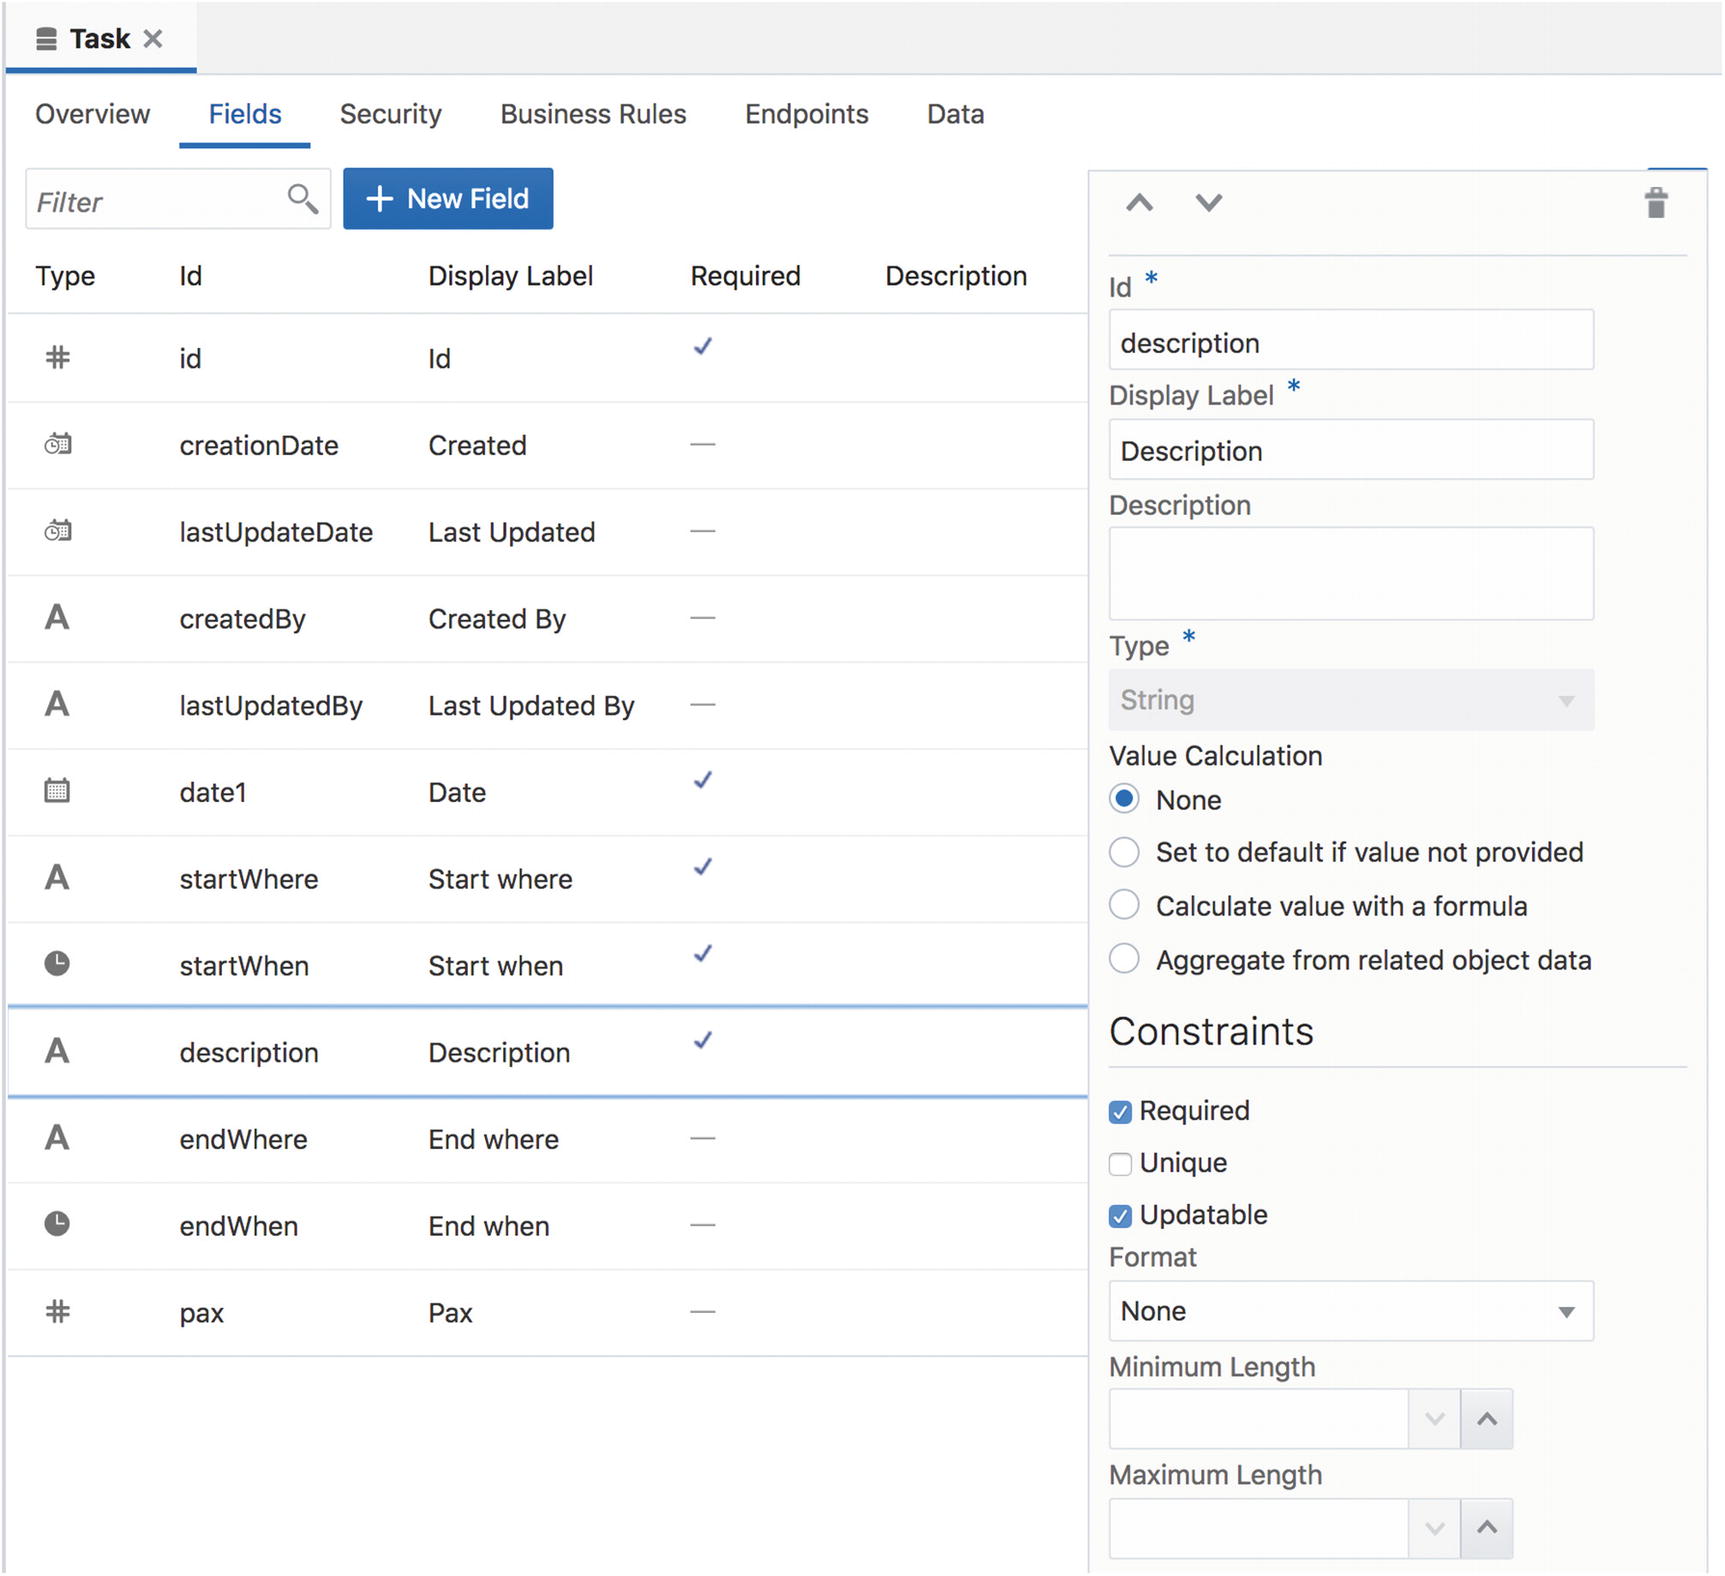
A Task business object
Once you have your business object with the necessary fields, go to the Data tab, click Add Row, and create a few rows of test data.
Note
We will get back to how to import data from Excel or CSV files in a later chapter. You can even create complete business objects from your data files, but we’re keeping it simple in this chapter.
That’s all you need to do to create a business object you can use in your application.
If you are interested, you can go to the Endpoints tab and see the REST web service endpoints that VBCS has automatically created for you. You can even publish these services for other applications to use. We’ll get back to that in a later chapter.
Creating the Web Page
The next step is to create the web page where the user can interact with task data. This happens in the Web Applications area that you select by clicking the corresponding icon in the menu bar along the left edge of your VBCS window. It’s the one that looks like a computer screen.

A new web application
On the left, the one that looks like a puzzle piece shows and hides the component palette (it is shown in the preceding figure).
Also on the left, the one that looks like a folder tree shows and hides the page structure (it is hidden in the preceding figure).
On the right, the box with the arrow expands and collapses the property inspector pane (it is expanded in the preceding figure).
Note
Confusingly, there are two “puzzle piece” icons: one at the far left (which switches to the main components tab) and one in the icon bar at the top of the work area (which toggles the component palette on that tab on and off).

Dropping a Table component onto a page
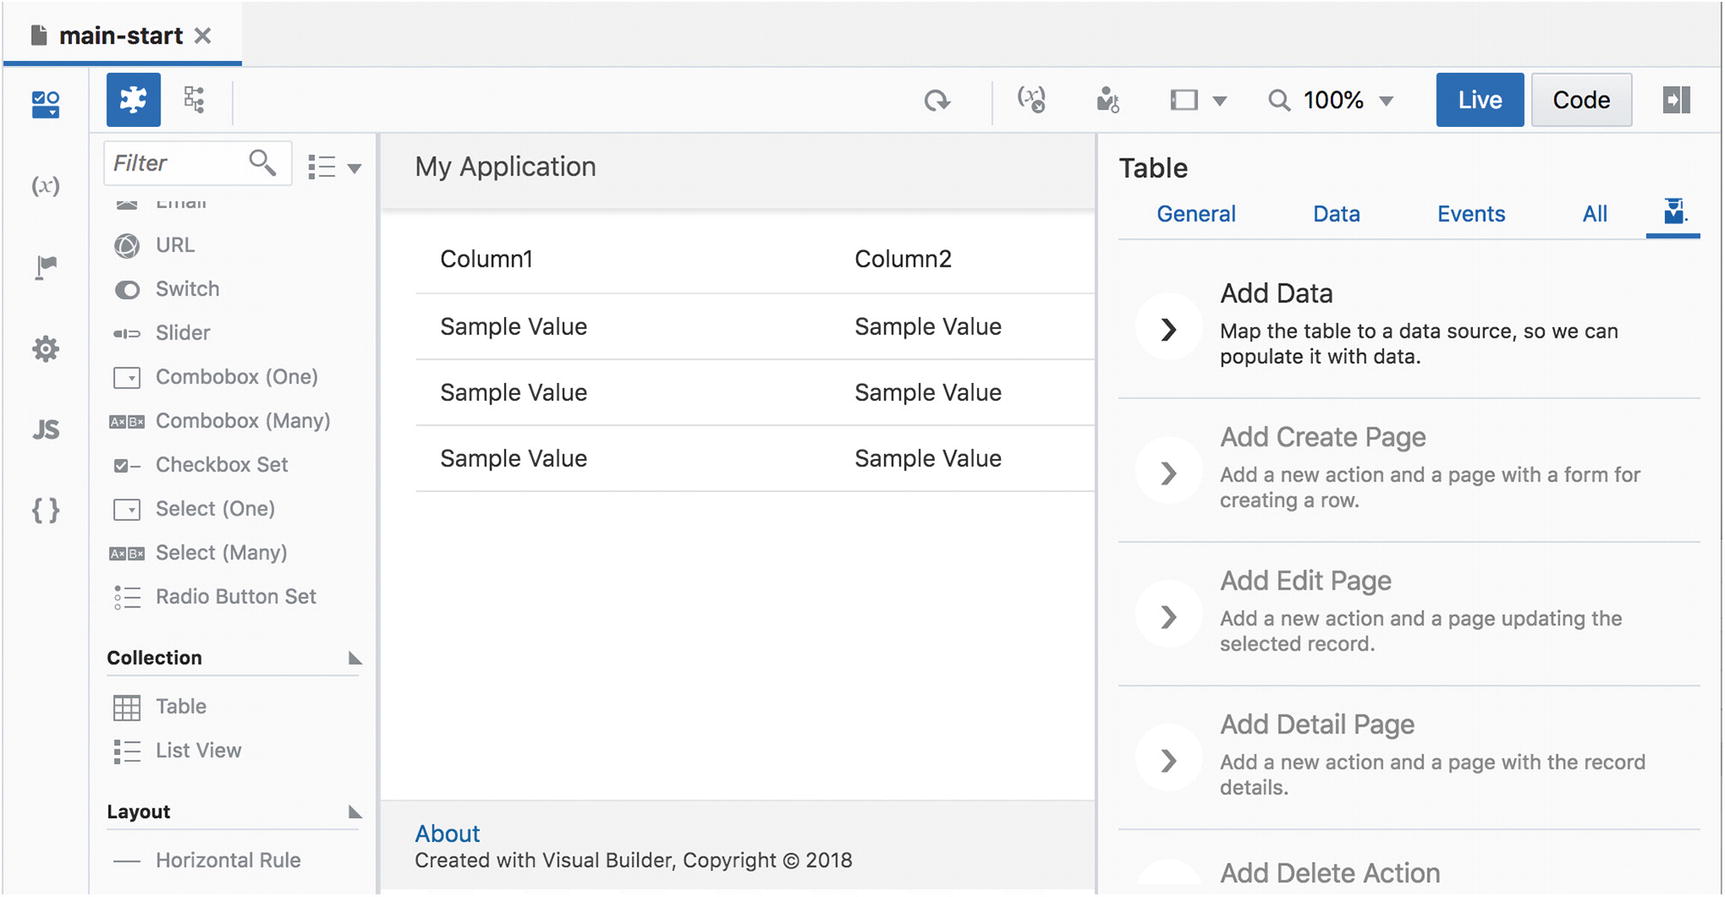
A page with a Table component
To connect your table to the business object, you need to expand the Property Inspector if it is not already shown. When the Table component is selected, the Property Inspector shows a number of tabs relevant for that component. The right-hand tab (with the university student icon) shows the Quick Starts, and one of these is Add Data. This wizard will prompt you for all the necessary information to connect your table with a data source.
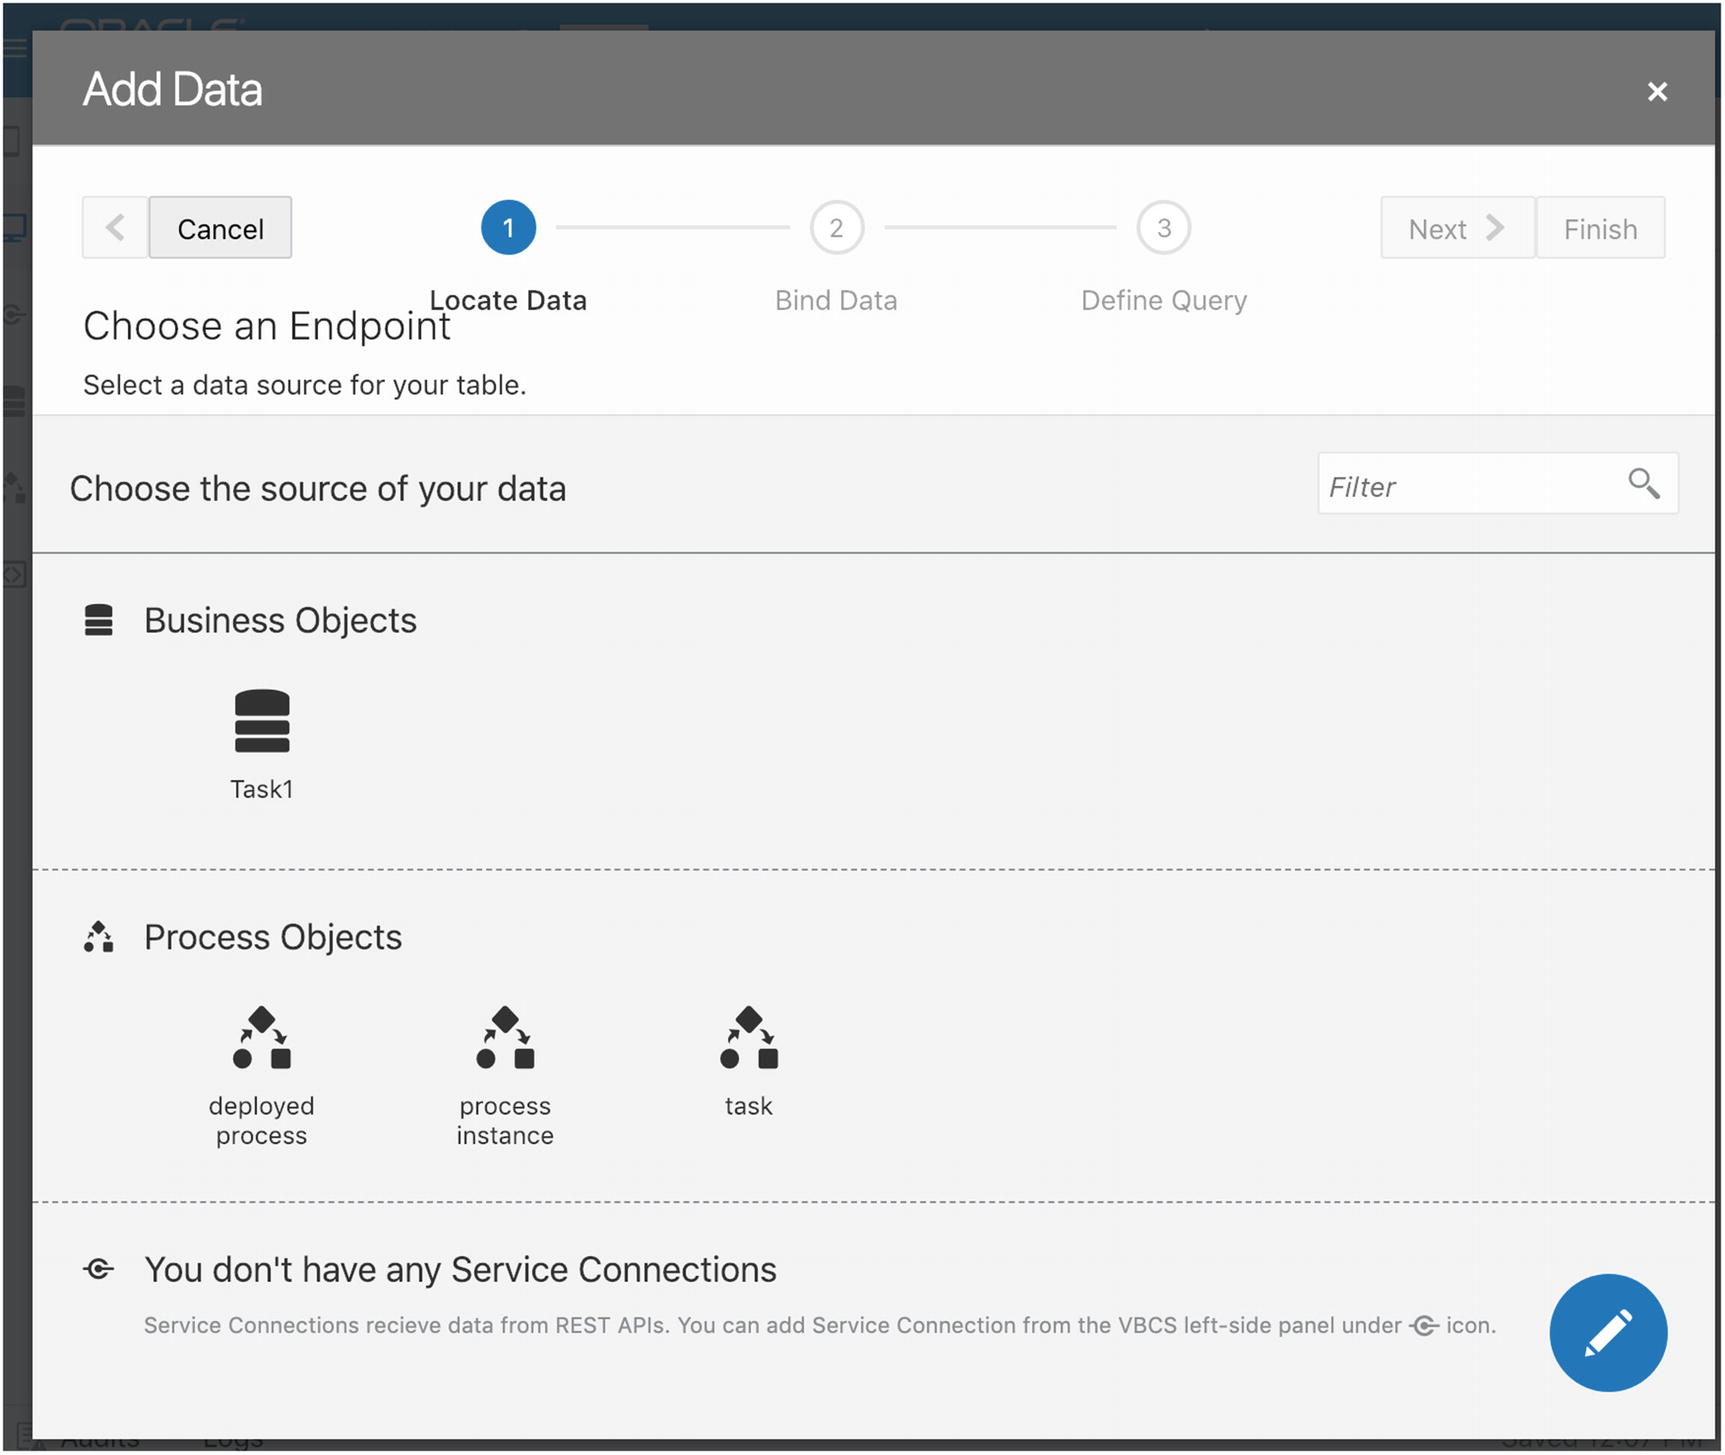
Selecting an endpoint for tasks
When you have selected a business object and have clicked Next, then second step of the Add Data wizard, add the columns you want to display. Select them in the order you want them displayed on your screen. You don’t have to select all columns.
In the last step of the wizard, you have an option to provide query parameters. We’ll skip that for this example and click Finish.
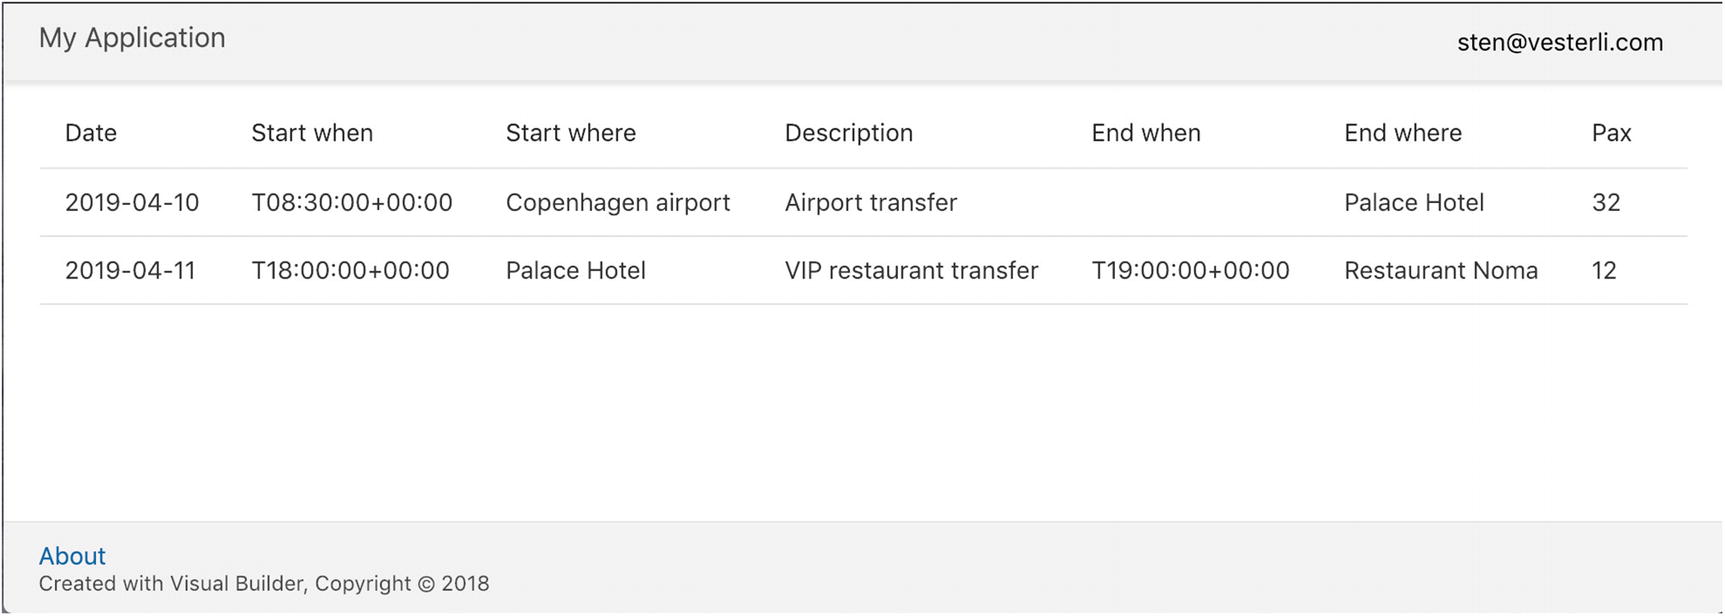
A running VBCS application
Note
We’ll see how to fix the default time representation in a later chapter.
Staging and Deploying the Application
Once you have built the application, the next steps are to test it and then release it into production. Visual Builder Cloud Service supports these lifecycle events really well.
Releasing to Test
When you as a developer are satisfied with the application, you can stage it. This means that a copy of your application is created and placed into another environment that is part of your VBCS instance. Your testers can access a stable version of the application in this environment, even as you might continue development on the dynamic development version.
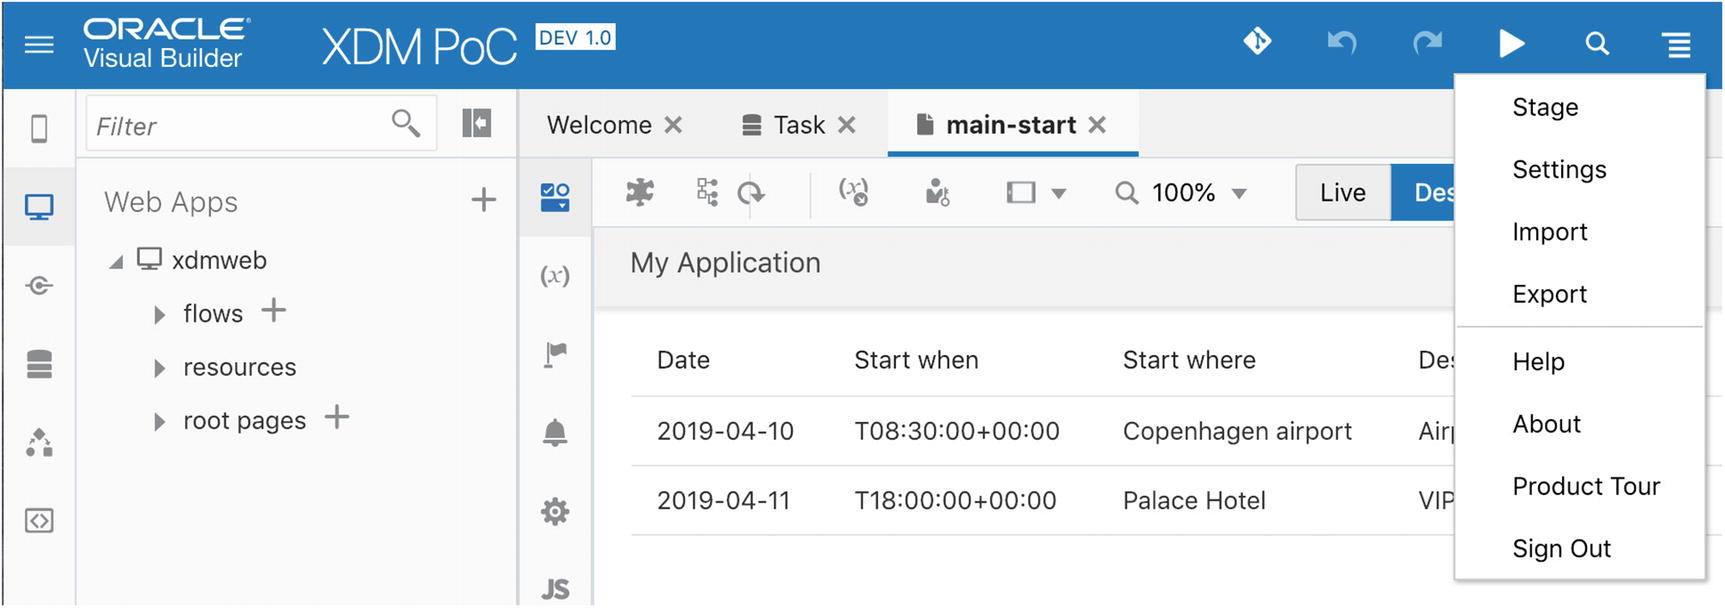
Application management options
To release your application to test, choose Stage from this menu. You will be given the option to either stage the application with a clean database where your testers will have to create their own data or ask VBCS to copy the data in your development database to the staging environment.
When you click the Stage button, VBCS creates the test version of your application (and data if you chose that). This might take a little while. When the staging process completes, you will see your application now has status Stage and still version 1.0.
Fixing Bugs
If your testers come up with anything that is not the way it is supposed to be, you need to change the application.
Tip
Testers get really annoyed if you change the application while they are testing it. Create a new version for your bug fixes.
To create a new version for your fixes, select New Version from the application menu. VBCS will suggest a version for you. If you are fixing bugs in version 1.0, in accordance with Semantic Versioning (see https://semver.org ), your bug fix version should be 1.0.1. When you click Create, you get a new version of the application that has status Development. You can edit this new version to fix whatever problem your testers have discovered, and then stage the fixed version.
Releasing to Production
When your application has passed testing, it is time to put it into production. To do so, you choose Publish from the application menu. Again, you are given the option to either publish the application with a clean database or include data from the staged application your testers worked on. It is recommended to publish the application with a clean database.
When you click the Publish button, VBCS creates the production version of your application from the staged version. When the publishing process completes, you will see your application with status Live and the same version number your testers approved. Your application is now ready to be used by your users!
Conclusion
In this chapter you saw how easy it is to create a small application, complete with data source and user interface. Did you record how long it took you? Once you get familiar with Visual Builder Cloud Service, you will be able to run through the process from inception to your first staged JavaScript and HTML web application ready for testing in less than an hour, including screens for creating and editing objects.
In the next chapter, we’ll discuss in more detail how to work with business objects.