
In the last chapter, you saw how you can add your own logic to business objects. In this chapter, we will discuss how to implement logic in the user interface layer of the application.
You’ve seen that the VBCS drag-and-drop features combined with the Quick Starts allow you to build a complete application that can handle query, insert, update, and delete. If that is enough for your needs, you don’t have to read this chapter unless you are curious how VBCS works behind the scenes. But if you want to understand the internals of VBCS and make full use of its power, you need to be able to write your own user interface logic.
How VBCS Really Works
If you examine what Visual Builder Cloud Service builds for you when you run the Quick Starts, you will see that the Quick Starts are just a convenient way for you to build the basics of your application quickly. When you need something more than the default, you can either adapt the logic built by the Quick Starts or create new logic from scratch.
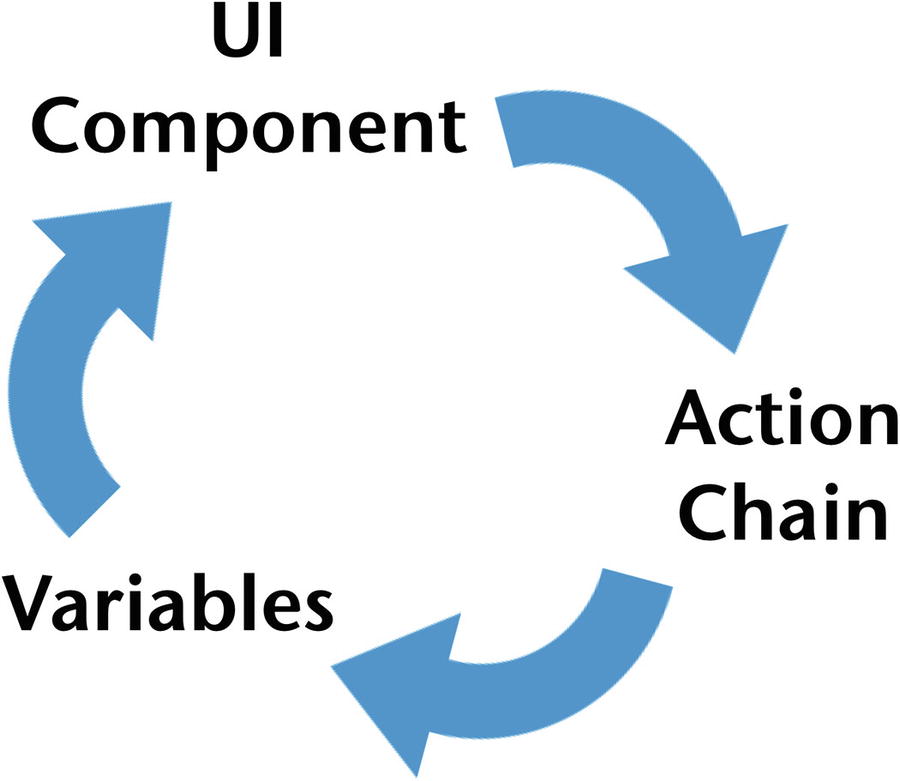
The VBCS processing circle
This chapter provides an overview of this process. For more details, refer to the long “Understand the Page Model” chapter of the Developing Applications with Oracle Visual Builder manual.
Examples from the Quick Starts
To see how these parts work together, you can build a simple application based on a business object. If you drop a collection component on the main-start page and then use Quick Starts to map that component to data and create an edit page, you have examples of much of the logic that a VBCS application uses.
Getting Data
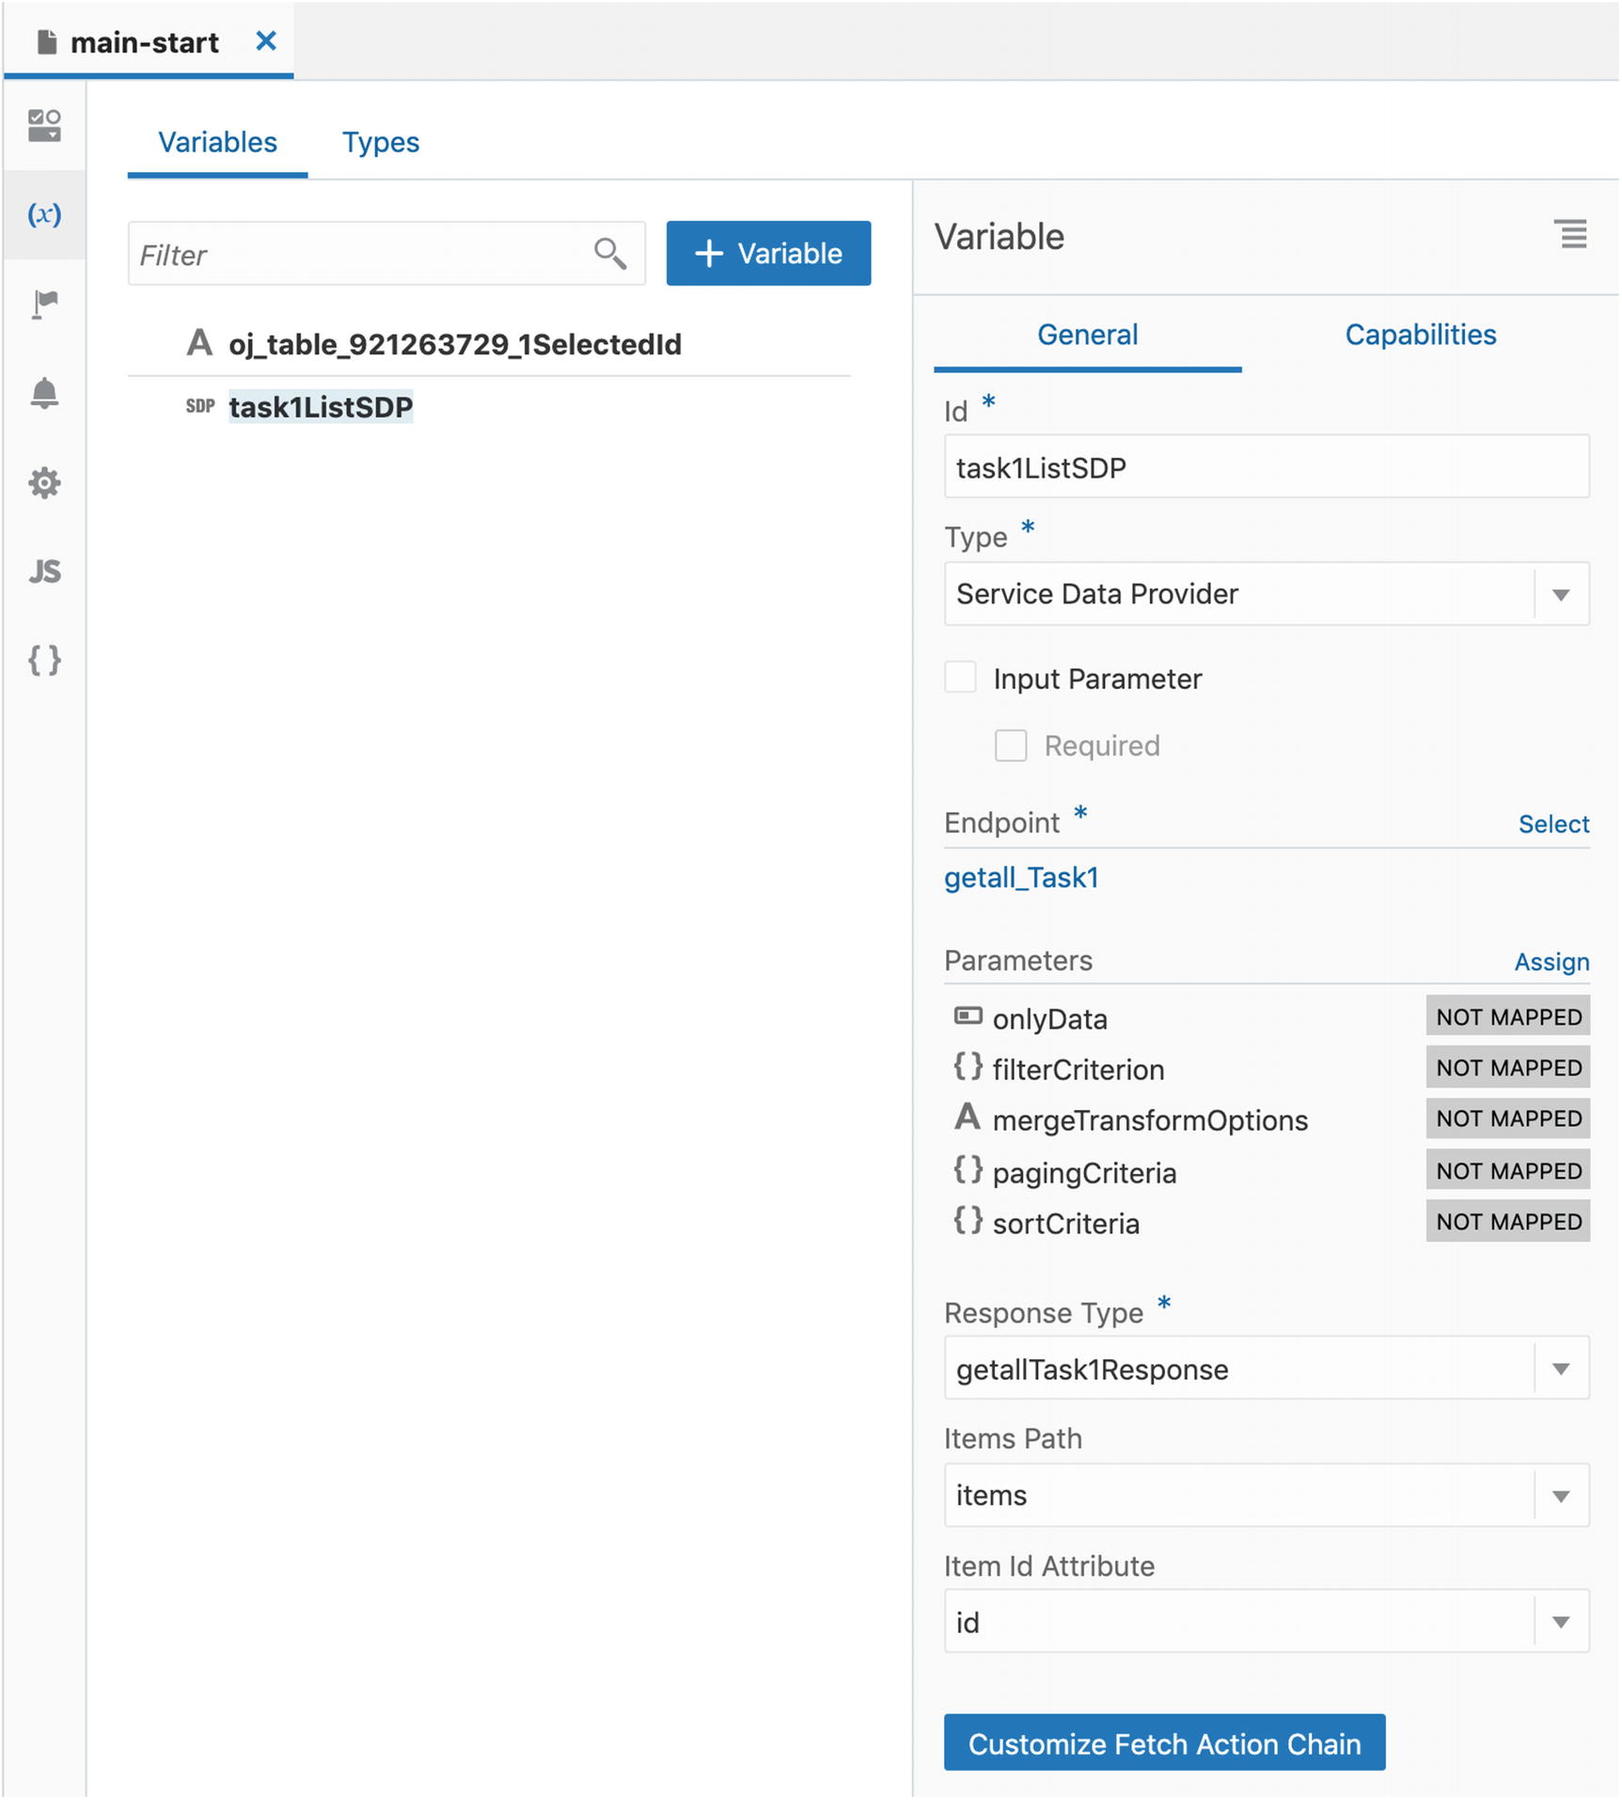
The variables created by the Add Data Quick Start

Customizing the fetch action chain
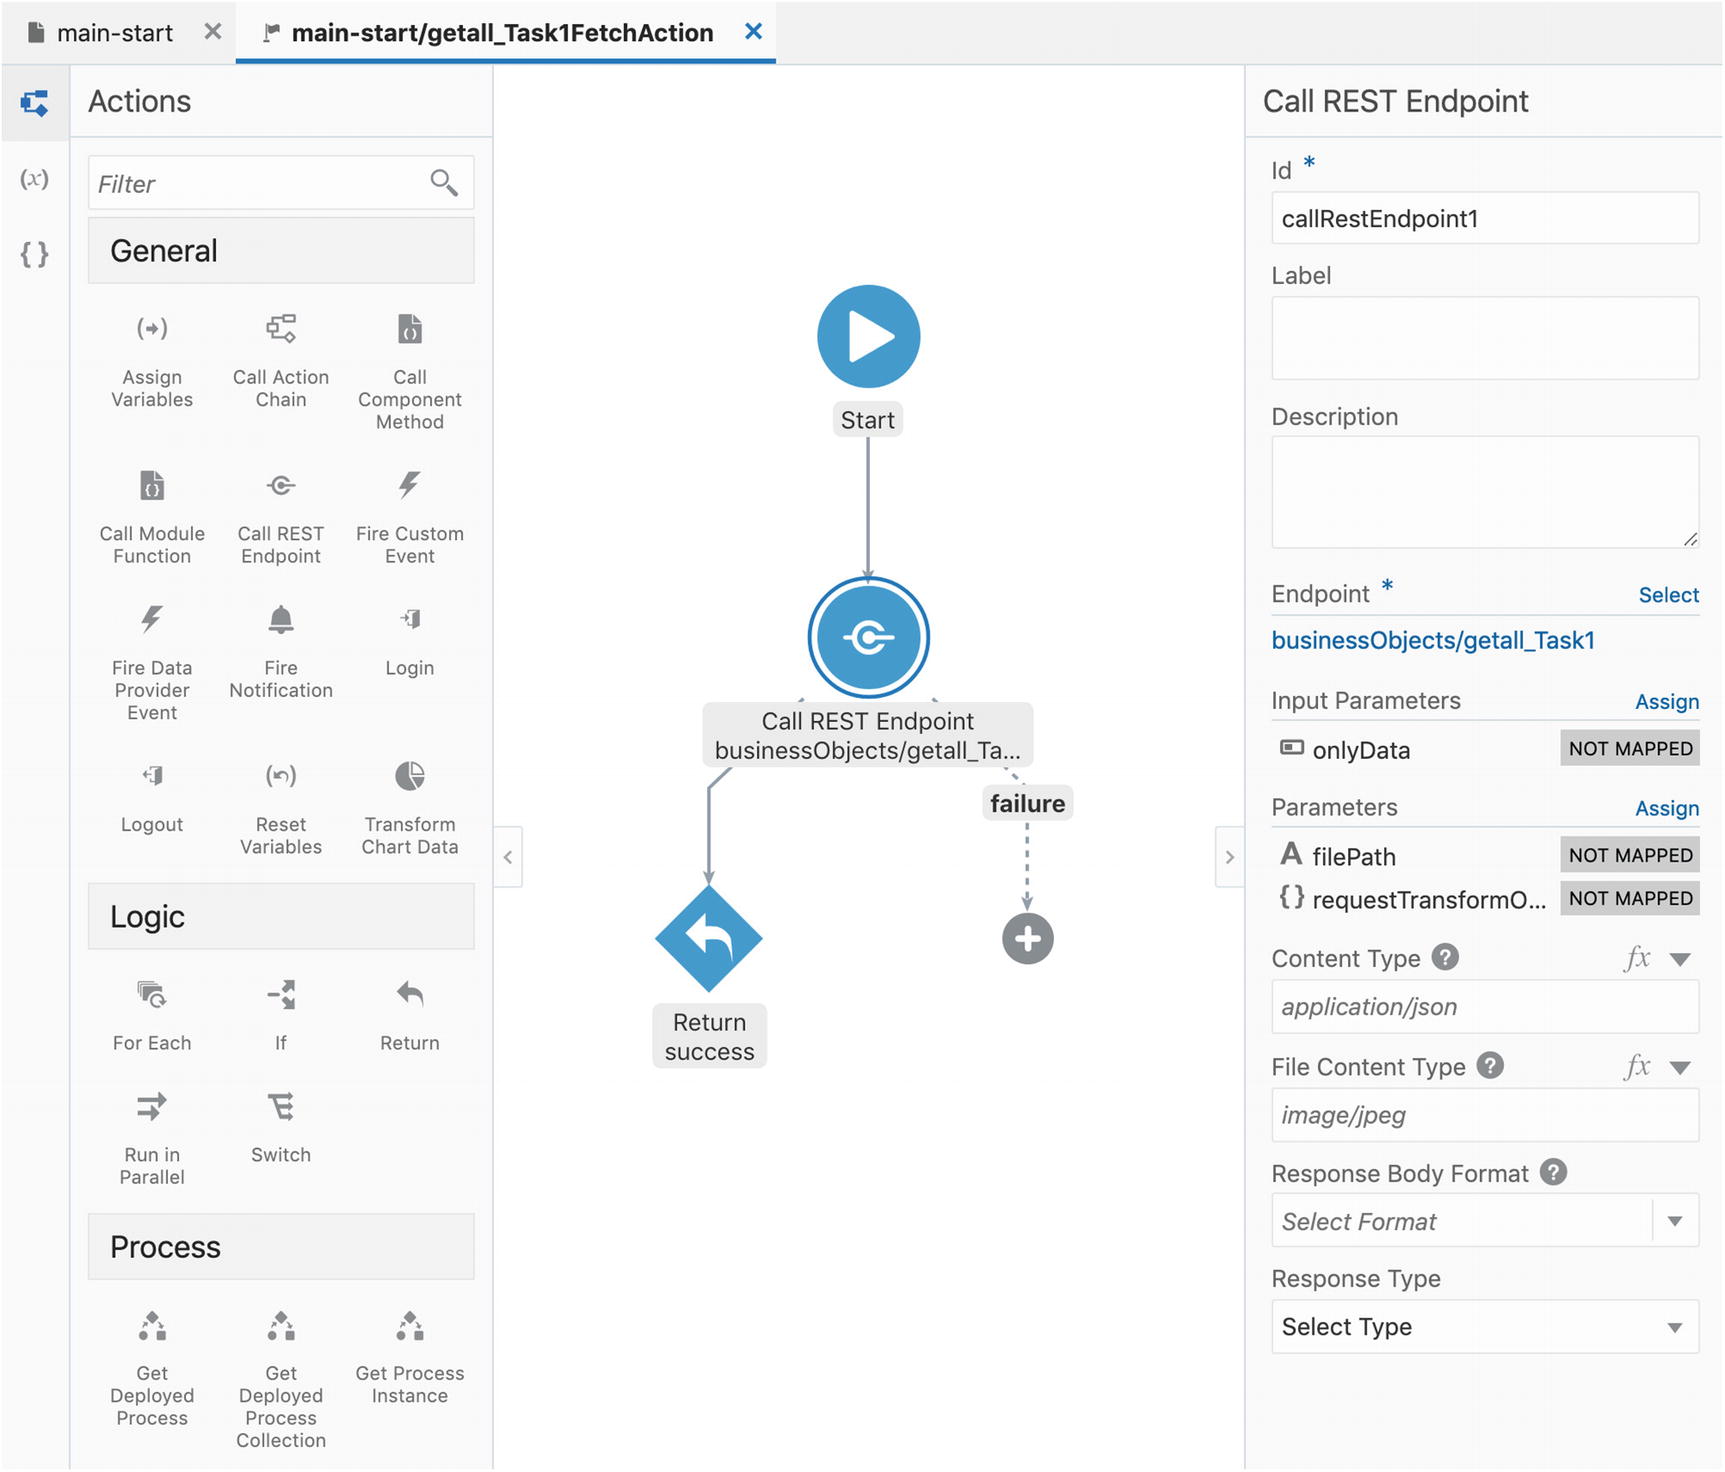
The default fetch action chain
This action chain is automatically triggered when you load the main-start page. You can click the Call REST Endpoint action and investigate its properties. There is an Endpoint property pointing to the specific REST service to call as well as some parameter mappings that define how to call the service and how to map the result back to VBCS variables.
Editing Data
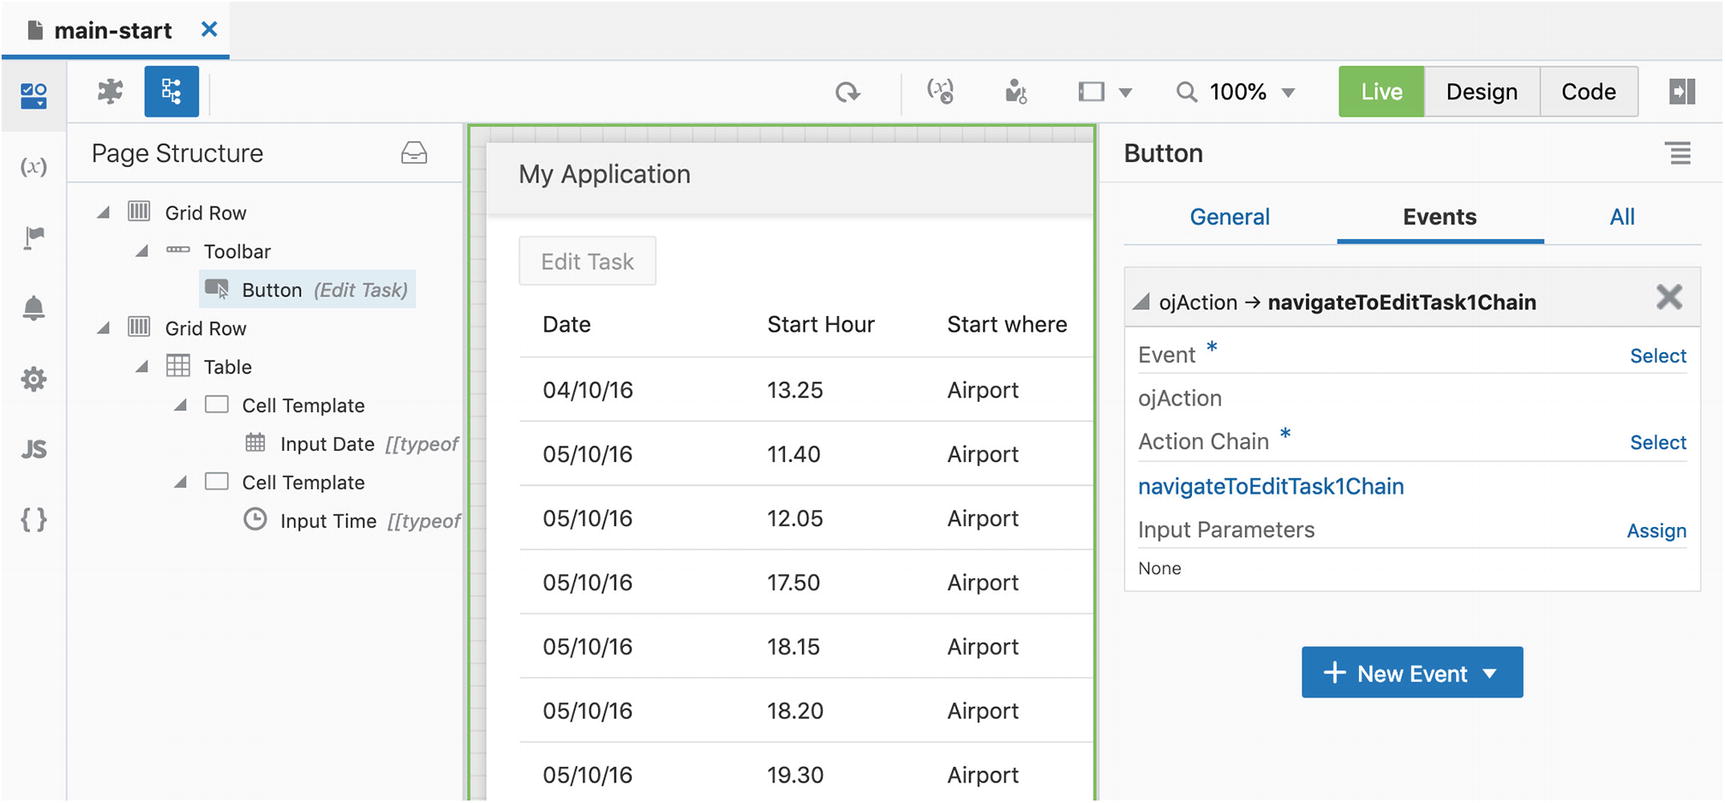
An event and its action chain
From here, you can click Select next to Event to see what the possible events are and Select next to Action Chain to see the available action chains. From the Select Action Chain dialog, you can even create a new action chain. You can also click the action chain name itself (navigateToEditXxxChain) to open the automatically created navigation action chain. This action chain is more straightforward than the one to fetch data and merely include the necessary navigation step.
If you open the main-edit-xxx page created by the Quick Start, you will see that it has its own action chains to load data (loadXxxChain), save data (saveXxxChain), and go back (goBackChain).
UI Components
Now that we’ve seen some example of how VBCS default functionality is implemented, let’s look at the different moving parts in detail. We’ll start with the UI components.
When you have a UI component selected in the Page Designer, you can see and edit the events associated with the component on the Events tab in the Property Inspector.
Note
Remember that you must be in Design mode (not Live mode) to change the properties of UI elements.
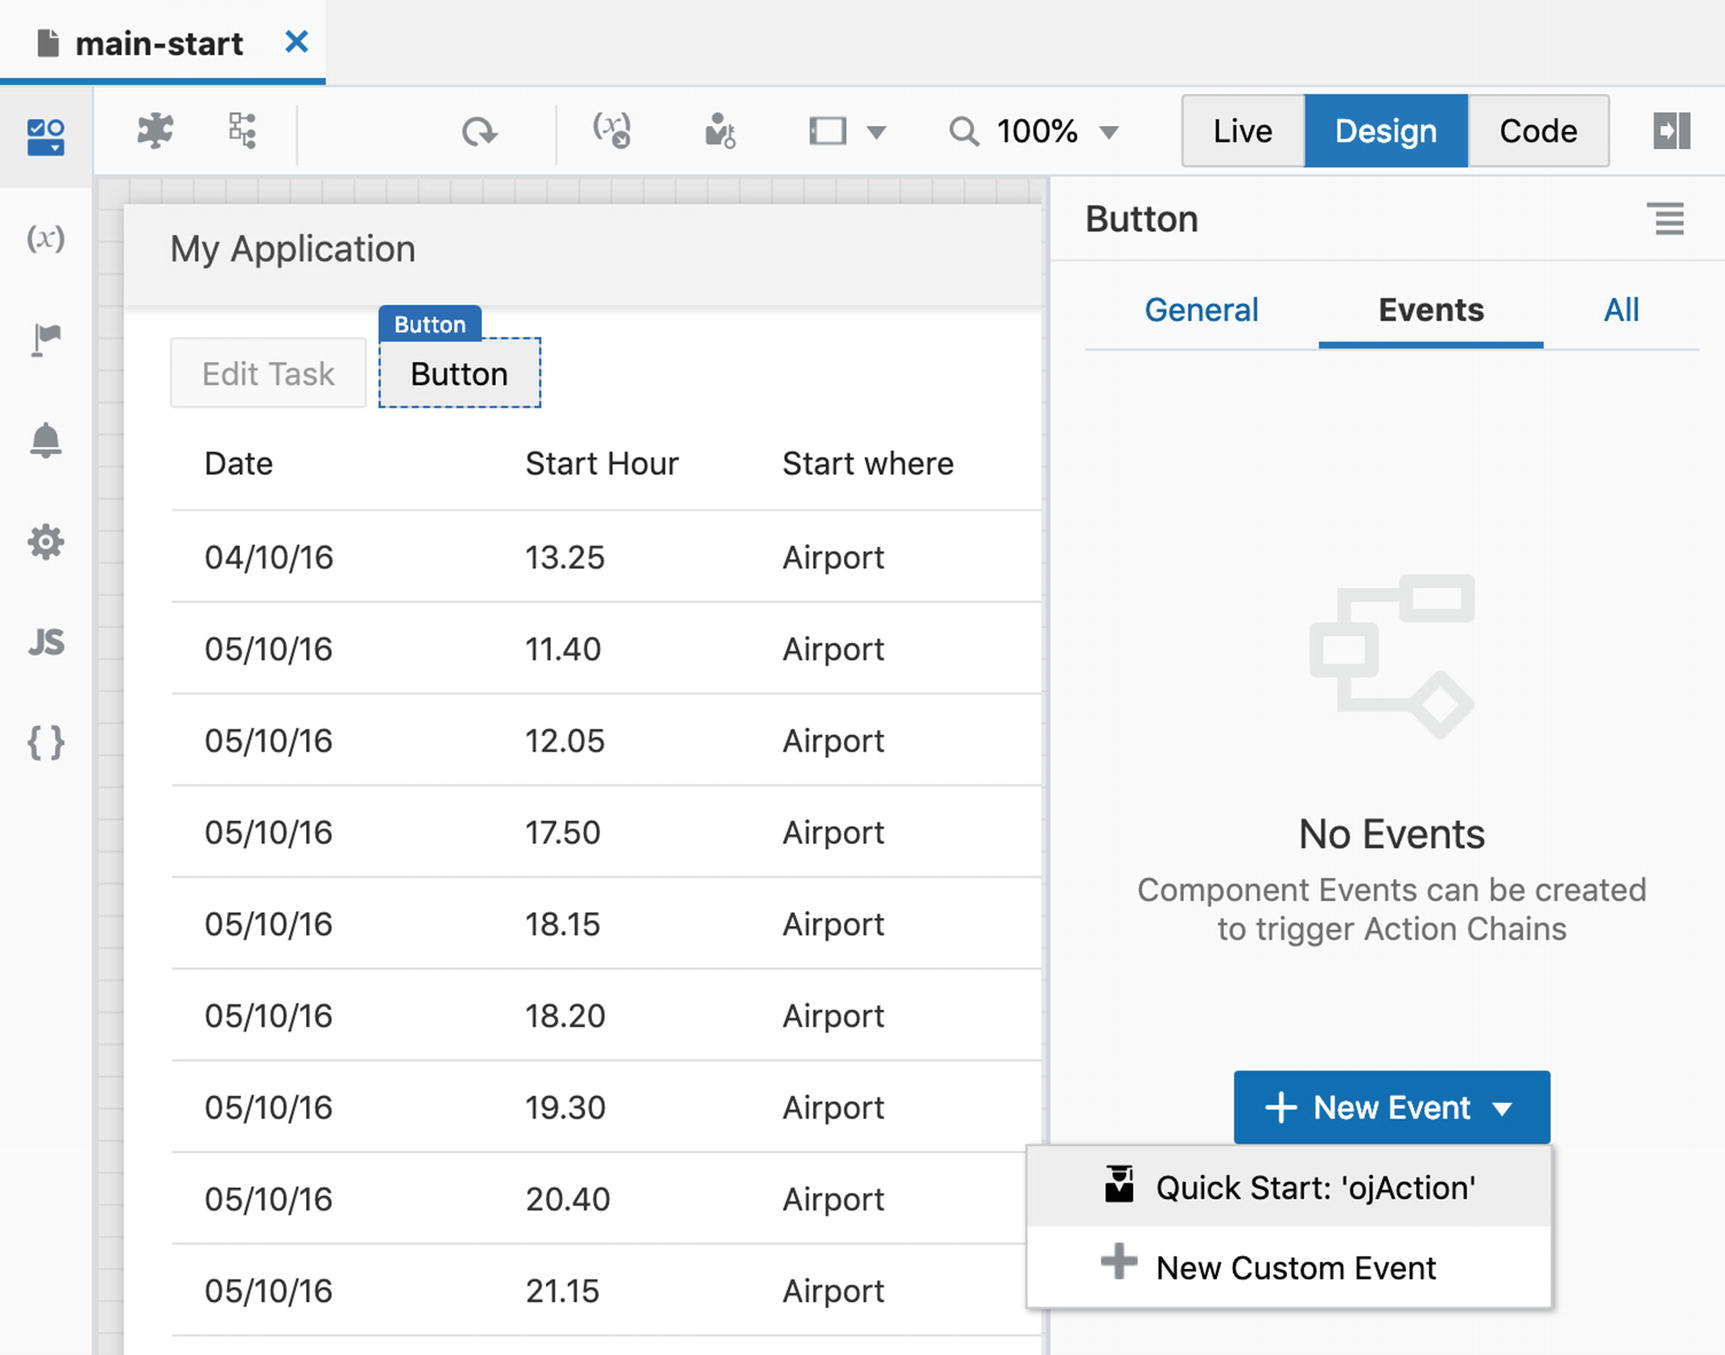
Creating a new event for a UI component
The Quick Start depends on the component you selected. For example, when adding an event to a Button component, the Quick Start will suggest an ojAction event (triggered by clicking the button). An input field will offer a value event (triggered when the value in the field is changed), and other components will offer other Quick Starts.
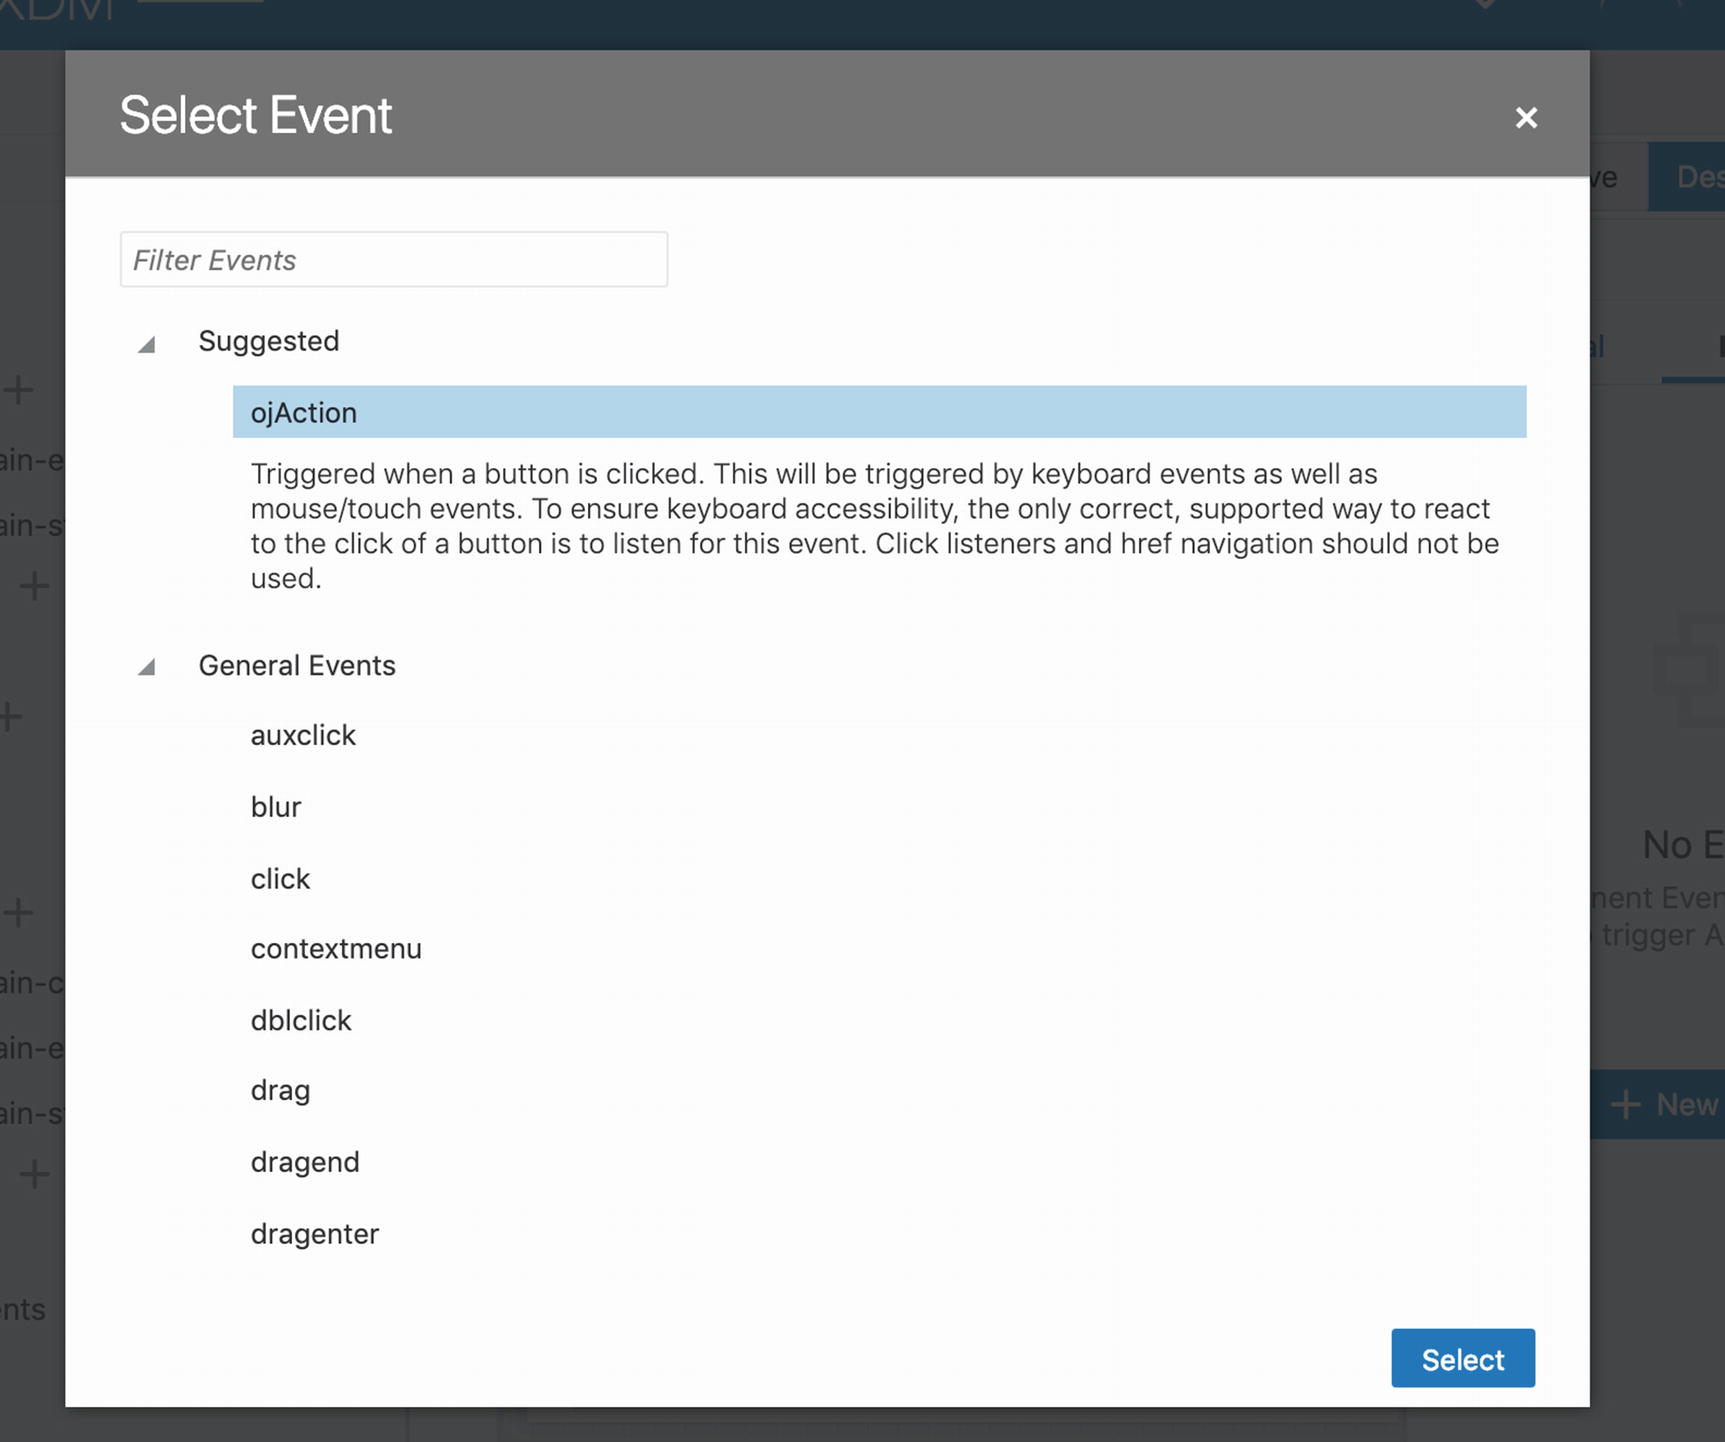
Creating a custom event
The Suggested heading will show the most commonly used event for that component, but the General Events heading allows you to react to double-click, mouse enter/leave, and much more. If you scroll down, there are more headings with more events you can react to.
The Quick Start automatically creates, connects, and opens a new action chain as described in the section on action chains later in this chapter. If you create a custom event, you will be prompted to select an existing action chain, or you can create a new one.
Once you have created events, you can access them either from the Property Inspector for the specific component or from the Events tab of the page.
Lifecycle Events
Some events are not tied to a specific component but are automatically triggered as the user works with the application. These are called lifecycle events and belong to pages or flows.
vbBeforeEnter is triggered before navigating to a page.
vbEnter is triggered when all flow or page variables have been initialized, but before the flow or page is shown.
vbBeforeExit is triggered before leaving a page. This event can be canceled, allowing you to force a user to, for example, decide on saving data before leaving.
vbExit is triggered when leaving a flow or page.
vbNotification is a standard event that can be triggered by the application when it needs to notify the user of something.
vbAfterNavigate is triggered when navigation to this page is complete.
Associating an action chain with one of these events allows you to intercept and augment the default VBCS page and flow processing.
Note
The fetch action chain that populates a screen with data when the user first enters it is implicitly triggered by a vbEnter event.
You add a lifecycle event to a flow or a page on the Events tab. This tab shows all the lifecycle and component events for the page or flow, and you can add a new lifecycle event by clicking the + Event Listener button.
Variables and Types
Like other applications, a Visual Builder Cloud Service application holds its data in variables. These can either be simple variables or larger data structures that VBCS calls types. Data retrieved from REST services are stored in variables, and the value of the variables is displayed to the user. When the user enters or changes data, this change is made to the variable and then made persistent by calling the underlying REST service.
Note
When you use the Quick Starts, VBCS automatically creates all the necessary variables and types for you. To learn about variables and types, you can use a Quick Start to create, for example, an Edit page and inspect the variables and types created for you.
Application scope variables are accessible everywhere in the application. They are created when the application starts and exist for the lifetime of the user session (until the user closes her browser or the session times out).
Flow scope variables are accessible from all pages within their flow. They are created when entering the first page in the flow and exist until the user navigates to another flow or exits the application.
Page scope variables are only accessible from a specific page. They are created when the user enters the page and are destroyed when the user leaves the page.
Action scope variables are only accessible within a specific action chain. They are created when the action chain starts and automatically destroyed when the chain completes.
You access variables from the Variables tab. When you have the entire application selected in the navigator, you can see and work with application scope variables. When you have a flow selected or are on the tab showing the flow, the Variables tab show flow variables. Similarly, when you select a page in the navigator or have the tab for the page selected, you see page variables. Action scope variables are only accessible from the tab showing the relevant action chain.
When you have a specific variable selected, the Property Inspector allows you to set various properties, for example, the default value.
Variable Types

Variable types

Create Type From Endpoint
Here you select the specific REST service you want to use as the basis for your type. You can point to one of the services to get more details about what that service does. When you click Next, you are given the option to select which attributes from the endpoint you want to include in your type.
Using the Quick Starts normally saves you from having to worry about variables and types, but you do need to work with the types if you afterward decide you need another attribute from the REST endpoint. To edit an existing type created from a REST endpoint, you click the Edit From Endpoint link next to the type. If you refer back to Figure 7-8, you find this link next to the getAllTask1Response heading.
The Edit Type From Endpoint dialog looks like the step in the Quick Start where you select attributes. You have the option to check the checkbox for additional attributes, adding them to the type. The action chains use the type, so the logic to retrieve and store values does not need to be changed if you add additional attributes.
Action Chains
Action chains are visual representations of the UI logic in your application. They are mapped to events triggered by something in the user interface, whether a button click or the loading of a page. Similar to variables, action chains also have a scope. Usually, your action chains will be created at the page level, but if there are chains you might want to use in several places in your application, you can also create action chains at the flow level or the application level.
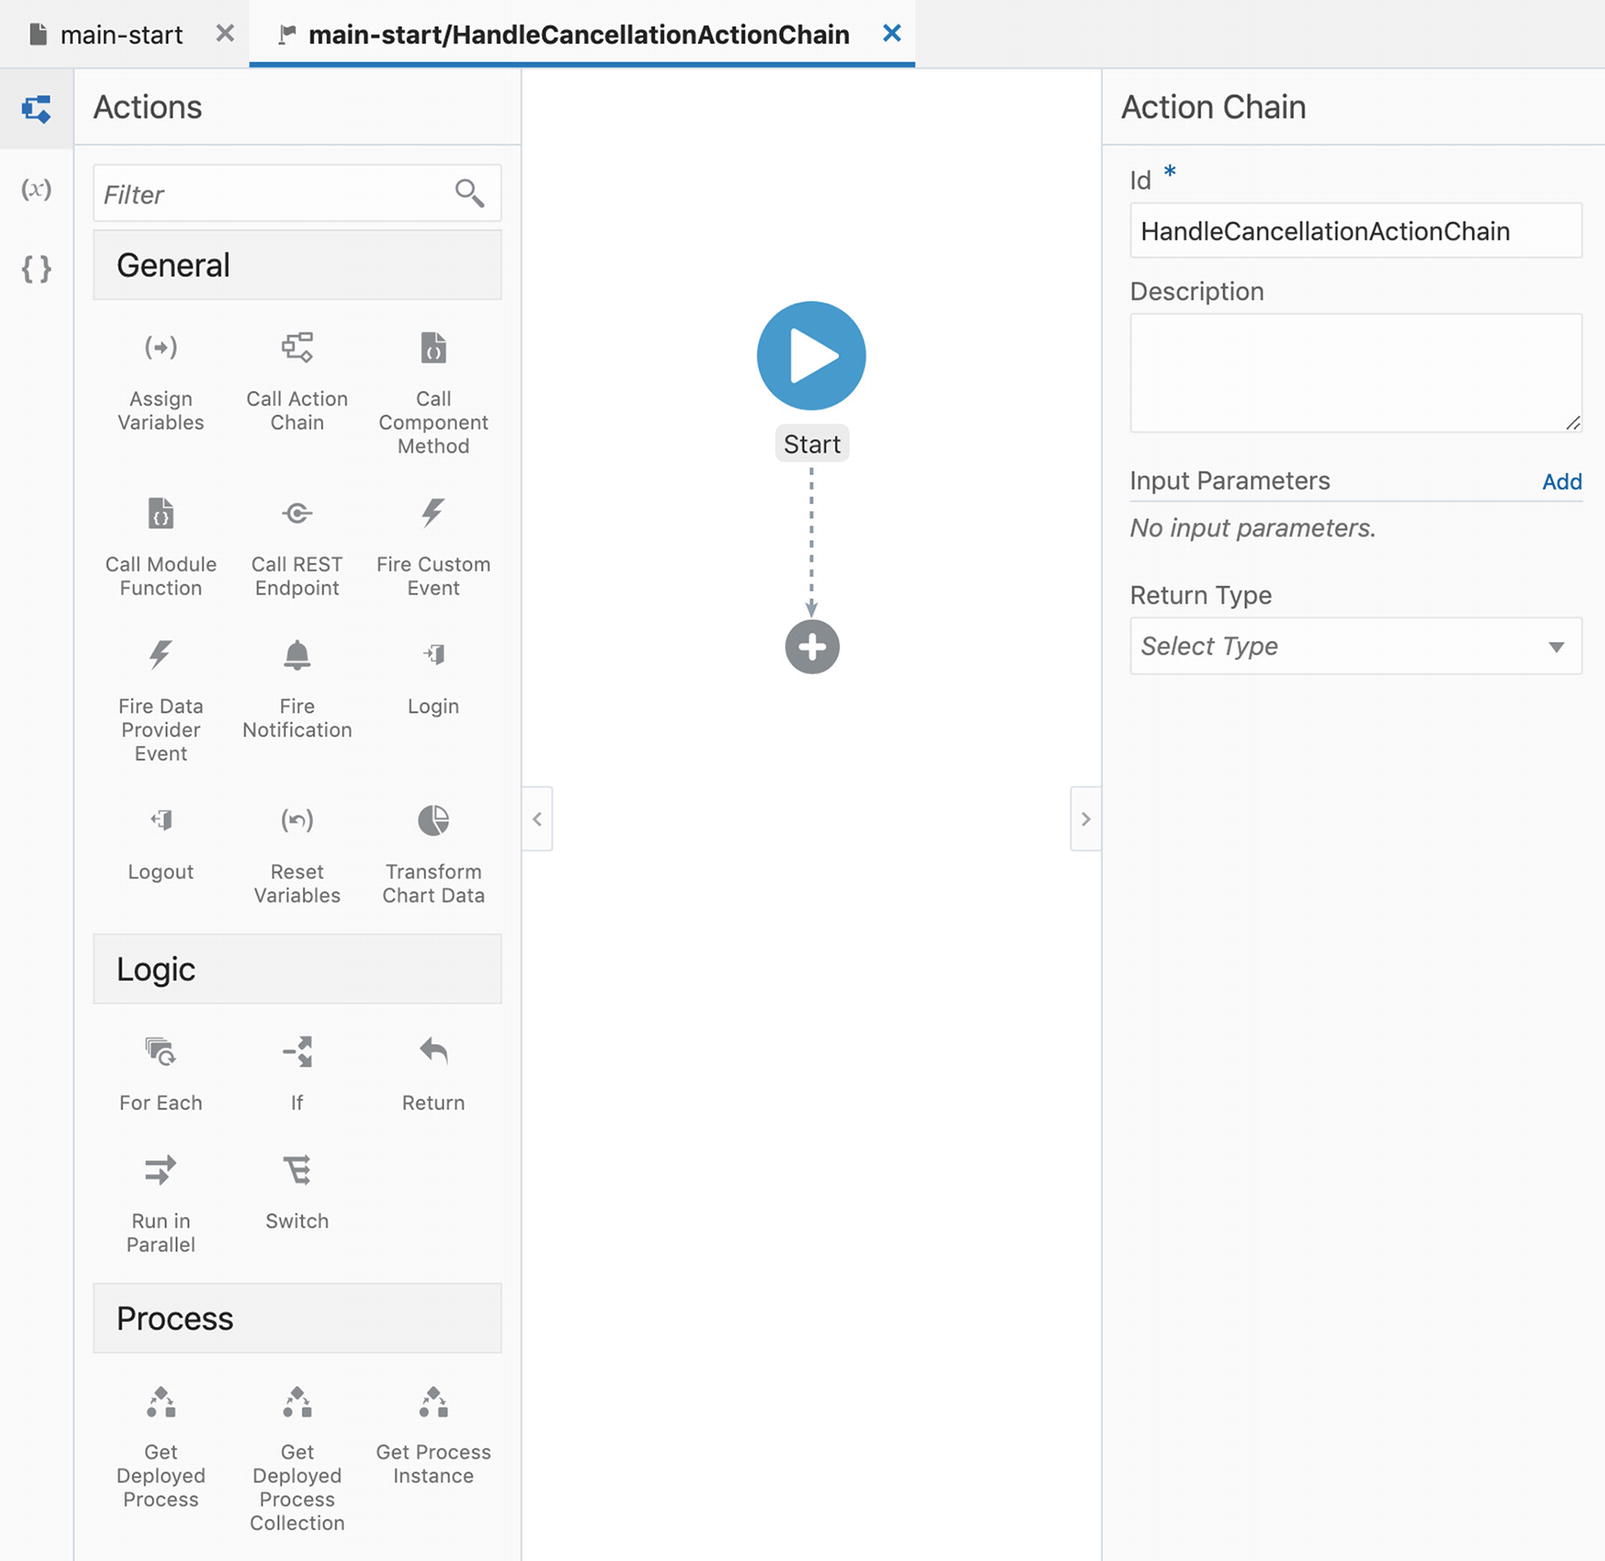
The action chain editor
In this editor, you can drag and drop elements from the action palette to the left onto the visual representation of the flow. If you drop it on a line or a plus sign at the end of a line, the action is added to the flow at that point.

Dragging a new action in
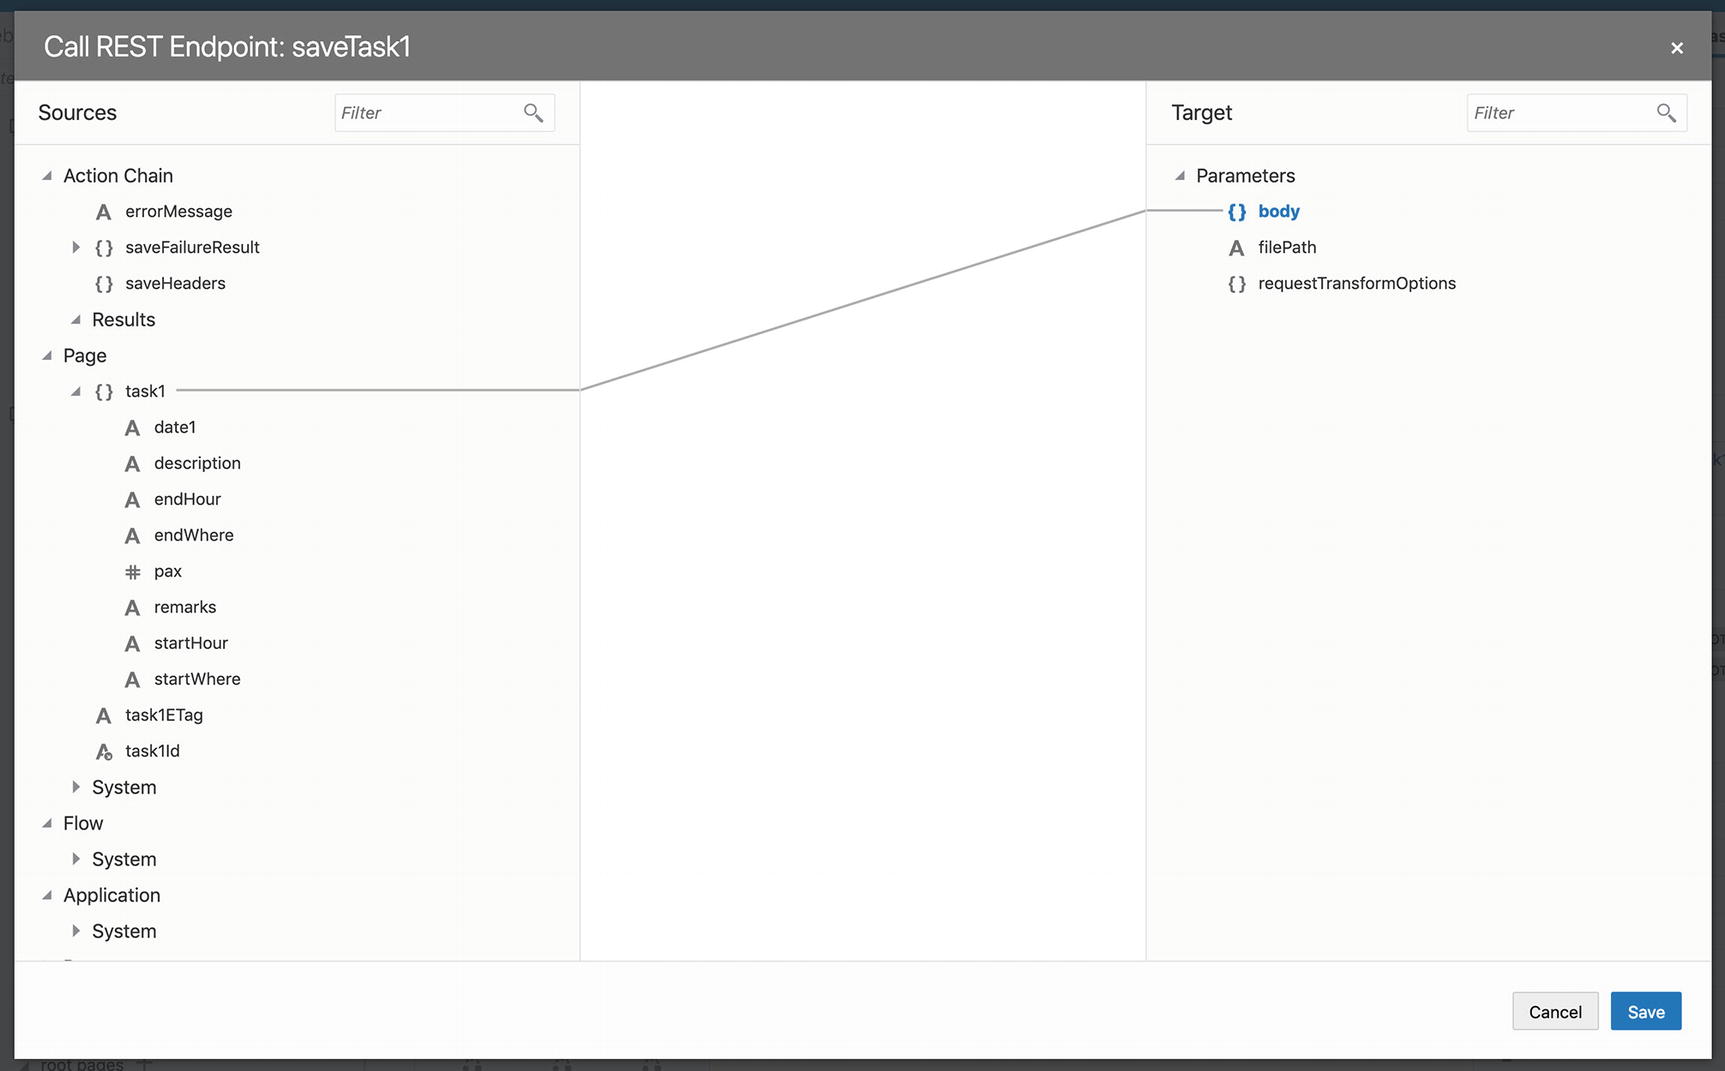
Assigning variables in an action chain
Here you can drag and drop to connect value sources on the left with targets on the right.
Adding JavaScript
The visual action chain builder can handle many simple requirements, but for more complicated requirements, you are likely to have to write your own JavaScript functions.
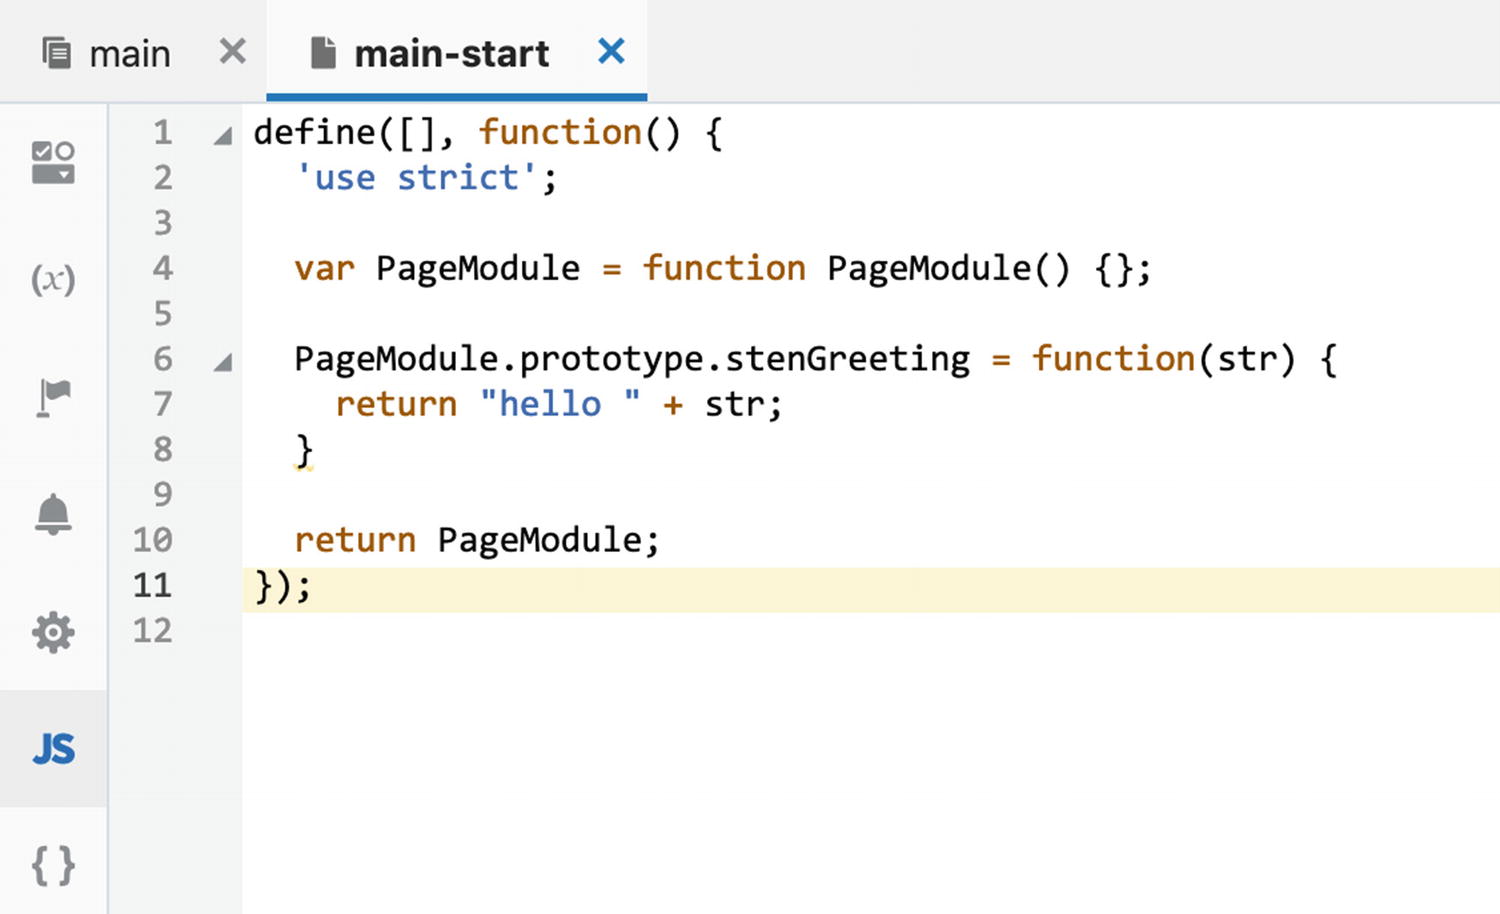
Adding a function to a VBCS module
If you want to refer to your variables in your JavaScript, you can refer to them by scope and name. For example, to refer to a page scope variable, you use $page.myVar. Similarly, you can use $application and $chain to refer to application level and action chain level variables. The shortcut $variables refers to variables in the current scope, that is, in a page-level module, $variables is the same as $page.
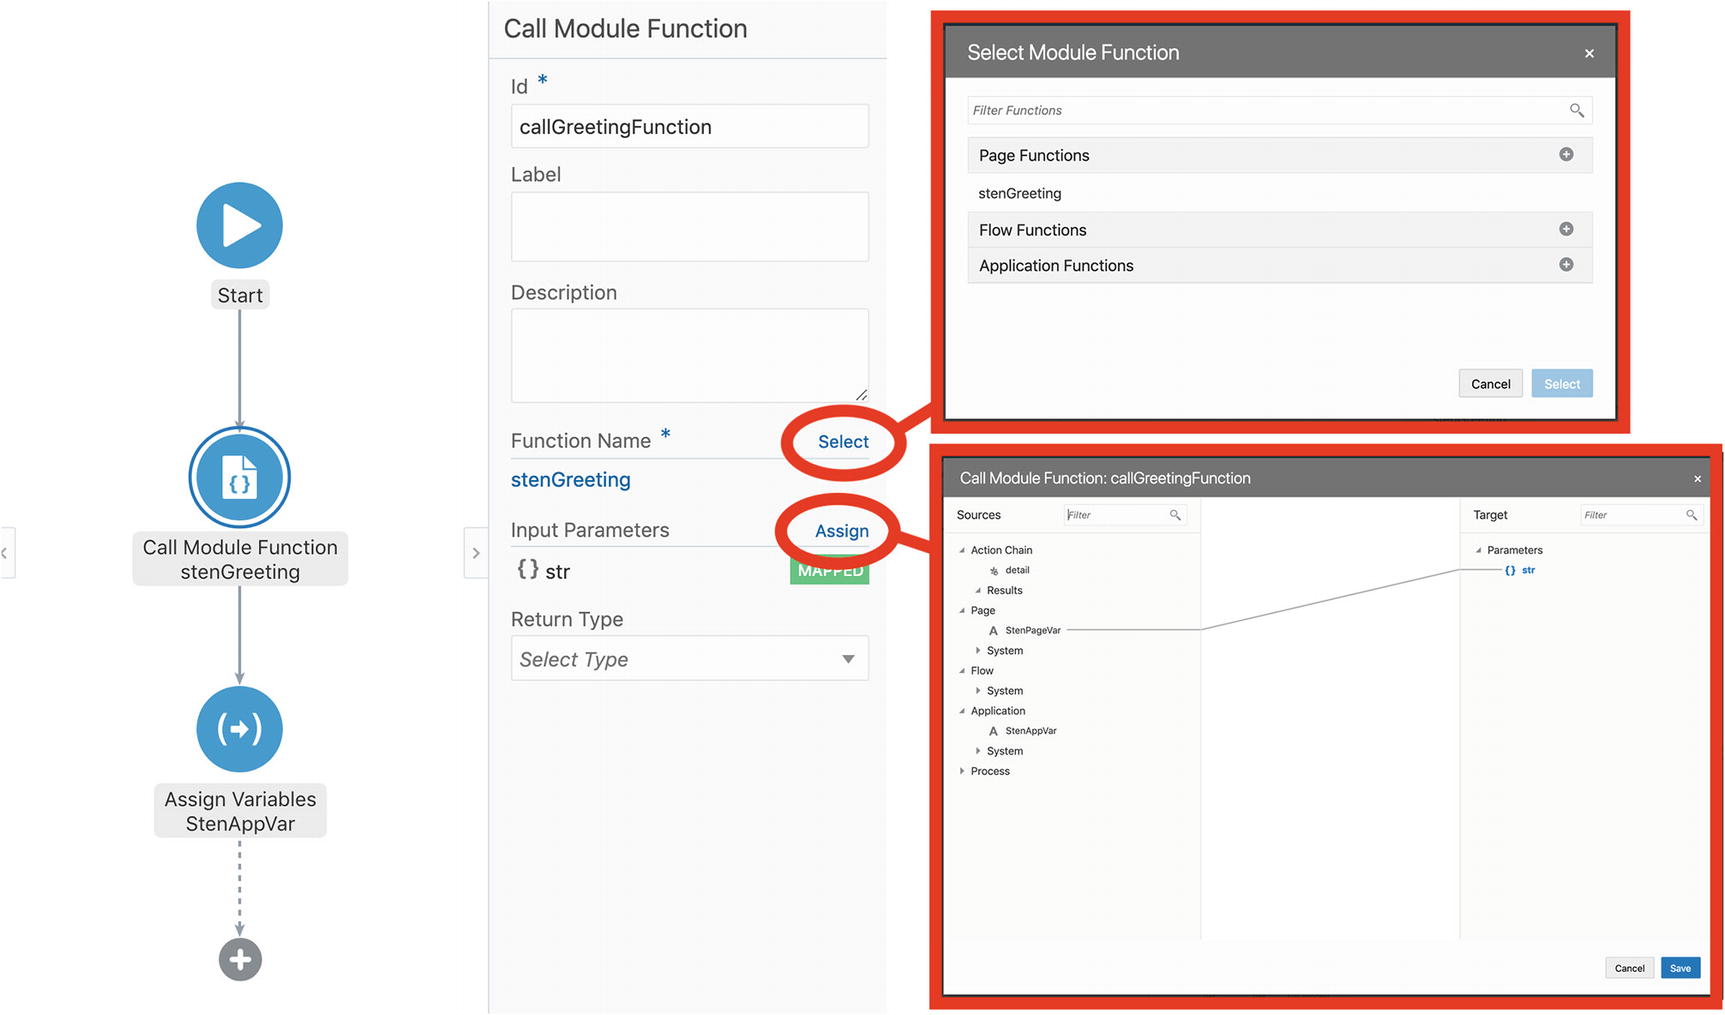
Calling a module from an action chain
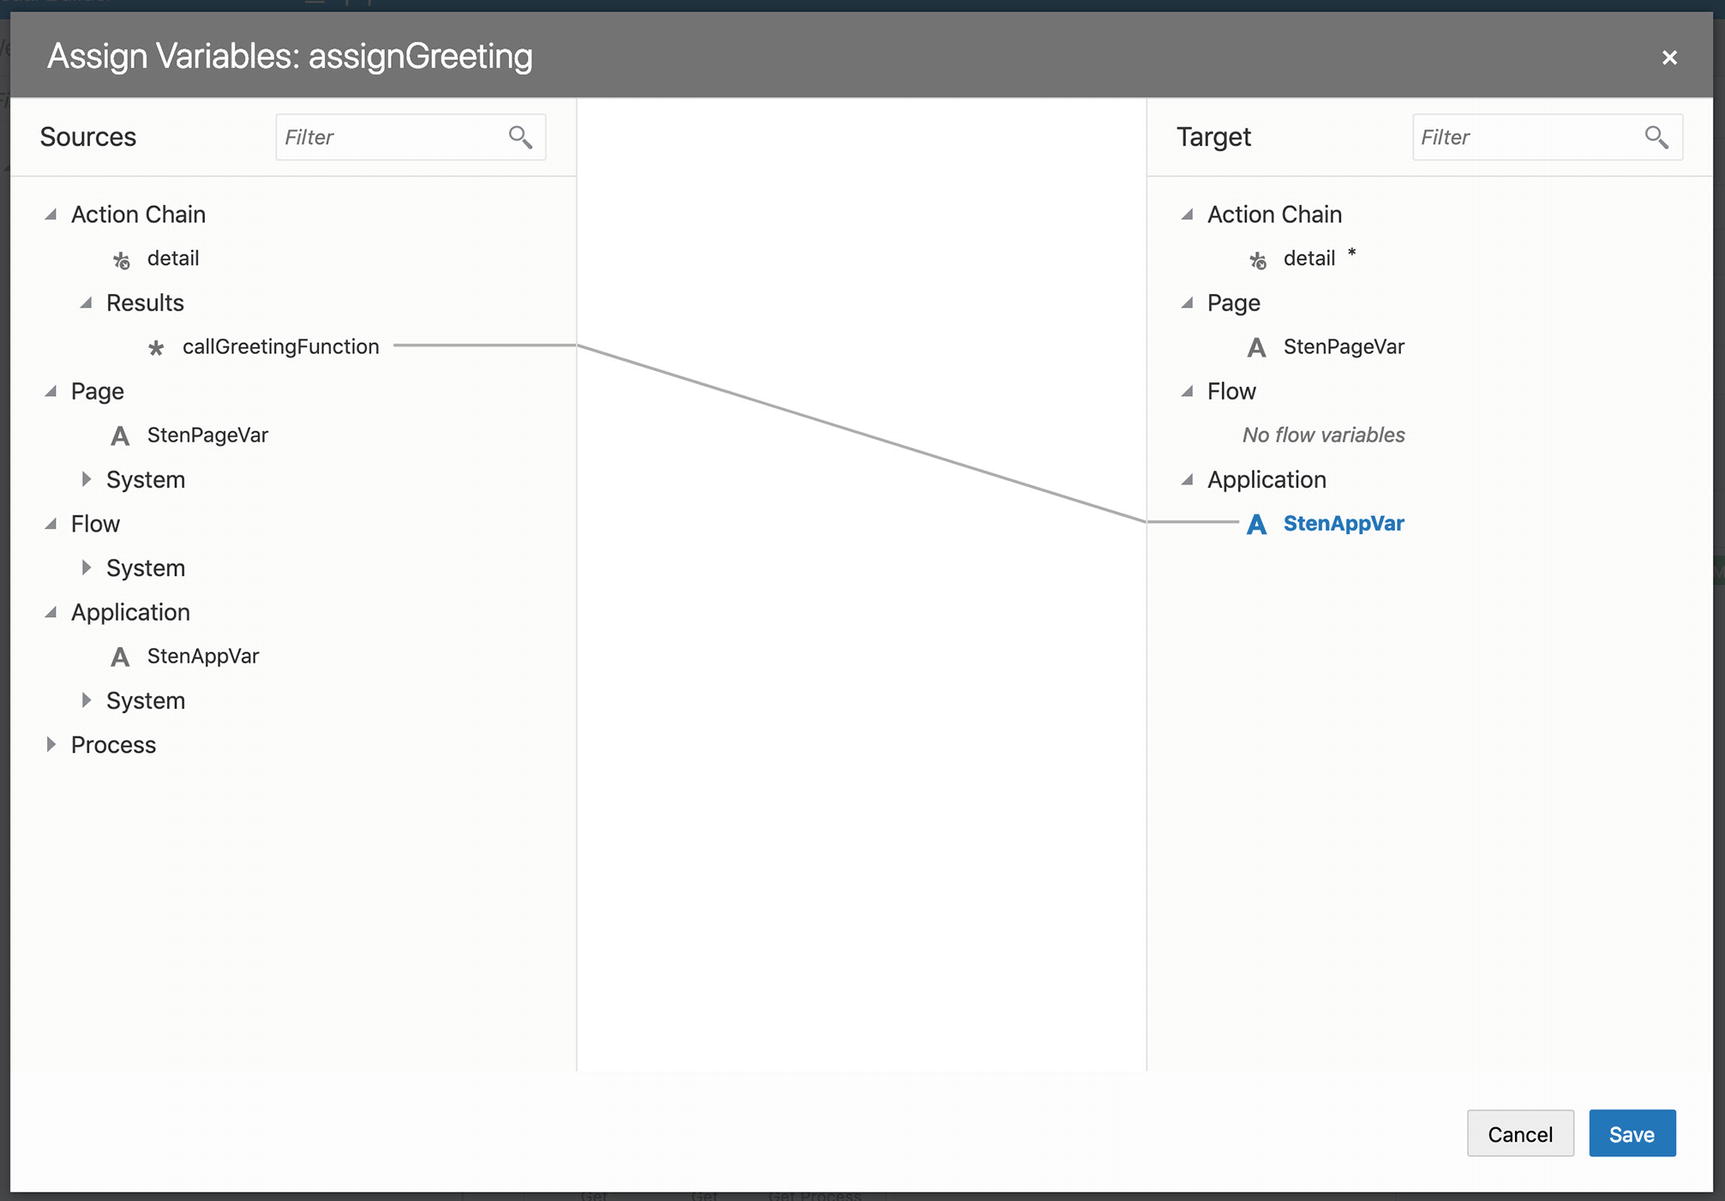
Assigning the result of calling a module
Conclusion
In this chapter, you learned about the way Visual Builder Cloud Service implements the functionality that magically appears in your application when you use the Quick Starts. You also saw how UI components, action chains, and variables work together to allow you to implement complex UI logic, and how to add your own JavaScript logic when the visual action chain builder doesn’t offer you enough functionality.
In the next chapter, you will see how to use the Visual Builder for Excel plugin, which is another way for your users to interact with data in your VBCS application.