In this chapter, we will discuss how we might use permissions in AWS, Azure, and Google Cloud. We might consider them as a first-line defense in our serverless environment from attacks on functions and account takeovers. Therefore, we should understand how to implement them. We will learn the permission capabilities each provider has and how we might use them.
Importance of Restricting Permissions
Permissions in a serverless or public cloud environment are conceptually similar to those in a private cloud environment. Both give you settings to define “what” is available to use and “who” has access. On a Windows computer, the Information Technology (IT) department determines which services a regular user can access vs. those of an administrator. This separation of duties typically prevents a regular user from installing unwanted and malicious software and impairing the level of security the organization desires. A malicious actor can potentially access sensitive data, modify the infrastructure, or perform other malicious activities if this person has compromised a computer with little or no permissions restricting access. The situation is similar in a serverless environment; a malicious actor can potentially access other services or take over an account if the permissions have little or no restrictions.
In Chapter 4, we discussed the importance of securing interfaces. We reviewed the different interfaces your serverless application might use and how to identify their existence. Listing 4-3 provided an example code for a function querying an AWS DynamoDB database. Let’s suppose the function code was not performing input validation, and it had the permissions to delete records. A malicious actor has determined how to send a “delete record” command via the function input. That actor can then potentially remove all the database records. Now let’s suppose the function had permissions that allowed access to any AWS service. Let’s also suppose a malicious actor has determined how to send a Linux shell command via the function input. That actor can now execute any AWS CLI command. Given it might be possible for a malicious actor to take over your entire account, we should restrict the function permissions.
Another example may be account hijacking. In general, there are two types of accounts: user accounts (used by persons) and service accounts (used by machines). Either of those accounts might be compromised. A malicious actor can take over an account by breaking into one of the two types of accounts and changing the login credentials.1 Let’s suppose we have a service account for our CI/CD pipeline. We grant the account more permissions than necessary for it to deploy all the different Serverless configurations; maybe it was too difficult or time-consuming to restrict the permissions, or we decided to restrict it later due to a tight schedule. We gave the account administrator privileges; we created access keys for authentication and gave them access to the AWS console. Suppose a malicious actor somehow obtained the secret keys. This person can now log in to the AWS console, use the administrator privileges to create new keys while revoking the existing keys, and modify other accounts to prevent anyone else from accessing the account; this person has successfully taken over the privileged account. There are multiple ways a malicious actor can take over an account; therefore, restricting permissions in accounts is essential.
We will learn how to restrict permissions by first understanding what they are. We will learn the general principles before getting into the specifics for AWS, Azure, and Google Cloud.
Understanding Permissions
AWS, Azure, and Google Cloud each implement permissions slightly differently. We will explore how each provider implements permissions after we review the general principles that apply to all three providers.
General Principles
All three providers have an Identity and Access Management (IAM) service that defines user accounts and service accounts and their privileges. The IAM service allows us to define “who” can access “what.” The “who” is a type of account (or principal). Typically, there are two types of IAM accounts: a user account (or user principal) and a service account (or service principal). There is also a provider account that grants access to the provider service but is different than the IAM accounts. This chapter mainly focuses on IAM accounts. Having both user and service accounts allow us to differentiate how an account interacts with the provider. A user account typically has access to the provider’s console (sometimes called a portal), which is a web-based interface; the user authenticates with a username and password. A service account typically has access to the provider’s APIs; the service authenticates with a secret key. All three providers support the concept of user and service accounts, though they implemented them differently.
Although an account can successfully authenticate to access the provider’s console or APIs, it cannot perform any actions without first defining permissions for the account. All providers’ IAM services support the Principle of Least Privilege (PoLP) 2 and Role-Based Access Control (RBAC),3 to some extent, and allow us to define “what” can be accessed.
PoLP suggests assigning the minimum number of permissions needed to perform an action and assumes it can take no action without assigned permissions. For example, we should only get a read privilege to a database if we only need to read from the database. We should not be able to perform a create, update, or delete action on a database. Furthermore, we should limit the read privilege to a specific database if we only need the data from that one database. We should not be able to read a database from the finance department, for example, if we are in the engineering department. At the time of this writing, AWS and Google Cloud support limiting access to specific resources. However, Google Cloud only provides limited support. RBAC suggests defining roles and the actions they can perform. For example, a data entry role enters data into a database. That role would have the permissions to perform a write action to that database. Auditor roles read data from the database. That role would have the permissions to perform a read action to the database. An administrator role can make any changes to a database. That role would have all the permissions to perform any actions to the database. A user can have multiple roles and should use the appropriate role to execute the desired actions.
The combination of RBAC with PoLP reduces the risk of any given role having excessive or overly permissive permissions. Each provider implements PoLP and RBAC differently, and their terminology varies too. We will review how permissions are applied in a general sense and distinguish how each provider implements them.
We define a “role” to contain the necessary permissions to perform an operation or access a resource. The role might define read permissions to a storage object or write permissions to a database resource, for example. We define the role based on the type of operations we need a group of accounts to perform. For example, we might define one role for users to perform security audits, another role for writing data to a database, or another role for deploying a Serverless configuration. The role defines the permissions but not the accounts who can use it. We must assign a role to an account or group of accounts to grant the permissions to those accounts; this is a role assignment.

Relationship Among General IAM Terms
Comparing Identity and Access Management (IAM) Terms
IAM Term | AWS | Azure | Google Cloud |
|---|---|---|---|
User Account | User (with AWS management console access) | Active Directory User | Member (Google, G Suite, or Cloud Identity account) |
Service Account | Service Role or User (with programmatic access) | Service Principal | Member (service account) |
Role | Policy | Role Definition | Role |
Role Assignment | Attach | Role Assignment | Policy (or IAM permissions) |
Some terms might be confusing because they are overloaded. AWS can have IAM users, which can be a user account or a service account. In contrast, Google Cloud uses “member” but distinguishes them as either a Google, G Suite, or Cloud Identity account, or a service account. AWS uses the term “role” to assign permissions to an AWS service, whereas “policy” is the role assigned to a user account or a service role. AWS assigns roles by “attaching” policies to groups, users, or roles. In contrast, Google Cloud uses a policy (or IAM permission) to assign roles to members. Keep these differences in mind while reading how each provider implements IAM. If the terminology starts to become confusing, it might help to think about this general principle: IAM allows us to define an assignment (or policy or attachment) of “who” (a type of account) can access “what” (via a permission list or a role) .
Amazon Web Services (AWS)
Policies define the permissions that grant access to AWS services and resources.
Groups define the policies available to their assigned users.
Users define the accounts that can access the AWS provider account. You can give users access to the AWS console, programmatic access (via the AWS CLI, SDK, and APIs), or both, specify the policies available to that user, and add users into a group.
Roles specify the policies used by AWS services.
Identity providers define the external services with which you can integrate third-party (or federated) logins.

Relationship Among AWS IAM Settings
Policies
We use policies to define a logical grouping of permissions. We might want to define policies that allow access to a specific AWS resource. These policies might be organized by read, write, create, and delete permissions. Having a convention in defining policies allows us to assign multiple policies and thus grant their respective permissions to the AWS resources. AWS does have managed (i.e., predefined) policies5 we can use too.

An Example of Using the AWS Policy Visual Editor
AWS Policy JSON

An Example of an AWS Managed Policy
Let’s explore the sections in our new JSON policy from Listing 6-1.
Statements
A policy contains one or more statements. The visual editor shows these as different sections. The JSON policy shows each statement as an object in the “statements” array. Each statement defines a set of permissions and their effect on the actions taken on the specified resources when meeting the condition.
Effect
The effect defines whether to allow or deny actions. By default, AWS denies access to all resources. An “allow” effect enables performing actions against the specified resources, as seen in our new policy. We typically do not use a deny effect unless we need to override an allow effect. For example, you might assign two policies to a user where the first policy allows access to all databases, and you assign a second policy to deny access to specific databases.
Actions
The actions define the allowed or denied operations. You specify the service and its operations. Our new policy specified the DynamoDB service and the following read operations: BatchGetItem, GetItem, Scan, and Query. We can use wildcards when defining our actions (e.g., “dynamodb:List*” to specify all “List” operations or “dynamodb:*” to specify all operations against DynamoDB). We should avoid using an overly permissive operation (e.g., “dynamodb:*”) that encompasses all operations for a service. We must be cautious when using wildcards to prevent creating an action with more operations than we desire. Having an action with “dynamodb:*” allows or denies all operations against the specified resource. Although this permissive action is easy to configure, it might grant undesired results (e.g., deleting databases used by other applications). We should use wildcards sparingly and with caution.
Resources and Amazon Resource Names (ARNs)
Amazon Resource Name (ARN) Formats
- 1.
All ARNs have a value of “arn” in the first component.
- 2.
The second component specifies the AWS partition. For the US services, we specify the “aws” value. Other AWS regions may have a partition name identifying the physical location (e.g., the “aws-cn” identifies resources in AWS China [Beijing] region).
- 3.
The third component specifies the service. We used “dynamodb” as the value in the preceding policy.
- 4.
The fourth component specifies the region. We defined “us-east-1” as the value because the DynamoDB table exists in that region. Some services (e.g., S3) have resources that are global (not specific to a region), so their region value is empty.
- 5.
The fifth component specifies the account identifier (ID). We specified “*” as the value because that is our example account ID. The asterisk is a wildcard for any account ID. Some services (e.g., S3) do not require an account ID, and thus the value is empty.
- 6.
The sixth and subsequent components specify the type of resource and its identifier. We defined “table/ch6” specifying the resource type as a table and the table name as the identifier. The format varies among the different AWS resources (e.g., S3 buckets use the bucket name as the value). In contrast, the CloudWatch Logs use a value like “log-group:log-group-name:*” that has multiple components.
When a policy uses an ARN, we can specify a specific ARN or use wildcards in the sixth and subsequent components except where it is the resource type. We can take advantage of wildcards in our policies to apply to multiple resources of the same type. For example, if all the application databases have the same prefix, we can use an ARN with a wildcard that applies to them all. The ARN “arn:aws:dynamodb:us-east-1:*:table/ch6*” will refer to all tables with names starting with “ch6” that exist in the “us-east-1” region for any account. We could have specified an account ID (e.g., “123456789012”) that would limit access to only that account. We must be cautious when using wildcards to avoid giving permissions to more resources than we desire. Having an ARN like “arn:aws:dynamodb:us-east-1:*:table/*” that uses a wildcard for the table name grants privileges to tables that might not be part of our application. Although this permissive ARN might be satisfactory when only one application exists in the AWS, it might become an issue when introducing additional apps or when a user should not access data from all the tables.
Conditions
We can use conditions when we want to add a safeguard before granting the permissions. Specifying an MFA condition requires a user to enter a valid MFA code before granting the permissions. We might want to enable an MFA condition as a confirmation before deleting any resources. We can also specify an IP address range in the conditions. We might want to use it to make the office network the only location when granting permissions. We might want to consider one or both when we need to exercise caution in granting permissions.
Groups
We want to attach policies to groups rather than attaching policies directly to users. We can categorize users into groups that need the same permissions. Most companies or projects have super administrators, administrators, developers, viewers, and deployment users per project. Super administrators typically have all privileges to all resources. Administrators usually have all or most privileges against project resources. Developers generally need the read and write privileges against project resources but may also need the create and delete privileges. Viewers usually have read privileges against project resources. Deployment users are used in a CI/CD pipeline and generally need to create, delete, read, and write privileges to deploy the Serverless configurations. Having all users categorized standardizes the privileges and minimizes having users with unique privileges, which might become complicated to manage.

An Example of Attaching Policies to a Group
- From the “DDB-Chapter6-ReadOnly-Policy” policy:
"dynamodb:BatchGetItem"
"dynamodb:GetItem"
"dynamodb:Scan"
"dynamodb:Query"
- From the “DDB-Chapter6-WriteItems-Policy” policy:
"dynamodb:BatchWriteItem"
"dynamodb:UpdateTimeToLive"
"dynamodb:PutItem"
"dynamodb:UpdateItem"
Any users we add to this group will inherit these permissions.
Users

An Example of Defining AWS Access Type for a User

An Example of Assigning Groups to a User
The user can log in to the AWS console to access the database and can affect the database using the Serverless Framework and AWS Command-Line Interface (CLI).
We might use multiple groups to support the roles of each user. We might assign a developer user the“DDB-Chapter6-ReadWrite-Group” group, but maybe not the “DDB-Chapter6-Create-Group” and “DDB-Chapter6-Delete-Group” groups. If a specific user needs a privilege not defined in an existing group, we should create a new group because another user may need that privilege too. We might assign the developer users to a “Developer” group that has the appropriate policies.

An Example of Creating a User for Deploying a Serverless Configuration

An Example of Obtaining the Access Key
Defining AWS Environment Variables in Linux or macOS Terminals
Defining AWS Environment Variables in Windows PowerShell
Now we can deploy the Serverless configuration using the “sls deploy” command.
Service Roles
We assign service roles to AWS services, other AWS accounts, and identity providers. We grant permissions to roles by assigning policies. Unlike users and groups, it is better to be granular when defining permissions. Each role should have the minimum permissions needed by a service and a resource. We can think of a role as an IAM group but for a specific resource (e.g., one Lambda function). Each Lambda should have a dedicated role or, at a minimum, a shared role with no more privileges than it needs.
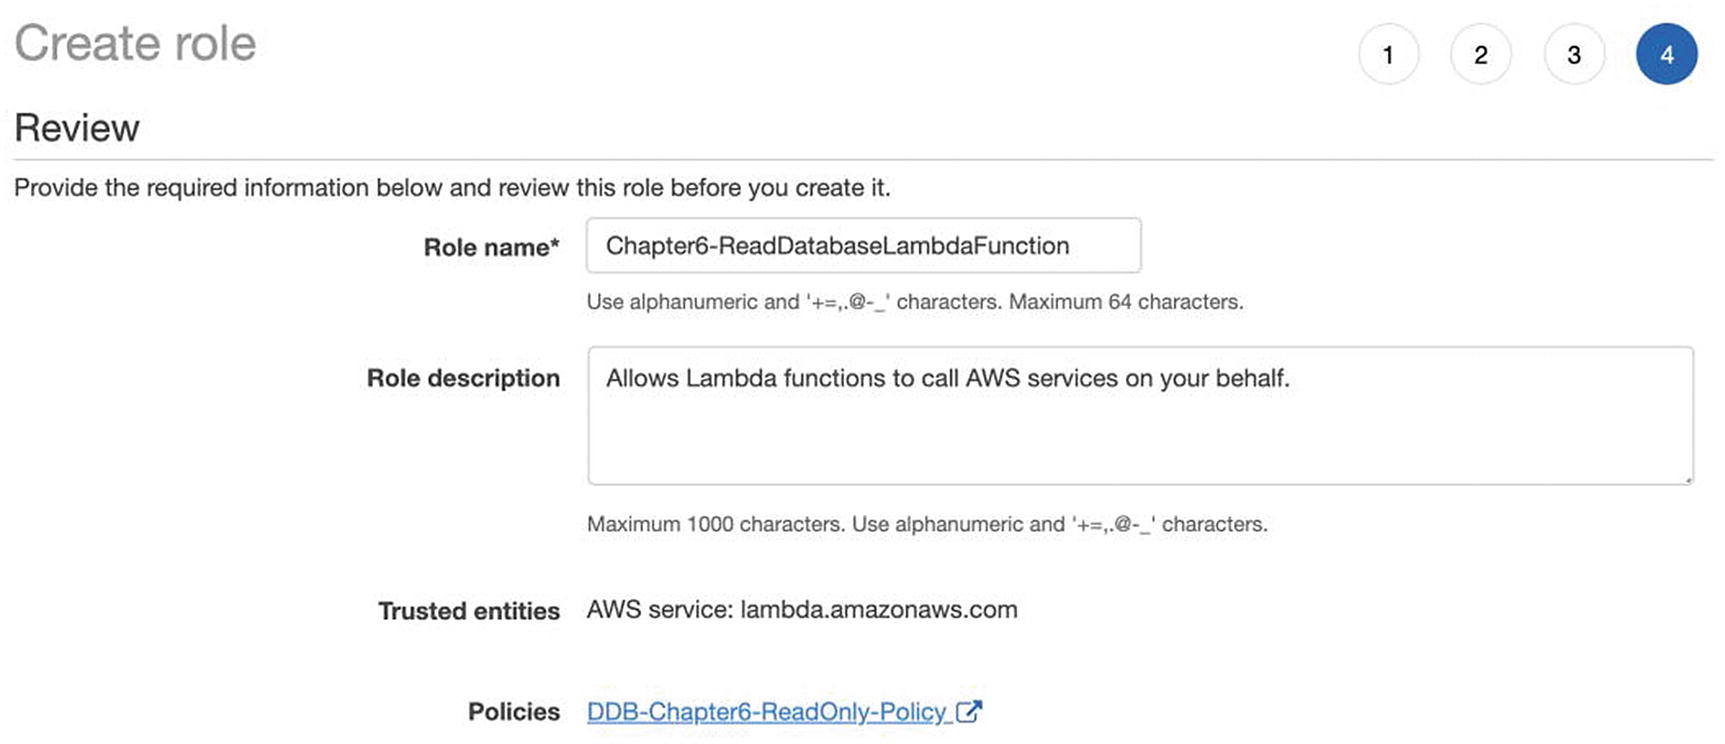
An Example of Creating a Policy
When we create the “ReadDatabaseLambdaFunction” Lambda function, we will assign it to the “Chapter6-ReadDatabaseLambdaFunction” role, which grants read access to the Chapter 6 DynamoDB table resource.
Identity Providers
We integrate with identity providers when we have a user management system with existing users. The users will use their existing login credentials to access AWS services, which simplifies user management. The identity provider must support either the Security Assertion Markup Language (SAML) protocol or the OpenID Connect protocol (we will discuss both in Chapter 9). Some identity providers allow you to have different login sessions that grant the appropriate permissions. We will not integrate with an identity provider because the integration varies per provider.
Azure
AD administrative roles define the permissions that grant access to Azure services.
AD groups define users and their access. We can create it as a security group (to grant permissions to Azure resources) or an Office 365 group (to give access to Office 365 services).9 We can associate Azure resources to security groups, which associate those services to their users.
AD users define the users that can access the Azure account. We can assign users to roles and groups.
Role definitions define the permissions that grant access to users, groups, and service principals for Azure services.
Application registrations represent the application and how it is accessed.
Scopes define the levels for granting access. The scope can be the management group (topmost level), subscription, resource group, or resource (lowest level). Allowing access at a high level gives access to its lower levels.
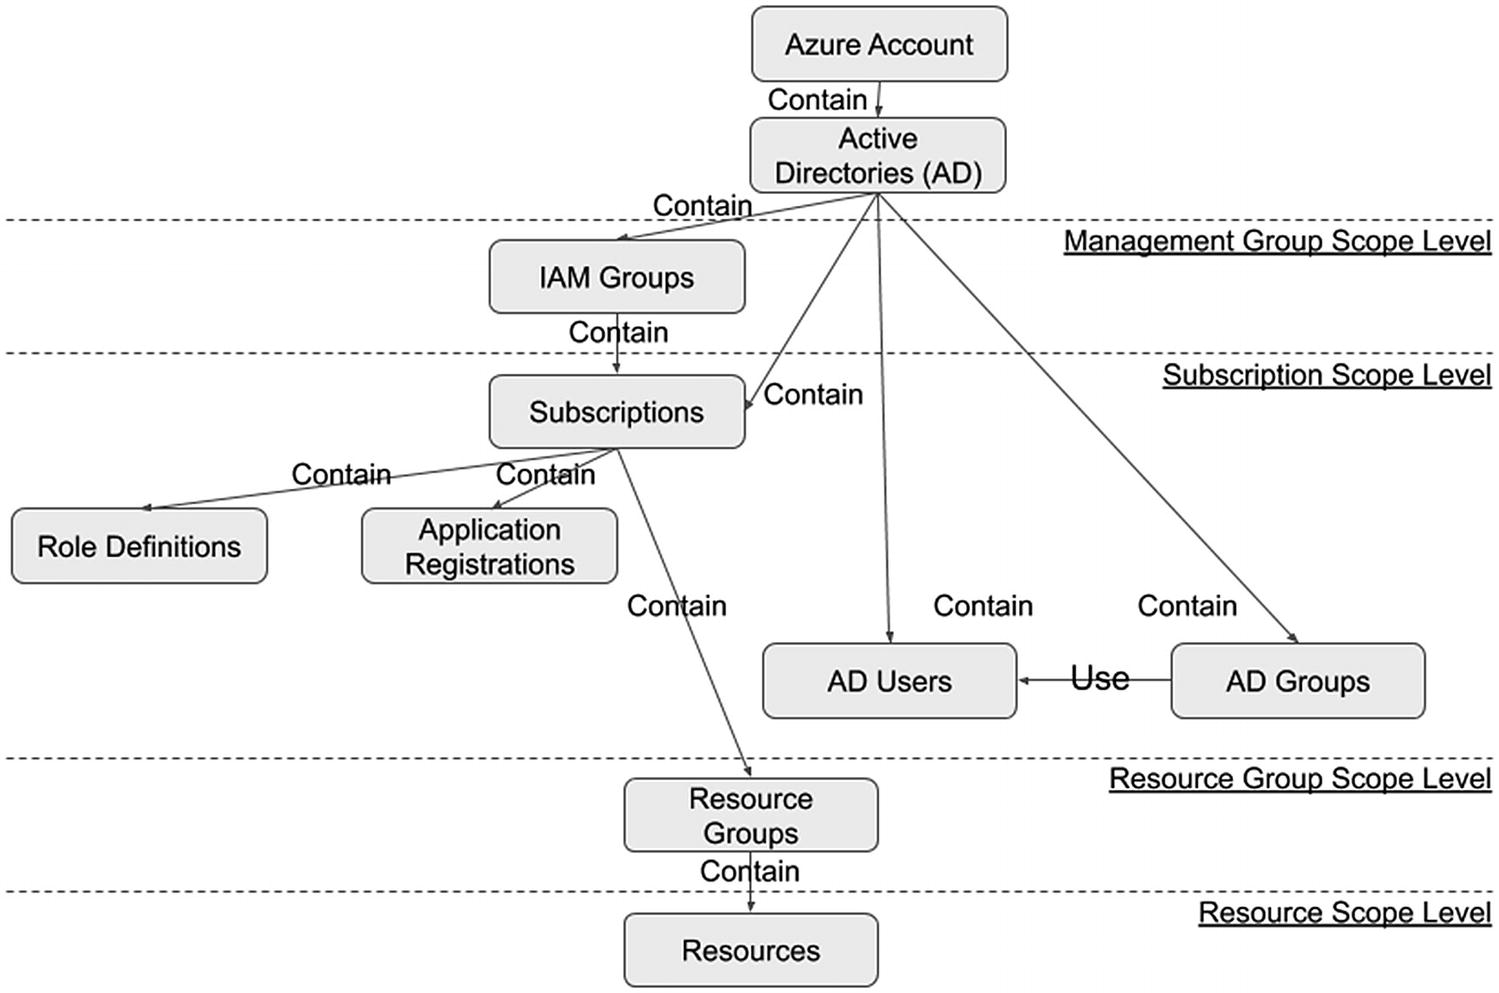
Relationship Among Azure IAM Settings
Active Directory (AD) Administrative Roles
We use administrative roles to define a set of permissions within the Azure AD. Azure AD comes with built-in (i.e., predefined) roles.10 We might want to create a custom role that grants specific permissions (e.g., reading audit logs). Roles should be named based on the function a user performs (e.g., security auditor). Creating custom roles is unavailable in the free tier, and thus we will not create one. You can review Azure documentation for the procedure to create a custom role.11
AD Groups

An Example of Creating an Active Directory (AD) Group
We can now add our users to this group.
AD Users

An Example of Creating an Active Directory User
Role Definitions
We use role definitions to define a set of permissions within an Azure subscription, which contains the billing plan and the deployed serverless applications. The subscription comes with built-in roles. We might want to create and assign one role per serverless application or assign multiple built-in roles. We should base the role definitions on RBAC,12 where users only have the minimum permissions needed to perform their responsibilities. Microsoft recommends having owner roles (administrators), contributor roles (managers), and reader roles (viewers).
We will create a custom contributor role. The built-in contributor roles grant access to manage specific services or all the services. This new role has the permissions common to all contributor roles but cannot manage any services. This new role allows us to create additional contributor roles that add to this “base” contributor role. We will use the Azure CLI to create the role13 because the Azure Portal cannot create custom roles at the time of this writing.
The example screen captures and Azure CLI all assume we have logged in to the Azure Portal and Azure CLI.

An Example of Displaying an Azure Subscription Identifier (ID)
An Example Azure Custom Role Definition
Name defines the role’s name, which we defined as “Contributor - Base” to describe its purposes and facilitate sorting. The “Contributor” part of the name defines the type of role. The “-” is a delimiter. The “Base” part of the name clarifies the type of contributor role, which has the least amount of privileges needed to be a contributor. This naming convention allows us to define additional contributor roles. For example, we might want to have a contributor role that can create and manage Azure Function Apps. We would call this role “Contributor - FunctionApp,” and all contributor roles are listed together when listed and sorted.
Description gives additional information for the custom role.
Actions define the permissions that the role is allowed to exercise. We defined the minimum set of permissions needed to deploy; view the list of permissions in the Microsoft Azure documentation.14
NotActions defines the permissions to deny a role from exercising. We did not define any restrictions because IAM does a deny by default. We could attempt to restrict all other permissions. Still, we run the risk of restricting the permissions we intend to allow. It might be better to use this property to limit permissions to any resources defined in the allowed permissions. For example, we might allow the contributor role to register for support and create and update tickets, but not read them. We might want only the contributor’s supervisor to read tickets. To achieve this, we add the “Microsoft.Support/supportTickets/read” to the “NotActions” similarly how the “Actions” are defined. Read more about using deny statements in the Azure documentation.15
AssignableScopes define at what level to assign a role. We set the subscription (with identifier “<subscriptionId>”) as the scope. We will discuss scopes in further detail later.
Creating an Azure Custom Role Using the Azure CLI
We split the command across two lines using a backslash to make it easier to read on the page. Press the Enter key after the backslash to continue the command on the next line.
An Example Response After Creating an Azure Custom Role

An Example of a Custom Role Displayed in the Azure Portal
Application Registrations
We use application registrations to define application objects and service principal objects.16 An application object represents the application and is only registered in one Azure AD tenant17 (i.e., instance). In contrast, a service principal object represents how an Azure AD tenant can access the application.18 We create a service principal in the same tenant (i.e., the same Azure AD), which defines the credentials to access the application resources. We also use a service principal to create and deploy an application.
We can choose to make our application available to multiple tenants. To do this, we grant the other tenants access to the Azure AD application object. Each tenant will need to create a service principal object to access the application resources associated with the application object. We will focus on single-tenant applications in our examples.
An Example of Creating an Azure Service Principal Object Using the Azure CLI
An Example Response After Creating an Azure Service Principal Object

An Example of a Service Principal Object Displayed in the Azure Portal
Azure subscription ID
Azure application ID (i.e., the service principal ID)
Azure application password
Azure tenant ID
Defining Azure Environment Variables in Linux or macOS Terminals
Defining Azure Environment Variables in Windows PowerShell
Now we can deploy the Serverless configuration using the “sls deploy” command.
Scope
We use the scope to define where our role definitions and service principal objects apply. The lowest scope is the resource level, and the topmost scope is the management group level. The topmost scope can affect all the lower levels, while the lowest level can only affect its own. Creating a role definition or service principal object in the resource scope will limit them to that resource; other resources do not inherit the role. Creating them in the management scope makes the role applicable to the resources, resource groups, and subscriptions within a management group.
Resource Level
A resource is the instance of an Azure service. When we deploy a Function App using the Serverless Framework, we use the Function App service to create a unique Function App (i.e., a resource). Any other services defined in the Serverless configuration file will create the appropriate resources. We can choose to create a role definition that only applies to those resources.
Resource Group Level
A resource group allows us to manage a group of resources without having to modify each resource individually. The Serverless Framework automatically creates a resource group for all the resources it deploys. We can choose to create a role definition that applies to the resource group, and all its resources will inherit that role definition.
Subscription Level
A subscription defines the services available based on the billing plan. All created resources are associated with a subscription. We can choose to create a role definition that applies to a subscription, and all its resource groups and resources will inherit the role definition. Defining the role definition at the subscription allows us to reuse it without having to create it for each resource group or resource.
We might choose to put each application in a separate subscription, thus allowing us to segregate all the resources from other applications. The approach also allows us to define the appropriate billing plan for each application and to get billing statements for each application.
Management Group Level
A management group allows us to group multiple subscriptions. We can choose to create a role definition that applies to a management group, and all its subscriptions (and their resource groups and resources) will inherit the role definition. Defining the role definition at the management group allows us to reuse it without having to create it for each subscription, resource group, or resource.
We might choose to use a management group to administer multiple applications based on similarity.19 We might organize them by business unit, application type, security requirements, and so on.
Google Cloud
Roles define the permissions that grant access to Google Cloud resources.
Members define the identities allowed to access Google Cloud resources.
Policies assign members to roles.
Scopes define the levels for granting access. The scope can be an organization (topmost level), a folder, a project, or resource (lowest level). Allowing access at a high level gives access to its lower levels.
Identity and organization use a G Suite domain or a Google Cloud Identity domain to create an organization.

Relationship Among Google Cloud IAM Settings
Roles
We use roles to define a logical grouping of permissions. We might want to define roles that allow access to a specific Google Cloud resource. These policies might be organized by read, write, create, and delete permissions. Having a convention in defining policies allows us to assign multiple roles and thus grant their respective permissions to the Google Cloud resources. Additionally, Google Cloud also has predefined roles we can utilize.21
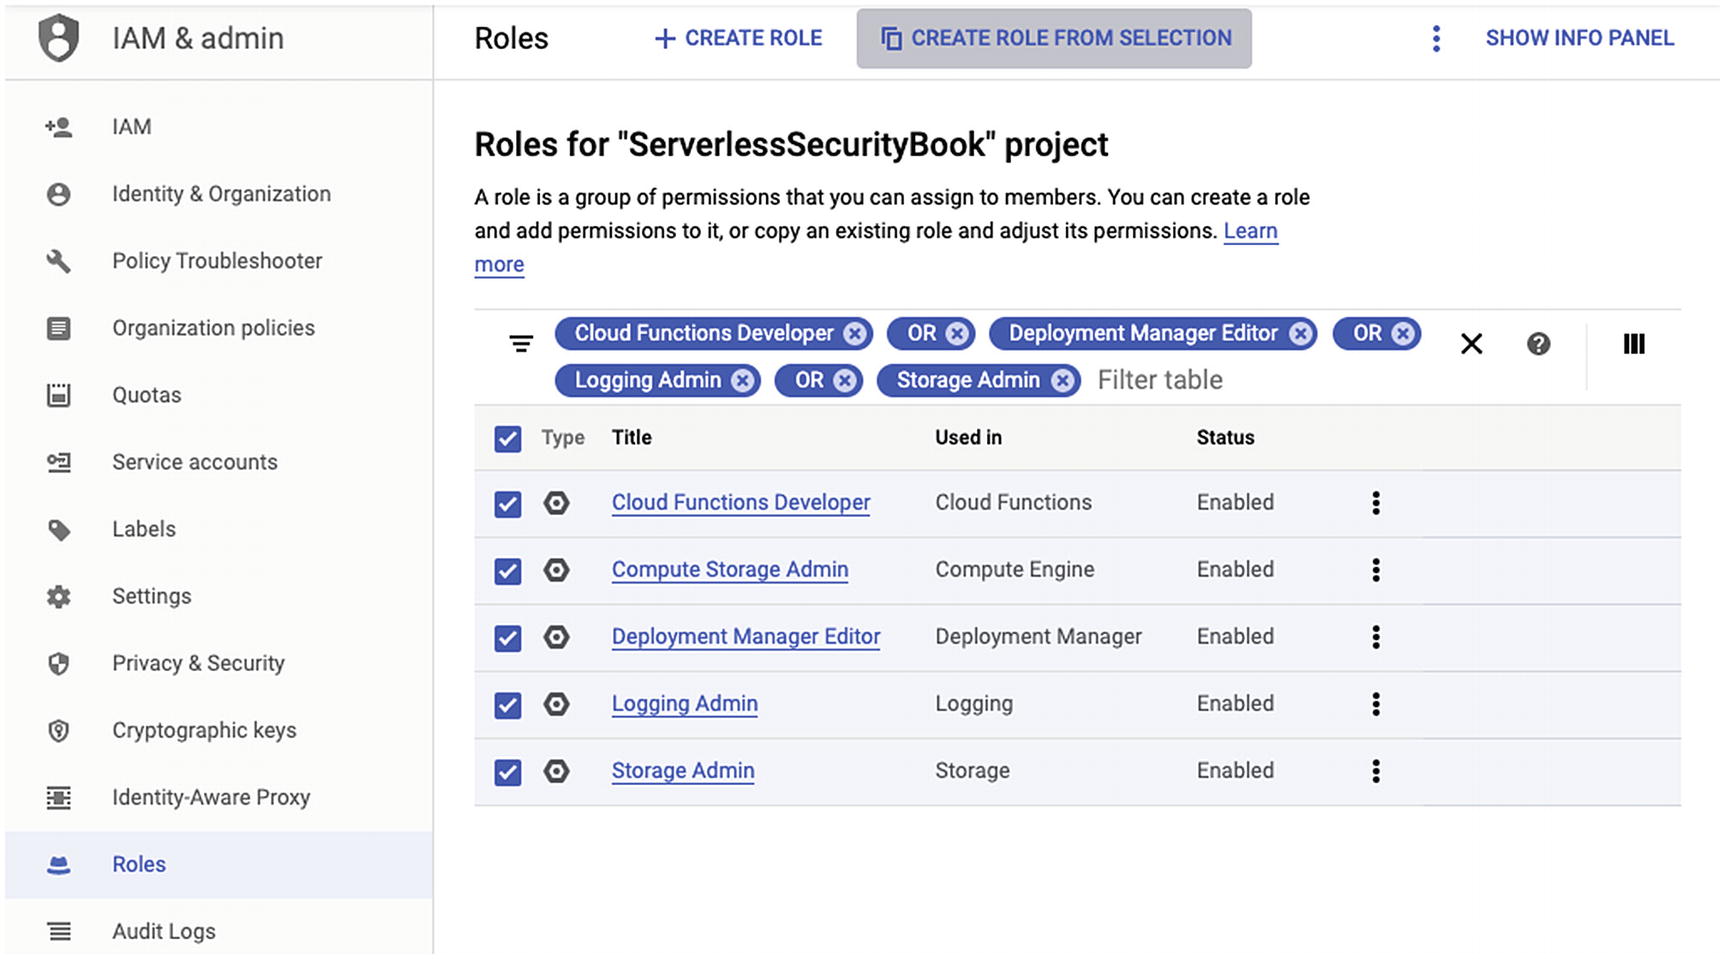
An Example of Assigning a Predefined Role to a New Role Using the Google Cloud Console

An Example of Naming the New Role Using the Google Cloud Console
Now we can use this role when defining a policy.
Members

An Example of Creating a Google Cloud Service Account
We have the option to assign roles to the service account in step 2 of the creation process and add a member to this service account in step 3. We will skip these steps because we will cover step 2 in the policies section, and step 3 introduces some complexities.23 When we grant members access to a service account, they inherit the service account permissions. The service account might have more permissions than a user account because it needs to create and modify resources. The user account might inherit access to resources not intended for that user. Therefore, we will focus on creating the private key for now, which we will need to deploy the Serverless configuration.

An Example of Creating a Google Cloud Service Account Private Key
The Google Cloud console will automatically download a private key file. We will reference its file path in the Serverless configuration file. When we deploy using the “sls deploy” command, Google Cloud will verify the key before it begins creating the resources defined in the Serverless configuration.
Policies

An Example of Creating a Google Cloud Policy
We can deploy a Serverless configuration now that we have a policy that binds the service account to a role with the necessary permissions needed to deploy. When we deploy using the “sls deploy” command, Google Cloud will verify the service account’s permissions before it begins creating the resources defined in the Serverless configuration.
Scope
We use the scope to define where our policies, roles, and service accounts apply. The lowest scope is the resource level, and the topmost scope is the organization level. Creating a policy in the resource level will limit access to that resource, and the policy does not apply to other resources. Creating a policy in the organization scope will make it applicable to its resources, projects, and folders.
Resource Level
The resource level contains one resource, which is the instance of a Google Cloud service. When we deploy a Cloud Function using the Serverless Framework, we use the Cloud Function service to create a unique Cloud Function (i.e., a resource). Some Google Cloud services support applying policies to resources, and we can choose to create a policy that only applies to a resource.
Project Level
The project level contains one project which might contain multiple resources.25 When we deploy a Cloud Function using the Serverless Framework, we deploy to a specific project. Any other services defined in the Serverless configuration file will create the appropriate resources. When we apply a policy to a project, all its resources inherit that policy.
Folder Level
The folder level contains one folder, which includes projects and other folders.26 Having folders allows us to manage a group of projects without having to modify each resource individually. When we apply a policy to a folder, all its folders and projects inherit that policy.
Organization Level
The organization level contains one domain, which includes folders and projects.27 The organization level may seem similar to the folder level. A folder enables us to organize other folders and projects within an organization. An organization can contain projects without needing folders. When we apply a policy to an organization, all its folders and projects inherit that policy.
Identity and Organization
We can use G Suite or Google Cloud Identity to create an organization based on the domain. Both G Suite and Cloud Identity are premium services. Still, Cloud Identity has a free version28 at the time of this writing. Irrespective of the service, we need a valid domain name we can verify.29 We use that domain name to create an organization resource.30 When the organization exists, we can assign policies to the organizational users and create projects. We will not set up an identity and organization here because the domain name verification varies between G Suite and Google Cloud.
Implementing Permissions
This section provides a suggestion on how to implement permissions. It is not a prescription since your organization and project requirements will ultimately dictate how to define the permissions. We will start with the general principles to provide context when working with providers. We will adopt approaches for implementing the general principles among AWS, Azure, and Google Cloud with consideration of their differences.
General Principles
We should use PoLP and RBAC when implementing permissions. To successfully take advantage of both concepts, we should consider using a model. The model enables us to define a high-level approach. Keeping it high level makes it easier to communicate and becomes a useful reference during implementation. The model can also translate to Azure and Google Cloud scopes. We will define a general permissions model for us to adopt when discussing each provider. The model will apply PoLP and RBAC and will use different IAM permission levels.
Organization Level
We will use an organization to be the topmost level in our model. An organization contains all the user accounts, projects, and resources of a similar kind. We can relate it to a business unit within a company that has employees, projects, and resources to operate the business. The entire company is an organization, but it might have smaller organizations within it. The organization structure might be large and have multiple levels. If possible, the model should have an organization that contains only the necessary user accounts, projects, and resources for the application(s) to function correctly.
There are fewer user accounts to manage within an organization.
Each organization can have only the settings and permissions it needs.
We can segregate data and access by using multiple organizations.
A breach in one organization has little or no impact to another organization.
Managing user accounts in multiple organizations might become burdensome.
It requires due diligence to enforce required settings and permissions across all organizations.
Sharing data across organizations has architectural and security implications.
More auditing is needed to detect breaches in multiple organizations.
Every approach has its benefits and drawbacks. Your company or project might choose to have one large organization to meet its requirements. We will assume a small organization in our model because it is useful for small businesses with a small number of projects, and large enterprises with numerous projects can also leverage it.
It might make sense to have an organization with other organizations under it when we have a large organization and want to manage them, similar to a small organization. This approach could help with keeping similar organizations aligned in the administration and billing. We assign a group of user accounts to the master organization and assign them to its child organization if they need access. We can apply security settings across the master and child organizations. We will assume the master organization will only have the minimum required child organizations to keep the group of organizations as small as possible.
Project Level
An organization might have multiple projects. We will consider each project as supporting one application. An organization might need numerous projects to support the different applications it needs to operate. For example, an ecommerce website might have a customer-facing website, a back-office website for processing orders, and a reporting system. We will treat each as having its own project. Having one project for each application allows us to group all its resources and separate them from the other projects’ resources.
There might be projects that could potentially support other projects and organizations. For example, the accounting system and human resources system likely support every organization. These projects should be under separate organizations, whether it is one for each project or one for them all. They would need to share data with all the projects that need access. For example, the accounting system may need sales information from the ecommerce reporting system. Depending on the business requirements, each organization might have an instance (or copy) of the project that applies to them all, and each is maintained separately.
Development Stage Level
Each project usually has at least two development stages: development and production. We want two separate instances of project resources for each development stage to avoid making changes to production (live) projects. We can grant permission to developers in the development stage, whereas we might limit or deny this access in production. Developers might introduce changes that break a project, and we want a safe place for them to test our changes. We should only allow privileged users and the CI/CD pipeline access to production resources. A developer might have access to the production stage but limited to read privileges. The roles for each user should be different among the different stages as appropriate.
Role Level
Each project will have its roles, although the same role can be copied (or leveraged) into all projects. We should tailor the project’s role to that project. For example, although each project might need an auditor role, the auditor may only need access to specific resources. Whenever possible, a role should define what resources it can access and with what privileges.
We will define roles based on RBAC and PoLP. We will use RBAC and PoLP to define roles for the user accounts that need to access resources and roles for service accounts. A user account might have different roles and will need to switch roles to perform their desired access. Service accounts might need to deploy different Serverless configurations. There could be one service account with a role that has permissions to deploy all the resources from all the Serverless configurations, or there can be one service account for each (or groups of) Serverless configuration(s). The service account should have the minimum number of permissions to deploy Serverless configurations. The goal is to prevent a user account or service account from having more permissions than needed when performing a task.
Resource Level
Each resource will have its own permissions and inherited permissions. Inherited permissions are those applied at higher levels (organization, project, or role) and automatically assigned to the resource. We might apply specific permissions to a resource when its higher level does not include them. We define permissions at the resource level when a resource needs permissions to access other resources or a user account needs access to resources not defined in a role.
Accounts
A user or service account might apply at any level. An account might have permissions from an organization, a project, a role, or a resource. We typically create an account in the organization and apply the permissions to the levels.
We want to ensure an account can access the correct project and development stage. We might need to create one account for each project and each stage. This approach could be burdensome. Some identity providers and some of the provider IAM capabilities allow for using temporary credentials, thus allowing an account to choose which project and stage to access. We will briefly discuss this approach in the appropriate provider sections, but not provide specific details to implement because the integration will vary by the identity provider.
Example Permissions Model

An Example of a Permissions Model
The organization has two projects: a website for customers to make orders (Project A) and a back-office system for processing orders (Project B). Each project has multiple Serverless configurations to create all the necessary resources. There are two development stages: one for developing and improving the projects (Develop) and another for the live system (Production). Each project will have developer and administrator roles for both development stages. The Production stages of each project will have an additional role for an auditor.
We are using one provider account to define our model and to contain the ecommerce organization. We will discuss how to organize provider accounts and organizations in the next chapter.
Live and development resources are logically separated.
Develop and live roles are separated and have different permissions, even if named similarly.
The stages themselves can become an organization.
We could have instead grouped by project, but it might introduce the complications of mixing multiple stages within the same organization.
You might have noticed we did not depict users in the diagram. Users might exist on multiple levels, such as the provider account, the organizations, and projects. Users have been omitted from the diagram for simplicity.
We will explore how to implement the general permissions model and where to create users within each provider.
AWS
We will discuss how we might implement the levels in the general permissions model for AWS based on the AWS permissions principles we reviewed earlier in this chapter.
Organization Level
You might have noticed we did not define an organization level or a scope for AWS earlier in this chapter. AWS does support organizations but implements them differently than Azure, Google Cloud, and the general permissions model. An AWS organization is simply an AWS account. Our AWS account is the organization from the general permissions model. We will discuss AWS organizations further in the next chapter. AWS does not explicitly have a scope concept, though it is somewhat built-in. For example, applying permissions to a policy affects the groups, users, roles, and resources that use them. For simplicity, we will use one AWS account to be our ecommerce organization.
Project and Development Stage Levels
Example Serverless Configuration Naming
The Serverless configuration automatically uses the “service” and “stage” properties to name resources prefixed with the“<projectName>-<stage>” naming convention.
Role Level
AWS IAM Settings for Each Project and Development Stage
Develop Stage | Production Stage | |||
|---|---|---|---|---|
IAM Setting | Project A | Project B | Project A | Project B |
Policies | developer, admin | developer, admin | developer, admin, auditor | developer, admin, auditor |
Groups | developer, admin | developer, admin | developer, admin, auditor | developer, admin, auditor |
Developer Group Policies | developer | developer | developer | developer |
Admin Group Policies | admin | admin | admin | admin |
Auditor Group Policies | Not Applicable | Not Applicable | auditor | auditor |
There are four sets of policies and groups for each project and its development stage. The policy for each project will have the permissions needed to access the different resources within the project and its stage. The developer policy in the Develop stage will have more permissions than its counterpart policy in the Production stage. We create groups similarly named as the policies. This allows us to associate the policies to groups based on RBAC. Now that we have the groups and policies in place, we can create users.
Users
The user creation can become a bit tedious if we want to segregate permissions by stage. Without using an identity provider, we would create an IAM user for a person. A developer named Amy Smith might have an IAM user named “amy.smith” and we would assign that user to the “projectA-develop-developer,” “projectB-develop-developer,” “projectA-production-developer,” and “projectB-production-developer” groups. Amy Smith now has access to the Develop and Production stages. She needs to be diligent and mindful about which project is being affected. Ideally, the Production stage policies will prevent any accidental changes. Still, the developer might accidentally make changes in Production if the policy is overly permissive. We should consider having the developer log in to a user account that only has access to the Develop or the Production stage, never both at the same time.
We can choose to have multiple IAM users per developer. Our developer might have a user with a name containing “production” and another containing “develop.” For example, Amy Smith might have “amy.smith.develop” and “amy.smith.production” IAM users. We assign the “amy.smith.develop” user to the “projectA-develop” and “projectB-develop” groups, and similarly for the Production IAM users and groups. This approach segregates access between the Develop and Production resources. Unfortunately, this approach puts the added burden to the developer and the AWS account administrator in maintaining multiple sets of accounts.
Although I stated earlier we would avoid giving examples using an identity provider and discuss AWS organizations in the next chapter, I feel it is essential to mention how we would use both in segregating access to Develop and Production resources for a single person. If we had set up an identity provider, we could create an IAM role31 for each RBAC role similar to how we created a group. When the user logs in to the identity provider, it would ask the user which role to assume, and the user would have a temporary credential to access the AWS resources using the selected role.32 We could also use multiple AWS organizations, one for each development stage, that contain the appropriate resources. We would create IAM users in the master AWS organization and create IAM roles33 to access the resources in AWS child organizations. A user will select the desired role when logging in to the IAM user account and will have access to the resources for the respective development stage.34 Both these options are suitable alternatives, but require more effort to set up.
AWS IAM Settings for CI/CD Pipelines and CloudFormation Roles
Develop Stage | Production Stage | |||
|---|---|---|---|---|
IAM Setting | Project A | Project B | Project A | Project B |
Policies | developer, admin cicd, slsdeploy | developer, admin cicd, slsdeploy | developer, admin, auditor cicd, slsdeploy | developer, admin, auditor cicd, slsdeploy |
Groups | developer, admin cicd | developer, admin cicd | developer, admin, auditor cicd | developer, admin, auditor cicd |
Roles | slsdeploy | slsdeploy | slsdeploy | slsdeploy |
Developer Group Policies | developer | developer | developer | developer |
Admin Group Policies | admin | admin | admin | admin |
Auditor Group Policies | Not Applicable | Not Applicable | auditor | auditor |
CI/CD Group Policies | cicd | cicd | cicd | cicd |
SlsDeploy Role Policies | slsdeploy | slsdeploy | slsdeploy | slsdeploy |
We added a “cicd” policy and added a “cicd” group that uses that policy. We can now create a user (with programmatic access only) that our CI/CD pipeline can use to log in to AWS to deploy the Serverless configurations. This CI/CD user will have the permissions defined in the “cicd” policy and group.
We also added an “slsdeploy” policy and created an “slsdeploy” role that uses that policy. We will use this role as the CloudFormation role in the Serverless configurations by specifying the policy’s ARN.
Resource Level
We use Serverless configurations to create resources. When we deploy, the Serverless Framework will create one IAM role for each Serverless configuration based on the permissions defined in the “iamRoleStatements” property. Each function that the Serverless Framework creates during the deployment will use the IAM role created for its Serverless configuration. Having the Serverless Framework create the IAM role and each function using it is a convenient feature, but it does have its downside.
Using one set of IAM role statements (permissions) that applies to each Lambda function can grant overly permissive roles to each function. Each function should only have the minimum required permissions to execute based on PoLP successfully. Having a blanket role that, for example, allows deleting database records will grant that permission to every function, even if that function only needs to read the database. Let’s suppose that a Lambda function that reads the database is vulnerable to an injection attack when it executes a delete command. That exploit is successful because the function has the delete database records permission. Still, it would have failed if it only had the read permission. It is a good practice to apply PoLP and only give the required permissions to each function.
Serverless Configuration Settings for the Serverless IAM Roles per Function Plugin
Example Serverless Configuration with Role Statements per Function
When the Serverless Framework deploys the updated configuration, it will create three roles: one role for the “iamRoleStatements” property, one role for the “getTransaction” function, and one role for the “deleteTransaction” function. The “getTransaction” function gets the “dynamodb:GetItem” permission, whereas the “deleteTransaction” gets the “dynamodb:DeleteItem” permission. Both functions also get the “kms:Decrypt” permission. Any functions that do not have their own “iamRoleStatements” property will use the role from the common “iamRoleStatements” property .
Azure
We will discuss how we might implement the levels in the general permissions model for Azure based on the Azure permissions principles we reviewed earlier in this chapter.
Organization Level
You might have noticed we did not define an organization level for Azure earlier in this chapter. Azure does support organizations but only within the Azure DevOps service. We can treat the Azure account as the organization, similar to our AWS approach, since we might or might not use the Azure DevOps service. We can also choose to use a management group to define an organization. Any subscriptions added to the management group are part of the organization, and we can use the scope to apply permissions to all items under it. We will create an “ecommerce” management group36 to define our organization.
Development Stage Level
We will create one subscription37 for each stage: one subscription for the Develop stage and another for the Production stage, thus allowing us to segregate the resources.
Project Level
Example Serverless Configuration Naming
The Serverless configuration automatically uses the “service,” “stage,” and “region” properties to name resources prefixed with the “sls-<region>-<stage>-<projectName>” naming convention.
Role Level
At the time of this writing, the Serverless Framework Azure plugin has no support for specifying custom role definitions. It will use the role definition from the service principal or the AD user used when deploying the Serverless configuration.
Users
We will create the users in an Azure Active Directory tenant. The users are primarily used to access Microsoft and Azure services (e.g., Office 365). We have the option of using the Serverless Framework Azure interactive login (which redirects to a browser login page). Still, the Serverless Framework documentation recommends using service principals.38 We will follow the recommended approach for deploying Serverless configurations. Still, it is advisable to have AD users for administration purposes.
We will create service principals to deploy the Serverless configuration. All users that need to deploy Serverless configurations can each have their own service principal. When we create service principals, we will specify the subscription as the scope. We can now have service principals for each subscription, thus meaning we cannot use a service principal from the Develop subscription to deploy Serverless configurations to the Production stage.
The service principal uses the built-in “Contributor” role,39 which can manage resources without accessing their content. We can create a custom IAM role definition within each subscription to define the least amount of privileges needed to deploy a Serverless configuration. Defining custom IAM role definitions allows us to apply PoLP and restrict what types of resources we can deploy.
We mentioned each user could have its service principal. Still, it presents a similar burden as using multiple AWS access keys. We could consider using temporary service principles when deploying.
Resource Level
We use Serverless configurations to create resources. When we deploy, the Serverless Framework will create a resource group containing all resources defined in the Serverless configuration. Each function can process triggers and inputs and send outputs based on the bindings specified in the Serverless configuration. Aside from bindings, the functions have no IAM permissions.
Google Cloud
We will discuss how we might implement the levels in the general permissions model for Google Cloud based on the Google Cloud permissions principles we reviewed earlier in this chapter.
Organization and Development Stage Levels
Google Cloud explicitly supports an organization by using a domain to define the organization. Having the ability to use domain names to create organizations gives us some flexibility. We can use different domain names for the Develop and Production stages and treat the domain organization as the development stage level. We did not explore using different domain names in the AWS and Azure setups. For simplicity and uniformity, we will use one domain name to create our organization and use folders to group the Develop projects and the Production projects.
Project Level
We will create a Google Cloud project for each project and development stage (four projects in total): a Project A Develop project, a Project A Production project, a Project B Develop project, and a Project B Production project. We put the two Develop projects in the Develop folder and similarly for the Production projects. What makes Google Cloud different is the project resources are segregated by project. In contrast, AWS and Azure have the project resources in the same account and subscription, respectively.
Role Level
We have the option of creating custom roles or using predefined roles. Google Cloud documentation40 and the Serverless Framework documentation41 both suggest using predefined roles as custom roles have known limitations. For this reason, we will use predefined roles.
Users
We will create user accounts and groups. The Google Cloud organization also functions as an identity provider that lets us manage user accounts and groups. We will create user accounts for individual persons. We will create groups based on roles: a developer group, an administrator group, and an auditor group. We can now assign users to each group, thus allowing us to manage the user permissions as a group rather than by each user.
We will create service accounts within each project to deploy the Serverless configurations. All users that need to deploy Serverless configurations can each have a separate service account, or we can assign a service account to a group. Although it requires more administration, assigning a service account to each user account allows revoking that user account without affecting other user accounts. Each user will need a service account and its associated key to deploy a Serverless configuration to the appropriate project. We will assign the service accounts the predefined roles necessary to deploy the Serverless configuration, which, at the time of this writing, include the Deployment Manager Editor, Storage Admin, Logging Admin, and Cloud Functions Developer roles.
We mentioned each user could have its own private key. Still, it presents a similar burden as using multiple AWS access keys. We could instead consider using short-lived service account credentials42 when deploying.
Resource Level
We use Serverless configurations to create resources. When we deploy, the Serverless Framework will create a deployment configuration for all resources defined in the Serverless configuration. The resources will inherit the permissions from its higher scope levels. It will also create additional permissions needed for the resources to process an event. For example, a Cloud Function that accepts an HTTP trigger will create the permissions to allow all users (i.e., the entire Internet) to execute that function by calling its HTTP address. At the time of this writing, the Serverless Framework does not support specifying specific permissions for each function.
Key Takeaways
This chapter is the longest and rightly so. We wanted to ensure we establish a foundation before discussing how to use permissions. Similarly how we used Chapter 1 to develop a foundation for this book, this chapter had a foundation section. Having an understanding of how permissions work prepares us for creating our own, robust permissions model, and diligently applying it will improve the overall security of our serverless application. Let’s recap what we discussed.
In this chapter, we first addressed the importance of permissions to limit function injection attacks and account takeovers. Restricting permissions to functions and accounts that have limited access reduces the risk of a successful attack from happening. After setting that precedence, we reviewed permissions principles before exploring how to apply those principles.
We started by discussing general permissions principles. These principles were necessary to address first because each provider approaches principles differently and uses similar terms, but with varying definitions. We established that we would use the Principle of Least Privilege (PoLP) and Role-Based Access Control (RBAC) as foundations for principles. After establishing the general principles, we reviewed how permissions work in AWS, Azure, and Google Cloud.
After understanding permissions principles in a general sense and for each provider, we discussed how to use these principles to implement permissions. We first established a general permissions model. This model helped us to develop an approach to adopt within AWS, Azure, and Google Cloud. Without this model, relating the implementation across all three providers might prove to be confusing and complicated. The model is a suggested approach and not a prescription when implementing permissions because your requirements will dictate our final setup. However, the method might be beneficial in giving us a starting point.