In this chapter, we will discuss how we might manage our account to reduce risk and improve security. The provider account allows us to access multiple services and create numerous resources. We will learn how we might use various accounts to organize the resources we create and how to secure our account by implementing standard practices.
The Importance of Account Management
Each provider account has a main/central/master/root account that gives us access to the provider’s services. With this account, we can use services to build the applications we need for our businesses. When we use these services, we can incur costs as little as pennies and as much as several thousand dollars per month. If someone manages to take over an account, that actor can use the services in our account and create a costly bill. Therefore, we want a secure provider account to protect the main account from someone compromising it.
We can structure our provider accounts to minimize our exposure. Rather than having all our applications in one provider account, we can choose to use multiple provider accounts. Distributing our applications across multiple provider accounts reduces the impact of any damage from a compromised provider account. Still, there is a trade-off because we need to manage more provider accounts. If one provider account is taken over or compromised, we can limit the extent of the damage to one application.
Understanding Provider Accounts
We briefly discussed organizations and multiple accounts in the previous chapter. The focus of the last chapter was permissions, and any mention of provider accounts was in that context. This chapter focuses on managing the accounts and using organization concepts where appropriate. We will review general and provider-specific principles.
General Principles
The providers have general consumer services in addition to cloud services. Having an account gives us access to both. A person might use cloud services with a personal account for business purposes. We should consider having separate accounts similar to how most professionals have both personal and professional email addresses. Having both personal and professional accounts provides mental compartmentalization on how we interact with the providers. It limits the scope of financial liabilities to the affected legal entity.

An Example of a Permissions Model Using Multiple Provider Accounts
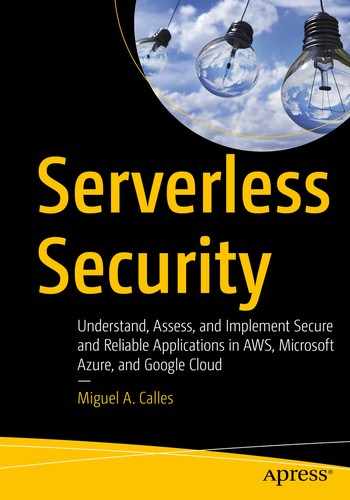
We restructured the example model from Chapter 6 to treat all provider accounts as the organization. We used one provider account per development stage. Doing this allows us to further separate develop and production resources rather than solely relying on IAM permissions.
Furthermore, it allows us to have the same IAM user account name for both accounts. For example, both the develop and production accounts can have an “amy.smith” user account. However, we can still adopt the “amy.smith.develop” and “amy.smith.production” accounts, as previously discussed. We can also leverage the example permissions model from Chapter 6, even if we use multiple accounts.
Having multiple accounts provides nonsecurity-related benefits. Each provider might impose technical limits on each account. Having all the projects and their resources in the same provider account means they all share the same limits. Assuming the provider cannot increase the limits, we would need to ensure our development has no negative impact on the operational resources. However, with separate accounts, the provider limits apply to each account. Therefore, using resources on one account does not affect the other accounts.
We will explore how we might set up our two-development-stage account model for each provider.
Amazon Web Services (AWS)
Example of an AWS Organization
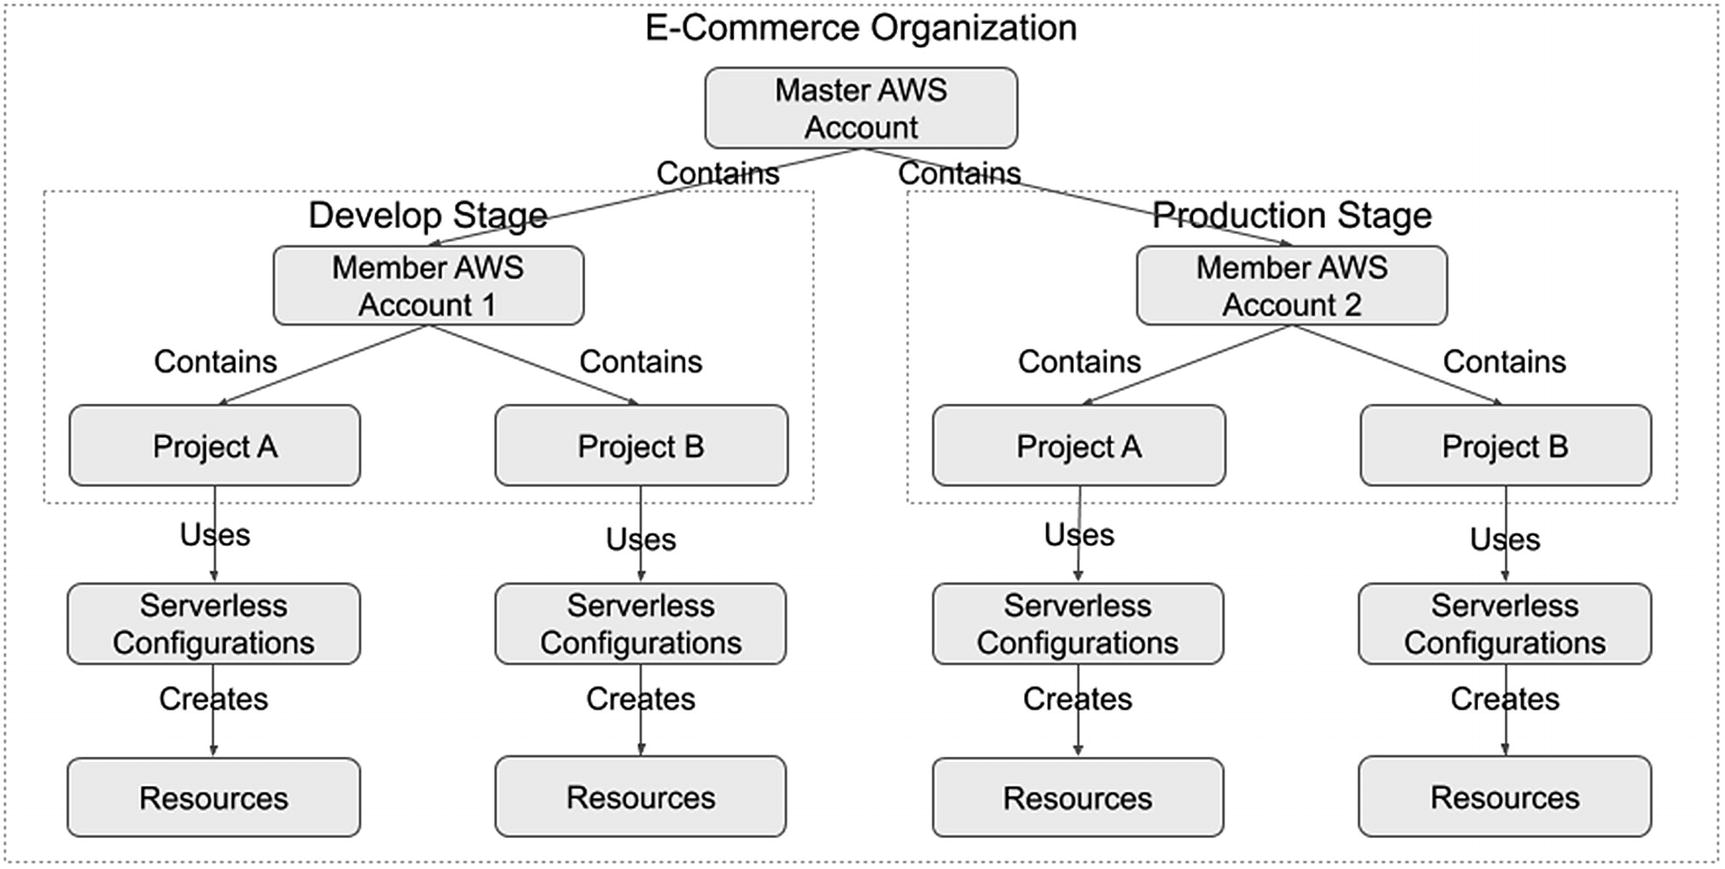
Creating an AWS Member Account
We specify the account name, the email address that owns the member account, and optionally an IAM role name. AWS Organizations automatically creates a service role in the member account that gives trust access to the master account.
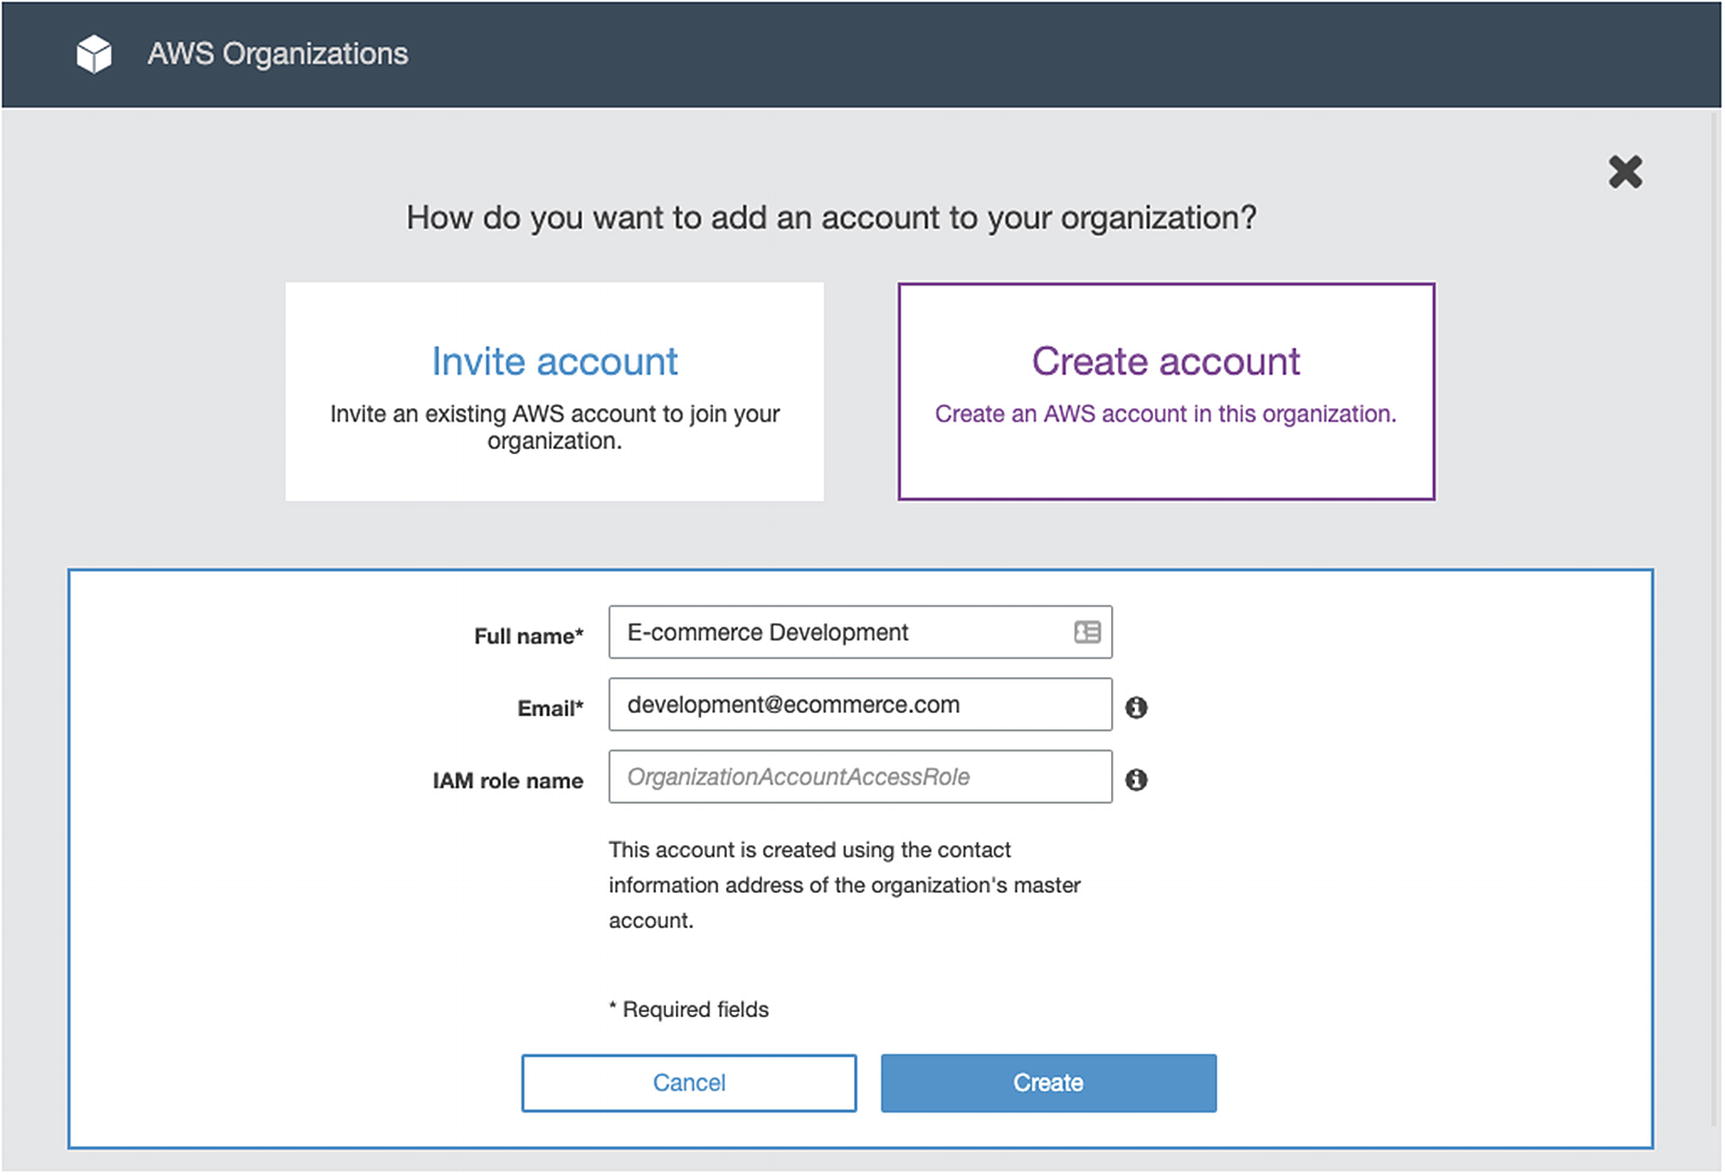
Organizing AWS Member Accounts into an Organizational Unit
The member accounts are unorganized when we first create them. We created an organizational unit named “Ecommerce” and moved the member accounts under it. Using organizational units allows us to organize multiple member accounts, especially when we have numerous organizations.
Centralized billing, auditing, monitoring, and security
Applying permissions across multiple member accounts using Service Control Policies
Sharing resources across member accounts
Now that we have our two member accounts organized under an OU, we can set up our projects. We can now deploy the development resources in the AWS develop member account and deploy the production resources in the AWS production member account. We can set up any security, auditing, and monitoring settings across all accounts to meet the business requirements.
Azure

Organizing Azure Accounts into an Organization Using Active Directory
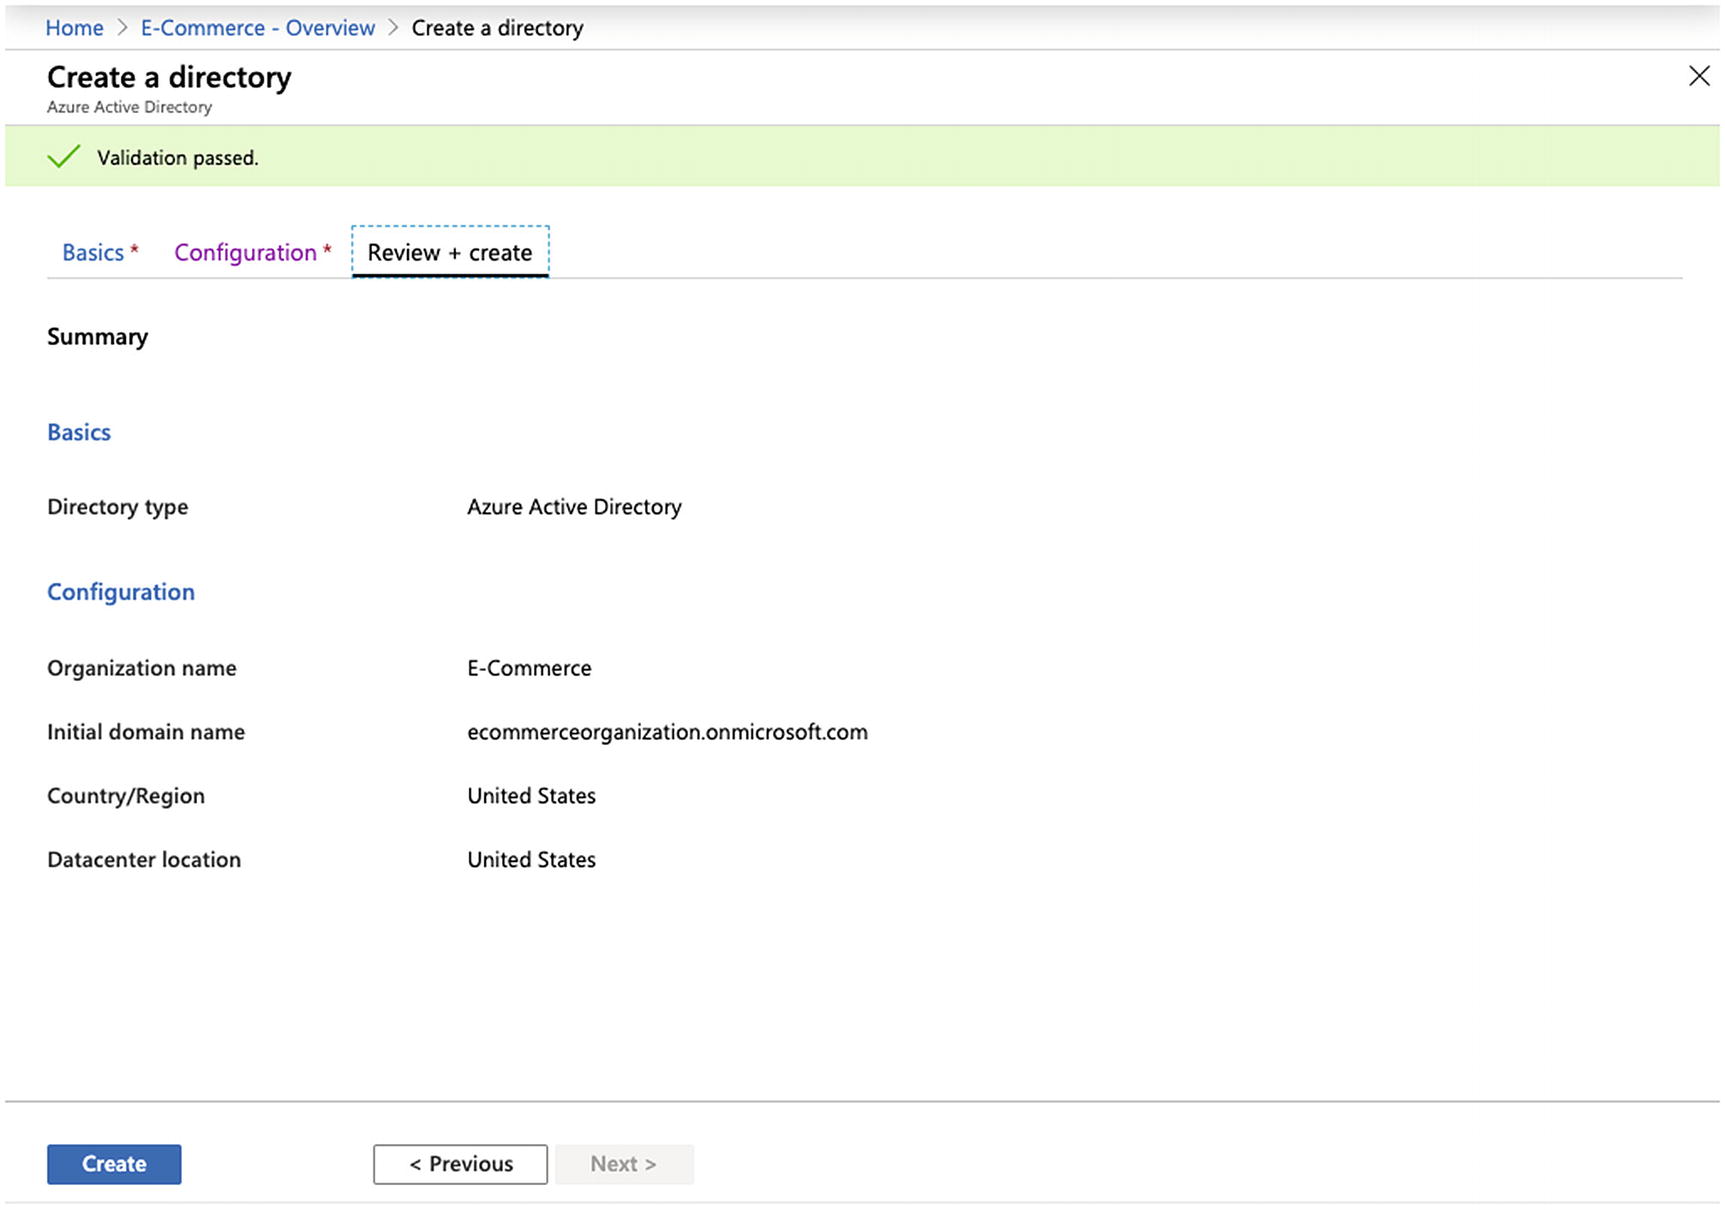
Creating an Azure Active Directory
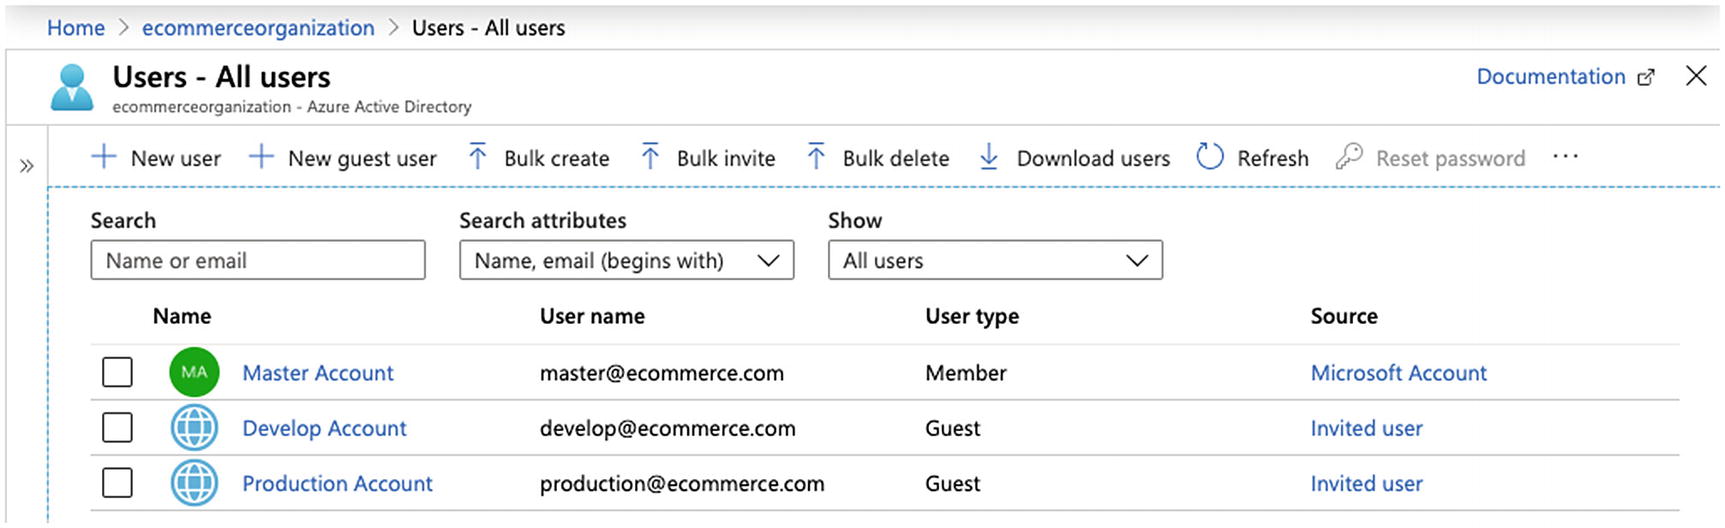
Inviting Others to an Azure Active Directory

Assigning Subscriptions to an Azure Active Directory Tenant
The master account now centralizes the develop and master subscriptions under one AD. This approach centralizes user management.
The subscription billing remains with the develop and production Azure accounts. If the business requirements specify centralized billing, the master account could create the subscriptions and change its ownership to AD tenants within the other accounts. The other AD tenants can use direct federation to reduce the administrative overhead.4
Google Cloud
In Chapter 6, we discussed how Google Cloud provides identity and organizations. Google Cloud documentation recommends using organizations as a best practice.5 We should follow this approach instead of having multiple Google Cloud accounts. AWS implements organizations via a master account and Azure via AD. However, Google Cloud implements organizations by relating it to a domain name using G Suite or Google Cloud Identity. The organization manages the projects it owns instead of the accounts that created them. Therefore, the organization approach we used in the previous chapter is sufficient.
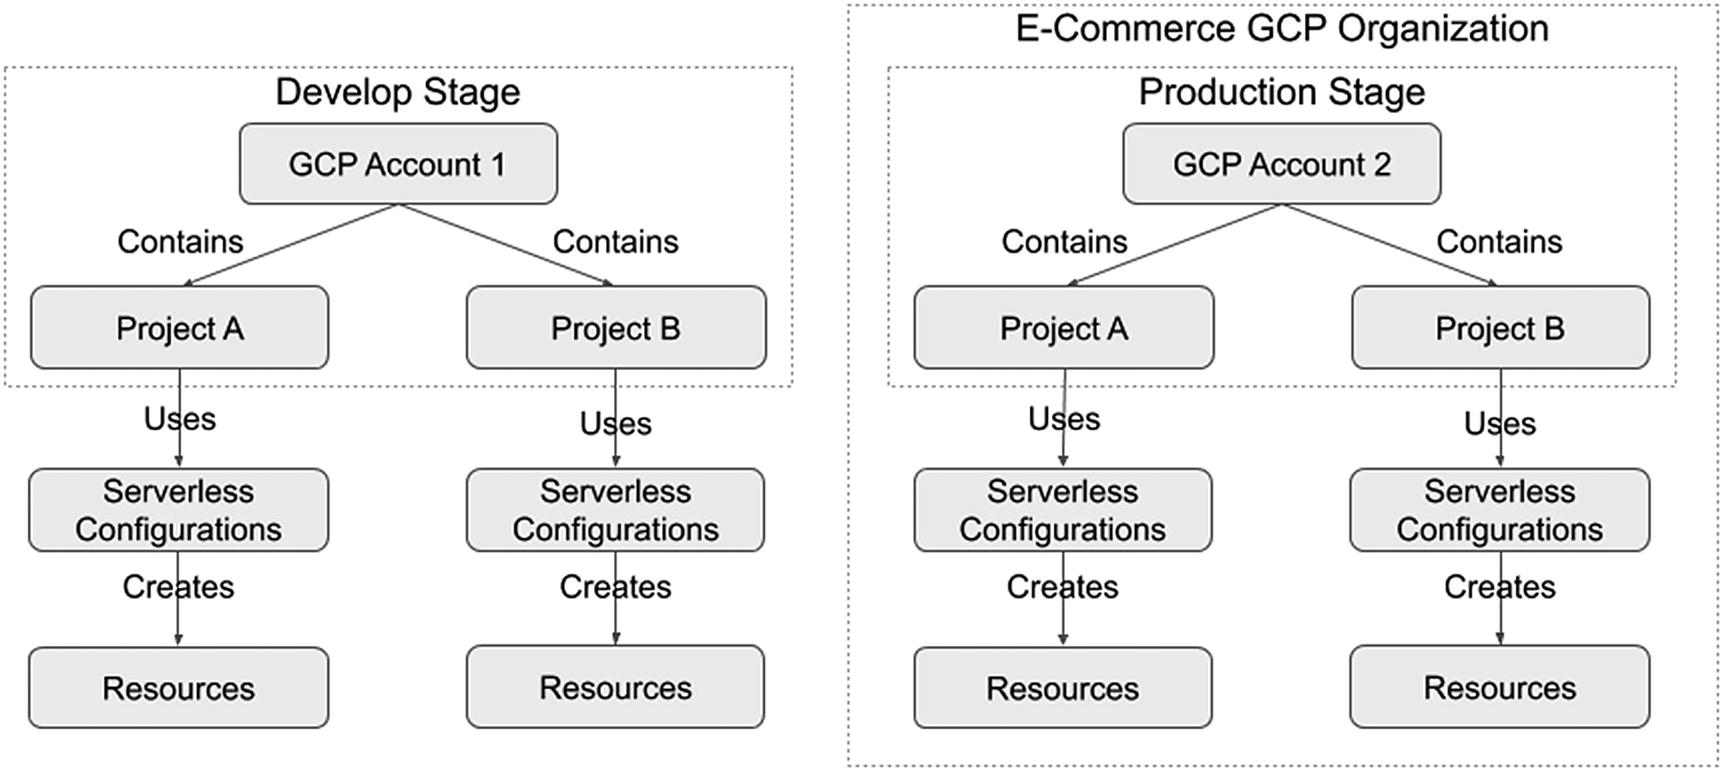
Alternate Approach for Organizing Projects in Google Cloud
We could choose to use Google Cloud organizations to manage all production resources. All other development stages could use a separate Google Cloud account. This allows us to separate resources while centrally administering the production resources. We lack certain benefits (e.g., centralized billing) by using this approach, but achieve any desired resource separation.
Securing Accounts
In addition to making use of multiple provider accounts, we want to secure them to prevent account hijacking, illegal changes or purchases, or unauthorized deleting of applications or data.
General Principles
Using a service or group email address for the account
Specifying contact information
Specifying alternate contacts
Using a secure and robust password
Enabling Multi-Factor Authentication (MFA)
Creating additional users to perform different functions
Avoiding creating access keys or service principals in the primary account
Enabling security questions
Using a service or group email address allows having a trusted group of persons to get email notifications about the account. This allows those trusted individuals to perform account recovery procedures. Whereas using an individual’s email address might put the business in a tough situation. Let's suppose the contact was an individual that unexpectedly became unavailable, and no one else has access to the account. Any account recovery requests would go to that person's email inbox and would be inaccessible. Instead, using a group email address will result in having account notices sent to multiple persons, thus allowing multiple people to notice and take action on account changes, service notices, and potential issues.
We want to specify contact information to ensure we get adequately notified when the provider needs to contact us. Likewise, password recovery procedures might leverage contact information. We should consider using a physical address not listed on any public-facing website to avoid someone attempting to take over the account using social engineering or password recovery. A small business might only have one physical location, so they might want to consider getting a mailbox from a third party to use as the mailing address for the provider account. If the contact information asks for a birthday, consider using a date not tied to a person’s birthdate.
We should consider using alternate contacts to ensure there are backups for getting notifications. We want to consider using group email addresses for these alternate contacts for the reasons mentioned earlier. The provider might allow you to specify alternate contacts for different domains (e.g., billing) and security contacts, and we should consider determining those to send appropriate communications to individuals that would typically support those business areas.
Having a strong password might seem apparent, but it is worth mentioning to avoid this common pitfall. Some companies might have a default password they use when setting up accounts. This password is easy to remember and makes it convenient to share among its employees. Yet it might become known by someone outside the company. Other companies might reuse a password for multiple websites, and that password might now be listed in hacker databases.6 We should use long passwords, difficult to guess, unique, and changed periodically, to avoid someone accessing our provider account.
MFA provides another layer of protection in the event someone discovers our password or manages to reset the password. Upon successfully entering a matching username and password, the provider will request an MFA one-time password. Failing to enter this one-time password prevents access to the account, and good MFA practices should then require the user to log in again. Also, consider using a physical MFA device for increased security because a malicious party will need to obtain it physically. This does mean only the individuals who have physical access to the device can log in to the provider account and might be difficult for a business with companies in different locations. The next principle will address this situation. We do have the option of using virtual MFA devices. This is an excellent alternative for all user accounts. Still, we should avoid it for the main provider account because any digital data is subject to getting hacked. Yet, it is better to use a virtual MFA device than not enforcing MFA in your provider account at all.
Read-only user account to view the account, but not make any undesired changes
Security administrator to make permission changes and create new user accounts
Billing user account to generate billing reports and make payments
Administrator user account to perform administrator actions for designated account services or projects
Creating access keys or service principals for the master account typically grants the same privileges that account has in the web-based management console. Anyone that obtains access to them has unrestricted access to the AWS provider account. Therefore, we should avoid creating access keys or service principals for the master account and create them for individual user accounts in which we can restrict access.
We should enable any security questions. These questions provide additional security when the answers are difficult to guess. Given these questions are used for account recovery, it is best to answer them in a manner that is difficult to guess.8
In the next section, we will review some of these general principles and provider-specific account settings.
AWS
When you log in to the AWS Management Console, click your account name at the top-right menu bar and select “My Account.” This will take you to your account page.
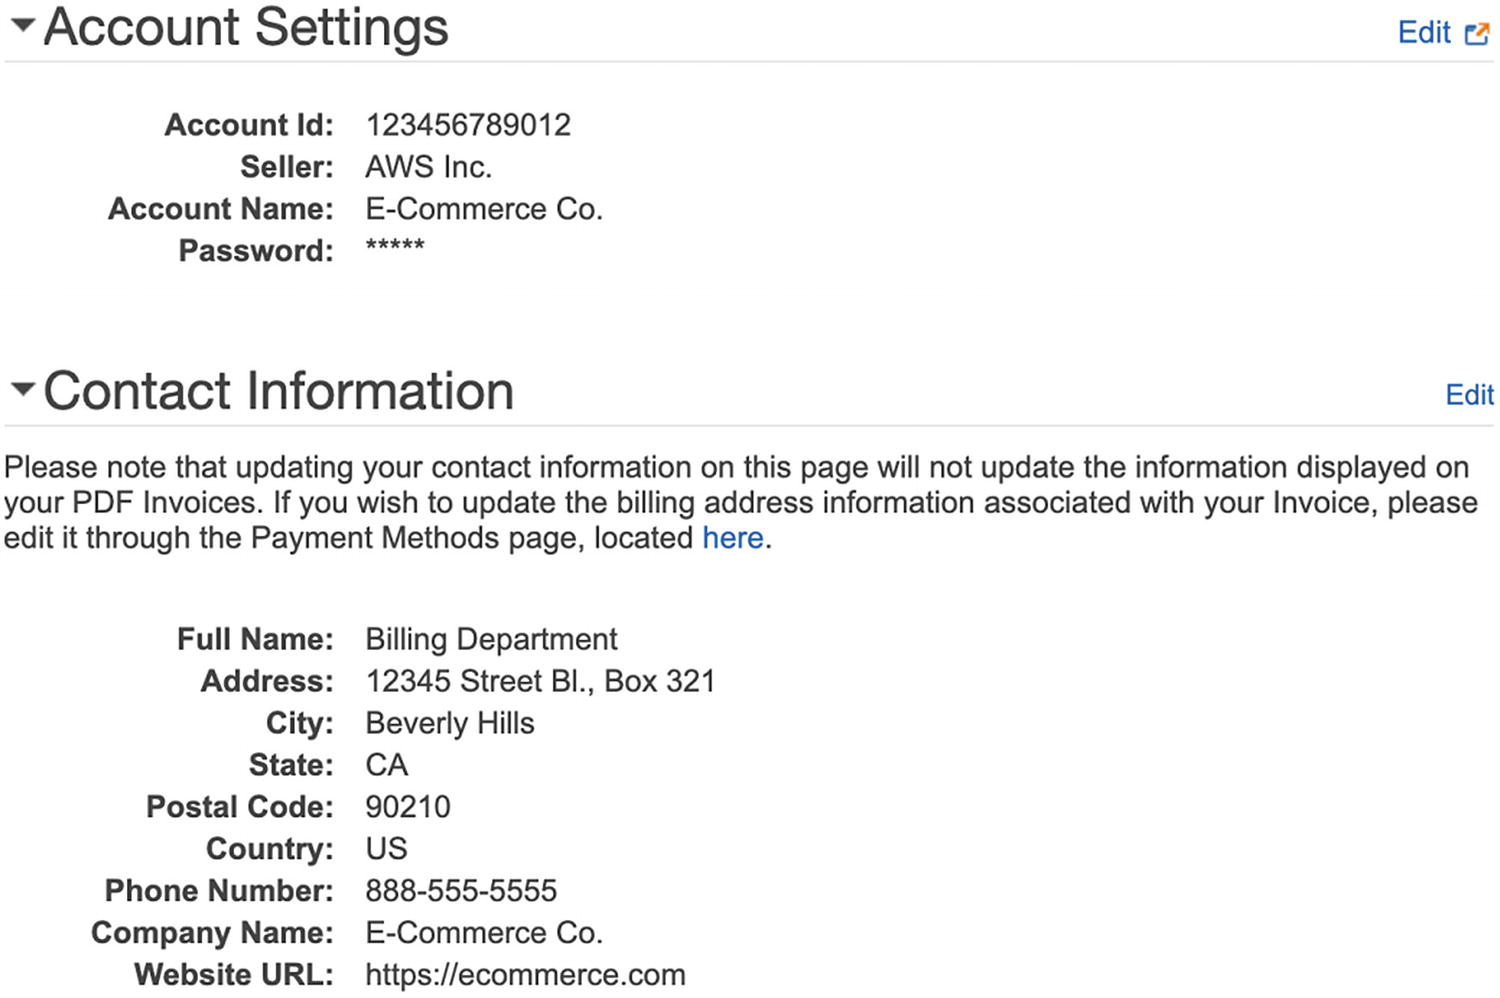
Updating AWS Account Information

AWS Alternate Contacts and Security Challenge Questions Sections

AWS Security Status
You should already be compliant with the “Delete your root access keys” item. If not, create an IAM user, create an access key to replace the existing master account (i.e., root) access keys, and delete the root access keys. By doing this, you become compliant with the “Create individual IAM users” item.
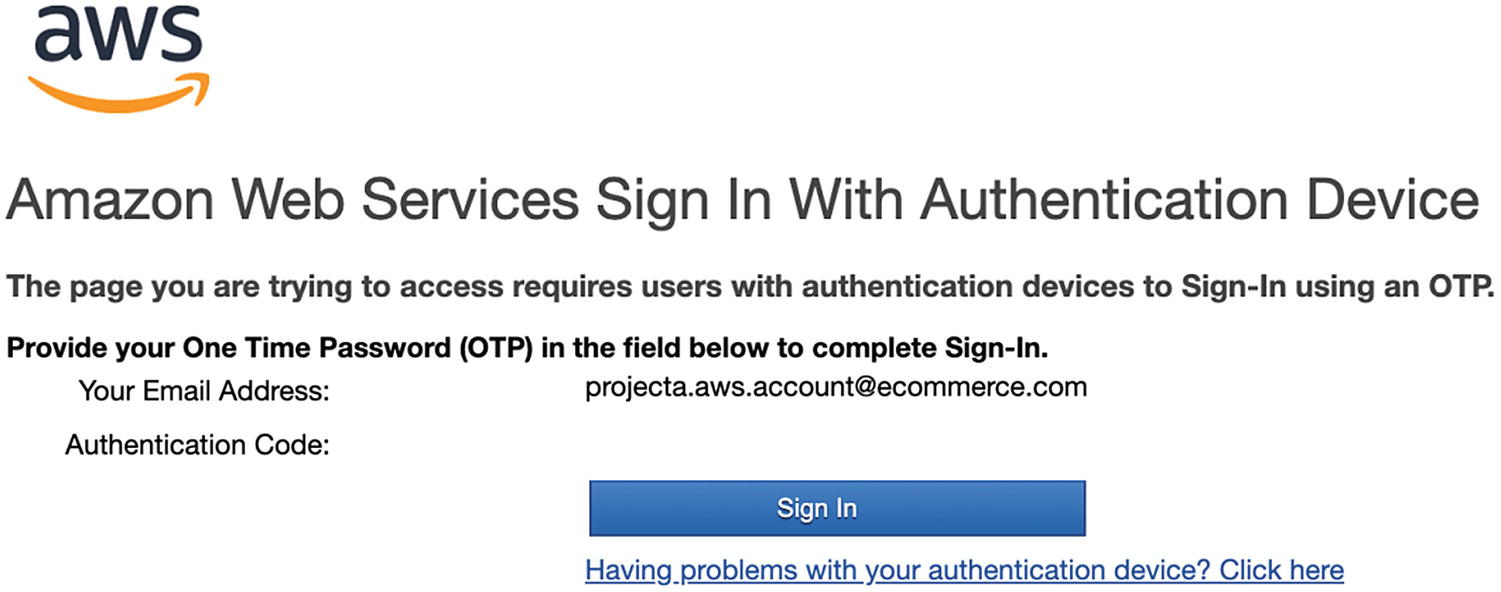
AWS One-Time Password Prompt Example
You will become compliant with the “Use groups to assign permissions” item when implementing a permissions model, as discussed in Chapter 6.

AWS IAM Password Policy Example
Azure
We will review some of the general principles and how to apply them to Azure. Visit https://account.microsoft.com to update your account settings.

Azure Account Information
Change your password to be a strong password. Manage your addresses per the previously mentioned guidance. I suggest avoiding passwordless login for your master account for a similar reason as having a virtual MFA device.
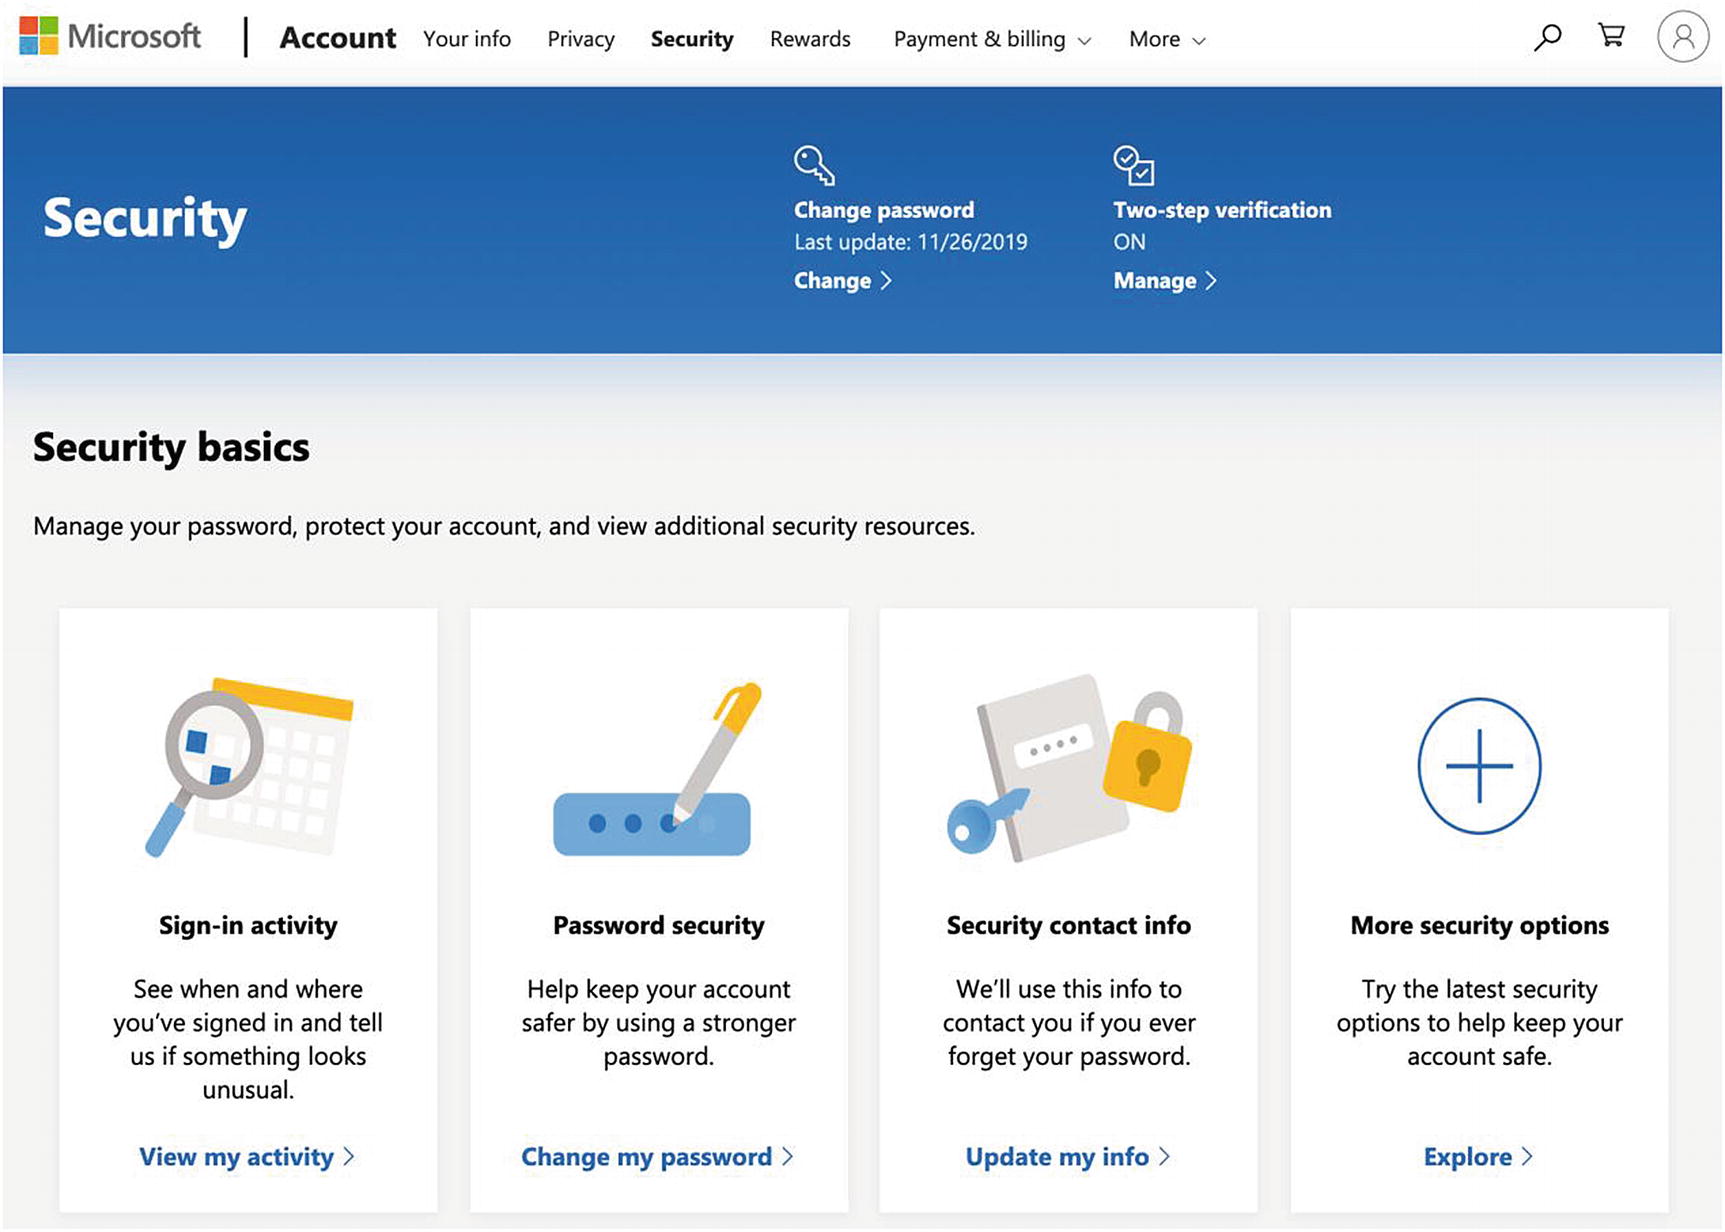
Azure Security Section
Click the two-step verification and follow the on-screen instructions to enable it.
Click the “More security options” section, go to the “Identity verification apps” section, and follow the on-screen instructions to enable an identity verification app (i.e., a virtual MFA device).
Optionally, go to the “Windows Hello and security keys” section and follow the on-screen instructions to set up a security key (which is like a physical MFA device, but does not require a username or password). This is a useful convenience feature and has comparable security since the security key requires a fingerprint or PIN to log in.9
Go to the “Recovery code” section and follow the on-screen instructions to print your recovery code as a backup method to access your account.
Visit the “Payment & billing” section and select the “Address book” link. Follow the on-screen instructions to specify the billing and shipping instructions.
Google Cloud
To apply the general principles to Google Cloud, visit https://myaccount.google.com to update your account settings.
Visit the “Personal info” section and follow the on-screen instructions to update your contact information as per the previously mentioned guidance.
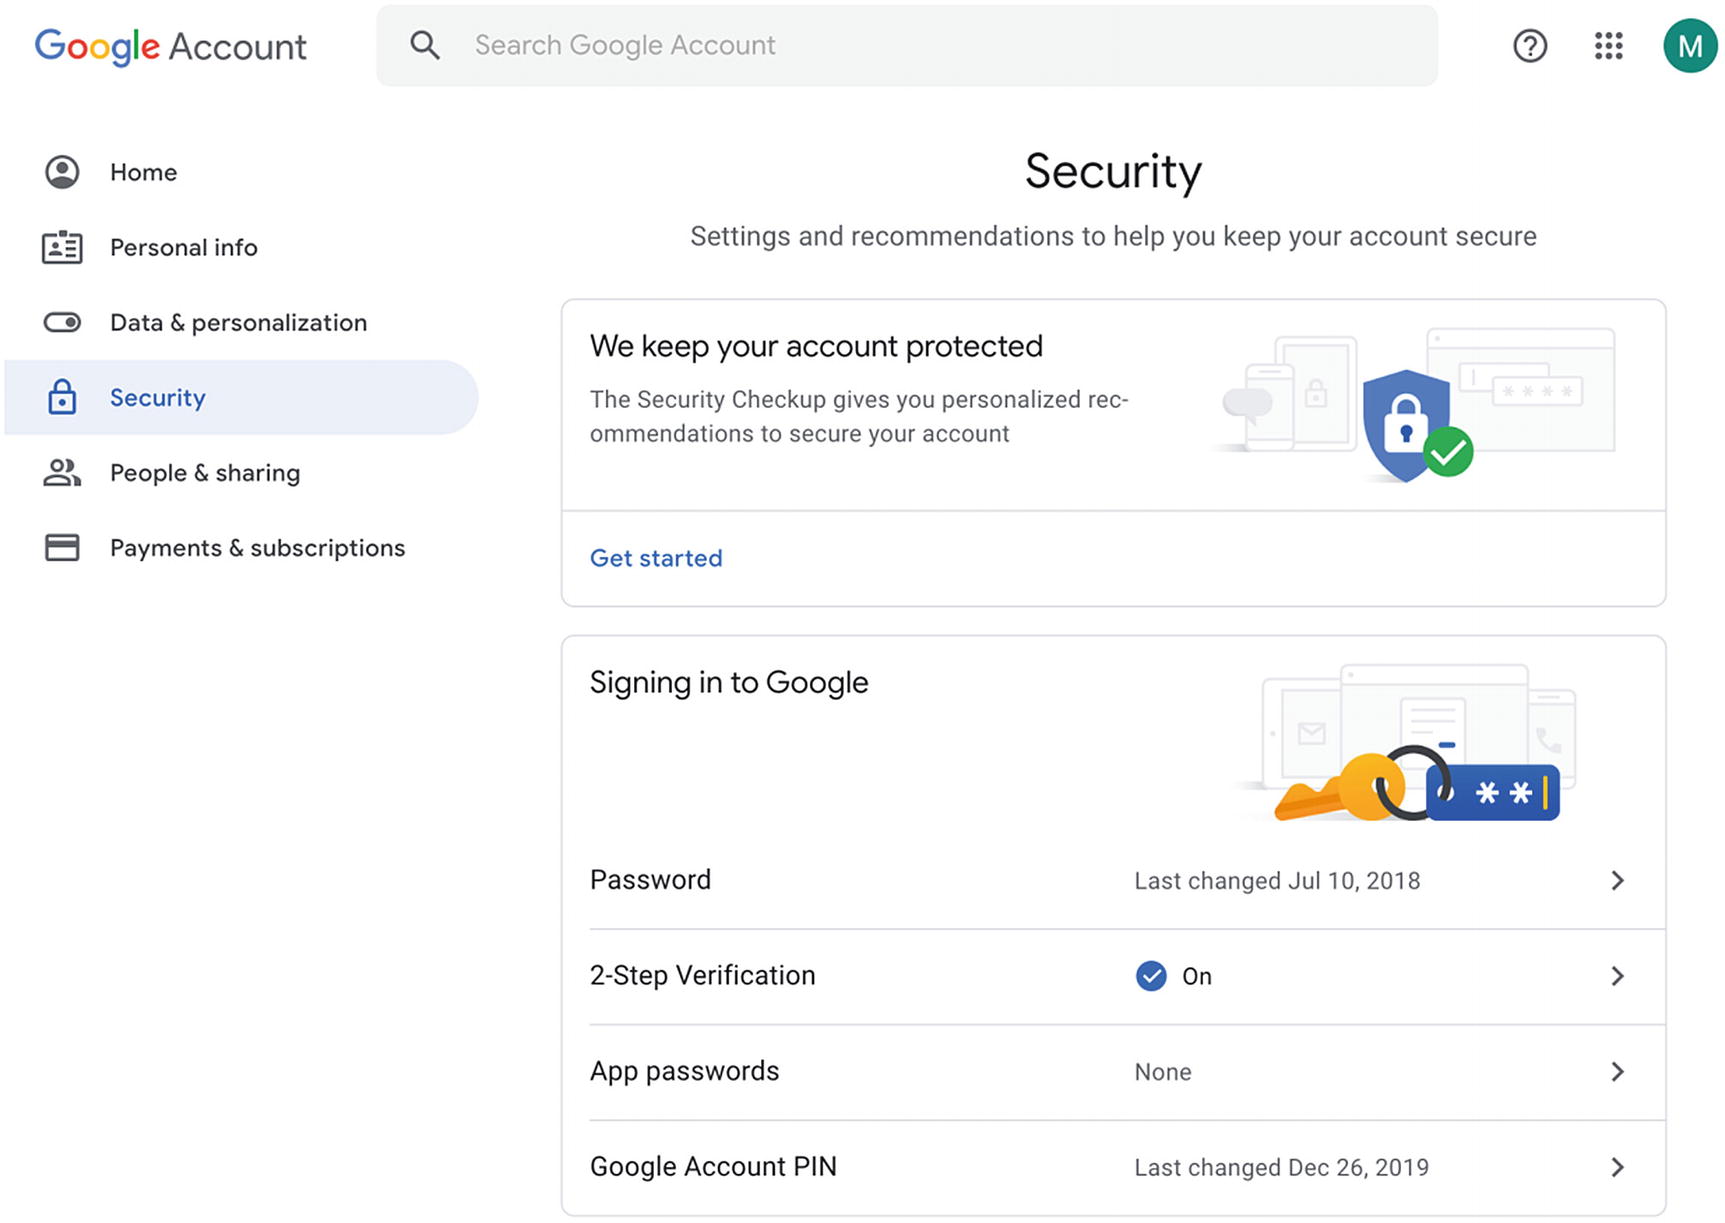
Google Cloud Security Checkup and Security Settings
Click the “Security Checkup” and follow the on-screen instructions to address any findings.
Return to the “Security” section and click the “2-Step Verification” button. You will see options to enable voice calls, SMSs, authenticator apps (i.e., virtual MFA device), and security keys (which is like a physical MFA device)10 to enable MFA. Follow the on-screen instructions to enable all or some of the MFA options.
Key Takeaways
We extended the permissions model concepts from Chapter 6 by leveraging multiple provider accounts. We proposed using one account per development stage, thus separating and isolating the resources. This approach allows us to leverage the permissions model with the added protection of having different accounts to access its resources.
We concluded by reviewing the general principles to protect our account. We covered having basic security hygiene, such as using strong passwords and enabling multi-factor authentication, to minimize the risk of an unwanted party logging in to our provider account. Additionally, we explored updating contact information and using group email addresses to assist in password recovery situations.
Although this chapter is not specific to implementing and using the Serverless Framework and serverless technologies, protecting your provider account is still an essential aspect of keeping your serverless application secure. The remaining chapters will focus more on protecting the provider infrastructure to ensure the overall serverless application is more secure and has less risk.