© Satheesh Pv 2021
S. PvBeginning Unreal Engine 4 Blueprints Visual Scriptinghttps://doi.org/10.1007/978-1-4842-6396-9_7

7. Demo Game

Satheesh Pv1  
(1)
Mumbai, India
 

In this final chapter, you create a demo game using the default First Person Shooter Template (Blueprint version) that comes with Unreal Engine (Launcher version) and extend it to include various features, such as ammo count, ammo pickup, and so forth. After the features are done, you learn how to package the game for Windows.

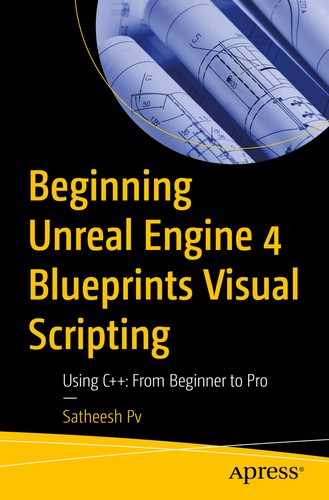
Creating the Project

Let’s start by creating a project using the First Person Template. Open Epic Games Launcher and click the big yellow Launch button in the top-right corner. This starts Unreal Engine, and soon, you are greeted with the Unreal Project Browser window (see Figure 7-1).
../images/496849_1_En_7_Chapter/496849_1_En_7_Fig1_HTML.jpg
Figure 7-1

.Unreal Project Browser 

Select Games and click Next. From the template selection screen, select the First Person template and click Next (see Figure 7-2).
../images/496849_1_En_7_Chapter/496849_1_En_7_Fig2_HTML.jpg
Figure 7-2.

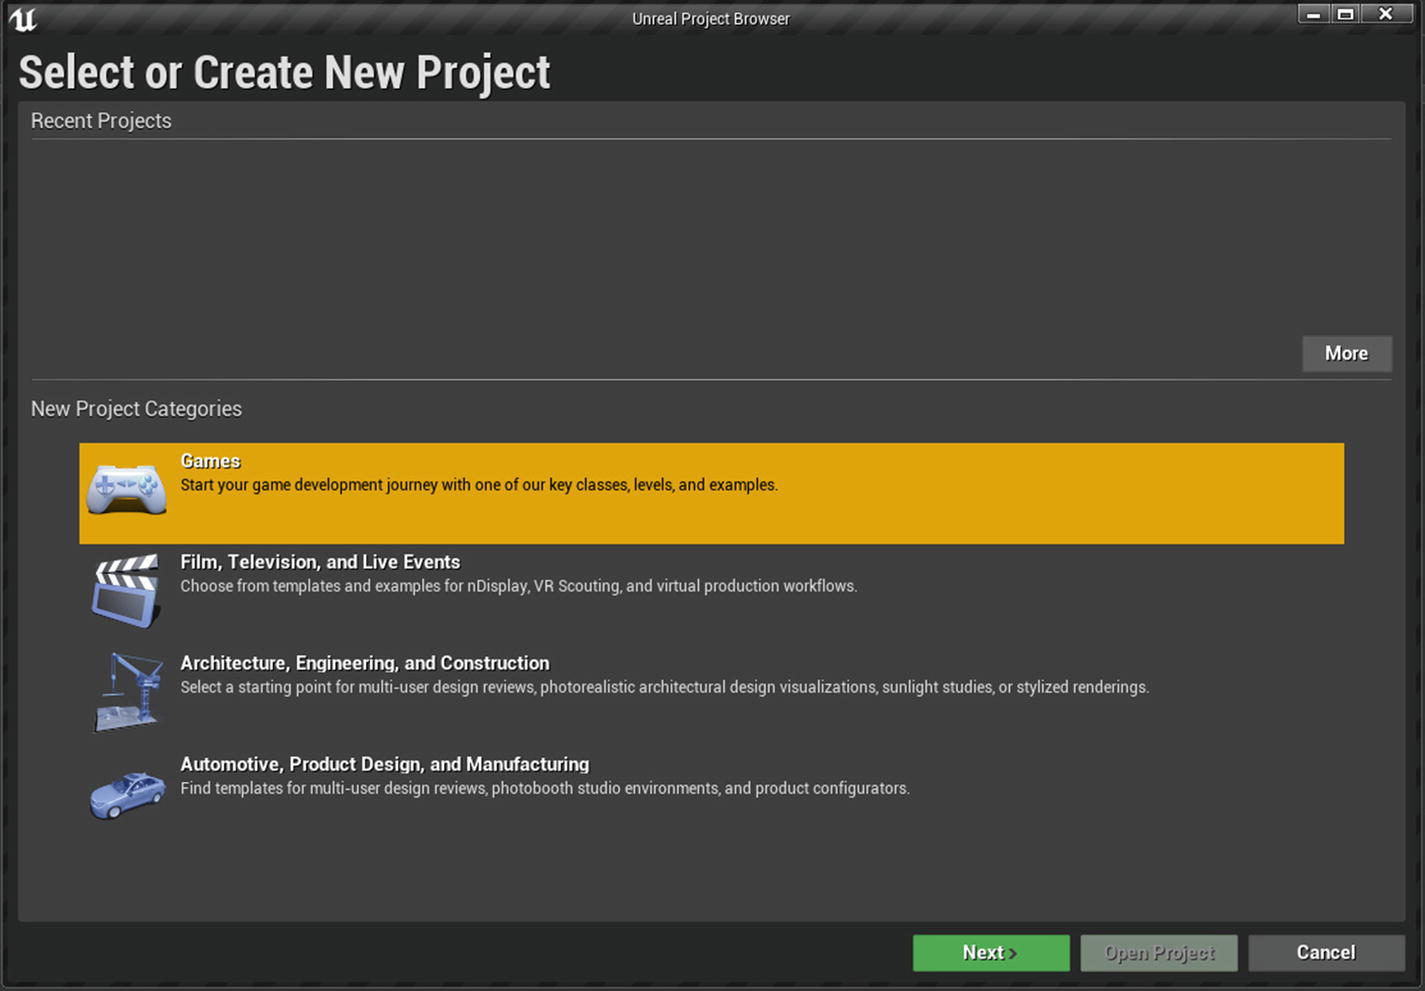
Select First Person Template

In the Project Settings page, you set the initial settings for your project and the type (Blueprint or C++). Start with a C++ project and create Blueprints. Choose C++, set a location, name your project, and click Create Project. It’s important to remember that the files are named in this context: <ProjectName><ClassType>.h. In this example, I named the project Chapter07, so my files are named based on that—for example, Chapter07Character, Chapter07GameMode and so on (see Figure 7-3).
../images/496849_1_En_7_Chapter/496849_1_En_7_Fig3_HTML.jpg
Figure 7-3.

Choose C++ project type

Once the project is created, Visual Studio automatically opens with the project’s solution file. Unreal Editor also starts. Press the Play button (or Alt+P) on the toolbar to test the FPS template. While playing, use the W key to move forward, S to move back, A to strafe left, D to strafe right, the mouse to look around, and left mouse button to shoot projectiles. The template also includes basic physics simulation, so that when you shoot any of the white boxes, it tumbles around (see Figure 7-4).
../images/496849_1_En_7_Chapter/496849_1_En_7_Fig4_HTML.jpg
Figure 7-4.

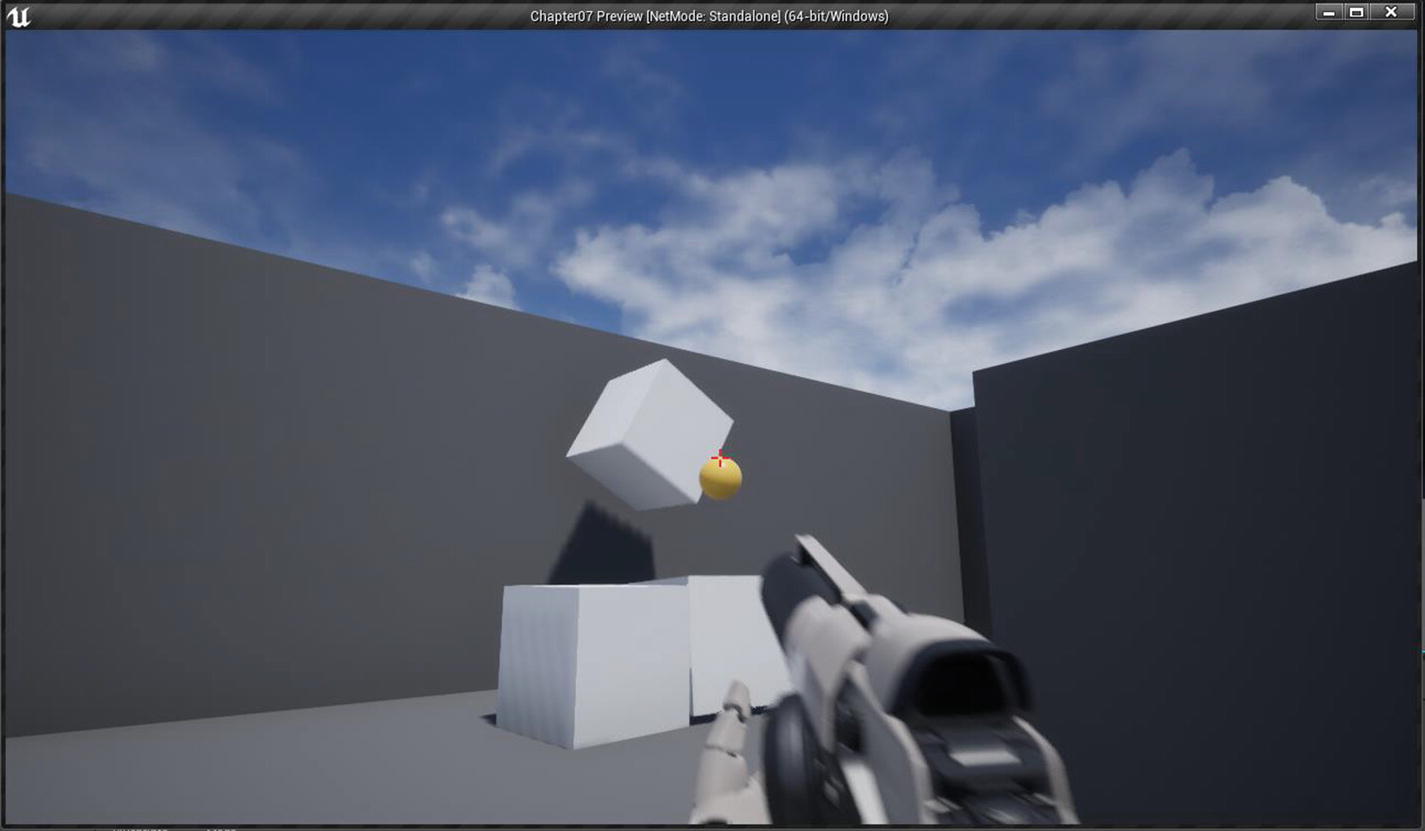
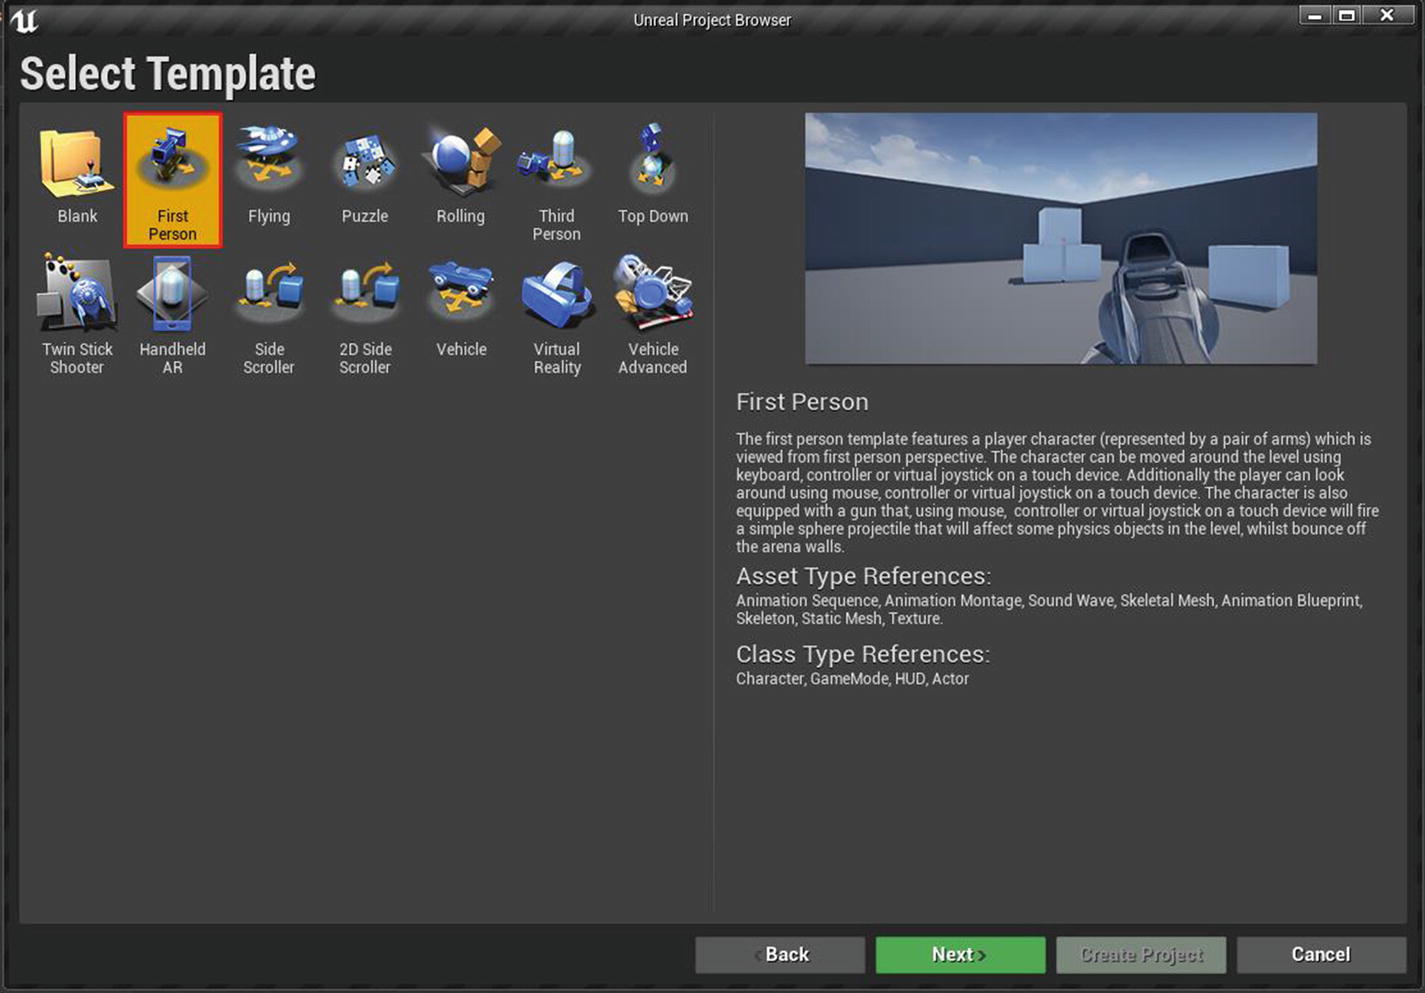
Physics enabled boxes

Ammo Setup

As you may have noticed, you can shoot the projectiles as much as you want. We need to change this. We need settings for the number of clips the weapon can have and the amount of ammo per clip. For example, if this weapon has 3 clips and 20 rounds of ammo per clip, then the maximum amount of ammo this weapon can have is 3 * 20 = 60. Every time you shoot 20 rounds of ammo, each clip is depleted. There is a two-second timeout before shooting the next clip. In a real project, this timeout is replaced by a reload animation. We will use variables to define the values so you can adjust everything without having to worry about the inner workings.

To have ammo functionality, open the Chapter07Character.h Header file. The following variables are created under GENERATED_BODY() macro.
  • Max Clips (integer): The maximum number of clips the weapon can have. Default 5.

  • Starting Clips (integer): The number of clips the weapon has when the game starts. This should never be greater than Max Clips. Default 3.

  • Ammo Per Clip (integer): The amount of ammo per clip. Default 20.

  • Current Clips (integer): The number of clips the weapon currently has. Every time the weapon reloads, subtract this variable by one to denote that the clip has been used. Default 0.

  • Current Ammo (integer): The amount of ammo the weapon currently has. Every time you shoot, subtract this variable by one to denote that you fired one bullet. Default 0.

  • bCanShoot (boolean): True or false variable that determines if you can shoot or not. Default false.

  • ReloadTime: Time in seconds for the weapon to reload when all bullets have fired. Default 2.

Since you want them to be exposed to the Editor, mark them as UPROPERTY. The following is the code for the variables. Note the usage of BlueprintReadOnly and BlueprintReadWrite.
/* Maximum amount of clips this weapon is allowed to have.  */
     UPROPERTY(EditDefaultsOnly, BlueprintReadOnly)
     int32 MaxClips;
     /* Amount of clips for the weapon to have when the game starts. This should never be greater than Max Clips. */
     UPROPERTY(EditDefaultsOnly, BlueprintReadWrite)
     int32 StartingClips;
      /* Amount of ammo per clip. */
     UPROPERTY(EditDefaultsOnly, BlueprintReadOnly)
     int32 AmmoPerClip;
     /* True or false variable that determines if you can shoot or not. */
     UPROPERTY(EditDefaultsOnly, BlueprintReadWrite)
     bool bCanShoot;
     /* Time in seconds for the weapon to reload when all bullets are fired. */
     UPROPERTY(EditDefaultsOnly, BlueprintReadOnly)
     float ReloadTime;
     /* Amount of clips this weapon currently has. Every time the weapon reloads, you subtract this variable by one to denote that the clip has been used. */
     UPROPERTY(BlueprintReadWrite)
     int32 CurrentClips;
     /* Amount of ammo this weapon currently has. Every time you shoot, you subtract this variable by one to denote that you fired one bullet. */
     UPROPERTY(BlueprintReadWrite)
     int32 CurrentAmmo;
After setting up the variables, let’s create our initial logic in the Construction Script graph. Before that, you must assign default values to these variables; otherwise, they are 0 and false. Open Chapter07Character.cpp. At the top of the file (around line 20), you see the AChapter07Character constructor (e.g., AChapter07Character::AChapter07Character()). Inside this block, assign the default variables as follows.
MaxClips = 5;
StartingClips = 3;
AmmoPerClip = 20;
CurrentClips = 0;
CurrentAmmo = 0;
bCanShoot = false;
ReloadTime = 2.f;

Press F5 to compile and start the project from Visual Studio. After the Editor has started, open FirstPersonCharacter Blueprint and the Construction Script graph.

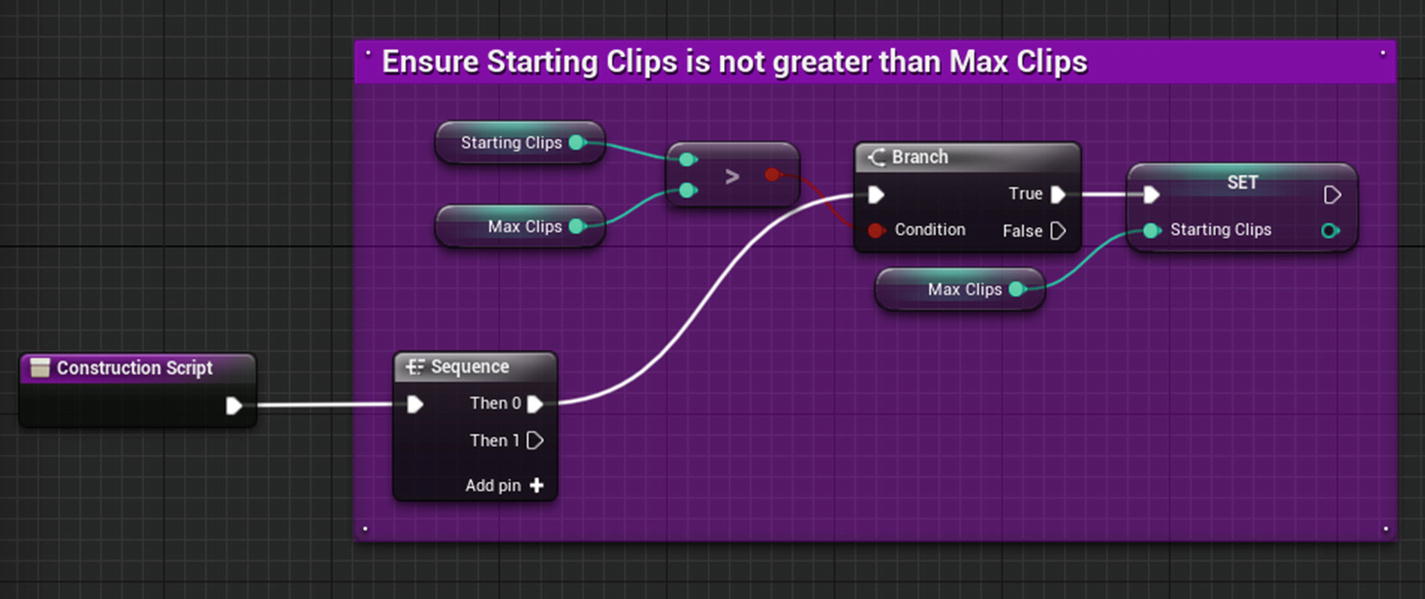
Drag a wire from Construction Script’s output pin, search for Sequence node, and add it. The Sequence node is a special Blueprint node that allows you to run multiple outputs (you can add as many outputs as you want) from top to bottom. Add a Branch node and connect the first output of the Sequence node (with the label Then 0) to the Branch node.

You need to use the Branch node condition to ensure that Starting Clips is not greater than Max Clips. Drag and drop both Starting Clips and Max Clips from the My Blueprints tab to the Construction Script graph. Drag a pin from Starting Clips, search for the > symbol, and select integer > integer node (Starting Clips is now automatically connected to the first input of the > node). This node returns true if the first input is greater than the second input, so connect Max Clips to the second input of > (greater than) node and connect the red output to the Condition input of the Branch node.

To set the value for the Starting Clip node, press and hold the Alt key on your keyboard, and then drag and drop the Starting Clip node again from the Blueprints tab to the Construction Script graph. This creates the Set node for Starting Clips. Connect the True output of the Branch node to the Set node. Connect Max Clips as the new input for the Set Starting Clip node. The graph should like Figure 7-5.
../images/496849_1_En_7_Chapter/496849_1_En_7_Fig5_HTML.jpg
Figure 7-5.

Ammo setup. Setting starting clips

The second step is to set the current ammo for this weapon. You need to set current ammo only if you have at least one clip to start with. So you first set Current Clips to Starting Clips and then check if Current Clips is greater than 0. If it is, then you set the Current Ammo to the same value as Ammo Per Clip. If Current Clips is 0, then Current Ammo is also 0. The second step of the graph should look like Figure 7-6.
../images/496849_1_En_7_Chapter/496849_1_En_7_Fig6_HTML.jpg
Figure 7-6.

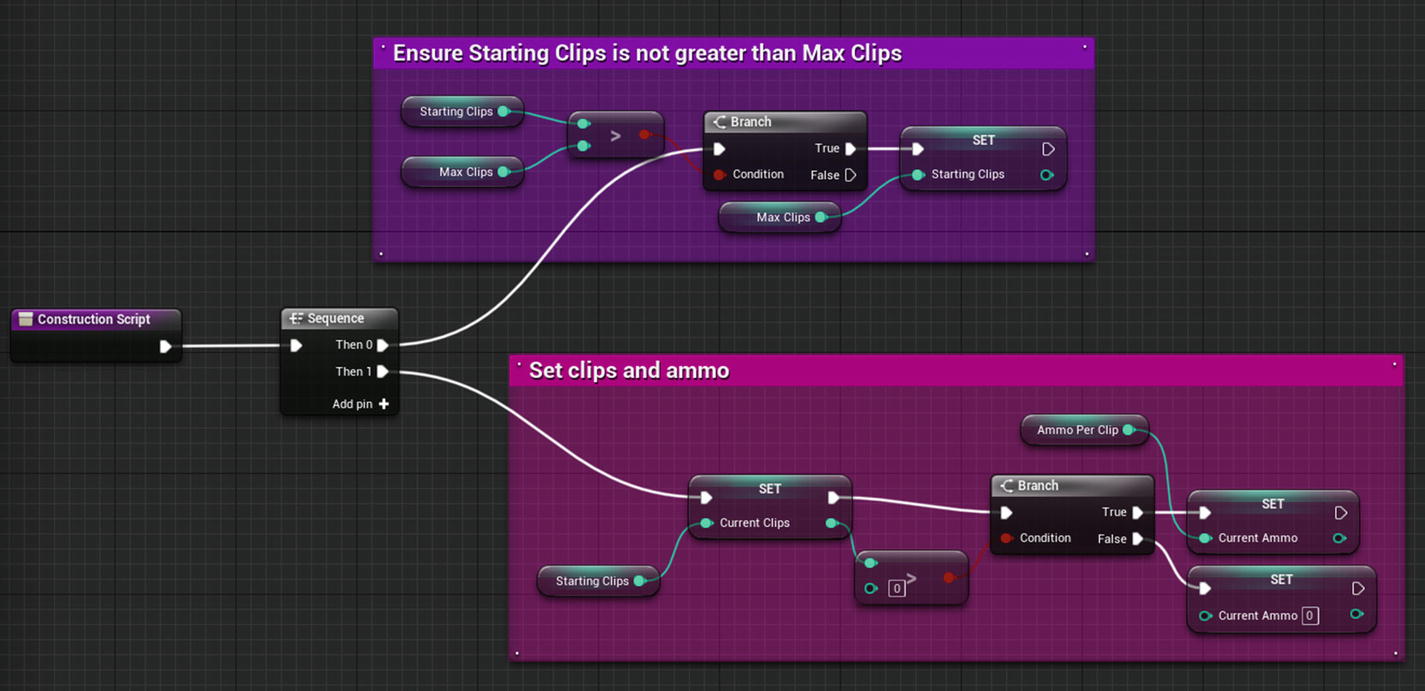
Ammo setup. Setting current ammo

The last step in the Construction Graph is to determine if you can shoot or not. Create the following nodes.
  1. 1.

    Set node for the Can Shoot boolean variable.

     
  2. 2.

    Get the node for Current Ammo.

     
  3. 3.

    Greater than integer node (Integer > integer).

     
Connect the Current Ammo node to the first input of the > node, and connect the red output of the > node to the Set Can Shoot node. The final graph should look like Figure 7-7.
../images/496849_1_En_7_Chapter/496849_1_En_7_Fig7_HTML.jpg
Figure 7-7.

Setting if we can shoot

You have now defined a basic logic for ammo and clips, so it’s time to make use of them.

Since this is done in Blueprint, let’s make a function that is called on Blueprint Graph whenever the player shoots a bullet. To create the function, first open Chapter07Character.h and add the following function.
/* Event called whenever the player shoots. */
UFUNCTION(BlueprintImplementableEvent, Category = "Chapter 07 Character")
void OnFireEvent();
Then open Chapter07Character.cpp and find the OnFire() function (it should be around line 140). Inside this function, add a new if condition that will only proceed if bCanShoot is true. Then inside the if condition at the end, call our OnFireEvent Blueprint Event that was added before. The following is the full code for the modified OnFire function.
void AChapter07Character::OnFire()
{
     // See if you can shoot first.
     if (bCanShoot)
     {
          // try and fire a projectile
          if (ProjectileClass != NULL)
          {
               UWorld* const World = GetWorld();
               if (World != NULL)
               {
                    if (bUsingMotionControllers)
                    {
                         const FRotator SpawnRotation = VR_MuzzleLocation->GetComponentRotation();
                         const FVector SpawnLocation = VR_MuzzleLocation->GetComponentLocation();
                         World->SpawnActor<AChapter07Projectile>(ProjectileClass, SpawnLocation, SpawnRotation);
                    }
                    Else
                    {
                         const FRotator SpawnRotation = GetControlRotation();
                         // MuzzleOffset is in camera space, so transform it to world space before offsetting from the character location to find the final muzzle position
                         const FVector SpawnLocation = ((FP_MuzzleLocation != nullptr) ? FP_MuzzleLocation->GetComponentLocation() : GetActorLocation()) + SpawnRotation.RotateVector(GunOffset);
                         //Set Spawn Collision Handling Override
                         FActorSpawnParameters ActorSpawnParams;
                         ActorSpawnParams.SpawnCollisionHandlingOverride = ESpawnActorCollisionHandlingMethod::AdjustIfPossibleButDontSpawnIfColliding;
                         // spawn the projectile at the muzzle
                         World->SpawnActor<AChapter07Projectile>(ProjectileClass, SpawnLocation, SpawnRotation, ActorSpawnParams);
                    }
               }
          }
          // try and play the sound if specified
          if (FireSound != NULL)
          {
               UGameplayStatics::PlaySoundAtLocation(this, FireSound, GetActorLocation());
          }
          // try and play a firing animation if specified
          if (FireAnimation != NULL)
          {
               // Get the animation object for the arms mesh
               UAnimInstance* AnimInstance = Mesh1P->GetAnimInstance();
               if (AnimInstance != NULL)
               {
                    AnimInstance->Montage_Play(FireAnimation, 1.f);
               }
          }
          // Call the Blueprint event.
          OnFireEvent();
     }
}
Press F5 to compile and start the project from Visual Studio. Once the editor is started, open our FirstPersonCharacter Blueprint. Inside the Event Graph, right-click and search for On Fire Event. You can see the event that you declared in C++ is now accessible inside the Blueprint Graph (see Figure 7-8).
../images/496849_1_En_7_Chapter/496849_1_En_7_Fig8_HTML.jpg
Figure 7-8.

Add C++ event in Blueprint

Select it and right-click again in the graph, search for Get Current Ammo and select it. Drag a wire from the Current Ammo and search for Decrement Int and select it. This macro node takes an integer, subtracts it by 1, sets the value, and returns it, so the output pin contains the result of Current Ammo – 1.

If the output node of Decrement Int is not 0, don’t do anything because the player can fire again. If it is 0, it means you ran out of ammo. To compare the results, right-click the graph, search for Compare Int, and add it. Then connect the Decrement Int node’s output to the first input (with label Input) of Compare Int.

This is also a macro that has three output nodes and two input nodes. The first input node is the value to compare, and the second input is the value to compare with. If the first input value is greater than the second input, the first output triggers. If the first input is the same as the second input, then the second output is triggered. If the first input is less than the second input, the third output is triggered.

In our case, you are interested in the second output (with label ==) so set the input named Compare With to 0. Right-click the graph and search for Set Can Shoot. Add it to the graph and set it to false. Connect the second output of Compare Int (with label ==) to Set Can Shoot node. If the player tries to shoot now, nothing happens because you just told the weapon that it can’t shoot once the current ammo is 0 (see Figure 7-9).
../images/496849_1_En_7_Chapter/496849_1_En_7_Fig9_HTML.jpg
Figure 7-9.

Updating Current Ammo and Can Shoot variables

This is where you add the reload logic. Right-click the graph, search for Set Timer By Event, and select it. This node can trigger a given event after a set time, which is the reload time. The event is the reload event. Right-click the graph, search for Get Reload Time and select it. Connect it to the Time input of the Set Timer node. Then drag a wire from the red input of Event input of the Set Timer node and select Custom Event from the Add Event section (see Figure 7-10).
../images/496849_1_En_7_Chapter/496849_1_En_7_Fig10_HTML.jpg
Figure 7-10.

Adding event to Timer

After the event is selected, rename it Reload (or any name you like) and connect the Can Shoot variable to the Set Timer By Event node (see Figure 7-11).
../images/496849_1_En_7_Chapter/496849_1_En_7_Fig11_HTML.jpg
Figure 7-11.

Rename event to reload

The Reload event is simple. In a nutshell, it is what is going to happen.
  1. 1.

    Check if you have any clips left. If you have a clip, then decrement it by one and set Current Ammo to Ammo per clip.

     
  2. 2.

    Enable or disable the Can Shoot variable based on Current Ammo (see Figure 7-12).

     
../images/496849_1_En_7_Chapter/496849_1_En_7_Fig12_HTML.jpg
Figure 7-12.

Updating Can Shoot variable

With the reload event done, you have finished our ammo setup. If you go back to viewport, press play, and start firing, you eventually run out of ammo, and it automatically reloads after 2 seconds. Once you run completely out of clips, you won’t be able to shoot the gun anymore.

From here, you move forward to implement a HUD and a pickup item. First, you create a basic HUD using Unreal Motion Graphics (UMG), which displays the amount of ammo you have. Then you move on to create an ammo pickup item that replenishes ammo.

Head over to the Content Browser, right-click and select Widget Blueprint from the User Interface category. You are prompted to rename the Blueprint. Let’s call it WBP_PlayerHUD (WBP is a short form of Widget BluePrint). Open it, and add a text block from the Common category in the bottom-right corner of the designer (see Figure 7-13).
../images/496849_1_En_7_Chapter/496849_1_En_7_Fig13_HTML.jpg
Figure 7-13.

Adding Text Block in UMG Designer

Keep the text block selected. In the Details panel, set the name to AmmoText (or anything you want) and make sure Is Variable is selected (see Figure 7-14).
../images/496849_1_En_7_Chapter/496849_1_En_7_Fig14_HTML.jpg
Figure 7-14.

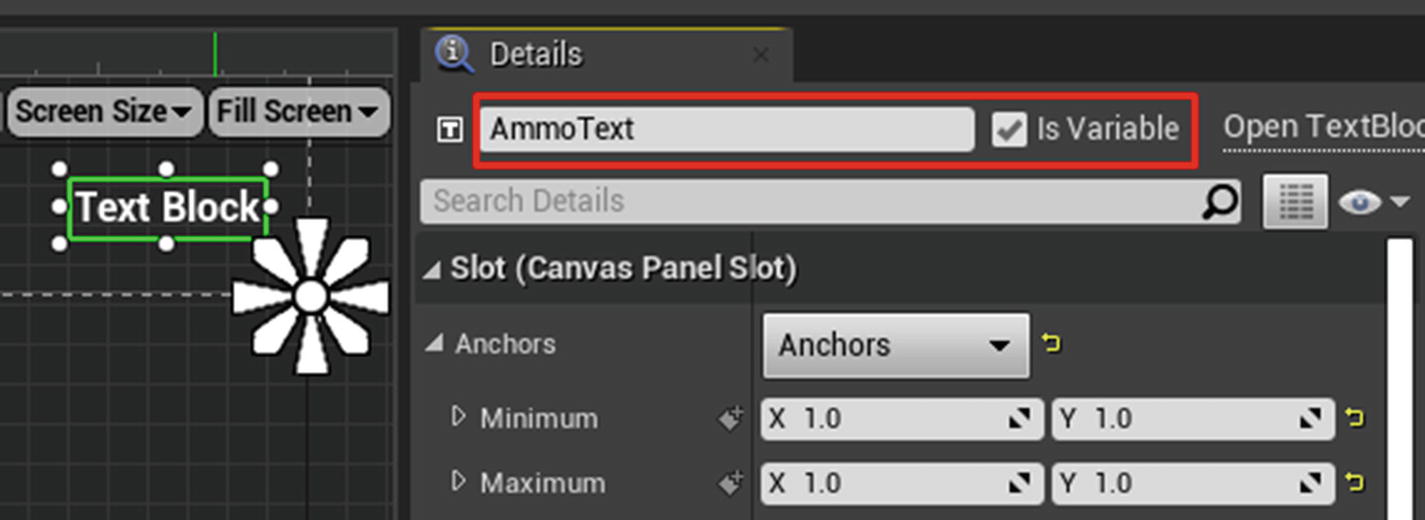
Setting Ammo Text as variable

It is important to set Is Variable to true; otherwise, you can’t access it in the Event Graph. You can also expand the Anchors section and set Minimum and Maximum to 1. Now you can switch to the Graph tab (top-right corner) and create a new custom event by right-clicking inside the graph and selecting Add Custom Event… under the Add Event category. You call this new event UpdateAmmo and add two integer parameters. The first input is called CurrentAmmo, and the second input is called TotalAmmo. Since you enable Is Variable for AmmoText in the Designer tab, you can now drag and drop a reference to our text block from the My Blueprint tab. Drag a wire from the Ammo Text node and search for set text and select it. This node takes a Text input, so you create a formatted text using a special node. Right-click inside the graph, search for Format Text, and select that node. This node helps to build formatted text using curly braces {}.

Inside the Format input of the Format Text node, type {Current}/{Total} and press Enter. The node now updates itself with two new gray input (a.k.a. wildcard) called Current and Total, which can directly accept any node (see Figure 7-15).
../images/496849_1_En_7_Chapter/496849_1_En_7_Fig15_HTML.jpg
Figure 7-15.

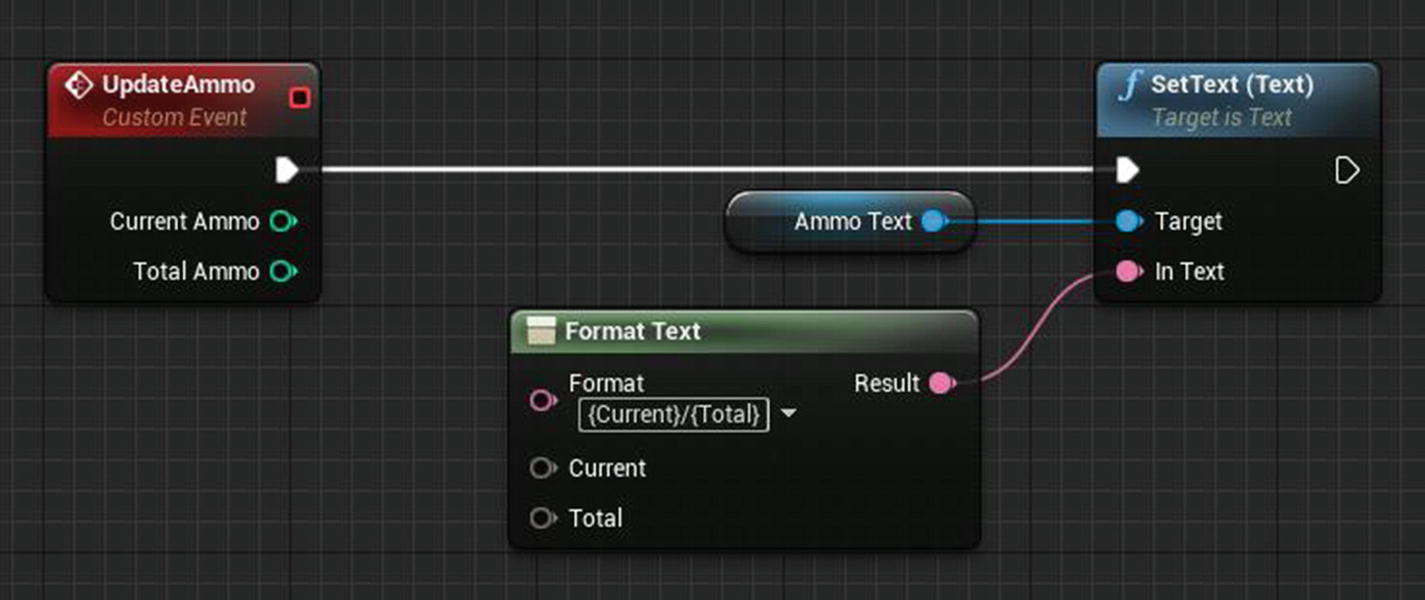
Setting Text using Format Text node

Connect the current ammo of the UpdateAmmo event to the Current gray input and connect the Total Ammo of UpdateAmmo event to the Total gray input (see Figure 7-16).
../images/496849_1_En_7_Chapter/496849_1_En_7_Fig16_HTML.jpg
Figure 7-16.

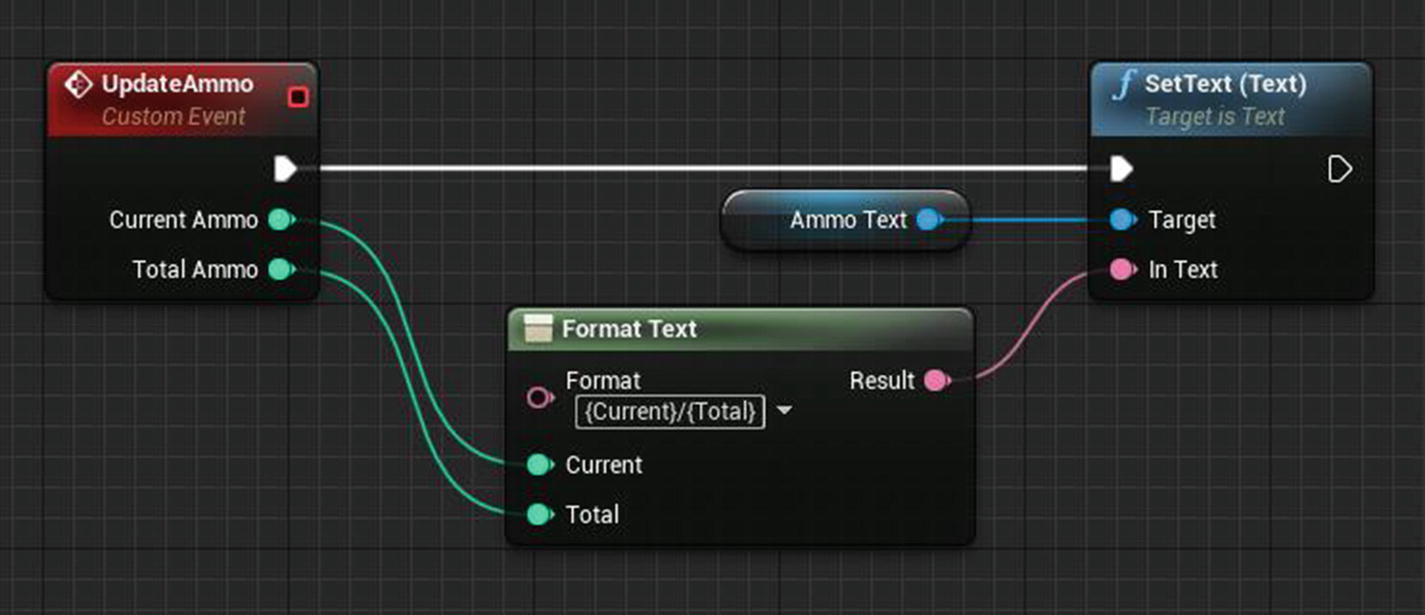
After connecting to Format Text

Now all that is left is to call this event from our First Person Character Blueprint class. To do that, you first need to create this HUD in that class. Open the FirstPersonCharacter Blueprint class and find the Event BeginPlay node. This node is automatically called when the game starts for this actor.

If you are not using VR (virtual reality ), feel free to delete all the nodes connected to Event BeginPlay (for this tutorial, I’ll delete them since VR is not our focus). Right-click the graph, search for Create Widget, and select that node. This node creates a widget based on the class input, so click the Select class button (purple input) and select our previously created WBP_PlayerHUD class. Right-click the Return Value output of Create Widget node and select Promote to Variable. This is because you want to access this later when ammo is changed. To add this widget to the screen, drag a wire from the PlayerHUD node’s output, search for Add to Viewport, and select it (see Figure 7-17).
../images/496849_1_En_7_Chapter/496849_1_En_7_Fig17_HTML.jpg
Figure 7-17.

Add Player HUD to viewport

If you press Play (Alt+P) now, you can see the default text block (the one created in UMG designer) on the screen (see Figure 7-18).
../images/496849_1_En_7_Chapter/496849_1_En_7_Fig18_HTML.jpg
Figure 7-18.

Game screen with Player HUD added

Since you have to update the ammo whenever the game starts, you need to call the Update Ammo event in multiple places when you shoot and after reload. It’s better to create a function, so from the My Blueprint tab, create a new function and name it UpdateAmmo. Open this function graph, and drag and drop the PlayerHUD (select Get PlayerHUD in the context menu) variable into this graph. Drag a wire from the PlayerHUD variable and search for Update Ammo and select it. You made two inputs for that, so for the first input, connect the Current Ammo variable. For the second input, you need the total ammo.

Remember, at the beginning of this chapter, I showed you how to get total ammo count using the number of clips and Ammo per Clip. To get the total ammo, first drag and drop Current Clips into the graph. From this Current Clips node, drag a wire, search for multiply node, and select integer * integer. Now drag and drop Ammo Per Clip into the graph and connect it as the second input to the multiply node, and connect the multiply node to the second input of Update Ammo node (see Figure 7-19).
../images/496849_1_En_7_Chapter/496849_1_En_7_Fig19_HTML.jpg
Figure 7-19.

Updating Ammo in Player HUD

Now the only thing that remains is to call the function. You can drag and drop the function from the My Blueprints tab to the Event Graph. The first location where you call this function is at the end of the Begin Play execution chain (see Figure 7-20).
../images/496849_1_En_7_Chapter/496849_1_En_7_Fig20_HTML.jpg
Figure 7-20.

Calling Update Ammo function after Begin Play

The second location is right after reducing the Current Ammo count in the InputAction Fire node (see Figure 7-21).
../images/496849_1_En_7_Chapter/496849_1_En_7_Fig21_HTML.jpg
Figure 7-21.

Calling Update Ammo after firing weapon

The third location is inside the Reload event. After setting the Can Shoot variable, call the Update Ammo function (see Figure 7-22).
../images/496849_1_En_7_Chapter/496849_1_En_7_Fig22_HTML.jpg
Figure 7-22.

Calling Update Ammo after Reloading

If you press Play (Alt+P) now and shoot, you can see the ammo count updated correctly (see Figure 7-23).
../images/496849_1_En_7_Chapter/496849_1_En_7_Fig23_HTML.jpg
Figure 7-23.

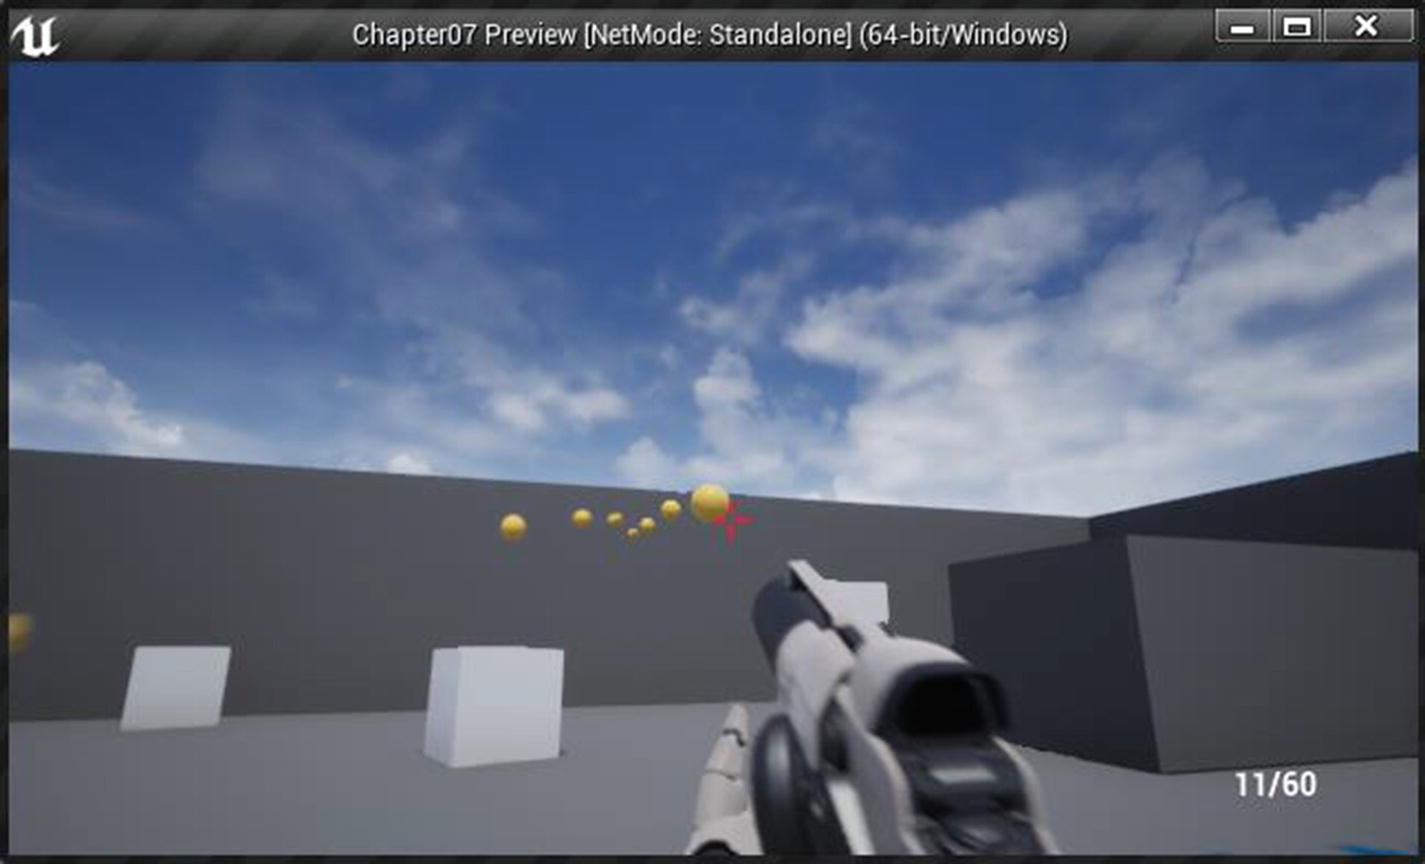
Ammo count updating on Player HUD

Ammo Pickup

In Chapter 5, you learned how to create input keys and use tracing to detect an item in front of us. As an exercise, I want you to recreate that setup but with two differences.
  1. 1.

    Instead of using MyItemTrace for the name, use ItemPickup.

     
  2. 2.

    Set the start location of the trace to the world location of Sphere Component. Add this location to the multiply node and then connect the result to the Line Trace node’s End input (see Figure 7-24).

     
../images/496849_1_En_7_Chapter/496849_1_En_7_Fig24_HTML.jpg
Figure 7-24.

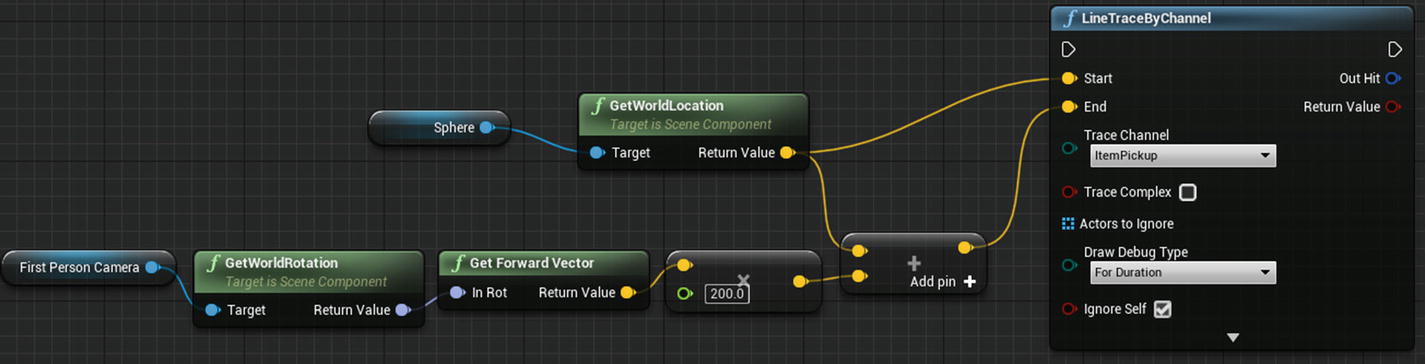
Updating end location of Line Trace

Right-click the graph, search for Input Action Trace, and select the Trace node. Connect the Trace node Pressed execution pin to the Line Trace By Channel node. You have the tracing setup done, for now, so let’s create our Replenish ammo function, which grants us a single clip.

Create a new function and call it ReplenishAmmo. This function has no inputs, but you create a boolean output, which determines if the ammo was successfully replenished. To create an output, select the function (either in My Blueprint tab or open function graph and select the purple node), and in the Details panel, click the plus button under the Outputs category. This creates a new Return node with a boolean output.

Rename the NewParam output to bReturnValue. This function is responsible for adding a new clip under Max Clips. First, drag and drop the Current Clips variable into the graph (select Get CurrentClips in the context menu). Drag a wire from this variable, search for less, and select integer < integer node. CurrentClips is now automatically connected to the first input of < node. Let’s drag and drop the MaxClips variable into the graph (select Get MaxClips in the context menu) and connect it to the second input of < node.
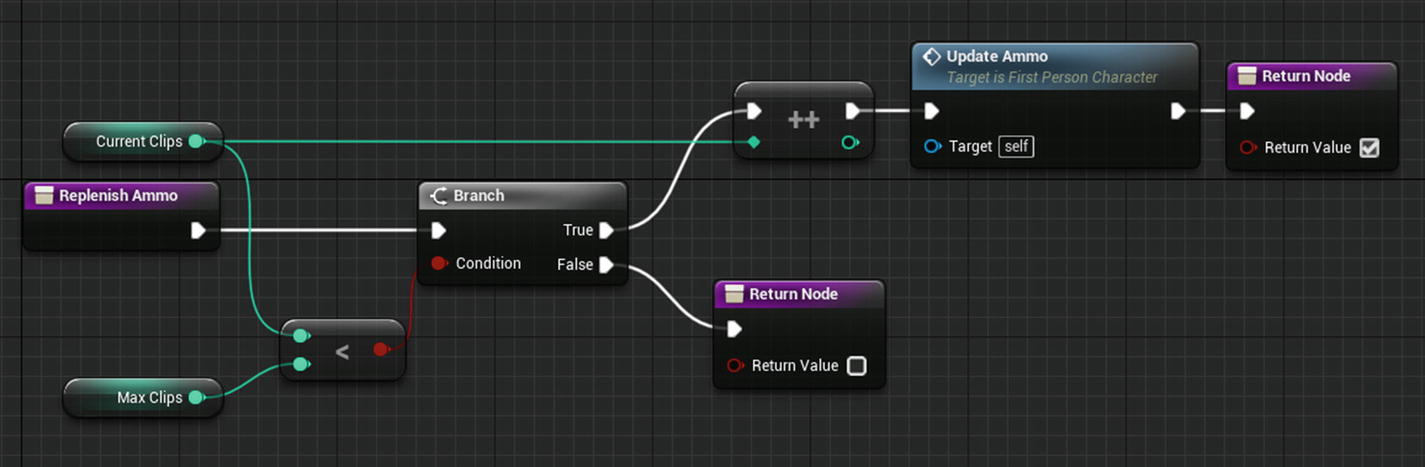
Create a Branch node and connect the output of < node to the Condition input of Branch input. If the current clips are less than max clips, the True output of the Branch node trigger drags a wire from Current Clips, search for Increment Int and select it. This is the same as Decrement Int except instead of subtracting by 1 this node add 1. Now drag and drop the Update Ammo function and connect it to the ++ node. After that, connect this to the Return node and make sure the return value is true. Right-click the graph, search for Add Return node and select it. Connect this to the Branch node’s False output and make sure it is set to False (see Figure 7-25).
../images/496849_1_En_7_Chapter/496849_1_En_7_Fig25_HTML.jpg
Figure 7-25.

Replenish Ammo

Go to Content Browser, create a new Blueprint class (Actor based), and call it BP_AmmoPickup. This is our class that grants the player a single ammo clip and destroys itself. Open our newly created actor (BP_AmmoPickup) and create a new custom event. Let’s call it GiveAmmo and add a new input to this event, set the type to FirstPersonCharacter, and name it Character.

This input is our FirstPersonCharacter, so drag a wire from this input, search for Replenish Ammo and select it. Create a Branch node and connect the output of Replenish Ammo to this Branch node. Then right-click the graph, search for DestroyActor and select it. Connect the True output from the Branch node to the DestroyActor, and you are finished with this class (see Figure 7-26).
../images/496849_1_En_7_Chapter/496849_1_En_7_Fig26_HTML.jpg
Figure 7-26.

Give Ammo event

Even though you have done our functions and events, you aren’t using any of it yet, so let’s fix that. Let’s go back to the tracing setup. Create a new Branch node and connect the Return Value of Line Trace node to the Condition input of the Branch node. You only want to continue if the trace hits something.

Drag a wire from the Out Hit node and select Break Hit Result. Expand the Hit Result node by clicking the arrow button and drag a wire from the Hit actor pin. Search for Cast to BP_AmmoPickup node and select it. This is a handy node that tries to convert the given Object input to the respective type and triggers the first output if successful or Cast Failed if the conversion has failed.

Drag a wire from the output node labeled As BP Ammo Pickup and search for Give Ammo, which was the event you created. Select it, and you can see that it requires an input that should be the First Person Character class. Since you use the trace inside the First Person Character, right-click the graph and search for self and select Get a reference to self. The Self node outputs a reference to an instance of this Blueprint, so connect it to the Give Ammo input (see Figure 7-27).
../images/496849_1_En_7_Chapter/496849_1_En_7_Fig27_HTML.jpg
Figure 7-27.

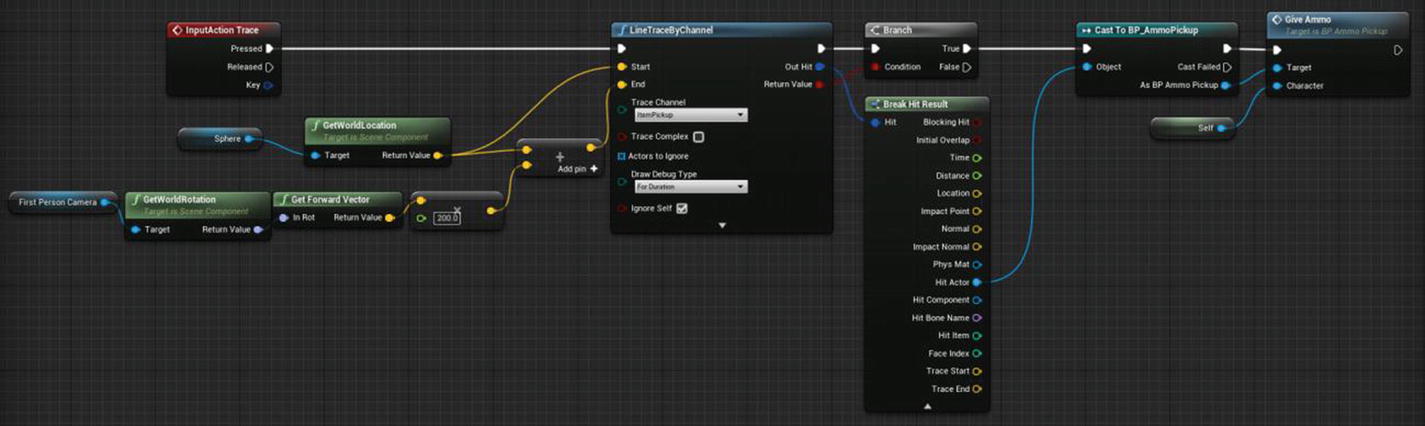
Giving ammo from line trace result

And you are done! Drag and drop the BP_AmmoPickup class into the game world and press Play (Alt+P). Keep shooting until you run out of ammo. And then go near an ammo pickup item in the world and press E to trace and pick up the item.

Package Game

The packaging game is a straightforward process. Packaging is the process of compiling and cooking the content in an optimized way for the target platform it is meant to run. When the packaging command is invoked, all the source code (if any) is compiled first. If the compilation is successful, then all the contents (Blueprints, Meshes, Textures, Materials, and so on) are converted (also known as cooking) into a special format that can be used by the target platform. Unreal Engine supports a wide variety of platforms, and from a Windows machine, you can compile and package for any platform except Apple Mac.

Each platform has its own settings that you can override. To do so, click Edit from the toolbar and select Project Settings (see Figure 7-28).
../images/496849_1_En_7_Chapter/496849_1_En_7_Fig28_HTML.jpg
Figure 7-28.

Accessing project settings
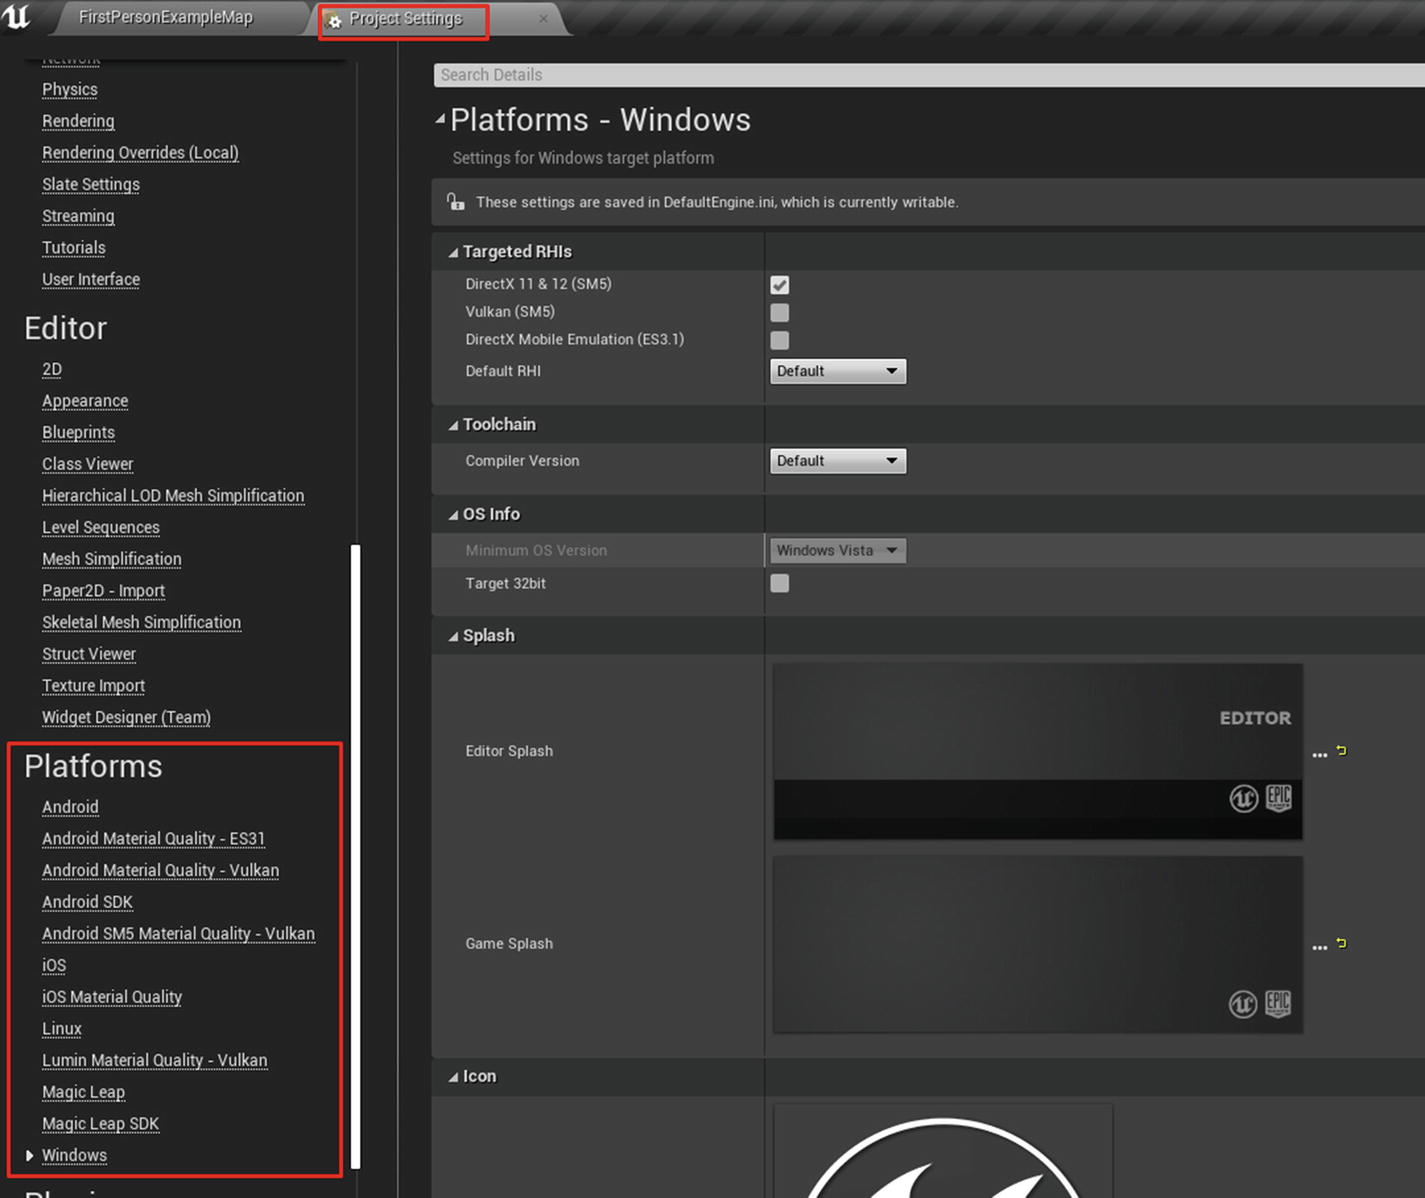
In Project Settings, on the right-side panel, scroll down until you reach the Platforms category. From this category, you can select your desired platform and override any settings (see Figure 7-29).
../images/496849_1_En_7_Chapter/496849_1_En_7_Fig29_HTML.jpg
Figure 7-29.

Platform category

To package your project, open Packaging Settings from File menu ➤ Package Project ➤ Packaging Settings (see Figure 7-30).
../images/496849_1_En_7_Chapter/496849_1_En_7_Fig30_HTML.jpg
Figure 7-30.

Accessing packaging settings

This opens the settings for packaging. In the settings window, under the Project category, switch the Build Configuration to Shipping and make sure the Full Rebuild and For Distribution checkboxes are turned on (see Figure 7-31).
../images/496849_1_En_7_Chapter/496849_1_En_7_Fig31_HTML.jpg
Figure 7-31.

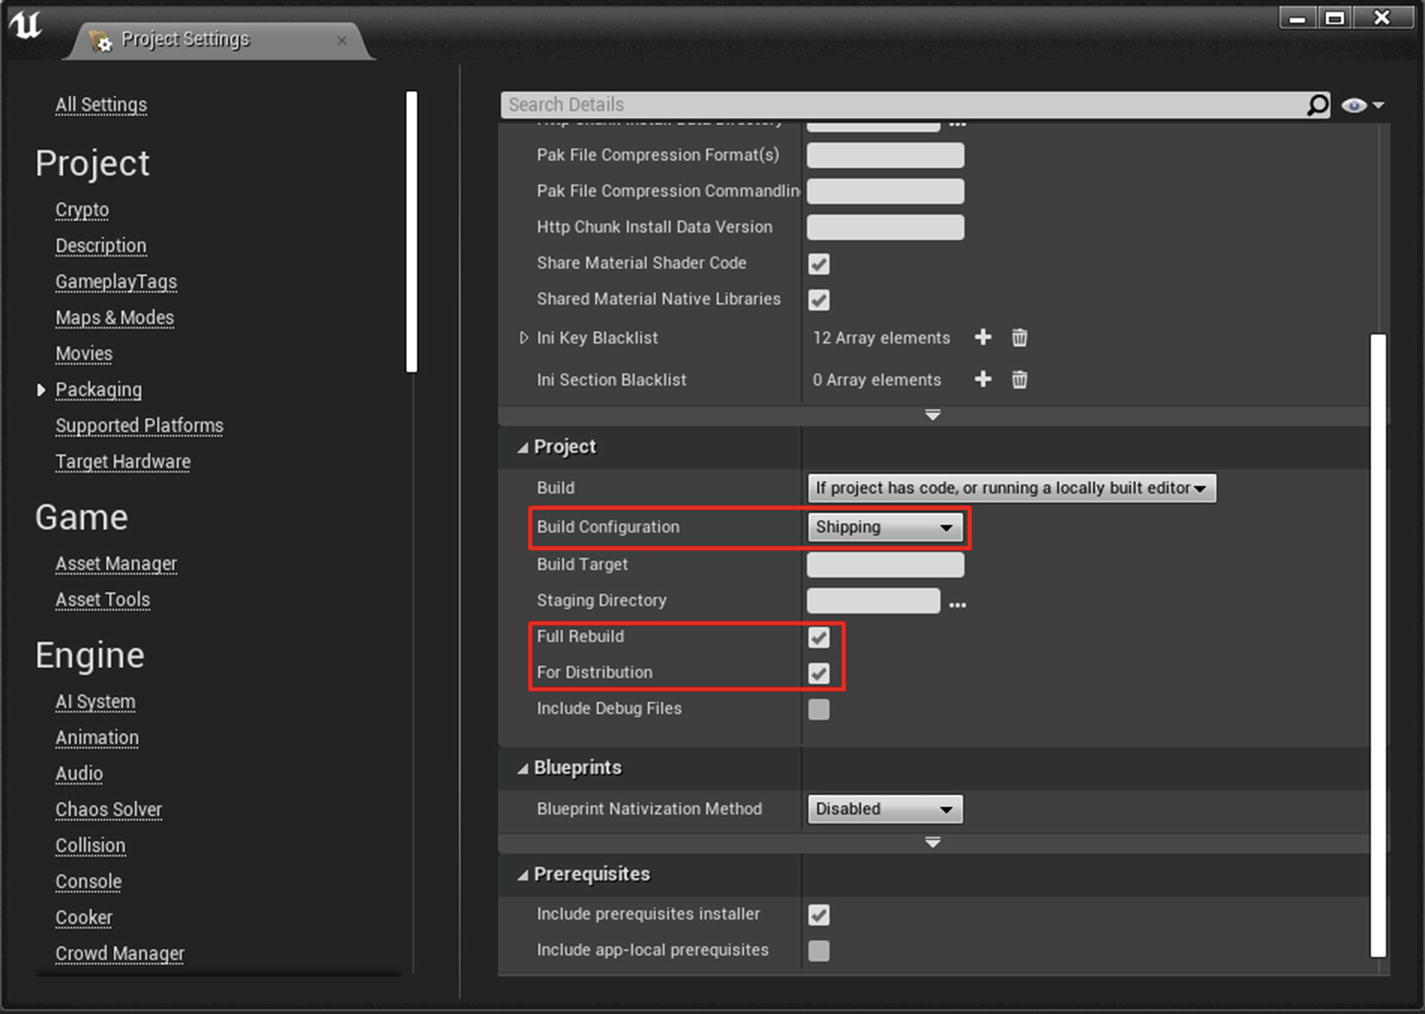
Selecting Shipping configuration

Once you verify these settings, click File Menu again and select Windows (64-bit) from the Package Project menu. If this is the first time, Unreal Engine now prompts you to choose a location to save the packaged build. Navigate to your desired location and click Select Folder. Unreal Engine now starts packaging your build, and you see a toast notification on the button right corner of your screen (see Figure 7-32).
../images/496849_1_En_7_Chapter/496849_1_En_7_Fig32_HTML.jpg
Figure 7-32.

Toast notification showing packaging for Windows

You can click the Show Output Log on the Toast notification to see the build process.

..................Content has been hidden....................

You can't read the all page of ebook, please click here login for view all page.
Reset
3.144.18.4