Solidity is all about building small and solid blocks.

An illustration of a pyramid with two camels and trees in the foreground.
This chapter describes the core objects available in Boozang and starts introducing the Integrated Development Environment (IDE) .
As we mentioned in the previous chapter, the project is the topmost Boozang entity to organize your work. Each project has its own team and permissions set. In a project, you can define Modules, Submodules, and Features. In a Module, you can define Tests and Test Suites. In a Feature you can define Scenarios whose steps are implemented via Tests. Let’s see each of these entities.
Modules and Submodules
Modules and Submodules are used to organize Tests and Test Suites.
A good approach is to create modules according to the application’s functionality.

A screenshot of a page with a highlighted cuboidal symbol on the left panel. It reads, creates a new project module, modules are containers for multiple tests.
Modules page
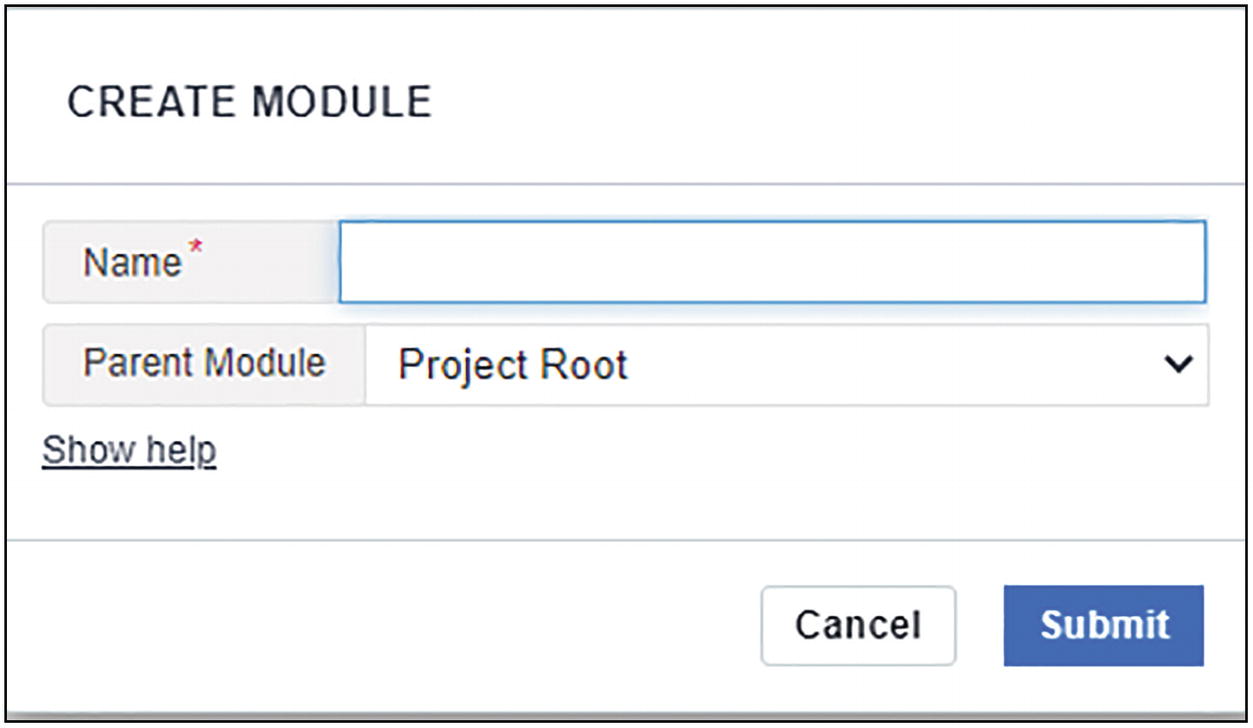
A screenshot of the create module page. It has a tab to enter the name and a drop-down menu for the parent module. The options to cancel and submit are present.
Creating a new module
The modules we created are application functionality like authorization, contacts, products, etc.
- 1.
The sections: Modules or Features, with the number of items inside
- 2.
Project and branch name (we will see how branches work in detail in section “Branching and Merging”)
- 3.
The list of modules with some metadata

A screenshot of the root project page has 3 sections labeled 1, 2, and 3. Section 1 reads modules, section 2 reads N I S, and section 3 has 5 modules.
Modules page
It is good practice, when testing multiple applications, to name your modules with the name of the application as prefix.

A screenshot of the module page has 2 highlighted sections. Section 1 has five entities, and the test entity is selected. Box 2 has five tests in the module.
- 1.
The group of entities within the module: Tests, API tests, Suite, and Submodules. Scenarios are also shown here even if they make more sense on the Feature page.
- 2.
The list of items in the group: For example, all the Tests within the Module.
Modules and Submodules have their own id created automatically by Boozang: m1, m2, m3, and so on.
You will use these ids when searching for Tests or running Tests from a CI tool.
Application Environments
From the Setting menu on the left bar, you can access the Environments page .
This page shows the Environments of each application.
As mentioned in the section “Test Environments,” having a good test environment classification is critical for testing activities.
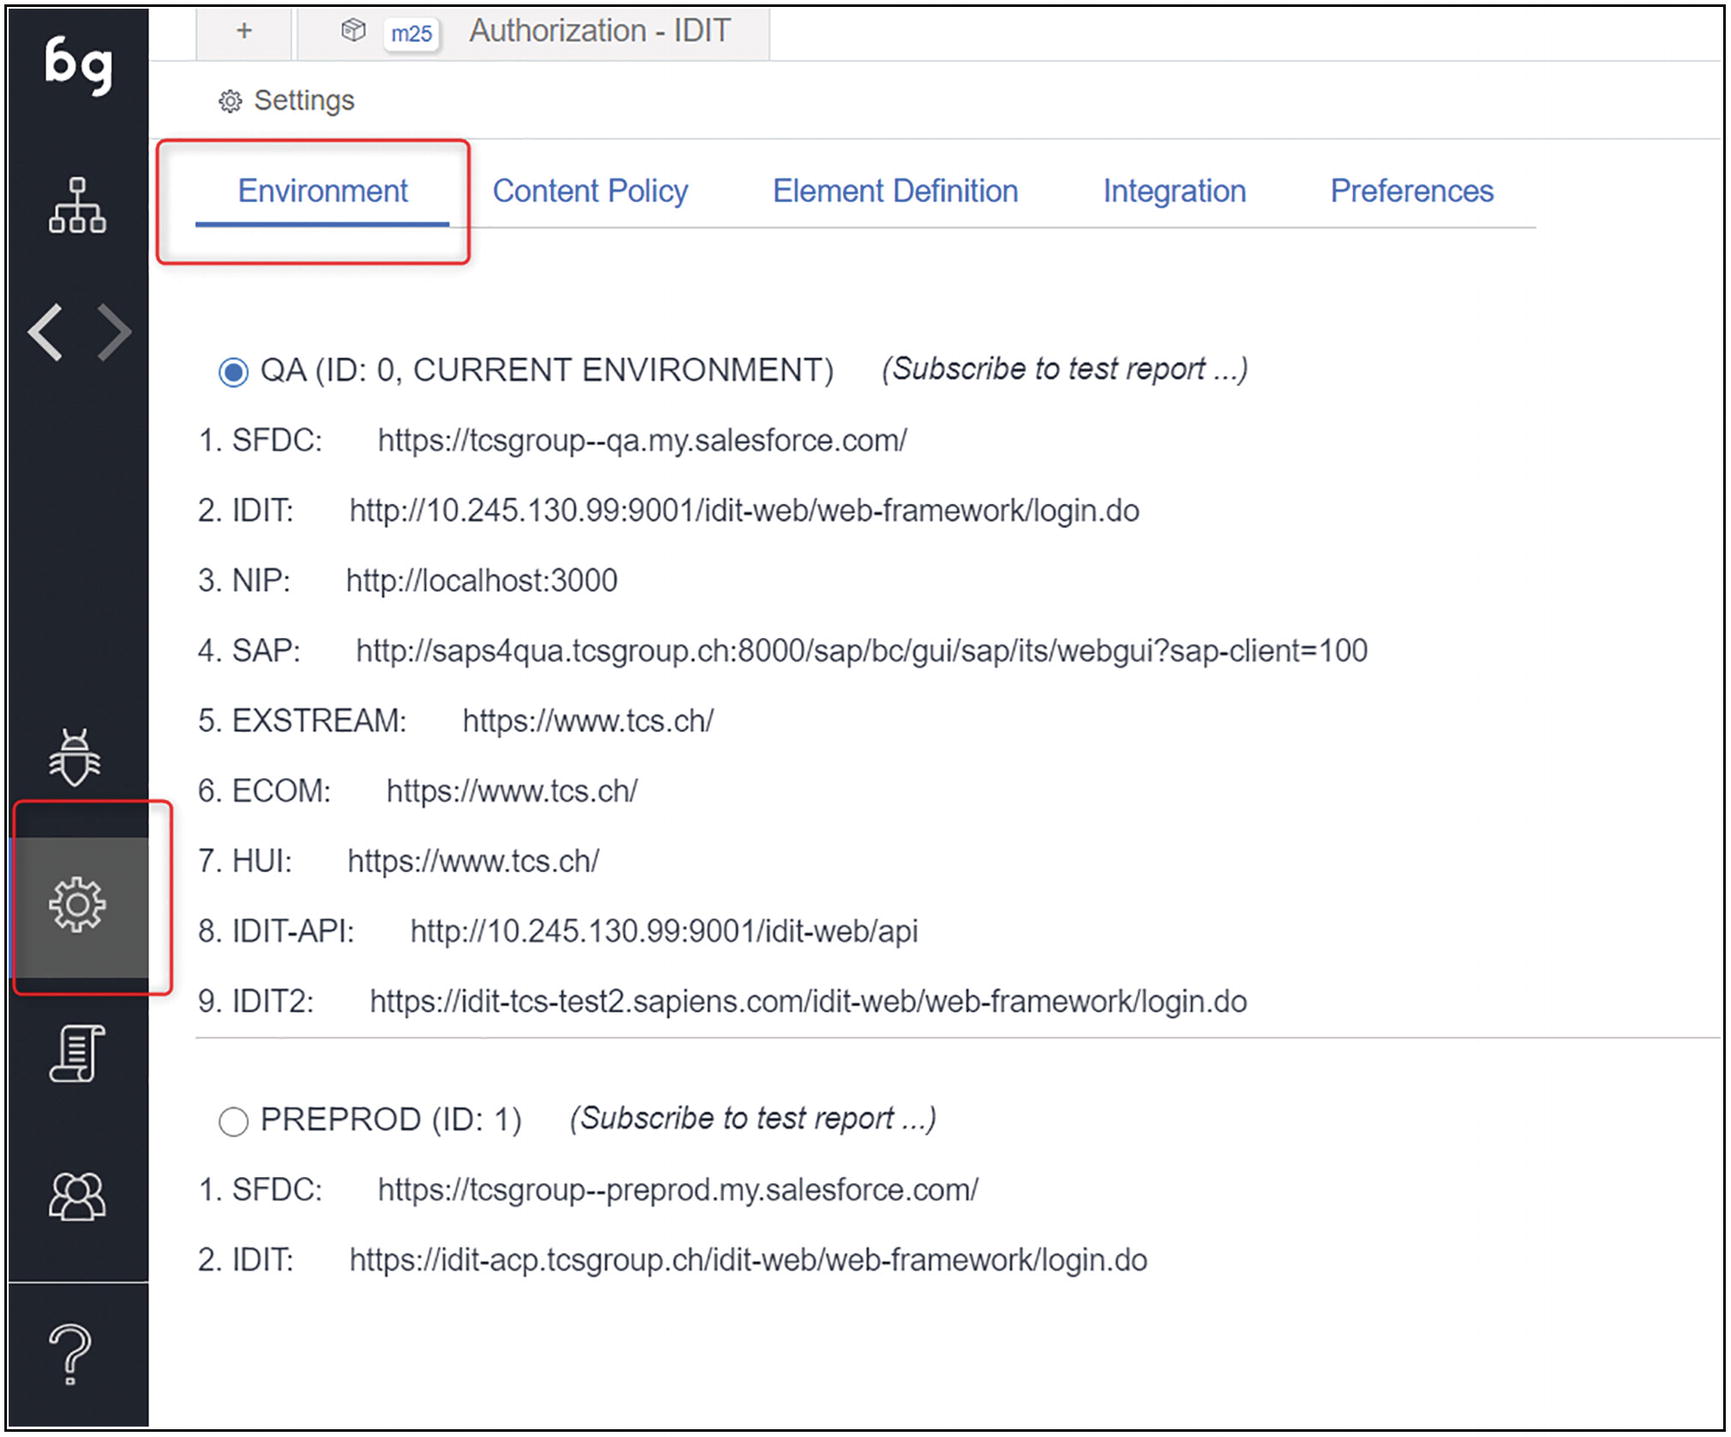
A screenshot of the environment page with the selected settings option on the left panel. There are 5 primary tabs on the page. The environment tab is selected.
Environments page
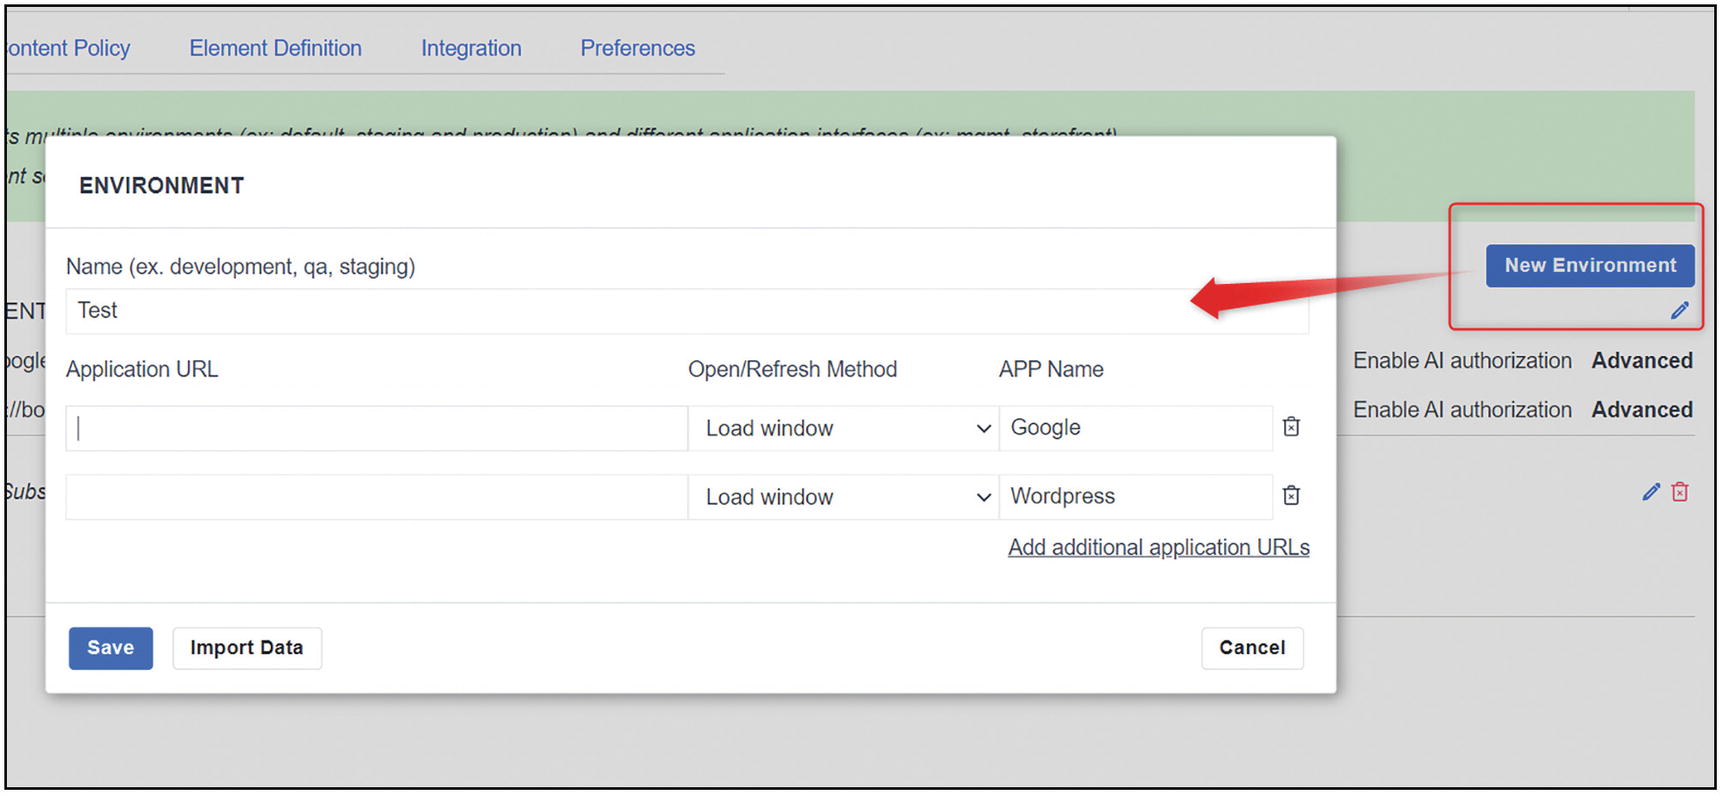
A screenshot of the new environment form. The button for the new environment is highlighted to the right and a pop-up window is on the left. It has sections for name and application U R L.
New Environment form
Tests and Test Suites
Finally, Tests! Yes, this is without any doubt the main Boozang item. You design, organize, run, and troubleshoot Tests. Therefore many features are built around this main item.
Test Suites are also essential to organize and group the execution of tests.
We are going to see here the main features and refer to later chapters when needed.
A Test in Boozang is built within a Module, it has a name, a unique id, and a specific URL, and it is made of one or several Actions.

A screenshot of the test page has three highlighted sections. They are the test U R L, test name, and test actions. The element tab is selected.
Sections of a Test page
Test URL
The Test URL has always the following format:
http(s)://<boozang site>/extension?id=<project id>#<project id>/<branch>/<module>/<test>
Boozang site: Depending on where your account is located, boozang.com, eu.boozang.com, or something else (see section “Where Are Your Data Stored?”)
Project id: A unique id of 24 characters that identifies your project1
Branch: “master” by default, or any other branch you are currently working on
Module: The module id, for example, m25
Test: The Test id, for example, t7
Action: Only when an action is selected, like in the picture above, the id of the action, for example, 5
Environment URL
Each Test has a starting URL. The URL is taken from a dropdown list that is populated with the environments that you have previously defined (see section “Application Environments”).
“Reload page on URL mismatch”: This is the default option. The test will load the URL whenever it is executed if the application is currently on a different URL.
“Reload page on host mismatch”: Same as above but only for the hostname.
“Never reload page”: The Test will never change the application URL when being executed. You will want this option in most of the cases.
“Always reload page”: Will always load the defined URL when the Test is executed.

A screenshot of the environment U R L page with tabs for environments, domain, page, and reload policy. Reload page on U R L mismatch policy is selected.
Test: Environment URL and options
Test Actions
The middle area of the Test page is where the logic of the Test resides.
Action Id.
Action type: Many action types are possible; the most common ones are Click, Set, Validate, and Script. We will see these options later on.
Action description: Boozang creates a default description based on the web element on which the action is performed. To maximize the readability, I suggest always ensuring that this description is clear and not filled with technical details.
Action value: the value set or retrieved by the action.
Action details are also present in the “Details” panel. This panel can be placed on top of the actions or below. I prefer to position it below, but it is just a personal preference.
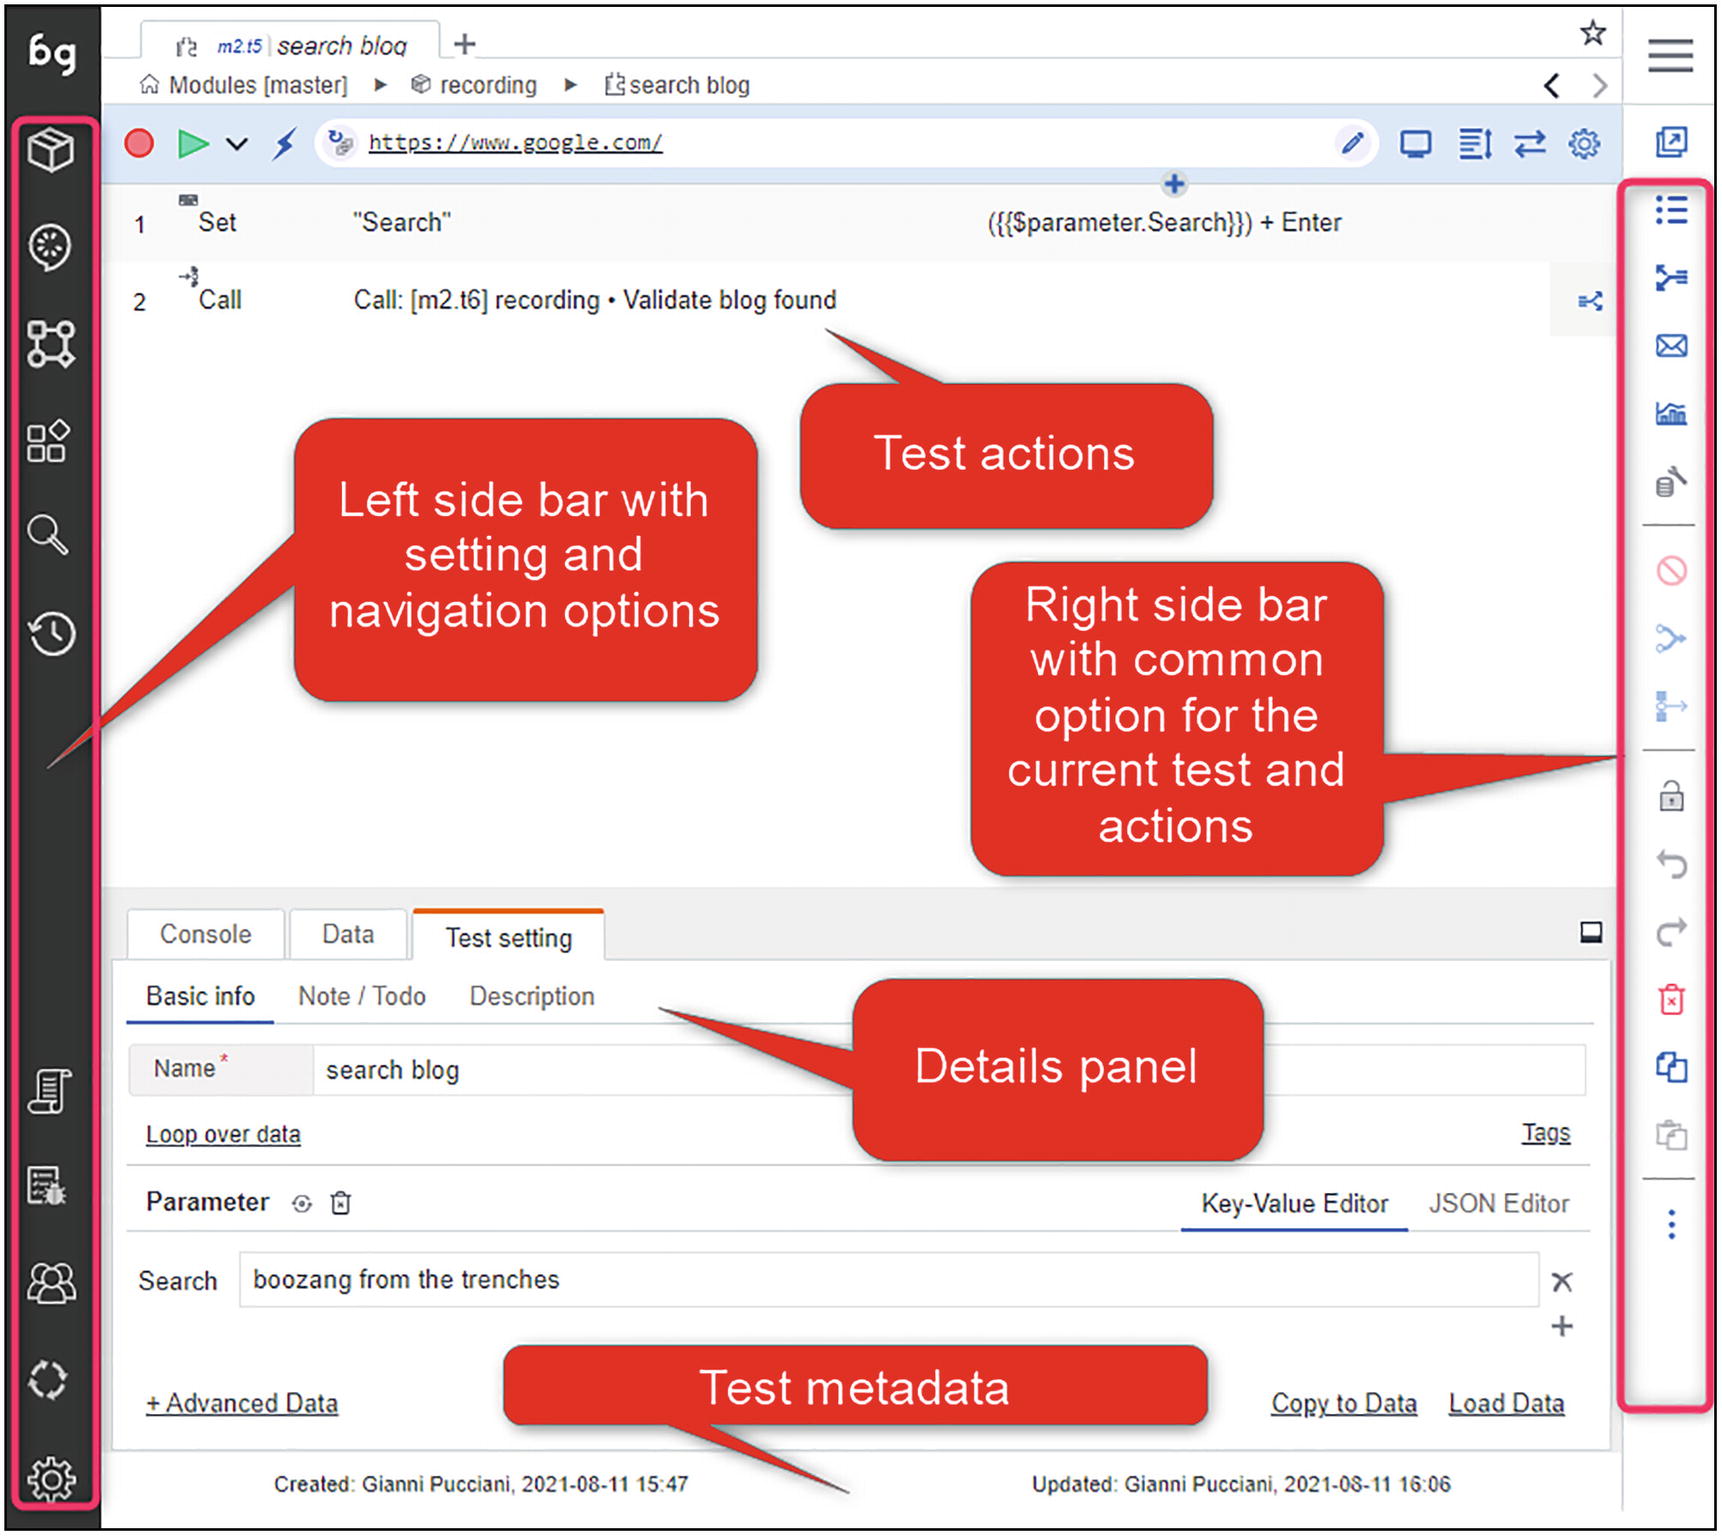
A screenshot of the test page has five sections, test actions, left sidebar for setting and navigation options, right sidebar with options for current test and actions, the details panel, and test metadata.
Test Page, high-level structure
Tests can call other Tests and pass and receive data via parameters, exactly like functions in software developments.
From many pages where tests are shown, you will see next to the Test name the green triangle to execute them.
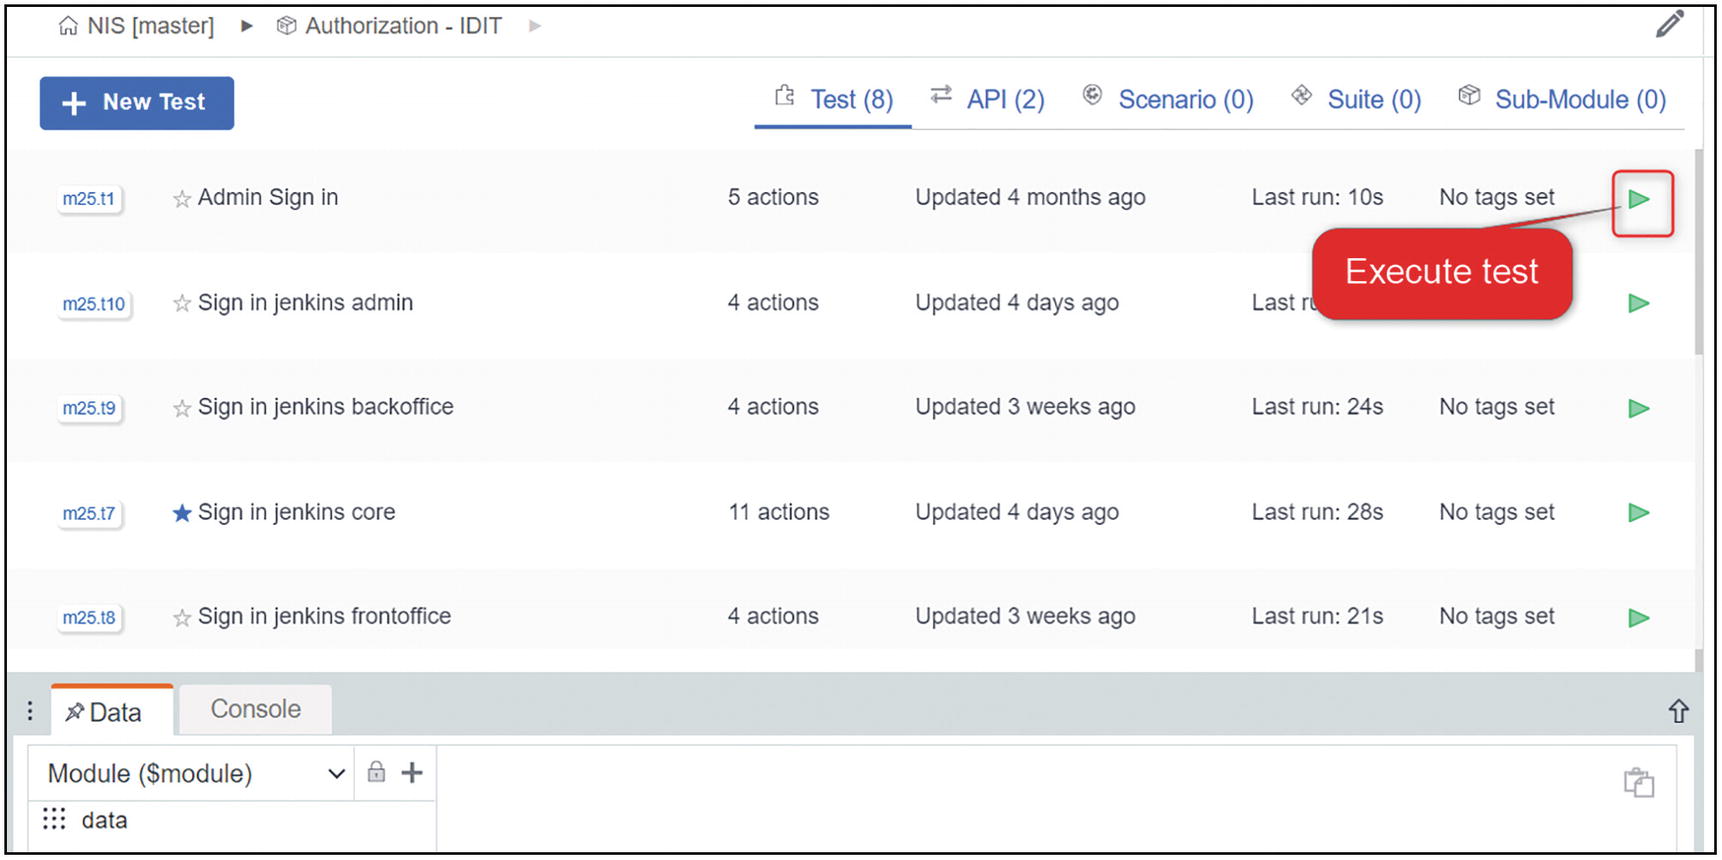
A screenshot of the module page has a list of 5 tests. Each one has a green triangle in the extreme right corner to execute the test.
Module page
Keep It Modular, Avoid Monolithic Tests
What is the difference between a solid automated test suite , which minimizes maintenance and provides high value, vs. another one that is painful to maintain and provides little or no value? Certainly modularity.
In the first one the maintenance is reduced because each Test is not more than 10 or 15 Actions, has a clear scope, and it is easy to reuse. Tests call other Tests, exchange data, in a logical chain that is easy to understand. When the application changes, you rarely have to touch more than one Test.
In the second one, Tests are long, 20 or even more actions, and the same business logic is repeated in multiple Tests. Tests are rarely reused. When the application changes, you need to apply the same changes in many places.
Don’t get me wrong, sometimes re-usability has a high cost, and some duplication is necessary. Finding a good compromise is key. In any case, the advanced search function is always a good help to locate specific actions in your project.

An illustration of a robot in a military outfit and equipment.
In Sprint 6, a bad regression was delivered in the test environment. The search contact function was broken. Since all our tests start with an account creation from API and then search for that account to continue the business scenario (e.g., a product acquisition), all the Tests were broken. The nightly run discovered this issue: at 8:15 am a Bug report was created and discussed in the daily “standup” meeting at 9 am.
The fix was scheduled for 12 am. That meant an entire morning lost since we could not run any test.
Luckily for us, the search function was broken from the contacts form but still working from the top bar. And thanks to a good modular design implementing the workaround for us meant modifying 3 actions on a single test.
At 9:30 am the workaround was operational, and we were able to continue our work, and then switch back to the original feature as soon as the fix got delivered in our test environment.
Test Suites
Test Suites are collections of Test or other Test Suites. Test Suites can be run locally in the IDE as well as remotely via the CI server.
You can define, for example, a “Smoke” Test Suite and a “Full Regression” Test Suite.
The first one may run a few basic Tests, while the second one will run all the Tests. On a large project, a full regression Test Suite can take several hours to complete. We will see in Chapter 14, “Jenkins and the Boozang Runner,” how to reduce the execution time or large Test Suites.
When working with Gherkin Scenarios (more on this in Chapter 13, “Gherkin and Behavior Driven Development”2), each Feature has its own Test Suite. Having one Suite per Feature allows you to run only the Scenarios related to a particular functionality, very useful while troubleshooting application issues.
Test Suites can be created within Features or Modules.

A screenshot of the global suites page. It has five suites listed below and an option to add a suite.

A screenshot of the Q A full set suite page. The selected option is of test setting.
Full regression suite
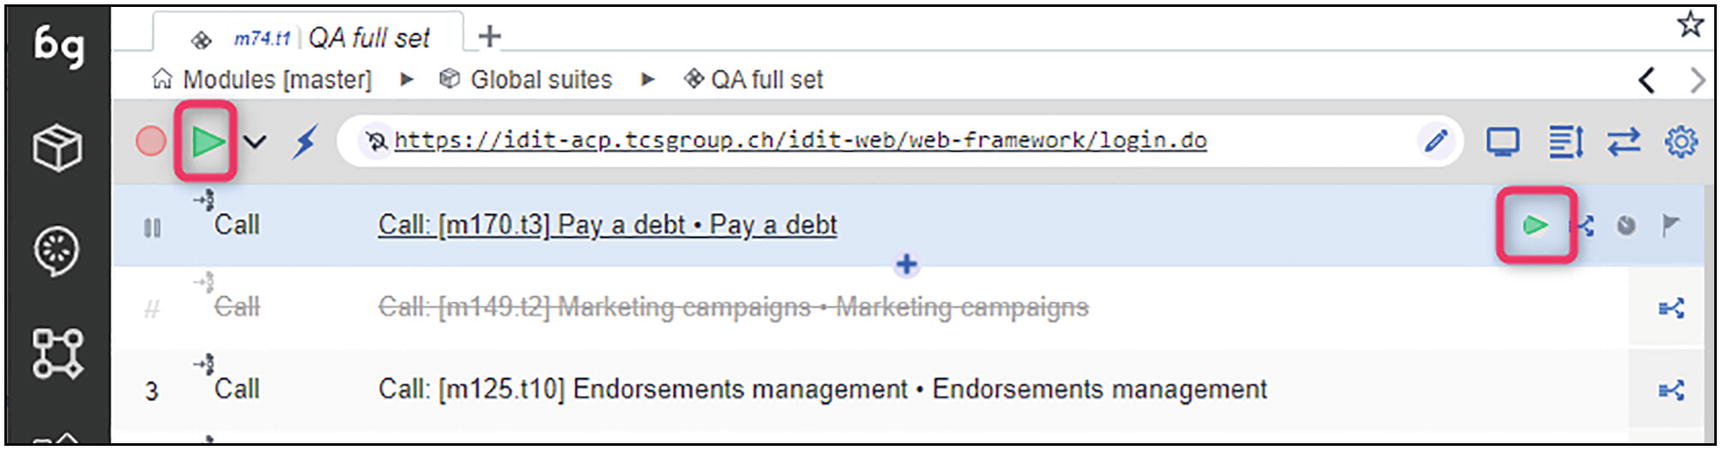
A screenshot of the Q A full set suite page. It has 2 highlighted triangles. Each is on the left and right corners of the page.
Execute whole or single suite
Features and Scenarios
Like Modules and Tests, Features and Scenarios are another way to organize your tests, especially when using Gherkin or doing pure Behavior Driven Development.
In Chapter 13, “Gherkin and Behavior Driven Development,” we discuss more in detail about Gherkin and BDD.
Given <an initial state or pre-requisite>
When <certain actions are performed>
Then <we can perform some validations on the expected results>
This is the simplest form of a Scenario in Gherkin format.
In Boozang, this is a Scenario, and several Scenarios can be organized into a Feature, following the Gherkin language specification.
A Scenario is made of steps. In Boozang a step is nothing else than the phrase in one line of a Scenarios that starts with a Gherkin keyword (Given, When, Then, And).

A screenshot of the features page. It has a list of features associated with a project. It has a button to add a new feature.
Features page

A screenshot of the product pricing scenario with 13 listed scenarios. A button is on the left to add a new scenario.
Scenarios page
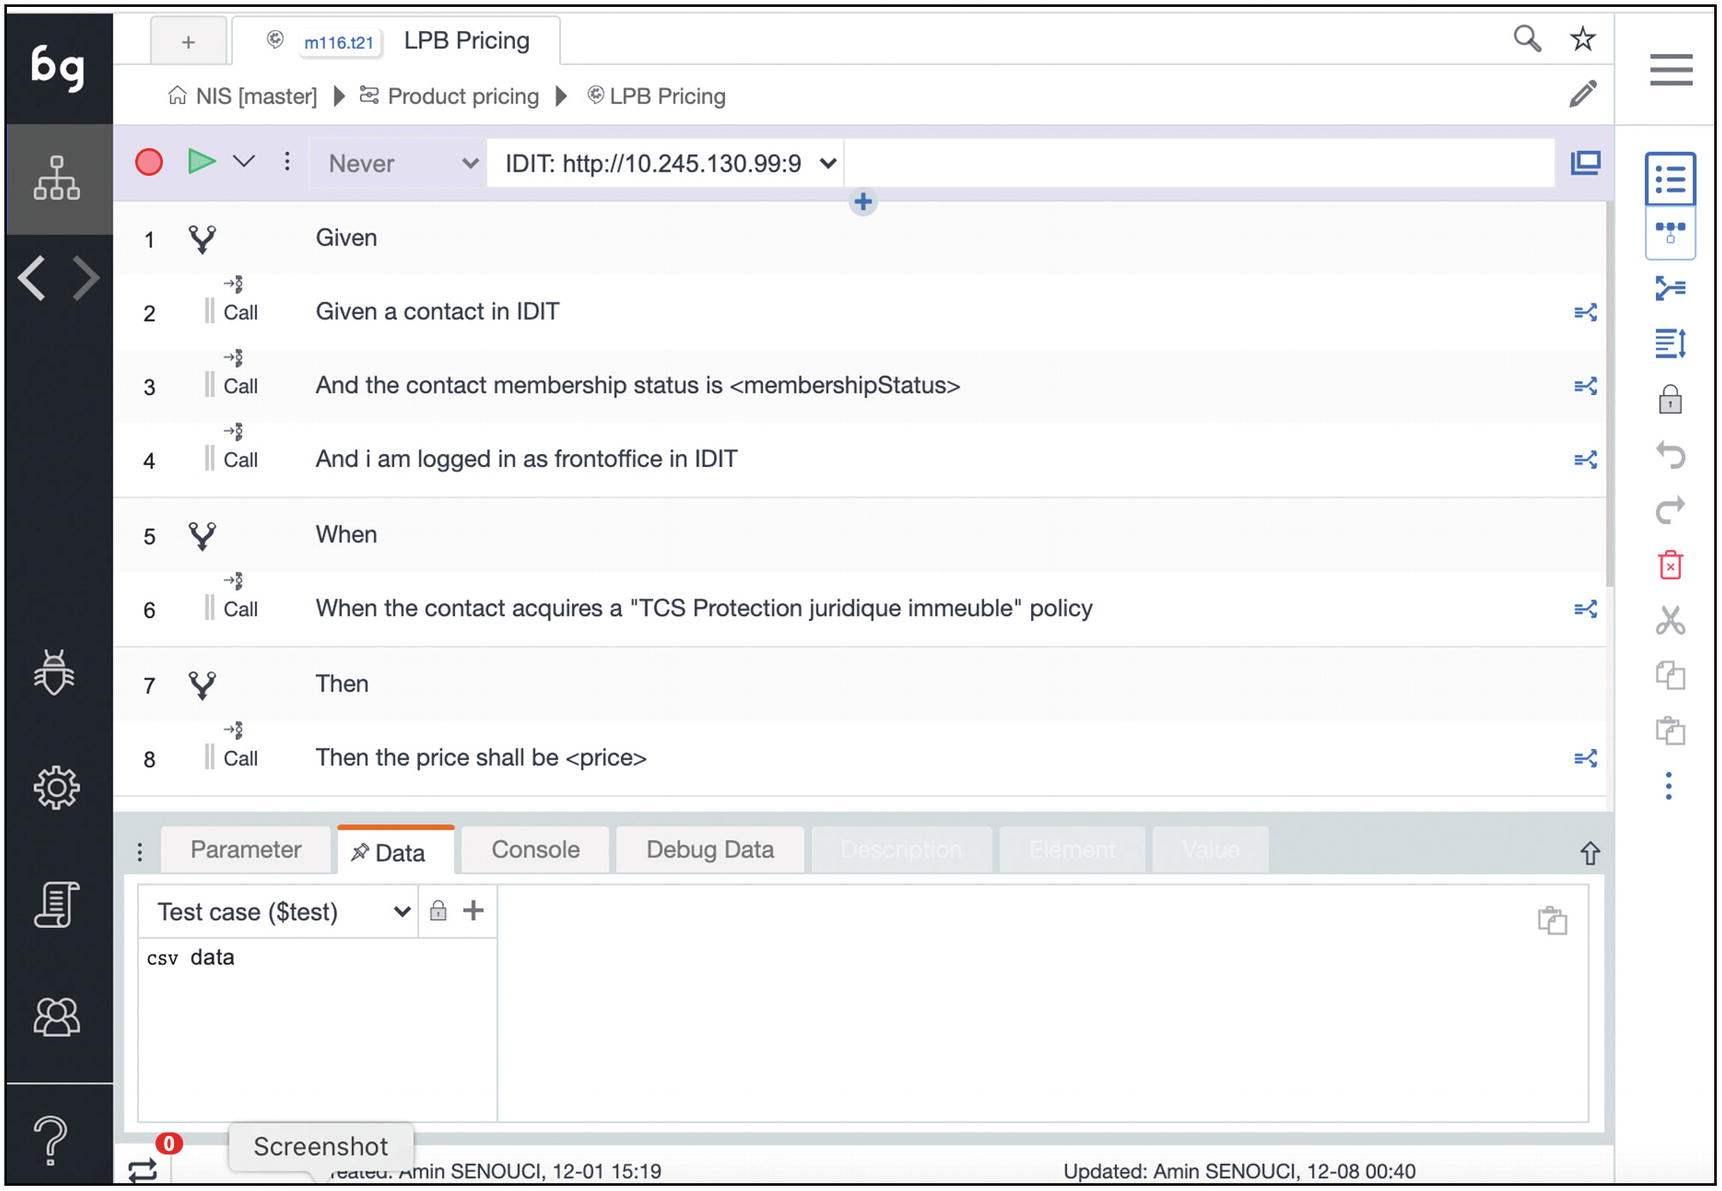
A screenshot of the L P B pricing scenario. It has given, when, and then as listed conditions. The option for data is selected.
Scenario description
The Scenario in the picture above (as most of our Scenarios) is a specific type of Scenario, called Scenario Outline, where parameters are passed in the Steps via an Examples table, stored in csv data. All this will be much clearer in Chapter 13, “Gherkin and Behavior Driven Development.”
You now have an understanding of all the main Boozang items. In the following sections, we will start using all these concepts to build and execute real tests.
Searching and Bookmarks
- 1.
The navigation tree panel : It allows you to see all the objects in a tree-like view, just like most development tools. This view is available for both modules-tests and features-scenarios:
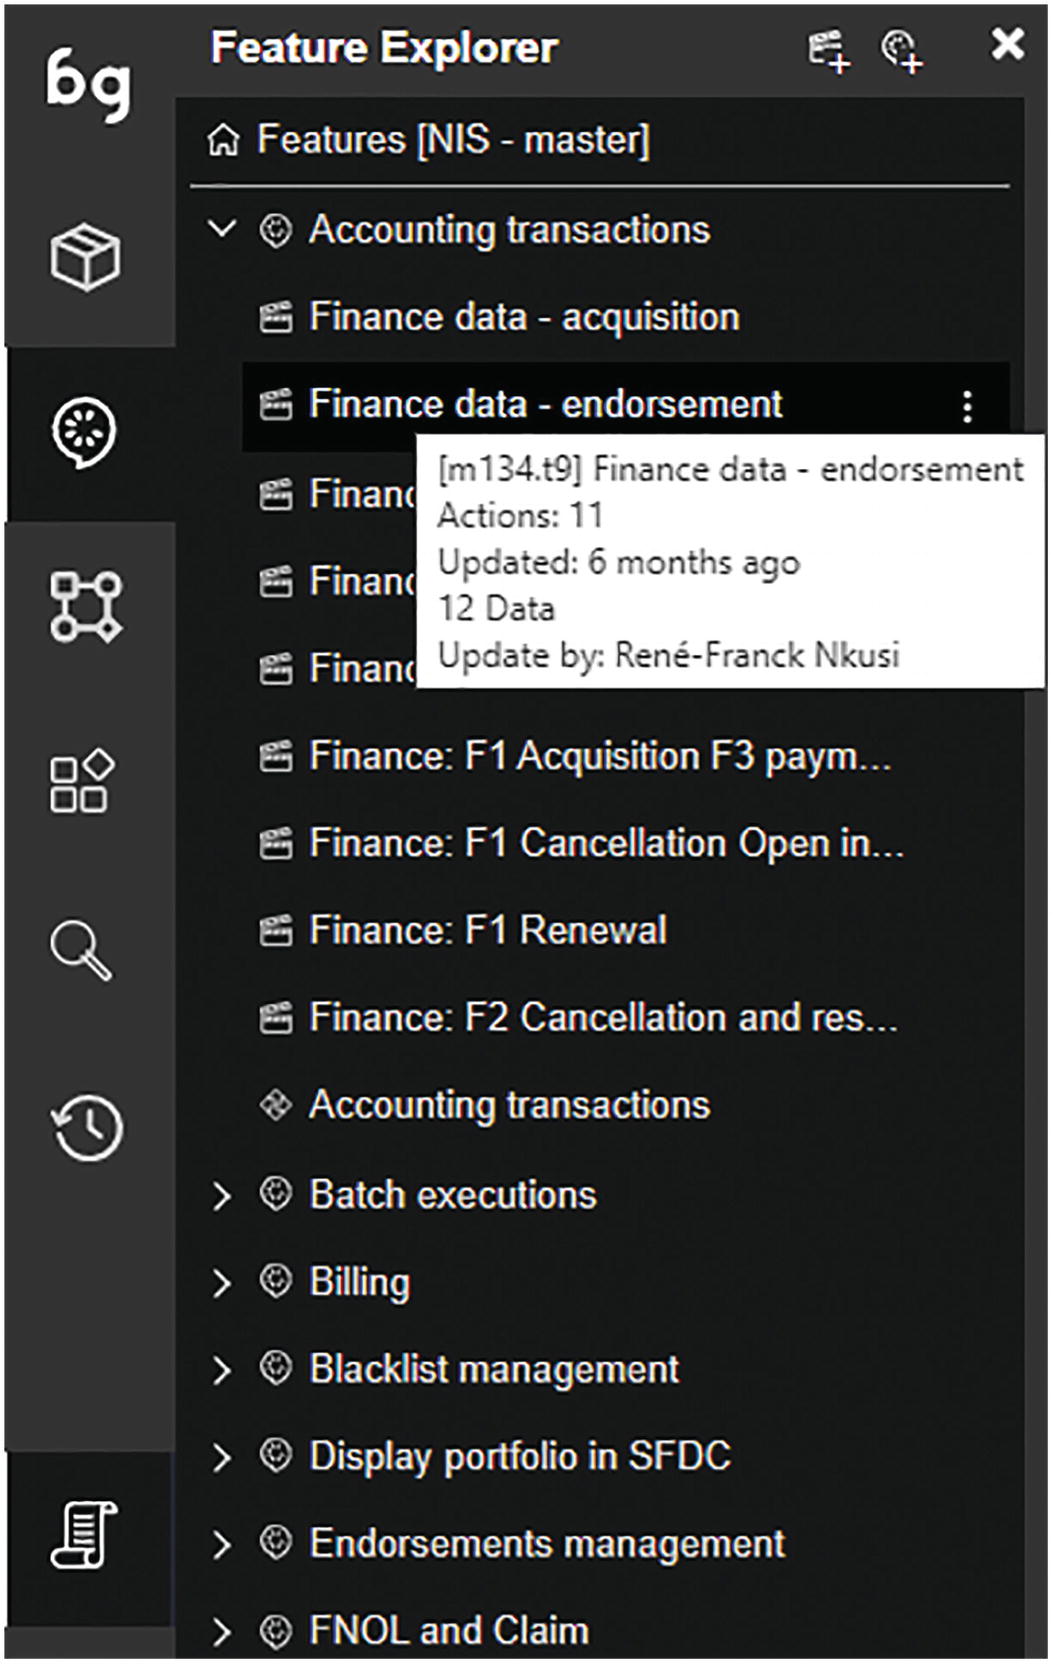
A screenshot of the feature explorer with different features. The finance data endorsement option under accounting transactions is selected.
- 2.
The Search engine : This is a powerful tool that allows you to search items by name or by ID in the navigation tree panel:

A screenshot of the fuzzy search window has a search bar. It yields a list of available products, each with scenarios within them on the right side.

A screenshot of the fuzzy search window with an I D in the search bar. It lists the scenarios within the entered I D.
- 3.
The Bookmarks : You can bookmark, for example, any Test with a click on the star so that you can quickly access it from wherever you are. The bookmarked items will show up when you mouse over the star icon, with the possibility to un-bookmark.

A screenshot of the test page. It has a list of 5 tests. The fourth test has a star sign on the left side of the name.
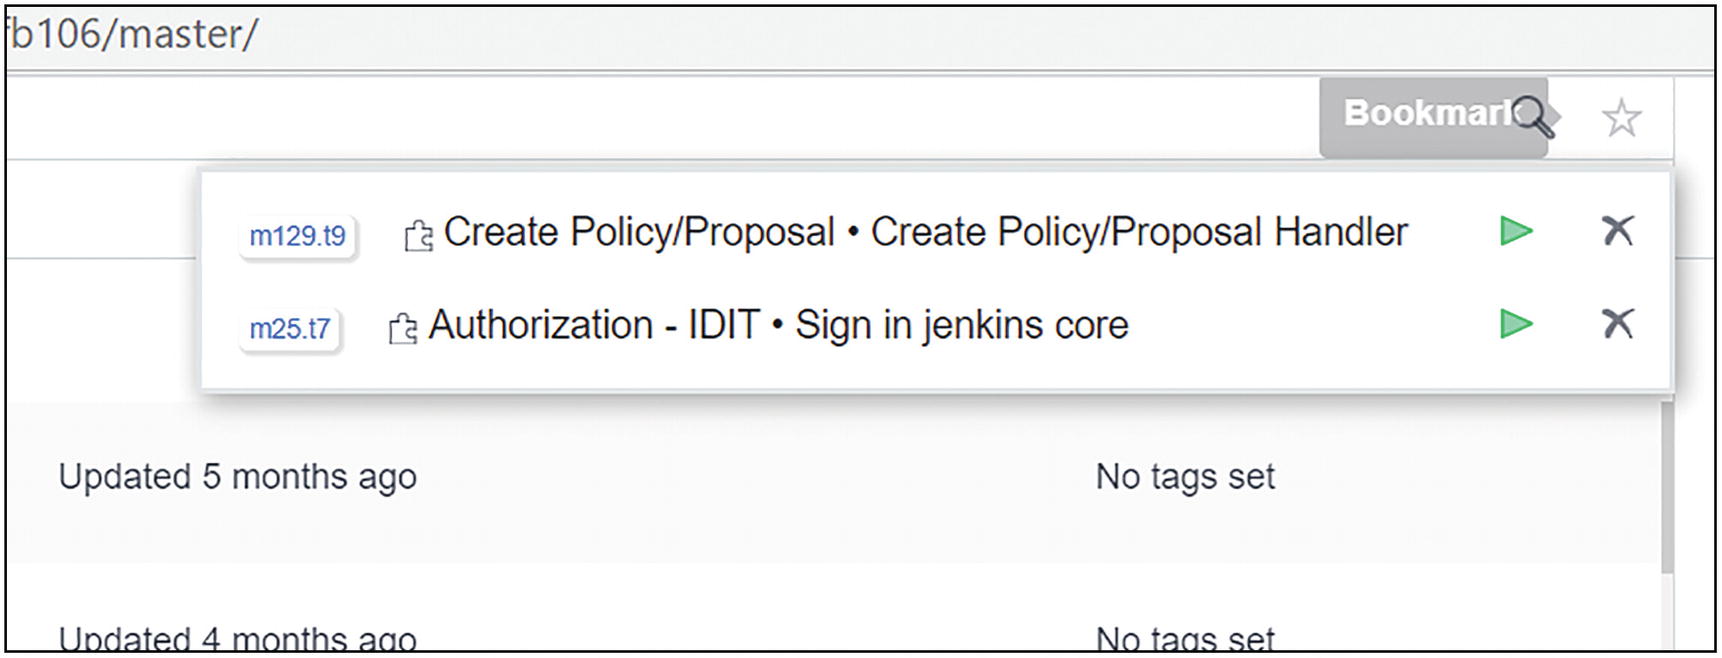
A screenshot of the bookmark page. It has two bookmarked tests.
Bookmarked items
Recording
Recording in Test Automation has a bad reputation, mainly among those with a developer background. This is because of some marketing slogans in commercial tools that presented the recording functionality as the way to avoid all the complexity of implementing automated scenarios.
The recording functionality in Boozang is a crucial feature, but it should be seen as an accelerator rather than the way to implement tests. Recording is where you should start when building a new test, at the beginning of your project, or when covering new flows in your application GUI. The more you advance in your automation project, the less you will use recording. You will, instead, plug and re-use existing tests.
Let’s see how the recording works in Boozang and what you should pay attention to. Please bear with me and accept a dummy example for this very basic functionality.
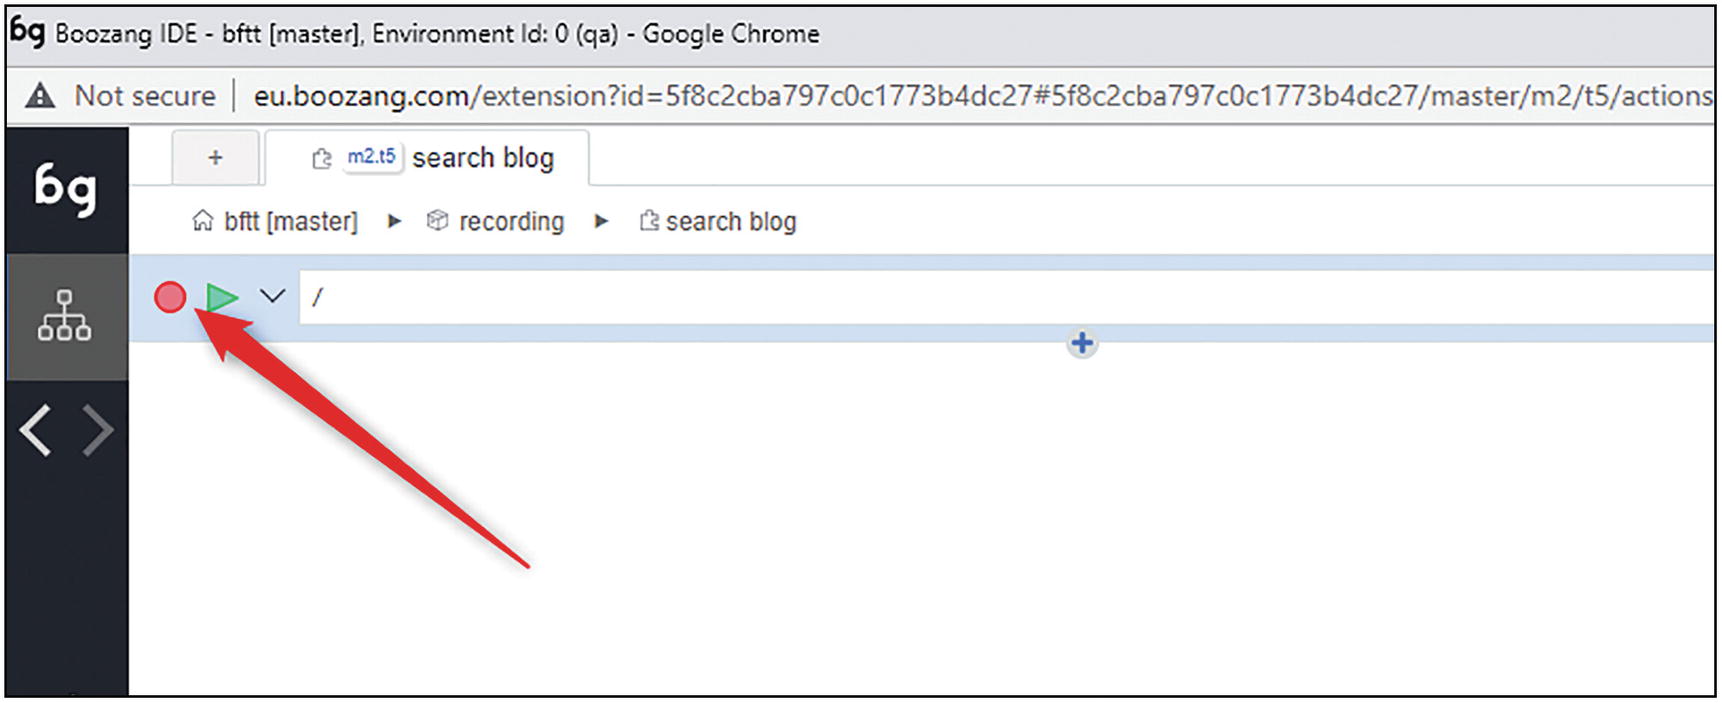
A screenshot of a window has a search bar with a U R L and no test listed. It has a round button on the left side, indicated by an arrow.
Recording, start
The application window will open at the set URL and a short pop-up window will tell you that the actions will be recorded.
In this dummy example, I headed to the Google site, entered a text in the search box, and clicked on a search result.

A screenshot of a window with a control menu has a selected square button on the left corner. The bind data option is selected.

A screenshot of the search blog tab has three actions, set, click, and validate. The right side of the set tab has an enter option.
Recorded test
- 1.
The “Search” parameter was automatically created. This will allow you to use the same test for searching with different texts.
- 2.
The “Enter” key press was added to the action.

A screenshot of the search blog tab. The parameter tab under the test setting is selected. It has a one-line code to search boozang from the trenches.
I have added a simple validation on the book title just by clicking the validation button and then selecting the element on the page.
What happened under the hood?
Click: A mouse click event
Set: When entering text in an input box
Validate: When validating a condition on a web element (see section “Validating the Expected Results”)
In this simple case, the recorded Test is simple enough to be executed with success without any modifications.

A screenshot of the search blog tab. Action setting is selected. It has element locators on the left and value used for the set action on the right side.
Action setting view
The set of actions recorded within the tests are stored in JSON format, sent over the net to the cloud service, and stored in MongoDB (see section “Boozang Under the Hood”). They will also be propagated immediately to all the other clients currently connected to the same project.
This is possible by having clients connected via web sockets.
Generate and Reference Test
After recording a Test with several actions, you might want to split it and create smaller and reusable parts. You can do this by selecting a set of actions (hold the Shift button and select), and then use the “Generate Test case and reference” button on the right bar.
Let’s see the first example of reusable components with our simple Google search example.

A screenshot of the process of the test case and reference. An icon on the right panel points to a pop-up window for generating test cases and references. It has a drop-down menu for names.
Generate and link new Test
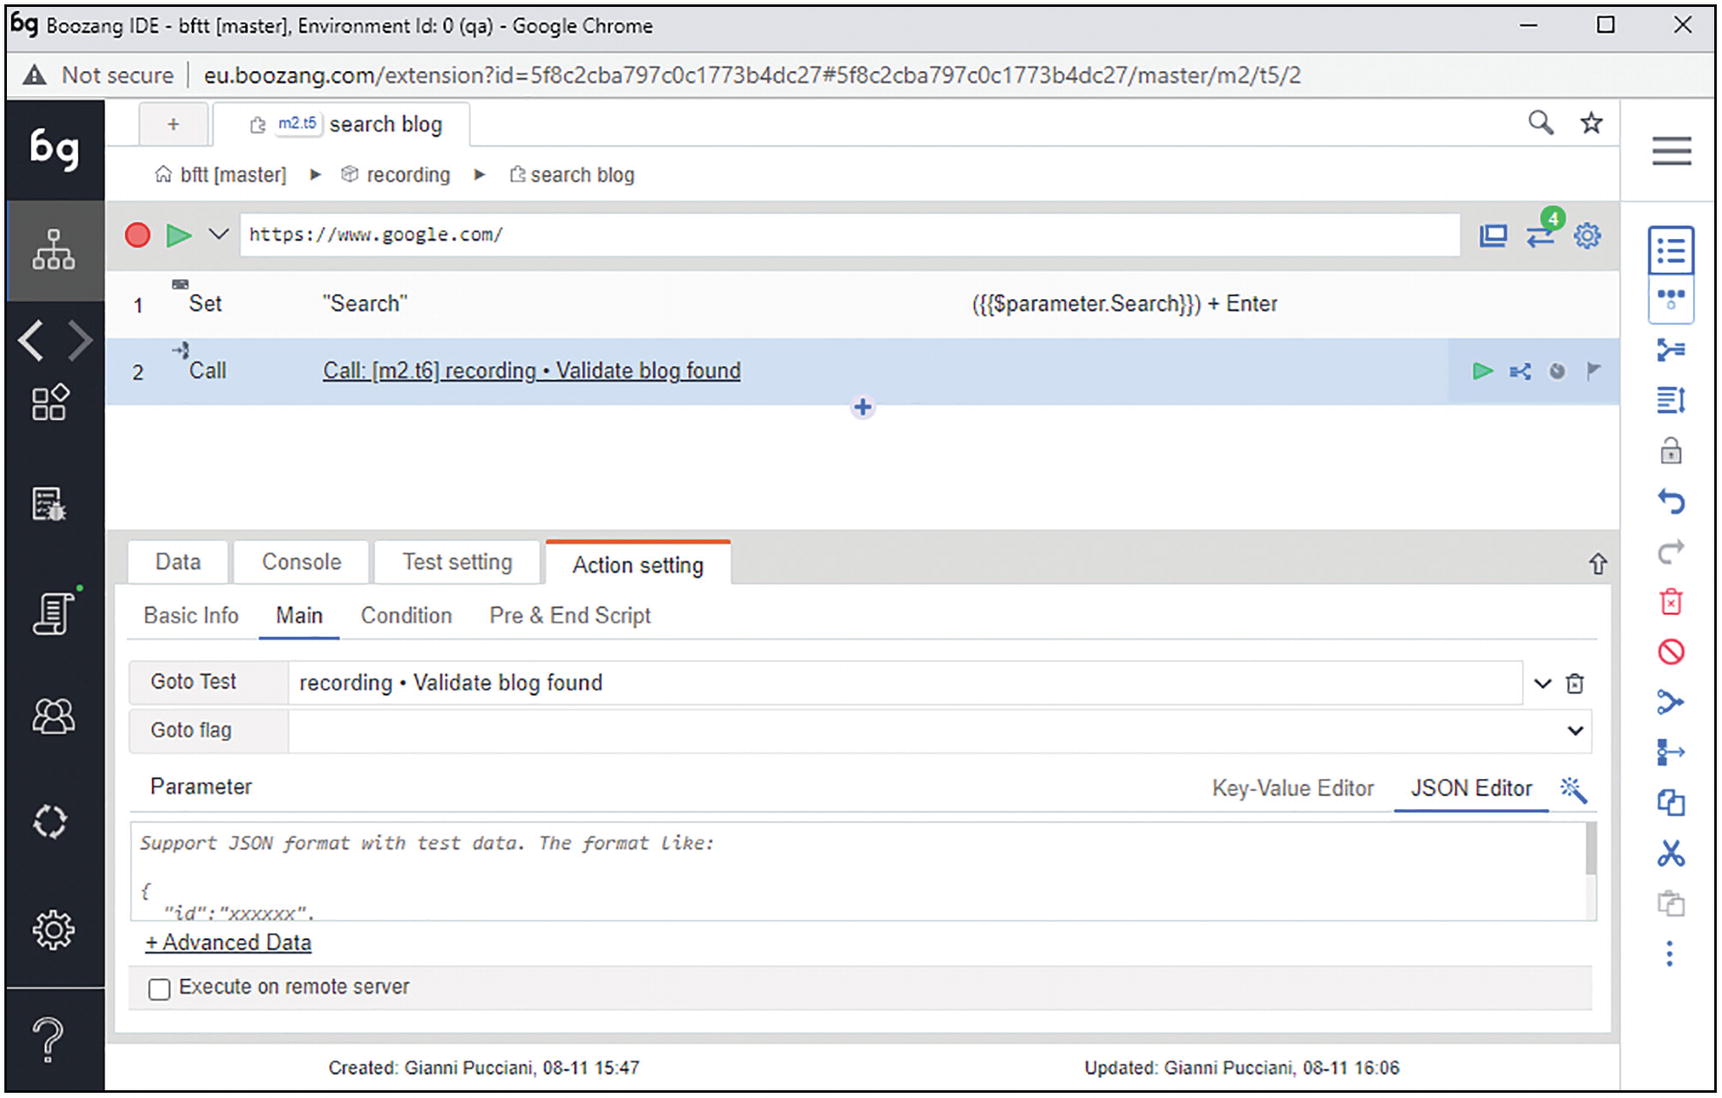
A screenshot of the search blog tab. It has action setting, under which the main tab is selected. It has columns for the Goto test and the Goto flag.
Execution with plugged Test
This was a very basic example. In the following chapters we will see more complex examples with data driven tests (more in this in Chapter 10, “Data Management”).
Execution and Reporting
Now that you have the first Test, you will want to execute it locally in the IDE to make sure it works as expected.
Several execution modes are available; in the next section, we see each of them.
Execution Modes
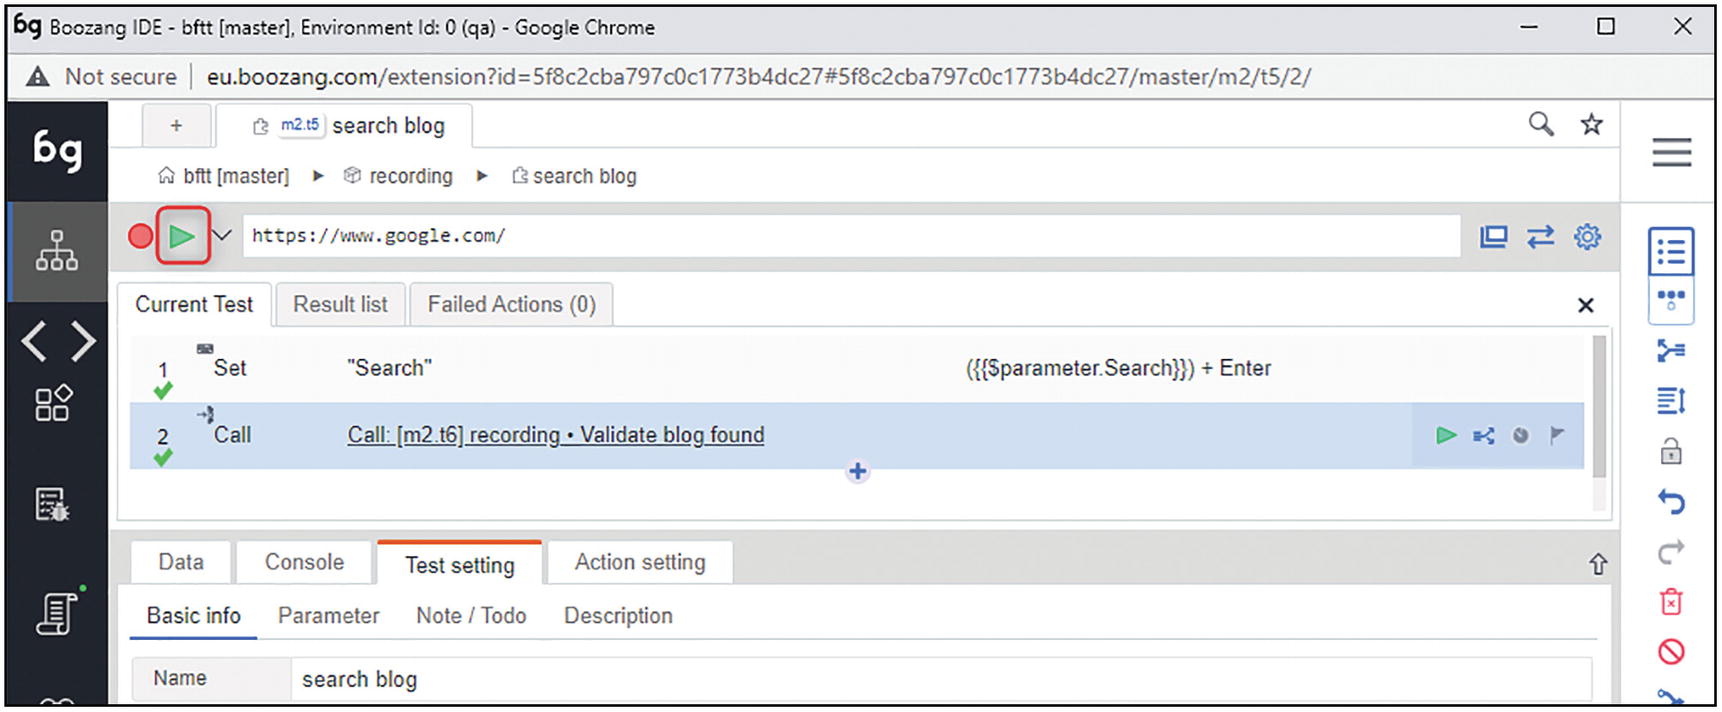
A screenshot of the current test page. It has a triangle button on the left side next to a circular button.
Play in IDE
When you execute your Test, Boozang will open a new window, load the initial URL, and then execute the actions one by one. The green check below the action number shows the successful execution of the action.

A screenshot of a test page has a drop-down menu next to the triangle button on the left. It has seven different play modes.
Remote play: It allows you to run the Test on a remote worker. A remote worker can be run on Jenkins and have it listen for client requests. This will be discussed in detail in Chapter 15, “Jenkins and the Boozang Runner.”
Play upstream Test: It will play the Test that calls the current test. In case multiple upstream tests exist, the user will be given the choice to select one.
Step forward: It allows you to execute the actions in the test one by one. This is especially useful when troubleshooting issues.
Play in demo mode: It is similar to the Step forward, but it is useful when demoing some executions since the executed action is described in the application GUI.
Generate API: We will talk about this more in Chapter 12, “APIs and Mixed API/GUI Testing.” For now, we can just say that this play mode helps to build API tests from existing GUI tests.
Automation play: This play mode will run the Test in a lightweight mode, that is, without the GUI part. You will see the Test running on the application window, and at the end of it, you will have a report. This play mode can be considered an intermediate mode between a local execution and a CI one. Sometimes, failures on the CI tool cannot be reproduced locally: in these cases, the automation mode is a step further in troubleshooting .
Execution Reports
Reporting execution results is a large topic. In this section, we see what Boozang offers as standard reports. Chapter 15, “Jenkins and the Boozang Runner,” covers more advanced reporting possibilities using the CI tool.
Function Details Log: It shows the execution of each called test and their actions.
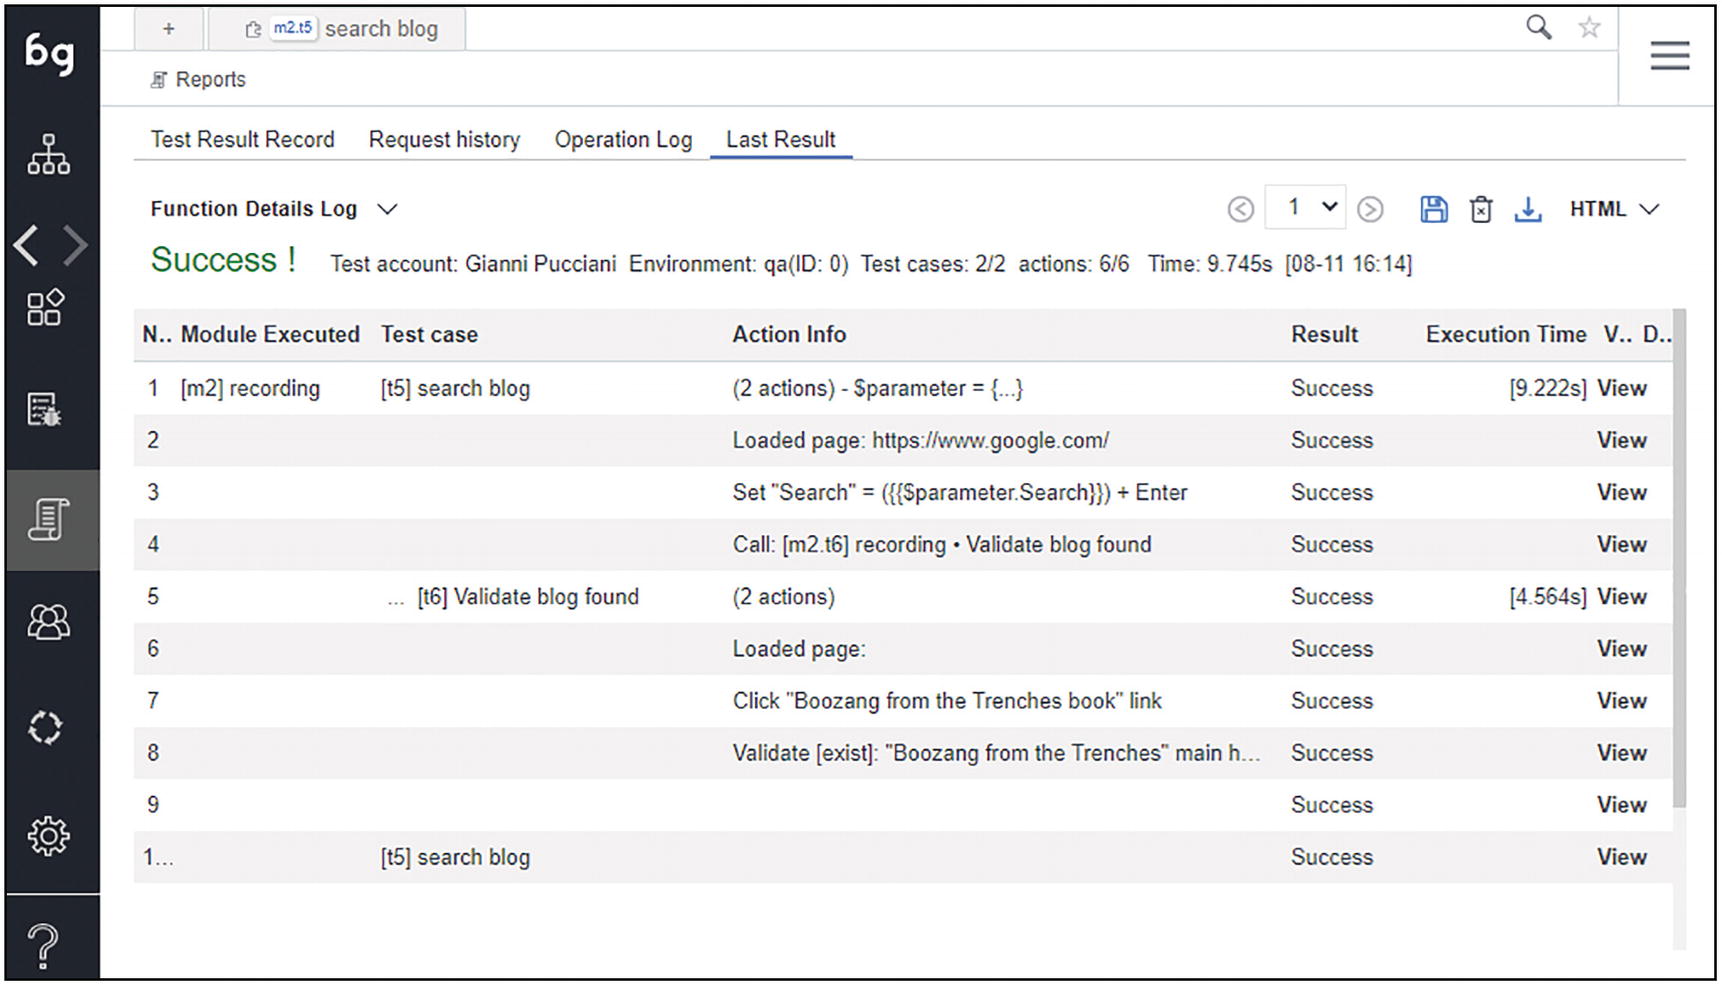
A screenshot of the last result tab. It has a function details log with a highlighted text, Success. It has a table with the details of the executed test.
Function Summary Log: It shows a higher level view, without action details.
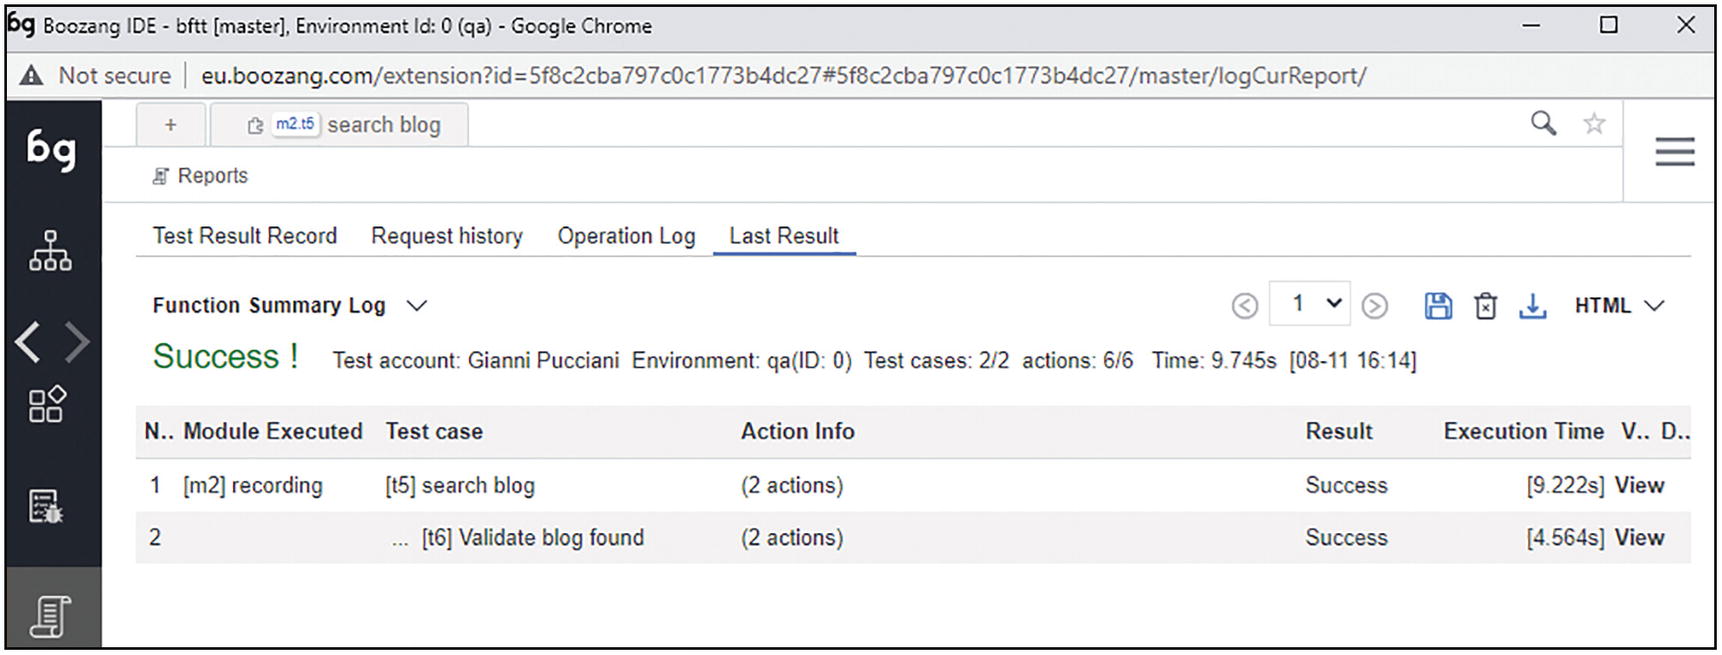
A screenshot of the last result tab. It has a function summary log with a highlighted text, Success. It has a table for module executed.
Summary report: It shows a complete report with more details, including who runs the test, when, and in which environment.

A screenshot of the last result tab has a summary report. It has details like the test account, test time, tested app, test scope, and test conclusion.
Summary report
Projects Settings and UI Customization
Boozang offers many configuration options. In this section, we cover the main ones. For a complete list, you can refer to the official Boozang documentation.
- 1.
Environments: To define applications and environments categories as explained in the section “Application Environments”
- 2.
Content Policy: To set some advanced options to customize the behavior of actions and locators
- 3.
Element Definition: Mainly used to customize the location strategy
- 4.
Integration: To set up the integration with external tools
Content Policy
APP Dictionary: It allows you to define your own dictionary for multi-language testing. We have not used this option yet.
Ignore Request (URL): Here, you can define a set of URLs whose requests will be ignored by Boozang. We used this option to speed up some tests in Salesforce.
Priority item for element select: This might be useful when you have control over your application to be tested and you want to prioritize certain HTML attributes for element location.3

A screenshot of the content policy tab. It has two highlighted sections, A P P dictionary, and ignore a request for the U R L.
Settings Content Policy section
Integration
In the Integration section you find the option to link Boozang to external tools.
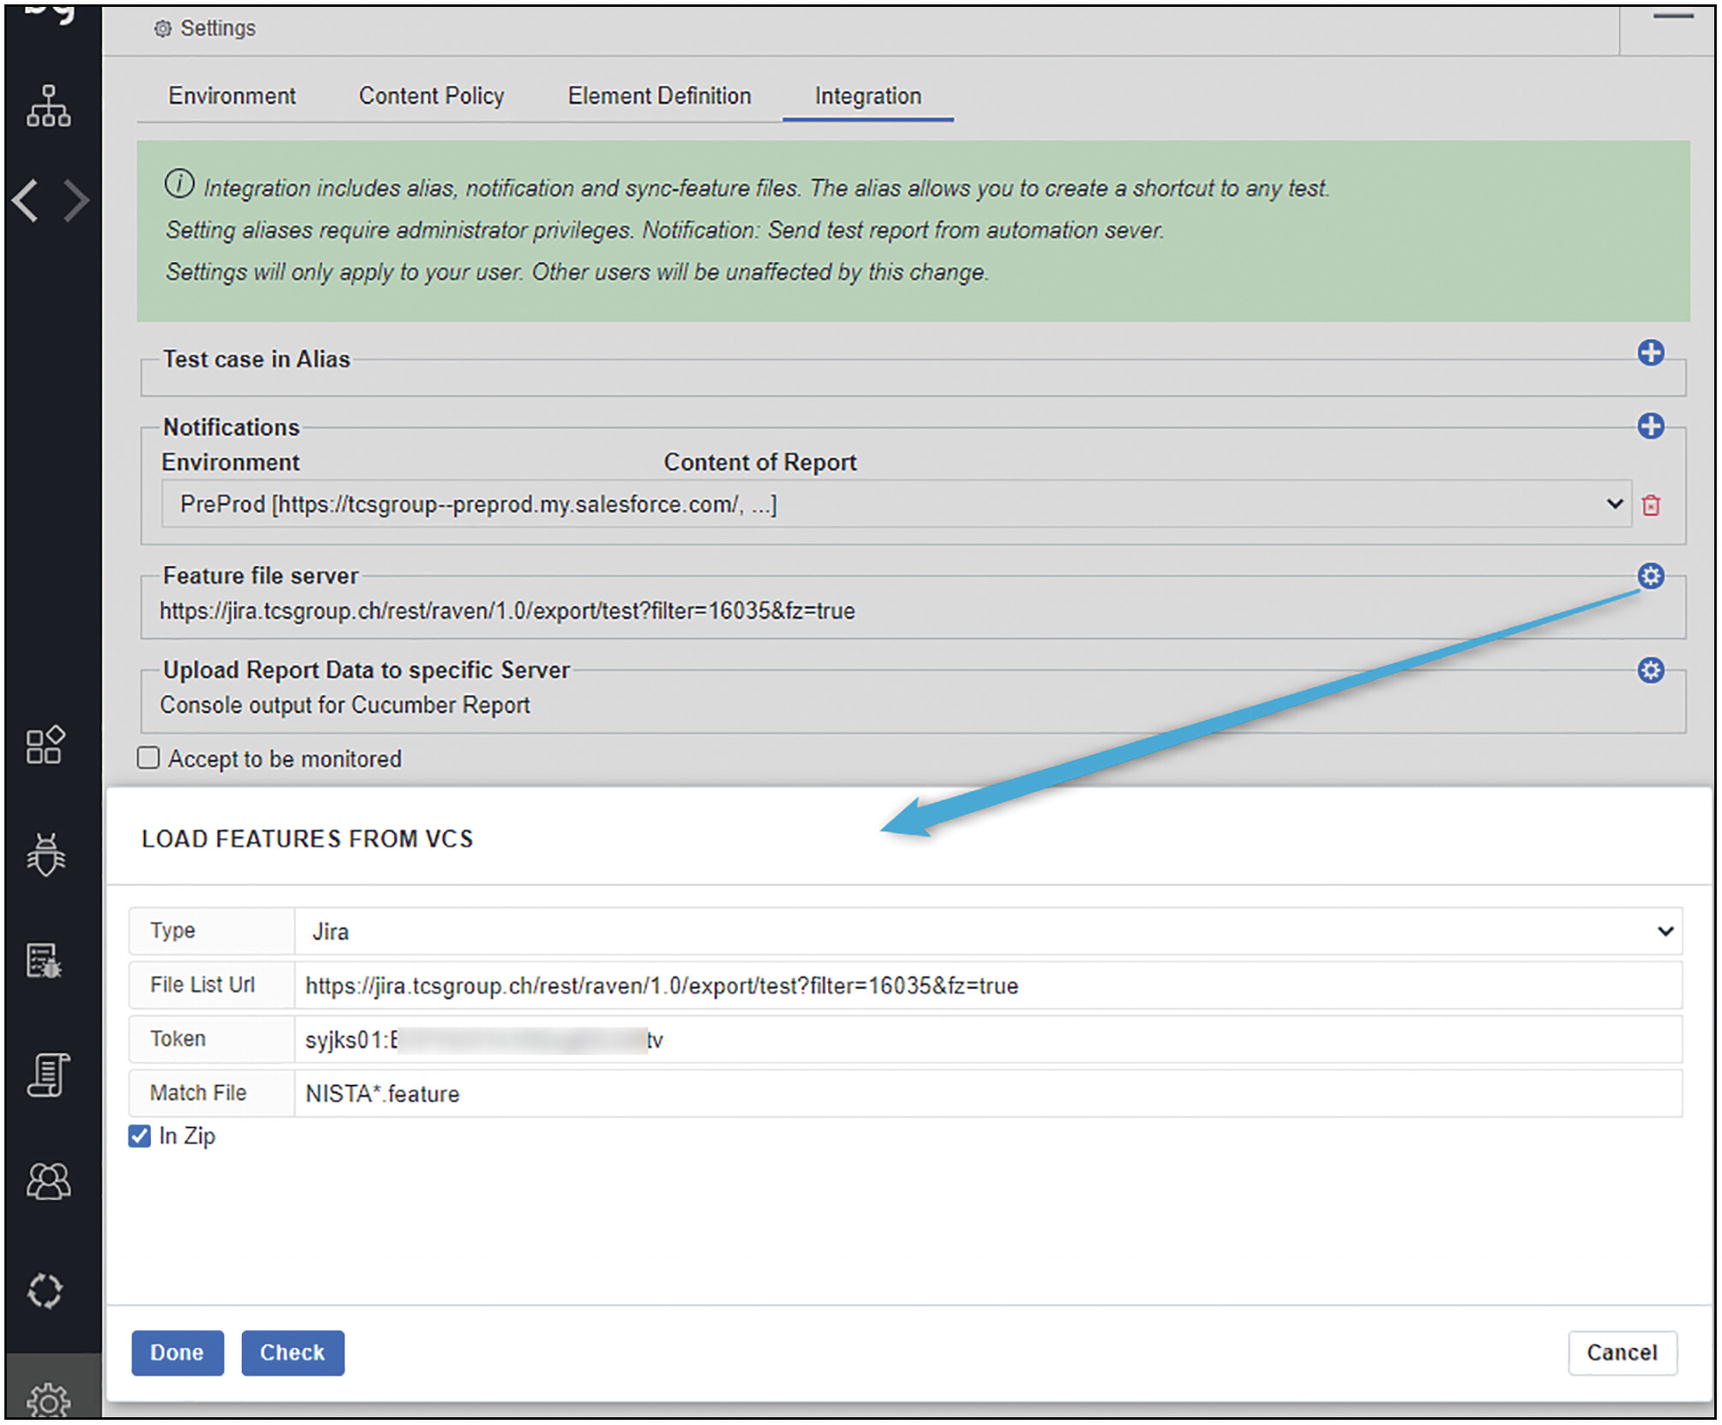
A screenshot of the integration tab. It has a settings symbol on the right that points to load features from V C S with an arrow.
Example of Project Settings Integration section

A screenshot of the C I settings page. It has a symbol for the C I menu, a section for the execution worker list, and a menu for third-party tools integration.
CI page and third-party tools integration

A screenshot of the Jenkins configuration window. It has columns for project I D, branch, environment, and test case. The option single worker is selected.

A screenshot of the Jenkins configuration output window. It has a few lines of code for the Jenkins configuration. There is a button below to copy the code.
Jenkins configuration setup output
The Jenkins integration is described in detail in Chapter 14, “Jenkins and the Boozang Runner,” where we will also show how to run tests in parallel with multiple workers.
UI Customizations
Boozang offers a number of customization options on the GUI client; let’s see the main ones.

A screenshot of the parameter tab. A long arrow points at a small upward arrow button on the screen.

A screenshot of the parameter tab. A long arrow points at a small downward arrow button on the screen.
Details panel at the top
In the Test actions panel, it is sometimes useful to have a complete view of each action, including the overridden exit conditions (see section “Exit Conditions”) or script details.
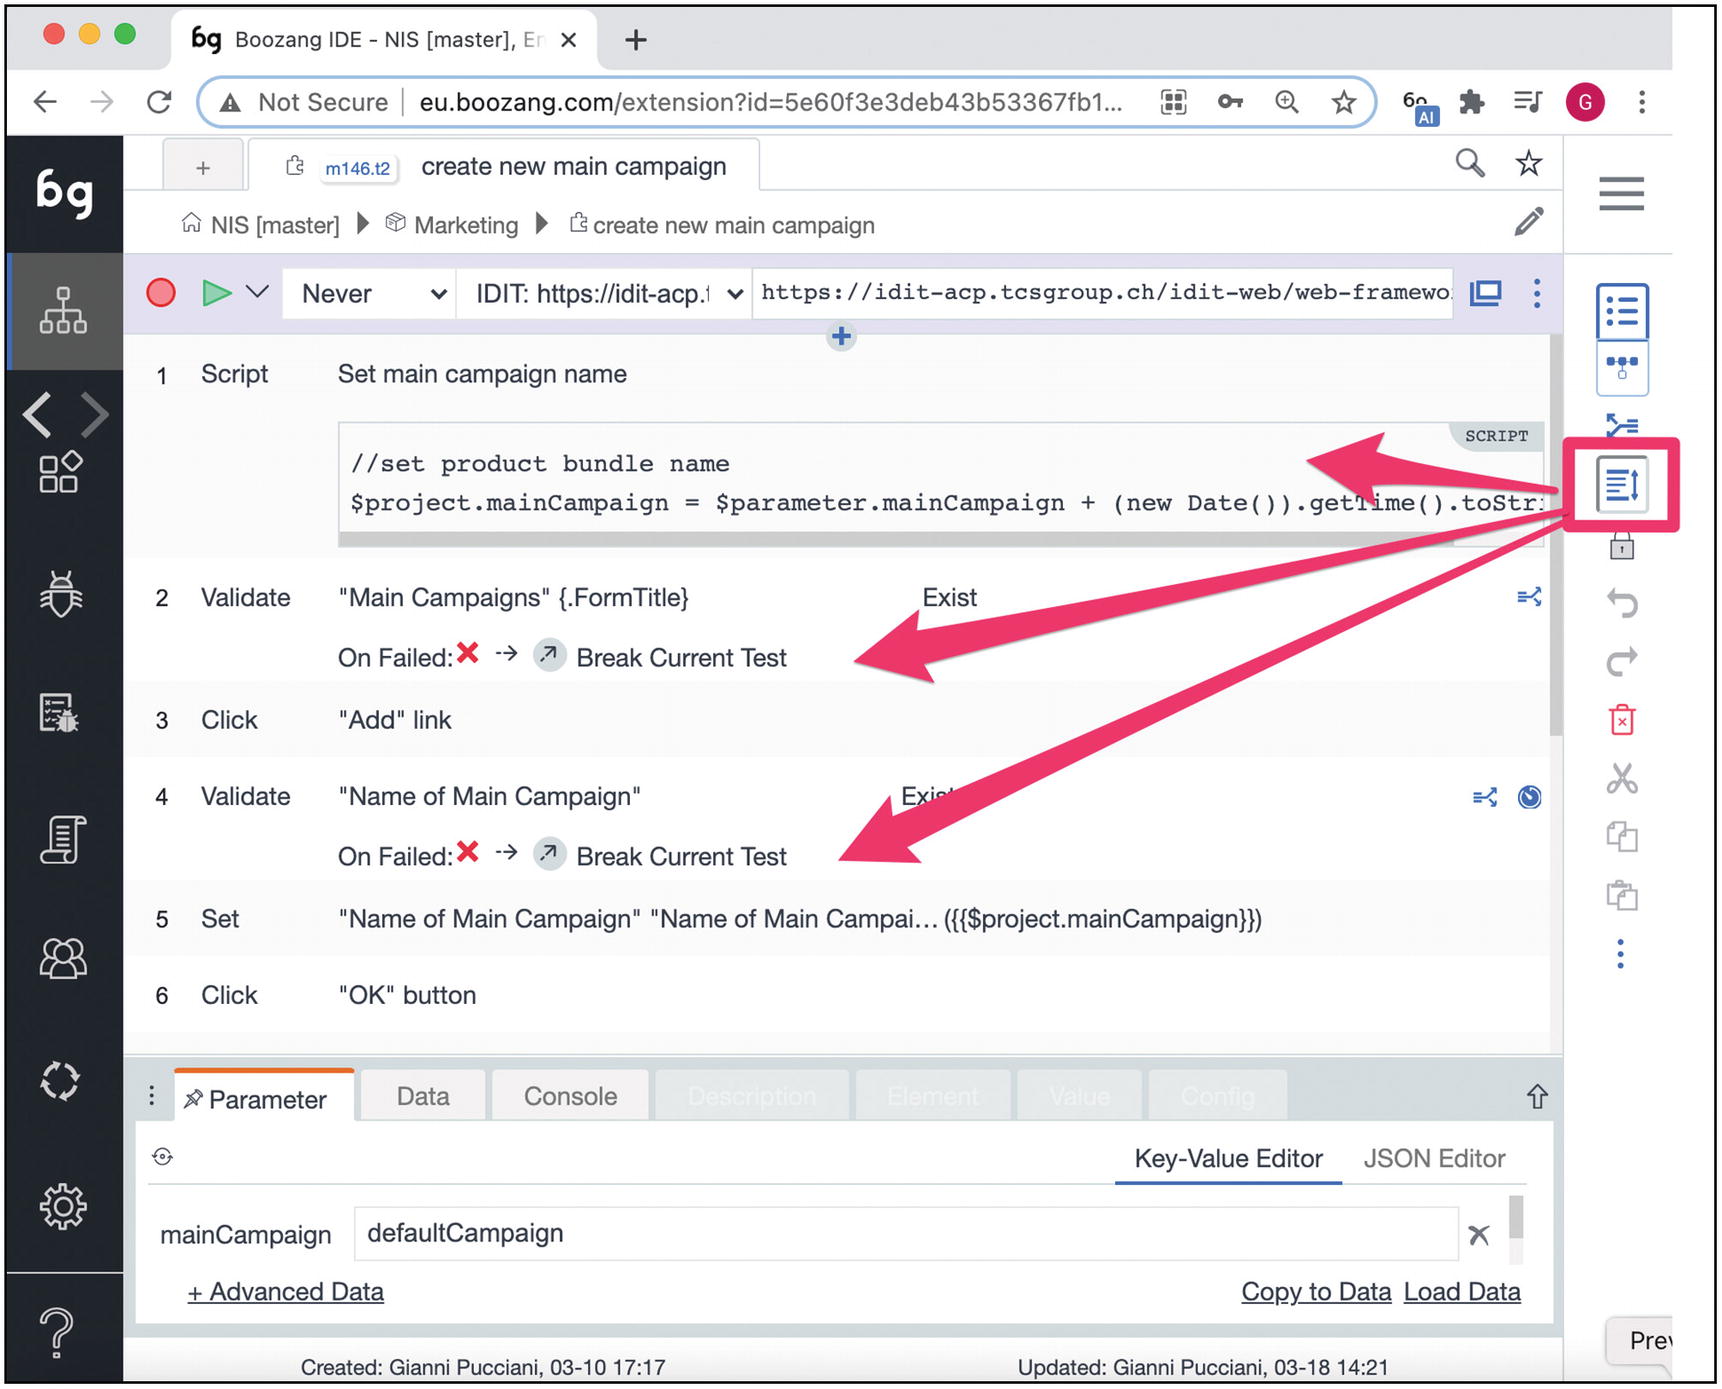
A screenshot of the test action window with a script to validate actions. The right side has a highlighted toggle symbol with 3 arrows pointing at the script and 2 validate columns.
Show actions details

A screenshot of the element tab. An arrow points at the 3 dots right. It has nine options to select from, and 7 of them are selected.
Details panels and tabs
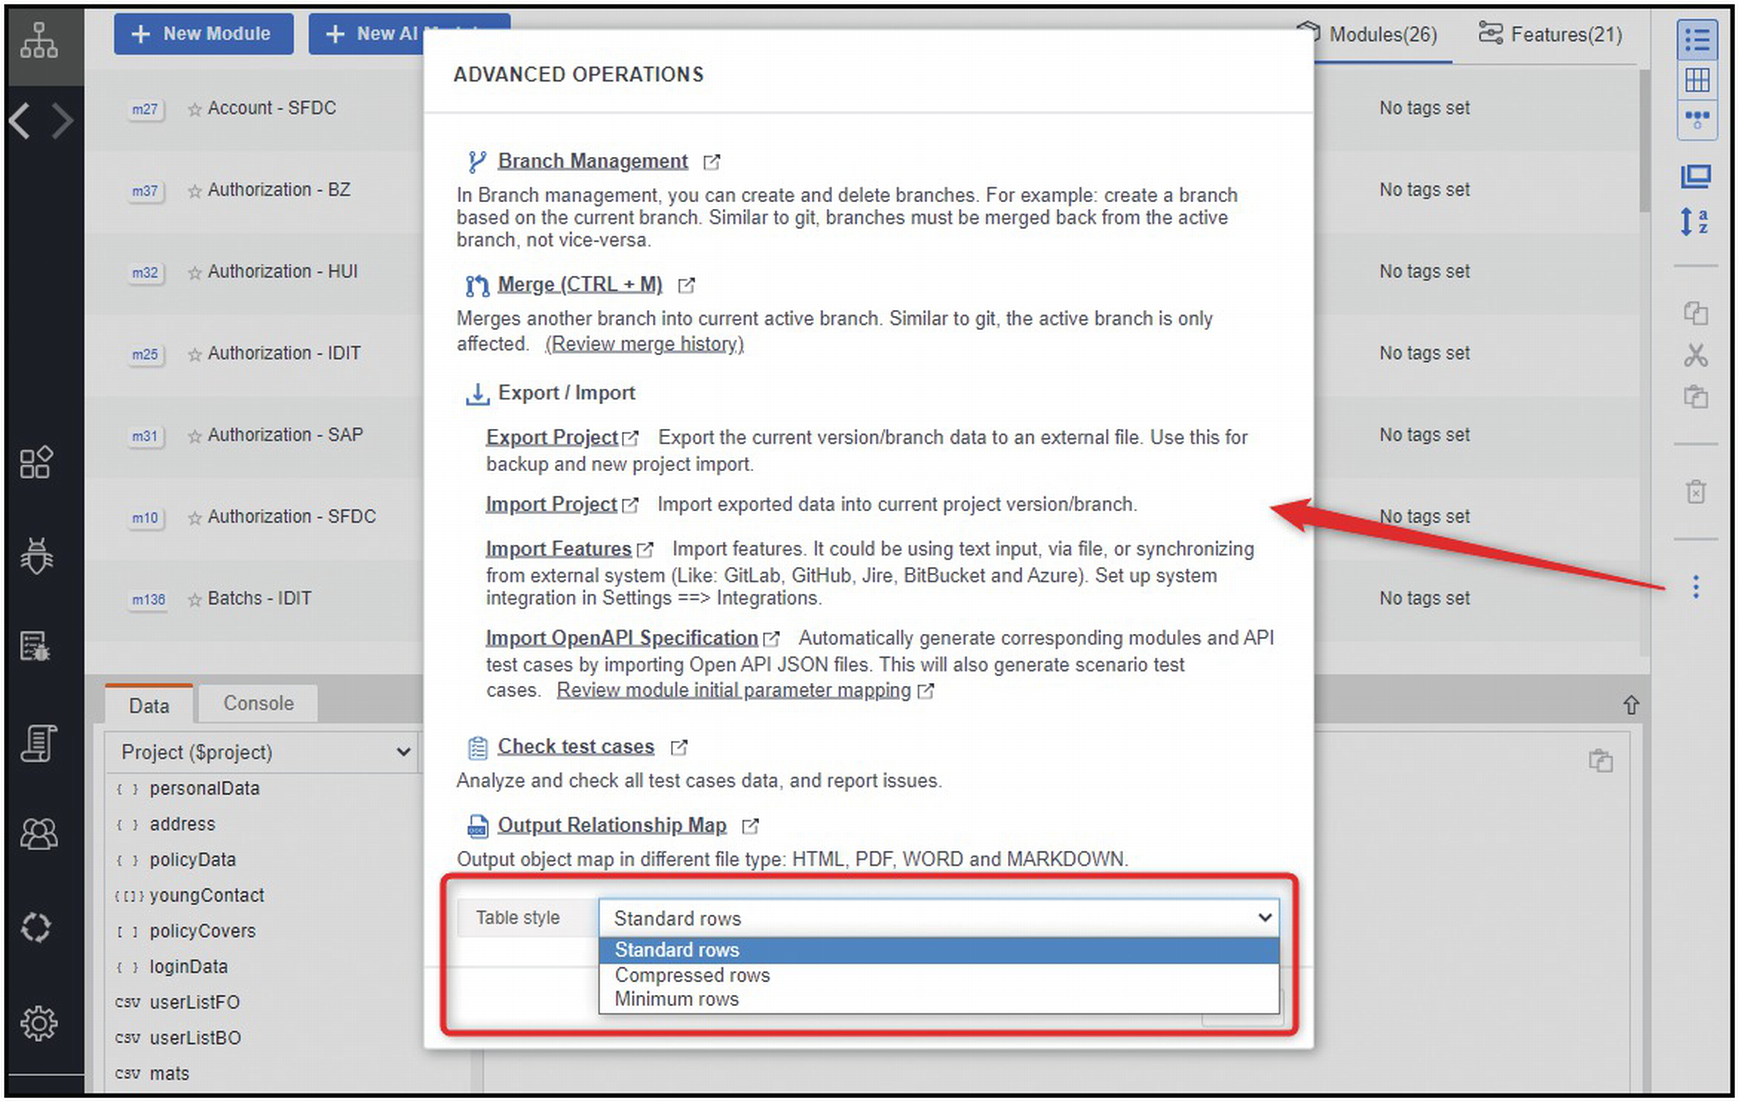
A screenshot of a pop-up window for advanced operations. It has highlighted drop-down menu for table style, with options for standard, compressed, and minimum rows. The standard rows option is selected.
UI customization options in the right panel kebab menu
In the second kebab menu (top bar), you find other advanced options. Let’s see some of the most important ones.
Updates from the Trenches

An illustration of a robot in a military outfit and equipment.
Half-way through the project (Sprint 12), time to share some learnings.
First of all, COVID impact. Like most of the world, we were obliged to work from home for several months, nearly every day of the week. Daily standups, Sprint demos, and retrospective sessions, all via Skype or Zoom. Hard to imagine, but we got used to the new way of working quite soon.
Tools like JIRA, Confluence, Slack, and of course Boozang allowed us to carry on our work with minimal disruption.
The project planning was also adapted: 6 Sprints were added and the initially planned 3 months UAT phase was replaced with 2 “UAT Sprints.” Besides COVID, the project extension was mainly due to the complexity of delivering the interfaces to internal and external applications.
Around the end of Sprint 10, we decided to move to the acceptance (ACP, AKA Pre-Production) environment5 for building our scenarios and reporting nightly executions. On the QA environment deliveries were frequent, once and sometimes twice a day. Remember we are not doing TDD nor BDD. In this environment the features were not yet validated by manual testers; hence we often ran into failures that were preventing us from completing some scenarios.
We wanted a more stable environment, hence the choice to work on the ACP one.
In the ACP environment builds are delivered once at the end of the 3 weeks Sprints. Therefore 3 weeks with an environment stable with features already manually tested.6 This allowed us to keep an average success rate between 80% and 90%. The 10%–20% of failures were most of the time equally split among system and automation issues.
200 Gherkin scenarios grouped among 19 Features.
190 Tests grouped into 26 Modules.
Maximum depth of a Scenario is 8, meaning that a scenario’s step is implemented via Tests that call other Tests until a nested level of 8.
The most used Test has more than 50 upstream Tests: this means that there are more than 50 Tests that are relying on this critical piece.
2 Test Suites (smoke plus full regression). A full regression run, executed nightly via Jenkins takes nearly 2 hours to complete, thanks to a dedicated 8 core Jenkins slave on which we execute jobs with 1 master and 8 workers (more on parallel runs in Chapter 15, “Jenkins and the Boozang Runner”).
In order to reduce the execution time, we used a lot of API tests (covered in Chapter 12, “APIs and Mixed API/GUI Testing”) in the Given part of a scenario. We sometimes created, for a specific Test, both a GUI and an API version. The API version is used when we need to set preconditions, while the GUI version is used in the actual steps (the “When” and “Then” parts in Gherkin).
In the first 10 Sprints we had four major versions of our Jenkins pipeline. We used the most recent feature in Boozang that allows for parallel runs at the Gherkin iteration level (more details on this in Chapter 15, “Jenkins and the Boozang Runner”).
We heavily rely on Boozang’s branching system, which evolved and improved a lot up until now.
Every automation implementation activity is tracked with JIRA tasks and implemented in a separate Boozang branch. We use a rather classic feature-branch approach, which we will describe in more detail in Chapter 16, “Boozang for Teams.”
Finally, around Sprint 8, we started discussing with the Boozang team about a new feature, implemented in Sprint 9, the Root Cause Analysis with the Known Issues repository.
To speed up the analysis of automation failures, we can now record Known Issues in Boozang, and have them automatically recognized and mapped on future executions (more on this in section “Root Cause Analysis” of Chapter 11, “Reporting and Troubleshooting”).