
In my house I am the boss, my wife is just the decision maker.

A cartoon illustrates the office meeting which enhanced team work. There are 2 women and 2 men with happy faces and under the table cat is sleeping.
Working with a team increases productivity but brings new challenges.
This chapter covers all the Boozang features for collaborative work, but also some specific details on how to effectively collaborate in a Test Automation project.
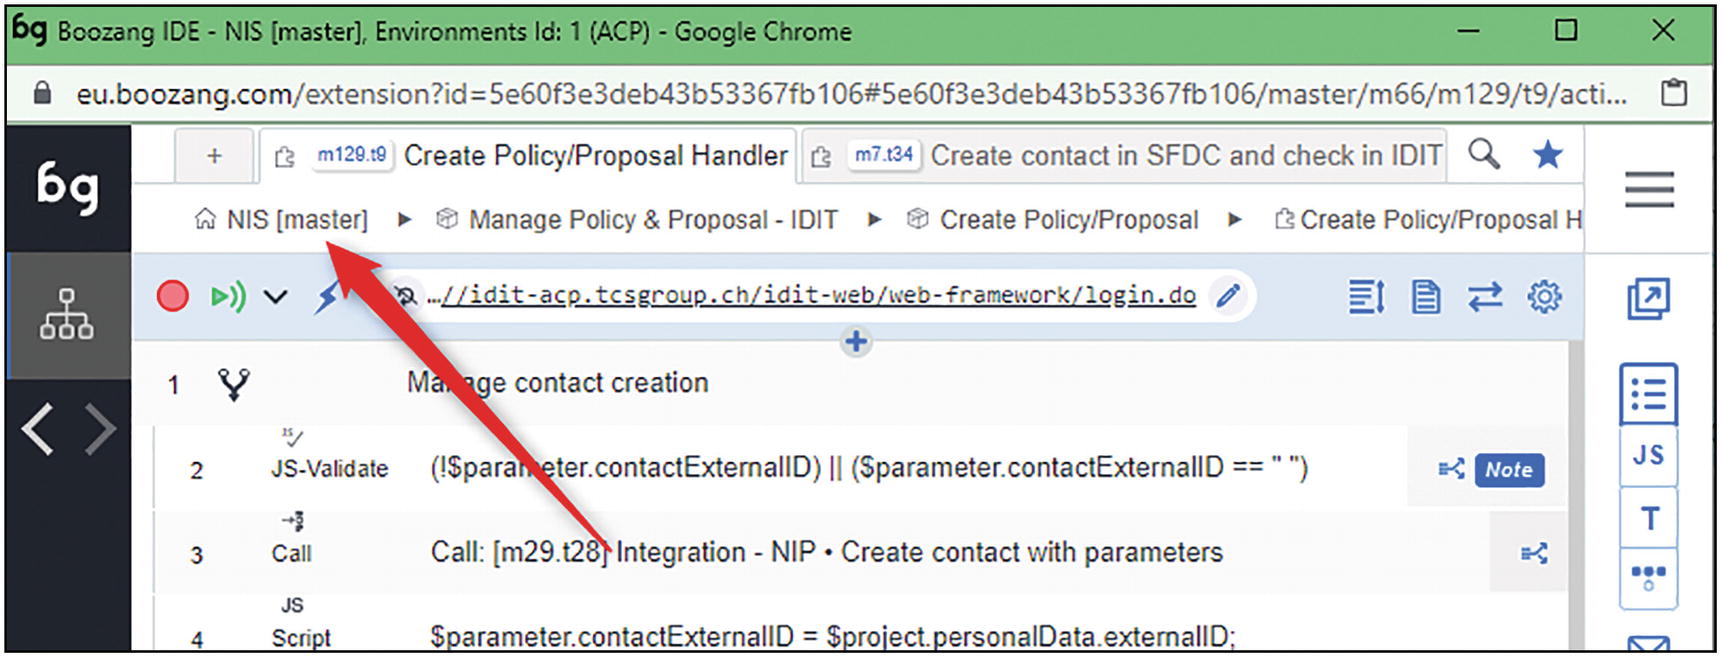
Team Collaboration
Boozang provides many features to make it well suited for team collaboration . Locking and especially branching provides all the necessary flexibility for concurrent work.
Besides Boozang features, keep in mind other collaboration and information sharing options.

A screenshot of text messages where some temporary issue is addressed with hyperlink.
A sample of Slack communication
Besides this we also practiced demo sessions on tasks done. The person who finishes a task (new scenarios, refactoring, CI work), before merging his work on the integration branch (see section “Working with Branches”), presents the work to the other team members and collects feedback. These periodic thirty minutes of screen sharing are very precious to catch issues, spot improvement opportunities, train team members, and share knowledge.
Explicit Lock
The explicit lock is the simplest way to avoid issues when working in a group without using the branching feature.

A screenshot of the test setting window where the lock test case option is highlighted.
Lock test case button
Changes are shown in real times, so conflicts are quite unlikely to happen.
However, the explicit lock is just a first support for concurrent work. Whenever you scale up your team, you might want to consider creating branches, which is the topic of the next section.
Concurrent Development and Safe Refactoring with Branches
The explicit lock works fine as long as you do not have many tests and rarely work at the same time on the same items. A better way to work for a team is via version control, working locally on your own version and then publishing your changes and resolving possible conflicts.
This is a topic that is well known in software development, where version control systems (VCS) have been around since the 1970s.
Since 2005, when Linus Torvalds created it to manage the development of the Linux Kernel , GIT has been used with success by many small and large, local and distributed teams. We can say that GIT is today the standard de facto for version control, and it is a fundamental piece of a CI/CD pipeline.
If you are new to GIT, start from the official documentation ( https://git-scm.com/ ) and then choose your favorite way of learning; resources on this topic are plenty. To understand the rest of this chapter, you should be familiar at least with the concepts of branching, merging, and conflict resolution.
What has all this to do with Boozang and Test Automation?
Boozang uses much of the same concepts as GIT when it comes to branching, merging, and conflict resolution, but for Test Automation code (represented as JSON data), not text files. This means for a user familiar with GIT, using branches in Boozang will be rather straightforward. It also means that in the software development life-cycle, it’s possible to mirror the ways of working of the development team, if needed.
You, or somebody else, will also probably use GIT for the development of the system that you are testing. Hence the CI/CD pipeline will try to build and deploy the SUT from a GIT repository.
Most importantly you will want to use a version management approach to manage concurrent implementation of tests in Boozang. Especially while performing some refactoring tasks, you will want to do that in isolation, and continue creating new tests at the same time.
In the following sections you will see what Boozang offers in terms of version control and possible ways to use it.
Working with Branches
When you create your project in Boozang, the master branch is automatically created. All the new tests and test data are added to this branch.
The branch you are working in is shown next to the project name on top of the IDE:
A window of boozang I D E when the new project is created, the master branch is created automatically with an arrow pointing it.
Branch display
When you click on the branch name, you can see all the currently active branches:

A window of the master branch, when u click on it various options is listed below.
Branches display
The branch management is done via the Advanced Operations page:

A window of advanced operation in which the arrow points towards the branch management option where you can create and delete branches.
Branch management
The Branch Management option gives you the possibility to see all the branches and create new ones.
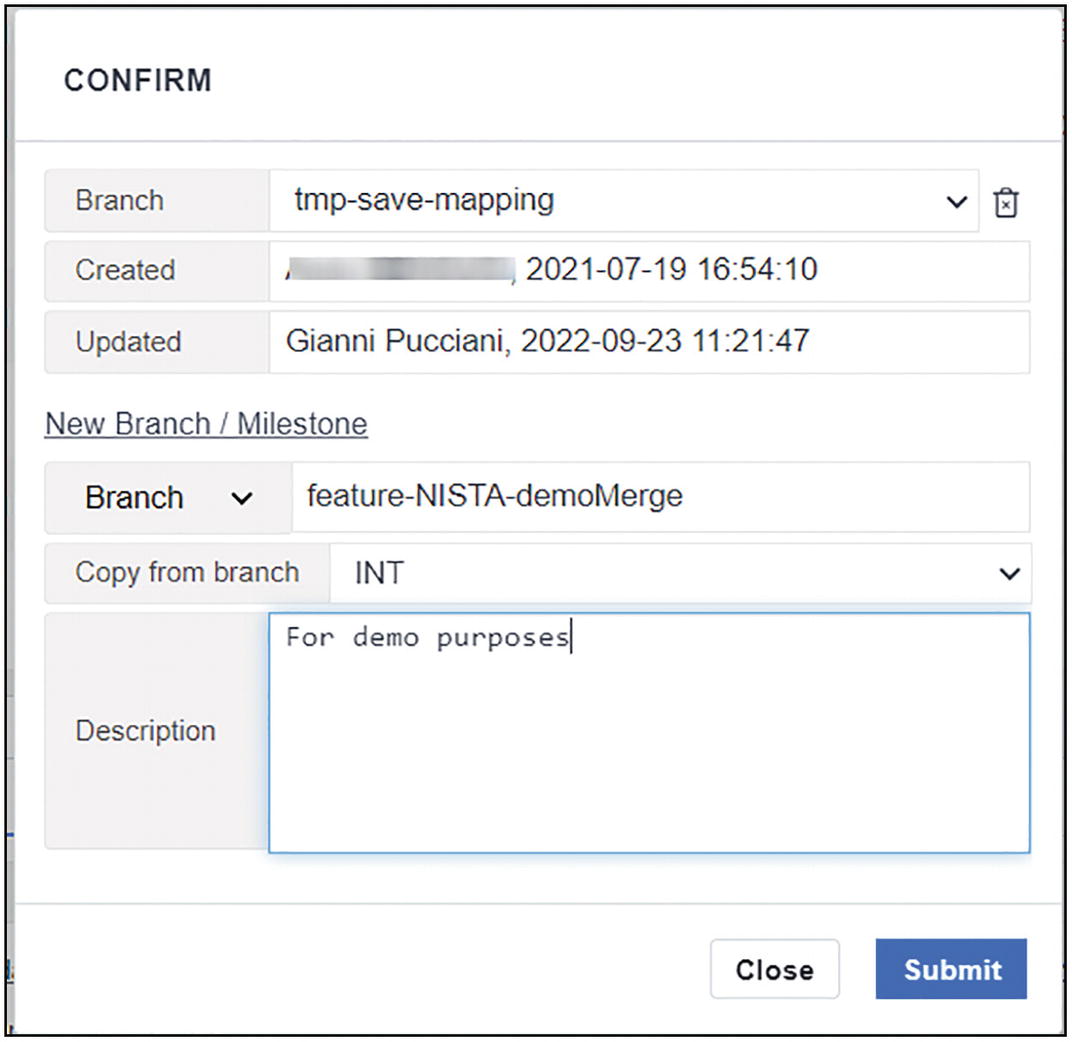
A window of CONFIRM where a new branch is created some specific information need to fill and submit.
Branches details
When you create a new branch, you will have to specify the starting point (i.e., the source branch), a name and a description.
Once you create a new branch, the IDE will reload to switch on the new branch.
In this page you can also create a milestone. A milestone is nothing else than a backup that you can use to return to a previous state.
Using a Feature Branch Approach
The approach I suggest for concurrent work in Boozang is the classic feature branch approach .2
- 1.
John wants to improve an existing test case. He creates a new branch (let’s call it “john-branch” for now) from the master branch and starts working on it.
- 2.
Julie wants to create a new test, but possibly interacting with existing tests that John is refactoring. Julie also creates her own branch (“julie-branch”) starting from the master branch.
- 3.
John has finished his refactoring; all the tests are passing on his branch. Julie has not finished yet. John goes on the master branch and merges the content of john-branch into the master branch. No conflicts are expected since nobody updated the master branch in the meantime. John notifies Julie that the refactoring is ready on the master branch.
- 4.
Julie, from her branch, merges the content of the master branch into her branch. Here conflicts might happen if Julie and John modified the same item (test action or data). Julie can now resolve the conflicts (accept John changes or not).
- 5.
Once conflicts are resolved, the new tests that Julie developed are now working together with the refactoring done by John, and all the existing tests are still working as expected. Julie can now safely go onto the master branch and merge the content of her branch into the master one.
Following this workflow allows people to safely work in parallel and keep the master branch clean and working as it should.
Branch Naming Convention
Here is the naming convention we used in our project, which is the standard when creating branches from JIRA and BitBucket:
< ISSUE-TYPE >/<NISTA- XXX >-< TITLE >
- ISSUE-TYPE: possible values:
feature for new developments.
hotfix: to fix the regression
XXX: is the number of JIRA ticket associated with the work. Exp: NISTA-123
TITLE: is the summary of the JIRA ticket of the auto test to implement
feature/NISTA-123-endorsement-refactoring
feature/NISTA-456-create-proposal
hotfix/NISTA-789-fix-date
Adding a Develop Branch
In many git workflows and in one of the most famous called Git-Flow (cite https://nvie.com/posts/a-successful-git-branching-model/ ), a new branch called “develop” is introduced.
The purpose of this branch is to add a quality gate between feature branches and the master.
In Test Automation , and with Boozang, this makes perfect sense since some time, the local execution might give different results than an execution within your CI tool. It is therefore desirable to integrate feature branches into the develop one, let your CI run on develop successfully, and only after that merge the content of the develop branch on the master one.
In this setup, the master branch will run your “official” or “production” tests via a “production” CI job. This job, when failing, should raise a big alarm. You will not want to have false positives in here.3
The develop branch instead will run all the finished work, and should have his own CI job. Failures on this job are tolerated, but must be fixed quickly.
Jenkins Setup
Master: This is the job used to run nightly all the tests and check for regressions. This job is linked to the master branch. This job must stay as green as possible, and when read it should mean an SUT issue.
Develop: This is the job used to run tests when they are ready and check if the execution from Jenkins runs as expected. This job will be launched manually with parameters because we might want to run and check just a subset of the tests. In this job we can tolerate failures, but they should be fixed with high priority.
Merging Process
The merge process in Boozang is available via the “Advance operations” menu .
- 1.
Place yourself on the target branch
- 2.
Call the merge process to take the changes of another branch

A window of advanced operation where the merge option is highlighted, which merge another branch to an active branch.
Merge process via the Advanced operations menu
To illustrate the merge process, I created a new branch, modified a test adding a note to an api action, and now trying to retrieve this change in the INT branch.

A window of merge branches is displayed where the view and overwrite options are highlighted.
Merge process: branch selection, no conflicts
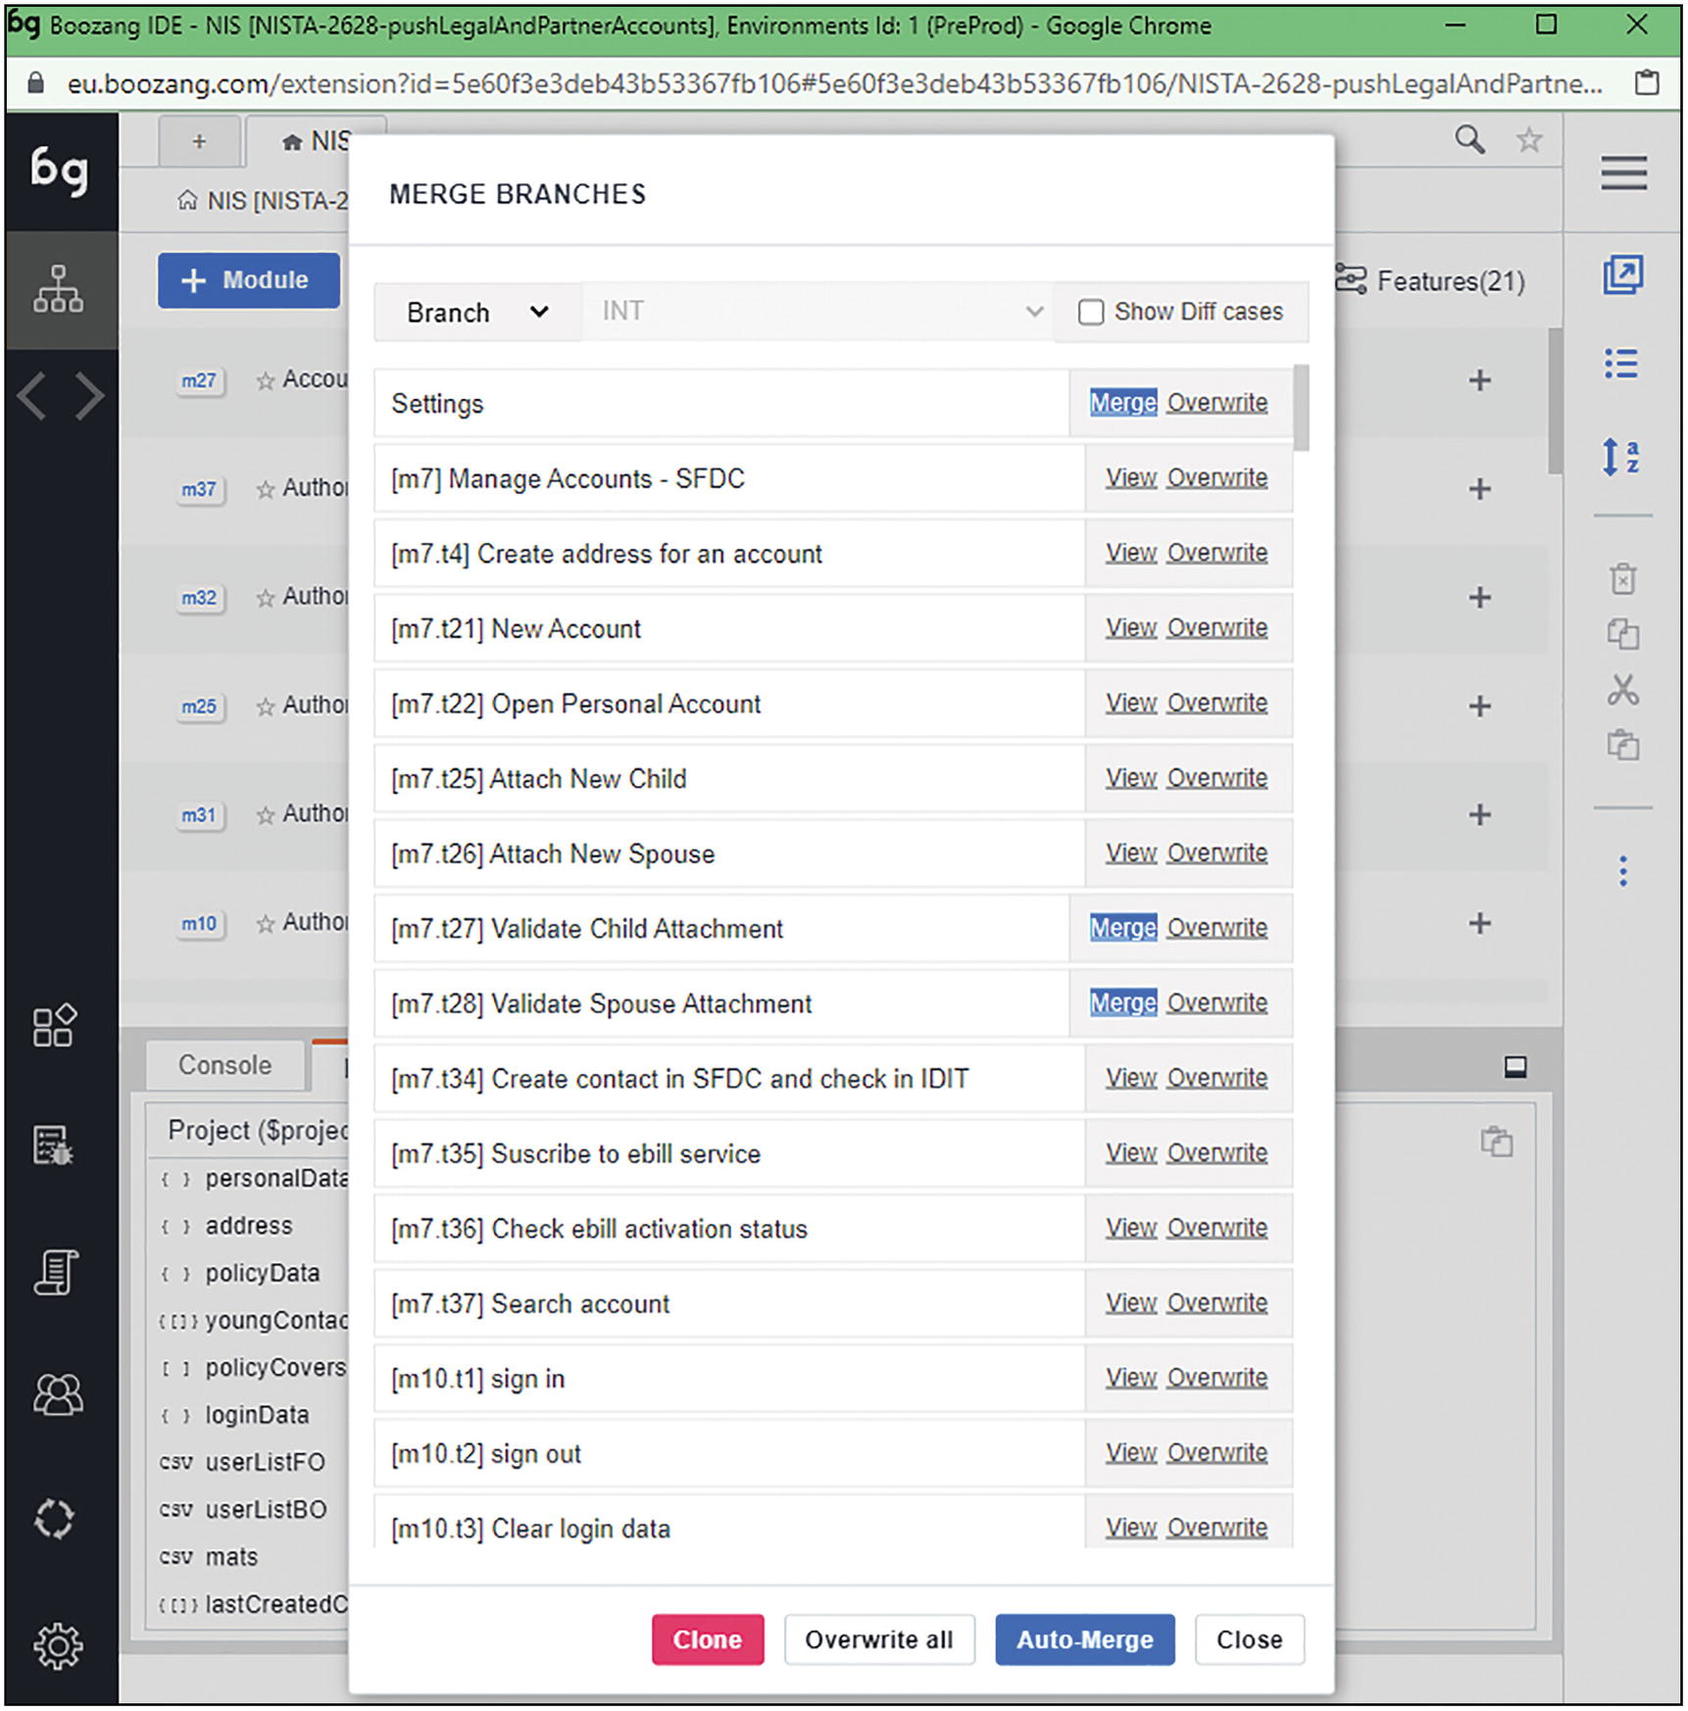
A window of merge branches is displayed with various elements listed below. There are 4 options at the end: close, overwrite all, auto merge, and close.
Merge process: changes
- 1.
Overwrite: The content of the target branch will overwrite the one of the current branch.
- 2.
Merge: You will be prompted to select the changes you want to keep.
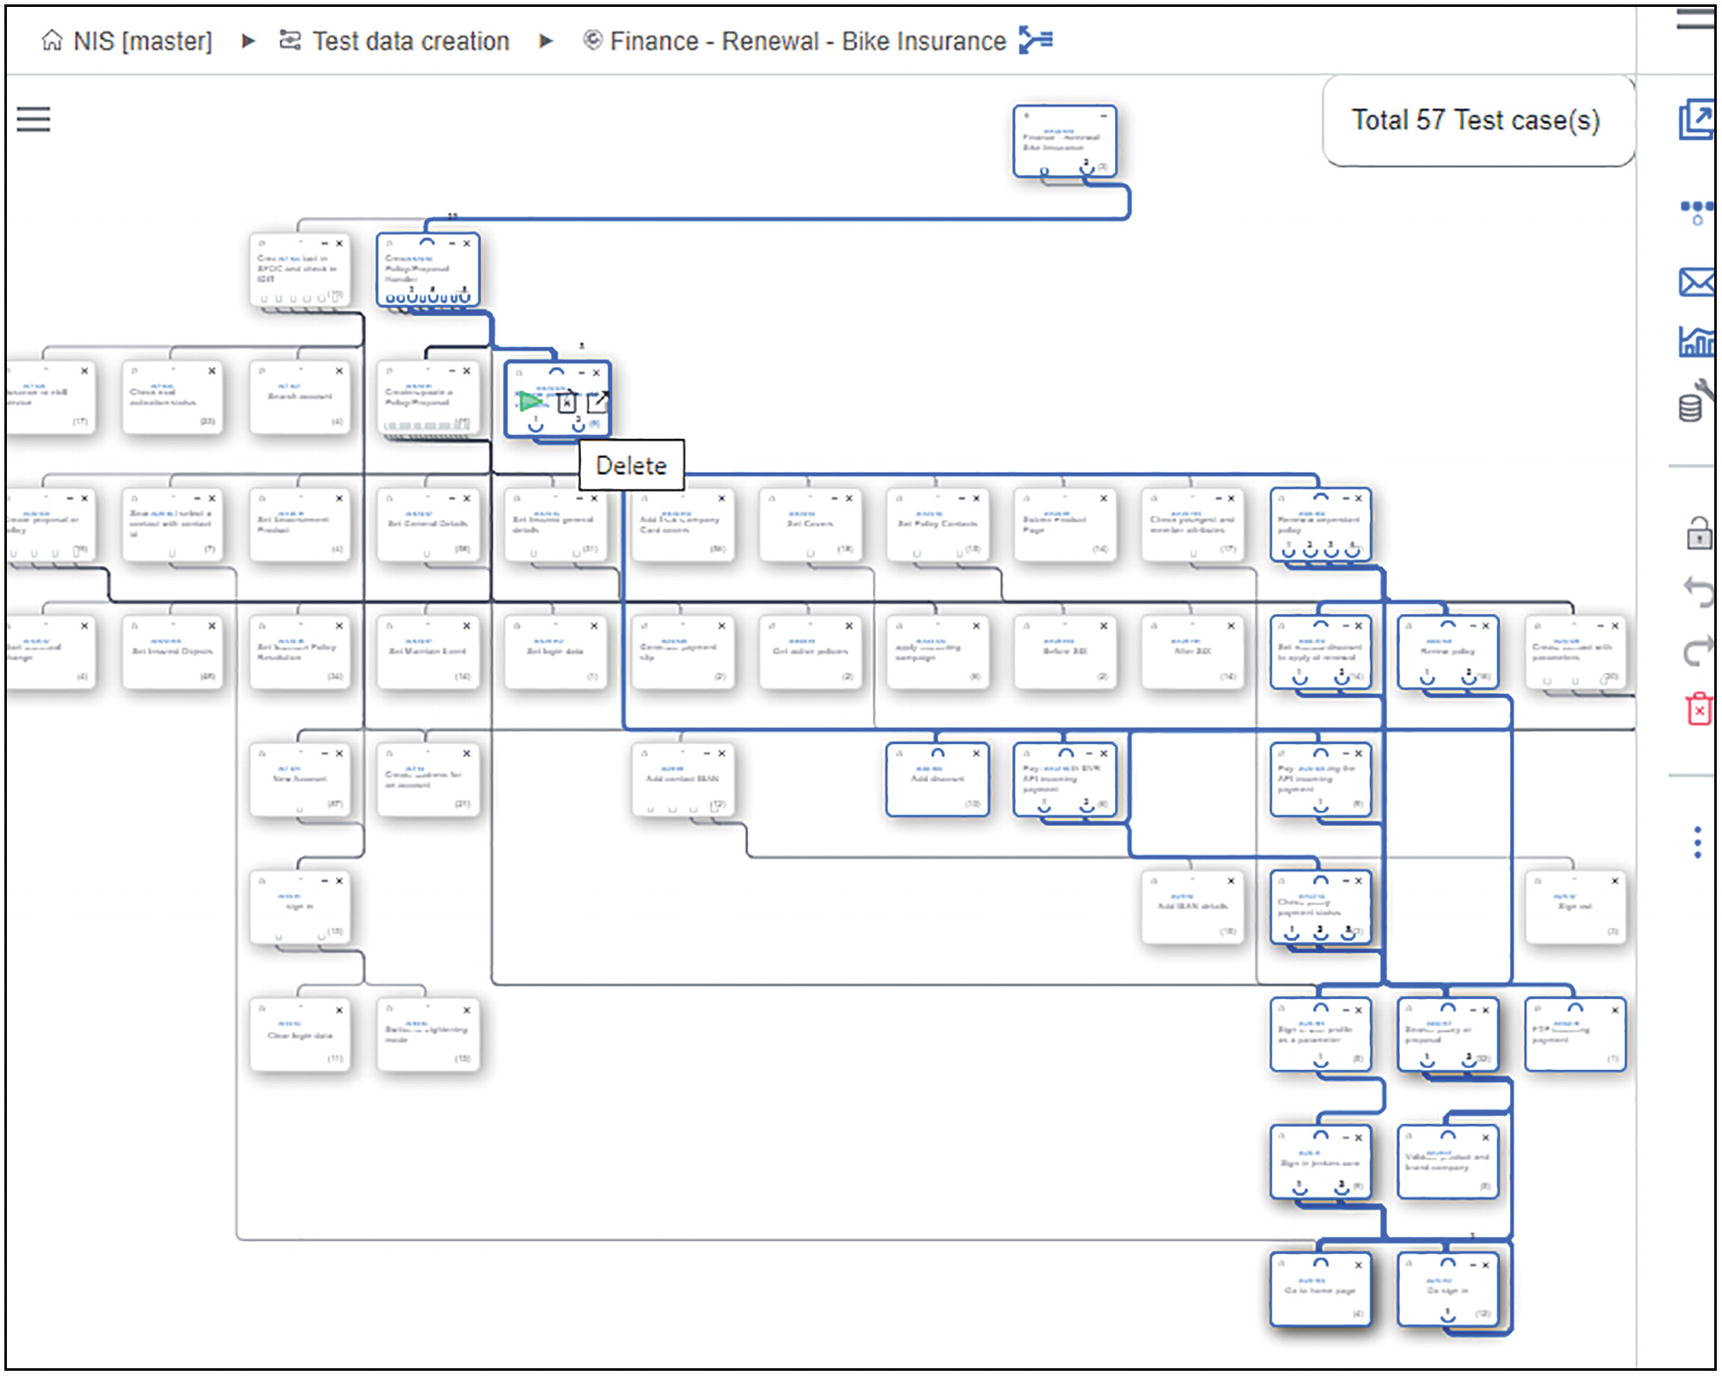
Tests Map

A window of advanced operation is displayed with an arrow pointing towards output relationship map.
Relationships map
This option is available from any test or scenario in your project, and gives you the possibility to print a map of all the relations of your tests:
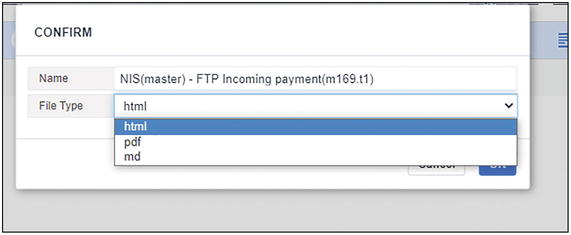 A window of the CONFIRM where F T P incoming payment tab is selected and file type is html.
File type selection for the map

A window of a project where CONFIRM box is displayed with various modules in pdf format.
Generation of the relationships map from the root of the project
On a large project like ours, this process can take several minutes. The results will be a PDF file with a table of contents organized by module.
A window of the relationship map that highlights upstream and downstream tests.
Relationships map with highlight of upstream and downstream tests

A window of pop up test case with the details of the test.
Popup Test Details
Onboarding new team members
Finding duplications or unused items
Quality Control
When working on a large project, with a lot of automated scenarios and a group of people collaborating, it is important to establish implementation policies and best practices early on, but also to monitor the quality of the scenario implementation on a constant basis.
Boozang can support this activity with the “Check Test Case” feature . This feature is available in the Advanced Operations page:

A window of advanced operation where check test cases are highlighted, which analyzes and checks all the test data.
Check Test Cases option
The Check Test Case feature can be run from any object, be it a Test Case, Module, or the entire project.
There are several checks that can be done, and you can filter the view to see each of them separately. Some of them are shown as errors, others as warnings.
The issue list is shown in a summary tab and as well in a more detailed one (Issue list) where you can filter issues by type of check.

A window of the issue list is seen in a summary tab which includes an error, data error, warnings, etc.
Issues summary

A window of the issues in which the issue list tab with the All (125) option is selected.
Issue list tab with all the checks
For all the checks, when you click on one issue, the IDE will switch to the concerned Test and action.
Warnings
Missing Plug Test Case

A window of the issue where the issue list tab in that missing plug test case (11) is selected.
Not implemented step
Un-referenced Test Cases
This check tells you which Tests are not called by any upstream test. This is especially useful when using Gherkin scenarios: in this case no tests should appear as unreferenced . When using Gherkin scenario all Tests should be linked, directly or via an up-stream Test, to a Scenario step.
Non-unique Element Selectors
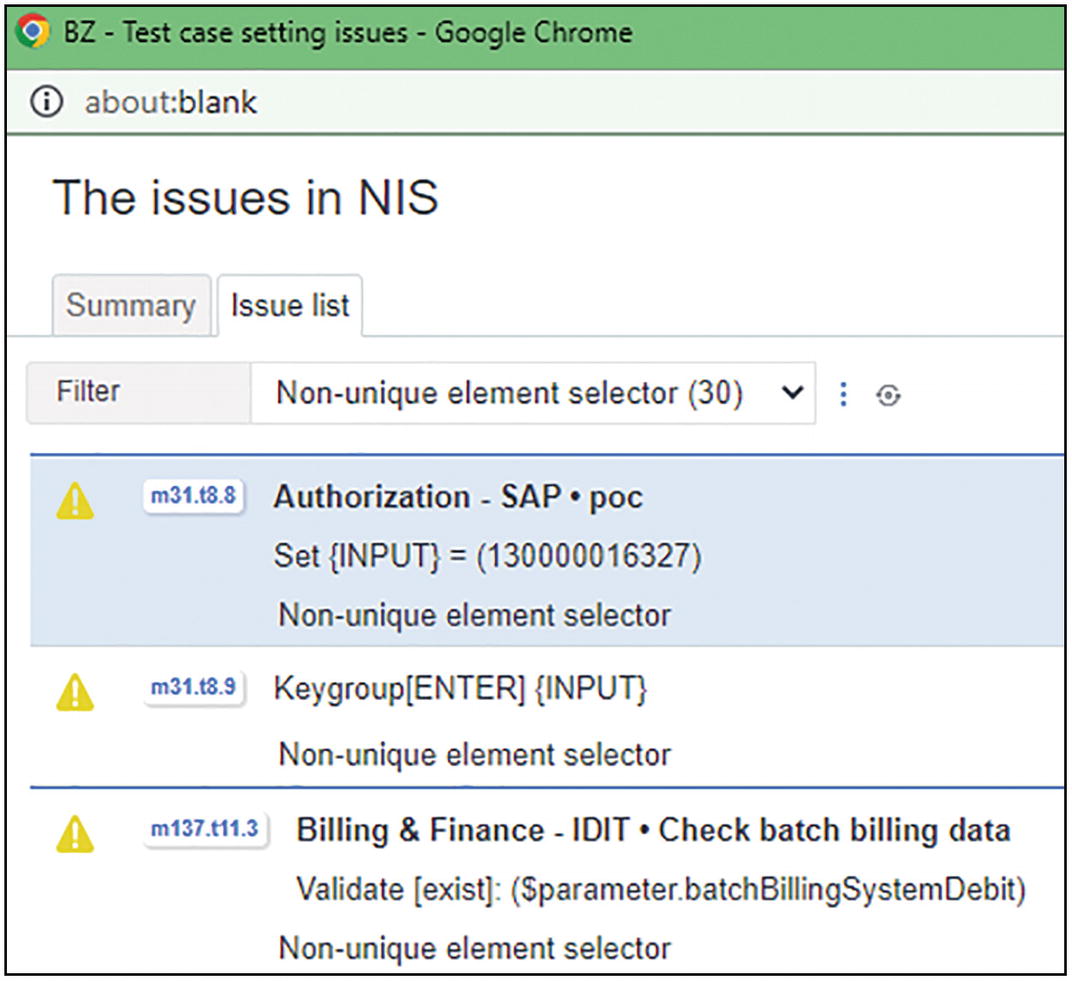
A window of the issues where issue list tab is selected and the non-unique element selector (30) is filtered.
Non-unique selectors
Empty Input Values

A window of missing expectations setting where some issues are seen that is manage accounts and utilities.
Empty input values
Launch Page Issue
As already mentioned in Chapter 7, “Main Concepts and Entities,” when discussing the environment URLs, a common issue is not to set the correct launch page option.

A window of the issues where the issue list is selected, and the launch page issue (11) option is filtered.
Launch page check
Errors
Missing Plug Test Case Target
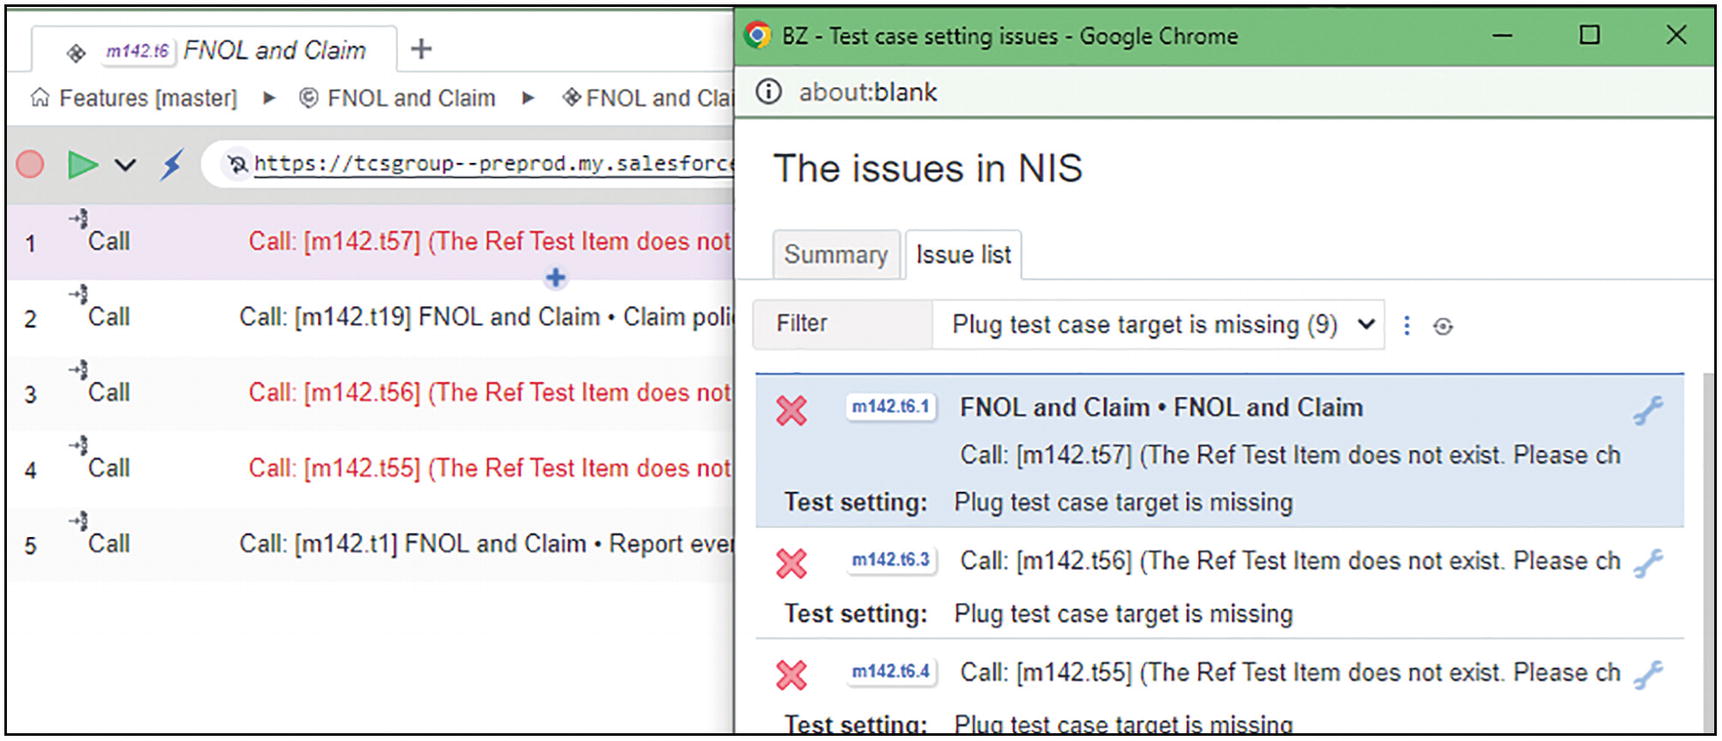
A window of the issues where the issue list tab is selected, and the plug test case target is missing (9) is filtered.
Missing Test Case target
Data Error

A window of the issues where the issue list tab is selected and the data error (1) option is filtered.
Data error
Missing Expectation Setting

A window of the issues where the issue list tab is selected and the missing expectation setting (2) option is filtered.
Missing expectations
Missing Element in Action

A window of the issues where the issue list tab is selected, and the missing element in action (1) is filtered.
Missing elements
Our Main Learnings
As for every project that comes to an end, it is important to share some learnings.
Will I use Boozang in our next project? Certainly yes. From the time I selected this tool as our main Web automation tool , new features have been added, the stability and robustness increased, and the support has always been top of the class.
In terms of organization, having a dedicated automation team is certainly something I would recommend. However, there are certainly things I wish we could have done better.
The first one is the proximity of the automation team with the delivery team, both business analysts and developers. We did spend too much time retro engineering the scenarios and understanding the application flow. A more BDD-like approach would have certainly increased the efficiency.
The same proximity would have given us more confidence in our coverage.
The point where I feel we could have done much better is on the management of the test environments. Especially on the ACP (AKA PreProd), several activities were performed by different stakeholders, mainly UATs , performance testing, and data migration. Although Slack proved to be very useful to align all the stakeholders, proactive monitoring of these environments was missing mainly due to capacity and organizational constraints.
The integration with JIRA and XRay worked flawlessly, and it allowed us to increase the visibility and transparency of our work, presenting the progress and the coverage on a daily basis with the Scrum teams.
The Jenkins pipeline also worked well. It did go through several improvements at the beginning of the project, but after a few sprints it has reached a good degree of maturity and stability.
Some improvements can still be made concerning the concurrency of different Jenkins jobs. This is however due to some application constraints and the need to execute each Boozang worker with a separate test user.