
Chapter 7. Scripting Preconditions
Chapters 5 and 6 focused on different ways to configure WebPageTest to more accurately represent how real users access a page. We considered the browser, connection speed, geographic location, and device type as customizable options. One thing that has been relatively unmentioned so far is the state of the page and how that can have an effect on its performance.
The cache state of a page has been discussed earlier, but as noted in “Enabling Repeat View”, we cannot simply rely on the repeat view to represent the cache state of a page. This view is useful for illustrating the resources that could benefit from client-side persistence through the narrow perspective of reloading a page to see what still needs to be downloaded. Realistically, however, users don’t just visit a page and reload it. There are other vectors in which a page could be warmed up with the user’s prior browsing history.
Two examples of this would be caching of resources both internal and external to the site. Resources can be shared between pages of the same site, such as a common stylesheet or masthead logo. Going from one page to another doesn’t usually require that these resources be downloaded again. External resources can also be shared between pages on different sites. Third-party resources like CDN-hosted JavaScript libraries may already be cached on a user’s machine before the user ever visits a page that requires that resource. When the user visits such a page for the first time, this is one fewer resource that needs to be downloaded. In both of these examples, the page is in an in-between state in which some resources are immediately available and some are not. As you may have guessed, this can have a dramatic effect on performance.
In this chapter, we will look at two approaches to configuring WebPageTest such that the results more accurately reflect real-user experiences. First, we will use scripting to address the cache-state gap. Instead of relying on a completely cold cache state on first view and an unrealistically primed cache in the repeat view, we will give instructions to the testing agent to simulate a third state known as the flow view. Finally, this chapter will tackle the problem of testing web pages that users are logged into. Many sites personalize content for users, and some pages are entirely blocked off to unauthenticated visitors. In order to get visibility into the performance of these types of pages, we will need to instruct testing agents to log in to a website before running the test.
Flow View
Out of the box, WebPageTest offers two simple yet powerful options to configure a test: first and repeat views. These views are extremely helpful for identifying general performance problems but do not always reflect the state in which a user experiences a page. For example, you may have found through “Popular Pages” that most users enter through the home page and navigate to some secondary page.
The resources shared between these two pages (Figure 7-1) would not need to be loaded when the user navigates to the secondary page, assuming that their cache configuration has been set properly. But the remaining resources unique to the secondary page still need to be loaded, and this exact scenario is not always captured by the first or repeat views. So we turn to the scripting interface for finer control.
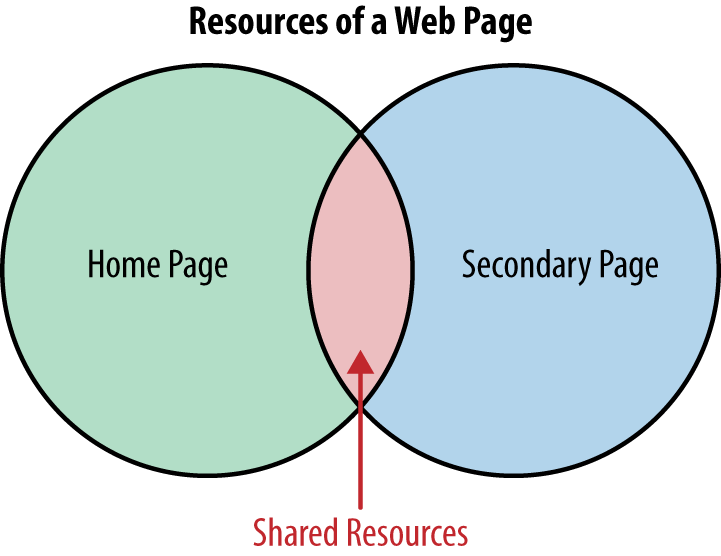
Figure 7-1. Diagram of the resources of two web pages, home and secondary. Between them, there are some shared resources.
logData and navigate
To script the flow view, there are only two basic commands that you need to know:
logData-
Turns on or off the recording of network activity presented by the waterfall diagram.
navigate-
Instructs the test agent to perform an HTTP navigation to a specified URL.
These commands are entered into the scripting input field in the Advanced Settings section, as shown in Figure 7-2.
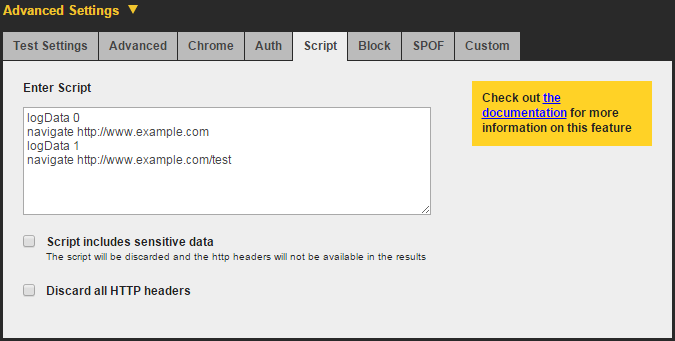
Figure 7-2. WebPageTest is configured to preload the home page of a website before navigating to and capturing the network data for a secondary page
The exact script to perform the flow view is as follows:
logData 0navigate http://www.example.comlogData 1navigate http://www.example.com/test
The first two commands disable network recording and preload the home page. In order to get a clear view of the secondary page’s performance, we disable network recording of the home page to exclude it from the waterfall diagram. When the home page is preloaded, all of its cachable resources are warmed up and downloaded for the secondary page to load immediately from cache. The last two commands enable network recording and load the secondary page. Enabling logData here ensures that we get the secondary page’s network activity in the waterfall diagram. The second navigate command simulates the user clicking on a link from the home page to the /test page. Resources that have already been loaded on the home page are not reloaded on the secondary page, but rather they are served from cache. In this particular test, we’re able to configure WebPageTest to establish the precondition that the home page has been loaded and its resources have been cached. Without scripting, this would not be possible.
By using this simple pattern on pages that are not usually visited directly, test results will more accurately reflect the real-user experience. Remember to look at your RUM report to determine common entry pages and configure your flow views accordingly.
Authentication
Until now, there has been a dangerous blind spot in our performance testing. Our test configurations have all lacked authentication, which is the means by which users are able to log in to a website. Some pages or even the entire site may be completely inaccessible to testing without authentication. Personalization is also an important part of the user experience and it would be important to capture any performance overhead this may incur. For example, simply authenticating a user would typically require a database lookup to verify their credentials. This lookup alone could be a performance bottleneck and would be completely invisible to unauthenticated tests. We need a way to run authenticated tests. Fortunately, WebPageTest provides three ways to do this.
Warning
When testing authenticated pages on WebPageTest, you are strongly advised to use an account specifically for testing purposes. The credentials for this account will be entered into WebPageTest and may be visible on the test results page.
You should also be sure to mark the tests as private, which will prevent the results from appearing in the publicly visible and searchable list of recent test results. Private tests can still be accessed by anyone with the test ID, so the test account credentials may still be exposed inadvertently.
A much more secure defense against leaking account credentials to the public would be to use a private instance of WebPageTest. Refer to Chapter 11 for more information about setting up a private instance.
In this section, we will demonstrate how to use each of the three techniques for enabling test authentication. First, the Auth tab is the most straightforward method. Next, we will utilize the scripting commands to programmatically submit a login form. And finally, we will look at setting an authentication cookie. Even though each approach is designed to produce the same result, we will discuss some caveats that you should consider when selecting a technique.
HTTP Basic Authentication
WebPageTest’s advanced configuration section includes a tab specifically for authenticating using a simple HTTP header. The Auth tab allows you to provide a username and password, which is base64-encoded and assigned to an HTTP request header (see Figure 7-3). This technique is called HTTP Basic Authentication (HBA).

Figure 7-3. In the Advanced Settings section, the Auth tab can be used to input a username and password. This data will be sent to the test page in the form of an Authorization header.
This is the simplest way to configure WebPageTest to log you in as a particular user. Keep in mind, though, that the account credentials are sent in plain text in the HTTP headers. For example, this would be the request header generated by entering a username of username and a password of password into the Auth tab:
Authorization: Basic dXNlcm5hbWU6cGFzc3dvcmQ=The name of the header is Authorization, whose value contains text that should be interpreted as account credentials. The Basic keyword is a hint to the server how to interpret the encoded value. In this case, the value is a base64-encoded string of a username and password, delimited by a colon. In other words, dXNlcm5hbWU6cGFzc3dvcmQ= is username:password in base64-encoding. With this data, the server can decode and parse the credentials and authenticate the user.
It’s up to the server to support HBA, so this is not always a reliable way to authenticate a test. Still, it is the most straightforward method offered by WebPageTest to log in to a test website.
DOM Manipulation
Another way to authenticate users with WebPageTest is to programmatically interact with the UI of the page to complete a login form. This approach most closely aligns with the way a user would manually log in.
WebPageTest provides several scripting commands that interact with the elements on a page. The two commands that we’ll leverage for authentication are setValue and submitForm:
logData 0navigate http://www.example.com/loginsetValue id=u usernamesetValue id=p passwordsubmitForm id=login-formlogData 1navigate http://www.example.com/profile/username
The way this script works is by first navigating to the login page of our test site without recording any of the activity so far. This should look familiar because this script is an extension of the “Flow View”, in which one page is loaded before the test page. Next, setValue literally sets username to be the value of the element with an ID of u. A similar command sets the password on element p. The IDs of these elements are specific to the markup of the login page, so you’ll need to inspect the source of the page you’re testing. If an ID is not present, you could use any other uniquely identifiable attribute:
<inputtype="text"name="uname"class="form-field">
For example, given the preceding HTML, you could use the name attribute to target this element directly. There would presumably be many other elements on the page with type="text" or class="form-field". The command you would use in this case is:
setValue name=uname usernameAs previously mentioned, this script extends the flow view, which means that it is a pseudocached test. One drawback to this approach is that it would not allow you to test a cold load of an authenticated page. This is because the login page’s resources will always have been cached first. To address this, we’ll look at one final technique that does not require a helper page to log in first.
Setting Cookies
The third and final authentication method is almost a hybrid of the first two methods. Recall that with HBA, the Authorization header is included on the initial request. We also tried to manually log in by programmatically mimicking the way a user would complete a form. These methods have their drawbacks: HBA is not supported everywhere, and DOM manipulation requires a login page to be sacrificed to the cache before testing. This method has the simplicity of leveraging HTTP headers and the versatility of using the scripting interface. Here’s how it works:
setCookie http://www.example.com session=286755fad04869ca523320acce0dc6a4navigate http://www.example.com/
The setCookie command enables you to configure a cookie to be included in the request headers. The syntax of the command is setCookie path name=value. The path specifies the domain on which the cookie is valid. After a space delimiter, the path is followed by the name and value of the cookie used to track authenticated users.
This is a hybrid approach because it sets a request header similar to HBA and it uses the scripting interface like the DOM-manipulation approach. However, this is a simple and elegant script unencumbered by the same drawbacks that limit the feasibility of the other techniques. Every website that does authentication will set some kind of cookie to persist the session, so you don’t need to worry about lack of support. Conveniently, it is also cold-cache-friendly, so you can get that first-view experience without having to preload a login page.
The beauty of this approach is its extensibility. As written, this is a first-view script with an empty cache, something we were not able to achieve with the DOM-manipulation approach. If necessary, we could incorporate the flow view to get a different caching experience.