Chapter 7. Prototyping
Explore, challenge, and evolve your ideas in reality.
Expert comments by:
Alexander Osterwalder | Carola Verschoor | Francesca Terzi | Johan Blomkvist | Kristina Carlander
7.1 The process of service prototyping
-
Prototyping service processes and experiences: Investigative rehearsal
Prototyping service processes and experiences: Desktop walkthrough
Prototyping physical objects and environments: Cardboard prototyping
Prototyping digital artifacts and software: Rehearsing digital services
Prototyping digital artifacts and software: Paper prototyping
Prototyping digital artifacts and software: Interactive click modeling
Prototyping ecosystems and business value: Service advertisement
Prototyping ecosystems and business value: Desktop system mapping (a.k.a. Business Origami)
Prototyping ecosystems and business value: Business Model Canvas
-
7.3.3 Case: Enabling staff and stakeholders to prototype for continuous evolution
7.3.4 Case: Minimum lovable products, living prototypes, and high-fidelity sketching in code
7.3.5 Case: Using role-plays and simulations in large-scale 1:1 prototypes
7.3.6 Case: Using multifaceted prototyping to create and iterate business and service models
This chapter also includes
Reducing Uncertainty
In service design, prototyping is used to explore, evaluate, and communicate how people might behave in or experience a future service situation. Prototyping helps the design team to:
→ Quickly identify important aspects of a new service concept and explore different alternative solutions.
→ Systematically evaluate which solutions might work in our everyday reality.
→ Effectively create a shared understanding of initial ideas and concepts, enhancing communication, collaboration, and participation of interdisciplinary stakeholders.
Prototyping is an essential activity to reduce risk and uncertainty as early and as cheaply as possible, to improve the quality of your final deliverable, and to eventually implement your project successfully. Usually prototyping is done after some initial research and ideation in a service design project, but it can also be used to kick off a project, especially when working on existing products. Prototyping activities often uncover new questions and send the team back to research or ideation, which leads to even more options you might decide to prototype and test.
 Comment
“One of the key challenges in service prototyping is the constant interplay between prototyping of single touchpoints vs. consistent and iterative development of holistic service experiences.”
— Johan Blomkvist
By turning your ideas into prototypes and testing them with real customers and stakeholders in realistic contexts, you keep your personal biases 1 in check. Through prototyping you produce work which is grounded in reality, not in assumptions and opinions.
Practically, over the course of a whole service design project you will use a wide range of methods, from quick-and-dirty prototyping to simulating and testing close-to-reality prototypes that deliver solid and valid (market) data. Prototyping is a structured but in itself iterative process. It often starts with exploring a simple idea or question and leads to iterating between working on specific parts of the service and exploring the effects of those changes on holistic end-to-end experiences.
Service prototyping uses walkthroughs, theatrical rehearsals, or process simulations as well as traditional model making and testing techniques from a wide range of disciplines. While the scope of prototyping in service design might vary, it should always balance holistic perspectives across multiple steps with a detailed focus on single touchpoints or experiences. You employ ethnographic research methods to evaluate and make sense of the gathered data. In many ways – especially when used for explorative and validating purposes – service prototyping can be seen as research focused on future service situations.
THE BASIC PROCESS OF SERVICE PROTOTYPING

Figure 7-1. Prototyping activities are embedded in an iterative sequence with other activities of research, ideation, and implementation.
Research-based: The creation of the prototype itself is only the starting point which allows us to focus on using and testing prototypes and learn from them.
Iterations and prototyping loops: Prototyping is an iterative process with a sequence of prototyping loops. The challenge is to find a balance between prototyping the details of a single (inter)action, object, or app and the wider end-to-end experience.
The Process of Service Prototyping
Introducing an actionable framework for service prototyping
Compared to prototyping in other (design) disciplines, the prototyping of services or product experiences is more holistic. It starts with the wider context of how services and physical or digital products 2 are experienced and used, but also encompasses traditional prototyping work on key assets like (physical) products, software, architecture, or actual content, making it more complex to work with. This chapter presents an actionable framework for service prototyping in practice.
Just like any other core activity of the service design process, prototyping 3 can benefit from a clearly articulated design. Even though not every prototyping activity needs extensive planning, the following framework might help you to achieve richer results with fewer resources. It doesn’t need to be followed step by step, but provides a collection of useful principles that you can apply to your prototyping efforts.
Expert Tip
“Don’t underestimate the energy factor in prototyping. It is highly stimulating to create tangible artifacts and to see quick results. It opens up stimulating conversations; it creates passion, pride, and ownership; and it attracts internal attention, sometimes also external. Prototyping pushes a team and an organization forward. These may look like positive side effects, but should be seen as important reasons in themselves.”
— Kristina Carlander
Decide on the purpose
Your first step in prototyping is to clarify your purpose: Why you are prototyping and what you want to achieve. There are three main reasons why prototyping is used in service design: to explore, to evaluate, and to communicate. 4 Be aware that this is not a strict distinction and often the activities can be mixed – to some degree even within a single prototyping session.
Prototyping to explore
Explorative prototyping (or prototyping to explore) is used to create new options and new future solutions based on a given initial service concept or idea (or a previous prototype). Think of it as a form of ideation, or “thinking with your hands.” You learn more about the opportunities and the challenges of the solution space.

Figure 7-2. Prototyping is used to explore, evaluate, and communicate at various stages in the process.
Explorative prototyping is mostly done for yourself or the core project team. 5 Prototypes are created in parallel to quickly compare different options and perspectives. Explicitly, they are built to be thrown away, so you might want to use prototyping materials or platforms that are geared toward creating prototypes fast. Early in the process, these are typically things you have lying around your workspace already. Explorative prototyping creates many insights, new questions, and hypotheses about how a future service might create value, might work, or might feel. 6
Comment
“We use prototyping sessions instead of traditional idea generation on sticky notes when we start working with highly interdisciplinary teams. Every one of them has their own specialist jargon and this leads to many misunderstandings. Prototyping is the universal language that helps them to understand each other much faster.”
— Francesca Terzi
Prototyping to evaluate
Evaluative prototyping is used to understand how people experience the future that our prototyping suggests. Sometimes you will carefully evaluate your hypotheses in formal testing, and sometimes you will do more lightweight tests on the fly. 7 Whether formal or informal, evaluative prototyping helps you to converge again, to start reducing the number of options you have and decide what to focus on. Evaluative prototyping sessions are created with a specific set of questions or hypotheses in mind that need to be tested. Prototypes are often built for potential customers or other carefully selected stakeholders from outside the team. 8
During formal evaluative prototyping, you strive to create prototypes that mimic aspects of reality as closely as possible. If you are interested in the emotional responses to a service (or part of a service), you must let the customers experience it. For the evaluation part, this form of prototyping is heavily supported by qualitative research and analysis methods that can provide some hard facts and metrics, such as contextual and in-depth interviews as well as various forms of observation.
Prototyping to communicate and present
Communicative prototyping is used to communicate important aspects of your project to selected audiences. Specifically tailored prototypes and prototyping activities help you to reduce misunderstandings and ignite meaningful discussions around the key design questions within the team or organization, or with other stakeholders. This facilitates collaboration, supports decision making, and reduces friction in your project right from the start. Different personal perspectives and potential conflicts become clearly visible and can be openly addressed. In addition to creating a safe space for experimentation, these activities are a great tool for team formation.
Comment
“If a picture is worth 1,000 words, a prototype is worth 1,000 meetings.”
— @johnmaeda 9
For a wider audience, presentational prototypes can be used as props for well-rehearsed storytelling presentations. In those cases there is little to no interactivity of the audience with the prototype. 10 The prototypes are adapted from previous prototyping activities and are usually quite polished. Used with care, presentational prototypes are a valuable strategic tool to present, persuade, and inspire management or key stakeholders.
Decide on your prototyping questions
At each iteration, you need to clearly state what you want to learn or achieve through your prototyping activities by formulating one or many prototyping questions. Think about these prototyping questions as the research questions 11 of the prototyping stage. In our prototyping work, we have found value, look and feel, feasibility, and integration to be especially helpful perspectives in generating initial prototyping questions and focusing on key aspects of a service concept during prototyping. 12
As Stephanie Houde and Charles Hill point out, “prototypes provide the means for examining design problems and evaluating solutions. Selecting the focus of a prototype is the art of identifying the most important open design questions.” 13 By formulating one or many prototyping questions you make sure that your team (and your potential client) have a common prototyping aim.
Start with a value prototype
Value prototypes are often a great start. Usually it is easier to find a suitable technology or business model if you already have a strong value proposition than the other way around. Be aware that look-and-feel and especially technical feasibility prototypes can take a lot of time and effort to create. This is easily wasted if the value proposition is still changing rapidly. You can spend a lot of effort and money creating a great look and feel, but if you don’t build it on top of a solid value proposition that is backed by research or prototyping, you are very likely to burn money.
Assess idea and project context
Keep in mind that your actual starting point always depends on your individual project. In the fashion industry, look-and-feel prototyping will get more focus than in B2B business consulting, where there is a stronger focus on value. In projects where a specific technology stack has to be used, feasibility prototypes should be given a higher priority as they define the playing ground for many solutions. Your decision will also depend on whether the project needs to deliver immediate results or is used to explore innovative future solutions as inspirations for future developments – like concept cars in the automotive industry.
VALUABLE PERSPECTIVES TO IDENTIFY PROTOTYPING QUESTIONS

Iterate
As you move forward, iterate between value, look and feel, and feasibility on one side and integration prototypes on the other to make sure you are not wasting time and effort on concepts that might not work in the implementation context. Identify dependencies between the different aspects early and learn how to integrate them into your design. Staying with value prototypes for too long tends to result in concepts that are hard to implement – which makes it challenging for short-term projects. On the other hand, this might be spot on when you are looking for inspirational concepts as a guidance for future work.
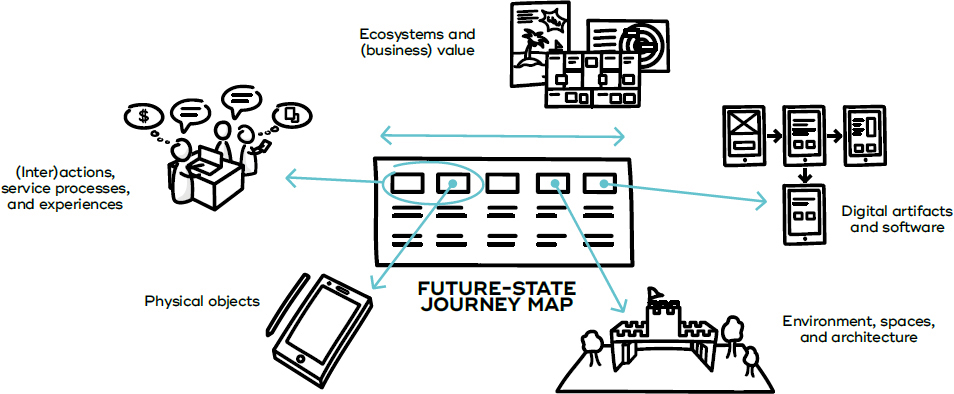
Figure 7-3. COMPONENTS OF PROTOTYPING
Future-state journeys are a great first step in assessing what you need to make or build in order to answer your prototyping questions.
Assess what to make or build
It can be helpful to first assess which parts of your future services and physical or digital products you actually need to make or build in order to get the answers you need, and then get concrete. Future-state journeys of customers or key stakeholders are a great first step. 14 Often, this allows you to break your prototyping challenge down to a mix of the following major components:
→ (Inter)actions, service processes, experiences
→ Physical objects
→ Environments, spaces, architecture
→ Digital artifacts and software
→ Ecosystems, (business) value
For some prototyping questions this can be straightforward. If for example you are working on a new home automation system, your questions about hardware and software might suggest that you build a functional prototype of a piece of software together with a physical prototype of an internet-enabled gadget.
However, more complex questions – for example, whether your home automation service actually creates a meaningful value for your customers and makes them happier people – cannot be answered directly.
In this context, experiences with services or products, whether physical or digital, can be likened to an (interactive) theater play. While theatermakers cannot design the emotions of an audience directly, there are things they can do. They can create a compelling story, write gripping dialogue, create great costumes and stage design, develop systems and technologies for special effects, and rehearse with actors and staff (front- and backstage). They can keep doing this until they can deliver an engaging interaction that evokes the emotional response and creates the value they are striving for in both the actors and their audience.
Prototyping tackles the same challenge with the same basic approach. We cannot design the actual experiences of our future services and physical or digital products directly, but we can design and prototype many concrete aspects around them to gather valuable feedback and other data from the people involved.
However, since it is usually impossible to prototype every aspect, you will need to make a decision about which aspects are most important. One way to do this is to use a prototyping portfolio (based on an idea portfolio) to discuss and prioritize the parts and elements of your service that you want to explore, evaluate, or communicate through prototyping. 16
Expert Tip
“Prototyping is serious business, that should be used systematically and may require a notable amount of planning. But don’t forget the ability to quickly create lo-fi prototypes of your ideas, also in later stages. You will learn a lot just by taking a step from thinking to doing. If you get stuck in a discussion, a simple role-play (acting out the problem) may in that moment suggest the solution you need. And that role-play is also a prototype others can react to. Nurture a prototyping culture!”
— Kristina Carlander
Planning prototyping
When planning your prototyping activities, you should think of the ways that are most likely to give you fruitful answers for your proposed design questions within your chosen purpose and goals. Just like anything else you do, prototyping activities must fit within certain business constraints, as you always have to consider how to best allocate time, money, and human resources within a project. Specifically, prototyping planning includes decisions about audience, authors, fidelity, context, prototyping loops, multitracking, and method selection. We’ll explore them further here. 17
Audience
Like in research, you have to think about your sample: 18 Who will be experiencing or testing your prototypes? Who do you want to observe? Who should participate in your prototyping sessions and how do you select them? These questions are critical for the reliability of what you are going to learn during prototyping and how valid the results will be. Use stakeholder mapping to get a clear picture about the sampling strategy for your prototyping activities. 19
In prototyping you will typically move between different groups of stakeholders acting as your audience: e.g., members of your project team, colleagues, current staff, internal/external experts, clients, (potential) users, customers, and future staff. 20 As a rule of thumb, the closer people are to the project team the easier (and faster) it gets to recruit them for your prototyping sessions. However, you will find stronger bias in those groups than with people from outside. Of course, your goal should always be to show your prototype to actual users and customers as soon as possible. 21
Roles in the team
While the audience has a huge impact on the outcome of the prototyping activity, so too do the people who drive the prototyping process, who prepare and build the prototypes, run the sessions, and observe the reactions of the chosen audience. 22 Typical roles in prototyping activities include:
Expert Tip
“Nurture a sustainable prototyping process. Some of us work with services as a project, which has an end. But the service should be continuously tested and improved. Provide the staff with training and easy-to-use tools and formats for prototyping. Prototype together, to make it easy for the staff to continue prototyping when the project is over.”
— Kristina Carlander
→ Concept owner: The concept owner is the person who came up with the concept you are prototyping.
→ Writer or (model) maker: The writer scripts or sketches out a starting point for the experiences, (inter)actions, or scenarios that you are going to prototype. The (model) maker builds all necessary (physical and digital) props, sets, and stages for the prototyping session. 23
→ Facilitator: The facilitator is responsible for the process and guides the selected audience through a prototyping session. 24
→ Actors and operators: Actors and operators assist the facilitator in creating an experience during the prototyping session. This involves people acting as staff or other customers during service simulations, or manually operating an interface that is tested. When preparing your prototyping sessions, always ask yourself: Who will be taking on which role during the prototyping process? What are the biases and motivations each person brings to the table?
→ Researcher: The researcher independently observes the audience during the prototyping session and records her insights.
→ Subject matter experts and key stakeholders: Subject matter experts and key stakeholders complete the prototyping team, adding special skills and in-depth knowledge about the subject matter and target contexts suggested by scope and prototyping questions.
Note that especially early in the project, one person can be concept owner, maker, facilitator, and researcher all rolled into one. Later, when you have a clearer picture of your service concept, you might make the decision to involve specialists for each necessary craft or discipline (e.g., model makers, UX specialists, experience directors, ethnographers, etc.).
Always be aware of your role, bias, and associated influence on the audience at every step of the prototyping process. For example, concept owners and makers often want their concept to survive – consciously or unconsciously – because they have already invested some time into the concept or prototype. This obviously has an influence on the audience, and the results become biased. 25 One way to tackle this prototyper bias is to be open about your role and acknowledge that there is a bias. This lets you consciously put down your concept owner or maker hat and take a more objective position. Other options include inviting an independent facilitator or researcher for your testing sessions, or changing roles within the existing team between iterations.
Fidelity
Decide how refined your prototype needs to be. What level of detail is needed? What resolution does it make sense to achieve for your given scope and research question? How much effort do you need or want to put into this prototype? The question of fidelity is closely connected to the economic principle of prototyping by Lim, Stolterman, and Tenenberg: “The best prototype is one that, in the simplest and most efficient way, makes the possibilities and limitations of a design idea visible and measurable.” 26
The economic principle seems to suggest starting with low-fidelity prototypes like paper or cardboard prototypes and then gradually increasing the level of detail as you get closer and closer to implementation. However, the world is slightly more complex than simply dividing the prototyping world into lo-fi or hi-fi.
Expert Tip
“Keep your first canvases rough and dirty when you use the Business Model Canvas to sketch out business models for new ideas or ventures. Then immediately test your early canvases in terms of desirability (will customers want it?), feasibility (can I build it?), and viability (will it be profitable?). Adapt your canvases rapidly based on what you learn from your tests. Iterate and refine your canvas with this so-called Lean Startup approach until you have sufficient evidence that your idea can succeed.”
— Alexander Osterwalder
While fidelity is often connected with visual fidelity (look and feel), you can also talk about fidelity in other dimensions, like fidelity of the implementation. 27 You can even find those different levels within one single prototype. The prototype of a website can be low fidelity with respect to look and feel, but quite high fidelity with respect to content or information structure. Hence, try to be specific about which parts of your prototype are really needed at which level of fidelity. This will help you manage your prototyping resources efficiently. It also is a great tool to guide the attention of your audience.
It is important to understand that the fidelity of your prototype has an impact on the quality and type of feedback you get from your test audience. Low-fidelity prototypes tend to inspire more open discussions while high-fidelity prototypes seem to lead the discussion more to the details of a concept because the prototype looks finished – and therefore decided.
Low-fidelity prototypes usually allow you to work blazingly fast. However, if you put too much emphasis on speed and low fidelity, your prototypes become meaningless. Try to find the sweet spot – the lowest meaningful fidelity at any given time – and move to high fidelity when you really need it.
The right fidelity for your prototype also depends on where you are in the process and what your purpose is. Earlier in the process, especially during explorative prototyping you would lean toward lower fidelity, while later in the process or during evaluative and communicative prototyping you usually lean toward higher fidelity. However, this needs to be reassessed for each project on an individual basis. Value prototypes like a service advertisement – which can be done quite early in the process – can already show high fidelity in a few essential perspectives (e.g., the value propositions), even though the rest of the business model is still quite raw.
In any case, always make sure the fidelity fits your audience. For example, people new to prototyping approaches usually need higher-fidelity prototypes together with clear guidance on purpose and scope. On the other hand, also make sure you are not over-promising. High-fidelity prototypes often are perceived as “finished” even if the underlying concept is still raw and basically untested.
Prototyping context
Choose the environment and context in which you run your prototyping sessions carefully. There are two major approaches:
→ Contextual prototyping: Contextual prototyping happens where the final service or product, whether physical or digital, would be used or be produced – for example, in the actual shop, tourism destination, or in one of your own offices where you run your consulting practice. By doing the prototyping session in context you can very efficiently assess whether or not a prototyped solution is a fit for that context or not. You also quickly learn what might work and, especially, what might not work. Just as in contextual research (e.g., contextual interviews, participant and non-participant observations, work-alongs, self-ethnography, etc.), you get a much better feel for the nuances that are needed to implement a working solution. 28
→ Lab prototyping: Lab prototyping is done within the safe confines of a lab environment or any place that is out of context. Choose lab prototyping when the real context is not available to you, does not allow any changes, does not exist yet, or simply is too expensive to use.
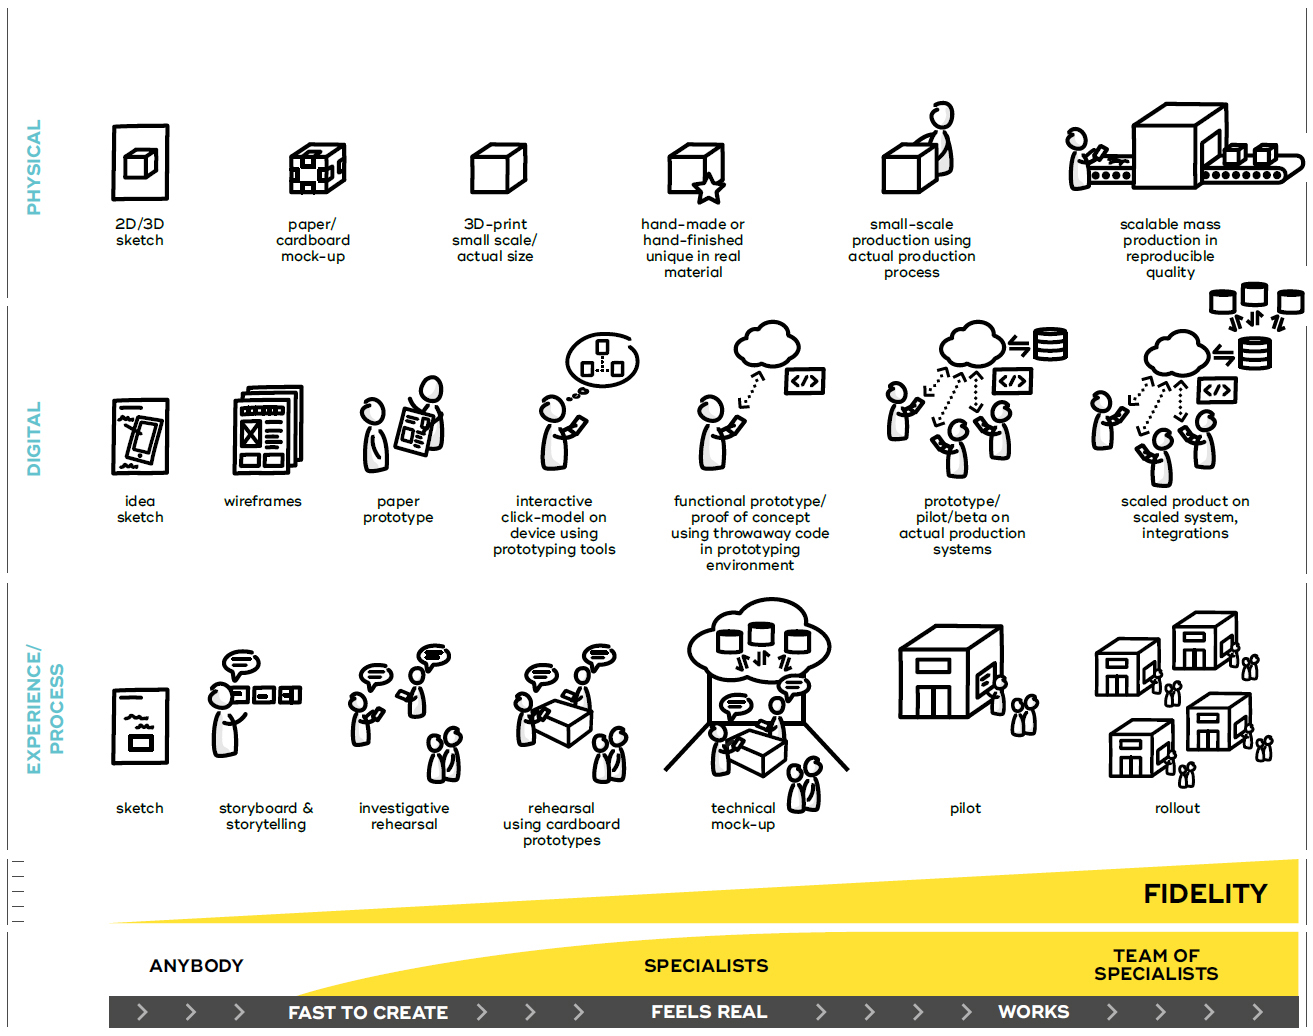
Figure 7-4. DIFFERENT FLAVORS OF FIDELITY
Fidelity comes in different flavors depending on what you are prototyping. While it is often connected with visual fidelity (look and feel), you can also talk about fidelity in other dimensions, like fidelity of the implementation.
It is important to note that context can include not only the space or location but also the time when you are prototyping, the availability of key resources, or even environmental conditions. For example, prototyping new hospitality services for a winter sport destination in winter can be contextual, while to test the same activities in summer you will have to fall back on lab prototyping.
Expert Tip
“Even if you have only a limited budget, do your best to stretch the scope to allow at least a few iterations, to make use of the learnings from the prototyping. It is better to make a few less ambitious prototypes than a bigger one-shot prototype.”
— Kristina Carlander
As a rule of thumb, the closer your prototyping environment and contexts are to the intended implementation contexts, the more reliable feedback you will get during evaluative prototyping. Similarly, during explorative prototyping, ideas generated in similar contexts tend to be more transferable from the prototype to the intended implementation context. 29
Prototyping loops
Always plan prototyping as an iterative process with a sequence of prototyping loops. Each loop should have a clear purpose; a clear set of prototyping questions; and include (a) building or preparing a prototype, (b) running the prototyping session, as well as (c) at least a simple form of data synthesis and analysis. The first loops are often explorative and might only take a couple of hours or a day. Use them to open up and create a shared understanding of the opportunity space. After those first loops, you might want to validate the proposed value propositions before eventually moving toward systematically exploring and validating the different aspects and dimensions of the selected concepts further and further. Continually check whether the chosen methods deliver meaningful results and whether your hypothesis or research questions for the prototyping stage need adjustments.
Depending on the skill set of your prototyping teams, you might have to involve specialists and split the work into separate work streams to achieve higher fidelity – for example, UX designers working on improving an existing app, service designers prototyping human-to-human interactions or required business processes, and an architect redesigning the office space. Even though they will work at different iteration speeds, it is still important to plan in regular sessions (e.g., weekly or biweekly) to give feedback and to adjust the prototyping plan. Depending on the complexity of your prototypes, you might also want to consider establishing a first sprint-like structure. 30
Keep iterating between the details of a single (inter)action, object, or app and the wider picture of the end-to-end experience.
Comment
“Just as there is theoretical saturation in design research, there is practical saturation in prototyping. Prototyping is great to help us understand by doing. At each iteration, you pivot into a new version by integrating the learnings of the previous version of the prototype. However, when any new learnings or insights have no significant or meaningful impact on the next version of your prototype anymore, you have effectively reached practical saturation. You are now ready to move on to the next phase on your service design journey.”
— Carola Verschoor
Multitracking
Decide how many prototypes you want to work on in any given segment. Multitracking your efforts helps you to reduce risk by not putting all your eggs into one basket. It also allows you to strategically manage uncertainty in your concept portfolio and expectations of stakeholders:
→ How many of the prototypes seem to be in reach for a quick win?
→ How many of them seem to have potential mid/long term?
→ How many of them are lined up for a disruptive breakthrough?
→ How many of them are a shot from the hip? 31
Also, decide whether you want to have different teams working on individual prototypes or have one team sequentially work through them.
The prototyping stage consists of a number of exploratory or evaluative prototyping sessions that can be lined up in parallel or in sequence. At certain points, you might add communicative prototypes to involve external stakeholders.
Method selection
Reflect on your chosen scope (including which elements of the service need to be prototyped), fidelity, and target context and choose the methods for your prototyping activities accordingly.
A helpful starting point is to do a quick assessment of the resources you have at your disposal. Before spending too much effort on creating complex prototypes, you might want to do some quick desk research 32 to find existing prototypes or research on similar questions or an appropriate prototyping platform you can leverage. Are there any elements you can simply reuse? Ask your Innovation department if they have already done something similar.
Desk research might quickly reveal similar services or products, whether physical or digital, which you can use as a basis to create your own prototypes so you do not have to start from scratch.
When you are selecting the “right” prototyping methods – ones that give you a lot of useful data, support your decisions, or communicate the concept well – you always face the question of how many methods you should use. Given a limited budget, you need to decide whether you should put all your budget into one method and do this rather well, or distribute our budget to use a variety of prototyping methods. Just like in research, you should also apply the concept of method triangulation during prototyping. 33
Expert Tip
“It is easy to like a prototype, even a mediocre prototype of a mediocre idea, as long as it addresses and solves an important problem in some way. It is therefore valuable to challenge one prototype with another, to make sure to get the best ideas. Therefore, make different prototypes, representing different ideas or directions of your idea. It is often valuable to stretch different directions to extremes (more or less), to provoke and learn rapidly. This is mostly relevant in early stages, where lo-fi prototypes are cheap to do and test.”
— Kristina Carlander
As a rule of thumb, you might want to consider to including at least one method from each of the following categories:
→ An experience prototyping approach to validate the core value proposition.
→ Some methods that allow the exploration and assessment of a holistic/end-to-end perspective on the service, like desktop walk- throughs, contextual walkthroughs, Business Model Canvases, Business Origami, minimum viable services/products or service simulations, and so on.
→ Some methods that focus on key elements within the holistic perspective, like paper prototyping, cardboard prototyping, digital mock-ups, and so on.

Figure 7-5. OVERVIEW OF PLANNING COMPONENTS
The planning of prototyping includes making decisions about audience, authors, fidelity, prototyping context, prototyping loops, multitracking, and method selection.

Figure 7-6. Running prototyping sessions: preparation, use and research. The creation of the prototype is only the starting point, which allows us to focus on using and testing the prototype and learning from it.
Running prototyping sessions
Prototyping methods share an underlying common structure. Any prototyping method can be broken up into the following three core activities:
→ Preparation: Prepare prototypes through setting up templates or canvases, scripting and practicing an intended interaction or walkthrough, making physical models, building stages/sets, and/or preparing environments.
→ Use: Use the prepared objects and practiced activities to explore, evaluate, or communicate a design concept.
→ Research: Use research methods while running the use scenarios to capture feedback, data and generate insights.
Expert Tip
“Make sure you do not get stuck on solving problems that only exist in your prototyping environment and not in the actual service system. Prototyping should be future oriented rather than task oriented.”
— Johan Blomkvist
Take, for example, the prototyping of the in-store experience of a retail store. To prepare, you might need to create a first sketch of the intended customer journey, consider your roles, practice the key scenes, set up the stage, and create a handful of key props (like an app prototype, some mock-up advertising posters, or a new checkout desk made of foamcore). You then use the setup to test the resulting experience (e.g., the checkout process). By using research methods like observation and interviews with the participants of your prototyping sessions you can collect a lot of data and capture and generate valuable insights.
It is important to understand that prototyping is not just about creating a prototype. 34 Rather, the creation of prototypes is only the starting point, which allows us to focus on using and testing prototypes and learning from them. 35 As Michael Schrage (author of the book Serious Play) says, “the value of prototypes resides less in the models themselves than in the interactions they invite.” 36 In this sense, prototyping indeed is research into future situations.
Data synthesis and analysis
Running prototyping sessions generates a lot of data, insights, and new ideas about the future service. So, as a next step you need to synthesize and analyze that prototyping data (sensemaking). As prototyping can be interpreted as research into future service situations, the synthesis and analysis process in prototyping is technically the same as the synthesis and analysis process that was covered in Chapter 5, Research. 38
Visualizing prototyping data
There are many ways to present your prototyping data, and once again what makes sense depends on your aim. Luckily, all the ways to capture research data in service design are also applicable for prototyping data. They include: 39
→ Research wall
→ Personas
→ (Customer) journey maps
→ Stakeholder maps
→ Key insights
→ Jobs to be done
→ User stories
→ Reports
Additionally, since you are now essentially working in solution space, there are two more tools that are especially useful:
→ Idea wall/portfolio: To get a quick overview of new concepts and ideas to be prioritized and lined up for prototyping and testing
→ The prototypes themselves: To make the future service experience tangible, and replace tedious verbal documentation
Again, it is important to consider the target audience for your visualization: Do you need something rather formal and self-explanatory so your outcomes can be used in different departments or organizations? Or are your outcomes only needed for your internal team? Any prototyping outcome that you need to communicate beyond your own team needs more polish.
Methods
Read more on methods and tools in our free online resources at:
![]() www.tisdd.com
www.tisdd.com
Prototyping Methods
This section provides concise descriptions of a selection of methods which allow you to prototype a broad range of services or products, whether physical or digital. As service design needs to provide a common language and support co-creation between different disciplines, we have chosen prototyping methods that do not require specialist skills. While this might sound limiting at first, this selection of methods allows you to push almost any concept to the point where you can make a safe decision on which experts you actually need to involve for which aspects of the project.
Many more methods exist and should be included in the planning and execution of your prototyping activities, but many of those require you to invite specialists from the respective field of expertise, like change managers, product designers, or software developers.
The prototyping methods selected for this book are structured in five categories:
→ Prototyping methods for service processes and experiences: Investigative rehearsal, subtext, desktop walkthrough
→ Prototyping methods for physical objects and environments: Cardboard prototyping
→ Prototyping methods for digital artifacts and software: Rehearsing digital services, paper prototyping, wireframing
→ Prototyping methods for ecosystems and business value: Service advertisement, desktop system mapping, Business Model Canvas
→ General methods: Mood boards, sketching, Wizard of Oz approaches 40
There are many variations of and names for each prototyping method, and the boundaries between the chosen categories might be rather fluid. Often, a specific prototyping method can also be adapted to answer different prototyping questions. Reflect on your chosen scope (including which elements of the service need to be prototyped), fidelity, and target context and choose the methods for your prototyping activities accordingly. As a rule of thumb, you might want to consider including at least a few methods to account for method triangulation. 41
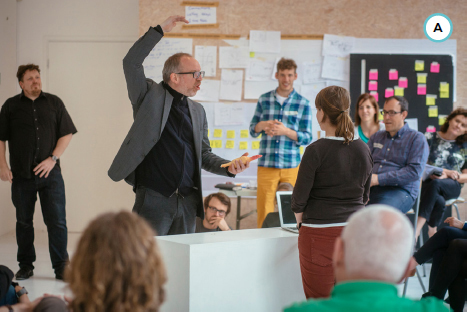
Prototyping Service Processes and Experiences Investigative rehearsal 
Investigative rehearsal is a theatrical method to deeply understand and explore behaviors and processes through iterative rehearsal sessions. 42
Based on forum theater, it is a structured, full-body way to clarify the emotional side of an experience and reveal many practicalities around physical space, language, and tone of voice. 43
Preparation: Choose and quickly prepare a (key) scene as a starting point, e.g. from research or from a future-state journey map, and create essential props and a stage.
Use: Play through the initial scene, repeating and commenting until there is a deeper understanding on a physical and motivational level. Only then, change the scene. Review the effect of each change and explore alternatives. Iterate. Always keep a list of bugs, insights, and ideas.
Research techniques: Use-it-yourself (autoethnography), participant observation, co-creative workshops
Expected output: Research data (specifically a list of bugs, insights, and new ideas), raw video footage and photos
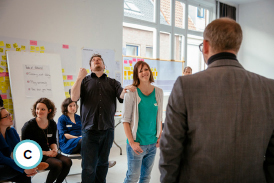
Prototyping Service Processes and Experiences Subtext
Subtext is a theatrical method that can reveal deeper motivations and needs by focusing on unspoken thoughts in a rehearsal session. 44
We can think of subtext as the unspoken thoughts of a character – it is what we mean, but don’t say. Bringing subtext into a rehearsal session can reveal deeper motivations, help us understand needs, and illuminate new opportunities to create value.
Preparation: In an investigative rehearsal, identify a key scene. Now, hold the scene at one key statement by a customer or employee.
Use: Ask, “What would be the subtext of that statement?” Continue with, “What would be the subtext of that subtext?” and repeat. As you go deeper, ask how the service could respond at each level.
Research techniques: Use-it-yourself (autoethnography), participant observation, co-creative workshops
Expected output: Research data (specifically documentation of the subtext chains, new insights, and ideas), raw video footage and photos
A team “stress testing” the returns procedure of a retail service using investigative rehearsal. Two team members simulate the encounter, while others are ready to step in with alternatives to the process, setting, systems, or behavior.
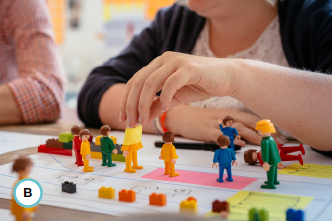
Simply moving figures around on a map and acting out the dialogues allows you to quickly simulate a service experience.
Subtext: another actor speaks out loud the unspoken thoughts of one character as part of a rolling rehearsal scene – subtext is what we mean, but usually don’t say.
A visual sketch of a multilevel subtext chain.

Prototyping Service Processes and Experiences Desktop walkthrough
Desktop walkthroughs can be seen as interactive mini-theater plays that simulate end-to-end customer experiences. 45
Using maps, figurines, and small-scale models of the service environment, you test and explore common scenarios and alternatives of a service process or experience.
Preparation: Create an overview map for all relevant locations. Pick a figurine for each key stakeholder in your service and create essential props using paper, cardboard, modeling clay, etc. Decide on a story as a starting point.
Use: Run through the story using the maps as the stage and the figurines as actors. Act out all dialogues and interactions with other actors, devices, etc. After each runthrough, reflect on what you would like to change or try. Always keep a list of bugs, insights, and ideas. Then iterate.
Research techniques: Participant observation, interviews, co-creative workshops
Expected output: Research data (specifically documentation of the simulated variants, new insights, and ideas), raw video footage and photos
Early cardboard prototypes are cheap and easy to make. This has one of the lowest entry barriers of any of the prototyping methods.

After each step the team reflects on what worked, what didn’t work, and what they would like to change or try next. Keep it brief. Then move on.

After creating hand-sketched versions, a user can easily test the interface by “clicking.” An operator simulates the changes by replacing or adding parts of the interface.

Prototyping Physical Objects and Environments Cardboard prototyping
Cardboard prototyping refers to prototyping 3D mock-ups of almost any physical object or environment out of cheap paper and cardboard. 46
The prototypes – for example, the interior of a shop or a ticket machine – can be small scale or actual size. To explore the role the objects play in the context of the future service, cardboard prototyping is often used together with walkthrough approaches.
Preparation: Use simple materials to build the objects. Split your team into users, operators, and observers and give them some time to prepare.
Use: As the user starts to use the object (i.e., handling it, pressing buttons, etc.), the operators manually simulate the reaction of the object. Observe and keep a list of bugs, insights, and ideas. After each testing session reflect on what you would like to change or try. Then iterate.
Research techniques: Use-it-yourself, participant observation, interviews, co-creative workshops
Expected output: Research data (specifically bugs, insights, and new ideas), raw video footage and photos, documentation of the tested variants
Prototyping Digital Artifacts and Software Rehearsing digital services
Rehearsing digital services is a variant of investigative rehearsal that helps to prototype digital interfaces as if they were human conversations or interactions. 47
Within an investigative rehearsal, your app or web page is replaced by a human actor. This method can be used even before creating any wireframes or paper prototypes.
Preparation: Choose a starting point, e.g. based on user stories from research, and prepare props and a space. Then, quickly familiarize yourselves with the chosen story.
Use: Run through the story and have a human play the app or web page. Don’t think digital be a full human being, but one with superhuman access to knowledge and media, like a knowledgeable butler or “genie in a bottle.” For example, a landing page can be simulated by a concierge asking, “What are you looking for?” then evolving the conversation naturally. Afterwards, consider how to digitalize the experience.
Research techniques: Use-it-yourself, participant observation, co-creative workshops
Expected output: Research data (specifically a list of bugs, insights, and new ideas), raw video footage and photos, updated wireframes or paper prototypes
Prototyping Digital Artifacts and Software Paper prototyping
In paper prototyping, the screens of a digital interface are hand sketched on paper and presented to a user to quickly test interfaces. 48
Users can now use the interface by “clicking” with their finger indicating what they want to do. A researcher simulates the operation of the computer simply by replacing the screen page or by adding “pop-ups” on smaller pieces of paper.
Preparation: Create hand-sketched versions of all key elements (e.g., pages, dialog boxes, and actual key content). Split your team to take on the roles of users, (computer) operators, and observers and give them time to prepare.
Use: As the user starts to use the interface, the operators simulate all changes in the interface by replacing or adding parts. Keep a list of bugs, insights, and ideas. After each testing session reflect on what worked, what didn’t work, what you would like to change. Revise your prototype and iterate.
Research techniques: Use-it-yourself, participant observation
Expected output: Research data (specifically bugs, insights, and new ideas), raw video footage and photos, documentation of the tested variants
Prototyping Digital Artifacts and Software Interactive click modeling
Interactive click modeling is a popular lo-fi method to create a first working digital prototype.
Special prototyping apps allow you to take photos of your hand-drawn sketches and link them together so you can test them on the actual device you are developing for.
Preparation: Hand-sketch all the different screens of the interface on paper, take photos of the sketches, and import them into the prototyping app. In the app you can now define click-areas that link between sketches, effectively creating a working interface.
Use: Ask a user to complete some tasks using the click-model and observe how she reacts to the interface. If you want to use the prototype for communication you can also film the use of the click-model for further reference.
Research techniques: Use-it-yourself, participant observation
Expected output: Research data (specifically bugs, insights, and new ideas), raw video footage and photos, documentation of the tested variants
Prototyping Digital Artifacts and Software Wireframing
Wireframing uses nongraphical schematics of digital interfaces and their structure to show how they fit together and create alignment within the design team. 49
Most of the elements are more hinted at than explicit, which makes wireframes fast to create, requiring less specialized skills. Wireframes are often used to align the different disciplines within a design team and to map out user journeys or act as the starting point for paper prototypes or interactive click-models.
Preparation: Rough versions of the different screens of the interface are sketched on paper, on whiteboards, or in special wireframing apps. Leave out color, specific fonts, and aesthetics as much as possible. Use placeholder content.
Use: The wireframes are put up on a wall and discussed with the team or a selected audience. Annotations are added to capture the behaviors of the marked interface elements and details about the content or context in which the system might be used.
Research techniques: Co-creative workshops, interviews, concept tests
Expected output: Research data (specifically bugs, insights, and new ideas), raw video footage and photos, documentation of updated wireframes and annotations
Special prototyping apps allow almost anyone (even without prior knowledge) to create interactive click-models of your interface. They can be shown to potential users for testing or storytelling to gather valuable feedback.

Wireframes help the design team to understand and explore how the different parts of software work together. They connect the conceptual structure, functions, or information architecture to the visual design.

Service advertisement posters are a fast and engaging way to quickly explore, clarify, and test your value proposition.

Prototyping Ecosystems and Business Value Service advertisement
Service advertisements are prototype advertisements that allow us to (re)focus on the core value proposition and test the desirability and perceived value of a new offering.
Like simple advertisement posters, they use concise slogans, engaging visuals, and text to sell the new offering. Later, service advertisements can be created as online ads, web landing pages, or TV or video advertisements (including in-depth documentary-style variants).
Preparation: Do a brief brainstorming on ideas for emotional and factual content for the poster. What do you want to communicate in the ad? What could be suitable emotional hooks or narratives? What are the facts? Sketch out a couple of advertisements on big pieces of paper.
Use: Show your advertisements to people who do not yet know your project and collect their feedback. Keep a list of bugs, insights, and ideas. Discuss what worked or what didn’t work, and what you would like to change. Revise your prototype and iterate.
Research techniques: Participant observation, interviews, co-design
Expected output: Research data (specifically bugs, insights, and new ideas), raw video footage and photos, quotes from the test audience
Business Origami first looks at the system taking a holistic approach. Like with many other service design tools, the critical deliverable is not the model itself but the experience of modeling the service system in the team.

Using the Business Model Canvas, you can quickly analyze existing business models and prototype new ones.

Mood boards are collages of existing media to communicate an intended design direction.

Prototyping Ecosystems and Business Value Desktop system mapping (a.k.a. Business Origami)
Desktop system mapping is an approach which helps us to understand complex value networks using simple paper cutouts representing key people, locations, channels, and touchpoints. 50
The cut-outs can be quickly placed, moved, and reconfigured again on a table or horizontal whiteboard. Relationships and value exchanges are visualized by grouping or drawing connections between different elements.
Preparation: Create, cut out, fold, and label the key elements of the service system using the paper templates.
Use: Create a draft of the service system by placing key elements to create a map. Reflect on relationships, value exchanges, (inter)actions, or basic material/money/information flows. Add those as arrows and consider grouping elements. Start to simulate the service system over time. Always keep a list of bugs, insights, and ideas. Then, revise your prototype and iterate.
Research techniques: Participant observation, co-design
Expected output: Research data (specifically bugs, insights, and new ideas), raw video footage and photos, documentation of the ecosystem
Prototyping Ecosystems and Business Value Business Model Canvas
The Business Model Canvas is a high-level approach to co-create and visualize the key components of a business model that allows you to iteratively test and refine various options. 51
Considered a strategic management tool, it is intended to be used in an iterative design process.
Preparation: Prepare the Business Model Canvas template. It helps if you have personas, stakeholder maps, customer journeys, and prototypes at hand as well.
Use: Fill in the upper seven boxes first. If available, use information from other service design tools to fill in information from previous work. Then fill in the lower two boxes, identifying cost drivers and potential revenue streams. Add numbers and estimate costs and revenues. Prototype and test whether your business model is sustainable. Then start creating alternative business models and test potential options. Compare different models and iterate; combine and refine them. 52
Research techniques: Co-creative workshops, interviews
Expected output: Research data (specifically bugs, insights, and new ideas), photos
General Method Mood boards
Mood boards are collages that help to visualize and communicate intended design direction.
Using a mix of text, sketches, visualizations, photos, videos, or any other media, they transport current or future experiences, style, or contexts.
Preparation: Start to collect inspiration and raw material (often photos or video footage) from magazines, stock photo libraries or your own media library, or quickly create new material yourself. Organize that material and set up a first collage. Iterate until you are happy. Your mood board can be a physical wall, or it can be an online media board, a more practical solution if you are working with video or interactive media.
Use: Present your mood boards either to each other within the design team or to an external audience to receive feedback and ignite discussions. During these presentation sessions, you can work on existing boards by adding annotations or adding, reshuffling, or removing media or even create completely new boards from a pool of data.
Research techniques: Studio interviews, focus groups, concept tests/discussions
Expected output: Research data (specifically bugs, insights, and new ideas), photos, collages
General Methods Sketching
Sketching refers to methods of visualization or representation of design ideas that support fast and flexible exploration. 53
Sketches – low-fidelity visualizations of an idea – are flexible, quick, and inexpensive. Their explorative nature often makes them the first step in explorative prototyping.
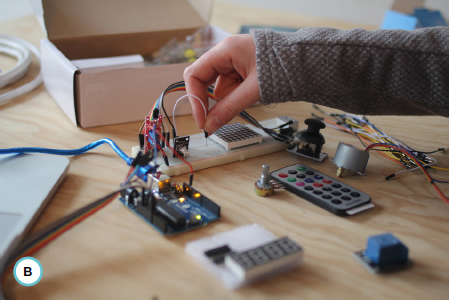
Preparation: Sketches are usually created fast using only pen and paper. However, you can create sketches with almost anything as long as they are quick to produce, inexpensive, and support exploration – e.g., sketching in software, 54 hardware, 55 or with our bodies (bodystorming).
Use: Present sketches to others to receive feedback and ignite discussion. During these sessions, you can directly work on existing sketches (e.g., by adding annotations or changing them on the spot) or easily add new ones with the changes already included.
Research techniques: Studio interviews, focus groups, concept tests/discussions
Expected output: Research data (specifically bugs, insights, and new ideas), photos, video footage
General Methods Wizard of Oz approaches
Faking it using invisible puppeteers. 56
Wizard of Oz techniques manually create the responses from people, devices, apps, or the context/environment through invisible operators (“wizards”) behind the scenes. The users are led to believe that they are dealing with an actual working prototype.
Preparation: Think of the operator (“wizard”) as an invisible puppeteer for those objects and service elements. Prepare all relevant parts of the service or systems and rig them to allow the “wizards” to create realistic responses on the spot.
Use: A user is given specific tasks to use the prototype. The operator simulates the operation of backstage processes, devices, or the environment by operating behind the scenes and manipulating the objects and environment. Use this approach to explore and evaluate core functionality and value.
Research techniques: Participant/non-participant observation, contextual interviews
Expected output: Research data (specifically bugs, insights, and new ideas), photos, video footage, observations and interview transcripts
Sketches using pen and paper provide a quick and low-fidelity visualization of an initial idea or concept.

Open source prototyping platforms like Arduino allow you to sketch in hardware, creating first working prototypes of interactive devices.
With the right prototyping platform, sketching in code lets you explore working prototypes early.

In Wizard of Oz techniques, the responses from people, devices, apps, or the context/environment are manually created by invisible operators (“wizards”) behind the scenes.
Bodystorming, or “sketching with our bodies,” is a very efficient lo-fi way to sketch (inter)actions using re-enactment.
This methods section only provides a concise selection of prototyping methods, specifically chosen to not require specialist skills. This allows you to have a conversation within a broader team about where the project should be heading. It also allows you to make safer decisions about what kind of skills and expertise will be needed when moving toward implementation; e.g., when you dive deeper into change management, software development, product development/management, architecture, or other more specialist disciplines. You can now safely invite the relevant stakeholders with their expert methods.
Those specialists bring in specialized tools to tackle specific challenges quickly and efficiently, including but certainly not limited to:
→ Software prototyping tools and frameworks
→ CAD (computer aided design) and 3D printing
→ Change management toolsets and structures
→ VR (virtual reality) applications for architecture and experience prototyping
→ Fablab (fabrication laboratory) environments or makerspaces with access to tools that allow you to prototype almost any physical object
When you choose suitable methods for your project, carefully assess how quickly they will allow you to build and test the prototype. Your choice might also depend on the skills of your team and the tools they have access to. 57
It can be useful to put together your own tailored prototyping pipeline or even create your own prototyping lab.
Where can you run a quick service simulation? Are you allowed to prototype in context? How fast do you get access to fabrication equipment, and are you able or even allowed to use it on your own? Do you have instant access to a user community for a quick user research, or do you first have to go through a long purchase process? Where can you experiment with fresh ideas and grow them before you need to apply for funding?
Your own prototyping lab can start small and be quite informal. With iteration, it might develop into something useful enough to become an official internal institution. 58
But remember, whatever you set up, always keep it accessible to your whole organization and stay fast. 59

Figure 7-7. Virtual reality environments and content can be highly engaging. Unfortunately, authoring VR content often still requires specialist skills – but as tools evolve this might change rapidly, making it one of the most exciting technologies not only for prototyping but also for documenting and revisiting field research data.
Cases
The following six cases provide examples of how prototyping is applied in practice: how to enable effective co-creation through prototyping minimum viable solutions and contextual mock-ups (“Case: Enabling Effective Co-Creation Through Prototyping Minimum Viable Solutions and Contextual Mock-Ups”); how to use prototyping and co-creation to create ownership and close collaboration between the designers, project group, and staff (“Case: Using Prototyping and Co-Creation to Create Ownership and Close Collaboration”); how to enable staff and stakeholders to prototype for continuous evolution (“Case: Enabling Staff and Stakeholders to Prototype for Continuous Evolution”); how to create minimum lovable products, living prototypes, and high-fidelity sketches in code (“Case: Minimum Lovable Products, Living Prototypes, and High-Fidelity Sketching In Code”); how to use role-plays and simulations in large-scale 1:1 prototypes (“Case: Using Role-Plays and Simulations in Large-Scale 1:1 Prototypes”); and how to use multifaceted prototyping to create and iterate business and service models (“Case: Using Multifaceted Prototyping to Create and Iterate Business and Service Models”).
-
- Innovation on the shop floor: How to demonstrate the value of design thinking to a manufacturing organization
— Thomas Abrell, Innovation Manager, Airbus
— Dr. Markus Durstewitz, Senior Innovation Manager, Airbus
7.3.2 Case: Using prototyping and co-creation to create ownership and close collaboration
- Reducing the waiting time for breast cancer patients
— Marie Hartmann, Design Director, Designit Oslo
— Kaja Misvær Kistorp, Lead Service Designer, Designit Oslo
— Emilie Strømmen Olsen, Senior Service Designer, Designit Oslo
7.3.3 Case: Enabling staff and stakeholders to prototype for continuous evolution
- Infinite prototyping
— Johan Dovelius, Head of Service Design, Doberman
— Henrik Karlsson, Creative Director, Doberman
7.3.4 Case: Minimum lovable products, living prototypes, and high-fidelity sketching in code
- ATO Partner Space case study
— Andy Polaine, Design Director, Fjord Evolution APAC
— Eduardo Kranz, Service Design Lead, Fjord
— Chirryl-Lee Ryan, Global Design & Innovation Principal, Fjord Evolution
7.3.5 Case: Using role-plays and simulations in large-scale 1:1 prototypes
- Prototyping at scale: Redesigning Lufthansa’s business class experience
— Barbara Franz, Senior Lead Design and Research, IDEO
7.3.6 Case: Using multifaceted prototyping to create and iterate business and service models
- Multifaceted prototype evolution over time
— Klara Lindner, Head of Customer Experience, Mobisol
Case: Enabling Effective Co-Creation Through Prototyping Minimum Viable Solutions and Contextual Mock-Ups
Innovation on the shop floor: How to demonstrate the value of design thinking to a manufacturing organization
AUTHORS
Thomas Abrell Innovation Manager, Airbus
Dr. Markus Durstewitz Senior Innovation Manager, Airbus

Crafting a design thinking strategy and proving it in reality
Design thinking at Airbus emerged organically from different departments – workshops were conducted, training offered, and projects following human-centered approaches established, all labeled under the term design thinking. However, besides a core group of departments that formed a deep understanding of the power design thinking can have in product and service innovation, the majority of employees of Airbus have different understandings of design and design thinking, if they are acquainted with the concept at all. In July 2015, we crafted a strategy to infuse design thinking as part of the DNA of Airbus. One step on the ladder toward a broader understanding of design thinking was to engage in a grand challenge: we wanted to show, in an investment project of strategic importance, the potential of design thinking. Airbus is currently extending its production capacity of its successful Single Aisle Family, A319, A320, and A321. To enable this ramp-up, Airbus has created an additional final assembly line in Hamburg. Our value proposition in this project was to co-innovate with the workers at the shop floor.
The project started in September 2015 and focused on problem framing and need finding from the workers’ perspective. To ensure visibility and to reach the right level of awareness, it was important that design thinking was placed prominently in the project structure as one dedicated work stream. Being placed at this level gave us enough influence to push for creating real impact by achieving an end-to-end implementation.
“With design thinking, we are following a balanced approach that emphasizes early user engagement. The purpose is to make sure that we address the real needs and focus on doing the right things, which finally will make the difference to succeed with innovation in delivering added value to customers and users by going beyond the obvious.”
— Dr. Markus Durstewitz
Prototyping plays a prominent role in the design process as a tool to make assumptions tangible and to involve users. We applied prototyping for gaining user insights, and for ensuring employee engagement and management buy-in. Our prototypes were often quite simple, rough mock-ups such as cardboard prototypes or clickable user interfaces. In general, these are good enough to test functionalities and to continuously involve users in the evolution of the concepts. In addition, we used the prototypes to better understand goals and the rationale behind requirements from different departments. Here, interdisciplinary and cross-functional collaboration was essential to reach consensus between all stakeholders.
“Fast iterations in prototyping minimum viable solutions are a key asset for gathering user insights, for reducing the time to product, and for accelerating the innovation process.”
— Dr. Markus Durstewitz
By having tangible prototypes and the possibility to interact with and alter them, we were able to gain deep insights, tapping into the tacit knowledge of the different stakeholders. We used the prototypes to test early and fail fast and cheap, in order to iterate to a solution that would ultimately be valuable to the end users and approved by all stakeholders. The simple prototypes helped us to perform early user tests and to reach a good level of maturity and alignment before making bigger investments.
From need finding to prototyping: Finding opportunities beyond the obvious and prototyping in design thinking
We started out with user research to understand how the production environment is perceived from a worker’s point of view. We shadowed key people, going through their workdays with them, and we interviewed workers on the shop floor and other relevant stakeholders such as production support and manufacturing engineers. The need-finding stage lasted three months, in which time we can to understand the final assembly line from the workers’ point of view. We distilled our findings into four opportunity areas where design can make a change.
“Although it is tempting to shortcut in the early phase, crucial for the success was to conduct deep need finding prior to prototyping. Only through going into the field, observing and shadowing users, was it possible to look beyond the obvious and to ensure we are doing the right things.”
— Thomas Abrell
After need finding, we selected two of the four opportunity areas to prototype in a timebox of eight weeks, from kickoff until the final prototypes were delivered. To master this tight timeline we built a team of internal and external experts with diverse skills, from industrial design and rapid prototyping to user research to coding.
We addressed two challenges in an iterative way, utilizing prototypes as a tool to co-create, to communicate, and to iterate: information system interfaces on the shop floor and material delivery.
In building the team, we relied on experienced service designers from Airbus to manage the overall design process, project and stakeholder management. For the information system side of the project, we chose an external partner with specialists in industrial design, design thinking, and user experience design. It was also important for us to bring in perspectives from a non-aerospace domain, bringing in diverse skillsets and design expertise.
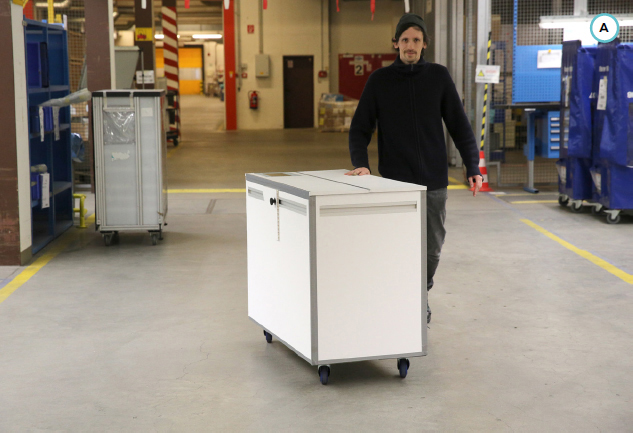
Prototype in the final assembly line.
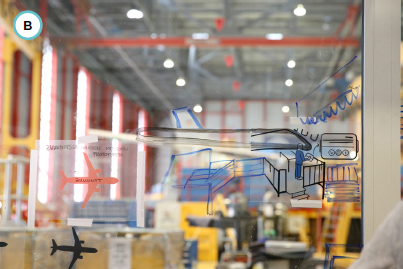
Sketch of the future system.
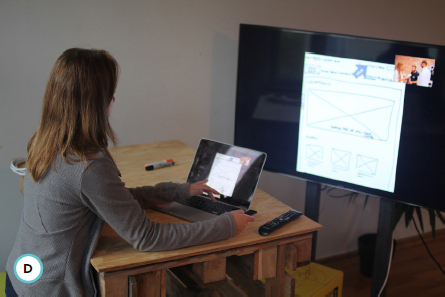
Information system interface feedback session.

Scale models as tools in the process.

Prototyping: Making things tangible on the shop floor
The project was set up in such a way that two teams worked in parallel, one focusing on the physical prototype, the other on the information interaction prototype. It was important to co-locate the teams in a creative space: we used an aircraft fuselage and built a workshop around it, so that our team had the possibility to continually build things.
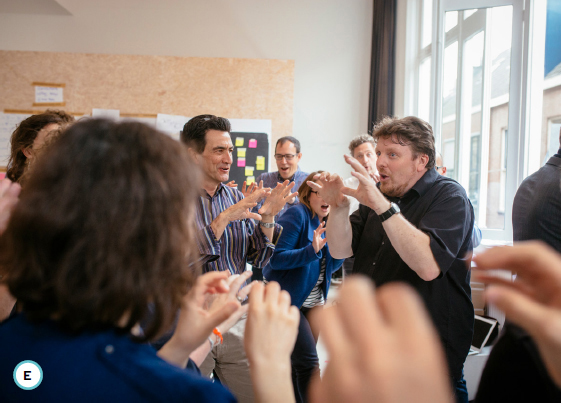
Our experiment was to see how digital and physical prototyping could work in parallel, involving all stakeholders. Workers were involved continuously. In addition, we scheduled three co-creation workshops to engage a wider group of stakeholders, a demo day, and an intermediate management presentation. We used a build-measure-learn cycle, but instead of measuring, we relied on qualitative evaluations and direct feedback from the users. The co-creation workshops were used to iterate the prototypes, and we moved from lo-fi mock-ups to functional usability mock-ups.
“It was an interesting experiment to run physical prototyping in parallel to digital prototyping. Ultimately, we designed a service for the workers, involving digital and physical touchpoints. Our aim was clearly to improve the work experience for our employees.”
— Thomas Abrell
With the information system interfaces, we complemented our need finding by researching what information workers really need – and want to use – to perform their work, and which devices would be suitable for interacting with the information. We therefore enriched our findings from the need-finding phase, and observed and interviewed the workers specifically with respect to the information they need. We mapped the necessary information and prototyped it in rough concepts, showing screens on different devices such as tablets, smartwatches, smartphones, and large touchscreen displays.
In the first co-creation workshop, we got user feedback on the devices and the functions. We distilled the most important insights before going into the next prototype iteration, until a user interface was generated and a device concept was determined. Finally, we took the prototypes into one existing final assembly line, and let the users interact with them, simulating their very own workflow with the new prototypes in their current day-to-day working environment. These insights helped us to further iterate and refine them.
The material delivery units (MDUs) were addressed the same way. First, we went to the shop floor to see how material delivery works in practice – complementing the view we had from need finding, the planning documents, and internal logistics. Then, we conceptualized three material delivery units and built 1:5 scale models – in practice, three material trolleys for the same set of material, but with different conceptual considerations behind them – which were iterated in co-creation workshops.
One week later, we had the first 1:1 full-scale mock-up, which was brought to the final assembly line for feedback at the assembly station itself. With this feedback, and feedback gathered in the co-creation workshops, we built two more iterations of the full-scale mock-up. We added “smart” functionalities (connectivity) to the prototype, simulating how it would interact with its environment and the parts inside. The second prototype iteration got additional usability features such as a bumper and boxes for tools to make it more usable and more useful for the worker.
In the last co-creation workshop, we simulated a scenario incorporating both prototypes, the information system interface and the material delivery unit. Our project team simulated the situation together with the users, gathering feedback about the overall workflow, since material delivery and the information system interface are interrelated in their respective workflow.
At the editorial deadline of this book, we are doing a proof of concept of the material delivery unit, and integrating the information system interface into a larger project at Airbus changing the way our manufacturing environment is set up and operations are performed. The learnings of the project are being used to propose a holistic design thinking approach for Airbus.
Learnings
Crucial for success were not only user engagement and user acceptance, but also the involvement of the Workers’ Council as a key stakeholder. This entity, entitled to represent the workforce, can amplify a project’s results in positive or negative terms. Only through continuous deep involvement of the council did we create a sense of ownership, involving them as a strategic partner for employee engagement implementing user-centered solutions.
“It’s important to have a good balance between internal and external project team members. Only with a small internal core team is it possible to maintain continuity during the project, while external team members bring in specific expertise.”
— Thomas Abrell
For the future, we will need a small internal core team with a wide array of skills to anchor the approach and leverage the expertise until implementation. In practice, it will be an interdisciplinary team consisting of aircraft manufacturing domain experts from Airbus, designers, method experts, and specialists for end-to-end support of the innovation project. We believe that collaboration with external partners from the design community (e.g., with freelancers and design agencies) will be necessary to keep up a high level of momentum and creativity.
“People are at the heart of our company. Let’s complement the diversity of our employees and introduce a new way of working in cross-functional teams to deliver outstanding results. Let’s team up for innovation! This may include all actors along the value chain, suppliers, customers, and users.”
— Dr. Markus Durstewitz
Now, the next step is to go further in our endeavor to make design thinking part of the DNA of Airbus, by creating a specific design center to coordinate and steer the activities and to give creatives a home within the organization. In this organization-to-be, we want to educate service designers inside Airbus, and build up a strong network spanning Airbus.
Key Takeaways
01 Deep need finding is necessary to ensure that you are “doing the right things.” If this phase is bypassed, you run the risk of merely incrementally improving existing solutions instead of innovating.
02 Prototyping is a powerful tool for demonstrating to stakeholders the power of a design team. Designers are fast at making assumptions visible and tangible. This craft helps to make tacit knowledge of stakeholders explicit, and to get buy-in for design thinking as an innovation approach.
03 A combination of external and internal team members is crucial, but the right balance needs to be found. A team of experts is needed to be fast, and it should be complemented by a cross-functional team from the organization to make innovation happen.
04 A new way of working for users leads to a strong commitment to finding solutions. However, these solutions might be in conflict with traditional metrics in the company, and the speed of working might alienate parts of the organization. Although benefits such as increased usability can be related to KPIs such as increased performance, organizations also need to acknowledge “soft” experience-related factors as benefit.
05 It is crucial to create the right environment for design teams to work in. Having not only an inspiring workspace but also access to prototyping facilities is clearly necessary. Also, a shared location is mandatory for success, as much of the information otherwise gets lost in transmission.
Case: Using Prototyping and Co-Creation to Create Ownership and Close Collaboration
Reducing the waiting time for breast cancer patients
AUTHORS
Marie Hartmann Design Director, Designit Oslo
Kaja Misvær Kistorp Lead Service Designer, Designit Oslo
Emilie Strømmen Olsen Senior Service Designer, Designit Oslo

By reducing the waiting time for breast cancer patients from (up to) three months to seven days, Oslo University Hospital used service design methods to improve the lives of women facing a difficult period in their lives.
Women with a heightened risk of developing breast cancer typically faced a delay of up to three months before receiving an examination and diagnosis at the Oslo University Hospital, the largest hospital in Scandinavia. Supported by the Norwegian Design Council’s Design-Driven Innovation Program (DIP), Designit worked together with a project team at the hospital to reduce waiting time and improve the overall patient experience. The collaborative, visual, and iterative process enabled the hospital staff to work more closely together and envision a new system.
Service thinking and co-creation
The project group and the designers facilitated a workshop with 40 employees across different departments within the hospital to map out a typical patient journey from their point of view. Afterwards, the patient journey was visualized in a detailed diagram demonstrating all the steps a patient goes through. This diagram was a valuable tool that enabled a common understanding across different departments of the complexity of a patient’s journey.
After the workshop, in-depth interviews were conducted with patients. The designers used image cards to help the patients express emotional aspects of their journey, which are just as important as the logical steps. In order to gain deeper understanding of the staff’s work process, the designers conducted contextual inquiry with the staff, role-play with general practitioners (GPs), and phone interviews with stakeholders. Designit talked to a number of different actors that were involved in the patient’s process, including oncologists, radiologists, radio technicians, nurses, patient coordinators, secretaries, private clinics, and GPs.
There was a lot of information gathered through these activities. This was used to identify the right opportunities for optimizing the process, ultimately reducing patient waiting time. The findings had to be inspiring and actionable. The key insight from all of this was that patients felt that they were patients from the day a lump was discovered, while the hospital considered them patients from the day the diagnostic work started.
The Oslo University Hospital decided to rethink the process. The ideal user journey was mapped out, completely removed from today’s process and its challenges, and they worked backward from that. Together with the designers, the staff came up with solutions on how they could work differently with new routines that reduced the diagnosis period. The team then ran co-creation workshops with staff members where they developed prototypes, mainly in the form of scenarios and user stories. The scenarios were tested by presenting them to patients and staff. The designers did some alterations based on the test results in collaboration with the project team until they had a solution that was both feasible and met user needs (both backend and frontend). As a result, the team defined what the radiologist, the nurse, the pathologist, and the patient coordinator had to do to deliver this experience.
The solution aimed to improve cancer patients’ lives by rethinking behind-the-scenes processes from a patient’s point of view. The hospital staff played an important role in their patients’ lives, and this had to be acknowledged. A large part of this included the hospital recognizing, accepting, and working on improving the customer service experience for the time leading to diagnosis.
The new Breast Diagnostics Centre (BDS)
The new process at the BDS was officially inaugurated at the Oslo University Hospital on November 4, 2013, with the Norwegian Minister of Health and the Norwegian Design Council attending the event.
With the new process, patients should feel confident that they are in the care of the hospital from the moment they leave their general practitioner’s office. The goal was to create a straightforward path from the GP to diagnosis, getting the patient an answer as soon as possible
The journey toward a diagnosis has been radically reduced down to a total of seven days, a previously unthinkable goal. On day one, patients receive a brochure from their GP with information detailing the steps they will go through to diagnosis. They are also equipped with a direct phone number they can call in case they have any questions. On the backend, the hospital now assesses the referrals daily, ensuring timely reviews. If the practitioner reports a suspicious lump, the patient in question now gets an appointment within seven days. In the cases that are not as alarming, the patient may wait longer, but never more than four weeks.
On the day of the examination, the patient is greeted at the center by a radiographer. The patient then meets the radiologist and is given a preliminary diagnosis. The patient receives a follow-up appointment the next day where the diagnosis is confirmed and, in the case of a positive diagnosis, a treatment plan is outlined.
Today’s patient journey.

Conducting in-depth interviews with patients.

Analyzing all the data gathered from the insight phase.

Ideation workshop with employees at the hospital.
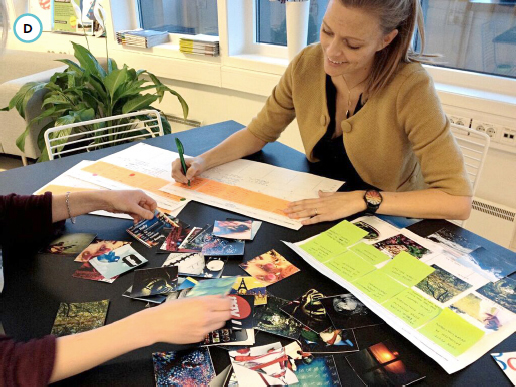
Developing analogue scenarios to lower the threshold for patients and employees to give feedback.

Patient flow with the new service.

90% waiting time reduction with the new Breast Diagnostic Center.

Instead of meeting once a week, all the specialists involved meet every morning to discuss the patients. The test results are ready four days after the examination, and are evaluated in this meeting. This ensures that all patient cases are discussed in a timely manner and the waiting time doesn’t accrue.
Prior to this, it could take up to 12 weeks before patients received a letter scheduling an examination at the hospital. Now, patients are contacted, either by phone or letter, just a few days after receiving their referral from their GP. All in all, the time from referral to diagnosis is now between 7 and 28 days, depending on the severity of the case. The new process represents a 90% reduction in waiting time.
Service design proved to be a valuable method in starting up this project and contributed to creating a real change. After the design phase, hospital staff drove the new process through implementation.
This combination enabled an ambition within the groups that led to the project’s realization and impacted patients’ lives. As a result of this success, it has now become the precursor to the national standardized procedures for breast cancer, introduced in January 2015.
Key Takeaways
01 The key to success throughout the project was the close collaboration between the designers, project group, and hospital staff.
02 The designers brought the patient’s perspective while the project group and staff identified where the pain points lay.
03 In addition to the ownership created through co-creation and involvement from the staff, top management had committed from the beginning of the project to realizing the solutions.
Case: Enabling Staff and Stakeholders to Prototype for Continuous Evolution
Infinite prototyping
AUTHORS
Johan Dovelius Head of Service Design, Doberman
Henrik Karlsson Creative Director, Doberman

Prototyping is often described as one of the core activities of the design process. But in service design, we need to embrace the prototype as the goal. There is no final service, it is just an infinite prototype.
Complex services need evolutionary improvements
Doberman was engaged by the healthcare innovation hub Experio Lab to redesign the different points of contact between people with chronic diseases and primary care clinics. Early in the process it became clear that smaller evolutionary improvements in the interface between patients and staff would have the most impact, as opposed to making one radical service innovation. And even more important, the improvements needed to be in constant evolution to be adapted to constantly changing needs, systems, and restricted resources. Enter infinite prototyping.
“I wish I had access to these tools when I got my diagnosis.”
— Sally Hjert, a participant in the design process living with chronic pain
Collaborative insights
Through a collaborative insight and discovery approach, the design process identified five service improvement tracks that spanned events, artifacts, interactions, and organization:
— Holistic responsibility
— Empowerment in meetings
— Empowerment in the process
— Meeting equals
— Service overview
“A primary care center will never be ‘ready’ or ‘final.’ Instead, we must see it as an ever-evolving service.”
— Erik Almenberg, Strategist, Doberman
All tracks needed prototyping, not just to evaluate ideas, but to establish viable and framed concepts that could be cultivated and evolved by the organization over time. The service will never be “done.”
Staff taking over the prototypes
The design team developed a wide range of lo-fi prototypes that were tested and refined by staff and patients, in up to five iterations. As all prototypes were made in simple formats, like Word documents, so the staff could gradually adapt the process of prototyping, with no need for in-depth designer skills. As a side effect, the staff involved have embraced the concept of the complete service as an infinite prototype, and are now capable of approaching further challenges through design together with the patients.
“As we worked with lo-fi prototypes, we could iterate quickly, together with the staff and patients.”
— Therese Björkqvist, Service Designer, Doberman
“As we see and spread the solutions as prototypes, they are easy to pick up, adjust, and integrate in other parts of the healthcare system. They also inspire staff to generate and prototype other solutions. Spreading the prototypes helps build courage and nourish a more innovative culture.”
— Thomas Edman, Experio Lab
Scaling the prototypes
The innovation hub Experio Lab helps to distribute the solutions within Swedish healthcare, still in an open, prototyping-friendly format. Therefore, the solutions can be continuously tested, refined, and adjusted to different contexts within the Swedish healthcare system.
Key Takeaways
01 Involve the staff in the prototyping process by letting them prototype, not just give input or feedback.
02 Use formats that can be easily used and evolved by the staff. They shouldn’t need a skilled designer or any special tools to take over the design process.
03 Focus on artifacts that are relevant to many, that can be easily adjusted to specific needs.
04 Foster a prototyping and remixing culture.
05 Make the prototypes accessible and shareable.
Collaborative insight and idea sessions with patients and staff were central to the prototyping process.

Conversation cards help patients to set the agenda for the interaction with staff. Made in a simple format, the conversation cards can evolve over time.

The Appointment Guide is a simple form used before, during, and after an appointment to help patients articulate their feelings and needs. The infinite prototype was designed in a simple format that can easily be adjusted to fit various situations.

The Diagnosis Day is a meeting format to interact with other people with the same diagnosis – participants get further medical information and updates on the latest research and have an opportunity to ask questions. The actual agenda for the meeting was identified as the infinite prototype to synchronize the organization around the meeting and test relevance with patients. This simple agenda can evolve over time and functions as an organic guideline for the Diagnosis Day.

A collection of prototypes. Experio Lab distributes the prototypes in formats that are easy to evolve, such as Word files, completed with instructions that encourage continuous evolution.

Case: Minimum Lovable Products, Living Prototypes, and High-Fidelity Sketching In Code
ATO Partner Space case study
AUTHORS
Andy Polaine Design Director, Fjord Evolution APAC
Eduardo Kranz Service Design Lead, Fjord
Chirryl-Lee Ryan Global Design and Innovation Principal, Fjord Evolution

In early 2015, the Australian Tax Office (ATO) embarked on a program called Reinventing the ATO, which outlined the future experience for ATO customers, partners, and staff. In partnership with the ATO, Fjord was engaged to help realize the Reinventing the ATO program through a subproject called Working with Our Partners – all the stakeholders who sit between the ATO and taxpayers, primarily tax and BAS (Business Activity Statement) agents and developers who create tax and accounting software that interacts with the ATO’s systems and services.
As a result of the initial engagement, a group of prioritized service concepts were created to bring Working with Our Partners to life. One of these concepts was Partner Space, an online space where tax partners can easily access information and start interactions with the ATO.
Collaborative prototyping workshops are an excellent substitute for telepathy, because they make intent tangible. They help concrete discussion, highlight hidden complexities, and avoid participants talking at cross purposes.
Building a team of stakeholders
Looking beyond the online space, a combined team of ATO and Fjord staff visited tax partners to conduct contextual research and gather in-depth knowledge of their goals, pain points, and opportunities, as well as the way they work with taxpayers and businesses across Australia (e.g., such as how the ATO communicated with them and their clients, the status of queries to the tax office, keeping track of deadlines, and maintaining an overview of their clients’ situations).
Additionally, tax software providers were involved in the research to ensure the ATO can support them to deliver a consistent experience for tax partners. We co-designed activities with ATO stakeholders and combined insights with internal data to ideate initial concepts.
After refining these concepts, we ran a special prototyping workshop 60 with tax partners, ATO staff, and the project team. Such collaborative co-design workshops are used to discuss and develop initial concepts with a focus on making ideas tangible by building simple prototypes on the spot.
Creating a minimum lovable product
Developing the prototyping workshop outputs further, the team mapped out what a “minimum lovable product” would look like in terms of features and user journeys. We use “lovable” instead of “viable” because this shifts the focus from the functional to the experiential. A bare-bones service that nobody likes using is not going to gain traction out in the world in its fragile early days.
Apart from the usual research and concept outputs at the end of this stage of a project, we created giant journey maps and roadmaps for the development of Partner Space. Since a focal point was a portal, Fjord’s Creative Technologist built a living prototype. This was a case in which it was quicker to build something in HTML, CSS, and JSON than to design mock-up screens and annotate them. The prototype was created over the course of a couple of weeks. It used a pseudo-dataset that could be queried and filtered by a mocked-up frontend. Within the bounds of the fake data, we could demo filtering, searching, notifications, and responsive layouts and give a much greater sense of the power of the design than with just clickable pages. This provides an easier segue from concept to UX to delivery.
The fundamental ideas and needs for the portal had already been gathered and synthesized and concepts refined and iterated in workshops and in the weeks following. These were shared with the client team and external partner stakeholders – tax agents and software developers. The roadmap for the rollout of the features of the big picture experience was done based on a scoring system. The final scores from each group determined, more or less, which features were to be developed in phase one, which in phase two, and so on. The portal prototype was only part of a broader set of concepts, since it was a portal view onto several other deeper and more complex features. The prototype was intended more to explain how such a portal might work than to be a final design – a high-fidelity sketch in code rather than an end state.
Spreading the service design practice
The prototype was only part of a larger project involving several other features. The project has since moved into full design, development, and delivery. Alongside the design activities, Fjord held service design learning sessions at the ATO as part of the knowledge transfer process. These sessions covered topics that were part of the design process in advance, so project members from the ATO could be aware of what was about to happen, and enabled them to collaborate effectively in the co-design exercises that took place throughout the project. Not only does this approach make working with our clients significantly more collaborative, it also ensures the impact of service design has long-term sustainability within the ATO by creating cultural change.
Workshop participants selecting and giving feedback on concepts.

A territory map of tools and software used every day by agents and whether they love them or they’re heartbreaking.

Participants were given content elements in a co-design session to help define the information architecture and features.

During the Makeshop, we quickly made our sketched ideas interactive in order to elicit immediate feedback and develop iterations.

Taking over a public space in the ATO helped communicate the process. Here, the research and concepts are all on the wall and eventually covered by the minimum lovable product journey map poster and the roadmap poster.

A prototype of the portal was the quickest way to describe the concepts in action.

ATO staff who worked with Fjord have gained the confidence to drive internal projects as they continue the design learning experience, and those who worked on Partner Space have become joint guardians of the design vision as it heads into the delivery phase. The project has been extremely well received in the ATO, and it is exciting to work on a project with large-scale societal impact from conception right through to delivery as well as helping to shift the design culture within a large government enterprise.
Key Takeaways
01 We conceive of a minimum “lovable” product instead of “viable” to shift the focus of the prototype from functional to experiential.
02 Collaborative prototyping workshops can help make intent tangible and highlight hidden complexities.
03 Creating artifacts – sketches and prototypes – is a powerful way of calming everyone’s nerves by having something tangible to discuss and carry forward.
Case: Using Role-Plays and Simulations in Large-Scale 1:1 Prototypes
Prototyping at scale: Redesigning Lufthansa’s business class experience
AUTHOR
Barbara Franz Senior Lead Design and Research, IDEO

Aiming to increase competitiveness through service, Lufthansa approached global design and innovation consultancy IDEO in October 2013 to redesign its long-haul business class experience. With an aggressive one-year time frame to roll out the new service, prototyping proved a vital tool throughout the process.
Learning by doing
The ambitious timeline demanded an iterative, hands-on approach from the get-go. After putting ourselves into the shoes of passengers and crew, and diving into what luxury means for today’s traveler, we immediately began to prototype. The team mocked up a section of an airplane cabin in the IDEO Munich studio which was used for regular role-plays, helping us draft the initial service concept.
“Our goal was to improve service in these private moments so that the guest receives a totally new flying experience with much more quality time – time which they can use to work, relax, or be pampered.”
— Dorothea von Boxberg, Head of Customer Experience, Lufthansa
Designing the personal experience
Based on our insights, we created a more personal service experience, focusing on the interaction between crew and passenger. Crew should think of themselves as a traveler’s trusted, knowing hosts, like at top-notch restaurants.
“Only if flight attendants understand and live the new service philosophy – being a host – will passengers feel the difference in the long run.”
— Stefan Wendland, Project Manager, Lufthansa
Prototyping, at scale
We then moved to a large-scale, 1:1 prototype – 92 seats, 3 galleys. Over four weeks IDEO and Lufthansa stakeholders, including crew, catering, and management, prototyped several versions of the new service, focusing on the feasibility and desirability of individual service steps, interactions, and the overall service flow from a passenger and flight attendant point of view.
Building for buy-in
The mock-up allowed us to run four- to five-hour simulations with real crew, watched by passengers and board members. The early involvement of key stakeholders created a sense of ownership and increased their confidence in shaping the design toward a common goal. During rollout, heightened awareness and buy-in from crew members helped ensured more willing adoption across all 18,000 flight attendants.
“We chose this holistic approach to trigger a new way of thinking about service quality and passenger experience at Lufthansa.”
— Dorothea von Boxberg, Head of Customer Experience, Lufthansa
The team mocked up a section of the airplane in IDEO’s Munich studio.

IDEO and Lufthansa prototyped the entire experience in a 1:1 model of a business class cabin.

Flight attendants were among the key stakeholders. Involving crew in the design helped ensure adoption during the rollout.

The experience was a more personal interaction between the crew and the passengers.

Key Takeaways
01 Challenge the system: If the organizational effort and lead time for change in your test follow the rigid rules of the current system, you won’t operate freely and are limited in your creativity. Allow for flexibility in the test to enable you to experiment and iterate on your learnings.
02 Zoom in and out: When prototyping, pay attention to the details, but don’t get lost in them. Balance that by constantly removing yourself to look at the bigger picture and the design intent.
03 Take time to tell and listen: Brief your partners before each test, and debrief afterwards. Customer experience projects require us to listen to customers, but also to all those who deliver the service to them.
04 Engage stakeholders early: Leverage knowledge from different stakeholders and use the opportunity to create a sense of support and ownership by bringing people on board early. This will accelerate implementation and minimizes the risk of failure.
05 Know what you’re measuring, and how: Many different factors impact a service, so agree beforehand on what you’re testing and, just as importantly, how you’re testing. Make sure to pick the appropriate technique for what you’re trying to measure, and one that doesn’t impact the overall service experience.
Case: Using Multifaceted Prototyping to Create and Iterate Business and Service Models
Multifaceted prototype evolution over time
AUTHOR
Klara Lindner Head of Customer Experience, Mobisol

The company Mobisol started with a goal and an insight: having traveled around the globe, its founder Thomas Gottschalk came to understand that energy is an essential requirement for development, and thus set his heart on “plugging in the world.” He also saw the potential of combining two seemingly unrelated trends: a steep cost decrease for photovoltaic (PV) solar, and the radical uptake of mobile networks and phones in the developing world.
Building on that, the initial business idea was quickly formulated: offer PV solar systems to people living off the grid, and let them pay for it over time via SMS.
Rather than working on a 50-page investor’s deck, the first action was building a tangible prototype that illustrated the concept, which was used to get rich feedback and find partners to collaborate with. The prototype at this point was a light bulb and a solar panel connected to microchip with an embedded SIM card. By sending an SMS to that card, you could turn it on and off. Sized to fit in a suitcase, we could take it anywhere we wanted.
To better understand how to turn this idea into a solid business model, we jumped on a plane to visit the three countries that had adopted mobile most (Kenya, Tanzania, and Ghana). We hired a car and a translator to carry out intensive field research and get in touch with potential partners in those isolated areas.
What we brought home were four main insights that would help to shape our offer substantially:
— Even in the remotest village, the awareness about PV solar is quite high, but bad-quality products and lack of after-sales infrastructure have harmed its reputation in the past.
— Better lighting is of course nice to have, but what people really long for is a power source that is able to run larger electric appliances like stereos or TVs.
— The classic indicator – ability to pay – is not fixed number. Many people have three or four income sources and their monthly income fluctuates depending on seasonal factors and also how much they want something.
— The current spending on energy, which we could substitute with a solar system (lighting and getting the phone charged), adds up to approximately 15 €/month.
We used these insights to evolve our core offer: large PV systems coming in three different sizes, complete with battery, cabling, lights, etc. The offer also includes a three-year credit agreement and free maintenance throughout the repayment period.
A second prototype of the PV system was developed, now fully functional (but still very ugly): we could remotely turn the PV system off and on based on incoming mobile money payments (M-Pesa), and gather performance and usage data in real time to foresee maintenance activities.
A hardware prototype made from DIY components helped to overcome cultural barriers and get honest feedback from our pilot customers.
During our trip, we had found a small, like-minded Tanzanian organization, with whom we started a field test soon after. In batches, we connected a total of 200 households (paying customers), gathered feedback on our technology, and prototyped different approaches to get the service ecosystem around the PV system right. There were many open questions about how to orchestrate different steps of the customer journey – let’s zoom in on a few of these to better understand the iterative approach we chose.
“This is like having to put the engine into your new Mercedes-Benz!”
— Mama Baraka, focus group member
How can we assure proper system installation?
Since we are all trained as engineers, we did the system installation ourselves in the beginning – but quickly grasped that this would not be feasible for a commercial rollout.
Our first move was to develop a plug-and-play kit that customers could install themselves, and in co-creative sessions with real customers, we even managed to draft an accompanying manual that works. But we came to realize that even though our customers were now able to do the installation themselves, they simply did not want to.
People wanted someone knowledgeable to do the job. Our second iteration was the development of the “Mobisol Akademie,” a two-week program through which technicians from the village (until then repairing houses, bikes, or phones) got trained and certified as Mobisol Installation Technicians.
And with that, we not only arrived at a feasible solution for us, but also made our customers even happier (because they know and trust their local technicians) – and created jobs in the village.
What is the business model behind this?
Initially, we thought that Mobisol could become a manufacturer or maybe wholesaler, with local distributors buying in bulk and acting as the point of contact for the end users. But in our field test, we learned that there was neither a distribution nor a financing infrastructure to build on, and if we wanted this to work, we would have to build up our own structures and adapt our value proposition:
— We needed to take on the role of a micro-lender. This meant that on the one hand we had to borrow money from somewhere to bridge the three-year repayment period, and on the other, we had to carefully assess the creditworthiness of interested households. While the “switch off” mechanism helped us to get the necessary pre-finance more easily than we had thought, it took several iterations to come up with a credit survey that allowed us to find suitable customers.
Cofounders Thomas and Klara meeting with village leaders in rural Kenya to better understand the role of energy in their village.

We evaluated our pilot phase and gained insights for further development through home visits and focus group discussions.
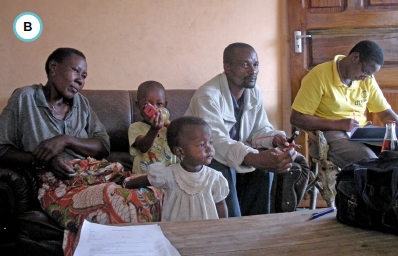
A Mobisol sales outlet right next to the regional market square.

A screenshot of our web app remotely monitoring all systems installed.

— We needed to make sure that our customers could gain access, no matter how remote their homes were.
To come up with a cost-efficient distribution strategy, we looked into informal markets for inspiration: when a Tanzanian family build their new home, they go to the nearest market, buy the bricks, and find a means for transporting all the materials home – sometimes a bus with the right route, sometimes a car, sometimes a boat. Every village has a mason, who is hired to build the house.
We already had the local technicians, so we started to build up a decentrally organized network of sales outlets. Today, we have our “market hubs” at marketplaces that our customers regularly visit. We make sure the packaging is optimized for easy transport, and as soon as the papers are signed our customers handle transport over the final stretch, bringing the system components home, where a village technician is waiting to do the installation for them.
“Side effects” of our pilot research
Through close interaction with our first 200 customers, we found out that some of them were using the system productively and making quite a bit of money. We wanted to foster that and started to develop small business kits, so-called “business out of the box.” In essence, these are electric appliances suited to our system together with entrepreneur-training materials and marketing materials for the customer to use. At the moment, we have a phone-charging kit and a barber shop.
Evolution of the business
Through our iterative process and being very close to our customers, we gained confidence about a business/service model that others considered pretty radical. As we pre-finance our technology for three years, we could only grow if we borrowed money. This confidence plus our “proof from the field” helped to make sure we found people who believe in it.
As I write this, Mobisol is about four years into the business and around three into commercial sales. We’ve grown to 500+ employees and provided access to electricity to more than 50,000 households. Having started in Tanzania, we went to Rwanda in 2014 and later started operations in a third country, Kenya.
Key Takeaways
01 Be flexible with your business model – sometimes customer research can reveal the need to create new possibilities.
02 Through the Mobisol Akademie, we found a way to empower our users to not just be consumers but business-people as well.
03 When asking for feedback on our prototypes, we used a DIY hardware iteration, which helped to overcome cultural barriers and get honest feedback.
1 As we are now working in solution space, we – the proud creators of a service concept or solution – are especially prone to confirmation bias. In other words, we want our babies to succeed. So, our assumptions and estimations about how our ideas will perform when implemented will most certainly be much too optimistic. Be mindful of this bias, especially when creating tests for your prototypes. Always try to really break your prototypes. Remember: if you do not break them, your clients will (or the board will during the final presentation).
2 The term “products” describes anything a company offers – no matter if this is tangible or not. In academia, products are often divided into goods and services. However, products are usually bundles of services and physical/digital products. As “goods” is colloquially understood as referring to something tangible, we prefer to speak of physical/digital products. Read more on this in the textbox Service-dominant logic in 2.5.
3 Interestingly, the process of service prototyping also works nicely for other forms of prototyping. One reason is that a service prototype often contains physical or digital products as props or architecture for its stage. So, to create a full-service prototype we also need to include all other forms of prototyping.
4 See Blomkvist, J., & Holmlid, S. (2010). “Service Prototyping According to Service Design Practitioners.” In Proceedings of the Service Design and Innovation Conference (pp. 1–11). Linköping University Electronic Press. Interestingly, this research also showed a lack of shared concepts and language in service prototyping. So, when you talk to colleagues, do not assume but ask about what they are actually doing and why they are doing it.
5 This does not mean, however, you cannot or should not include an audience from outside your team (i.e., customers or other stakeholders) in the explorative prototyping sessions as co-creators. See for example 6.5.1, Case: Opening the design studio to your customers, for a great example of how to engage with your customers.
6 It can also be used as a tool during research to better understand users’ needs or desires using a physical representation of their ideas. For example, see Buchenau, M., & Suri, J. F. (2000). “Experience Prototyping.” In Proceedings of the 3rd Conference on Designing Interactive Systems: Processes, Practices, Methods, and Techniques (pp. 424–433). ACM.
7 Note that a prototype itself can be seen as an implicit way of expressing a hypothesis which is otherwise hard to articulate. The prototype is the hypothesis.
8 Note that even early in the process and even with rough, lo-fi prototyping you will still use evaluative prototyping. It is used whenever you need to make decisions or have to reduce the number of prototypes you want to work on.
9 Maeda, J. [@johnmaeda on Twitter, 5 Oct 2014]. “If a picture is worth 1000 words, a prototype is worth 1000 meetings.” – saying at @ideo. Retrieved September 27, 2016, from https://twitter.com/johnmaeda.
10 The presenter usually follows well-prepared steps through the different aspects of a prototype (e.g., like showing precreated click paths through an app prototype). Some people would refer to this as a demo.
11 See 5.1.1, Research scope and research question.
12 The model presented here is adapted from Houde, S., & Hill, C. (1997). “What Do Prototypes Prototype?” Handbook of Human-Computer Interaction, 2, 367–381. It uses a set of high-level perspectives that is tailored toward a more general prototyping approach. While we (the authors) have found using it to be quite insightful in most of our own projects, we are aware that these perspectives certainly are not the only ones you could use. For example, another widespread set is people-business-technology, which might work for some.
13 Houde, S., & Hill, C. (1997). “What Do Prototypes Prototype?” Handbook of Human-Computer Interaction, 2, 367–381.
14 Note that your chosen scope can be frontstage as well as backstage. Usually you would start by looking at the journeys of customers and frontstage staff, but this can and should be extended to other key stakeholders depending on your specific purpose and prototyping questions.
15 Note that the experiential aspects of an idea or concept are closely related but not limited to the concept of physical evidences (see textbox Physical evidences in 3.5). The experiential aspects go beyond physical or digital artifacts and also include interactions, processes, and activities as well as other aspects that can be experienced directly by an audience using suitable prototyping/simulation methods.
16 See Idea portfolio in 6.4. Useful dimensions for an efficient prototyping portfolio are complexity (“How hard is it to actually implement or test this aspect of the service?”) and importance (“How important in the overall context of your service concept is it to get this aspect right?”).
17 Please note that you do not have to work through those aspects in the order presented here, or in any other particular sequence. This is more like a checklist to help you ask the right questions when planning prototyping activities.
18 See Sample selection in 5.1.2 to learn more about sampling and the different strategies you can use there.
19 Also see Stakeholder maps and Ideas from system mapping in 6.4 Ideation methods.
20 See 7.3.2 Case: Using prototyping and co-creation to create ownership and close collaboration between the designers, project group, and staff for an example of how to rethink behind-the-scenes processes with multiple stakeholders from a customers or users perspective.
21 Or in the words of Hazel White: “Show your prototypes to the people who will use the service – they’ll add to them, turn them upside down, tear them apart, and challenge your assumptions. Listen.”
22 Prototyping might never stop. In a running service, needs, systems, and access to resources are changing constantly – so it’s valuable to ask yourself early on how you can involve the people who will be responsible for running and adapting the future service. See 7.3.3, Case: Enabling staff and stakeholders to prototype for continuous evolution, for an example of how to enable staff to take over the prototyping and design process, without the need for a skilled designer or any special tools.
23 Possible starting points are an exposé (text), sketching up a sh!tty first draft of a storyboard (visualization), defining a set of rules for the improvisation game (guidelines/ruleset), or filming part of a desktop walkthrough (hands-on simulation documented on film).
24 Because the facilitator’s involvement can actively influence the audience, it’s important to be as neutral as possible when acting as the facilitator. See Chapter 10, Facilitating workshops, for more on different kinds of neutrality.
25 This very much relates to the problem of researcher bias. See Researcher triangulation in 5.1.3.
26 Lim, Y. K., Stolterman, E., & Tenenberg, J. (2008). “The Anatomy of Prototypes: Prototypes as Filters, Prototypes as Manifestations of Design Ideas.” ACM Transactions on Computer-Human Interaction (TOCHI), 15(2), 7.
27 See 7.3.4, Case: Minimum lovable products, living prototypes, and high-fidelity sketching in code, for an example of how to use sketching with code in a service design project.
28 See 7.3.1, Case: Enabling effective co-creation through prototyping minimum viable solutions and contextual mock-ups, for an example of simulating workflows in day-to-day working environments.
29 Blomkvist, J., & Holmlid, S. (2011). “Existing Prototyping Perspectives: Considerations for Service Design.” In Proceedings of the Nordic Design Research Conference (pp. 29–31).
30 See 9.5.2 Case: Managing strategic design projects for an example of how to adopt agile methodologies like sprint structures in a service design project.
31 Out-field prototypes which are thought to have a low chance of success but which help teams think bigger are often called “dark horse” prototypes.
32 Also see Desk research in 5.2.
33 Also see Method triangulation in 5.1.3.
34 This is why some people refer to the creation of a prototype as model making to make a clear distinction. It is only after you have used the model and learned from it that it becomes a real prototype.
35 See 7.3.6, Case: Using multifaceted prototyping to create and iterate business and service models, for an example of how learning from ongoing prototyping activities might allow you to gain confidence in a business model that others might consider radical.
36 Schrage, M. (2013). Serious Play: How the World’s Best Companies Simulate to Innovate. Harvard Business Press.
37 Buchenau, M., & Suri, J. F. (2000). “Experience Prototyping.” In Proceedings of the 3rd conference on Designing interactive systems: processes, practices, methods, and techniques (pp. 424–433). ACM.
38 See 5.1.4, Data visualization, synthesis, and analysis, and 5.3, Methods of data visualization and analysis, for details.
39 See Visualizing data in 5.1.4
40 General methods can be used across any of the above categories.
41 See Method selection in 7.1.4 for guidance on how to create a suitable mix of methods.
42 Investigative reheasal is based on Forum theater. See, for example, Boal, A. (2000). Theater of the Oppressed. Pluto Press. Investigative Rehearsal uses participants’ own experiences, ideas, or prototypes as a starting point, and goes beyond Forum’s focus on behavioral strategies to also examine and challenge the basic process, the architectural setting, support tools, and more.
43 See 7.3.5, Case: Using role-plays and simulations in large-scale 1:1 prototypes, for an example of how to use similar techniques to focus on the feasibility and desirability of the overall service as well as individual elements.
44 Subtext is a crucial concept in performing arts, and is especially important in the work of Stanislavski and his artistic heirs. On stage, the subtext is usually implicit, but in prototyping (as in some rehearsal techniques and improv games) it becomes explicit, making it easier for the workshop participants to focus on it. For more on subtext in theater, see Moore, S. (1984). The Stanislavski System: The Professional Training of an Actor, New York: Penguin Books. For a film where subtext becomes explicit for comedic effect, see Annie Hall (Woody Allen, 1977, MGM).
45 See Blomkvist, J., Fjuk, A., & Sayapina, V. (2016). Low threshold service design: desktop walkthrough. In Proceedings of the Service Design and Innovation Conference (pp. 154-166). Linköping University Electronic Press.
46 For example, see Hallgrimsson, B. (2012). Prototyping and Modelmaking for Product Design. Laurence King Publishing. For a full-scale example of cardboard prototyping in service design see Kronqvist, J., Erving, H., & Leinonen, T. (2013). Cardboard Hospital: Prototyping Patient-Centric Environments and Services. In Proceedings of the Nordes 2013 Conference (pp. 293–302).
47 See Investigative rehearsal in 7.2
48 See, for example, Snyder, C. (2003). Paper Prototyping: The Fast and Easy Way to Design and Refine User Interfaces. Morgan Kaufmann.
49 See, for example, Brown, D. M. (2010). Communicating Design: Developing Web Site Documentation for Design and Planning. New Riders.
50 See Hitachi Ltd. (n.d.). “Experiential Value: Introduce and Elicit Ideas,” at http://www.hitachi.com/rd/portal/contents/design/business_origami/index.html. See also McMullin, J. (2011). “Business Origami,” at http://www.citizenexperience.com/2010/04/30/business-origami/.
51 See 3.6, Business Model Canvas, for a summary of the canvas and its connection to other service design tools. Also see Osterwalder, A., & Pigneur, Y. (2010). Business Model Generation: A Handbook for Visionaries, Game Changers, and Challengers. John Wiley & Sons.
52 Eventually, a Business Model Canvas needs to be translated into experience prototypes or actual offers. See 7.3.6, Case: Using multifaceted prototyping to create and iterate business and service models, for an example of ongoing prototyping activities supporting confidence in a business model that others might consider radical.
53 See 7.3.4, Case: Minimum lovable products, living prototypes, and high-fidelity sketching in code, for an example of how sketches and prototypes can make intent tangible and highlight hidden complexities.
54 See Reas, C., & Fry, B. (2004). “Processing.org: Programming for Artists and Designers.” In Proceedings of SIGGRAPH ‘04: Web Graphics (p. 3). ACM.
55 For a first discussion, see Holmquist, L. (2006). “Sketching in Hardware.” interactions, 13(1), 47-60. But it is possibly best to find a local makerspace, get your hands dirty, and make things!
56 Go watch The Wizard of Oz (Victor Fleming, 1939, MGM). Only then, get some more popcorn and read the seminal publication on Wizard of Oz techniques in design: Kelley, J. F. (1984). An Iterative Design Methodology for User-Friendly Natural Language Office Information Applications. ACM Transactions on Information Systems (TOIS), 2(1), 26-41.
57 See 7.3.3, Case: Enabling staff and stakeholders to prototype for continuous evolution, for an example of how to enable staff to take over the prototyping and design process – without the need of a skilled designer or any special tools.
58 You might even consider including a network of supporters like internal/external development teams in other time zones that can finish your prototypes overnight. This can be very impressive to teams.
59 Also see Chapter 10, Making space for service design.
60 Fjord Makeshop is a proprietary co-design and prototyping workshop.