
Chapter 12. Administration: Running
Before Accumulo is started, HDFS and ZooKeeper must be running.
Accumulo can either be managed from a single control node using scripts provided in the bin/ directory, or using init.d scripts.
A running instance can be verified using the monitoring methods described in “Monitoring”.
Starting Accumulo
This section describes two types of scripts you can use to start Accumulo.
Via the start-all.sh Script
The start-all.sh script will SSH into all the machines listed in masters, slaves, gc, monitor, and tracers and start the associated processes. Password-less SSH is required to do this without having to type passwords for each machine.
Note
In each of these files, the hostname of machines should be listed, rather than IP address. In addition, each hostname should resolve to an IP address that can be resolved back to the same hostname.
Here is additional detail on each of the host files:
- slaves
-
The conf/slaves file is used by the start-all.sh script to start Accumulo processes on worker nodes, namely tablet server and, in the case of Accumulo 1.4 and earlier, logger processes. The hostnames of all machines that should run tablet server processes should be listed in this file.
In cases in which a tablet server will run on the same machines that will host master processes, the hostname of those machines should be listed here too.
- masters
-
The conf/masters file contains a list of the machines that will run a master process. There should be at least one machine, but more than two or three is generally not necessary. If more than one machine is listed here, the master processes will choose an active master, and the others will serve as failover masters in the case that the active master fails. Unlike tablet servers, only a few machines need to run master processes.
- gc
-
This file contains a list of the machines that will run garbage collector processes. Like the master, only one will be active at any given time and any machines beyond the first will only take over should the active garbage collector fail.
- monitor
-
This file contains a list of the machines that will run monitor processes. Like the master, only one will be active at any given time and any machines beyond the first will only take over should the active monitor fail.
- tracers
-
This file contains a list of the machines that will run tracer processes. Like the master, only one will be active at any given time and any machines beyond the first will only take over should the active tracer fail.
Via init.d Scripts
Some distributions of Hadoop include init.d scripts for Accumulo.
The ACCUMULO_HOME environment variable may need to be set in the script.
Accumulo can then be started by running:
sudo service accumulo start
Depending on the masters, slaves, etc. files, processes will be started based on the files in which a machine’s hostname appears.
Accumulo processes can be started at boot time and stopped at shutdown by adding the accumulo script to one or more Linux runlevels.
Stopping Accumulo
Accumulo clusters can be stopped gracefully, flushing all in-memory entries before exiting so that the next startup can proceed without having to recover any data from write-ahead logs. The Accumulo master orchestrates this shutdown.
Via the stop-all.sh Script
If using the start-all.sh and stop-all.sh scripts, Accumulo can be shut down via the stop-all.sh script. This script will attempt to talk to the master to orchestrate the shutdown. If the master is not running, the stop-all.sh script will hang. Hitting Ctrl-C will prompt the user to hit Ctrl-C again to cancel shutdown or else the script will forcefully kill all tablet servers and other Accumulo processes. If Accumulo is stopped this way, the next time the system is started tablet servers must recover any writes that were in memory at shutdown time from the write-ahead logs.
Usually this is not necessary. If the master is down, bringing up a new master process, perhaps on another machine, before attempting to shut down will help reduce the need for recovery on startup.
The accumulo admin command can also be used to stop the cluster:
accumulo admin stopAll
If a ClassNotFoundException occurs when using the stop-all.sh script, ensure that the MapReduce and HDFS JARs are correctly specified in the general.classpaths property in the accumulo-site.xml file.
Starting After a Crash
If tablet server processes crash or exit due to a temporary network partition, they can simply be restarted and the Accumulo master will start assigning tablets to them.
If a cluster was shut down without allowing tablet servers to flush, (e.g., if processes were all killed with a kill -9 or if power was lost to the cluster), the cluster can be restarted and the process of recovery will begin.
For each tablet on a tablet server that was killed before it could flush the entries in memory to HDFS, the Accumulo master will coordinate a recovery process. See “Recovery” for details.
During the recovery process, tablet servers will be assigned a tablet and will attempt to replay the mutations written to the write-ahead log to re-create the state that was in the memory of the machines that were killed. This process can take from a few seconds to a few minutes depending on the size of the write-ahead logs. The master will display the status of this process on the monitor page.
Clients can begin to read and write to tablets that aren’t involved in recoveries while recoveries are taking place. As soon as a tablet’s recovery is complete, clients can again read and write key-value pairs to it.
For additional information on steps to recover a cluster in cases when automatic recovery is insufficient, see “Failure Recovery”.
Now that Accumulo is installed, configured, and running, clients can connect, create tables, and read and write data.
The primary administrative concerns at this point are monitoring system usage and health, and adding or removing machines from the cluster as a result of failure or response to changes in usage. Accumulo is designed to operate on large clusters, and most individual failures do not require immediate administrative attention. Otherwise, keeping up would quickly become infeasible. Accumulo automatically detects certain types of machine failures and automatically recovers from them, reassigning work to remaining healthy machines in some cases.
For many maintenance operations it is not necessary to stop an Accumulo instance. This allows clients to continue to operate as machines fail, are added, or are removed.
One notable exception to this is in the case of upgrades. Accumulo does not yet support rolling upgrades, a practice in which some machines are brought down, upgraded, and introduced to the cluster while machines that have not been upgraded are still participating in the cluster.
Monitoring
Accumulo provides several methods of monitoring system health and usage. These include the monitor web service, logging, and JMX metrics.
Monitor Web Service
Accumulo provides a monitor process that gathers information from a running cluster and presents it in one place for convenience. The monitor makes it relatively simple to determine system health and performance.
Overview
The default view in the monitor presents an overview of activity in the cluster (Figure 12-1). Particularly useful are the various graphs on this page. Administrators and developers can quickly gain an idea of how well the cluster is operating, spot issues, and analyze application performance.
The main section of this page shows two tables, followed by 10 graphs, all in two columns. The two tables show information from the Accumulo master and about the ZooKeeper cluster.
An attempt is made to draw attention to any known problems with the cluster in the form of a red background that appears behind information that indicates a severe problem. This includes things such as the master being down, unassigned tablets, and log warnings and errors.
On the left are links to all the other views, described next.
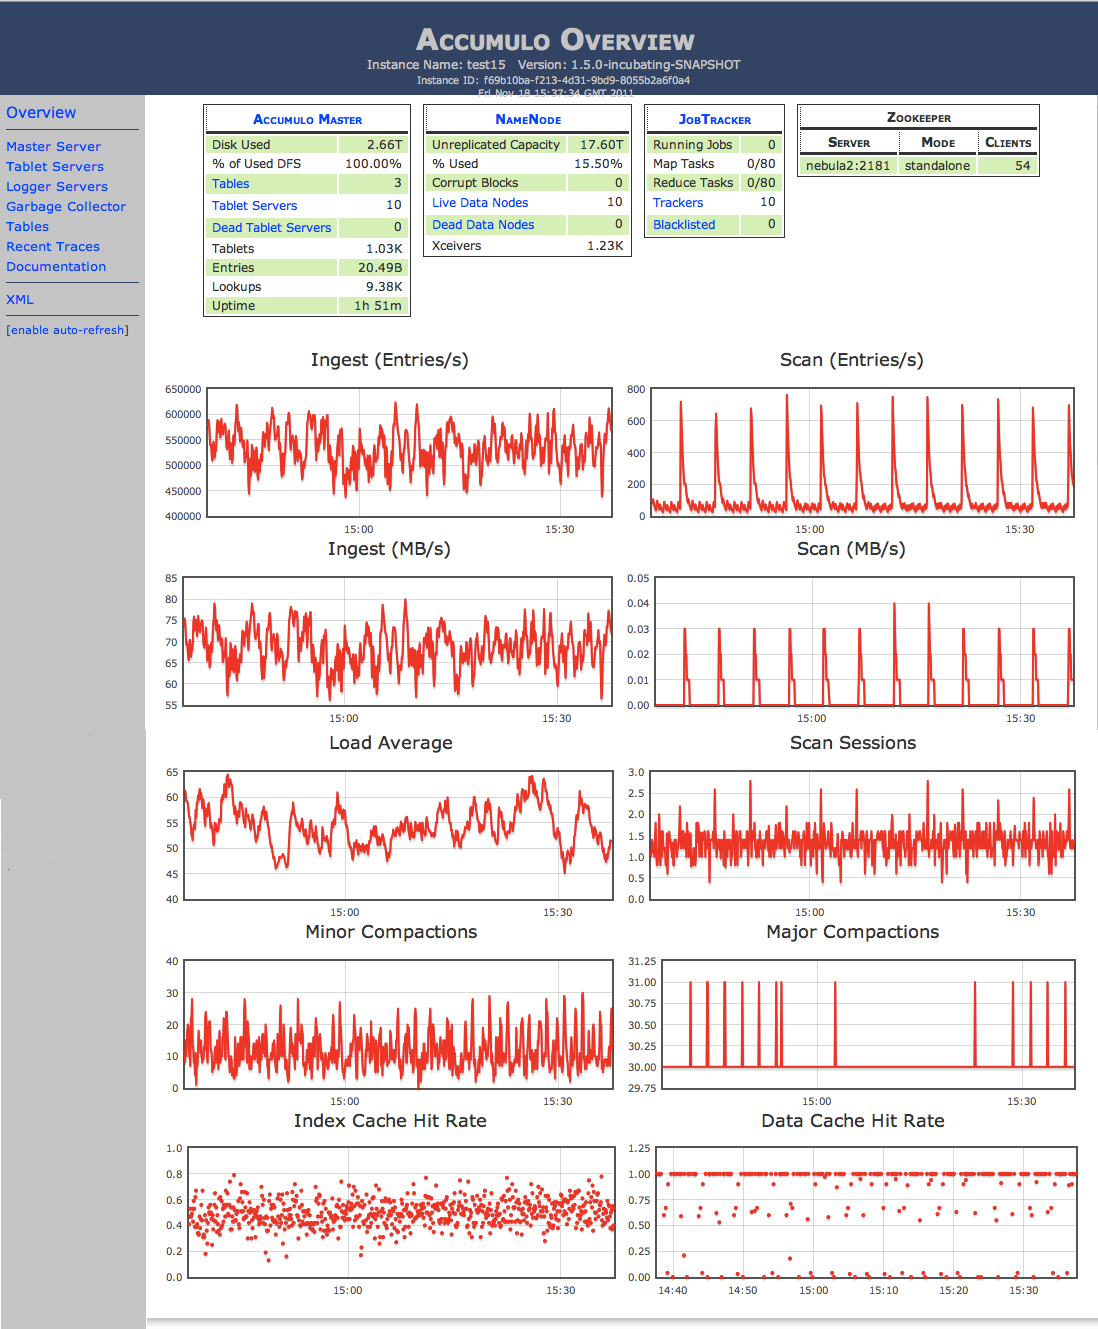
Figure 12-1. View of the monitor
Master Server View
The Master Server View provides information on the instance overall, as well as a list of tables.
A legend is provided of the meaning of the columns in the first table:
- # Online Tablet Servers
-
Number of tablet servers currently available.
- # Total Tablet Servers
-
The total number of tablet servers configured.
- Last GC
-
The last time files were cleaned-up from HDFS.
- Entries
-
The total number of key-value pairs in Accumulo.
- Ingest
-
The number of key-value pairs inserted, per second. (Note that deleted records are counted as “inserted” and will make the ingest rate increase in the near-term.)
- Entries Read
-
The total number of key-value pairs read on the server side. (Not all may be returned because of filtering.)
- Entries Returned
-
The total number of key-value pairs returned as a result of scans.
- Hold Time
-
The maximum amount of time that ingest has been held across all servers due to a lack of memory to store the records.
- Load
-
The one-minute load average on the computer that runs the monitor web server.
This view is where active recoveries from any tablet server failures are displayed.
Tablet Servers View
The Tablet Servers View shows a list of active tablet servers and activity per server.
Here, an administrator can quickly see if tablets are evenly distributed across servers, how many key-value pairs (entries) per second are being ingested, and how many entries are being read for each server. This view is particularly useful for determining whether the entire cluster is being utilized evenly, or whether there are hotspots (i.e., a few servers that are handling the majority of the load).
Note that this view does not show which tablets belong to which tables.
Clicking the hostname of a tablet server will show a list of tablets currently hosted by that server. Statistics about server activities such as compactions and splits are also shown.
Server Activity View
This view is a graphical representation of various aspects of server activity across the cluster.
Each circle or square in the grid represents a tablet server. Various dimensions of each server can be displayed as color or motion, according to the selections from the drop-down menus across the top of the view.
The intent of this view is to provide a high density of information at a quick glance. For example, you can choose to monitor load to see which servers may be overloaded, including by work from other processes running alongside tablet servers. Or you can choose to show queries to try to highlight any hotspots and reveal flaws in table design.
You can show information for an individual server by hovering the mouse cursor over a particular square or circle.
Garbage Collector View
The Garbage Collector View shows recent activity performed by the garbage collector. Administrators will want to check this view to make sure the garbage collector is running. Without it, the cluster could run out of disk space as files are combined in compaction operations, creating new files and making old files obsolete.
Tables View
The Tables View shows activity on a per-table basis.
Of particular interest here is the number of tablets per table. The aggregate ingest rate and number of concurrent queries will increase as the number of servers hosting a table’s tablets increases, up until all servers have at least one of the table’s tablets.
To see which servers are hosting a table’s tablets, administrators can click the name of the table. A list of servers and the number of tablets from this particular tablet is shown.
Recent Traces View
This view shows information about recent traces, which are a sample of operations that are timed to indicate performance.
For more on tracing, see “Tracing”.
Recent Logs View
This view collects log messages at the warn and error level from across the cluster. This can be very useful as clusters get larger and going out to each individual server becomes more cumbersome.
Logs are listed in ascending time order, so the latest messages appear at the bottom. You can dismiss messages that have been read and acknowledged by clicking Clear All Events.
JMX Metrics
Metrics can be enabled for measuring several operations throughout an Accumulo cluster. These include metrics such as:
-
Number of minor or major compactions currently running
-
Number of entries in memory
-
Minimum and maximum times for scan operations
-
Average time for commit preparation
The collection of these is controlled via the $ACCUMULO_HOME/conf/accumulo-metrics.xml file. This file allows metrics to be enabled and logged. When logging is enabled, files will be created by default in $ACCUMULO_HOME/metrics.
To allow servers to accept JMX connections, we may have to first modify accumulo-env.sh by adding the following lines:
export ACCUMULO_TSERVER_OPTS="-Dcom.sun.management.jmxremote.port=9006
    -Dcom.sun.management.jmxremote.authenticate=false
    -Dcom.sun.management.jmxremote.ssl=false $ACCUMULO_TSERVER_OPTS"
export ACCUMULO_MASTER_OPTS="-Dcom.sun.management.jmxremote.port=9002
    -Dcom.sun.management.jmxremote.authenticate=false
    -Dcom.sun.management.jmxremote.ssl=false $ACCUMULO_MASTER_OPTS"
export ACCUMULO_MONITOR_OPTS="-Dcom.sun.management.jmxremote.port=9003
    -Dcom.sun.management.jmxremote.authenticate=false
    -Dcom.sun.management.jmxremote.ssl=false $ACCUMULO_MONITOR_OPTS"
export ACCUMULO_GC_OPTS="-Dcom.sun.management.jmxremote.port=9004
    -Dcom.sun.management.jmxremote.authenticate=false
    -Dcom.sun.management.jmxremote.ssl=false $ACCUMULO_GC_OPTS"
export ACCUMULO_LOGGER_OPTS="-Dcom.sun.management.jmxremote.port=9005
    -Dcom.sun.management.jmxremote.authenticate=false
    -Dcom.sun.management.jmxremote.ssl=false $ACCUMULO_LOGGER_OPTS"
If we modify this file, Accumulo processes will need to be restarted before these settings will take effect.
Next we can enable the metrics we want.
For example, to turn on metrics collection for scans on tablet servers, we can simply change a boolean value in the metrics XML file:
<tserver><enabledtype="boolean">true</enabled><loggingtype="boolean">false</logging><update><enabledtype="boolean">false</enabled><loggingtype="boolean">false</logging></update><scan><enabledtype="boolean">true</enabled><loggingtype="boolean">false</logging></scan>
These configuration files must be distributed throughout the cluster.
We can now connect to the JMX port on processes to view the metrics.
For example, we can use the jconsole command to view metrics for a tablet server by specifying the hostname and port:
jconsole
This opens the connection window in Figure 12-2.
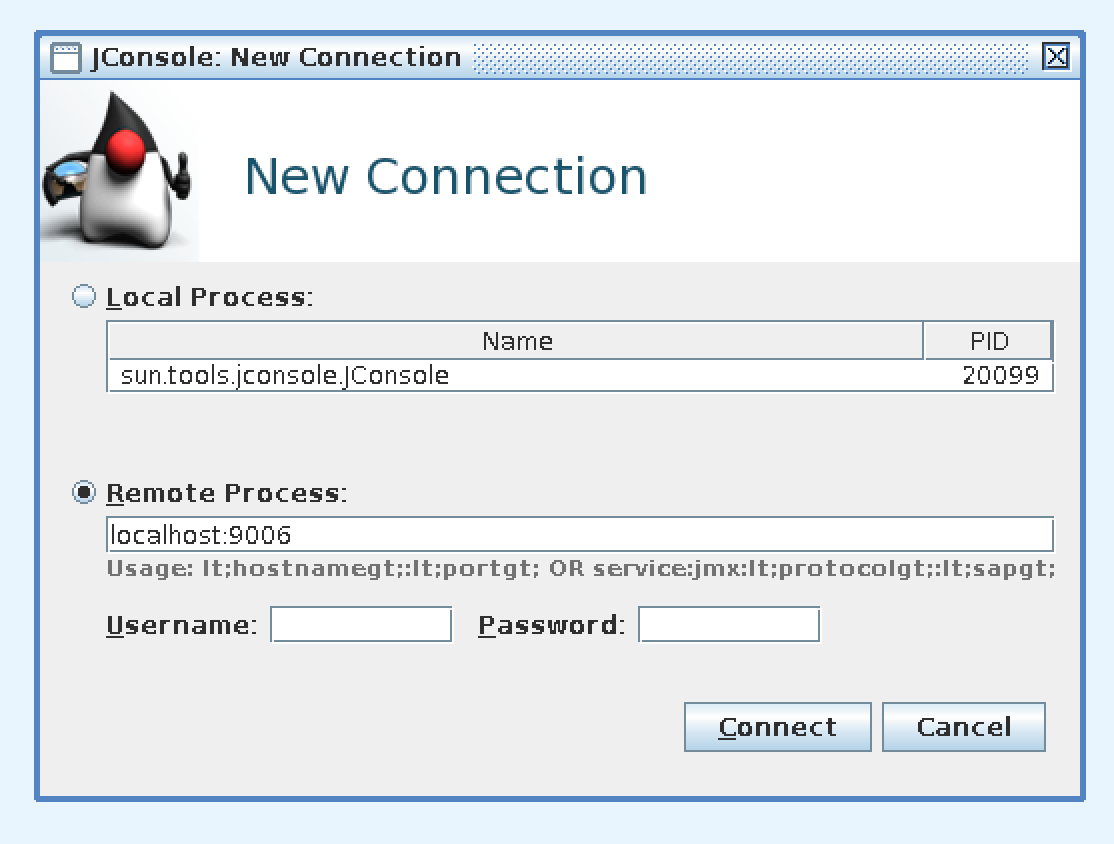
Figure 12-2. Connecting to a local tablet server JMX port
After connecting, we can navigate to the MBean tab and expand the tablet server–related metrics from the options in the left-hand pane (Figure 12-3).
We can also see metrics as they are logged to files in the metrics/ directory:
accumulo@host metrics]$ ls
tserver.scan-20141025.log
Alex Moundalexis has written a helpful tutorial on enabling JMX for use with Ganglia written.
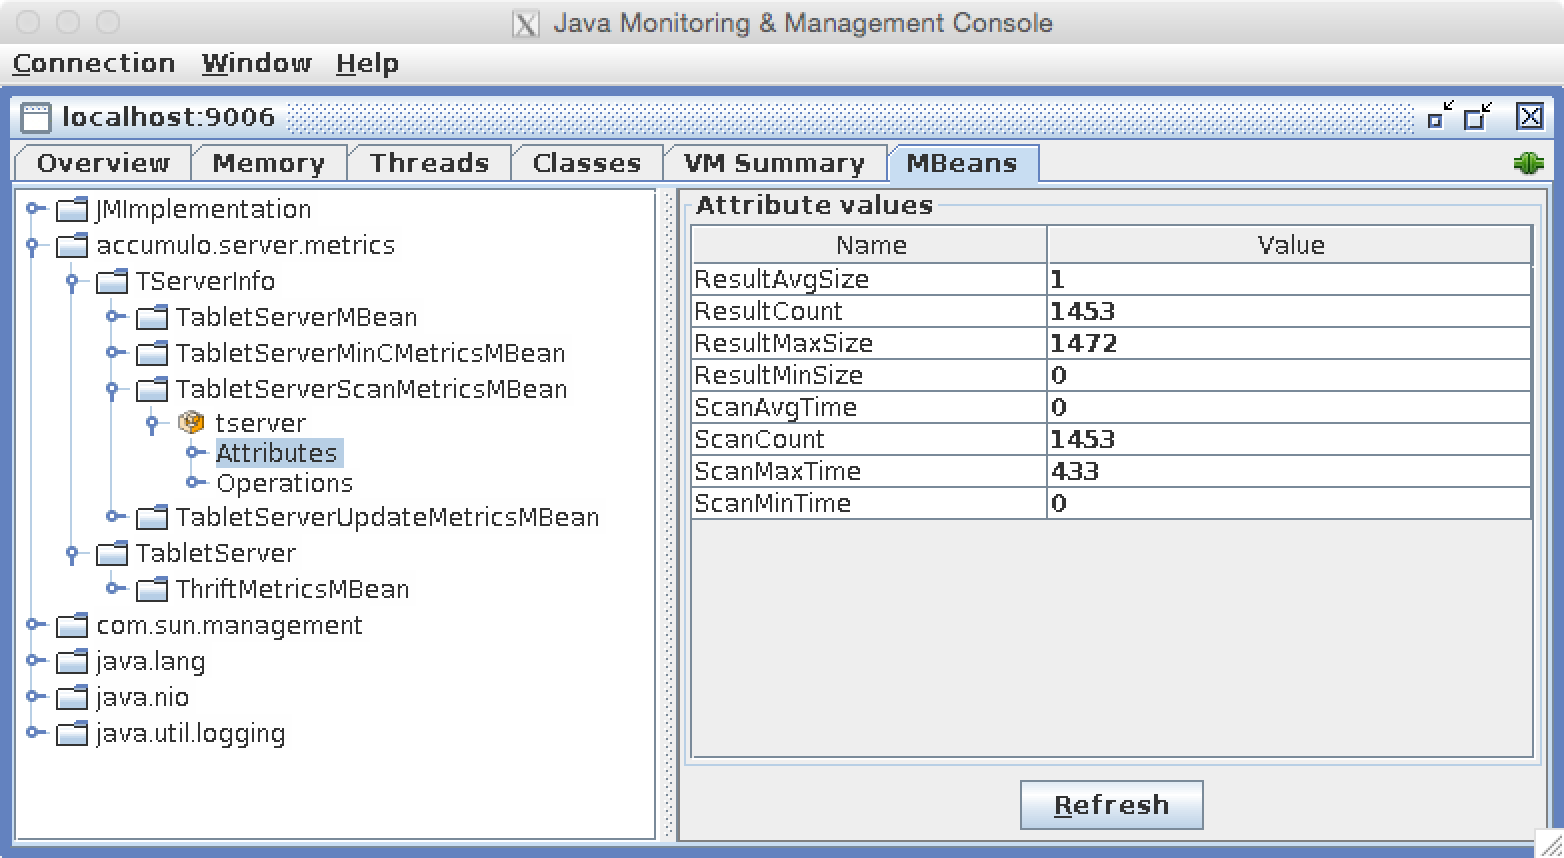
Figure 12-3. Viewing tablet server metrics via JMX
Logging
Accumulo processes log to several local logfiles. Logs are configured via Log4j configuration XML and properties files.
By default, DEBUG-level events are written to a separate debug logfile, INFO and higher-level events are written to the regular log, and WARN and higher-level events are forwarded to the monitor for consolidation.
You can modify this behavior by editing the $ACCUMULO_HOME/conf/generic_logger.xml file and the $ACCUMULO_HOME/conf/monitor_logger.xml file.
You can suppress some types of messages and configure them separately by editing the log4j.properties file.
Tracing
In a distributed system, diagnosing application performance and errors can be difficult. This is because operations can span several machines as clients call remote procedure calls on servers and servers call other servers.
In Accumulo, clients talk primarily to tablet servers, which in turn talk to HDFS DataNode processes, all of which can be on different physical servers.
Tracing is a way of following an operation as it moves from server to server in order to get a holistic view of the timing of each stage of the operation. Clients can enable tracing explicitly, and Accumulo also traces some of its internal operations. If an Accumulo tracer process is running, trace information is collected and stored in a trace table in Accumulo. The Accumulo shell has a special formatter configured to display this information.
Tracing in the shell
To trace individual shell commands, you can enable tracing with the trace on command.
Subsequent operations are traced until the trace off command is used to disable tracing.
After tracing is disabled, trace information will be gathered and printed to the screen:
root@accumulo> table test
root@accumulo test> trace on
root@accumulo test> insert g g g g
root@accumulo test> scan
a b:c []    d
e f:g []    h
g g:g []    g
row f:q []    v
root@accumulo test> trace off
Waiting for trace information
Trace started at 2013/12/12 04:33:52.602
Time  Start  Service@Location       Name
14108+0      shell@ubuntu shell:root
   28+10122    shell@ubuntu close
    2+10122      shell@ubuntu binMutations
   28+10127      shell@ubuntu org.apache.accumulo.core.client.impl.
                     TabletServerBatchWriter$MutationWriter 1
   22+10127      shell@ubuntu org.apache.accumulo.core.client.impl.
                     TabletServerBatchWriter$MutationWriter 1
   22+10127        shell@ubuntu sendMutations
    2+10135          shell@ubuntu client:update
   10+10138          tserver@localhost update
    9+10138            tserver@localhost wal
    6+10140              tserver@localhost update
    6+10140                tserver@localhost wal
    2+10142                  tserver@localhost update
    2+10142                    tserver@localhost wal
    1+10147            tserver@localhost commit
    1+11998    tserver@localhost getTableConfiguration
    1+12003    tserver@localhost getTableConfiguration
    6+12012    shell@ubuntu scan
    6+12012      shell@ubuntu scan:location
    4+12013        tserver@localhost startScan
    4+12013          tserver@localhost tablet read ahead 7
    1+12020    tserver@localhost listLocalUsers
root@accumulo test>
See “Using Tracing” for more information on enabling tracing in applications and interpreting the trace results.
Cluster Changes
Accumulo is designed to withstand regular occurrences of machine failure, so adding and removing machines from a cluster configuration can be done easily. Machines can be added to or removed from a running Accumulo instance without causing interruption to clients.
Adding New Worker Nodes
A major advantage of the shared-nothing, horizontal scale-out architecture of Accumulo and Hadoop is that adding more hardware resources can increase the aggregate performance of a cluster in a near-linear fashion. Clusters can be increased in size quite a few times and still realize a significant increase in performance rather than sharply diminishing returns.
When additional storage, increased ingest rate, or increased concurrent query performance is required, worker nodes can be added. Empirically, some clusters have been shown to yield an increase of roughly 85 percent in write and query capabilities when a cluster is doubled in size.
To add a new worker machine to a cluster, simply install the Hadoop and Accumulo software (most workers run Hadoop DataNode and tablet server processes), and copy the Hadoop and Accumulo configuration files to the new machines. Upon starting, the DataNode process will contact the HDFS NameNode and let it know that the new machine is available for storing new HDFS data blocks. When the tablet server starts it will register itself in ZooKeeper. The Accumulo master will notice that it is available and has no tablets assigned, and will begin the process of migrating responsibility for hosting several tablets to the new machine.
If the start-all.sh and stop-all.sh scripts are being used to start and stop the cluster, the new machine should be added to the conf/slaves file on the machine from which the start/stop scripts are run.
Removing Worker Nodes
Removing a live worker node from the cluster can be done as simply as turning off the machine. However, this will cause the cluster to have to recover the entries that were in the memory of the machine from write-ahead logs. It can take a while before all the entries are again available for query. In addition, if the worker node is running a DataNode process, the replicas on that node must be rereplicated.
To avoid the recovery process, tablet server processes can be shut down gracefully, in which they flush in-memory entries before exiting. This allows the machines that take over responsibility for its tablets to begin hosting them immediately.
The accumulo admin command can be used to shut down a specific tablet server:
accumulo admin stop [hostname]
If you are using the start-all.sh and stop-all.sh scripts to control the cluster, the machine’s hostname should be removed from the conf/slaves file.
If you are removing several machines at once, care must be taken to avoid taking all of the replicas of any particular HDFS data block offline simultaneously. To avoid this, HDFS provides the ability to decommission a DataNode, which will cause HDFS to replicate all the blocks hosted by decommissioning nodes elsewhere. When this process is complete, the nodes can be turned off.
Decommissioning HDFS DataNodes can be done by adding their hostnames to the conf/excludes.xml file (or another file defined by the setting dfs.hosts.exclude from $HADOOP_HOME/conf/hdfs-site.xml) and running the command:
hadoop dfsadmin -refreshNodes
This will start the decommissioning process. The HDFS monitor page at http://<namenode>:50070 can be used to monitor the process for completion. When the number of decommissioning nodes is 0 and the number of decommissioned nodes reaches the correct number, the DataNode processes can be stopped.
Adding New Control Nodes
Normally control nodes do not need to be added to the cluster in order to improve performance—they don’t participate in most client operations such as reading or writing data. From time to time a control node may fail and may need to be restored or replaced.
A new inactive master process can be started at any time provided it has the configuration files for a particular cluster. It will register itself in ZooKeeper and stand by until the active master process fails.
A new garbage collector process can be added if the previous garbage collector has failed. Because the garbage collector runs periodically in the background, it is not configured to perform automatic failure the way the master process is.
Removing Control Nodes
Control node processes do not maintain any persistent state and can simply be killed to remove them from the cluster. The hostnames should also be removed from the masters, monitor, gc, and tracers files to avoid trying to start processes on removed machines the next time start scripts are run.
Before stopping the active master process, an inactive master process should be started in order to ensure a master process is always running in case a tablet server fails. Once the inactive master process is started, the active master can be brought down and the inactive master will automatically take over responsibility.
Table Operations
Administrators can perform various operations on tables through the shell. These functions are also available to applications via the Table API described in Chapter 4.
Changing Settings
Accumulo allows administrators to configure a large number of settings that govern the behavior of Accumulo processes.
Besides the configuration controlled by the files in the Accumulo conf/ directory, additional settings are stored in ZooKeeper. These settings allow changes to be made that in some cases can be reflected immediately across the cluster without having to restart processes.
The shell can be used to view current settings:
accumulo@hostname:~$ accumulo shell -u root
Password: ******
Shell - Apache Accumulo Interactive Shell
-
- version: 1.5.0
- instance name: accumulo
- instance id: xxxxxxxx-xxxx-xxxx-xxxx-xxxxxxxxxxxx
-
- type 'help' for a list of available commands
-
root@accumulo> config
---------+--------------------------------------------+-------------------------
SCOPE    | NAME                                       | VALUE
---------+--------------------------------------------+-------------------------
default  | gc.cycle.delay ........................... | 5m
default  | gc.cycle.start ........................... | 30s
...
default  | instance.dfs.uri ......................... |
default  | instance.security.authenticator .......... | org.apache.accumulo.
    server.security.handler.ZKAuthenticator
default  | instance.security.authorizor ............. | org.apache.accumulo.
    server.security.handler.ZKAuthorizor
default  | instance.security.permissionHandler ...... | org.apache.accumulo.
    server.security.handler.ZKPermHandler
default  | instance.zookeeper.host .................. | localhost:2181
...
default  | master.bulk.threadpool.size .............. | 5
default  | master.bulk.timeout ...................... | 5m
default  | master.fate.threadpool.size .............. | 4
default  | master.lease.recovery.interval ........... | 5s
default  | master.port.client ....................... | 9999
To view a specific setting, use the -f flag:
root@accumulo> config -f table.compaction.major.everything.idle
---------+--------------------------------------------+-------------------------
SCOPE    | NAME                                       | VALUE
---------+--------------------------------------------+-------------------------
default  | table.compaction.major.everything.idle ... | 1h
system   |    @override ............................. | 2h
---------+--------------------------------------------+-------------------------
root@accumulo>
You can also view settings that match a given prefix:
root@accumulo> config -f tserver.bulk
---------+--------------------------------------------+-------------------------
SCOPE    | NAME                                       | VALUE
---------+--------------------------------------------+-------------------------
default  | tserver.bulk.assign.threads .............. | 1
default  | tserver.bulk.process.threads ............. | 1
default  | tserver.bulk.retry.max ................... | 5
default  | tserver.bulk.timeout ..................... | 5m
---------+--------------------------------------------+-------------------------
root@accumulo>
The config shell command can also be used to change configuration settings.
In some cases this change will be reflected across the cluster immediately:
root@accumulo> config -s table.compaction.major.everything.idle=2h
Altering load balancing
Tablets should always be balanced evenly across tablet servers, using the default load balancer.
The particular load balancer in use can be controlled on a per-table basis via the table.balancer property.
Information about configuring load balancers and how the load balancers work can be found in “Additional Properties”.
Configuring iterators
At times administrators will find it useful to enable, configure, or disable iterators for a particular table. We talk about a specific example in “Data Lifecycle”. Here we describe how to configure iterators.
Iterators that implement the OptionDescriber interface can be configured through the shell via the setiter or setscaniter commands.
Iterators can also be configured through the Java API via the IteratorSetting object.
Configuring iterators amounts to setting a number of string properties on a table, which are stored in ZooKeeper.
Iterators can also be configured manually by setting the appropriate properties, but this is not recommended because it can be more error-prone. To change the parameters of an existing iterator, the easiest method is to change the string property through Accumulo’s API or the shell.
To configure an iterator on a given table, use the setiter command.
The command requires a number of parameters.
The iterator class can be specified with -class where the class name is fully qualified.
Some iterators have built-in flags, so you can use those as shortcuts instead of specifying -class with the entire class name. These are:
-
The
AgeOffFilter(-ageoff) -
The
RegExFilter(-regex) -
The
ReqVisFilter(-reqvis) -
The
VersioningIterator(-vers)
In addition to the class name, specify between one and three scopes—the -minc, -majc, and/or -scan scope—signifying that the iterator should be applied at minor compaction time, major compaction time, and scan time, respectively.
Tip
Configuring an iterator for the scan scope applies the iterator to all scans of the table by all users.
To configure an iterator through the shell for the current scan session only (i.e., all scans issued in the shell by the current user on a given table), use the setscaniter command instead.
The syntax is the same as for the setiter command, except that the iterator scope does not need to be specified.
You must also specify the iterator’s priority, which controls the order in which the iterators are applied.
Specifying a shorthand name for the iterator is optional with the -n parameter.
Iterator configuration is stored in ZooKeeper under parameter names of the form table.iterator.scope.name.*.
If the shell is in a table context (which can be obtained with the table command), the iterator will be applied to the current table.
A different table can be specified with the -t option.
For example, to configure an AgeOffFilter that ages off data older than one hour, do the following:
user@accumulo tablename> setiter -ageoff -scan -p 10
AgeOffFilter removes entries with timestamps more than <ttl> milliseconds old
----------> set AgeOffFilter parameter negate, default false keeps k/v that pass
    accept method, true rejects k/v that pass accept method:
----------> set AgeOffFilter parameter ttl, time to live (milliseconds): 3600000
----------> set AgeOffFilter parameter currentTime, if set, use the given value
    as the absolute time in milliseconds as the current time of day:
user@accumulo tablename>
After you have configured an iterator on a table, type config -t table name in the shell to see the actual properties.
config -t table name -f iterator reduces the list to the iterator-related properties.
You could set these properties manually on the table using the shell or the Java API.
To add the AgeOffFilter to the majc scope in addition to the scan scope, run the following commands:
config -t tableName -s table.iterator.majc.ageoff.opt.ttl=3600000
config -t tableName -s table.iterator.scan.ageoff=
    10,org.apache.accumulo.core.iterators.user.AgeOffFilter
Safely deploying custom iterators
Newly developed iterators can be challenging to deploy. This is because you are effectively allowing some application logic to be hosted inside tablet servers, where bugs can cause problems that affect data. One especially bad scenario is one in which a bug in an iterator causes data to be lost as it is compacted to disk.
To help avoid losing data, or experiencing other issues when deploying new custom iterators, it can be helpful to enable an iterator to be applied at scan time only, at least at first.
This can be done via the shell as follows:
user@accumulo> setiter -class com.company.MyIterator -n myiterator -scan

    -t myTable -p 40
This allows administrators to view the effects of an iterator in a way that isn’t permanent. Scanning an entire table with an iterator applied can help expose any bugs that can arise from running real data through the iterator.
If no issues are observed, an iterator can also be applied at minor and major compaction times, making the changes permanent on disk. In the shell this would be done like this:
user@accumulo> setiter -class com.company.MyIterator -n myiterator -minc -majc
    -t myTable -p 40
If issues are observed, an iterator can be disabled in the shell via the deleteiter command:
user@accumulo> deleteiter -n myiterator -minc -majc -scan -t myTable
In particular, shutting down a system with a faulty iterator configured to be applied at minor compaction time can cause special havoc because tablet servers will perform minor compactions at shutdown and may prevent safe shutdown. It is preferable to disable any such iterators and attempt to correct the situation while the system is running.
Another strategy for testing out new iterators is to configure them on a clone of a table. This has the advantage of allowing the logic to be tested through scan, minor compaction, and major compaction without affecting the original table. See “Cloning” for details on cloning tables.
Custom constraints can cause similar issues and can be similarly disabled if issues arise, but these are usually not as egregious as those with iterators.
Changing Online Status
A table can be brought offline, a state in which the table is no longer available for queries or writes and also no longer uses system resources.
All tables are online upon creation.
The offline shell command can be used to take a table offline:
root@accumulo> offline mytable
The monitor’s tables view will show the online/offline status of each table.
Taking tables offline can allow a cluster that is heavy on storage to store more tables than administrators would want to be available at any given time. This could be useful if tables need to be kept around for archival purposes, and can be brought online in the event that they need to be queried. Offline tables will not be affected by compactions.
To bring a table back online for queries and writes, use the online command:
root@accumulo> online mytable
Cloning
Accumulo tables can be cloned at very low cost in terms of system resources. This allows applications to operate on a version of a table without making permanent changes. As soon as a table is cloned, its clone can be written to and read from without affecting the original table.
Cloning works by copying just the configuration information for an original table to a new table. This configuration information is stored in Accumulo’s metadata table. Cloning tables is fast because Accumulo’s files are all immutable, meaning they can be shared between several logical tables for reads. If new entries are written to a cloned table, they will be written to a separate set of files in HDFS.
Cloned and offline tables can be considered a consistent snapshot of a table as it existed at the time it was cloned. Tables that are offline can be exported for the purpose of backing up data or moving a table to another cluster.
To clone a table, use the clonetable command in the shell, specifying the name of the original table followed by the name of the table to create as a clone of the first.
In this example we create a test table and clone it:
root@accumulo> createtable testtable
root@accumulo testtable> insert a b c d
root@accumulo testtable> scan
a b:c [] d
root@accumulo testtable> clonetable testtable testtableclone
root@accumulo testtable> table testtableclone
root@accumulo testtableclone> scan
a b:c [] d
In order to get a consistent view of a table before cloning, the clonetable command will first flush the original table.
Flushing a table will ensure that all key-value pairs that currently only live in the memory of tablet servers (and write-ahead logs) are written to HDFS.
Otherwise, these key-value pairs will not show up in the newly cloned table.
It is possible to clone a table without flushing first by using the -nf option when creating a clone.
In this case, any entries that are still in the memory of tablet servers when the clonetable command is run will be excluded from the newly cloned table:
root@accumulo testtable> insert e f g h
root@accumulo testtable> scan
a b:c [] d
e f:g [] h
root@accumulo testtable> clonetable -nf testtable testtablenoflush
root@accumulo testtable> table testtablenoflush
root@accumulo testtablenoflush> scan
a b:c [] d
root@accumulo testtablenoflush>
To export a snapshot of a table elsewhere, for backup or other purposes, see “Import, Export, and Backups”.
Altering cloned table properties
Table properties can be excluded from or added to the cloned table before it is brought online. For example, if the original table has an age-off iterator configured that is designed to remove data older than a given date, we may want to exclude that iterator from our cloned table, if the intent of the cloned table is to serve as an archive of the original for some time beyond the age-off date.
Possible reasons to add a property to the cloned table before it is brought online include testing out an experimental iterator or modifying the behavior of the cloned table.
For example, to modify the cloned table to keep the latest three versions of each key-value pair:
root@accumulo testtable> clonetable testtable testtableclone
    -s table.iterator.majc.vers.opt.maxVersions=3,
       table.iterator.minc.vers.opt.maxVersions=3,
       table.iterator.scan.vers.opt.maxVersions=3
root@accumulo testtable> config -t testtableclone -f table.iterator
---------+---------------------------------------------+------------------------
SCOPE    | NAME                                        | VALUE
---------+---------------------------------------------+------------------------
table    | table.iterator.majc.vers .................. | 20,org.apache.accumulo.
    core.iterators.user.VersioningIterator
table    | table.iterator.majc.vers.opt.maxVersions .. | 3
table    | table.iterator.minc.vers .................. | 20,org.apache.accumulo.
    core.iterators.user.VersioningIterator
table    | table.iterator.minc.vers.opt.maxVersions .. | 3
table    | table.iterator.scan.vers .................. | 20,org.apache.accumulo.
    core.iterators.user.VersioningIterator
table    | table.iterator.scan.vers.opt.maxVersions .. | 3
---------+---------------------------------------------+------------------------
Cloning for MapReduce
One use case for cloning is to create a copy of a table whose files can be used as the input to a MapReduce job. Tables that are online can receive new inserts of data, and Accumulo can perform a compaction in which the set of files that comprises a table changes. Each file Accumulo stores in HDFS is immutable once closed, but the set of files associated with a table at any given time can change. To avoid a situation in which a table’s set of files changes, a table can be cloned and then taken offline:
root@accumulo> clonetable mytable mytablecopy
root@accumulo> tables
!METADATA
mytable
mytablecopy
trace
root@accumulo> offline mytablecopy
Once the table is offline, its set of files will not change and a MapReduce job can be run over them. The MapReduce job must be configured to read over a table’s files instead of reading data through tablet servers. See “MapReduce over Underlying RFiles” for details on how to configure a MapReduce job to run over files of an offline table.
Import, Export, and Backups
Accumulo stores all its data in HDFS, which features full-data replication to prevent data loss in the event that one or more machines fail. Although HDFS replication is often sufficient for maintaining data availability for applications, there are a few remaining reasons to back up data to places other than the HDFS.
The most obvious is that an Accumulo instance is designed to run within a single data center. Data centers can suffer catastrophic failure, such as in the event of a widespread power failure or natural disaster. The ability to back up data to data centers in other geographic locations is important if data is to survive one of these catastrophic failures.
Another reason to create a backup is to create a copy of the data to be used for purposes other than those of the original cluster. Servers are often powerful enough to support mixed workloads on a single cluster, and many Accumulo clusters do double duty, managing data for low-latency requests for applications and performing in-depth or historical bulk analysis via MapReduce. Nevertheless, the ability to copy data to another cluster can be useful for supporting a wider variety of workloads on the same data set.
Exporting a table
Creating a backup of Accumulo data, as in other systems, involves copying the data to be backed up to another storage medium and restoring that data at some future point to recover from a disaster, or simply loading it into another Accumulo instance. To back up a table, administrators should first flush, clone, then offline the newly cloned table and leave it offline while the export is taking place. The export command will write information about a table’s files to a directory in HDFS. This information can be used to copy table files to another cluster or other storage medium:
root@accumulo> clonetable mytable mytable_backup1
root@accumulo> offline mytable_backup1
root@accumulo> exporttable -t mytable_backup1 /table_backups/mytable
To use Hadoop’s distcp (distributed copy) utility to move the files, reference the distcp.txt file like this:
hadoop distcp -f hdfs://namenode/backups/mytable/distcp.txt
  hdfs://othernamenode/tmp/mytable_backup1
Importing an exported table
To import a table that has been exported via the exporttable command, Accumulo provides an importtable command.
The importtable command tables two parameters: the name of the table to create into which the files will be imported, and the directory in HDFS where exported information is stored:
root@accumulo> importtable importedtable /tmp/mytable_backup1
If the Linux accumulo user doesn’t have permission to read the files in the import directory, this command will fail as it moves files from the import directory.
The imported table will have the same split points and configuration information as the table that was exported.
Bulk-loading files from a MapReduce job
MapReduce jobs can be used to write data into files that Accumulo understands.
(See Chapter 7 for details on how this is done.)
These files can then be bulk-loaded into Accumulo without the need to write each key-value pair to tablet servers.
The advantage of bulk loading is that users can take advantage of the efficiency of MapReduce to sort data the way Accumulo would if key-value pairs were written to its tablet servers one at a time, or one batch at a time as via the BatchWriter.
Another advantage of using MapReduce to create files for bulk import is that a consistent set of files can be created without the chance of creating duplicates in the event that one or more machines fail during the MapReduce job.
See “Bulk Ingest to Avoid Duplicates” for scenarios in which bulk-importing files can help avoid creating duplicate rows in Accumulo tables.
To import files created from a MapReduce job, use the importdirectory command.
This command will import files into the current table set in the shell, so administrators should first set the current table via the table command before running the importdirectory command.
importdirectory expects three parameters—the name of the HDFS directory that contains files to be imported, the name of a directory to which to store any files that fail to import cleanly, and whether to set the timestamp of imported key-value pairs:
user@accumulo> table myTable
user@accumulo mytable> importdirectory /newFiles /importFailures true
Data Lifecycle
Managing large amounts of data creates new challenges for long-running systems. Not only can data be large to begin with, but also—as data is continually ingested over time—the amount of data under management can get to be extremely large. Applications can be designed to look after the data under their management. Accumulo can automatically apply policies set by applications and applies background compaction processes and garbage collection to maintain the data lifecycle.
System designers can elect to allow administrators to address data lifecycle issues without making changes to an application’s logic. Accumulo provides some features to help address data lifecycle management even when dealing with very large-scale data, by leveraging and coordinating resources across the cluster.
Versioning
It may be the case that the data stored in Accumulo is written once and never updated. If not, the first consideration in data lifecycle management is how to deal with multiple versions of data. Applications can choose to store one, some, or all versions of data. It can be useful to be able to view previous versions of data to see how data changes over time, for debugging, or simply to make reverting an application to a previous state easier.
Accumulo handles versions by examining the timestamp element of keys that are otherwise identical.
That is to say, when two or more keys have the same row ID, column family, column qualifier, and column visibility, the timestamp is the only thing left that can vary between keys.
Keys that only vary in timestamp are considered to be different versions.
Each version has a unique timestamp and potentially different values.
The built-in but optional VersioningIterator can be configured to keep one, some, or all versions.
The VersioningIterator is configured by default on new tables to key at most one version of a key-value pair.
This policy can be changed via the following options:
table.iterator.majc.vers.opt.maxVersions
table.iterator.minc.vers.opt.maxVersions
table.iterator.scan.vers.opt.maxVersions
These options’ settings apply at major compaction, minor compaction, and scan time, respectively.
Whatever the setting, the VersioningIterator will prefer more recent versions—the versions with the highest-numbered timestamps—over older versions.
Data Age-off
Many times data needs to be kept for a certain period of time, after which it should be deleted or archived.
Accumulo’s timestamps and AgeOffFilter support automatically removing data with timestamps that are beyond a certain date.
When the ttl parameter is set, the AgeOffFilter is set to remove key-value pairs that are older than the specified number of milliseconds:
setiter -ageoff -majc -minc -scan -n ageoff -p 30
-> set AgeOffFilter parameter negate, default false keeps k/v that pass accept
    method, true rejects k/v that pass accept method: false
-> set AgeOffFilter parameter ttl, time to live (milliseconds): 10000
-> set AgeOffFilter parameter currentTime, if set, use the given value as the
    absolute time in milliseconds as the current time of day:
Ensuring that deletes are removed from tables
The delete operation is implemented through the insertion of special delete markers that suppress earlier versions. As a result, deleted data—meaning key-value pairs suppressed by a delete marker—are not immediately removed from files belonging to a table. Key-value pairs are only really removed during the compaction processes, when data is transferred from memory to a file on disk or when two or more files are combined into a merged file.
During the minor compaction process, when data in memory is flushed to a file on disk, any key-value pairs in memory that are suppressed by a delete marker are not written to disk, but the delete marker is. This eliminates some of the deleted data that was in memory. Delete markers are kept around in order to suppress any older versions of key-value pairs that may exist in other files.
During a major compaction when multiple files are combined, any existing versions of key-value pairs that are suppressed by a delete marker found in any of the files as part of the compaction are not written to the newly merged file. This eliminates more of the deleted data, but the delete marker is still written to the newly merged file.
Only when a tablet server performs a full major compaction, merging all files for a particular tablet into one new file, is it guaranteed that all deleted data is removed and the delete marker can also be omitted from the newly merged file.
Tablet servers do not typically merge all files for a tablet into one unless there is an idle period.
The table.compaction.major.everything.idle setting controls how long a tablet server will wait after a table receives a mutation before compacting all of its files into one.
But this is not guaranteed to happen.
The tablet server can be busy with other tables.
To guarantee that all deleted data has been removed from a table at a particular time, schedule a full major compaction via the shell:
user@accumulo table> compact
If the intent is not simply to remove deleted entries from a table but also to remove them from disk and reclaim space, the Accumulo garbage collector process and HDFS trash must be involved. The Accumulo garbage collector will ensure that files no longer used by Accumulo are deleted in HDFS, which can simply move them to the HDFS trash, depending on the version of HDFS.
The hdfs dfs -expunge command can be used to empty the HDFS trash.
HDFS DataNodes must then ultimately delete blocks for those files from the Linux filesystem.
Compactions
All of Accumulo’s files are immutable. Data is only removed during the compaction process, when one or more files are combined—omitting any key-value pairs that fail to pass the VersioningIterator and AgeOffFilter tests—and new files are written out.
After compaction, the old files containing old key-value pairs that should be removed sit around in HDFS until the garbage collector removes them.
One thing to keep in mind is that some files may never be automatically compacted if there is no need to cut down on the number of files per tablet.
To ensure that all extraneous versions and all aged-off data is removed, administrators can periodically schedule compactions of all files in a table, ensuring that all files are compacted at least once.
The compact shell command will do this:
user@accumulo> compact
After a compaction in which key-value pairs are removed, the existing split points may no longer be appropriate.
For example, the distribution of the data may have shifted, and the table can have some tablets that are empty.
The merge shell command can be used to eliminate empty tablets, as described in “Merging Tablets”.
Using major compaction to apply changes
Because a major compaction scheduled from an application will effectively cause all the data in a table to be reprocessed, compactions are a convenient way of affecting a change in configuration for a range within a table or over the entire table. In particular, occasionally it can be useful to apply an iterator to a table just for the duration of the compaction.
For example, we can choose not to have an age-off filter configured on a table all the time, but from time to time we might choose to aggressively prune old data, perhaps within areas of a table that are known to contain data that is not considered as important anymore.
We can choose to change a configuration option on a table, such as the compression algorithm used or the replication factor for files in HDFS, and compact the entire table to ensure that the effects of those changes are realized.
Or we can choose to simply compact to ensure that all data marked for deletion is actually removed from disk.
In this example we’ll demonstrate how to turn off compression for a test table.
The du command shows how many bytes the table is using:
root@accumulo testtable> du
                     239 [testtable]
root@accumulo testtable> config -t testtable -s table.file.compress.type=none
root@accumulo testtable> config -t test -f table.file.compress.type
---------+---------------------------------------------+----------
SCOPE    | NAME                                        | VALUE
---------+---------------------------------------------+----------
default  | table.file.compress.type .................. | gz
table    |    @override .............................. | none
---------+---------------------------------------------+----------
root@accumulo testtable> du
                     239 [testtable]
Note that our table has not yet changed in size. Any new files created or merged in a merging compaction will not be compressed. To change the files already on disk, we can schedule a compaction manually:
root@accumulo testtable> compact -t testtable
root@accumulo testtable> du
                     270 [testtable]
The -w option can be used to cause the shell wait for the compaction to complete before returning.
If the -t option is not specified, Accumulo will compact the current table in the shell.
If a compaction has been scheduled but has not yet begun and you want to cancel it, the --cancel option can be specified to cancel the compaction.
The --noflush option can be used to avoid flushing entries still in memory on tablet servers to disk before compacting.
Tables that are offline will not be affected by compactions.
Compacting specific ranges
It is possible to compact only a portion of a table by specifying a range of rows to the compact command.
The -b or --begin-row option and -e or --end-row options will cause the compaction to affect only the key-value pairs between the begin and end rows, inclusively.
This can be used to alter sections of a table. For example, if a table’s rows are based on time, we might want to allow for more versions of each key-value pair for more recent data, and only keep one version of each key-value pair around for the oldest data.
To affect this change, we can temporarily change the VersioningIterator options for our table, and schedule a compaction for a range comprising our oldest data.
We can then restore the original configuration.
Accumulo 1.6 allows administrators to specify specific iterators and options to use for a particular compaction.
See “Compacting” for details on the compaction API.
Merging Tablets
A table’s key distribution could change over time, which could even result in empty tablets due to data age-off.
Even the AgeOffFilter isn’t used, over time data may be deleted from tables during the normal course of an application.
In this case a table can have empty tablets (Figure 12-4).

Figure 12-4. Empty tablets listed in the tablet server view of the monitor
Empty tablets are not a big problem per se, but they are basically wasted overhead in the metadata table. They can also cause balancing to be a bit off, because the default load balancer only looks at tablets per server and not necessarily key-value pairs per server.
Tablet merging can be used to reduce the number of tablets in the table. In a tablet merge, two or more tablets are combined to form one tablet.
Note
Unlike tablet splitting and compaction, tablet merging is not an automatic operation performed by tablet servers, as of version 1.6.
As such, tablets will not be merged unless these commands are applied.
The merge command in the Accumulo shell has two modes: merging a range of tablets into a single tablet, or merging consecutive tablets until a given minimum size is reached.
To merge tablets to a given size in bytes:
user@accumulo> merge -s 100M -t mytable
If the minimum size is chosen appropriately, this will result in fewer, larger tablets (Figure 12-5).

Figure 12-5. Empty tablets are eliminated after merging
To merge tables beginning at a given row and ending at a given row:
user@accumulo> merge -b j -e o -t mytable
This can also be done via the Java API:
Instanceinst=newZooKeeperInstance(myInstance,zkServers);Connectorconn=inst.getConnector(principal,passwordToken);conn.tableOperations().merge("mytable",newText("e"),newText("o"));
See “Merging tablets” for details on the merging tablets via the Administrative API.
Garbage Collection
With both VersioningIterator and AgeOffFilter, as well as individual deletes, the garbage-collection process is ultimately responsible for getting rid of data permanently.
The garbage collector works by scanning the metadata table to determine which files can be removed and issuing delete commands to the HDFS NameNode. The garbage collector competes with the other processes in the cluster for HDFS NameNode resources, and so long-running garbage-collection times can be an indicator of a NameNode under stress.
Failure Recovery
With clusters of up to thousands of relatively unreliable commodity-class machines, hardware failures are commonplace. Many types of failure, however, are automatically managed and clients and administrators do not need to take any action.
Typical Failures
Here we outline the types of failures Accumulo is designed to tolerate gracefully and without immediate administrative intervention, and the actions to be taken.
Single machine failure
By far the most common occurrence—the failure of a single Accumulo server, including the master—will not cause any data to become unavailable, or even any interruption in client service.
If the Accumulo master is down, clients can continue to communicate with tablet servers, and one inactive master process will automatically be chosen to become the new active master. However, if a tablet server fails while there are no operational masters, the tablets that were being hosted by the failed tablet server will not be reassigned and hence will be unavailable for writes or reads by clients until a new master process is started again.
If a process is only temporarily crashed, as can happen if some other process uses up all available memory and a tablet server is forced to exit, the failed process can simply be restarted, as outlined in “Starting After a Crash”.
Any permanently failed machines can be replaced or removed. No configuration information needs to be changed, except perhaps to remove the hostname of a machine that you don’t intend to replace from the conf/slaves file.
Single machine unresponsiveness
Sometimes a tablet server continues to respond to ZooKeeper requests but fails to respond to Accumulo client requests. In this scenario clients may be caused to wait indefinitely, because the master will not reassign the stalled tablet server’s tablets if it still holds its ZooKeeper lock. The process may eventually exit on its own and lose its lock, allowing the Accumulo master to reassign its tablets so clients can continue.
Before that happens an administrator can elect to examine the logs on the monitor for any indication of a problem, or else simply shut down the tablet server process so that its tablets can be served by other healthy tablet servers. This way clients can continue more quickly.
Accumulo clients are designed to wait indefinitely for a cluster to become healthy in terms of all of the tablets being online and available. For example, MapReduce jobs that are stalled because of an unresponsive server may well simply continue after a stalled tablet server process is killed.
Network partitions
Accumulo does not allow clients on both sides of a network partition to continue to write data. In the event of a network partition, in which messages are lost between nodes in a cluster, some tablet servers will find themselves on a side of the partition that can continue to talk to the ZooKeeper cluster, and others will not. Rather than allowing clients that can talk to tablet servers that are disconnected from ZooKeeper to continue writing and reading data, Accumulo tablet servers will exit upon discovering that they can no longer communicate with ZooKeeper.
Because all Accumulo tablet servers and often all clients are in the same data center, it’s often the case that load balancers in front of clients can redirect requests to clients that can still talk to ZooKeeper during the network partition.
For additional details, see “Accumulo and the CAP Theorem” for a discussion of Accumulo and the CAP Theorem.
More-Serious Failures
These types of failures can result in data loss or unavailability.
All NameNodes failing simultaneously
Running a single NameNode used to be a big risk to Hadoop and Accumulo clusters because its failure meant some or all the mappings of filenames to data blocks in HDFS were lost or at least temporarily unavailable. Now HDFS can be configured to automatically failover from one NameNode to a hot standby that is kept in sync with the active NameNode.
Care must be taken to ensure the NameNodes don’t share a common resource that, in the event of failure, would cause both NameNodes to go offline. There are limits to this, of course, because both NameNodes could be destroyed in a disaster affecting a data center. Accumulo is not designed to run over multiple geographically distributed data centers, though work is being done to allow Accumulo instances to replicate data to another data center in future versions of Accumulo.
Power loss to the data center
Accumulo is designed to run within a single data center, with low-latency networking between nodes.
If power is lost to the data center, none of the machines in the Accumulo cluster will be operational.
The hsync setting should true to avoid data loss if no uninterruptible power supply can be used to bring down the cluster gracefully in the case of a sudden power outage.
Loss of all replicas of an HDFS data block
HDFS replicates data blocks so that the loss of any one block will not cause an interruption in service. HDFS clients will simply find another remaining replica. If all replicas of a given block are unavailable, Accumulo operations will fail.
To avoid the scenario in which a single hardware failure causes all replicas to become unavailable, HDFS provides the ability to specify the number of replicas, and also allows the specification of which machines live on which rack. The assumption here is that all machines within the same rack share a common power supply or network switch. So, not all replicas should be stored on machines in that rack; rather, at least one should be stored on a machine in another rack. This capability is known as HDFS rack-awareness.
Tips for Restoring a Cluster
In the more serious failures outlined previously, additional action may be required to restore the cluster to a healthy state.
The first thing is to run hadoop fsck on the HDFS /accumulo folder to make sure there are no missing or corrupt blocks.
If there are problems in HDFS, the grep command in the Accumulo shell can be used to scan the metadata table to see if any of the files affected by missing blocks are RFiles currently referenced in the metadata table.
RFiles that are no longer referenced can be deleted from HDFS.
If the RFiles are still referenced but are not part of the Accumulo metadata table, those RFiles will need to be put into a known good state.
If corrupt RFiles are part of the metadata table, you must rebuild the metadata by creating a new instance and importing all the data. Usually that known good state is from some time in the past, which will mean data is missing. To account for the missing data, you will need to replay all the changes since that known good state, unless you can figure out exactly what changes to replay.
It is not recommended to modify the Accumulo metadata table to get to a good state. Following are some things you can do to help yourself with these steps.
Replay data
Provide yourself with the ability to replay incoming data. This can mean saving off the ingest source files for some period. It can also mean creating a change log of updates that can be replayed. Ensure that you have timestamps for when this data was originally pushed to Accumulo.
Back up NameNode metadata
This is especially important for Hadoop 1.0 because the NameNode is a single point of failure. Back up NameNode’s fsimage, edits, VERSION, and fstime files so you can recover HDFS. Doing so will allow you get Accumulo into a good state from a point in the past, and then you can do things like replay all updates since that point.
Back up table configuration, users, and split points
If the Accumulo metadata table went away or got corrupted, you could bulk-import the existing RFiles to recover. But to get your cluster to the same state, you would need to re-create the existing table configuration, table splits, and users. Some of this information is stored in ZooKeeper but is tricky to pull out. Some of this information is not saved anywhere outside the metadata table, which is why you should back it up yourself.
Accumulo 1.6 includes a command for dumping the configuration information to a file:
accumulo admin dumpconfig
Otherwise, the following commands can help gather information to help restore configuration:
config -t tablename-
This command will show you the current table configuration.
getsplits-
This command in the Accumulo shell can be used to store the current splits.
users-
This command in combination with the
getauths -u usernamecommand will show you users and authorization tokens. systempermission,tablepermission, anduserpermission-
These commands will show permission information.
Use these commands to dump text files with information. Having this information can also help in the case when ZooKeeper information has been deleted due to user error or catastrophic failure.
Turn on HDFS trash
Turning on the HDFS trash makes a copy of every deleted file.
Configuration is done by setting fs.trash.interval to a number of minutes greater than zero in core-site.xml.
The trash interval should based on how much your Accumulo data changes and how much storage you have.
For example, lots of HDFS storage or a higher rate of change in Accumulo would mean a longer trash interval.
Create an empty RFile
If you can’t find a known good copy of an RFile, you can create an empty RFile that gets copied to that expected location.
Note
An empty RFile is not simply an empty file; it contains header information.
This procedure should only be used to allow an Accumulo table to be partially recovered and brought online without error.
Accumulo versions 1.5.2 and later have a utility to create an empty RFile:
accumulo org.apache.accumulo.core.file.rfile.CreateEmpty /some/path/to/empty.rf
Prior to those versions, you can use the following shell commands to create an empty RFile that will serve the same purpose:
createtable foo
delete "" "" ""
flush -t foo
Now you can find the RFile that was created with something like the following and then copy or move it:
tables -l # look for id of the foo table, 22 for example
hadoop fs -ls /accumulo/tables/22/default_tablet
Take Hadoop out of safe mode manually
When Accumulo restarts, it will begin compacting and flushing write-ahead logs.
Additionally, any client will be able to write data, which could get flushed to an RFile.
You can set up Hadoop to not come out of safe mode automatically, which will prevent any changes from happening to RFiles.
Setting dfs.namenode.safemode.threshold-pct to a value greater than 1 in the Hadoop hdfs-site.xml config file will require human intervention to take HDFS out of safe mode.
Troubleshooting
If Accumulo clients are experiencing issues such as errors or timeouts, several things should be checked as part of the troubleshooting process.
Ensure that processes are running
If any of the services on which Accumulo depends is not healthy, Accumulo will experience issues. Make sure HDFS is running and healthy. The HDFS monitor page at http://<namenode host>:50070 will show the status of HDFS. If any blocks are missing, Accumulo will be unable to serve the data from the files those blocks belong to. If DataNode processes have crashed, it may be possible to restart them and for their blocks to become available again.
ZooKeeper should also be running and healthy.
Administrators can check this by connecting to a ZooKeeper process via Telnet (to port 2181 by default) and typing ruok, short for are you ok?
The server should respond with imok (I am ok) and close the connection.
If ZooKeeper is down, it should be restarted before you attempt to start any Accumulo processes.
Finally, Accumulo processes should be checked to make sure they are running and operating properly. The Accumulo monitor page will indicate problems by highlighting issues in red. For example, if you have zero running tablet servers, if any tablets are unassigned, or if the Accumulo master is unreachable, the monitor page will show red boxes behind text.
Check log messages
The Accumulo monitor also gathers error log messages from tablet servers and displays them in one place for convenience. Checking for these can help explain issues.
If the monitor is not showing any errors or if it is down, logs are still written to local files on each machine running Accumulo processes.
Understand network partitions
If for some reason a tablet server is unable to reach ZooKeeper (a condition known as a network partition), within a period of time it will lose its tablet server lock. At this point the Accumulo master will attempt to obtain the tablet server’s lock. If the attempt is successful, the tablet server is no longer considered to be part of the cluster and the master will reassign its tablets to remaining healthy servers. The tablet server that lost its lock will then exit to prevent clients from sending any more writes to it.
This procedure is designed to guarantee that each tablet is hosted by only one tablet server at a time. If ZooKeeper or tablet servers are not responsive enough to network requests, tablet server processes may terminate because they can’t distinguish between arbitrarily delayed requests and a network partition. If tablet servers are exiting regularly due to a loss of a ZooKeeper lock, they or ZooKeeper may not have sufficient resources.
Causes of this can include swapping to disk if available memory is insufficient, the Java garbage collector pauses when not using native libraries, or hardware for the application is insufficient.
Graphs on the monitor are “blocky”
“Blocky” means that the lines are completely horizontal for a period, then there is an increase or decrease, then more horizontal lines, then an increase or decrease, and so on.
This means that tablet servers are having delays in reporting information back to the monitor.
Tablet servers report information back every 5 seconds.
If data for two or more periods is late, the monitor uses the prior value.
Usually this is an indication that one or more tablet servers are having trouble.
You can look on the tablet server monitor page and sort by last update time to get an idea of which servers are having trouble.
Another way to find the server is to start up a shell, run debug on, then scan accumulo.metadata.
It will take some time, but you should see messages repeated with the IP address of problem servers.
Once you find out which tablet server or tablet servers are having problems, you can go there and look at system monitoring tools and the logs to diagnose the cause.
Tablets not balancing across tablet servers
It is safe to stop and start the master if needed. Sometimes error messages show that tablets are not balancing, but there are no failed tablet servers and no other indication. Or the master is having problems communicating, but there is no other apparent cause. Accumulo will gracefully handle stopping the master service and restarting.
Calculate the size of changes to a cloned table
Sometimes it is useful to see how much a table has changed since it was cloned. We talk about cloning in “Table Operations” and why it might be useful as a snaphot of the original table. But the original table is going to continue to change as data is inserted and deleted.
The du command in the Accumulo shell can be used to see the size in bytes of a table.
When passed in multiple arguments, it also shows how much space is shared.
Here is an example run in the shell:
du table1Clone table1
 1,232,344 [table1]
51,212,424 [table1, table1Clone]
   723,232 [table1Clone]
This is showing that 51.2 MB are still shared between the tables, 723 KB have been removed from table1, and 1.2 MB have been added to table1, since the clone.
Unexpected or unexplained query results
If you get unexpected results when running a query, be sure to consider all the iterators being applied. This includes both iterators configured on the table and iterators being applied programmatically to the scanner. Having a scan iterator at the same priority as a table iterator is allowed. This is so that table iterator options can be overridden at scan time by configuring an identical iterator at scan time with different options.
But having different iterators at the same priority will cause unexpected behavior, because only one is applied and it is nondeterministic which one. Two scans that appear exactly the same may use different iterators and return different results. Additionally, consider the logic of lower-numbered iterators that may remove or alter a record before it gets to iterator you are expecting.
Slow queries
If queries are running more slowly than usual, the first thing to look for is hotspots. This is an indication that tablets or data are not balanced and Accumulo is not distributing the workload very well. Other things you might look at include:
-
Is disk space filling up on tablet servers?
-
Are there extra-large logfiles? Be sure to check logfiles for other services running on the node as well, such as DataNode logs.
-
Are scans in the shell slow too? This is an indication of system problems instead of problems with your code.
-
Is there contention on the tablet server with another Accumulo process such as garbage collection, compaction, or even MapReduce tasks?
Look at ZooKeeper
Sometimes it is useful to see what is stored in ZooKeeper.
Extreme caution should be used, because changing data in ZooKeeper could cause serious issues for Accumulo.
First, you need to know the instance ID, which is displayed when you log in via the shell.
You can also find the instance ID by looking in /accumulo/instance_id in HDFS or in the header of the monitor page.
Use the zkCli.sh command included with ZooKeeper and any of the ZooKeeper hosts defined in accumulo-site.xml under the instance.zookeeper.host property:
zkCli.sh -server host:port
While in the command-line client, use commands like the following to see what ZooKeeper has stored:
ls /accumulo/replace with instance_id
The get command will display information about each entry.
Accumulo 1.4, some of the entries in ZooKeeper are protected. Once the CLI comes up, use a command like the following to authenticate:
addauth digest accumulo:SECRET
Replace the SECRET passphrase with whatever is defined in the instance.secret property in the accumulo-site.xml file.
Use the listscans command
The listscans command is very useful for finding out what is happening currently in your cluster.
It will show you information about scans running on every tablet server.
There is a lot of information, though, so it is common to dump this information to a file:
accumulo shell -u username -p password -e 'listscans -np' > /path/to/file.txt
As a developer, you can add information to what is displayed in the listscans command by setting options on any IteratorSetting object you add to your Scanner.
This can be useful for debugging long-running queries.
Look at user-initiated compactions
When looking for long-running processes on your cluster, sometimes you may want to see what user-initiated compactions are happening. These will show up as FATE operations, and you can run the following to see what is currently in progress:
accumulo org.apache.accumulo.server.fate.Admin print
To get a sense for these over time, you can loop this command as in the following:
while true; do
  date;
  accumulo/bin/accumulo org.apache.accumulo.server.fate.Admin print;
  sleep 60;
done
There is also a fate command that you can run in an Accumulo shell to get information. Note that system-initiated compactions are not managed by fate transactions. For those, you will need to go to the tablet server logs and filter or search for the lines with Starting MajC or use the listcompactions command, which is similar to the listscans command.
Tip
The Accumulo documentation has a section on troubleshooting that has more troubleshooting tips not covered in this book.
Inspect RFiles
Invariably, during the development phase a situation can arise wherein key-value pairs are being labeled incorrectly. Accumulo is designed to take security labels very seriously. As such, it is not possible to simply turn off the iterator responsible for examining security labels and filtering out key-value pairs whose label logic is not satisfied by the querying user’s credentials—even if that user is logged in as the Accumulo root user.
What this means for key-value pairs that have incorrect labels is that they simply won’t show up in any scan. If a scan over an entire table yields no results when the monitor page indicates that data is, in fact, in there—and when all the known granted labels are being used to scan the table (the default mode of scanning in the shell)—this is a symptom indicating that a table might contain entries with incorrect labels.
If this appears to be happening, a table can be configured to throw exceptions if it is asked to store a key-value pair with a label that can’t be satisfied with the writing user’s credentials. This way, an incorrect security label shows up before it ever gets written to a table.
This constraint can be added in the shell like this:
root@accumulo> constraint -t tableName -a
          org.apache.accumulo.core.security.VisibilityConstraint
If for some reason this and other troubleshooting methods of fixing labels have failed, or other parts of key-value pairs need to be inspected, an administrator with access to read files from HDFS can inspect Accumulo’s underlying RFiles to see what the key-value pairs actually are.
Caution
Reading RFiles directly should not be done lightly, because there are no checks in place to ensure that the user has the authorization to see all of the data stored in an Accumulo table. This is the exact reason that access to HDFS must be restricted.
This procedure should only be executed and allowed on development clusters during the debugging phase.
Administrators can dump the contents of an RFile using the following procedure. This procedure should only be executed and allowed on development clusters during the debugging phase:
-
Determine the underlying table ID for the table containing suspected incorrect labels.
This will allow us to locate the RFiles for the table of interest in HDFS. In the shell, type:
root@accumulo> tables -l
!METADATA       =>         !0
baseball_stats  =>         17
  wikipedia     =>         18
  wikipedia_index =>         15
trace           =>          1
-
List the files in HDFS for one of the tablets in the table of interest. In our example, we’ll examine a file in the default_tablet of the wikipedia_index table with ID
15.Exit the shell and run the
hadoop fscommand:$ hadoop fs -ls /accumulo/tables/15/default_tablet
Found 7 items -rw-r--r-- 1 accumulo supergroup 24215993 2013-12-11 05:14 /accumulo/tables/15/default_tablet/F0000hy3.rf -rw-r--r-- 1 accumulo supergroup 18290804 2013-12-11 05:21 /accumulo/tables/15/default_tablet/F0000hyk.rf -rw-r--r-- 1 accumulo supergroup 4515 2013-12-11 09:01 /accumulo/tables/15/default_tablet/F0000iab.rf -rw-r--r-- 1 accumulo supergroup 673682 2013-12-11 09:20 /accumulo/tables/15/default_tablet/F0000iax.rf -rw-r--r-- 1 accumulo supergroup 1201112 2013-12-11 09:47 /accumulo/tables/15/default_tablet/F0000ibd.rf -rw-r--r-- 1 accumulo supergroup 5282634 2013-12-11 11:17 /accumulo/tables/15/default_tablet/F0000idd.rf -rw-r--r-- 1 accumulo supergroup 5631122 2013-12-11 11:24 /accumulo/tables/15/default_tablet/F0000ids.rf -
View summary information about an RFile file by using
PrintInfo.To view simple details of the file, use the
PrintInfoclass with only the filename as an argument. This will show statistics from the file as well as the first and last key. These keys may show an example of one of the incorrect labels:$ accumulo rfile-info /accumulo/tables/15/default_tablet/F0000hy3.rf
Locality group         : <DEFAULT>
  Start block          : 0
  Num   blocks         : 665
  Index level 0        : 83,095 bytes  1 blocks
  First key            : 0000313867566100000000205001 :fields [public]
                                      0 false
  Last key             : 0000313867568500000000205001 :fields [prvate]
                                      0 false
  Num entries          : 31,218
  Column families      : []
Meta block : BCFile.index Raw size : 4 bytes Compressed size : 12 bytes Compression type : gzMeta block : RFile.index Raw size : 83,257 bytes Compressed size : 12,992 bytes Compression type : gzIn this case, the prvate security token probably represents a misspelling of the word private. If we scanned the table using the private token we would not see the keys with the label prvate.
-
View RFile contents using PrintInfo.
To dump key-value pairs from the file, use the
-doption:accumulo rfile-info -d /accumulo/tables/15/default_tablet/F0000hy3.rf
The utility will print out the statistics as before, followed by string representations of the key-value pairs in this file.