
CHAPTER 3
Manage and maintain Windows
In this final chapter you will focus on the management and maintenance of Windows 10. The 70-698 Configuring Windows 10 exam will likely focus on how Windows 10 is a modern operating system. You should understand how to keep Windows 10 updated in terms of security, features, and device driver updates. In addition, you must be able to revert each type of update should a problem be encountered. You’ll be expected to know how to monitor a Windows 10 system and troubleshoot issues that may occur. Proficiency using the Windows Recovery Environment and both traditional and new methods of recovering a system are likely to be required.
Windows 10 offers new ways for users to sign in to their devices such as using Windows Hello, and how technologies such as biometrics and virtualization can help secure a modern device. Using a Bluetooth connected smartphone a device is able to dynamically-lock itself whenever a user steps away from their desk. Finally, the exam covers aspects of Windows 10 user and device management that are relevant for larger organizations and includes delegation of tasks, automation using scripting, and assisting the migration away from traditional Group Policy managed devices to a mobile device management solution.
Skills covered in this chapter:
Skill 3.1: Configure updates
Keeping computers safe and protected from external threats such as malware and hackers is a big challenge. In earlier versions of Windows, you could decide whether the operating system was automatically updated with the latest features, security updates, and fixes through the Windows Update feature. Some users chose to disable automatic updates, and these computers are vulnerable from attack. With over a billion Windows devices worldwide, even if this number is a small percentage of the total, it might mean millions of devices were unprotected.
Windows 10 changes the game with regards to updates and security because it will continually and automatically benefit from new updates rolled out through Windows Update. To enhance the security protection delivered in Windows 10, the consumer can no longer turn off security updates. Enterprise users will have some leeway on the timing of updates and upgrades, and can still choose to test updates and deliver them internally, using Windows Server Update Service (WSUS) or other management tools to keep their devices updated. For organizations that require deployment of a static installation of Windows 10 that will not have upgrades, Microsoft ships a special build of Windows 10.
Configure Windows Update options
With Windows as a service, Windows 10 will receive security updates as they are required in addition to a regular schedule of rollup updates and feature upgrades. The process of continually bringing your computer up to date is known as servicing. Microsoft has confirmed that new feature upgrades will appear two a year. During the year there will be two milestone builds available to volume licensing, system builders, and MSDN customers. Such milestone builds will include all updates and upgrades built in, serving as the latest starting point for a new installation or upgrade.
It is important to distinguish the different types of Windows 10 updates.
Quality updates Regular security updates and software updates
Feature upgrades New features and functionality
Both types will be cumulative and contain all previous updates, which reduces the likelihood of a hacker or malware attack succeeding by exploiting a missing update.
Feature upgrades are mandatory and must be applied within one year for the following versions of Windows 10.
Windows 10 Pro
Windows 10 Enterprise
Windows 10 Education
Upgrades are delivered to devices running Windows 10 Home when Microsoft releases them. When downloaded to the device, the upgrades are installed immediately.
Enterprise editions of Windows 10 (Windows 10 Pro, Windows 10 Enterprise, and Windows 10 Education) are configured for immediate installation of feature upgrades by default, but you can configure the device to defer the installation in the Settings app. Typically, this defers the upgrades up to a maximum of 365 days after they are made available. You can also temporally pause the updates for a device for up to 35 days. Once the pause has been removed or expires, the updates cannot be further delayed. Through Group Policy, you can defer upgrades for up to one year.
A new special build of Windows 10, available only to enterprise customers, called the Long Term Servicing Branch (LTSB), is available and does not allow feature upgrades. The only way to upgrade the Windows 10 LTSB edition is to download and use a more recent edition of the LTSB.
Configure Windows Update settings
As with earlier versions of Windows, security updates will continue to be distributed on the second Tuesday of each month by Windows Update, and additional reliability improvements, hardware driver updates, and ad hoc security updates will be pushed out through Windows Update.
Although the process of updating the device is largely automatic, home users have several options available to modify the update behavior so that the process does not disrupt the user:
Change Active Hours This setting allows the user to identify the period of time when they expect the device to be in use. This must be a contiguous block of time and automatic restarts after an update will occur outside of the configured active hours.
Restart Options Updates will automatically be installed on your system. Windows will ask you to schedule a restart of your device to complete the installation of updates. The installation can be completed at a particular time and day within the following seven days. Users can also see more reminder notifications to prompt them to restart their PCs.
New Windows features will be delivered in update packages that behave just like complete in-place upgrades. This might alarm some users, especially those who never allowed updates on earlier versions of Windows. You can choose how updates are applied to your computers. This can be through the Settings app, Group Policy, or by using System Center Configuration Manager.
To configure Windows Update settings on a computer, follow these steps.
Click the Start button and open Settings.
Click Update & Security > Windows Update.
The Windows Update page opens.
Review the date and time Windows last checked for updates.
Click Check For Updates.
To configure and control Windows Update in more detail, click Advanced Options.
The Choose How Updates Are Installed screen opens, as shown in Figure 3-1.
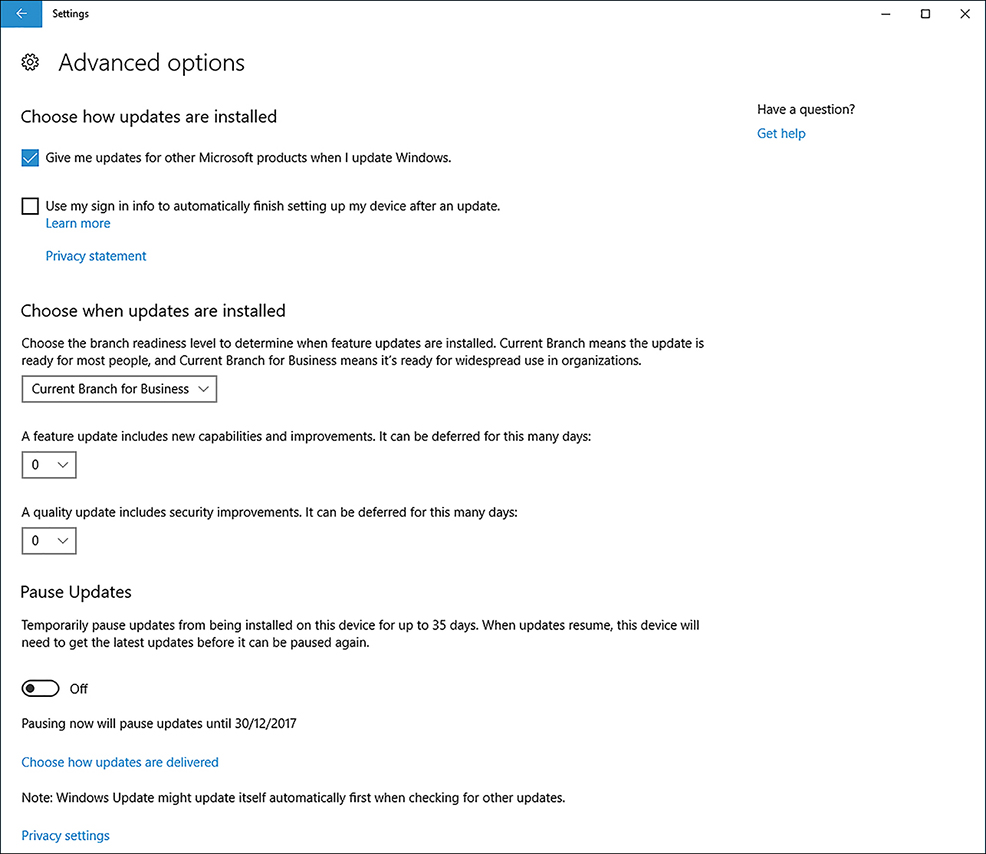
FIGURE 3-1 Choose How Updates Are Installed
On the Advanced Options page, choose one of the following options to configure how updates are installed.
Give Me Updates For Other Microsoft Products When I Update Windows This enables Windows Update to keep other Microsoft products, such as Microsoft Office, up to date at the same time as Windows 10.
Choose The Branch Readiness Level All editions of Windows 10, except Home edition can choose either Current Branch, or Current Branch for Business from the drop down menu shown in Figure 3-1. This allows the updates to be delivered to the device in the timescale most appropriate to the environment it is being used. For example, Current Branch for Business updates are normally installed several months after widespread deployment to the general home and business population.
Choose When Updates Are Installed Enterprise editions of Windows 10 (Windows 10 Pro, Windows 10 Enterprise, and Windows 10 Education) allow you to defer updates. Users defer feature updates for up to 365 days, and quality updates which include security improvements for up to 30 days.
Pause Updates A user can temporarily pause updates from being installed onto their device for up to 35 days. After the device is un-paused it will automatically receive and install updates and cannot be paused again until these complete.
The following two options offer additional update information.
Update History
Choose How Updates Are Delivered
View Your Update History
The Update History page shows you the updates that have been applied and those that failed to be applied. Each update contains a unique name and reference number and a summary of the effect the update will have on the system. A detailed description of each update is available online by clicking the More Info link in each update summary.
You can also select Uninstall Updates, which opens Installed Updates in Control Panel. You remove any update by selecting it and clicking Uninstall on the menu bar.
If you have installed the preview build of Windows 10 on your device, you can also uninstall this by clicking Uninstall Latest Preview Build. This option opens the Recovery page in the Update And Security Settings app and enables you to reset your PC.
Choose How Updates Are Delivered
Windows 10 includes a new feature that enables you to choose how updates are delivered and enables Windows Update to obtain updates through peer-to-peer file sharing from other devices that already have downloaded the update.
To review and configure this option, use the following steps.
Click the Start button and open Settings.
Click Update & Security, Windows Update.
On the Windows Update page, click Advanced Options.
Select the Choose How Updates Are Delivered link.
The Choose How Updates Are Delivered dialog box, shown in Figure 3-2, is where you can configure how updates are delivered.
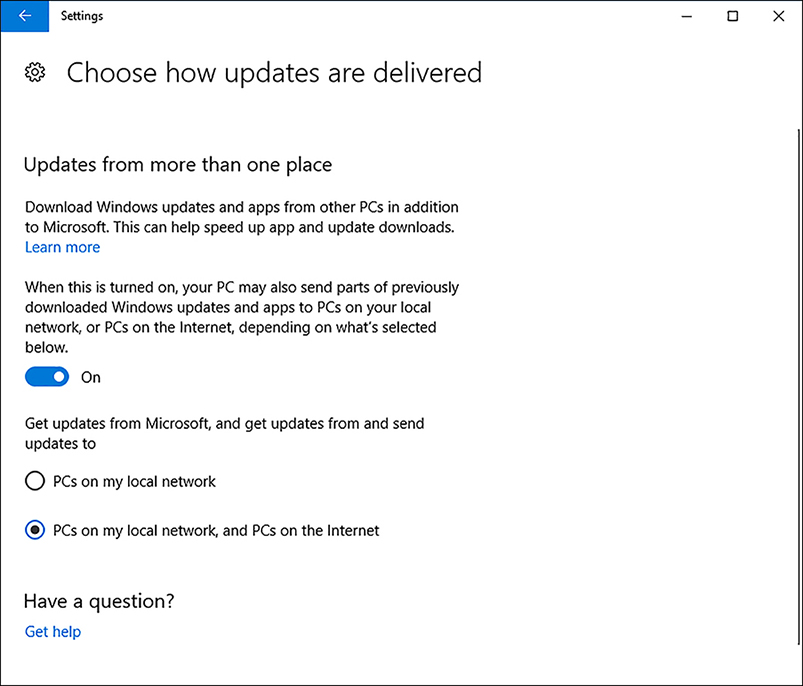
FIGURE 3-2 Choose How Updates Are Delivered page of Windows Update Move the toggle to On.
Configure the additional peer-to-peer sources as either:
PCs On My Local Network (Default).
PCs On My Local Network, And PCs On The Internet.
Exit the Settings app.
After you choose to receive updates from more than one place, Windows obtains updates from Microsoft and from computers on the local network and, optionally, from PCs on the Internet. By allowing Windows to obtain the update files from additional sources, the settings can be applied more quickly. This can be especially useful when using a reduced bandwidth or metered connection, because after one device has been updated, it can share the update file fragments peer-to-peer with other devices locally without needing to download them from Microsoft.
If you disable the Updates From More Than One Place setting, Windows Update obtains updates directly from the Microsoft update servers.
Use Group Policy to configure Windows Update
You can use Group Policy to configure the new Windows Update settings and then use Active Directory Domain Services (AD DS) to distribute the settings to the devices across the network.
Although there are many Group Policy Objects (GPOs) that relate to Windows Update for earlier versions of Windows, four nodes in Group Policy contain Windows Update settings for Windows 10. They are found in the Computer Configuration > Administrative Templates > Windows Components > area with the following node names:
Windows Update
Defer Windows Updates
Data Collection And Preview Builds
Delivery Optimization
Windows Update
The Windows Update node contains several settings, including:
Configure Automatic Updates Specifies whether the computer will receive security updates and other important downloads through the Windows automatic updating service. This setting enables you to specify whether to enable automatic updates on your computer. If this service is enabled, you must select one of the four options in the Group Policy setting.
2 = Notify before downloading and installing any updates When Windows finds updates that apply to your computer, you are notified in the notification area by an icon, with a message that updates are ready for download. When they are downloaded, the icon appears again to notify you that the updates are ready for installation. If you click the notification, you can then select which updates to install.
3 = Download the updates automatically and notify when they are ready to be for installed (Default) When Windows finds updates that apply to your computer, it automatically downloads them in the background. When the download is complete, the user will be notified that the updates are ready for installation. Click the notification to install the updates.
4 = Automatically download updates and install them on the schedule specified below Specify the install schedule by using the options in the Group Policy setting. If you do not specify a schedule, all installations will be every day at 3:00 A.M. If updates require a restart to complete the installation, Windows restarts the computer automatically. If a user is signed in to the computer when Windows is ready to restart, it notifies the user and offers an option to delay the restart.
5 = Allow local administrators to select the configuration mode that Automatic Updates should notify and install updates With this option, local administrators can use the Windows Update Control Panel to select a configuration option, such as to choose the scheduled installation time. Local administrators cannot disable Automatic Updates configuration. If you set a GPO to Enabled, Windows searches Windows Update for updates that apply to your computer whenever the computer is online. With the status set to Disabled, all updates must be manually triggered for download and installation. If the status is Not Configured, the Group Policy is not used to configure Automatic Updates, and the computer uses the Automatic Updates in Control Panel or the Settings app.
Defer Windows Updates
The Defer Windows Updates node contains two policies. You can choose when Feature or Quality updates are received and they reflect the options provided within the Settings app.
Select When Feature Updates Are Received This setting allows you to choose which branch readiness level the device will use and defer upgrades for up to 365 days, as shown in Figure 3-3. You can also configure the Pause feature start date.
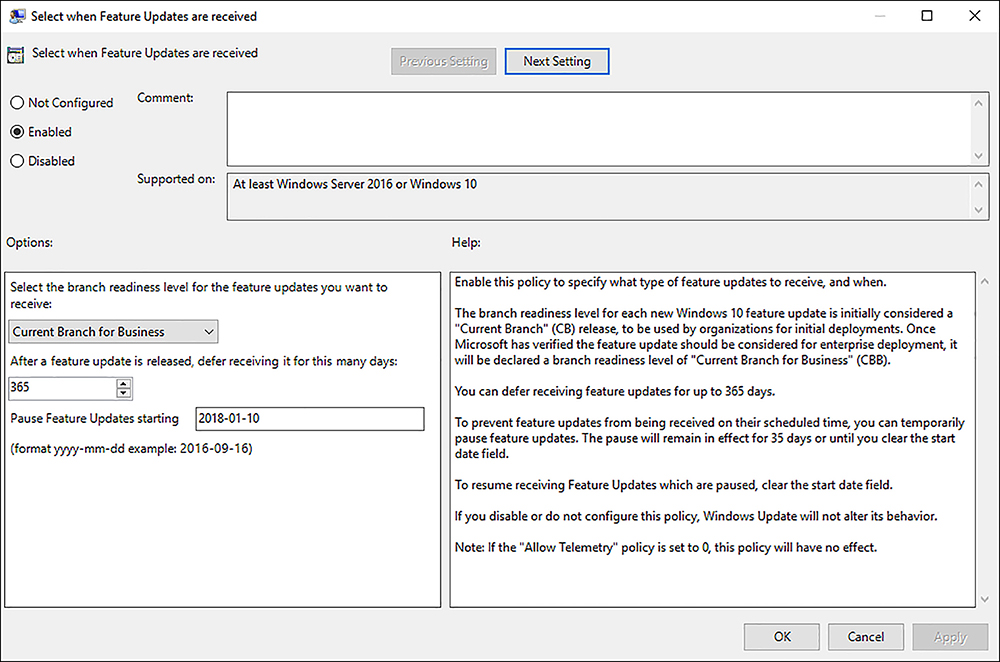
FIGURE 3-3 Defer feature updates using Group Policy Select When Quality Updates Are Received This setting allows you to defer receiving a quality (security) update for up to 30 days after they become available. An option to Pause Quality Updates for up to 35 days is also available. This setting will not affect Windows Defender antimalware definition updates.
Data collection and preview builds
The Data Collection And Preview Builds node contains several settings including:
Toggle User Control Over Insider Builds This policy setting determines whether users can access the Insider build controls in Advanced Options for Windows Update. If you enable or do not configure this policy setting, users can download and install Windows preview software on their devices. If you disable this policy setting, Get Insider Builds will not be available.
Allow Telemetry This policy setting determines the amount of diagnostic and usage data related to Microsoft software that is reported to Microsoft. The policy offers four choices.
0 - Security (Enterprise Only) No telemetry data is reported to Microsoft except security data such as Windows Defender data.
1- Basic Reports a limited amount of diagnostic and usage data.
2- Enhanced Sends enhanced diagnostic and usage data.
3 - Full Sends the same data as the Basic setting plus additional diagnostics data, such as the system state at the time of a system halt or crash, and the files and content that might have caused the problem.
If you disable or do not configure this policy setting, users can configure the Telemetry level in the Settings app.
Disable Pre-release Features Or Settings Use this policy setting to configure the level to which Microsoft can experiment with Windows 10 to study your preferences or device behavior. There are two settings.
Device Settings Only Permits Microsoft to configure device settings only
Full Experimentations Enables Microsoft to conduct full experimentations and study user preferences
Do Not Show Feedback Notifications This policy setting enables an organization to prevent its devices from showing feedback questions from Microsoft through the Windows Feedback app.
Delivery optimization
The Delivery Optimization node contains several settings including:
Download Mode Use this setting to configure the use of Windows Update Delivery Optimization in downloads of Windows Updates, Apps and app updates. These settings offer slightly more granularity than in the Settings app, allowing the device to receive updates from more than one place. There are six options, as follows.
HTTP only HTTP downloading only, no peering of updates
LAN HTTP downloading and Local Network/Private Peering (PCs in the same domain and same NAT)
Group HTTP downloading and peers in the same private group on local LAN
Internet HTTP downloading and Internet peering only
Simple Download mode only using HTTP, with no peering
Bypass Do not use Delivery Optimization, use BITS instead
Group ID Set this policy to specify an arbitrary group ID to which the device belongs by using a globally unique identifier (GUID) as the group ID. This segments the devices when using the Group option in the Download Mode setting.
Max Cache Age Use this to define the maximum time (in seconds) that the Delivery Optimization cache can hold each file.
Max Cache Size This option limits the maximum cache size Delivery Optimization can use as a percentage of the internal disk size.
Max Upload Bandwidth This policy defines a limit for the upload bandwidth that a device uses for all concurrent upload activity by Delivery Optimization (kilobytes per second).
Minimum RAM capacity (inclusive) required to enable use of Peer Caching (in GB) This policy defines the minimum amount of RAM that a device must have to use Peer Caching. This is useful to limit the use of peer caching on small tablets.
![]() Exam Tip
Exam Tip
Review the new GPOs that relate to the new Windows Update functionality found in Windows 10.
Troubleshoot Windows Update
If a machine is not receiving updates and you have checked the Settings app and Group Policy settings to ensure that updates are not deferred or paused, you should verify that the two services in Windows relating to Windows Update are running.
The first is the Windows Update service, which checks which updates have been installed locally and what is available on the update servers. The Windows Update service also handles the download, installation, and reporting of the state of updates.
Background Intelligent Transfer Service (BITS) is a supplemental service that handles the transfer of update files in the most efficient manner.
Both services need to be running for Windows Update to function correctly.
Implement Insider Preview
With Windows 10, rollouts of new upgrades are made available to different sets of users, depending on the update settings you have configured in Windows 10. With the continual development of Windows 10, Microsoft has created a process to support the incremental build process that Windows 10 uses.
Microsoft internally implements a new version of Windows 10 on a regular basis, such as daily and weekly, and initial user issues such as bugs or improvement feedback is relayed immediately back to the development team rapidly. These versions are deemed too early for widespread public release, but when they have experienced a level of acceptance and reliability, they are ready for the next group of users to field test.
The first publicly available version of Windows 10 was made available to a growing volunteer user base called Windows Insider. Initially, this group of IT pros and consumers were invited to download and review the Windows 10 Technical Preview (in 2014). Nowadays, the program has many millions of members. These insiders sign up to receive early feature upgrades to their Windows 10 devices and receive a dedicated newsletter and blog to keep them informed from the program manager at Microsoft. You must be registered as a Windows Insider and can use a Microsoft account or organization account to participate.
Need More Review? Windows Insider
For additional information and to sign up as a member of the Windows Insider Preview Program, visit https://insider.windows.com/.
Most of the content that is previewed in the Windows 10 Insider Preview will eventually be implemented in the mainstream version of Windows 10, so it can be useful if you are interested in testing new feature upgrades early in the process. You should be cautious, however, because the Insider builds can contain incomplete or unstable code. For this reason, do not use Windows Insider builds in a production environment.
Each new Windows 10 build proceeds through progressive branches on its way to the general public users and enterprise users. Figure 3-4 shows a diagram of how the build and servicing development process works. The guideline dates define how long each servicing remains in the testing and bug-fixing period before the build moves on to the next branch on the right.
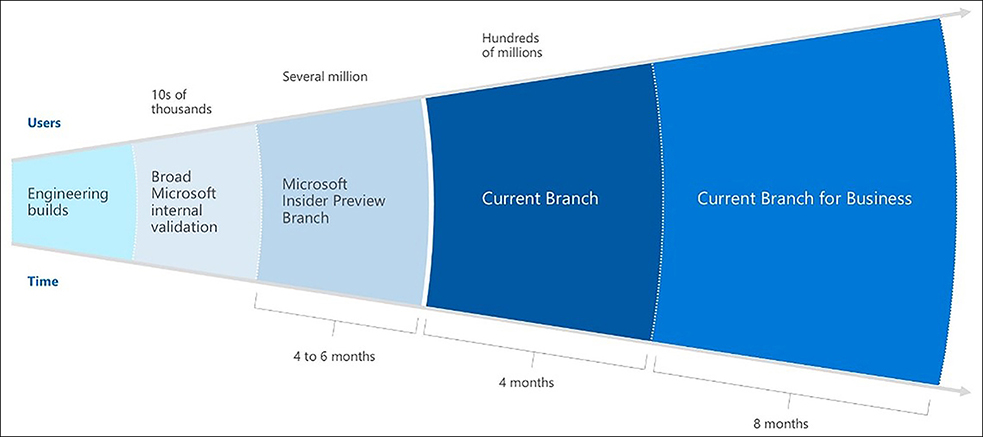
In the Windows Insider program are two levels of adoption of preview builds that participants can currently choose. These two update speeds are referred to as rings. The Fast ring makes new builds available as soon as Microsoft releases them; the second option, the Slow ring, delays the availability of the build until it has been exposed to the Fast ring members and most if not all the bugs have been addressed by interim incremental updates.
If the Windows Insider Program proves to be too volatile or risky, members can change from Fast to Slow or leave the program at any time. Consider using a virtual machine to keep abreast of the evolution of Windows 10.
Each version that progresses to the Current Branch stage is assigned a version number with the version numbering scheme corresponding to the release date and the year and month in yydd format, such as 1607 or 1703.
To enable the Insider Preview builds on your Windows 10 device, follow these steps.
Sign up to be part of the Windows Insider Program at https://insider.windows.com/.
Sign in to your PC with the Microsoft account you used in step 1.
Open the Settings app.
Select Update & Security and then select Windows Insider Program.
Click Get Started under Get Insider Preview Builds.
If you are prompted to link your account to the Windows Insider Program, click Link an account and select the correct account and then click Continue.
On the What kind of content would you like to receive screen, choose one of the following options:
Just fixes, apps, and drivers
Active development of Windows
Skip ahead to the next Windows release
To receive regular new builds of Windows 10, choose the Active development of Windows option and click Confirm.
Chose to receive from the Fast or Slow ring of preview builds and click Confirm.
Read the warning message shown in Figure 3-5 and click Confirm to continue.
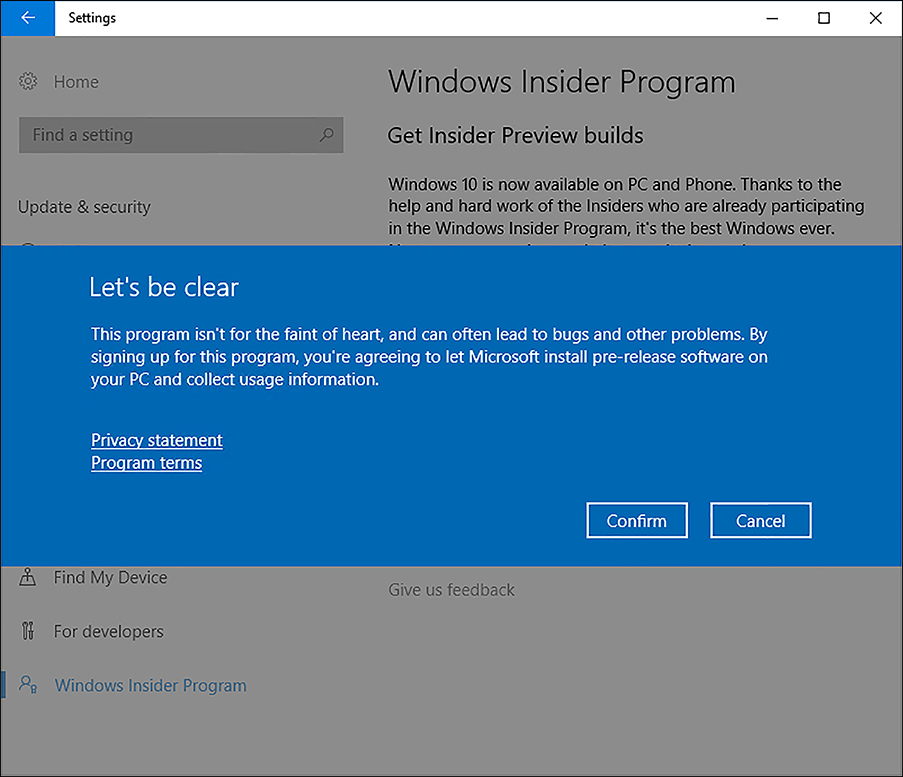
FIGURE 3-5 Windows Insider build warning Click Restart Now to restart your PC.
After you have configured your test computer for Windows Insider builds, you can also consider volunteering to give Microsoft feedback. When you encounter problems or crashes in Windows 10 Insider builds, Windows automatically reports information back to Microsoft. When evaluating Windows 10, you can use the Feedback Hub, which is a Windows Store app included in Windows 10 that enables you to communicate with Microsoft and view suggestions, give feedback, and vote on issues from other Insiders.
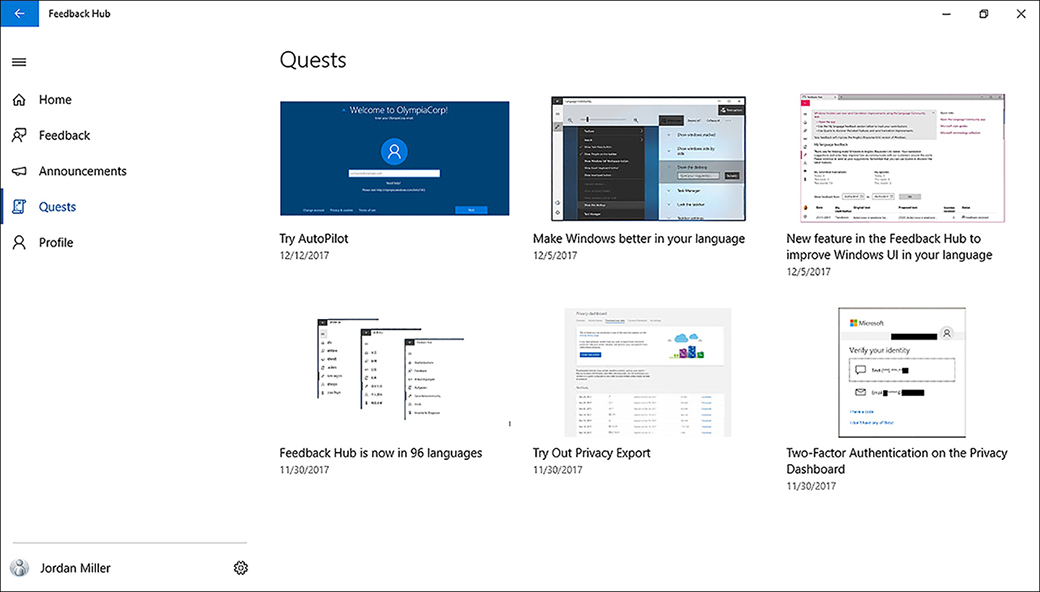
You can also participate in Quests, which are short tutorials that guide you through how to use new features, as shown in Figure 3-6. Each Quest provides you with an overview and then a series of steps that you should perform. If the quest is not achievable, you can provide feedback to Microsoft on the issue and, in addition, review other feedback in this area.
If the pace of change is too fast, you can swap from the Fast ring to the Slow ring, or you can easily stop getting insider builds on your computer. You will need to re-run the Get Started option on the Windows Insider Program page in the Update And Security settings app and modify your settings.
If you want to exit the Windows Insider program, you can also reset your computer to a normal build. After you revert to a previous version of Windows 10, your Microsoft account will remain associated with the Windows Insider program and you can re-enable the feature at any time.
Current Branch and Current Branch for Business
Enterprises typically require more control of their updates and could be concerned with the new rolling Windows 10 upgrade process. The progressive branches shown in Figure 3-4 show the time frame in which Microsoft plans to deliver feature updates to Windows 10 customers.
For the majority of business customers, two branch choices are available to choose from.
Current Branch (CB)
Current Branch for Business (CBB)
These two main servicing options are described in detail in this section.
Use Current Branch
This servicing option ensures that devices are kept up to date with the latest Windows 10 features through the upgrades that are released two times a year. When Microsoft releases a new public build, all devices that have the default configuration begin downloading and installing the upgrade.
In the real world, the default configuration is most appropriate for early adopters, IT team members, and other, broader piloting groups who need to test the mainstream business build before full rollout with CBB. All versions of Windows 10 are on the Current Branch unless they have been configured to be on CBB.
Windows 10 Home edition will always be on CB and will upgrade through Windows Update automatically.
Other Windows 10 editions can upgrade through Windows Update, WSUS, or other management systems such as System Center Configuration Manager. You can use the GUI interface, Group Policy, or a management tool to defer upgrade implementation for approximately four months before you are required to deploy the upgrade.
With each release of a Current Branch feature update, Microsoft produces new ISO images that volume licensing, system builders, and similar kinds of users can download from MSDN or similar websites. You can use these images to upgrade existing machines or use as a base image to create new custom images. Organizations using WSUS will be able to deploy these feature upgrades to devices already running Windows 10.
Use Current Branch for Business
This servicing option is for the majority of users within an organization. Businesses often prefer or require more time to test the feature upgrades prior to mainstream deployment. Only the Windows 10 Pro, Windows 10 Enterprise, and Windows 10 Education editions support Current Branch for Business by Windows Update, WSUS, or other management systems.
Microsoft re-releases the feature upgrade a second time, approximately four to six months after the initial release, which includes any fixes or remediation required following the CB roll out. Once CBB is available all devices using Current Branch for Business begin downloading and installing the upgrade. If the organization wants to further delay the adoption up to 365 days, they can use the Settings app, Group Policy or System Center Configuration Manager. Throughout this time, monthly quality (security) updates will continue to be made available to all machines on CB or CBB.
When the maximum deferral period has expired, the upgrades will be automatically installed.
From mid-2017, Windows 10 adopted new servicing naming terms that allowed both Windows 10 and Office 365 ProPlus servicing to be aligned as shown in Table 3-1.
TABLE 3-1 Servicing process name changes
OLD NAME |
NEW NAME |
|---|---|
Current Branch |
Semi-Annual Channel* |
Current Branch for Business |
Semi-Annual Channel |
*The Semi-Annual Channel replaces the Current Branch and Current Branch for Business concepts. During the transition period, you may see the Current Branch referred to as the Semi-Annual Channel (Targeted).
Since some systems may have updates deferred, or delayed, you may notice that this change may not be reflected in all installed systems.
![]() Exam Tip
Exam Tip
The CBB servicing option is not available for the Home edition of Windows 10.
The servicing approach is similar to the way Android and iOS devices receive updates. The change for many large organizations might have a significant impact because they will want to balance their desire to deliver the latest operating-system features, functionality, and security to their users with the need to provide predictable and stable devices.
Update mobile devices
One of the challenges with a highly mobile workforce is that those employees seldom connect to the corporate network, which makes it difficult to ensure that they are regularly updated.
Many new devices that run Windows 10 might not be part of the domain, perhaps because they are constantly mobile, do not belong to the organization, or are privately owned. These devices can be upgraded to an enterprise SKU such as Windows 10 Enterprise, using a provisioning package, and then managed using a mobile device management (MDM) service or Windows Update for Business to provide the same type of control provided today with WSUS or System Center Configuration Manager.
Implement continuous servicing
The servicing lifetime of Current Branch or Current Branch for Business is fixed for a period of 18 months. Windows 10 will be continually upgraded itself. To continue receiving monthly security updates, you must ensure that new feature upgrades on machines running these branches are installed before the end of each servicing period. For many organizations, this requires a change to the current deployment and image servicing methodology.
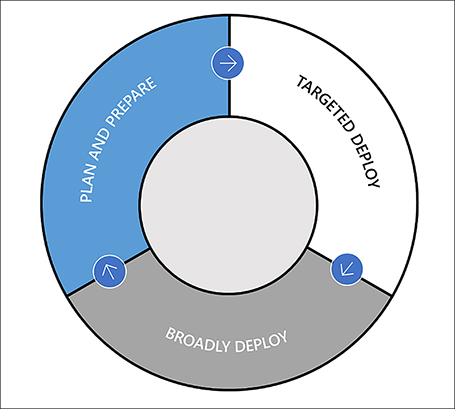
There are three stages to consider when deploying Windows 10 in an enterprise. These are:
Plan and Prepare Use the Windows Insider Program to keep aware of developments of new Windows 10 features and validate compatibility.
Targeted Deploy Once a new Windows 10 feature update is available, pilot deployments to a targeted group of devices to validate compatibility.
Broadly Deploy After pilot deployments are concluded, begin broadly deploying the Windows 10 feature update throughout the organization.
The diagram shown in Figure 3-7 depicts the Windows 10 feature update release process, which is useful to overlap with your new deployment and image servicing methodology.
Long-Term Servicing Branch scenarios
For some organizations, the concept of a continually changing and upgrading operating system would be a reason for not installing Windows 10. Microsoft has therefore created a specialized edition of Windows 10 Enterprise that only enterprise customers can obtain and install.
This special branch of Windows 10 is referred to as the Long-Term Servicing Branch (LTSB), and it is aimed at businesses that have computers that need to run in a known (and fixed) environment that does not change. Microsoft envisages that the maximum period an organization will use a particular build of LTSB is five years, but it will provide long-term support for 10 years.
There are key differences in the feature set between this edition and other Windows 10 editions. The following features and apps are not included in the LTSB:
Microsoft Edge web browser
Windows Store Client
Cortana
Microsoft Outlook Mail/Calendar, Microsoft OneNote,
In-box Universal Windows Apps are not included
Since these apps or services are likely to be frequently updated with new functionality, their support cannot be maintained on PCs running the LTSB.
Note Long-Term Servicing Branch availability
At the time of going to print, Microsoft released two LTSB versions of Windows 10 named Windows 10 Enterprise 2015 LTSB and Windows 10 Enterprise 2016 LTSB. The next version, expected in 2019, will adopt the new naming convention and will be referred to as the Long-Term Servicing Channel (LTSC).
The LTSB receives security and other updates as they are released, but there will be no upgrades. It is recommended that each build version of LTSB have a normal life expectancy of five years.
Certain industries that use a base operating system to host line-of-business (LOB) or critical applications are likely to consider deploying LTSB. These scenarios include:
Factory production, factory floor machinery.
Manufacturing control systems.
Hospital emergency room computers.
Retail point-of-sale (POS) systems.
Automated teller machines (ATM).
Pharmaceutical firms that might have regulatory requirements for PCs used for the development of their products.
Kiosk devices.
Where a device is running a dedicated app, such as in a kiosk or banking ATM, and does not allow users to log on, or have users interact with the operating system, the LTSB might be appropriate.
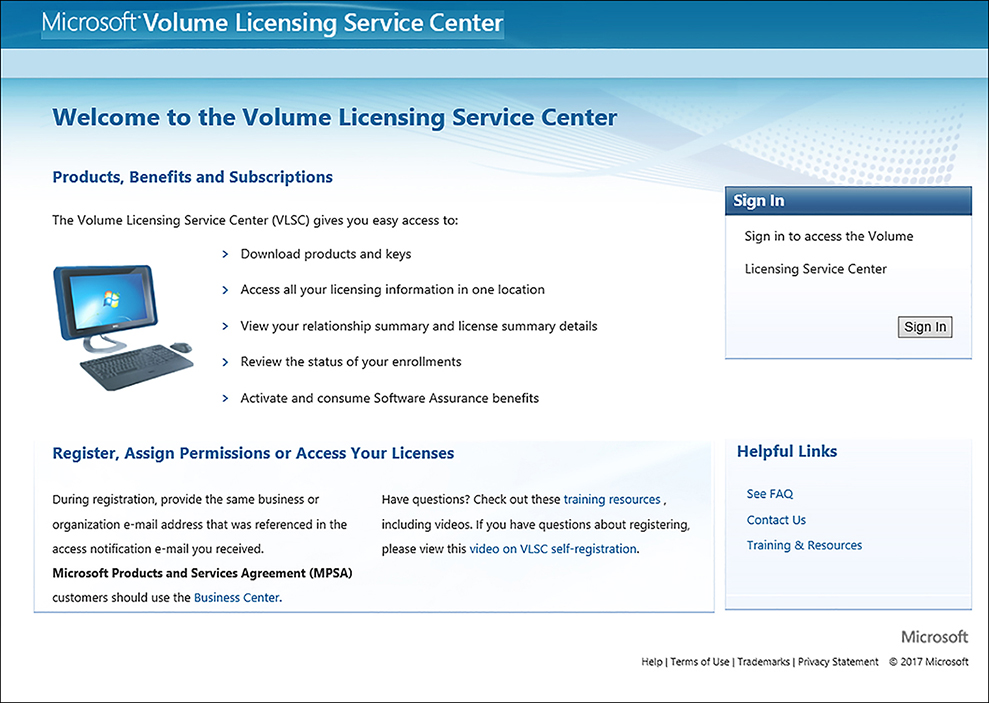
The Windows 10 Enterprise Long-Term Servicing Branch (LTSB) ISO images are made available on MSDN and sites such as the Volume Licensing Service Center, as shown in Figure 3-8.
The LTSB should not be viewed as an alternative to receiving the mandatory upgrades. There will be few, if any, scenarios in which an entire organization would justify using the Long-Term Servicing Branch for all users and PCs. If the device is ever connected to the Internet then generally it should not use the LTSB edition.
The release schedule for the LTSB is likely to be one release every few years and will be less often than CB and CBB releases. When they are released, each LTSB will be supported with security and reliability fixes for five years, with extended support after this for a further five year period.
At any stage during the lifetime of a device running LTSB, the device can be upgraded to a more recent version of the Windows 10 Enterprise LTSB by using the available media. You can upgrade LTSB to a CB or CBB build if you have the Windows 10 Enterprise license. It is not possible to upgrade from CB or CBB to LTSB.
Manage update history
Updates are necessary to maintain the security and reliability of Windows 10. However, in rare cases, an update can actually create a problem for your system. In such cases, you need a mechanism to review installed updates and, if necessary, uninstall and block offending updates from being installed again. In Windows 10, you can uninstall the update or driver that is causing that instability.
Microsoft releases important updates every second Tuesday each month, known as “Patch Tuesday.” Security and definition updates can be released at any time, and the Windows Update service automatically checks for new Windows Updates at the default time of 3:00 A.M. or the time you set in automatic maintenance.
Note Windows Defender Definition Updates
Windows Defender definition updates are no longer shown in the Windows Update history. You can view the timestamp for the last definition update installed on the Update tab in Windows Defender.
View update history
To view your update history and see which Windows updates failed or successfully installed on your Windows 10-based PC, follow these steps.
Open Settings and click Update & Security.
Click Windows Update and then click Update History.
A list of your installed Windows updates appears, similar to the list shown in Figure 3-9.
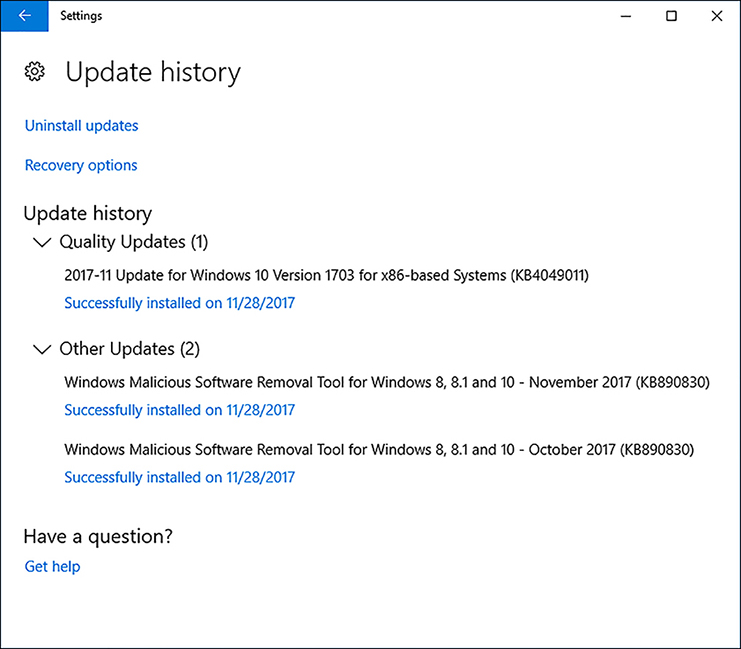
FIGURE 3-9 View Update History Click one of the Successfully Installed On (date) links to see more details for that update.
Close Settings.
Each update contains a summary of the payload. If you click More Info at the bottom of the summary, you are directed to the detailed knowledge base description on the Microsoft support pages.
If you prefer to use Control Panel, you can see a list in Installed Updates in Control Panel by using these steps.
Click the Start button and type Control Panel > click Control Panel.
Open Programs > Programs And Features.
Click View Installed Updates.
Select an update.
The support link for the update appears in the lower part of the screen.
Close Control Panel.
Hide or show Windows Updates in Windows 10
In an enterprise environment, you use tools, such as Windows Server Update Services (WSUS), to manage and approve each update before it is made available to a pilot group and then the main corporate population. On consumer devices, updates are automatically installed.
In rare cases, a specific driver or update might cause undesired results such as poor performance or instability. You can manually remove an update, but for consumers, the update will be reinstalled automatically the next time Windows Update checks whether updates are missing.
To assist with this problem, Microsoft has made available a utility for Windows 10 that you can install. The Show or Hide Updates troubleshooter enables you to view updates and mark individual drivers or updates to prevent it from being reinstalled. You can download the utility from https://support.microsoft.com/kb/3073930. To hide updates, follow these steps.
Sign in to Windows 10 with an account that has administrative privileges.
Open the wushowhide.diagcab file to launch the wizard.
Click Advanced.
Select the Apply Repairs Automatically check box and then click Next.
The tool detects problem updates and searches for updates.
Click Hide Updates.
Select the check box for each of the updates you want to hide, as shown in Figure 3-10, and then click Next.

FIGURE 3-10 Resolving a problematic device driver or update The selected updates are now hidden.
Click Close.
To show previously hidden updates, follow these steps.
Sign in to Windows 10 with an account that has administrative privileges.
Open the wushowhide.diagcab file to launch the wizard.
Click Advanced.
Select the Apply Repairs Automatically check box and then click Next.
Click Show Hidden Updates.
Select the check box for each of the hidden updates you want to show in Windows Update again and then click Next.
The selected hidden updates are now no longer hidden.
Click Close.
Need More Review? Windows 10 Update History
Microsoft publishes the contents of each Windows 10 update for you to review and understand what is contained in each periodic software updates. View this list at https://support.microsoft.com/en-gb/help/4018124/windows-10-update-history.
Roll back updates
With the rhythm of regular updates becoming the method of keeping devices secure and up to date, there might be instances when an update causes problems and you need to consider removing the update completely by rolling it back. You might have experience with driver rollbacks; the same concept is used for rolling back Windows updates.
Sometimes you need to remove a single Windows update. You can perform this task in a number of ways, through Control Panel, the Settings app, or the command prompt.
Uninstall a Windows update by using Control Panel
If you prefer to use Control Panel, you can see an Installed Updates list in Control Panel by following these steps
Click the Start button and type Control Panel, click Control Panel.
Open Programs > Programs And Features.
Click View Installed Updates.
Select an update that you want to uninstall.
If Windows allows you to uninstall it, Uninstall appears on the toolbar.
In the Uninstall An Update dialog box, click Yes to confirm.
Accept the UAC if prompted.
A restart might be needed to complete the removal of the update.
Uninstall a Windows update in Settings
The Settings app ultimately opens the same Installed Updates list in Control Panel. Perform these steps if you prefer to use the Settings app.
Open Settings and click Update & Security.
Click Windows Update and then click Update History.
A list of your installed Windows Updates appears.
Click Uninstall Updates at the top of the screen.
The link opens the Control Panel > Programs> Programs and Features > Installed Updates page.
Select an update that you want to uninstall.
If Windows allows you to uninstall it, Uninstall appears on the toolbar.
In the Uninstall An Update dialog box, click Yes to confirm.
Accept the UAC if prompted.
A restart might be needed to complete the removal of the update.
Uninstall a Windows update by using the command prompt
Sometimes you will want to remove the same update from multiple devices. After you have tested the command-line tool on your test device, you can use the command prompt or Windows PowerShell to script the command and distribute it to multiple devices by using Group Policy or Windows PowerShell.
You can use the Windows Management Instrumentation (WMI) command-line utility to generate a list of installed Windows Update packages on a Windows 10-based device, as shown in Figure 3-11.
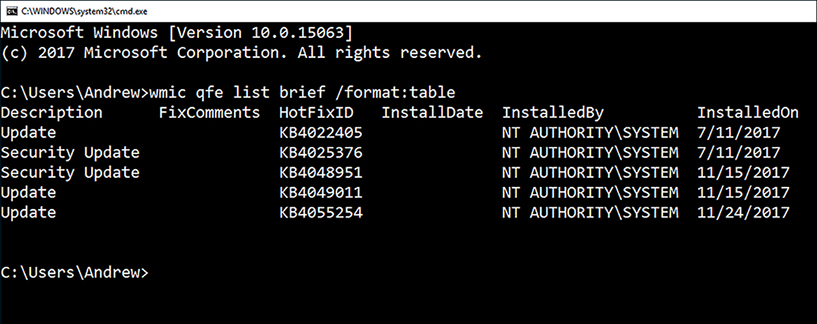
To generate the list of installed Windows Update packages on your device, open a command prompt, (or Windows PowerShell) and type the following command.
wmic qfe list brief /format:table
When you have identified an update that you want to remove, you can use the Windows Update Stand-Alone Installer (Wusa.exe) command-line tool to uninstall updates by providing the package number (from the Microsoft Knowledge Base) of the update to be uninstalled. The syntax for the tool is as follows.
wusa.exe /uninstall /kb:<KB Number>
Substitute <KB Number> in the command with the actual KB number of the update you want to uninstall. The WMIC and WUSA commands work in either the command prompt or Windows PowerShell.
Revert to a previous build of Windows 10
Since Windows 8, you have had the option to remove an update completely and revert to the pre-update status. With Windows 10, this process has become more reliable and more refined.
If you have installed the Insider Preview of Windows 10, you can remove the preview version and install the full version. If you upgraded from a previous version of Windows within the past 10 days, and things are not working out, you can simply roll back to your previous operating system installation, and your settings, apps, and any files, such as photos or documents, you’ve added during the past 10 days to your Windows 10 installation will be retained with the older version of Windows.
During any system upgrade, for example, upgrading from Windows 8.1 or implementing the Windows 10 1703 build upgrade, Windows creates a Windows.old folder on the system volume to retain a copy of your previous version of Windows. Because this file can be very large, 10 GB or larger, the file is automatically deleted after 10 days. You can preserve a copy of this file, or rename it, to prevent the deletion. You would need to replace and rename it back to the original Windows.old filename if you wanted to use it.
If you have recently upgraded to a newer build of Windows 10 and want to revert to the previous version, you can do so by using Recovery in the Settings app or the Go Back To The Previous Version in the Advanced Startup options.
Note Preview Builds are Experimental
When using Insider Preview builds of Windows 10, there can be changes to menus, options, and processes. The steps to revert to a previous build might change when you carry out these steps.
To use Recovery in the Settings app, use these steps.
Open the Settings app and select Update and Security
Select Recovery
On the Recovery page, shown in Figure 3-12, under the Go Back to Windows 7 select Get Started.
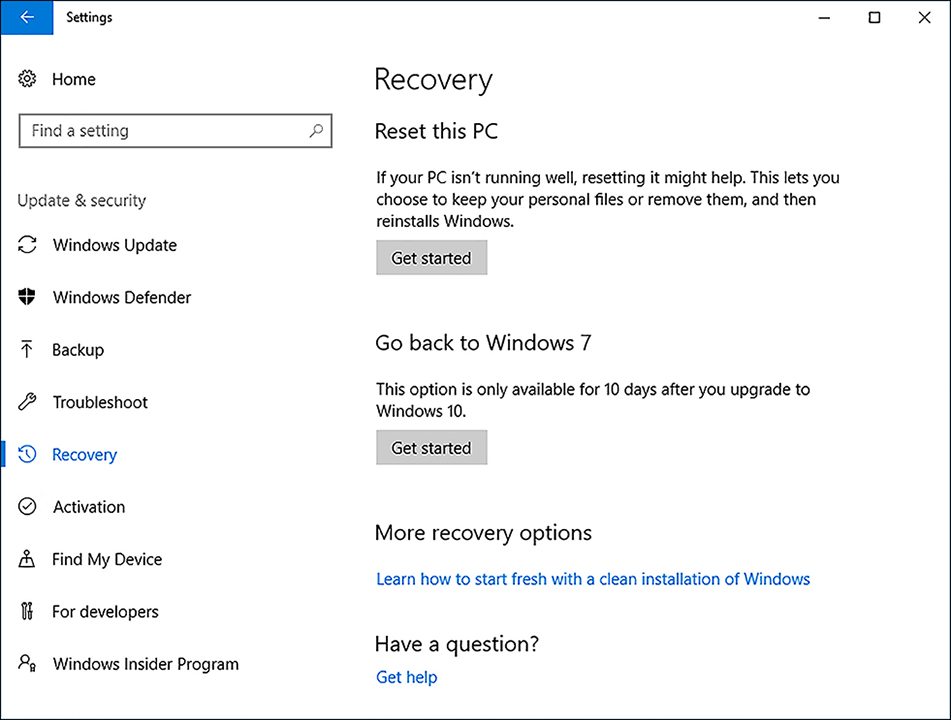
FIGURE 3-12 Roll Back Windows to a previous Windows 10 version The Getting Things Ready dialog box appears, and Windows checks whether the Windows.old file is present.
Answer the short questionnaire to provide feedback to Microsoft about why you are going back and then click Next.
On the Check For Updates page, click No, Thanks.
On the What You Need To Know page, click Next.
On the Don’t Get Locked Out page, click Next.
On the Thanks For Trying Windows 10 page, click Go Back To Windows 7.
Your computer restarts, and the earlier build of Windows now starts restoring.
To use the Go Back To Previous Windows From Windows 10 in Advanced Startup, use these steps.
Boot to advanced startup options.
In the Choose An Option dialog box, click Troubleshoot.
On the Troubleshoot page, click Advanced Options.
On the Advanced Options page, if you don’t see Go Back To The Previous Build, click See More Recovery Options if displayed.
Click Go Back To The Previous Build.
On the Go Back To The Previous Build page, select an administrator account and enter the password for this administrator account.
Click Continue.
On the Go Back To The Previous Build page, click Go Back To Previous.
Your computer restarts, and the earlier build of Windows now starts restoring.
Note We’re Sorry, but you can’t go Back
If the Windows.old folder is not found, Windows 10 recovery will not be able to take you back to a previous version of Windows.
You can check which version of Windows 10 your device is currently running by using these steps.
Click the Start button and then click Settings.
Click System and then select About.
The details of your Windows 10 operating system appears, as shown in Figure 3-13.
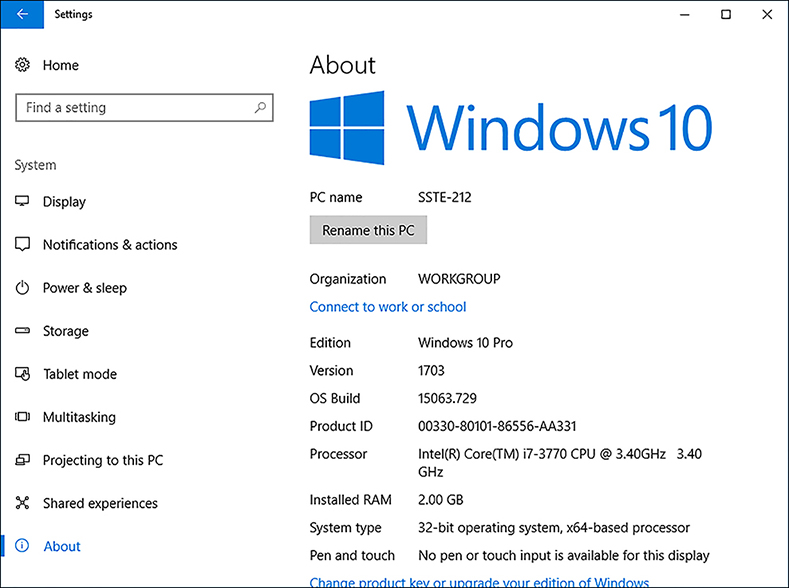
FIGURE 3-13 Windows 10 Version and OS Build Alternatively, you can click the Start button and type WinVer, then press Enter
From the About screen shown in Figure 3-13, you can determine whether you should upgrade your system. If you are using version 10.0 (Build 10240), this is the initial release version of Windows 10 (RTM), and you should install a later Windows 10 update. The version used at the time of writing is version 1703 (OS Build 15063.723).
Update Windows Store apps
Windows 10 supports the Windows Store apps first introduced in Windows 8. Windows Store apps are different from traditional desktop apps, such as Office apps. However, in Windows 10, Microsoft introduced a new Universal Windows Platform (UWP), which provides a common app platform across every device that is capable of running Windows 10. Apps that are designed for the UWP can call both the traditional desktop apps (using the Win32 application program interfaces [APIs] and Microsoft .NET Framework) and the Windows Store apps. This means developers can now create a single app that can run across all devices.
In earlier versions of Windows, the system would check whether updates were available. If they were, the Store tile on the Start page would display an indication that updates are available.
Windows 10 automatically checks the Windows Store for updates to installed apps on a daily basis and displays a counter (downward pointing arrow along with a number) on the menu bar of the Windows Store app for how many apps you can update. When an update is available, Windows 10 by default automatically downloads the files and updates the installed apps. You can modify this behavior and manually select which apps you want to update by following these steps.
Sign in to Windows 10, using a Microsoft account.
Open the Windows Store.
Click the three dots to the right of the avatar profile icon and then click Settings.
Under App Updates, slide Update Apps Automatically to On, as shown in Figure 3-14.

FIGURE 3-14 Microsoft Store update settings
To update apps manually, perform the following procedure.
Sign in to Windows 10, using a Microsoft account.
Open the Windows Store.
Click the three dots to the right of the avatar profile icon and then click Downloads And Updates.
All apps with available updates appear.
You can click Update All or manually select individual apps to update by clicking the downward-pointing arrow next to each app
Scroll down to see the download status for each app, as shown in Figure 3-15.
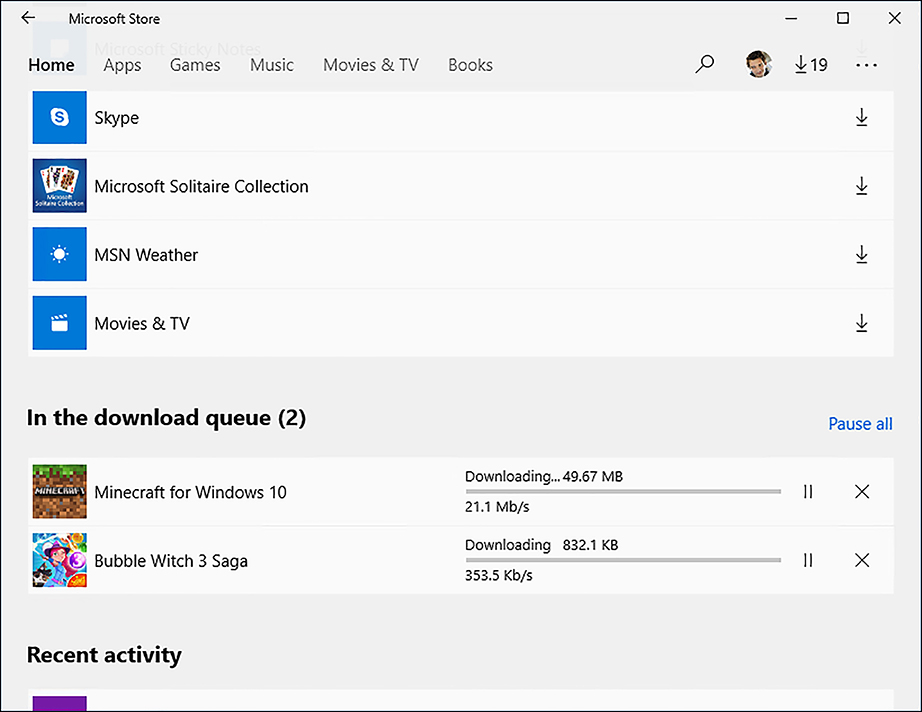
FIGURE 3-15 Viewing Microsoft Store app downloads and installations
Windows Store apps can be regularly updated by the developer and made available to the Store for you to install. Previous versions of the app can be automatically updated whenever the device is connected to the Internet. Because apps install and update in the background, the first indication that there was an update might be when a new or updated tile appears in Start.
Administrators have limited control over the installed Windows Store app updates, though it is possible to turn off automatic updates for apps at any time by configuring the App Updates setting in the Windows Store or changing Group Policy. You cannot control which specific updates are installed; the device downloads and receives all available updates or no updates.
Administrators can also block many features of the Store app completely by using the settings found in the Group Policy node: Computer ConfigurationAdministrative Templates Windows ComponentsStore. The settings that are most appropriate for Windows 10 are listed in Table 3-2.
TABLE 3-2 Windows Store Group Policy settings
Group Policy Setting |
Description |
|---|---|
Turn off Automatic Download And Install of Updates |
Enables or disables the automatic download and installation of app updates. If enabled, the automatic download and installation of app updates is turned off. |
Disable All Apps From Windows Store |
Disable turns off the launch of all apps from the Windows Store on the device. The Windows Store is also disabled. |
Turn Off The Store Application |
Denies or allows access to the Store application. If enabled, access to the Store app is denied, and apps cannot be updated. |
Only Display The Private Store Within The Windows Store App |
Denies access to the retail catalog in the Windows Store app but displays the Company app store. |
Skill 3.2: Monitor Windows
With the emergence of solid state drives, there are fewer moving parts in a modern computer, but the internal workings of a device and the operating system are still hugely complicated. To the majority of users, their device is a tool to facilitate their work and, in this regard, a computer system that performs poorly or slows them down either at home or at the workplace reduces their productivity and can increase their frustration.
Windows 10 has built-in, self-tuning mechanisms that maintain the system. If you need to review and diagnose potential causes of poor performance manually, you can use some of the many tools to resolve issues. In response to a major increase in system attacks, Microsoft keeps Windows secure from malware by enabling Windows Update to download new definitions for Windows Defender automatically. This chapter reviews numerous tools and focuses on the skills required to configure and monitor Windows 10 so that you can assess issues through logs and real-time data collection.
Configure and analyze Event Viewer logs
A key built-in security tool in all Windows operating systems are event logs, which are accessed in the Windows Event Viewer and provide information regarding system events that occur. Event logs are generated as a background activity by the Event Log service and can include information, warning, and error messages about Windows components and installed applications and actions carried out on the system.
Understand event logs
You can start Event Viewer, as shown in Figure 3-16, by typing eventvwr.msc.
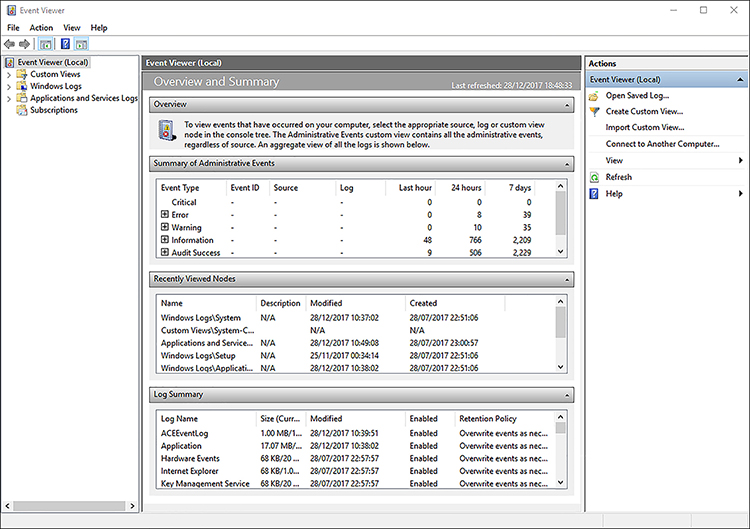
Upon opening, the console retrieves the events that have occurred on your computer and displays them. You can configure the Event Viewer to work with event logs from remote computers; you must enable remote management in your firewall.
There are two types of log files.
Windows logs Include Application, Security, Setup, System, and Forwarded Events
Applications and services logs Include other logs from applications and services to record application-specific or service-specific events
Because logs are created as part of the operating system, they can provide forensic-level metadata that can help you understand problems that are difficult to diagnose, using real-time analysis of the system.
The Windows logs are described in more detail in Table 3-3.
TABLE 3-3 Built-in Windows logs
Log |
Description |
LOG FILE Location |
Default LOG Size |
|---|---|---|---|
Application |
Events logged by installed applications. |
%SystemRoot%System32Winevt LogsApplication.Evtx |
20,480 KB |
Setup |
Records events logged by Windows during setup and installation. |
%SystemRoot%System32Winevt LogsSetup.Evtx |
1,028 KB |
Security |
Contains auditable events such as logon, logoff, privilege use, and shutdown. |
%SystemRoot%System32Winevt LogsSecurity.Evtx. |
20,480 KB |
System |
Contains events logged by Windows 10. This is the main system log. |
%SystemRoot%System32Winevt LogsSystem.Evtx |
20,480 KB |
Forwarded Events |
Used when event forwarding is operational. This log records forwarded events from other computers. |
%SystemRoot%System32Config ForwardedEvents.Evtx |
20,480 KB |
The default Windows 10 event log maximum file size is 20 MB. If your system reaches this maximum size, new events will overwrite old events.
Open Event Viewer and take some time to familiarize yourself by reviewing some logs. There are several levels of events, with meanings as follows.
Information These logs provide information about changes related to a component or system process, usually a successful outcome.
Warning These events are not critical, although they could lead to more serious problems and should be investigated.
Error Events warn you that a problem has occurred.
Critical These events are the most severe and could lead to failure or loss of function. They are highly significant and indicate that a problem is occurring or has occurred.
Audit Success/Failure If you have enabled auditing, these log entries appear in the security log.
In Event Viewer, select each of the Windows logs and look at the types of events that have been generated. The Actions pane on the right side provides tools and wizards to help you work with logs, including saving a log, clearing/deleting entries in a log, opening a previously saved log, and attaching a task to an event.
Create a custom view
When you explore Event Viewer, you might find so many entries that it is hard to locate specific issues. You’ll want to remove entries, but you should not clear a log on a production machine without first saving the log. A better method of removing log entries such as informational or warning log entries is to create a custom view that shows only specific events. This acts like a saved filter that you can invoke.
To create a custom view in Event Viewer that displays only Critical events in the System log, follow these steps.
Open Event Viewer.
On the Action menu click Create Custom View.
On the Filter tab select the Critical check box in Event Level.
In By Log use the Down Arrow and expand Windows Logs; select only the System check box.
Click OK.
Type a name, such as System-Critical for the log name, and click OK.
The custom view immediately refreshes and displays log entries that match the criteria.
Your custom view filter, in this case named System-Critical, is located in the left pane under the Custom Views node.
Close Event Viewer.
With all events, you can double-click the event log entry to reveal its Properties dialog box. The Event Properties dialog box provides you with additional detailed information together with a Copy button so that you can copy the event data to the Clipboard and then work with the data or seek help. Event descriptions have become easier to understand than in previous versions of Windows. The experience of reading event log entries will also help build your understanding.
Configure event subscriptions
You can configure Event Viewer to gather other computers’ event logs. Manually connecting to other computers on a regular basis can be cumbersome. You can automate the collection of event logs from other computers by creating event subscriptions.
All computers participating in a subscription must be configured to allow remote administration. This is achieved by enabling the Windows Remote Management service on the source computer. On the collector computer, start the Windows Event Collector service, which enables the computer to collect events from remote devices. To configure the computers to collect and send events, perform the following two short procedures.
View subscriptions
To enable the collector computer to view subscriptions:
Open an elevated command prompt.
Type wecutil qc and press Enter.
Type Y and press Enter to start the Windows Event Collector service.
Windows Event Collector service announces it was configured successfully.
Close the command prompt window.
To enable remote collection of events on the source computer:
Open an elevated command prompt.
Type winrm quickconfig and press Enter.
Type Y and press Enter; repeat when prompted.
The WinRM firewall exception is now enabled.
Close the command prompt window.
![]() Exam Tip
Exam Tip
The winrm quickconfig and wecutil qc commands are needed to create and allow subscriptions to be successfully collected. Make sure that you know which command is run on each participant for the exam.
You can create two kinds of subscriptions: collector initiated and source-computer initiated. The subscriptions are described in Table 3-4, with some of the key terms related to event subscriptions.
TABLE 3-4 Event subscription terms
Term |
Description |
|---|---|
Subscription |
A group of events you configure based on specific criteria you create is called a subscription. Subscriptions enable you to receive events from other computers, called sources. |
Source |
The event source computer is the computer that provides you with events on your network. The source computer can be a PC or a server. |
Collector |
The event collector computer is the computer on which you view the collected events. The collector computer can be a PC or a server. |
Collector-initiated subscription |
In a collector-initiated subscription, the subscription must contain a list of all the event sources that need to be added one at a time. This is used on small networks because each must be configured manually. |
Source computer-initiated subscription |
The source computer transmits local events to the collector computer. This is a push type of arrangement, often configured using Group Policy. |
Create a subscription
To create a collector-initiated subscription, follow these steps.
Open Event Viewer.
Click the Subscriptions node.
If the option to start the Windows Event Collection Service dialog box appears, click Yes.
In the Action pane, click Create Subscription.
Type a name and a description for the subscription, as shown in Figure 3-17.
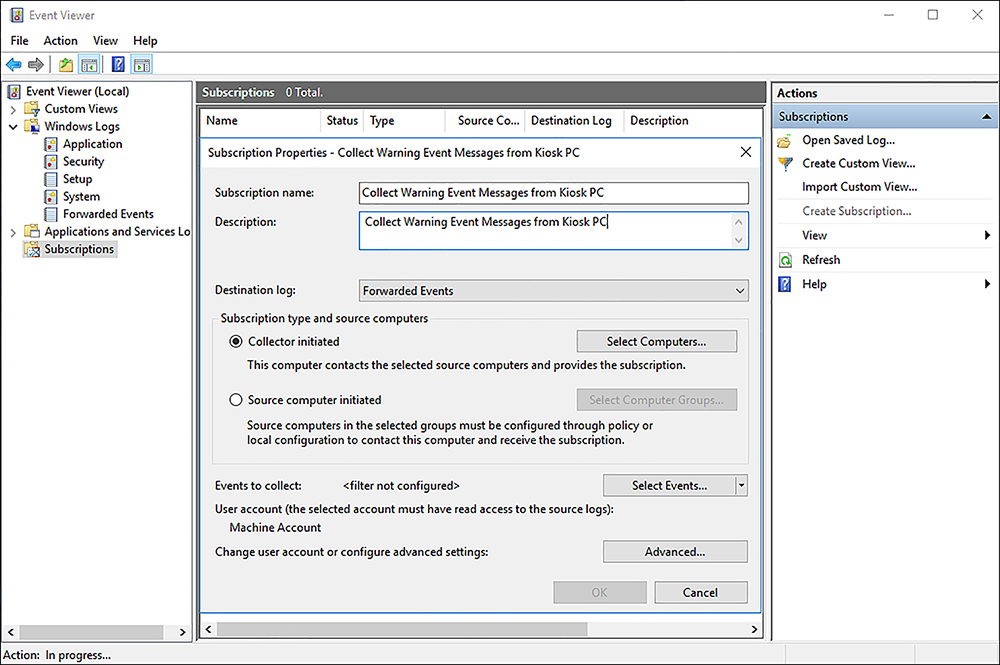
FIGURE 3-17 Creating an event subscription Under Subscription Type And Source Computers, click Collector Initiated and click Select Computers.
In the Computers dialog box, click Add Domain Computers, select the computer to be polled for subscriptions, and click OK.
Under Events To Collect, click Select Events and define the event criteria, such as event levels, log type, and event source, that will be used to match and collect events. Click OK.
Click OK to save and make the subscription active.
The new subscription is listed in the Subscriptions node main pane.
If you want to view events on other computers on your network, you can do so without creating a subscription. This is useful for ad hoc monitoring, for example, to see whether a particular event has occurred.
Access event logs remotely
When you need to quickly view event logs on a remote computer, you don’t need to create a subscription. Instead you can view the event logs directly. To view event logs on a remote system, follow these steps.
Open Event Viewer.
Right-click Event Viewer (Local) in the left pane and choose Connect To Another Computer.
When the Select Computer dialog box opens, click Another Computer and enter the name, type the domain name or IP address of the computer, or click Browse to search for the computer on your network.
If you need to specify logon credentials, select the Connect As Another User check box. Click Set User and type the logon credentials for a local administrator or user on the remote device and then click OK.
Note View Events on Remote Computers
You must have administrator privileges to view events on a remote computer. You must also configure Windows Firewall on all participants to allow traffic on TCP port 80 for HTTP or on TCP port 443 for HTTPS.
Monitor performance using Task Manager
If you have used an earlier version of Windows, you probably have used Task Manager. This is one of the most useful tools available in Windows for gaining an immediate insight into how a system is performing.
Access Task Manager
The Task Manager built into Windows 10 shows you which processes (tasks) are running on your system and, importantly, shows the system resource usage that directly relates to performance. If a particular task or process is not responding, or continues to run after you have closed the application, you can use Task Manager to view this behavior and force the offending process to end.
When troubleshooting, you might find that some users are comfortable using Task Manager to review the system status and end problematic tasks.
If you are moving to Windows 10 from Windows 7 or earlier, notice that Task Manager has been redesigned extensively and is now much more user-friendly, informative, and colorful and slightly less technical.
To open Task Manager, right-click the Start button and then click Task Manager. There are several other ways to open Task Manager, including Ctrl+Shift+Esc or right-clicking the taskbar, Cortana, or the Task View button and then clicking Task Manager.
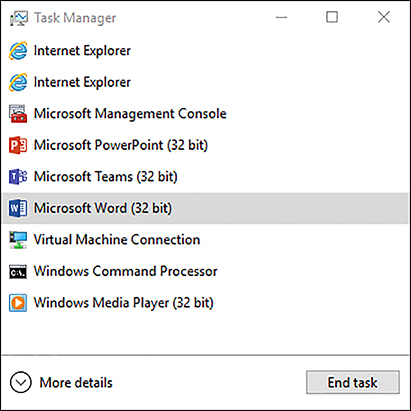
By default, the Task Manager opens to show only the running applications, as shown in Figure 3-18. While using this view, you can highlight any of the listed applications and click End Task to stop a running app.
If you click More Details, Task Manager reopens and displays seven tabs, which enable you to review specific areas of your computer activity. The tabs are described in Table 3-5.
TABLE 3-5 Task Manager tabs
Task Manager Tab |
Description |
|---|---|
Processes |
Shows all running apps and background processes |
Performance |
Shows real-time statistics for CPU, memory, disk, Ethernet, Bluetooth, and Wi-Fi usage |
App History |
Shows historical data for universal and modern apps usage for the previous month |
Startup |
Lists the apps that start when the computer boots |
Users |
Lists all the users currently logged on to the computer locally and remotely |
Details |
Shows detailed statistics on all running and suspended processes |
Services |
Displays all running and stopped system services |
Each tab offers you a different view of the system. Most users might be interested only in the simple view, whereas most IT professionals will only use the detailed version of Task Manager.
Processes tab
All running apps and background processes are grouped as shown in Figure 3-19, and within each process, there might also be more detail. Where an app or process has an arrow beside it, you can click the arrow to see the related processes. For example, if you are running Word and have two documents open, when you click the arrow next to the Word app, the display expands to show both instances of the app that are running. If you highlight an app instance or process and click End Task, Windows 10 attempts to close the activity.
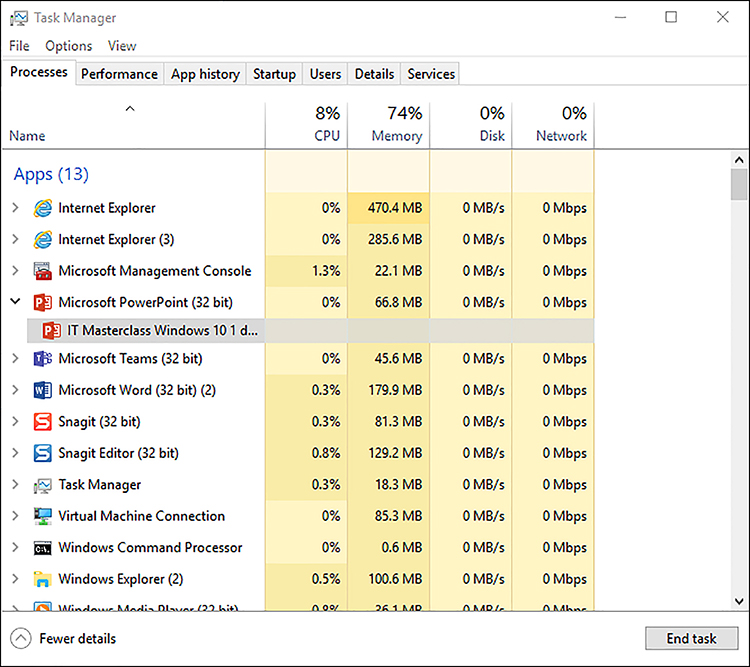
The new visual appearance of the contents shown in the Processes tab is representative of a heat mapping of the data. This is designed to be easier for you to spot the high resource usage and problematic issues requiring attention or further investigation.
Each of the data columns on the heat map is sortable by clicking each heading, such as Memory or Disk. Notice that when you click a column heading, all apps and processes are listed together and are no longer grouped in the first column.
Performance tab
The Performance tab provides a graphical, real-time, statistical view for CPU, Memory, Disk, and Ethernet. If you have multiple Ethernet devices, such as Wi-Fi, these are listed. Figure 3-20 shows the Performance tab with disk 0 selected. In the lower pane, below the graphics, you see additional information such as read/write speed, capacity, and average response time. If you are connected to Wi-Fi and click Ethernet, you see the adapter name, Service Set Identifier (SSID), Domain Name Service (DNS) name, connection type, IPv4 and IPv6 addresses, and signal strength.
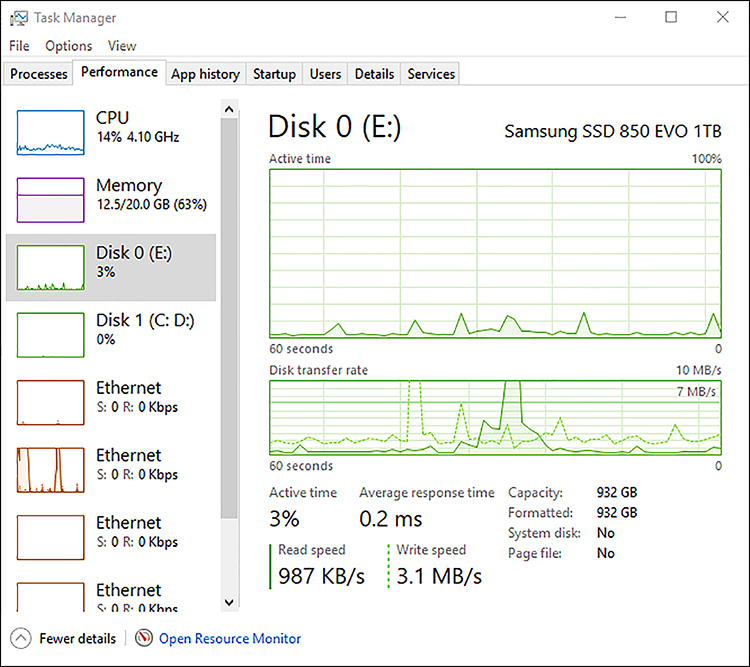
At the bottom of the Performance tab is an Open Resource Monitor link to the management console.
App History tab
The App History tab shows a list of all modern apps that are installed on the device. The table format lists the app usage for the previous month, and columns include CPU Time, Network, Metered Network, and Tile Updates. Where an app has related apps, such as the Messaging + Skype item, the results show aggregated usage totals for Skype Video and Messaging. The grid uses color to highlight the items that are using the most resources within each column.
If you right-click the name of an app, you can select Switch To, which launches the app.
Startup tab
The Startup tab displays which apps start when Windows 10 launches. The information appears in a table, and the columns include Name, Publisher, Status, and Startup Impact.
Under each column is displayed the status or setting for each app. You can enable or disable each app to allow or prevent it from starting when Windows starts. The startup impact caused by the app is an indication of what resources the app is using and how long it takes to initialize; it’s categorized by None, Low, Medium, or High.
If you right-click one of the app names, the context menu allows you to:
Toggle the Disable/Enable status for the app.
Open File Location for the app.
Search Online for details of the app.
Launch the app Properties.
Users tab
All users currently logged on interactively or remotely are displayed on the Users tab. The information is displayed in table format, and the default columns include User, Status, CPU, Memory, Disk, and Network. You can right-click the column heading and select additional information to be displayed.
If the user signed on using a Microsoft account, the user name is the email address associated with the Microsoft account. On shared devices, such as a home computer on which users may access HomeGroup or still be logged on concurrently, you can review the impact on the computer resources for each active user.
If you right-click a user, you can expand the tree to view the active processes for the user. You can terminate any process in this list by selecting a single process and then clicking End Task.
If you want to end the session that the user has on the computer, you can disconnect a user by right-clicking the user and clicking Disconnect. The user will be informed by a pop-up window that they have been disconnected.
Details tab
All running processes are displayed on the Details tab. The information is displayed in table format, and the default columns include Name, Process ID (PID), Status, User Name, CPU, Memory (private working set), and Description.
You can right-click the column heading and select additional information to appear, including Package Name, Session ID, CPU Time, Page Faults, Threads, and many more. The information displayed is the same as was reported on the Windows 7 Task Manager Processes tab.
If you right-click a process, you can then select several options, including End Task, End Process Tree, Set Priority, Set Affinity, UAC Virtualization, Create Dump File, Open File Location, Search Online, Properties, and Go To Services.
Services tab
The last tab displays all services that are available on the device. These include the status of Running or Stopped. If you right-click a service, you can then select from the context menu to Start, Stop, Restart, Open Services, Search Online, and Go To Details for each service. Some options are only available for services that are running. At the bottom of the Services tab is a link to open the Services management console.
Monitor performance using Resource Monitor
The Resource Monitor displays more information and activity statistics relating to your system resources in real time. It is similar to Task Manager, but also enables you to dive deeper into the actual processes and see how they affect the performance of your CPU, disk, network, and memory subcomponents.
Open the Resource Monitor by using the link on the Performance tab of Task Manager or search for Resource on the Start button. The executable for Resource Monitor is Resmon.exe, which you can run from a Run dialog box or command prompt.
When you open Resource Monitor, you see an overview of your system with graphs for each area of the system subcomponent. Four further tabs are available, for CPU, Disk, Network, and Memory. The statistics tracked on the Overview tab include the following.
% CPU Usage
CPU Maximum Frequency
Disk I/O Bytes Per Second
Disk % Highest Active Time
Network I/O Bytes Per Second
% Network Utilization
Memory Hard Faults Per Second
% Physical Memory Used
Review each tab; each subcomponent offers additional components, as shown in Table 3-6.
TABLE 3-6 Resource Monitor components
System Component |
Additional subcomponents |
|---|---|
CPU |
Processes Services Associated Handles Associated Modules |
Memory |
Processes Physical Memory |
Disk |
Processes With Disk Activity Disk Activity Storage |
Network |
Processes With Network Activity Network Activity TCP Connections Listening Ports |
In each data collector, you can sort the output by clicking the column title. If you select one or more processes in the topmost section, selecting the check box on the left side creates a filter for the items across all four tabs. The selected item is highlighted in an orange color so that you can see how the item compares to the overall output, as shown in Figure 3-21.
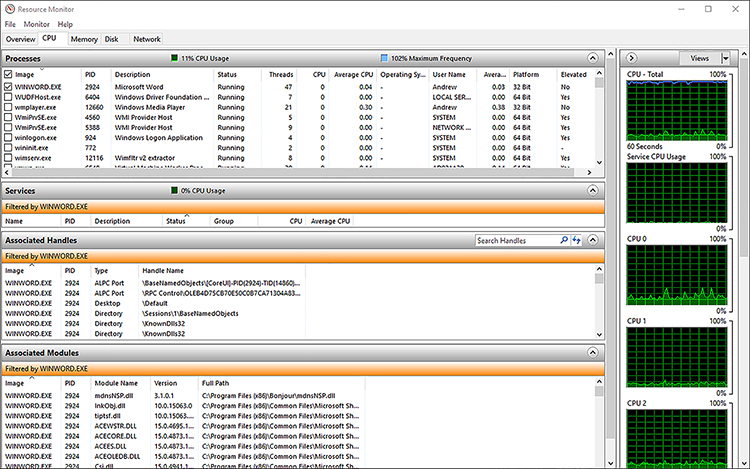
The Resource Monitor is useful for troubleshooting performance issues that relate to high resource usage, and you need to establish which process is using a more than normal amount of resource such as memory.
For more advanced analysis, you can right-click any column and choose additional columns by choosing Select Columns. Each tab has associated columns; the CPU panel offers the following additional columns.
Average Cycle Average percentage of CPU cycle time for the process (over a 60-second interval).
Cycle Current percentage of CPU cycle time the process is using.
Elevated The elevation status of the process. (If this is Yes, it is an elevated process.)
Operating System Context The operating system context in which the process is running.
Platform The platform architecture that the process is running.
User Name The name of the user or service that is running the process.
If you want to freeze the screen so that you can analyze the display or capture an image, you can click the Monitor menu item and select Stop Monitoring.
Monitor performance using Performance Monitor and Data Collector Sets
You can use the Performance Monitor Microsoft Management Console (MMC) snap-in to monitor and track your device for the default set of performance parameters or a custom set you select for display. These performance parameters are referred to as counters. Performance Monitor graphically displays statistics and offers real-time monitoring and recording capabilities. By default, the update interval for the capture is set to one second, but this is configurable.
You can use the tool to record performance information in a log file so that it can be played back and used as part of your overall benchmarking process on a system being tested, or when collecting information to help you troubleshoot an issue. You can also create alerts that notify you when a specific performance criterion, such as a threshold or limit, has been met or exceeded.
The easiest way to learn how to use Performance Monitor is to run one of the two built-in collector sets and review the results.
System Diagnostics Data Collector Set collects the status of local hardware resources and configuration data, together with data from the System Information tool.
System Performance Data Collector Set reports the status of local hardware resources, system response times, and processes.
Run the Performance Monitor data collector
To run the System Performance data collector and view the report, follow these steps.
Type Performance into Start and click Performance Monitor in Control Panel.
On the navigation pane, select Data Collector SetsSystem and click System Performance.
On the toolbar, click the Run icon (green triangle).
The collector runs for 60 seconds and then stops.
After the collector has stopped, in the navigation pane, select Reports and expand System.
Click the chevron arrow next to System Performance and then click the report icon related to the collector just run. The latest report should be listed at the bottom.
The System Performance Report appears in the results pane.
Review the System Performance Report and then close Performance Monitor.
When you review the report, as shown in Figure 3-22, you can see how extensive and detailed the monitoring is. The report is saved and can be printed and refreshed to provide an up-to-date report, which you can compare to other reports.

The diagnostic or performance-monitoring data collector sets are very useful when identifying the cause of performance deterioration that might be a warning sign of potential malfunction or failing hardware.
You can manually configure Performance Monitor to report on one or many parameters you select for display. You choose the counters that relate to the hardware and software installed on your system. If you add new hardware, such as a new network card, Performance Monitor updates the set of performance counters for the new resource.
Use Performance Monitor
To use Performance Monitor, you start with a blank canvas and add items that you want to monitor. There are three components that you can add as follows.
Performance objects These relate to any system component that enables monitoring such as:
Physical The memory, the processor, or the paging file.
Logical component For example, a logical disk or print queue.
Software For example, a process or a thread.
Performance object instances These represent single occurrences of performance objects. You can choose individual instances or track all instances of an object.
Performance counters These are the measurable properties of performance objects, such as the Bytes Sent/Sec for the Ethernet Controller as shown in Figure 3-23.
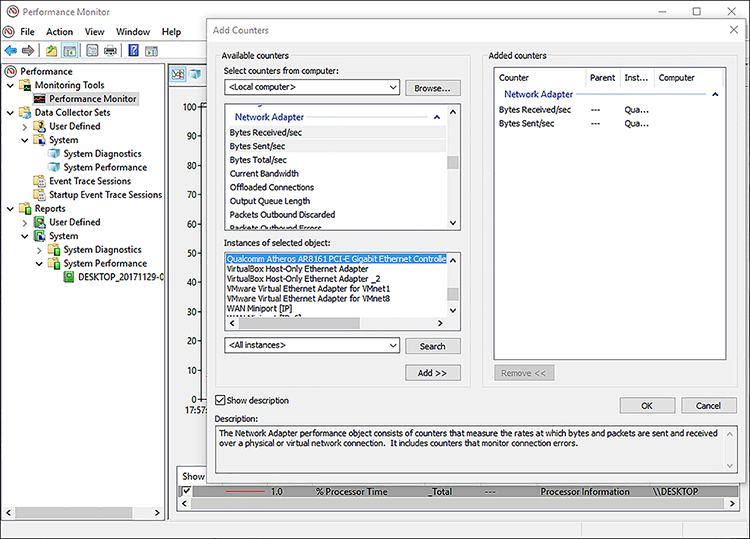
FIGURE 3-23 Performance Monitor Add Counters dialog box
After some counters have been selected, a moving graphical display shows the activity relating to the counters selected. You can locate the color of the line from the key at the base of the graph and hide/show any counter by clearing the check box on the left of the counter.
A selection of the most common performance objects that you might want to monitor are summarized in Table 3-7.
TABLE 3-7 Commonly tracked performance objects
Performance Object |
Description |
|---|---|
Memory |
Monitors memory performance for system cache, physical memory, and virtual memory |
IPv4 |
Monitors IPv4 communications |
LogicalDisk |
Monitors the logical volumes on a computer |
Network Interface |
Monitors the network adapters on the computer |
PhysicalDisk |
Monitors hard disk read/write activity and data transfers, hard faults, and soft faults |
Print Queue |
Monitors print jobs, spooling, and print queue activity |
Processor |
Monitors processor idle time, idle states, usage, deferred procedure calls, and interrupts |
Because the monitoring is performed in real-time, the effect of monitoring many counters can have an impact on the host system performance, which could distort the usefulness of the performance information. You should therefore test the number of counters and the frequency of data collection and witness the impact. To add new values to the Performance Monitor chart, follow these steps.
Click the Start button and type perfmon.
Performance Monitor opens.
Click the Performance Monitor node in the left pane.
The default counter for % Processor Time appears.
On the toolbar, click the plus (+) symbol to add an additional counter.
In the Available Counters area, expand PhysicalDisk and click % Idle Time.
In the Instances Of Selected Object box, click 0 C:, click Add, and click OK.
Right-click % Idle Time and then click Properties.
In the Color box, click blue, and then click OK.
Leave Performance Monitor open.
To create a new Data Collector Set based on a template, in Performance Monitor, follow these steps.
In the left pane, expand Data Collector Sets and then click User Defined.
Right-click User Defined, click New, and then click Data Collector Set.
On the Create New Data Collector Set page, type Disk Activity and click Next.
In the Template Data Collector Set box, click Basic and click Next.
Click Next to accept the default storage location.
Select Open Properties For This Data Collector Set and click Finish.
The Disk Activity Properties dialog box appears and has six tabs.
Review the General, Directory, Security, Schedule, Stop Condition, and Task tabs and click OK.
In the right pane, double-click Disk Activity.
Three types of logs are shown in the right pane:
Performance Counter collects data, viewable in Performance Monitor.
Configuration records change to registry keys.
Kernel Trace collects detailed information about system events and activities.
In the right pane, double-click Performance Counter.
Select the Processor Counter and click Remove.
Click Add and then click PhysicalDisk in Available Counters.
Click Add and then click OK.
In the left pane, right-click Disk Activity and then click Start.
On the Disk Activity node, a small play icon appears for 60 seconds.
When Data Collector Set has stopped recording, right-click Disk Activity and then click Latest Report.
Review the report, which shows the data that the data collector set collected.
Close Performance Monitor.
In the troubleshooting section of this chapter, review some of the performance bottlenecks that can occur on a system and the performance counters that can be useful when diagnosing the cause and choosing remediation.
Monitor system resources
Every computer system has a performance threshold that, if pushed beyond this level, will cause the system to struggle to perform optimally. If you overload the system, it eventually slows down as it attempts to service each demand with the available resources. Most systems include a capable processor and sufficient amount of RAM for everyday or general needs. Memory is automatically reclaimed from apps that are closed. However, when apps or web browser tabs are left open, and more apps are then opened, the overall ability for the system to perform is degraded.
Understand baseline performance vs. real-time monitoring
You have seen that with tools such as Performance Monitor, Resource Monitor, and Task Manager, you can monitor your system activity and understand how demands on processor, RAM, networking, and disks affect your computer system. Real-time monitoring information is useful for instant diagnosis, whereas creating a baseline for your computer’s performance can generate a system-specific report that can be useful to show what your performance statistics look like during normal or heavy use.
If you intend to ship a device to a user who will use the device extensively for system-intensive tasks, such as video editing or computer-aided design, it might be useful to create a performance baseline for the device so that you can establish how the system performs normally and when under heavy load. This will be useful to confirm that the device specification is suitable for the user, but also if the user reports performance issues, you can run another performance baseline and compare the two baselines to evaluate whether the system environment has changed, for example, if the user regularly multitasks with additional new apps on the system that use additional memory.
In this scenario, when an issue or symptom occurs, you can compare your baseline statistics to your real-time statistic and identify differences between the two instances. When you can diagnose the issue, you can recommend a solution, such as to add more memory.
The most appropriate tool to record a baseline in Windows 10 is Performance Monitor; it will help you review and report on the following areas in your system.
Evaluate your system workload.
Monitor system resources.
Notice changes and trends in resource use.
Help diagnose problems.
Create a performance baseline
To create a performance baseline that monitors key system components you can use to measure against a future performance baseline, follow these steps:
Click the Start button and type perfmon.
Performance Monitor opens.
Click the Data Collector Sets node in the left pane.
Click User Defined, right-click User Defined, click New, and then click Data Collector Set.
In the Create New Data Collector Set Wizard, on the How Would You Like To Create This New Data Collector Set page, in the Name box, type Initial PC Baseline.
Click Create Manually (Advanced) and then click Next.
On the What Type Of Data Do You Want To Include page, select the Performance Counter check box and then click Next.
On the Which Performance Counters Would You Like To Log page, in the Sample Interval box, type 1 and then click Add.
Include the following counters.
Memory > Pages/Sec
Network Interface > Packets/Sec
PhysicalDisk > % Disk Time
PhysicalDisk > Avg. Disk Queue Length
Processor > % Processor Time
System > Processor Queue Length
Click OK and then click Finish.
Right-click Initial PC Baseline and then click Start.
Simulate load on the system by starting several programs, including Internet Explorer, Word 2016, Microsoft Excel 2016, and Microsoft PowerPoint 2016.
Close all Microsoft Office apps and Internet Explorer and stop the Initial PC Baseline data collector set.
To view the baseline report, in Performance Monitor, expand the ReportsUser Defined nodeInitial PC Baseline and click the report to open it.
Print the report or view the report and record the values for the following counters.
Memory > Pages/sec
Network Interface > Packets/Sec
PhysicalDisk > % Disk Time
PhysicalDisk > Avg. Disk Queue Length
Processor > % Processor Time
System > Processor Queue Length
Monitor and manage printers
Windows 10 provides some additional options for you to manage your printing compared to previous versions of Windows. A new Print Management desktop app and the new Printers & Scanners options in the Settings app provide basic printer management such as Add, Remove, and Set As Default Printer.
You still have previous printer tools, in the Devices And Printers section of Control Panel or from the link at the bottom of the Printers & Scanners options in the Settings app. The Devices And Printers Control Panel item is the same interface as in previous versions of Windows 7. This section focuses on the new features relating to Printer With Windows 10, but for the exam, you should also review the older printer tools.
Manage printers by using Print Management
A new Print Management console is available for you to manage your device printers from a single management console. Print devices connected to your PC can be shared, and you can manage the properties of the device. The Print Management MMC, as shown in Figure 3-24, is included in the Administrative Tools of Windows 10 Pro and Enterprise editions and lists all printers, drivers, and other print servers that you are connected to.
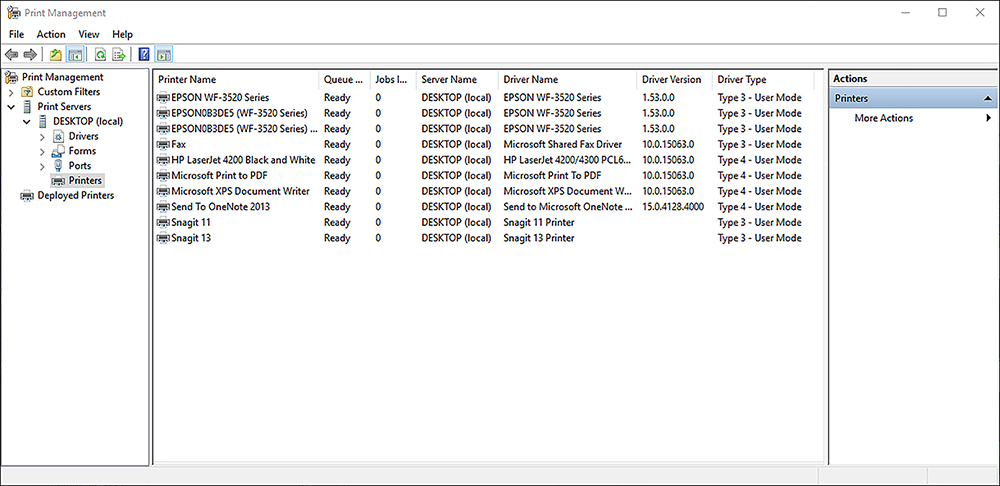
You can also launch the Print Management console by typing Printmanagement.msc in the Start menu.
The Print Management console offers you a single location to perform the following printer-related management tasks.
Add and delete print devices
View printers and print servers
Add and remove print servers
Add and manage print drivers
Deploy printers using Group Policy
Open and manage printer queues
View and modify status of printers
Use the filter feature to view printers based on filters
If you right-click a printer, you are presented with a list of some action items that can be performed on the selected printer. These can include the following tasks.
Open Printer Queue
Pause Printing
List In Directory
Deploy With Group Policy
Set Printing Defaults
Manage Sharing
Print Test Page
Enable Branch Office Direct Printing
Properties
Delete
Rename
Help
Note Remote Printers
You can use the Print Management console to manage both local and remote printers. Devices And Printers in Control Panel can only manage locally connected printers.
Manage printers by using Windows PowerShell
More than 20 Windows PowerShell cmdlets can be used to manage printers. Some of the most common cmdlets are shown in Table 3-8.
TABLE 3-8 Windows PowerShell printer cmdlets
Cmdlet |
Description |
|---|---|
Add-Printer |
Adds a printer to the specified computer |
Add-PrinterDriver |
Installs a printer driver on the specified computer |
Add-PrinterPort |
Installs a printer port on the specified computer |
Get-PrintConfiguration |
Gets the configuration information of a printer |
Get-Printer |
Retrieves a list of printers installed on a computer |
Get-PrinterDriver |
Retrieves the list of printer drivers installed on the specified computer |
Get-PrinterPort |
Retrieves a list of printer ports installed on the specified computer |
Get-PrinterProperty |
Retrieves printer properties for the specified printer |
Remove-Printer |
Removes a printer from the specified computer |
Remove-PrinterDriver |
Deletes printer drivers from the specified computer |
Remove-PrintJob |
Removes a print job on the specified printer |
Rename-Printer |
Renames the specified printer |
Restart-PrintJob |
Restarts a print job on the specified printer |
Resume-PrintJob |
Resumes a suspended print job |
Set-PrintConfiguration |
Sets the configuration information for the specified printer |
Set-Printer |
Updates the configuration of an existing printer |
Set-PrinterProperty |
Modifies the printer properties for the specified printer |
To list all the available cmdlets, type the following command into a Windows PowerShell console.
Get-Command -Module PrintManagement
Default printer behavior
Whenever you print to your printer, Windows 10 sets the last used printer as the default printer. This saves you some time if you take your device between the office and home and, therefore, the default printer attempts to follow you. When you often print to different printers, such as a color, or print files to the PDF format, this feature is less useful.
To review the setting and configure the behavior you require, open the Printers & Scanners settings in the Settings app as follows:
Open Start and click Settings.
In the Settings app, click Devices.
The Printers & scanners item is highlighted.
The Let Windows Manage My Default Printer setting is below the Printers & Scanners list, as shown in Figure 3-25.

FIGURE 3-25 Managing printer and scanner settings If this setting is turned on, the last-used printer becomes the default printer until you select a different printer.
When the setting is set to Off, you configure which printer is the default by selecting a printer and then choosing Set As Default.
Note Default Printer
The Let Windows Manage My Default Printer is a new feature in Windows 10 version 1511. The default configuration is set to On, and Windows 10 will configure the default printer to be the most recently used one.
At the bottom of the Printers & Scanners screen is an option to configure the behavior to determine whether Windows 10 should allow the downloading of drivers, info, and apps for new drivers when on a metered connection. This is set to Off by default and, therefore, won’t download while you’re on a metered Internet connection.
Configure indexing options
To maintain the performance of Windows 10 search, the system automatically indexes data on your computer in the background. This data includes user-generated files, folders, and documents. Most users will never modify the default indexing settings, but you can add new areas to be indexed and exclude others. Common locations include your user profile areas and app data that you access frequently, such as Office apps.
If you store a lot of data in a storage space or a removable drive, you can add this location to Indexing Options to speed up the performance of future searches in this location significantly.
To view your existing indexing locations, type Index on the Start screen and click Indexing Options in Control Panel to see the Indexing Options dialog box shown in Figure 3-26.
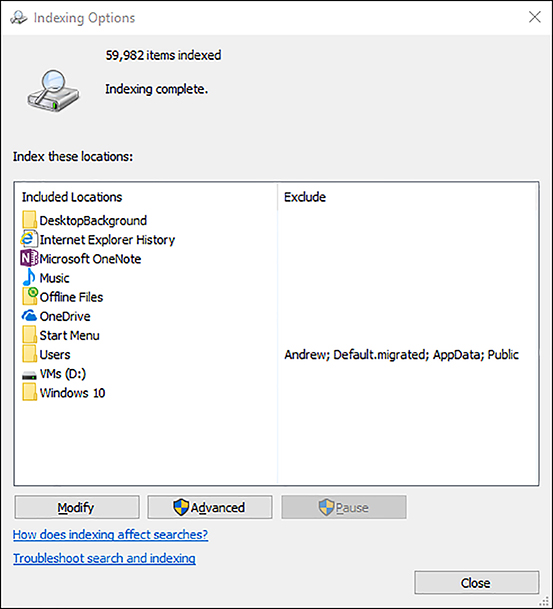
You can use the Modify button to add or remove locations. In the Indexed Locations dialog box, you see the summary of locations. If you click Show All Locations, Windows 10 displays all the hidden locations, and this enables you to fine-tune the indexing to specific subfolders, if necessary. To select the Downloads and Documents folders within your profile, select the arrow next to the Users folder and then locate and select Downloads and Documents in your user profile.
After you apply changes to indexing, the indexing process doesn’t happen immediately; rather, it runs as a background task whenever your machine is running but not being used. While the indexing process is incomplete, the message in the dialog box indicates that Indexing Speed Is Reduced Due To User Activity. When the process has finished, the message states Indexing Complete.
Be careful not to index everything on your disk. A large index can affect the search performance negatively.
In the Indexing Options dialog box, the Advanced button enables you to configure Index Settings and specify File Types to be excluded. You can include or exclude encrypted files, treat similar words as different words, delete and rebuild the index (useful if you suspect search is not working), and change the index location from the default C:ProgramDataMicrosoft.
On the File Types tab, you can exclude file types from the index and configure whether the index searches in the file contents or just in the file properties. You can also manually add new file types that have not been automatically included to index.
Manage client security by using Windows Defender Security Center
Most organizations use an enterprise malware solution, often unaware that the Windows Defender antimalware software that is included with Windows 10 offers fully featured antimalware protection against viruses, spyware, rootkits, and other types of malware. Compared to earlier versions of Windows Defender, the solution is significantly improved in Windows 10.
Malware is a major problem for most computer users; therefore, Microsoft includes Windows Defender to monitor, protect, and if necessary, help remove malware from your computer.
Windows Defender also works with the
hat protects your web browsing activity and prevents downloading or installing malware. The signature-based antimalware technologies used in both SmartScreen Filter and Windows Defender are updated regularly, often daily, to provide the most comprehensive protection.
Understand malware
Malicious software, or malware, can do many things to your computer, such as allowing unauthorized parties remote access to your computer or collecting and transmitting information that is sensitive or confidential to unauthorized third parties.
Some types of malware include:
Computer viruses Replicating malware, normally with email attachments or files.
Computer worms Replicate, without direct intervention, across networks.
Trojan horses Tricks the user into providing an attacker with remote access to the infected computer.
Ransomware Harms the user by encrypting user data. A ransom (fee) needs to be paid to the malware authors to recover the data.
Spyware Tracking software that reports to the third party how a computer is used.
The most common attack vector for malware is still by email, although attacks from websites, pirated software, video, and music files are becoming increasingly common.
You can help protect against malware infection by following these guidelines.
All software should be from a reputable source.
All software and operating system updates are applied.
Antimalware software is installed and enabled on your devices.
Antimalware definitions are up to date.
Avoid using or accessing pirated software or media sharing sites.
Be suspicious of out-of-the-ordinary email attachments, and don’t open links in spam or phishing email.
Although no antimalware solution can provide 100 percent safety, modern solutions can reduce the probability that malware compromises your device.
Windows Defender can help protect your device by actively detecting spyware, malware, and viruses both in the operating system and on Windows 10 installed on Hyper-V virtual machines. Windows Defender runs in the background and automatically installs new definitions as they are released, often on a daily basis.
You can use Windows Defender manually to check for malware with various scan options listed in Table 3-9.
TABLE 3-9 Windows Defender scan options
Scan options |
Description |
|---|---|
Quick |
Checks the most likely areas that malware, including viruses, spyware, and software, commonly infect. |
Full |
Scans all files on your hard disk and all running programs. |
Custom |
Enables users to scan specific drives and folders to target specific areas of your computer such as a removable drive. |
Windows Defender Offline Scan |
Allows users to find and remove difficult to remove malicious software. The system will need to reboot and the scan can take about 15 minutes. |
Monitor for malware
You should routinely check your system for malware. If it becomes infected or you suspect malware is on your system, you can run a Full scan. To configure and use Windows Defender, follow these steps.
Type Windows Defender into Start and select Windows Defender Security Center app.
Click the Home item on the left and verify that your device is being protected and that Virus and Threat Protection is active (You’ll see a check mark on a green background), and the threat definitions are up to date.
Click the Shield item on the left, and in the Scan History, review the last scan results, and number of files scanned, as shown in Figure 3-27.
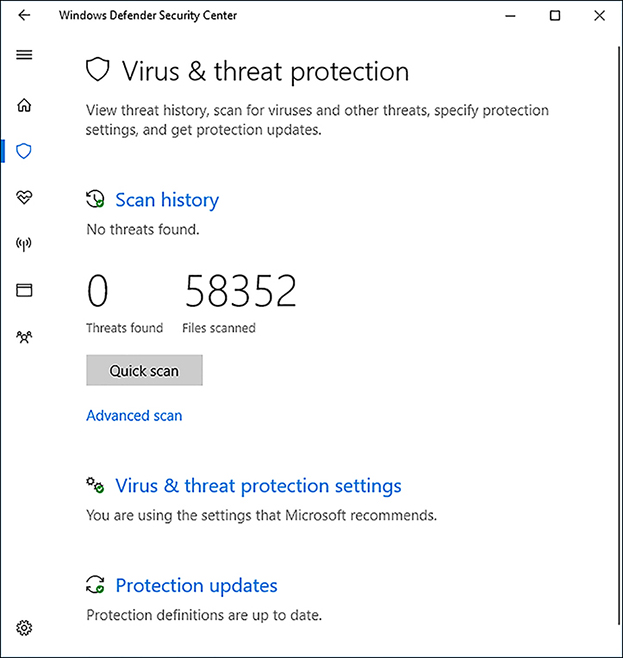
FIGURE 3-27 Windows Defender Security Center Home screen Click the Protection Updates link and verify that the definitions are up to date. If they are not, ensure that you are connected to the Internet and click the Check for Updates button.
Click the Scan History link on the left. Here you can view Current, Quarantined and Allowed threats. Review the results of any quarantined or allowed items that were on your PC.
If items have been detected, they appear in the results area as shown in Figure 3-28, which shows a Trojan has been detected and quarantined.
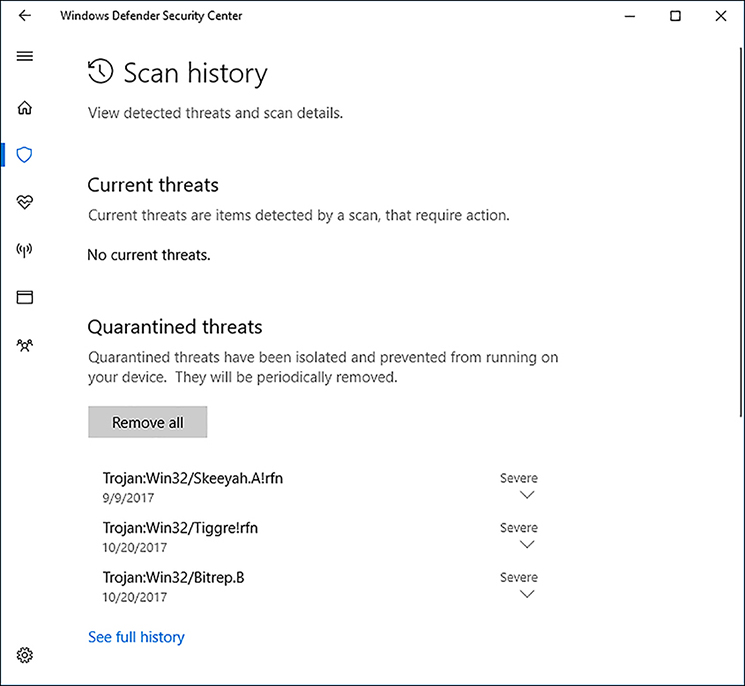
FIGURE 3-28 Windows Defender Security Center History screen If you want to remove all quarantined threats, click Remove All.
You can also highlight each item and choose Remove (to remove a single item), or Restore (to restore the file if you believe this is not malware).
When it is removed, the item is deleted, and the Quarantined Threats list is cleared.
Close Windows Defender Security Center.
Configure Windows Defender Advanced Threat Detection
Windows Defender is able to detect and then report directly to the Microsoft, details of suspicious or malicious activity on devices across the world. This provides an effective early warning system that allows near-instant detection and subsequent blocking of new and emerging threats by Windows Defender. Telemetry from Windows Defender is sent automatically and can include samples of malicious code. This code is then analyzed and helps reduce the threat and likelihood of “zero day” exploits which can affect millions of users worldwide. Microsoft is able to see activity and react much earlier than with traditional threat notification which would involve manual interventions to forward samples of malware.
You can customize this option to turn off the feature that sends data to Microsoft by selecting Turn Off Telemetry Options in the Settings app, using these steps.
Type Windows Defender into Start and select Windows Defender Security Center app.
Click on the Virus and Threat Protection item on the left.
Select the Virus and Threat Protection Settings.
Under the Cloud-Based Protection, toggle the setting to Off, to prevent Windows from automatically sending sample submissions of malware to Microsoft.
You can also configure these settings by using Group Policy. The settings are found in the following node: Computer ConfigurationAdministrative TemplatesWindows Components Windows Defender AntivirusMAPS.
The Microsoft Active Protection Service (MAPS) is the cloud service that Microsoft uses to collect and analyze key telemetry events and suspicious malware queries from users running Windows Vista or later. The service also provides real-time blocking responses back to client devices for suspicious items that do not match published definitions. As a cloud service it uses distributed resources and machine learning to deliver the endpoint protection. This results in malware analysis and remediation including signature updates delivered to the end user much faster than with traditional methods.
Evaluate system stability by using Reliability Monitor
Members of the desktop support team often report that it is difficult to ascertain the precise nature of calls that relate to poor performance or system instability. Reliability Monitor is an excellent tool for these situations because it enables you to review a computer’s reliability and problem history and offers both the help desk and you the ability to explore the detailed reports and recommendations that can help you identify and resolve reliability issues. Changes to the system such as software and driver installations are recorded, and changes in system stability are then links to changes in the system configuration.
To launch Reliability Monitor, type reliability in the Start screen and click View Reliability History in Control Panel, or type perfmon /rel at a command prompt. The tool displays a summary of the reliability history for your system, as shown in Figure 3-29.

The top half of the Reliability Monitor screen shows a line graph with a scale of 1 to 10 and date timeline along the bottom axis. You can toggle the view from weeks to days. The graph rises and sinks over time, and at the low points are colored markers in red, blue, or yellow. Below the graph are the details that relate to system configuration changes, such as software and driver installations. When system changes result in a negative system stability, such as an app crashing or a service stopping, there might be a relationship between the two, and these can be further explored. The graph gradually reaches the maximum level of 10 if the system does not experience negative system stability over a prolonged period.
Reliability Monitor is enabled by default in Windows 10 and requires the Microsoft Reliability Analysis task, RacTask, to process system reliability data, which is a background process that collects reliability data. RacTask can be found in the Task Scheduler library under the MicrosoftWindowsRAC node.
The Reliability Monitor main features include:
System stability chart Provides summary of annual system stability in daily/weekly increments. The chart indicates three levels of stability data: information, warning messages, and critical errors.
Records key events in a timeline Tracks events about the system configuration, such as the installation of new apps, operating system patches, and drivers.
Installation and failure reports Provides information about each event shown in the chart, including:
Software Installs/Software Uninstalls
App Failures
Hardware & Driver Failures
Windows Operating System Failures
Miscellaneous Failures
Because the tool offers a rolling view of reliability history, you can retain a copy of a point-in-time report. You can save this by clicking the Save Reliability History link to save complete details at periodic time points, such as annually. System builders and repair shops often use the report to demonstrate computer stability for future reference.
At the bottom of the Reliability Monitor screen are two additional links that list all computer problems and attempt to locate problem solutions from the Internet. The Problem Reports And Solutions tool helps you track problems that are reported and checks for all available solution information to problems.
Troubleshoot performance issues
In normal operating conditions, the majority of users rarely experience performance issues with their device after it has been configured with the necessary security, antimalware, productivity, and specialist software. Out of the box, Windows 10 is optimized for general user environments.
Over time, the device might gradually seem to become slower. If the user notices this decreased system performance, they might request help from the help desk.
You can avoid some performance degradation by performing regular maintenance, such as using the Disk Cleanup utility to remove temporary or unwanted files. Windows 10 does a good job at self-healing and maintaining the system and schedules many maintenance tasks to run automatically for you.
If poor performance occurs, investigate and troubleshoot the reason to establish whether there is a bottleneck, perhaps a memory-hungry app, multiple startup programs, or even malware. Another gradual but common occurrence is when a system runs out of disk space, especially because the majority of devices are now using solid-state drives (SSDs) that are typically smaller capacity.
When looking at the factors that might influence your PC, consider some of the following.
Windows 10 architecture: x86 or x64
Processor speed, processor quantity, onboard cache memory, cores
Physical hard disks input/output speed, buffer size, and defragmentation state
Memory: capacity, speed, and type
Graphics card: throughput, memory, onboard processing speed, quantity, and drivers
Network interface throughput, onboard processing capability, quantity, and drivers
Application number, type, available optimizations, architecture
System, peripheral, and application drivers
Understand how system bottlenecks can occur, how to diagnose a system that is suffering from a performance bottleneck, and how to respond and recover from the problem. Some common performance bottlenecks that are useful to know about when troubleshooting are shown in Table 3-10.
TABLE 3-10 Performance bottlenecks
Performance Counter |
Bottleneck |
|---|---|
LogicalDisk\% Free Space |
If this is less than 15 percent, you risk running out of free space for Windows 10 to use to store critical files. |
PhysicalDisk\% Idle Time |
If this is less than 20 percent, the disk system is overloaded. Consider replacing with a faster disk. |
PhysicalDiskAvg. Disk Sec/Read |
If the number is larger than 25 milliseconds (ms), the disk system is experiencing read latency; suspect drive failure (or a very slow/old disk). |
PhysicalDiskAvg. Disk Sec/Write |
If the number is larger than 25 milliseconds (ms), the disk system is experiencing write latency; suspect drive failure (or a very slow/old disk). |
PhysicalDiskAvg. Disk Queue Length |
If the value is larger than 2 times the number of drive spindles, the disk might be the bottleneck. |
Memory\% Committed Bytes in Use |
If the value is greater than 80 percent, it indicates insufficient memory. |
MemoryAvailable Mbytes |
If this value is less than 5 percent of the total physical RAM, there is insufficient memory, which can increase paging activity. |
Processor\% Processor Time |
If the percentage is greater than 85 percent, the processor is overwhelmed, and the PC might require a faster processor. |
SystemProcessor Queue Length |
If the value is more than twice the number of CPUs for an extended period, you should consider a more powerful processor. |
Network InterfaceOutput Queue Length |
There is network saturation if the value is more than 2. Consider a faster or additional network interface. |
Sometimes you might experience poor performance with the physical memory that is installed on a computer. Memory is generally very reliable, but it can suffer from overheating or from degrading performance with age. If the device is still under warranty, you can use a diagnostic tool to verify the problem and then return the device or memory for replacement. If the device is not under warranty, the diagnosis is useful for identifying whether faulty memory is the cause of the problem.
For pinpointing memory failures, use the Windows Memory Diagnostic tool by typing mdsched.exe into a command prompt and following the instructions on the Windows Memory Diagnostic tool, as shown in Figure 3-30.
Select either Restart Now And Check For Problems or Check For Problems The Next Time I Start My Computer; the Windows Memory Diagnostics tool runs when your computer restarts.
Skill 3.3: Configure system and data recovery
In this section, you review how to configure system and data recovery options for Windows 10. If you have experience with an earlier version of Windows, you might be familiar with many of the options, because some are included in Windows 10. To prepare for the exam, it is recommended that you work through all the wizards and tools to ensure that you’re comfortable with each process, paying special attention to the newer options.
Note Overlap in Skills
You have already covered the skills relating to performing a driver rollback, resolving hardware and device issues, and interpreting data from Device Manager in Chapter 1, Skill 1.3.
Configure a recovery drive
When you install Windows 10, it does not include a separate recovery partition by default. However, if you purchase a new device, the original equipment manufacturer (OEM) might create one instead of providing Windows 10 installation media. You can create a USB recovery drive that enables you to recover your system. If Windows 10 becomes corrupted, your recovery drive can help you troubleshoot and fix problems with your PC when it won’t start.
To do so, open Control Panel and click Recovery. Several advanced recovery tools are listed, including Create A Recovery Drive. You need a USB drive with a minimum capacity of 8 GB, which you should label as your system recovery drive.
Note Secure Digital High-Capacity Memory Cards
If your device supports the use of Secure Digital High-Capacity (SDHC) memory cards, you can use one as an alternative to a USB flash drive when creating the recovery drive.
To create a recovery drive, follow these steps.
Click the Start button, type Recovery, and click Create A Recovery Drive.
Accept the User Account Control (UAC) prompt and provide the necessary credentials if required.
In the Recovery Drive dialog box, select the Back Up System Files To The Recovery Drive check box and click Next.
Windows 10 creates a recovery image, which can take a while.
Once the image has been prepared, the Connect An USB Flash Drive dialog box appears, and you’re prompted to connect a USB drive with at least 8 GBs of space to your PC.
On the Select The USB Flash Drive page, confirm the USB drive to be used from the list and click Next.
On the Create The Recovery Drive page, read the warning that everything on the USB drive will be deleted and click Create.
The tool formats the USB drive and copies the recovery image files to the USB drive, which can take a while[md]in excess of an hour, depending on the performance of the PC and the media.
On The Recovery Drive Is Ready page, click Finish, as shown in Figure 3-31.
FIGURE 3-31 Creating a recovery drive
The last page of the wizard advises you that you can delete the recovery partition stored on your PC and provides a link to do this, which will free up disk space.
Test that the recovery drive was successful by booting to the drive. It is good practice to label your USB flash drive as your recovery drive.
If you need to use the recovery USB, you can boot from the USB drive and access the advanced recovery tools to recover your computer.
![]() Exam Tip
Exam Tip
The recovery drive is architecture-specific; therefore, a 64-bit (x64) recovery drive can only be used to reinstall a device with 64-bit architecture. Windows 10 Recovery Drive cannot be used to repair earlier versions of Windows.
Configure System Restore
System Restore has been available in previous versions of Windows. It is useful when a computer becomes unstable and you need to restore the operating system to one of the restore points created during a period of stability.
System Restore is not enabled by default in Windows 10. To turn on System Restore and manually create a system restore point, follow these steps.
Click the Start button, type system protection, and click Create a Restore Point.
On the System Properties dialog box the System Protection tab is visible, highlight the drive you want to protect and click Configure.
In the System Protection For Local Disk dialog box, select Turn On System Protection.
Under Disk Space Usage, move the slider for Max Usage to allow room on the restore points to be saved (5 percent is a reasonable amount), as shown in Figure 3-32.
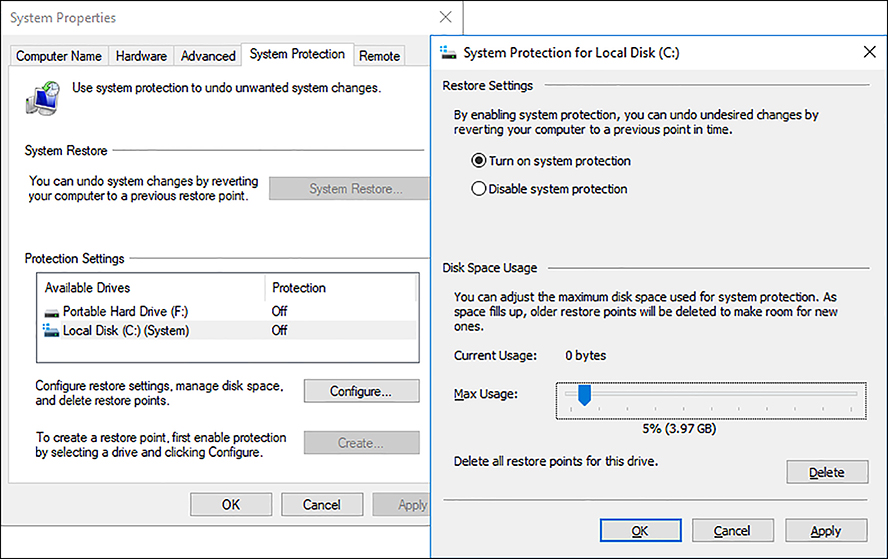
FIGURE 3-32 Configuring System Restore properties Click OK.
In the System Protection dialog box, click Create, provide a name, and then click Create.
After the restore point is created successfully, click Close.
Click OK to close the System Properties dialog box.
When System Restore is enabled, it automatically creates restore points at these times:
Whenever System Restore-compliant apps are installed.
Whenever Windows 10 installs Windows updates.
Based on the System Restore scheduled task.
When you create a system restore manually from the System Protection screen.
When you use System Restore to restore to a previous restore point. Windows 10 automatically creates a new restore point.
Note Task Scheduler
The scheduled task that automatically creates system restore points is located at the Task Scheduler LibraryMicrosoftWindowsSystemRestore location in the Scheduled Tasks feature.
Many users prefer to use the graphical user interface (GUI), but you can use Windows PowerShell to configure System Restore. This is useful if you need to configure the settings on a large group of computers and do not use Group Policy. Some of the available Windows PowerShell commands include:
Enable-ComputerRestore Enables the System Restore feature on the specified drive
Disable-ComputerRestore Disables the System Restore feature on the specified drive
Checkpoint-Computer Creates a new system restore point
Get-ComputerRestorePoint Gets the list of restore points on the local computer
Use the following command to enable System Restore on the C drive of the local computer.
PS C:> enable-computerrestore -drive "C:"
Note System Restore Requirements
The System Restore feature requires drives that are formatted with the NTFS and uses the Volume Shadow Copy Service (VSS) in the background.
For systems with a small hard drive, you can still use System Restore, but you might want to reduce the amount of space allocated for the restore points to limit the number of historic maintained restore points. When the allocated space becomes full, System Restore deletes the oldest restore point and reuses the space.
To recover your system by using System Restore, start the process from System Restore in System Protection in Windows 10. If you cannot log on to your system, you can launch the wizard from Advanced Options, as shown in Figure 3-33.

Prior to launching the System Restore tool, the wizard offers to show you whether any apps and files will be affected by performing a specific System Restore based on the date and time of the restore point you select. To use System Restore to restore your PC to an earlier time, follow these steps:
Click the Start button, type system, and click System Control Panel.
On System, select the System Protection link in the left pane.
The System Properties dialog box appears with the System Protection tab open.
Click System Restore.
On the Restore System Files And Settings page, click Next.
On the Restore Your Computer To A State It Was In Before The Selected Event page, choose the restore point that you want to be restored.
After you select a restore point, click Scan For Affected Programs and then click Next.
On the Confirm Your Restore Point page, click Finish.
On the warning screen, click Yes.
The System Restore prepares your computer and restarts. The System Restore process can take several minutes to complete.
When the process has completed, the system restarts, and you can sign in to Windows.
You are presented with a summary of the system restore status and a confirmation that your documents have not been affected.
Click Close.
Note Password Protected Recovery Environment
If you started System Restore from the Advanced startup options rather than from Windows 10, the Advanced startup options prompt you to log on to your account before allowing the System Restore process to complete.
Perform a refresh or recycle
With earlier versions of Windows, you might have manually reinstalled Windows from removable media following a system failure. This can involve reinstalling all apps, settings, and user data, and can take many hours to complete. In Windows 10, if other methods of recovering your system fail, you can return your computer to its original state when you purchased it or when Windows 10 was first installed.
You have the option to refresh or recycle your computer in Windows 10. This feature was first introduced in Windows 8, and Windows 10 has improved the speed and reliability of the process. When referring to recovering a system by using this new quick method, the terms reset, refresh, and recycle are often used interchangeably. These terms refer to the recovery process that you access in Recovery in the Settings app.
To start the recovery process, follow these steps.
Open the Settings app, click Update & Security, and select Recovery.
On the Recovery page, under Reset This PC, click Get Started.
The background screen is dimmed, and you are presented with either two or three options:
Keep My Files Removes all apps and settings but retains your personal files.
Remove Everything Removes all apps, settings, and your personal files and offers two levels of cleaning: Just Remove My Files and Fully Clean The Drive.
Restore Factory Settings This option is only available on systems purchased from an OEM. It removes personal files, apps, and settings and reinstalls the version of Windows that came with the PC together with any pre-installed apps and settings.
Important Removing all settings
If you choose to remove all settings, user accounts, apps, and personal files, Remove Everything restores the operating system to the initial state that is, the state of the computer when you first installed or upgraded to Windows 10. With this option, you can clean the disk by fully erasing the hard disk prior to reinstallation of Windows 10. This option is useful if you are recycling your PC and need to make the recovery of any data on the computer, such as your personal files, nearly impossible. This is similar to performing a low-level full format of the disk, whereas the normal operation uses quick formatting.
Select Keep My Files. Choose one of the following options.
Just Remove My Files Initiates a quick drive format
Remove Files And Fully Clean The Drive Performs a complete drive format
A warning appears, informing you that your apps will be removed; it lists any apps that will need to be reinstalled, as shown in Figure 3-34. After the process has completed, a new text file is created on the desktop that contains this list of apps.
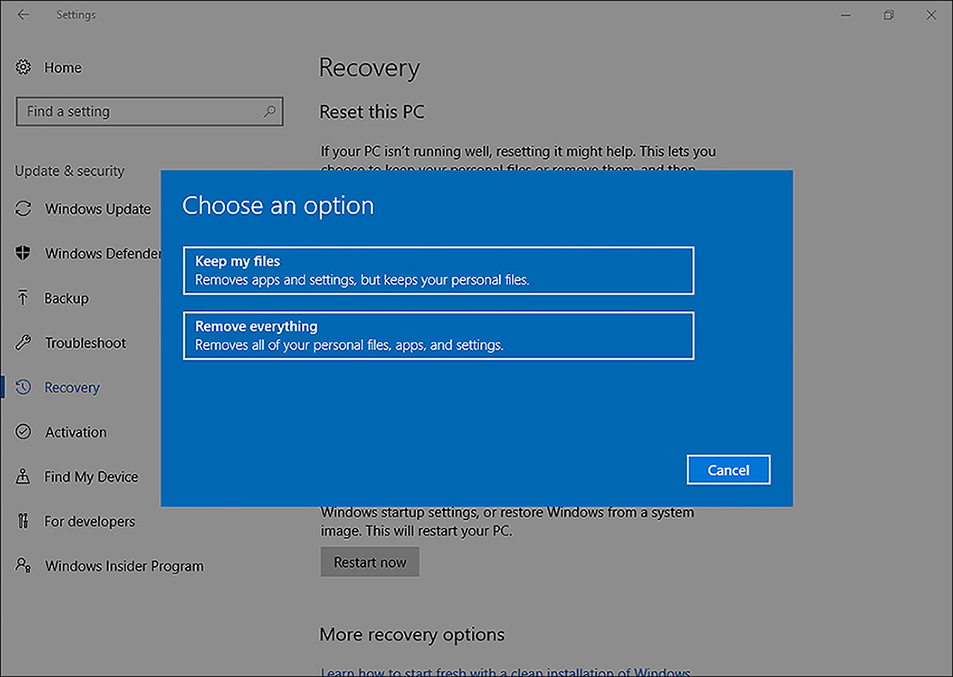
FIGURE 3-34 Reset this PC Click Next.
On the Ready To Reset This PC page, you are reminded that resetting the PC removes apps and resets all settings to defaults.
Click Reset to restart the PC and allow the reset process to begin.
Your PC will be reset, and after a short time, you are presented with the logon screen.
Note Reset Your PC is Destructive
Be careful when reviewing the reset feature because this deletes all personal information and data on the computer. Do not perform this action on your personal computer unless you understand the implications.
If you are using a PC in an enterprise environment, the Recovery options might be disabled. Often, enterprises use image deployment solutions such as Microsoft Deployment Toolkit (MDT) or System Center Configuration Manager to deploy a customized image directly to a networked computer. This method is often the quickest way to provide a fully configured computer to a user on the local network. As administrators become familiar with the Windows Configuration Designer (WCD) and DISM tools mentioned in an earlier chapter, there might be more deployments of Windows 10 using these tools together with provisioning packages.
![]() Exam Tip
Exam Tip
The Refresh Your PC and Reset Your PC options that were available in Windows 8 and Windows 8.1 have been consolidated into Reset This PC.
At the end of the reset process, Windows 10 offers you the normal out-of-box experience (OOBE), and you must configure the device, add users, install any apps, and modify any settings that you need.
If the refresh or recycle process fails to complete for any reason, the system will not be modified, and after logon, a notification declares that the process could not complete and no changes were made to your computer.
![]() Exam Tip
Exam Tip
In earlier versions of Windows, you could use a Recimg.exe utility to capture an image of your computer. This was useful to create a custom recovery image. This utility has been deprecated and is not available in Windows 10.
Perform a Fresh Start
With the Creators Update, Windows 10 provides a new way to reset the system called “Fresh Start.” This is included in both the Recovery section of the Settings app and within the Windows Defender Security Center. Fresh Start performs three actions:
Reinstalls Windows 10 while retaining your data.
Removes all installed apps and bloatware.
Installs the latest security updates.
You can access the Fresh Start feature using the following steps:
Launch Settings, click Update & Security.
Select Windows Defender and click Open Windows Defender Security Center.
On the Windows Defender Security Center screen, select Device Performance and Health and then under Fresh Start click Additional Info.
On the Fresh Start page click Get Started and accept the UAC prompt.
On the Fresh Start page, to proceed, click Next.
Fresh Start will then display a list of apps that will be removed. Fresh Start saves a list of apps removed, called Removed Apps, which will be found on the desktop once the process is completed.
Click Next.
If you recently upgraded to Windows 10, click Next on the warning regarding the previous version of Windows.
On the Let’s Get Started page, click Start.
The PC is then reset which can take up to 20 minutes.
Note Previous version of Windows will be removed
When performing a Fresh Start, if the device was recently upgraded to Windows 10, you won’t be able to go back to the previous version of Windows.
When the PC restarts after the Fresh Start has completed, you can log in with the same username and password and all your data will be retained. Any applications that you use will need to be reinstalled, but crucially any third-party apps or bloatware that came preinstalled on your system by the OEM will have been removed. If you need access to the list of removed apps, a file is created during the process and this is found on the desktop after you sign in to the device. Within the Fresh Start page in Windows Defender Security Center, you will see a history of when the Fresh Start feature has been used, and a link to the list of Removed Apps.
Note Download the Refresh Windows tool
If the Fresh Start option is not available on your system, you can download the RefreshWindowsTool.exe from: https://www.microsoft.com/en-gb/software-download/windows10startfresh.
Perform recovery operations using Windows Recovery
Windows 10 includes a comprehensive recovery environment that enables you to troubleshoot issues relating to the boot process and retains most of the functionality that was available in previous versions of Windows.
The Windows Recovery Environment (Windows RE) enables you to boot Windows 10 into safe mode or use other advanced troubleshooting tools. There are several ways to start Windows 10 in advanced troubleshooting mode, including:
If available, select Restart Now under Advanced Startup in the Recovery section of the Settings App.
Recovery from the menu. Restart the device using the Recovery Drive.
Boot the device using Windows 10 installation media, and select the Repair Your Computer option.
Press the Shift key and select the Restart option on the Start menu.
After Windows 10 boots to the advanced troubleshooting mode, you can select Troubleshoot and then click Advanced Options. On the Advanced Options screen, shown in Figure 3-35, the primary recovery tools are listed.
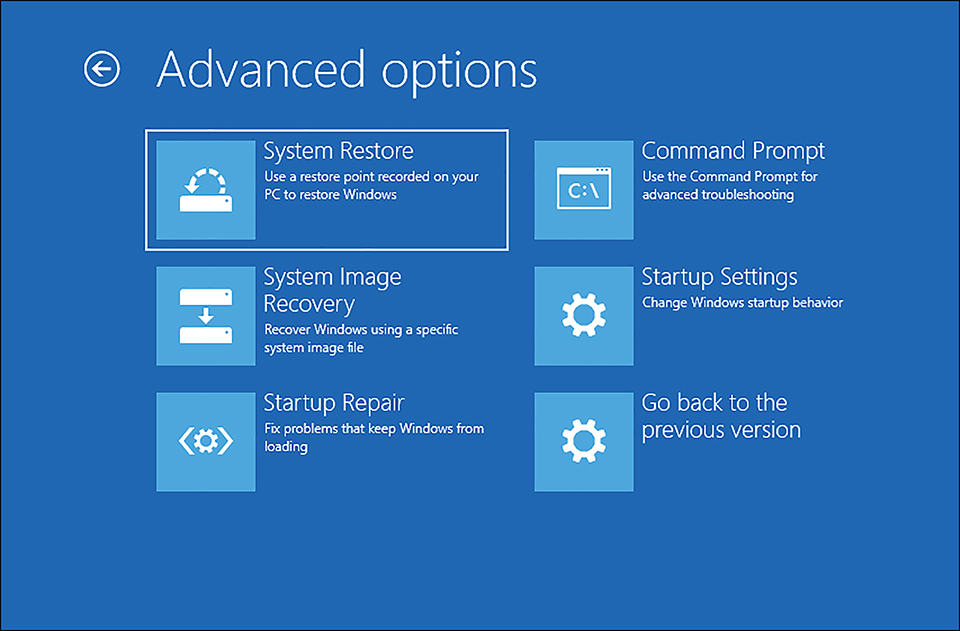
You can choose one of the following options.
System Restore To restore Windows from a System Restore point.
System Image Recovery To recover Windows by using a system image file.
Startup Repair To attempt to fix startup issues automatically that prevent Windows from loading.
Command Prompt To start advanced troubleshooting.
Startup Settings To change Windows startup behavior. This is similar to the F8 menu options in earlier versions of the operating system.
Go Back To The Previous Build To revert your system to a previous Windows build.
If your system has a UEFI motherboard, you are also offered an additional option:
UEFI Firmware Settings Modify UEFI motherboard settings.
If you want to start Windows by using one of the earlier startup options, such as Enable Safe Mode or Enable Low-Resolution Video Mode, select Startup Settings on the Advanced Options screen. This instructs you to click Restart, and Windows 10 loads into a special troubleshooting mode that you might be familiar with if you have used previous versions of Windows.
After clicking Startup Settings and restarting, the troubleshooting mode presents you with a choice of startup options, as listed in Table 3-11.
TABLE 3-11 Startup settings
Startup Setting |
Description |
|---|---|
Enable Debugging Mode |
Restarts Windows 10 to monitor and debug the behavior of device drivers to help troubleshoot device driver issues. |
Enable Boot Logging Mode |
Restarts Windows 10 and creates a file named Ntbtlog.txt, which records all device drivers installed and loaded during the startup process. |
Enable Low-Resolution Video Mode |
Starts Windows 10 in a low-resolution graphics mode. |
Enable Safe Mode |
Restarts Windows with a minimal set of drivers, services, and applications, enabling you to troubleshoot the system by using the GUI but without third-party drivers and services running. |
Enable Safe Mode With Networking |
Restarts Windows with a minimal set of drivers, services, and applications and enables network connectivity. |
Enable Safe Mode With Command Prompt |
Restarts Windows with a minimal set of drivers, services, and applications by using a command prompt window rather than the GUI. |
Disable Driver Signature Enforcement |
Enables you to bypass the requirement to load device drivers with a digital signature. |
Disable Early-Launch Anti-Malware Protection |
Restarts Windows and disables the Early Launch Anti-malware (ELAM) driver, useful if you suspect issues with Secure Boot or if you are modifying Windows boot configuration or anti-malware settings. |
Disable Automatic Restart On System Failure |
Prevents Windows 10 from automatically restarting after a system failure occurs. This allows the information screen to be reviewed. |
Note Last Known Good Configuration
Windows 10 no longer supports the Last Known Good Configuration startup option that was present in Windows 7 and other versions of Windows.
While on the Startup Settings screen, you can press Enter if you want to exit and restart your system normally. To choose a Startup Settings boot option from the list in Figure 3-36, press the number key or F1-F9 function key that corresponds to the item in the list.
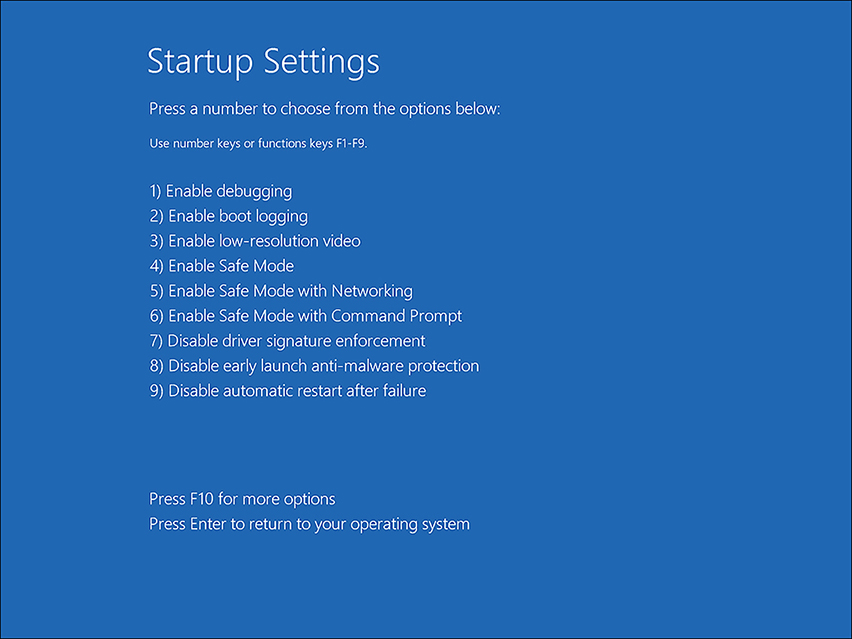
If you press F10, a screen appears with a single option, Launch Recovery Environment, which returns you to a menu screen that offers you these three options:
Continue Exit And Continue To Windows 10
Troubleshoot Reset Your PC Or See Advanced Options
Turn Off Your PC
Configure restore points
You reviewed how to enable System Restore earlier in this chapter. You also need to make sure you understand how to configure the amount of disk space that restore points occupy and how to remove old restore points manually to recover disk space.
The Recovery item in the Control Panel contains the advanced recovery tools. Configure System Restore enables you to perform the several tasks relating to restore points that this section covers in more detail.
Change restore settings
On the System Protection tab of System Properties, if you have administrative privileges, you can modify the protection settings for your system.
Most users configure just the system drive for system protection. If you use additional drive volumes and store any data on them, consider using system protection for these drives also. The system protection feature helps prevent permanent data loss when you accidentally change or delete files, or files become corrupted.
To modify the drives that you currently protect using restore points, follow these steps.
Click Start and type Recovery, click Recovery in Control Panel.
Click Configure System Restore.
If prompted by UAC, click Yes.
Under Protection Settings, select the drive on which you want to modify protection and click Configure.
In Restore Settings, you can select Turn On or Disable System Protection.
Click OK.
Manage disk space
With system protection enabled, your computer regularly creates and saves restore points containing your computer’s system files and settings. Even if you do not perform any significant system events, such as install software or upgrade a device driver, a restore point is automatically created. A scheduled task every seven days creates a restore point if no restore point was created during the past week. You can create restore points manually, but this is unlikely to be practical for most users.
For each drive that you want to use with system protection, you can adjust the maximum disk space reserved for the feature. Over time, this allocation will be consumed. When the space is full, older restore points are automatically deleted to make room for new ones.
To resize the maximum storage space that system protection uses for a drive, sign in as an administrator and follow these steps.
Click Start and type Recovery, click Recovery in Control Panel.
Click Configure System Restore.
If prompted by UAC, click Yes.
Under Protection Settings, select the drive and click Configure.
In Disk Space Usage, adjust the Max Usage slider to the percentage of the total drive that you want to allocate and click OK.
To perform the same process by using the command prompt, use the vssadmin command-line tool as detailed in these steps.
Right-click Start and select Command Prompt (Admin); accept UAC.
To show you the current maximum usage size for all drives that use system protection, type vssadmin list shadowstorage and press Enter.
To resize the space allocated for system protection to five percent of the total volume size, type vssadmin resize shadowstorage /for=C: /on=C: /maxsize=5%, and press Enter.
Close the command prompt.
Note Specify the unit Measurement
For the disk space size, you can use either a percentage of the drive or one of the following units: KB, MB, GB, TB, PB, or EB. If you do not specify a unit, the value defaults to bytes.
Create or delete restore points
You have reviewed how restore points are both manually and automatically created. To create a restore point manually, you must have administrator privileges. When you create a restore point, the feature creates a restore point that includes all drives that are protected.
If you find that not many restore points are available, you can increase the space used for system protection.
Note Safe Mode
You cannot create a restore point if you started Windows 10 in Safe Mode.
To view the amount of space that system protection currently uses, you can use the vssadmin list shadowstorage command within an elevated command prompt or view the Current Usage amount in the System Protection For Local Disk dialog box, as shown in Figure 3-37. This usage information is reported on a per volume basis.
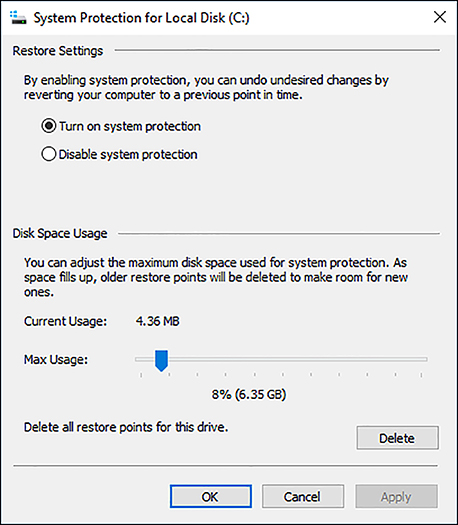
If you want to delete all restore points for a specific volume, click Delete in the System Protection For Local Disk (C:) dialog box, as shown in Figure 3-37. After you click Delete, you receive a warning message that you cannot undo the deletion. After it is deleted, the current drive usage for the selected drive is zero.
Another method of removing restore points is to use the Disk Cleanup feature, which removes all restore points, except the most recently created one. In Disk Cleanup, click the More Options tab and choose Clean Up in System Restore And Shadow Copies, as shown in Figure 3-38.
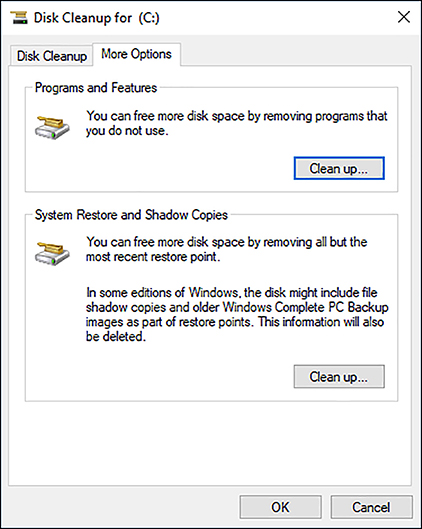
Note Turn off System Protection
If you turn off system protection on a disk, all restore points are immediately deleted from that disk.
You can remove all or selected restore points from the command prompt, using the vssadmin command. You need to use an elevated command prompt to use this feature.
When you use the vssadmin command-line tool, you see for each restore point the volume drive letter and a Shadow Copy ID number. This ID number is useful if you need to delete specific restore points. Examples using the vssadmin command-line tool to delete restore points are shown in Table 3-12.
TABLE 3-12 Deleting restore points using vssadmin
Command Line |
Description |
|---|---|
vssadmin list shadows |
List restore points are currently stored on all drives. |
vssadmin delete shadows /all |
This deletes all restore points on all drives. |
vssadmin delete shadows /all /quiet |
This deletes all restore points on all drives, without confirmation. |
vssadmin delete shadows /For=C: /all |
Delete All Restore Points On C: Drive. |
vssadmin delete shadows /For=C: /oldest |
Delete Oldest Restore Point On C: Drive. |
vssadmin delete shadows /Shadow={ 3e6d99a8-4242-4a29-abcd-9887cd8aa911 } |
Delete Specific Restore Point, using Shadow Copy ID. |
Use Windows Backup And Restore
Windows 10 includes the Backup And Restore (Windows 7) tool, which allows the creation of backups of your data. This backup feature was not included in Windows 8, but it has returned in Windows 10 to enable users who might have upgraded from Windows 7 to this version to restore data contained in Windows 7 system image backups.
In addition to restoring files and folders, you can also use this tool to create backups of files contained in folders, libraries, and whole disk volumes.
Backups can’t be saved to the disk on which Windows 10 is installed, so you must provide another location such as an external USB drive, network drive, or non-system local disk. To launch the Backup And Restore (Windows 7) tool in the GUI, open the System And Security section of Control Panel or use the Backup And Restore (Windows 7) item listed in the Settings app.
To create a backup of your files and folders and a system image, follow these steps.
Search for Backup And Restore, and select the Backup And Restore (Windows 7) item listed in Settings.
On Backup And Restore (Windows 7), click Set Up Backup.
On the Select Where You Want To Save Your Backup page, choose the location and click Next.
On the What Do You Want To Back Up page, click Let Windows Choose (Recommended) and click Next.
On the Review Your Backup Settings page, click Change Schedule.
On the How Often Do You Want To Back Up page, leave the Run Backup On A Schedule (Recommended) check box selected and, if necessary, modify the backup schedule.
Click OK.
On the Review Your Backup Settings page, click Save Settings And Run Backup.
The backup begins, and you see the progress bar as shown in Figure 3-39.
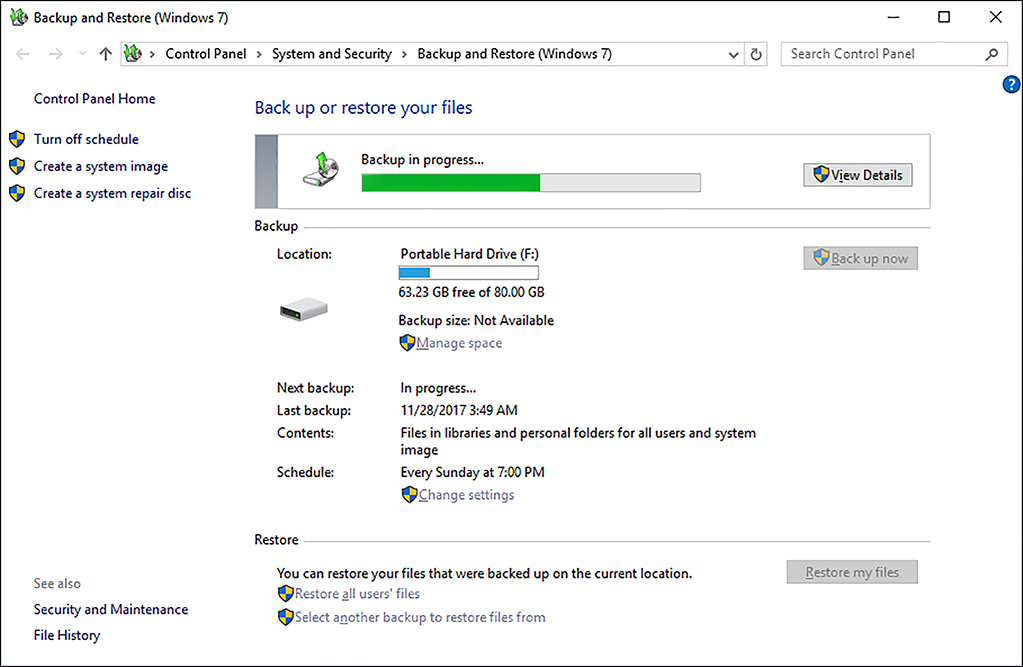
FIGURE 3-39 Backup And Restore (Windows 7)
Note Backup Time
The first backup takes the longest time because it is a full backup. Subsequent backups are incremental and can take only a few minutes to complete.
When the backup is complete, use the links on the Backup And Restore (Windows 7) page to see the size of the backup on disk, edit the schedule, and manage the disk space the Backup And Restore (Windows 7) tool uses.
When backing up your system, you can opt for the recommended settings, which create a backup of all files and folders in your user profile (including libraries) as well as a system image. The system image files are large, likely to be approximately 10 GB in size. You can specify the frequency and time when Windows 10 performs backups or retain the default backup schedule of Sunday at 7 P.M. every week.
If you require more specific scheduling, you can modify the triggers in the AutomaticBackup job in Task Scheduler after you have enabled scheduled backups. Available options to trigger a scheduled backup include:
On A Schedule
At Logon
At Startup
On Idle
On An Event
At Task Creation/Modification
On Connection/Disconnect To A User Session
On Workstation Lock/Unlock
If you want to choose specific libraries and folders for the backup manually, select the Let Me Choose on the What Do You Want To Back Up page when initially setting up the backup. Although you cannot select individual files for backup, you can clear the check box to include a system image of the drive.
The Backup And Restore (Windows 7) tool uses the Volume Shadow Copy Service (VSS) to create the backups. The initial backup creates a block-level backup of the files to the backup file and uses the virtual hard disk (.vhdx) file format. VSS greatly enhances the performance of the backup operation because subsequent backups only copy the data that has changed since the previous backup, which is typically a smaller amount of data, thus creating the incremental backup much faster.
Each time you run a backup, the Backup And Restore (Windows 7) tool creates a new restore point, which the Previous Versions feature in File Explorer can use (and is covered later in this chapter).
Note Back up NTFS Only
The Backup And Restore (Windows 7) tool can only be used to back up data that is stored on file system volumes formatted as NTFS.
To restore libraries, folders, or files from a backup, you can use the Restore My Files link in the lower right of the Backup And Restore (Windows 7) screen. You can select which backup set to use and restore items to their original locations or to different locations. To restore data from a backup, use these steps.
On the Backup And Restore (Windows 7) page, click Restore My Files.
The Restore Files dialog box presents you with access to the latest backup. If you want to choose an alternative backup, click Choose A Different Date, select the correct backup, and click OK.
Locate the files or folders you intend to restore by using one of the three options for you to find your files to recover.
Search Type part of the name of the file you intend to restore. Click the file or Select All to restore all the found files. Click OK. (The search speed is very fast.)
Browse For Files Click the backup name with the correct date and time stamp and browse to the folder that contains the items you want. Select the items and click Add Files.
Browse For Folders Click the backup name with the correct date and time stamp and browse to the folder that you want. Select the folder and click Add Folder.
You can choose multiple files and folders and use any of the three options or combinations of the options to locate the items you want.
Click Next.
On the Where Do You Want To Restore Your Files page, choose to restore to the original location or browse and select a different location.
If you restore an item to a location that contains the same item name, you are prompted to choose one of the following.
Copy And Replace The item restored from the backup overwrites the item in the destination location.
Don’t Copy Nothing changes and no item is restored.
Copy, But Keep Both Files The original items remain as is, and the file name of the restored item is modified to show it is a version of the same item.
Do This For All Conflicts If you’re restoring multiple items, you can apply the same choice to each conflict.
When the restoration is complete, the Your Files Have Been Restored page appears, and you can click the link to View Restored Files.
Click Finish.
Perform a backup and restore with WBAdmin
In addition to the Backup And Restore (Windows 7) tool, Windows 10 includes another backup tool, the Windows Backup tool that you can use from a command line. This tool is also found in Windows Server and is useful if you need to automate or create a backup job on several computers. Use the WBAdmin.exe command to create, configure, and restore backup jobs. In this section, you review some of the commonly used applications for WBAdmin.
Backing up using WBAdmin
The Windows 10 version of WBAdmin is a simplified version of the utility that is available with the Microsoft Server operating systems and offers some of low-level features such as the generation of index listings of all files and folders within an image data file. To perform a recovery using WBAdmin, you must be a member of the Backup Operators group or the Administrators group, or have been delegated the appropriate permissions. You must also run WBAdmin from an elevated command prompt. A number of the subcommands are not supported in Windows 10, and you must boot to Windows RE to perform a restore operation of data that was created using the WBAdmin Start Backup subcommand.
Table 3-13 lists the command-line syntax of WBAmin.exe.
TABLE 3-13 WBAdmin.exe command-line syntax
Command |
Description |
|---|---|
Wbadmin get versions |
Lists the details of backups available from the local computer or from a specified computer. |
Wbadmin enable backup |
Configures and enables a regularly scheduled backup. |
Wbadmin start backup |
Runs a one-time backup; if used with no parameters, uses the settings from the daily backup schedule. |
Wbadmin get items |
Lists the items included in a backup. |
Wbadmin start recovery |
Runs a recovery of the volumes, applications, files, or folders specified. Supported only in a Windows Recovery Environment (RE). |
Need More Review? Wbadmin Command Line Reference
You can find additional detailed information relating to WBAdmin by typing WBAdmin /? at the command prompt. The content provided in this section should be sufficient for your exam preparation, and if required, you can find additional WBadmin resources on the Windows IT Pro Center at: https://docs.microsoft.com/en-us/windows-server/administration/windows-commands/wbadmin.
For example, if you connect a removable hard drive to your computer, which uses the drive letter E, the following examples guide you through the process of performing a backup and restore using the WBAdmin command-line tool.
To back up the entire contents of the C drive to a backup drive located on E, follow these steps.
Right-click Start and select Command Prompt (Admin); accept UAC.
Type the following command.
WBAdmin start backup -BackupTarget:E: -Include:C:
Type Y to begin the backup operation.
The tool creates a shadow copy of the volume and then creates a block copy of the volume, as shown in Figure 3-40. A simple log file relating to the operation is created, and this is stored in C:WindowsLogsWindowsBackup.
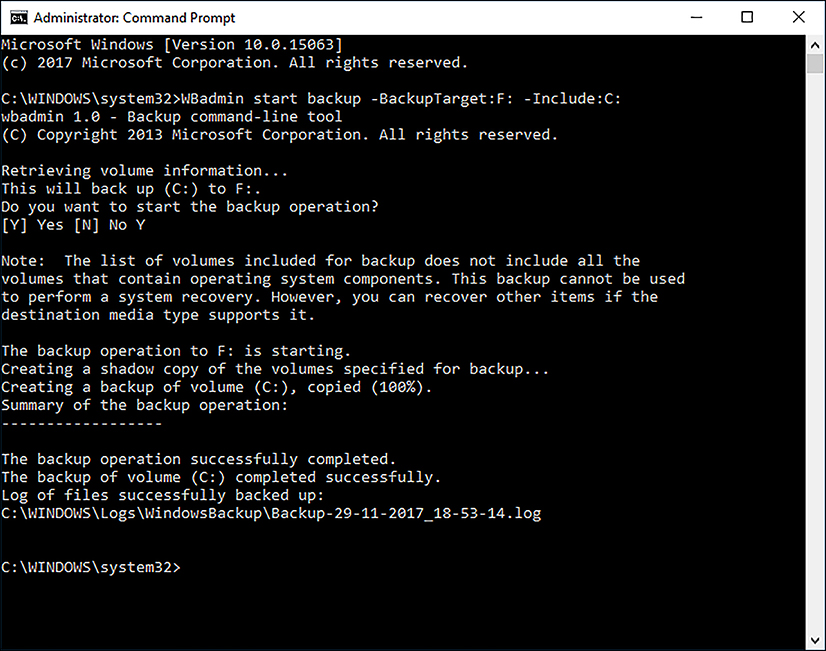
FIGURE 3-40 WBAdmin Command-Line Tool
The WBAdmin utility saves the image backup in a WindowsImageBackup folder on the target drive.
After you have created a backup, you can list backup images created on the system by using the following command.
WBAdmin get versions -backupTarget:E:
Restoring data using WBAdmin
To recover from a backup that you have previously created with WBAdmin, boot to a Windows RE Command Prompt, and type WBAdmin get versions –backuptarget:d: to provide the version information of the available backups. (You may need to change the driver letter to correspond to your system). For example, to recover a backup of volume E from May 31, 2017, at 17:12, type the following command at a command prompt and then press Enter.
WBAdmin start recovery -version:05/31/2017-17:12 -itemType:Volume -items:\?Volume{a6f2e427-0000-0000-0000-501f00000000} -BackupTarget:D: -RecoveryTarget:E:
![]() Exam Tip
Exam Tip
The WBAdmin start recovery command is only supported in Windows RE and not in a normal Windows 10 administrative command prompt. Be careful because the drive letters of the mounted volumes can be different in Windows RE from those in Windows 10. You might need to replace the drive letters in your WBAdmin start recovery options.
Configure File History
The File History feature protects your data by backing it up periodically to a local or network drive. You can easily recover files that have been accidently deleted or modified, in a simple and user-friendly method. When it’s enabled, File History automatically creates a backup on an hourly schedule, but this can be modified. As long as the backup destination location does not become full, File History continues to store changes made to your data indefinitely.
Configuring File History
File History was introduced in Windows 8; the current version has an enhanced user interface and new improvements and is the recommended backup solution that Windows 10 offers.
To turn on File History for the first time, follow these steps.
Open Settings, click Update & Security, and select Backup.
Click the Plus (+) icon labeled Add A Drive.
File History searches for available drives.
In the Select A Drive dialog box, select the external or local hard drive that you want to use for File History.
On the Back Up Using File History page, verify that the Automatically Back Up My Files toggle is On.
When it’s enabled, File History saves copies of your files for the first time. This is a background operation, and you can continue to work normally while it completes.
File History saves the files from your user profile and all the folders located in your libraries, including data synced to your device from your OneDrive. You can modify what is saved by including or excluding folders. To manage the folders File History monitors, perform the following steps.
Open Settings, click Update & Security, and select Backup.
Click More Options.
In the Backup Options page, as shown in Figure 3-41, click Add A Folder.
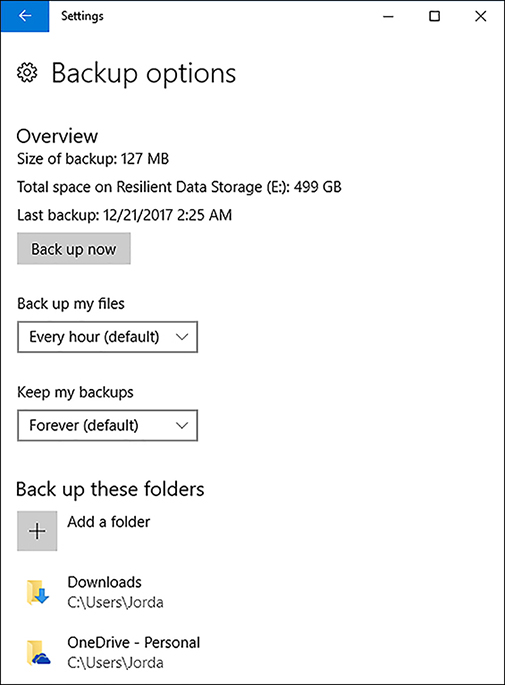
FIGURE 3-41 Configuring File History Backup Options Select the folder that you want to be backed up and click Choose This Folder.
Ensure that the folder appears in the list of folders under Back Up These Folders.
If you scroll down to the bottom of the screen, you can also use Exclude These Folders to remove folders explicitly from File History.
Close the Backup Options page.
Some advanced settings are available in File History. Some of these can be configured through the Settings app or from the Advanced Settings link in File History in Control Panel. For example, you can configure the following.
Modify the frequency of how often File History saves copies of files from every 10 minutes to daily.
Share the backup drive to other HomeGroup members.
Open File History event logs to view recent events or errors.
Define the length of time to keep saved versions of your files.
Manually clean up older versions of files and folders contained in the backup to recover space on the backup drive.
![]() Exam Tip
Exam Tip
For the exam, it might be useful to know that the FhManagew.exe command-line tool enables you to delete file versions based on their age stored on the File History target device from the command line, such as: FhManagew.exe -cleanup 180.
Recovering files by using File History
After it’s enabled, File History monitors the files and folders you choose and backs them up to your backup storage. If you need to restore a folder or files that have been deleted, you can begin a restore operation by launching File History file recovery, as shown in Figure 3-42, in several ways, including the following.
History icon Open File Explorer and navigate to the folder that contains a modified or deleted file and then click History on the Home ribbon. The File History page opens, and you can view the recoverable files at this location.
Restore Personal Files Open File History in Control Panel and select the Restore Personal Files link on the left side. This screen displays all recoverable items.
Restore Files From A Current Backup The Restore Files From A Current Backup link is at the bottom of the Backup Options page in the Settings app.
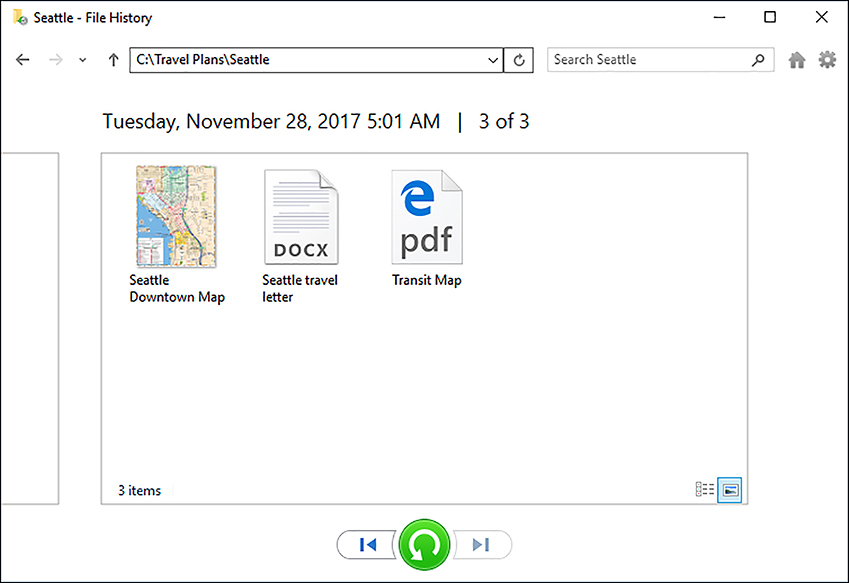
FIGURE 3-42 Restoring deleted files by using File History
When the File History page is in view, you can navigate through each restore point by using the arrow buttons at the bottom of the screen. In Figure 3-43, three restore points relate to items in the selected folder. Each restore point has a date and time to help you decide which version of the file or files to restore. You can select one or more files in the center pane, as in Figure 3-42, to revert, and select which version of the file by navigating through the numbered backups that File History has made. If you right-click the file, you can preview the file to view the contents. If you want to proceed to recover the file, click the large green button on the File History screen. The file or files selected are automatically restored; File Explorer opens the folder and displays the restored files.
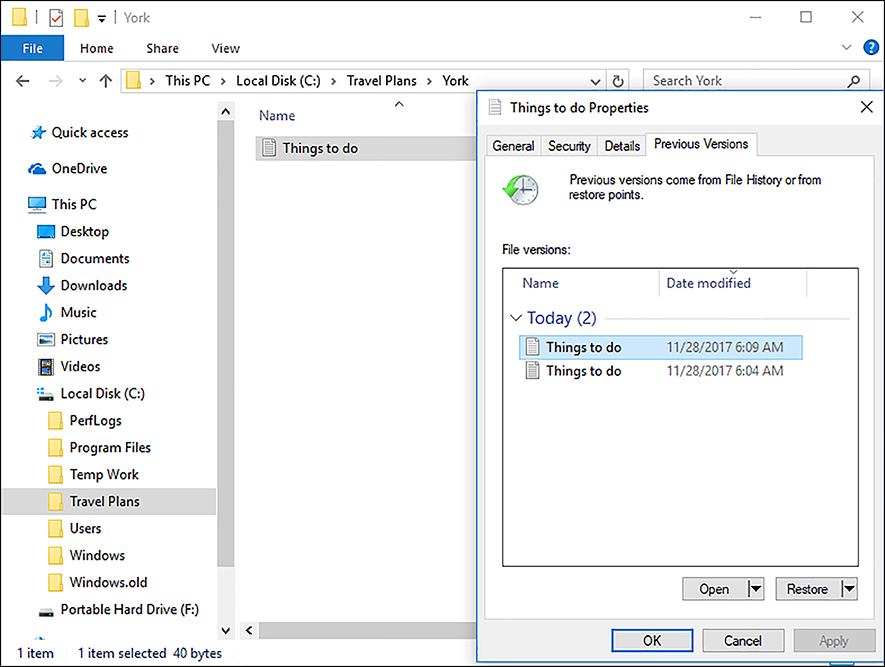
Note File History Backup Location
You can easily navigate to the backup files that File History creates. They are stored on the backup drive in a logical folder hierarchy. The files backed up in Figure 3-42 are found at E:FileHistoryDemoSSTE-212DataCTravel PlansSeattle.
In the upper-right corner of the File History screen is a cog icon that displays links relating to the restore operation, view options, File History setup, and Help. The Restore To option enables you to select another location on your hard disk to restore the file.
Enterprise considerations for using File History
In an enterprise environment, you might configure File History to use removable USB drives for staff members who work away from the office. Removable drives containing data backups should to be secured.
File History supports backing up files that are encrypted using Encrypting File System (EFS) if you use Windows 10 Pro, Education, or Enterprise. The removable USB drive must be formatted with NTFS to allow either File History or EFS.
If you have Windows 10 Pro, Education, or Enterprise, you can use BitLocker Drive Encryption to protect your data on your PC, but this will not protect the backed-up files stored externally. If you want to use BitLocker technology to protect data stored on a portable drive, consider enabling BitLocker To Go on the removable drive, which will protect the contents.
If you want to disable File History from use on a device, you can configure the Group Policy Object (GPO) relating to File History located at Computer Configuration Administrative TemplatesWindows ComponentsFile HistoryTurn Off File History. When enabled, users can’t turn on File History.
Restore previous versions of files and folders
Restoring files from a regular backup can take several hours or even longer if the backup is stored offsite; it typically requires administrator-level resources to accomplish the task. To reduce the administrative effort, you can enable the Previous Versions feature on Windows 10, which uses the Volume Shadow Copy Service (VSS) to generate local shadow copies, and then you can restore previous versions of files and folders within seconds.
The Previous Versions feature enables users to view, revert, or recover files and folders that have been modified or deleted. Previous Versions requires either the File History feature or restore points that the Backup And Restore (Windows 7) tool created. One of these features must be configured for you to be able to use the Previous Versions feature.
After you have enabled File History or created a backup by using Backup And Restore (Windows 7), your system will have created a shadow copy (or a snapshot) of your data, such as the files and folders located in your user profile. The snapshot tracks the changes to the files and folders on the drive, but it should be seen as complementary to the existing backup solution that is in use. Because the snapshot data is not a complete copy of files and is typically stored on the same drive as your data, it is not considered a replacement for traditional backups.
By default, Previous Versions monitors special folders, including AppData (Roaming), Desktop, Documents, Pictures, Music, Videos, Favorites, Contacts, Downloads, Links, Searches, and Saved Games. With Previous Versions, you can browse in File Explorer to a location where your files and folders have been modified or deleted, and when you open the item properties, a Previous Versions tab lists the available restore points for your data. If the Previous Versions tab is empty, it might be that the file has not been modified, or the shadow copy has not yet made a snapshot.
![]() Exam Tip
Exam Tip
Do not confuse System Restore points and File History. The Previous Versions feature uses restore points that are created by either File History or the Backup And Restore (Windows 7) tool and not the restore points that System Restore creates.
If you configure both File History and Backup And Restore (Windows 7), you benefit from the creation of multiple restore points that will be available to Previous Versions.
To revert files using Previous Versions, use the following steps.
Ensure that File History is turned on.
Create a folder on your computer, for example, “C:Travel PlansYork,” and then create or save a text file called “Things to do.txt” into the folder.
In File History, click Run Now.
Open Test.txt and modify the contents, save, and exit the file.
In File History, click Run Now.
Right-click Test.txt and select Restore Previous Versions.
On the Previous Versions tab. Note that the Things to do.txt file has one previous version listed, which is the original file. Modify the file again. There will not be another Previous Version listed until the next Restore Point is created by File History.
To manually create a new Restore Point, return to File History and click Run Now. Return to the Things to do.txt file and notice that it now has two file versions listed, as shown in Figure 3-43.
Delete the Things to do.txt file.
To recover the last version of the file that was saved by File History, right-click the “C:Travel PlansYork”, folder and select Restore Previous Versions.
On the Previous Versions tab, select the Travel Plans folder, and drop down the Open menu item, and select Open in File History.
File History launches. Double-click the folder which contained the deleted file.
Select the deleted file, and choose the green restore button.
Verify that the Things to do.txt file has been restored to the This “C:Travel PlansYork” folder.
In a corporate environment, an administrator can enable shadow copies for folders shared over the network. This can be useful because, normally, when a user deletes a file contained in a shared folder, the files are permanently deleted and are not moved to the local Recycle Bin. Before the introduction of VSS technology, the only way to recover deleted files on a network share was from a backup, which is not very efficient. With shadow copying in place, the Previous Versions feature enables users to recover deleted files instantaneously without needing assistance from an administrator.
The VSS command-line tool vssadmin can be useful to review or troubleshoot VSS, for example, if you want to review the space that shadow copies use, create a new volume shadow copy, or suspect shadow copies are not working properly.
Some of the volume shadow commands available with vssadmin are listed in Table 3-14.
TABLE 3-14 VSSAdmin commands
Command |
Description |
|---|---|
Vssadmin add shadowstorage |
Adds a volume shadow copy storage association. |
Vssadmin create shadow |
Creates a new volume shadow copy. |
Vssadmin list providers |
Lists registered volume shadow copy providers. |
Vssadmin list shadows |
Lists existing volume shadow copies. |
Vssadmin list shadowstorage |
Lists all shadow copy storage associations on the system. |
Vssadmin list volumes |
Lists volumes that are eligible for shadow copies. |
Vssadmin list writers |
Lists all subscribed volume shadow copy writers on the system. |
Vssadmin delete shadows |
Deletes volume shadow copies. |
Vssadmin delete shadowstorage |
Deletes volume shadow copy storage associations. |
Vssadmin resize shadowstorage |
Resizes the maximum size for a shadow copy storage association. |
Recover files from OneDrive
Microsoft OneDrive enables you to store your files online, sync files between your PC and OneDrive, and access files directly by a web browser located at OneDrive.com. You need to understand how you can recover files from OneDrive that you have deleted.
Recovering files from OneDrive
If you accidentally delete a file stored in your OneDrive account, you can recover it by using Recycle Bin, which is available with OneDrive.com and File Explorer if you have set up your PC to sync with your OneDrive account. OneDrive automatically empties files from Recycle Bin after 90 days. If you delete a file by mistake, to prevent losing a deleted file, make sure you restore it within 90 days.
When you delete a file in OneDrive from one device, OneDrive deletes the file from all your OneDrive locations everywhere, including the OneDrive folder synced to File Explorer. If you move a file out of OneDrive to a different location, such as a local folder on a device, this removes the file from your OneDrive.
The OneDrive Recycle Bin can retain deleted items for a minimum of three days and up to a maximum of 90 days. The actual retention period is dependent on the size of the Recycle Bin which is set to 10 percent of the total storage limit by default. If the Recycle Bin is full, old items will be deleted to make room for new items as they are added to the Recycle Bin and this may have an impact on the 90-day retention period.
To recover deleted files from your OneDrive.com, follow these steps.
Browse to your OneDrive.com or right-click the cloud icon in the notification area and click Go To OneDrive.com.
On the left side of the page, select Recycle Bin.
If Recycle Bin is not visible, click the three horizontal lines in the top left corner of the screen and select Recycle Bin.
Select the items that you want to recover.
Click Restore on the menu.
OneDrive restores the items, and they are removed from Recycle Bin.
Note Recycle bin Size
There is no setting for you to modify the size of Recycle Bin. If you increase the OneDrive space by freeing up space or purchasing additional OneDrive storage space, the 10% allocation for Recycle Bin will be increased.
Just as with Recycle Bin in File Explorer, if you select items in Recycle Bin and delete them, you are warned that they will be permanently deleted, as shown in Figure 3-44.
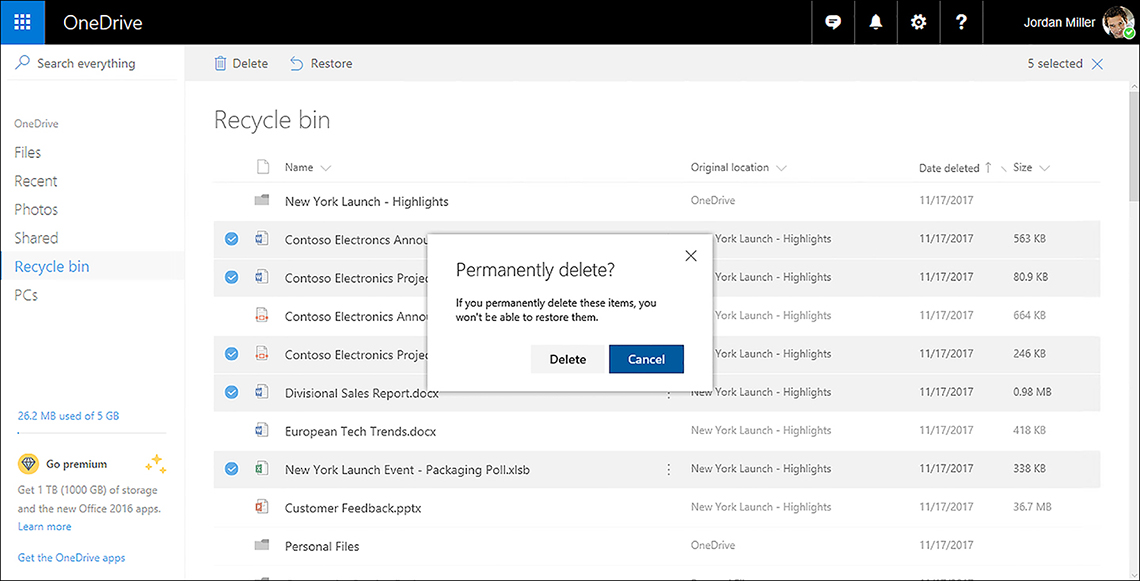
Take care also when using Restore All or Empty Recycle Bin because these tasks are irreversible.
The Search Everything feature in OneDrive.com is a very powerful method of locating files stored in your OneDrive, because it searches the file name and metadata. However, OneDrive search results do not include items in OneDrive Recycle Bin or File Explorer Recycle Bin.
Using Previous Versions in OneDrive
Earlier in this chapter, you reviewed the Previous Versions feature in File Explorer. A similar feature exists when you use OneDrive. Whenever you store and modify Microsoft Office documents in OneDrive.com, OneDrive maintains a version history of these documents, similar to how Previous Versions behaves.
To view the available versions stored in OneDrive, navigate to and select a Microsoft Office file and then choose Version History from the context menu. OneDrive opens the file in a new browser tab, and you see the list of available versions in the left pane. You can review the contents of each file, as shown in Figure 3-45. If you open the document in Word Online, you can select Previous Versions from the settings menu on the right side.
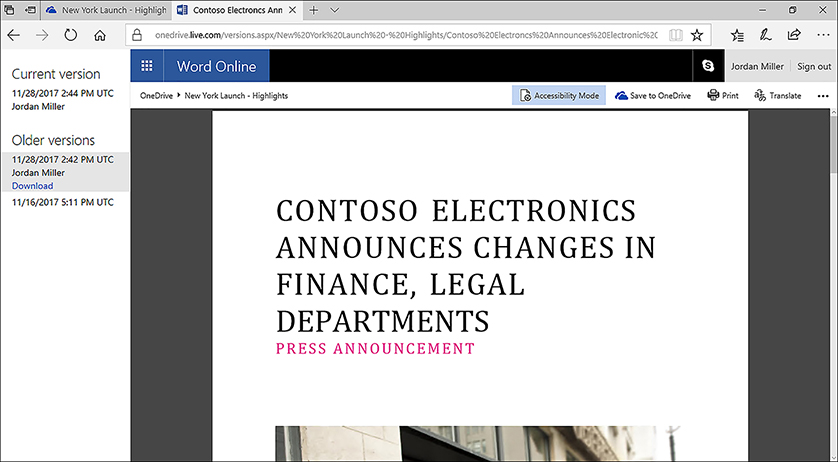
Skill 3.4: Configure authorization and authentication
Authentication is the process of verifying the identity of a security principal, which is any entity that will be authenticated by the system, such as a user, a group, a computer or other device, a service or process. Authorization takes place after a security principal has been authenticated and is the process of granting access to a resource for an identified security principal.
In Windows 10, you can implement authentication in a number of ways. It is important to understand the various authentication methods and to know how to enable and configure them to help ensure that your network and connected devices remain secure. As a result, the 70-698, “Installing and Configuring Windows” exam contains questions that relate to authentication methods, account and credential management, and device security.
Note Homegroup
The list of skills measured for the exam includes HomeGroup in this section. To avoid repetition, this topic isn’t covered here. You’ll find information about configuring HomeGoup in Chapter 2, “Configure networking,” and in “Configure data access and usage.”
Configure user accounts
Before you can sign in to your Windows 10-based computer, you must create a user account. Windows 10 supports the ability for you to sign in using local accounts, Active Directory Domain Services (AD DS) domain accounts, Azure Active Directory and Microsoft accounts.
After you are signed in, it is important to ensure that your user account operates as a standard user account and is only elevated to an administrative level when needed. User Account Control (UAC) can help you control administrative privilege elevation in Windows 10.
Configure local accounts
Local accounts, as the name suggests, exist in the local accounts database on your Windows 10 device; it can only be granted access to local resources and, where granted, exercise administrative rights and privileges on the local computer.
When you first install Windows 10, you are prompted to sign in using a Microsoft account or Work Account, such as an Office 365 account that is connected to Azure Active Directory. If neither of these options are available, you can choose an offline account and create a local account to sign in with. Thereafter, you can create additional local user accounts as your needs dictate.
Default accounts
In Windows 10, three user accounts exist by default in the local accounts database. These are the Administrator account, Default Account, and the Guest account. All of these are disabled by default.
When you install Windows 10, you create an additional user account. You can give this account any name. This initial user account is a member of the local Administrators group and therefore can perform any local management task. Once you have created your local account, a second account called Defaultuser0 may also be created, which is disabled by default.
You can view the installed accounts, including the default accounts, by using the Computer Management console, as shown in Figure 3-46. You can also use the net user command-line tool and the get-wmiobject -class win32_useraccount Windows PowerShell cmdlet to list the local user accounts.

![]() Exam Tip
Exam Tip
In Windows 10 Home edition, you cannot use Computer Management to view or edit user accounts because the Local Users And Groups node does not exist.
Managing local user accounts
You can manage local user accounts by using Computer Management (except with Windows 10 Home edition), the Settings app, Control Panel, and Windows PowerShell.
Using Computer Management
To manage user accounts by using Computer Management, right-click Start and then click Computer Management. Expand the Local Users And Groups node and then click Users. To create a new user, right-click the Users node and click New User.
In the New User dialog box, configure the following properties, as shown in Figure 3-47, and then click Create.

User Name
Full Name
Password
User Must Change Password At Next Logon
User Cannot Change Password
Password Never Expires
Account Is Disabled
After you have added the new user account, you can modify more advanced properties by double-clicking the user account. On the General tab, you can change the user’s full name and description and password-related options. On the Member Of tab, you can add the user to groups or remove the user from groups. The Profile tab, shown in Figure 3-48, enables you to modify the following properties.
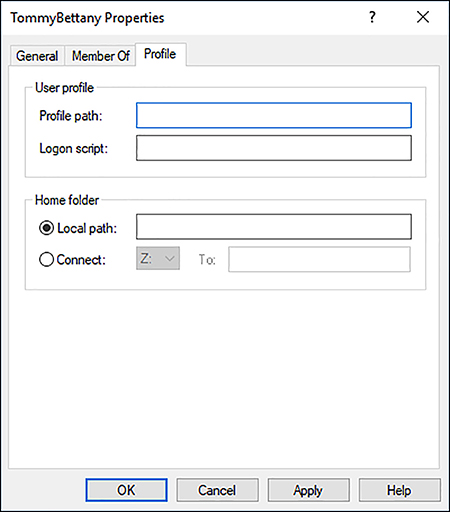
Profile path The path to the location of a user’s desktop profile. The profile stores the user’s desktop settings, such as color scheme, desktop wallpaper, and app settings, including the settings stored for the user in the registry. By default, each user who signs in has a profile folder created automatically in the C:UsersUsername folder. You can define another location here, and you can use a Universal Naming Convention (UNC) name in the form of \ServerShareFolder.
Logon script The name of a logon script that processes each time a user signs in. Typically, this will be a .bat or .cmd file. You might typically place commands to map network drives or load apps in this script file. It is not usual to assign logon scripts in this way. Instead, Group Policy Objects (GPOs) are used to assign logon and startup scripts for domain user accounts.
Home folder A personal storage area where users can save their personal documents. By default, users are assigned subfolders within the C:UsersUsername folder for this purpose. However, you can use either of the following two properties to specify an alternate location.
Local path A local file system path for storage of the user’s personal files. This is entered in the format of a local drive and folder path.
Connect A network location mapped to the specified drive letter. This is entered in the format of a UNC name.
Using Control Panel
You can manage user accounts from Control Panel. Open Control Panel, click User Accounts, and then click User Accounts again. From here, you can:
Make Changes To My Account In PC Settings Launches the Settings app to enable you to make user account changes.
Change Your Account Name Enables you to change your account name.
Change Your Account Type Enables you to switch between Standard and Administrator account types.
Manage Another Account Enables you to manage other user accounts on this computer, as shown in Figure 3-49.

FIGURE 3-49 Managing user accounts in Control Panel Change User Account Control Settings Launches the User Account Control Settings dialog box from Control Panel
You cannot add new accounts from this location. If you want to add a new account, use Computer Management, the Family and other people section of the Settings app, or Windows PowerShell.
Using the Settings app
The preferred way to manage local accounts in Windows 10 is by using the Settings app. From Settings, click Accounts. As shown in Figure 3-50, on the Your Info tab, you can modify your account settings, including:
Assigning a picture to your account.
Adding a Microsoft account.
FIGURE 3-50 Modifying your user account properties in the Settings app
If you need to add a new account, click the Family & Other people tab and then click Add Someone Else To This PC. You must then enter that person’s email address, typically the address they use to sign in to Office 365, OneDrive, Skype, Xbox, or Outlook.com.
If you want to add a local account by using the Settings app, use the following procedure.
In the Settings app, click Accounts.
On the Family & Other Users tab, under Other Users, click Add Someone Else To This PC.
In the How Will This Person Sign In dialog box, click I Don’t Have This Person’s Sign-In Information.
In the Let’s Create Your Account Dialog Box, click Add A User Without A Microsoft Account.
On the Create An Account For This PC page, type the user name, type a new password twice, and then click Next to create the local account.
Using Windows PowerShell
Before you can manage local user accounts, you must install the Windows PowerShell local account module. You can do this by running the following cmdlet from an elevated Windows PowerShell command.
You can use the following cmdlets to manage local user accounts.
Get-LocalUser
New-LocalUser
Remove-LocalUser
Rename-LocalUser
Disable-LocalUser
Enable-LocalUser
For example, to add a new local user account called Kiosk02 with no password, run the following cmdlet.
New-LocalUser -Name "Kiosk02" -Description "Public Kiosk" -NoPassword
Need More Review? Local Accounts Cmdlets
To review further details about using Windows PowerShell to manage local accounts, refer to the Microsoft PowerShell reference at: https://docs.microsoft.com/powershell/module/microsoft.powershell.localaccounts/?view=powershell-5.1.
Configure Microsoft accounts
A Microsoft account provides you with an identity that you can use to sign in on multiple devices and access online services. You can also use the account to synchronize your personal settings between your Windows-based devices.
If Windows 10 detects an Internet connection during setup, you are prompted to specify your Microsoft account details. However, you can link your Microsoft account to a local or AD DS domain account after setup is complete.
After you connect your Microsoft account with your local account, you can:
Access personal Microsoft cloud services, including OneDrive, Outlook.com, and other personal apps.
Use the Microsoft account to access Microsoft Intune, Microsoft Office 365, and Microsoft Azure.
Download and install apps from the Microsoft Store.
Sync your settings between devices that are linked to your account.
![]() Exam Tip
Exam Tip
You can browse the Windows Store even if you do not sign in using a Microsoft account, however you cannot install Store apps without using a Microsoft account.
Signing up for a Microsoft account
To sign up for a Microsoft account, use the following procedure.
Open a web browser and navigate to https://signup.live.com.
To use your own email address for your Microsoft account, type it into the web form. If you choose this option, you must verify the address later.
If you want to create a Hotmail or Outlook.com account, click Get A New Email Address and then complete the email address line, specifying whether you want a Hotmail or Outlook suffix.
Press Tab to verify that the name you entered is available.
Complete the rest of the form and then agree to the privacy statement by clicking I Accept.
After you have created your Microsoft account, you can connect it to your local or domain account.
Connecting your Microsoft account to your device
To connect your Microsoft account to your local or domain user account, use the following procedure.
Sign in with your local account.
In Settings, click Accounts.
On the Your Info page, click Sign In With A Microsoft Account Instead, as shown in Figure 3-50.
On the Make It Yours page, enter the email address and then click Sign In, as shown in Figure 3-51.
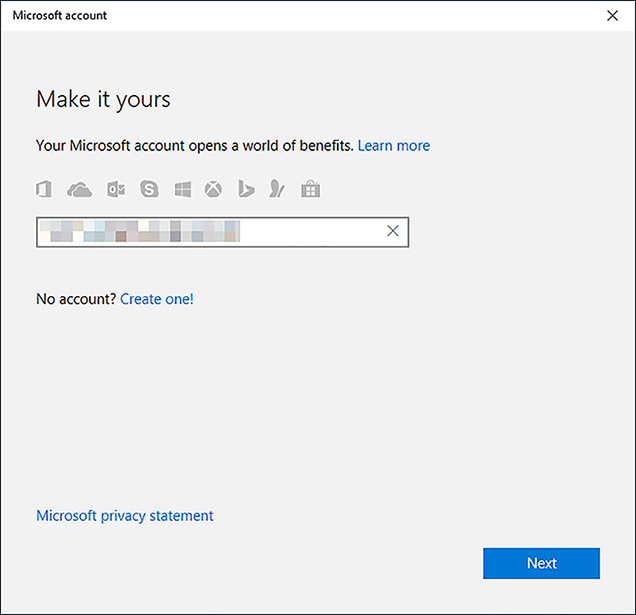
FIGURE 3-51 Enter the Microsoft account credentials On the Enter Password page, enter the password associated with your Microsoft account and click Sign In.
If prompted, enter your local account password to verify your local identity and click Next.
The device will now use your Microsoft account to log on.
Need More Review? Setting up Accounts on Devices
For more information about setting up Microsoft accounts on devices, refer to the Microsoft website at: https://account.microsoft.com/account/connect-devices.
Configure User Account Control behavior
In earlier versions of Windows, it was necessary to sign in using an administrative account to perform administrative tasks. This often led to users signing in with administrative accounts at all times, even when performing standard user tasks, such as running apps or browsing Internet websites.
However, being signed in with administrative privilege at all times poses a security risk because it provides for the possibility of malicious software exploiting administrative access to files and other resources. Windows 10 provides UAC to help mitigate this threat.
When you sign in using an administrative account, UAC inhibits the account’s access to that of a standard user, only elevating the account’s privileges to administrative level when required, and only after prompting the user for permissions to do so. In addition, if a user signs in with a standard user account and attempts to perform a task requiring administrative privileges, UAC can prompt the user for administrative credentials.
Standard users can perform the following tasks without requiring elevation.
Change their user account passwords.
Configure accessibility options.
Configure power options.
Install updates by using Windows Update.
Install device drivers included in the operating system or by using Windows Update.
View Windows 10 settings.
Pair Bluetooth devices.
Establish network connections, reset network adapters, and perform network diagnostics and repair.
However, the following tasks require elevation.
Install or remove apps.
Install a device driver not included in Windows or Windows Update.
Modify UAC settings.
Open Windows Firewall in Control Panel.
Add or remove user accounts.
Restore system backups.
Configure Windows Update settings.
Note User Account Control behavior
This is not an exhaustive list of tasks but, merely, an indication of the types of tasks requiring or not requiring elevation.
When a user performs a task requiring elevation, depending on settings, UAC can prompt the user in two ways for elevation.
Prompt for consent This appears to administrators in Admin Approval Mode when they attempt to perform an administrative task. It requests approval to continue from the user.
Prompt for credentials This appears to standard users when they attempt to perform an administrative task.
Admin Approval Mode is the process whereby a user signed in with an administrative account operates in the context of a standard user until a task is attempted that requires administrative privilege. At that time, the user receives a prompt for consent.
Note Turning off UAC is not supported for Windows 10 devices
UAC helps prevent malware from damaging PCs and should not be turned off. If UAC is turned off all Universal Windows Platform apps will stop working.
To configure UAC by using Control Panel, use the following procedure.
From Control Panel, click System And Security.
Under the Security and Maintenance item, click Change User Account Control Settings.
As shown in Figure 3-52, you can use the slider bar in the Choose When To Be Notified About Changes To Your Computer dialog box to adjust the UAC settings.
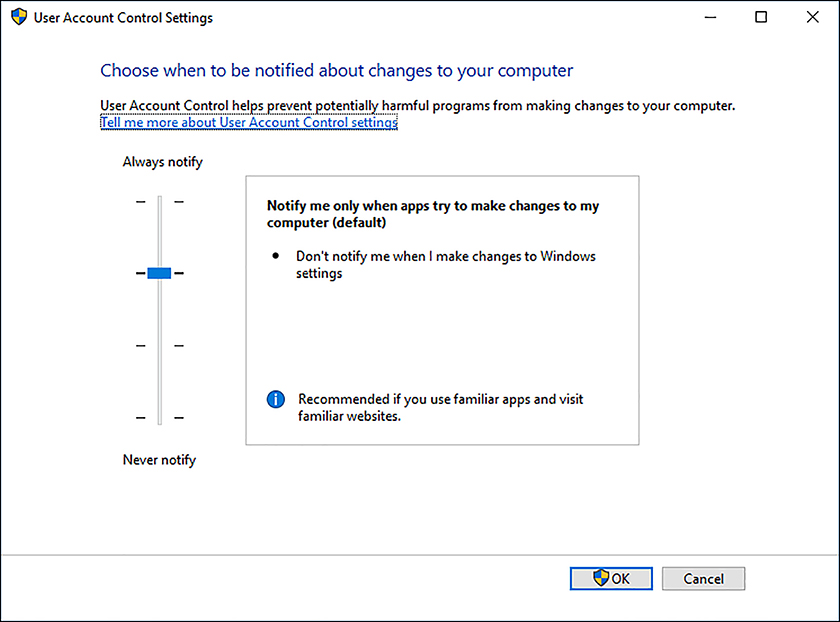
FIGURE 3-52 Configuring User Account Control prompts
The available settings are:
Never Notify Me When In this setting, UAC is disabled. This means that users signing in with Standard accounts cannot perform administrative tasks because there is no means to prompt for credentials with which to perform those tasks. Users signing in with administrative accounts can perform any task requiring elevation, without a prompt for consent.
Notify Me Only When Apps Try To Make Changes To My Computer (Do Not Dim Desktop) In this mode, users are prompted, but Windows does not switch to Secure Desktop while awaiting user consent. This is less secure.
Notify Me Only When Apps Try To Make Changes To My Computer (Default) In this mode, users are prompted, and Windows switches to Secure Desktop while awaiting user consent. This is more secure.
Always Notify Me When This is the most secure but most intrusive setting. Users are prompted not only for application installations, but also any time they make Windows settings changes.
In addition to configuring UAC settings locally, you can also use Group Policy in a domain based environment. On a domain controller, open Group Policy Management and locate the appropriate GPO. Open the GPO for editing and navigate to Computer ConfigurationPoliciesWindows SettingsSecurity SettingsLocal PoliciesSecurity Options. There are 10 settings in the details pane that have the User Account Control prefix.
Need More Review? UAC Group Policy Settings and Registry Key Settings
To review further details about configuring UAC by using GPOs, refer to the Microsoft website at: https://docs.microsoft.com/windows/security/identity-protection/user-account-control/user-account-control-security-policy-settings.
Configure Microsoft Passport and Windows Hello for Business
Traditional computer authentication is based on user name and password exchange with an authentication authority. Although password-based authentication is acceptable in many circumstances, Windows 10 provides for a number of additional, more secure methods for users to authenticate with their devices, including multifactor authentication.
Multifactor authentication is based on the principle that users who wish to authenticate must have two (or more) things with which to identify themselves. Specifically, they must have knowledge of something, they must be in possession of something, and they must be something. For example, a user might know a password, possess a security token (in the form of a digital certificate), and be able to prove who they are with biometrics, such as fingerprints.
Configure Windows Hello and Windows Hello for Business
Windows Hello is a two-factor biometric authentication mechanism built into Windows 10 to address the requirement that users must be able to prove who they are by something they uniquely have. When you implement Windows Hello, users can unlock their devices by using facial recognition, fingerprint scanning or a PIN.
Windows Hello works with Windows Hello for Business to authenticate users and enable them to access your network resources. It provides the following benefits.
It helps protect against credential theft. Because a malicious person must have both the device and the biometric information or PIN, it becomes more difficult to access the device.
Employees don’t need to remember a password any longer. They can always authenticate using their biometric data.
Windows Hello is part of Windows 10, so you can add additional biometric devices and authentication policies by using GPOs or mobile device management (MDM) configurations service provider (CSP) policies.
To implement Windows Hello, your devices must be equipped with appropriate hardware. For facial recognition you need to use special cameras that see in Infrared (IR) light. These can be external cameras or cameras incorporated into the device. The cameras can reliably tell the difference between a photograph or scan and a living person. For fingerprint recognition, your devices must be equipped with fingerprint readers, which can be external or integrated into laptops or USB keyboards.
After you have installed the necessary hardware devices, to set up Windows Hello, open Settings, click Accounts, and then, on the Sign-in Options page, under Windows Hello, review the options for face or fingerprint. If you do not have Windows Hello-supported hardware, the Windows Hello section does not appear on the Sign-in Options page.
To configure Windows Hello, follow these steps:
In Settings, select Accounts.
On the Accounts page, click Sign-in options.
Under the Windows Hello section click Set Up under Face Recognition.
Click Get Started on the Windows Hello setup dialog.
Enter your PIN or password to verify your identity.
Allow Windows Hello to capture your facial features, as shown in Figure 3-53.

FIGURE 3-53 Configuring Windows Hello Once complete, you are presented with an All Set! Message that you can close.
Users can use Windows Hello for a convenient and secure sign-in method and is tied to the device on which it is set up.
For Enterprises who want to enable Windows Hello, they can configure Windows Hello for Business, which uses key-based or certificate-based authentication for Azure AD tenants, by using Group Policy or mobile device management (MDM) policy on the devices. Devices enrolled with on-premises Active Directory accounts can use Windows Hello but these do not include key-based or certificate-based authentication, though this feature is likely in a future release.
Need More Review? Windows Hello Biometrics in the Enterprise
To review further details about using Windows Hello in the enterprise, refer to the Microsoft website at: https://docs.microsoft.com/en-us/windows/access-protection/hello-for-business/hello-biometrics-in-enterprise.
Configure Microsoft Passport and biometrics
To avoid authentication with passwords, Microsoft provided an authentication system called Microsoft Passport. This enables secure authentication without sending a password to an authenticating authority, such as Azure AD or an AD DS domain controller.
Together Microsoft Passport and Windows Hello worked together and provided compliance with the new FIDO 2.0 (Fast IDentity Online) framework for end to end multi-factor authentication.
Microsoft has combined both Microsoft Passport and Windows Hello under the Windows Hello name. Windows Hello for Business offers support for enterprises.
Windows Hello for Business uses two-factor authentication based on Windows Hello-based biometric authentication (or a PIN) together with the ownership of a specific device. Using Windows Hello for Business provides a number of benefits for your organization.
User convenience After your employees set up Windows Hello, they can access enterprise resources without needing to remember user names or passwords.
Security Because no passwords are used, Microsoft Passport helps protect user identities and user credentials.
To set up Windows Hello for Business, after users have configured Windows Hello and signed in using their biometric features (or PIN), they register the device. The registration process is as follows.
The user creates an account on the device; this can be a local account, a domain account, a Microsoft account, or an Azure AD account.
The user signs in using the account, and the identity provider may require additional proof, such as a second authentication factor, such as an SMS pass number send to the user.
The user sets up PIN authentication which is associated with the credential for the account.
![]() Exam Tip
Exam Tip
Signing in with a Microsoft account on a Windows 10-based device automatically sets up Windows Hello for Business on the device; users do not need to do anything else.
After a user has completed the registration process, Windows Hello for Business generates a new public-private key pair on the device known as a protector key. If installed in the device, the Trusted Platform Module (TPM) generates and stores this protector key; if the device does not have a TPM, Windows encrypts the protector key and stores it on the file system. Windows Hello for Business also generates an administrative key that is used to reset credentials if necessary.
Note Pairing of Credentials and Devices
Windows Hello for Business pairs a specific device and a user credential. Consequently, the PIN the user chooses is associated only with the active account and that specific device.
The user now has a PIN gesture defined on the device and an associated protector key for that PIN gesture. The user can now securely sign in to their device using the PIN and then add support for a biometric gesture as an alternative for the PIN. The gesture can be facial recognition, iris scanning, or fingerprint recognition, depending on available hardware in the device. When a user adds a biometric gesture, it follows the same basic sequence as mentioned earlier. The user authenticates to the system by using the PIN and then registers the new biometric. Windows generates a unique key pair and stores it securely. The user can then sign in using the PIN or a biometric gesture.
Need More Review? Windows Hello for Business Guide
To review further details about Windows Hello for Business, refer to the Microsoft website at: https://docs.microsoft.com/en-gb/windows/access-protection/hello-for-business/hello-identity-verification.
You can use MDM policies or GPOs to configure settings for Microsoft Passport in your organization. For example, you can configure a policy that enables or disables the use of biometrics on devices affected by the policy. You can also impose rules on PINs so that, for example, a PIN must consist of six characters, including digits and lowercase letters.
To implement GPOs to configure Windows Hello for Business settings in your organization, open the appropriate GPO for editing and navigate to Computer Configuration > Policies > Administrative Templates > Windows Components > Windows Hello for Business. Edit and configure the appropriate values.
Configure picture passwords
In addition to using PINs and biometric gestures to sign in, users can also choose to use a picture password. This is configured in the Settings app. As shown in Figure 3-54, select Accounts, and then select the Sign-In Options tab.
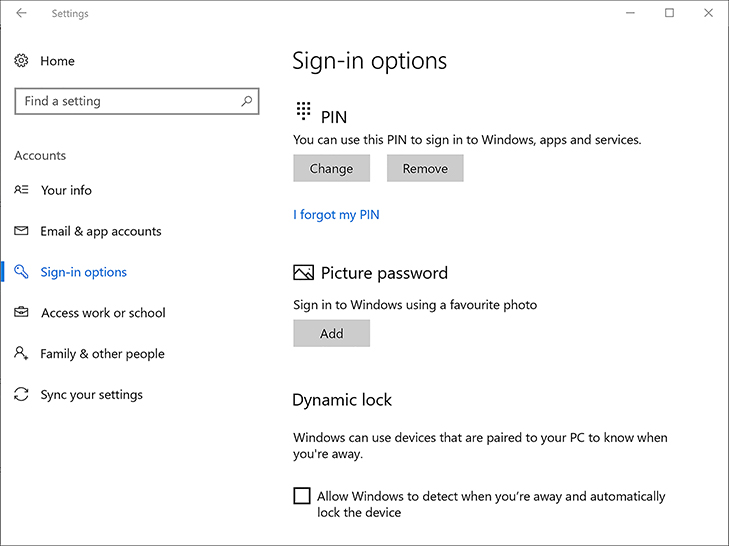
![]() Exam Tip
Exam Tip
If you do not see the Picture Password heading, your display is not touch-enabled. Picture passwords are associated with an image and a touch gesture on the screen.
To set up picture passwords, complete the following procedure.
On the Sign-in Options tab, under Picture Password, click Add.
You are prompted to verify your account information.
Reenter your account password.
You are provided with an initial picture. If you want, click Select Picture to choose another.
Draw three gestures directly on your screen.
Remember that the size, position, and direction of the gestures are stored as part of the picture password.
You are prompted to repeat your gestures. If your repeated gestures match, click Finish.
Configure Dynamic Lock
Users with smartphones can take advantage of a feature introduced with the Creators Update for Windows 10 which allows users to automatically lock their device whenever they step away from their PC.
The feature relies on a Bluetooth link between your PC and smartphone.
To configure Windows 10 Dynamic Lock use the following steps:
Open Settings, then Devices and connect your smartphone using Bluetooth.
Once your peripheral is paired then click Accounts.
In the Sign-in Options area locate Dynamic Lock.
Check the Allow Windows To Detect When You’re Away And Automatically Lock The Device option, as shown in the lower part of Figure 3-54.
The feature will automatically lock your device whenever the system detects that your connected device has moved away from your desk for 30 seconds.
Manage credential security
After you have configured sign-in options, it is important to understand how user credentials are stored and protected. Users must sign in not only to Windows 10 but to websites and online services, most of which do not use the user’s Windows 10 credentials. To help users access these websites and services, Windows stores the credentials and provides two features to help protect users’ credentials.
Configure Credential Manager
When users access a website, online service, or server computer on a network, they might need to provide user credentials to access those sites and services. Windows can store the credentials to make it easier for users to access those sites and services later.
These credentials are stored in secure areas known as vaults. To access the stored credentials, open Control Panel, click User Accounts, and then click Credential Manager. As shown in Figure 3-55, you can then browse the list of stored credentials. Windows separates the list into those used for websites, listed under Web Credentials, and those used for Windows servers, listed under Windows Credentials.
To view stored credentials, select the appropriate website or online service from the list and expand the entry by clicking the Down Arrow. Click Show to view the stored password and click Remove if you no longer want to store the entry. For security, you are prompted to reenter your Windows 10 user account password before you can perform either of these actions.
Configure Windows Defender Credential Guard
When a user signs in to an AD DS domain, they provide their user credentials to a domain controller. As a result of successful authentication, the authenticating domain controller issues Kerberos tickets to the user’s computer. The user’s computer uses these tickets to establish sessions with server computers that are part of the same AD DS forest. Essentially, if a server receives a session request, it examines the Kerberos ticket for validity. If valid in all respects, and issued by a trusted authenticating authority, such as a domain controller in the same AD DS forest, a session is allowed.
These Kerberos tickets, and related security tokens such as NTLM hashes, are stored in the Local Security Authority, a process that runs on Windows-based computers and handles the exchange of such information between the local computer and requesting authorities. However, it is possible for certain malicious software to gain access to this security process and, hence, exploit the stored tickets and hashes.
To help protect against this possibility, 64-bit versions of both Windows 10 Enterprise and Windows 10 Education editions have a feature called Windows Defender Credential Guard, which implements a technology known as virtualization-assisted security; this enables Windows Defender Credential Guard to block access to credentials stored in the Local Security Authority.
In addition to requiring the appropriate edition of 64-bit editions of Windows 10, the following are the requirements for implementing Windows Defender Credential Guard.
Support for Virtualization-based security.
UEFI 2.3.1 or greater.
Secure Boot.
TPM 2.0 either discrete or firmware.
UEFI (firmware) lock.
Virtualization features: Intel VT-X, AMD-V, and SLAT must be enabled.
A VT-d or AMD-Vi input-output memory management unit.
After you have verified that your computer meets the requirements, you can enable Windows Defender Credential Guard by using Group Policy in an AD DS environment. On the Domain Controller open the appropriate GPO for editing and navigate to Computer Configuration > Policies > Administrative Templates > System > Device Guard. Enable Turn On Virtualization Based Security, as shown in Figure 3-56. Only systems that support virtualization will display this GPO.
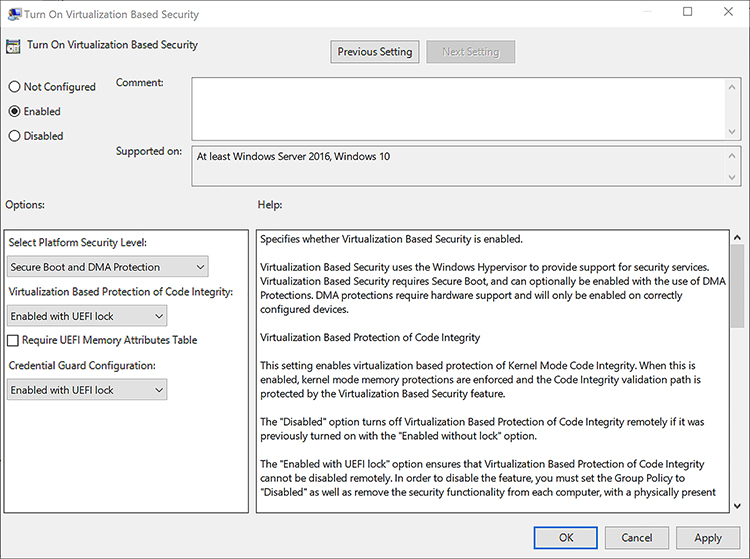
Need More Review? Protect Derived Domain Credentials with Windows Defender Credential Guard
To review further details about how Windows Defender Credential Guard works, refer to the Microsoft website at: https://docs.microsoft.com/en-us/windows/access-protection/credential-guard/credential-guard.
Manage device security
It is important that when users attempt to connect their devices to your organization’s network, you can determine that those devices are secure and conform to organizational policies regarding security settings and features.
Microsoft provides two features in Windows 10 that can help you meet the goal of allowing only secured devices to connect to your organization’s network. These features are Windows Defender Device Guard and Device health attestation.
Configure Windows Defender Device Guard
With malicious software (malware) changing daily, the ability of organizations to keep up to date with emerging threats is challenged. Windows Defender Device Guard is an attempt to mitigate this challenge. Rather than allow apps to run unless blocked, Windows Defender Device Guard only runs specifically trusted apps.
![]() Exam Tip
Exam Tip
Windows Defender Device Guard supports both Universal Windows Platform apps and Classic desktop Windows applications. However since universal applications are trusted to run by Microsoft if you want to prevent specific universal applications from running you could use AppLocker alongside Windows Defender Device Guard.
The requirements for Windows Defender Device Guard are as for Windows Defender Credential Guard. These are:
64-bit version of Windows 10 Enterprise.
Support for Virtualization-based security.
UEFI 2.3.1 or greater.
Secure Boot.
TPM 2.0 either discrete or firmware.
UEFI (firmware) lock.
Virtualization features: Intel VT-X, AMD-V, and SLAT must be enabled.
A VT-d or AMD-Vi input-output memory management unit.
To enable Windows Defender Device Guard in your organization, you must first digitally sign all the trusted apps that you want to allow to run on your devices. You can do this in a number of ways.
Publish your apps by using the Windows Store All apps in the Windows Store are automatically signed with signatures from a trusted certificate authority (CA).
Use your own digital certificate or public key infrastructure (PKI) You can sign the apps by using a certificate issued by a CA in your own PKI.
Use a non-Microsoft CA You can use a trusted non-Microsoft CA to sign your own desktop Windows apps.
Use the Windows Defender Device Guard signing portal In Windows Store For Business, you can use a Microsoft web service to sign your desktop Windows apps.
Need More Review? Windows Defender Device Guard Signing
To review further details about digital signing for Windows Defender Device Guard by using the Microsoft Store for Business and Education, refer to the Microsoft website at: https://docs.microsoft.com/en-us/microsoft-store/device-guard-signing-portal.
After digitally signing the trusted apps, you must enable the required hardware and software features in Windows 10. Assuming your devices meet the hardware requirements, and you have enabled the required software features in Windows 10 (Hyper-V Hypervisor and Isolated User Mode), using Control Panel, you can use GPOs to configure the required Windows Defender Device Guard settings. Open the appropriate GPO for editing and navigate to Computer Configuration Policies Administrative Templates System Device Guard.
Need More Review? Windows Defender Device Guard Deployment Guide
To review further details about deploying Windows Defender Device Guard, refer to the Microsoft website at: https://docs.microsoft.com/en-us/windows/device-security/device-guard/device-guard-deployment-guide.
Configure Device Health Attestation
It is important to consider the question, “What is device health?” before looking at how Windows 10 helps to ensure that only healthy devices can connect to corporate network resources.
Generally, a Windows 10 device might be considered healthy if it is configured with appropriate security features and settings. For example, a Windows 10-based device might have the latest antivirus patterns and antimalware signatures installed, be up to date with important Windows updates, and have Windows Defender Device Guard and Windows Defender Credential Guard enabled and configured.
Windows 10 Enterprise includes the Device Health Attestation feature, which can help you determine the health of devices connecting to your corporate network. The requirements for Device Health Attestation are the same as for Windows Defender Device Guard with the exception that TPM 2.3.1 is required. However, you also require a cloud-based service such as Microsoft Intune to enable the necessary MDM features and device policies to enforce health attestation on your users’ devices. The MDM software is provided access to a remote attestation service called Windows Health Attestation Service to establish the health status of devices.
After determining what constitutes a healthy device, you must next consider how to evaluate device health and what to do when devices fail health evaluation. Windows 10 contains features that enable device health determination during startup, and Device Health Attestation to be stored in the device’s TPM. The process is as follows.
Hardware startup components are measured.
Windows 10 startup components are measured.
If Windows Defender Device Guard is enabled, the current Windows Defender Device Guard policy is measured.
The Windows 10 kernel is measured.
Antivirus software is started as the first kernel mode driver.
Boot start drivers are measured.
The MDM server through the MDM agent issues a health check command by using the Health Attestation configuration service provider (CSP).
Startup measurements, now stored in a log, are sent to and validated by the Health Attestation Service.
The following process describes how health startup measurements are sent to the Health Attestation Service.
The device initiates a request with the remote device Health Attestation Service, usually a Microsoft cloud service such as Microsoft Intune.
The client sends the startup log with associated digital certificates.
The remote device Heath Attestation Service then:
Verifies that the certificate is valid.
Verifies the integrity of the submitted log.
Parses the properties in the TCG log.
Issues a device health token that contains the health information, the device ID, and the boot counter information. The device health token is encrypted and signed.
The device stores the health token locally.
Need More Review? Control the Health of Windows 10-Based Devices
To review further details about Device Health Attestation, refer to the Microsoft website at: https://docs.microsoft.com/en-us/windows/device-security/protect-high-value-assets-by-controlling-the-health-of-windows-10-based-devices.
Configure HomeGroup, workgroup, and domain settings
There are a number of ways you can connect your users’ devices to your organization’s network infrastructure, depending on your requirements. In small networked environments, the simplicity of creating and using a workgroup is usually sufficient. In larger organizations, the desirability of centralizing security settings for connected devices means that using an AD DS domain is the logical option. Understanding when to use workgroups and domains is important, and you must know how to connect your users’ devices to these environments.
Note Homegroup
The list of skills measured for the exam includes HomeGroup in this section. To avoid repetition, this topic isn’t covered here. You’ll find information about configuring HomeGoup in Chapter 2, “Configure networking,” and in “Configure data access and usage.”
Configure workgroups
A workgroup is a small collection of computer devices that can share resources. Unlike a HomeGroup, which is discussed in Chapter 2, “Configure networking,” setup and sharing resources in a workgroup requires significant manual intervention. Unlike a domain, there is no centralization of user accounts and related security policies and settings.
A workgroup is sometimes described as a peer-to-peer network, in which each device has its own set of user and group accounts, its own security policy, and its own resources that can be shared with others.
To establish a workgroup, you must define the workgroup name. You do this on each computer that will be part of the workgroup. Use the following procedure to define the workgroup.
Open Control Panel.
Click System And Security.
Click System.
On the System page, click Change Settings, as shown in Figure 3-57.
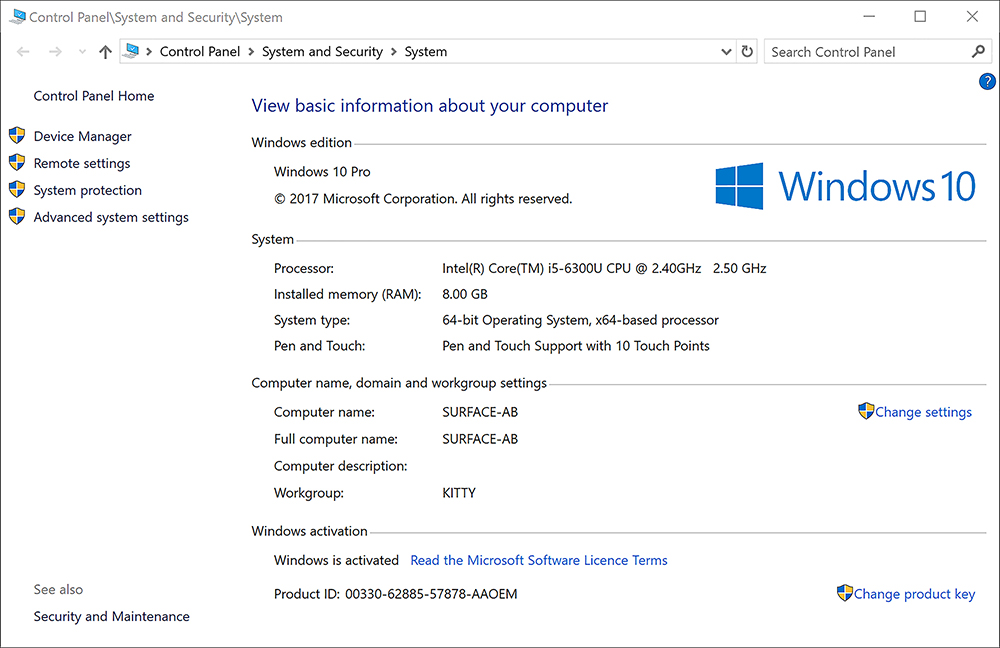
FIGURE 3-57 System settings In the System Properties dialog box, on the Computer Name tab, click Change.
In the Computer Name/Domain Changes dialog box, in the Workgroup box, as shown in Figure 3-58, type the name of the new workgroup and click OK twice. Restart your computer for the changes to take effect.

FIGURE 3-58 Change the workgroup name
![]() Exam Tip
Exam Tip
Your computer can only belong to one workgroup. Your computer can also only belong to a workgroup or a domain, not both.
After you have defined the workgroup name, configure all other devices to use the same workgroup name; this makes browsing for network resources easier for users. Next, set up user accounts on each computer. This is necessary because there is no centralization of user accounts in a workgroup. When a user maps a network drive to a folder that you have shared on your computer, they must provide credentials to connect to the resource; these credentials are held on the sharing computer.
For more information about sharing resources, refer to Chapter 2, “Configure data access and usage.”
Configure AD DS domain settings
In most organizations, using an AD DS domain environment provides the best management experience. In a domain environment, you can centralize administration, security, and application policies and provide a more managed approach to sharing and accessing resources.
To join a computer to an AD DS domain, use the following procedure.
Open Control Panel.
Click System And Security.
Click System.
Click Change Settings, as shown in Figure 3-57.
In the System Properties dialog box, on the Computer Name tab, click Change.
In the Computer Name/Domain Changes dialog box, under Member Of, in the Domain box, type the domain name and click OK.
In the Windows Security dialog box, shown in Figure 3-59, enter the credentials of a domain account that has the required permission to join computers to the domain. Typically, this is a domain administrator account.
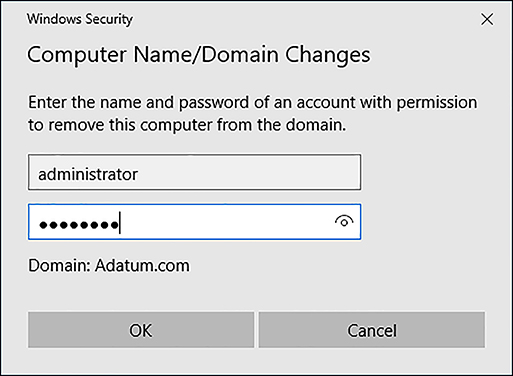
FIGURE 3-59 Adding a computer to an AD DS domain Click OK.
The computer attempts to connect to the domain, create an object for the computer in the AD DS domain, and then update the local computer’s configuration to reflect these changes.
When prompted, click OK twice.
Click Close and restart your computer.
You can now sign in using domain user accounts. After you have added your computer to the domain, it becomes a managed device and is affected by domain GPO settings and security policies.
To use the preceding procedure to add a computer to a domain, the computer you are adding must be connected to the network and must be able to communicate with a domain controller. It is possible to add a computer to a domain if the computer you want to add is offline; this process is known as offline domain join.
Offline domain join is useful when you are adding computers to a domain from a regional data center that has limited connectivity to the main data center where domain controllers reside. To add a computer to a domain by using the offline domain join procedure, use the Djoin.exe command-line tool.
Need More Review? Offline Domain Join (Djoin.exe) Step-by-Step Guide
To review further details about using offline domain join, refer to the Microsoft website at: https://docs.microsoft.com/en-us/previous-versions/windows/it-pro/windows-server-2008-R2-and-2008/dd392267(v=ws.10).
Configure Device Registration
The Device Registration and Workplace Join experience in Windows 8/8.1 has been replaced with the Add Work or School Account, which uses Azure AD, and allows device registration into both Azure AD and MDM solutions.
If a Windows 10-based device is joined to your AD DS domain, users can access your organization’s resources by using the same credentials they signed in to their device with, without needing to reenter them. Users who are using devices that are not domain-joined that connect to resources in your organization must enter credentials for each resource to which they attempt a connection. This can be frustrating for users that want to use their own devices.
Device Registration enables you to facilitate a single sign-on (SSO) experience for these users, negating the need to enter credentials repeatedly or add the device to the domain. The main reasons to implement Device Registration are:
To enable access to corporate resources from non-domain-joined devices.
To enable SSO for specific apps and/or resources in your internal network.
After you enable Device Registration, users can register and enroll their devices in your organizational network. After they have enrolled their devices:
Enrolled devices are associated with a specific user account in the AD DS directory.
A device object is created in AD DS to represent the physical device and its associated user account.
A user certificate is installed on the user’s device.
Requirements
Establishing Device Registration can require complex infrastructure. Table 3-15 shows the infrastructure requirements.
TABLE 3-15 Infrastructure requirements for Device Registration
Requirement |
Explanation |
|---|---|
AD DS |
You must implement an AD DS forest. One of the domain controllers must run at least Windows Server 2012. You must extend the AD DS forest schema to Windows Server 2012 R2 level. |
PKI |
Devices require digital certificates, so you must implement a PKI in your organization to manage the process of issuing and revoking certificates. All devices that use Device Registration must trust the CAs in your PKI, and that is not necessarily automatic, because these devices are not domain members. You might need to configure the devices manually for them to trust the CA. |
Active Directory Federation Services (AD FS) |
You require AD FS to implement Device Registration. The AD FS server requires a certificate from your CA. |
Device Registration Service |
This service is required for you to perform the registration of the devices in AD DS. |
DNS |
You must add appropriate records in DNS so that devices can locate the components for Device Registration. A host record for Enterpriseregistration is required. |
Supported client operating systems |
You can only implement Device Registration on devices running Windows 10, Windows RT 8.1, Windows 8.1, and iOS operating systems. |
Enabling Device Registration
Assuming that your organization’s network infrastructure meets the prerequisites listed in Table 3-15, you can use the following procedure to register devices:
Open Settings and then click Accounts.
In Accounts, click the Access Work or School tab, as shown in Figure 3-60.

FIGURE 3-60 Enabling Device Registration In the details pane, under Related Settings, click Enroll Only In Device Management.
On the Set Up a Work Or School Account page, enter the email address that is used by your work or school and click Next.
On the Connecting to a Service page, enter the password for your account, and click Sign in.
The device attempts to communicate with the Enterpriseregistration host and continue the process of Device Registration.
![]() Exam Tip
Exam Tip
Each device must be configured with the necessary network settings to enable the device to locate servers in your organization. The device must also trust the company CA. If you used a public certificate on the server with the Enterpriseregistration address, this trust is implicit. If you did not, you must export the root certificate from your CA and import it on all devices that you want to register.
Need More Review? Join to Workplace from any Device for SSO and Seamless Second Factor Authentication Across Company Applications
To review further details about Device Registration, refer to the Microsoft website at: https://docs.microsoft.com/en-gb/windows-server/identity/ad-fs/operations/join-to-workplace-from-any-device-for-sso-and-seamless-second-factor-authentication-across-company-applications.
Configure Azure AD Domain join
As organizations move to Office 365 or Microsoft 365 tenants, more machines will need to be joined to the Azure Active Directory (Azure AD). This is a simple process and is seamlessly built-in to Windows 10. So long as the user is online, and has an account in Azure AD (this could be linked from an on premise AD DS domain using AD Connect), then the discovery of the tenant and set up will be automatic.
You can join your device to Azure AD in a number of ways, including during the Windows out of box experience (OOBE), installation setup or at any time after setup by using the Settings app to add a device manually.
To join a new device during the initial setup of Windows, you will be presented with a screen as shown in Figure 3-61. Choose to set up the device for an organization and then proceed to enter your Azure AD credentials such as your Office 365 username and password and Windows 10 will automatically join your device to the correct work or school tenant.
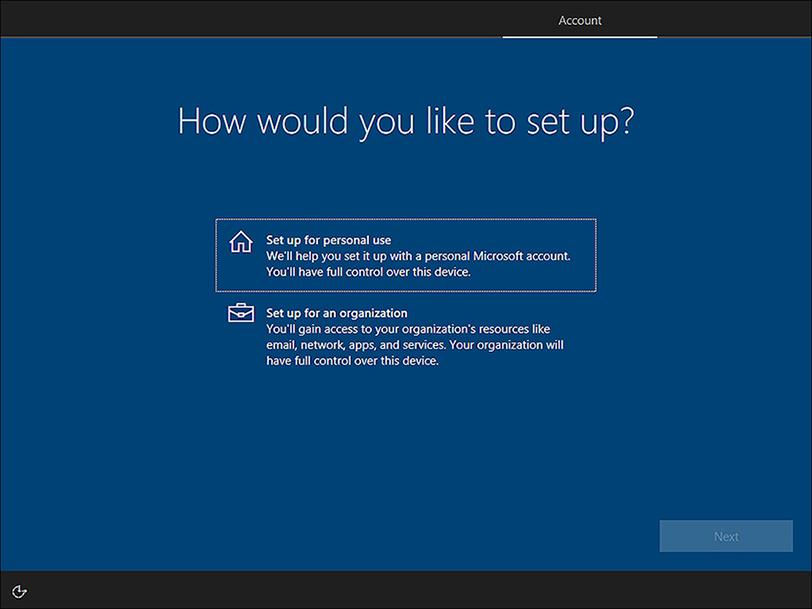
After you have verified your account, using a phone, the device setup will continue as normal and you will be connected to your work or school Azure AD account.
For devices that have already been installed, it is possible to join them to a work or school Azure AD domain at any time.
You can use the following procedure to join your Windows 10 device:
Open Settings and then click Accounts.
In Accounts, click the Access Work or School tab, as shown in Figure 3-60.
In the details pane, under Connect to Work or School, click Connect.
On the Setup a work or school account dialog, click Join This Device to Azure Active Directory and click Next.
On the Help Us Protect Your Account page, click Set it up now.
On the Verify your Identity, choose a method of verifying your identity using a phone, and complete the verification by entering the code that Microsoft sends to your phone.
On the Keep your existing apps working, click Next
On the Make sure this is your organization, confirm the details are correct and click Join.
The You’re all set! Page displays, and your device is now connected to the work or school Azure AD tenant. Click Done.
On the Access work or School page, you should now see your account details displayed under the +Connect button, as shown in Figure 3-62.
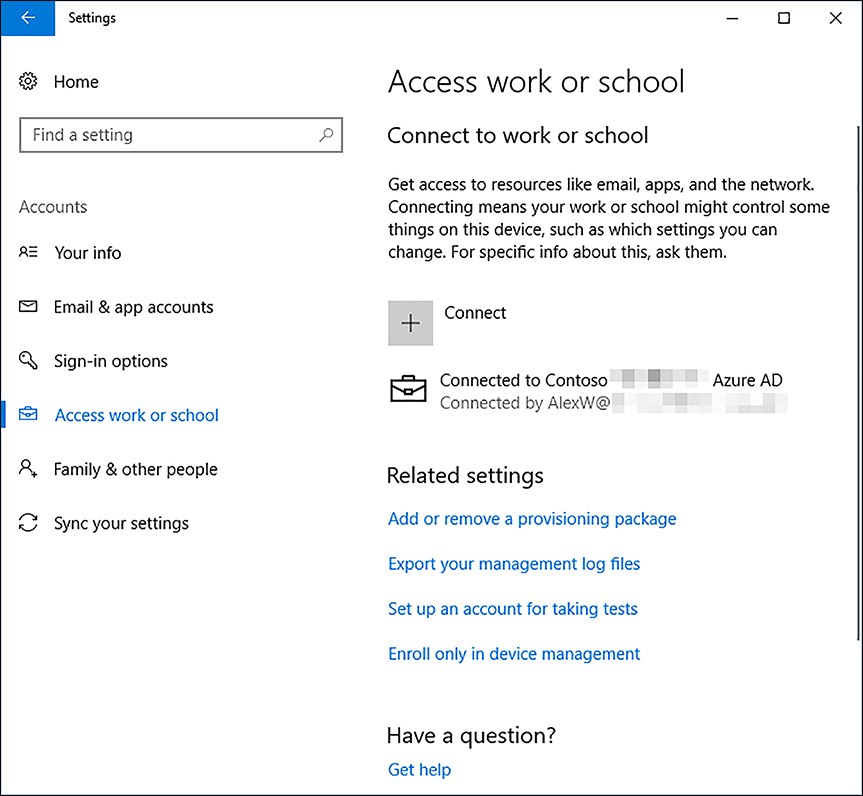
FIGURE 3-62 Azure AD joined
Skill 3.5: Configure advanced management tools
Windows 10 provides you with a number of tools with which to manage the operating system. You can use any or all of these tools, depending on your needs. This chapter explores how to use these tools to manage your users’ Windows 10 devices efficiently.
Configure services
A service can best be described as a software component that interacts at one level with device drivers and, at another level, with app-level components. In a sense, services sit between apps and hardware devices and are considered a core part of the operating system, controlling user requests, through apps, to hardware resources.
These operating system services provide discrete functions in Windows 10 and require no user interaction.
Manage services
You can manage services in a number of ways, including from the command-prompt, by using Windows PowerShell, and by using the management console.
Using the Services management console snap-in
The most straightforward way to manage services is to use the Services management console snap-in, shown in Figure 3-63.
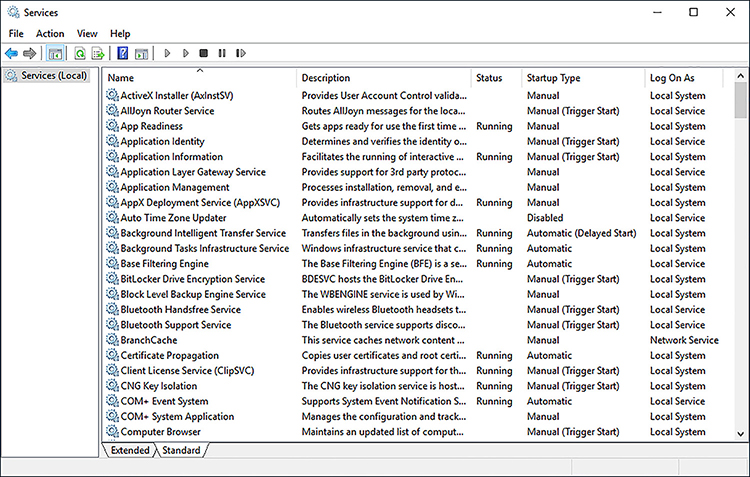
You can use this console to view and manage services in the operating system. For example, to manage the status of a service (assuming it is not running), right-click the service and then click Start. If you want to stop or restart a running service, right-click the running service and then click either Stop or Restart.
You can also manage the settings of a service by double-clicking the desired service. In the Properties dialog box for the named service, as shown in Figure 3-64, you can then configure the properties shown in Table 3-16.
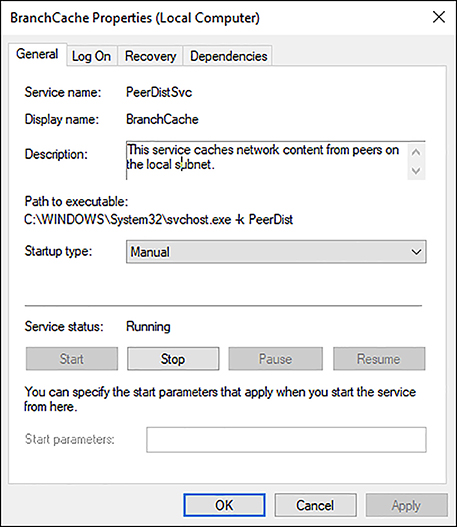
TABLE 3-16 Configurable options for a Windows 10 service
Tab |
Options and explanation |
|---|---|
General |
Service name. You cannot change this value, but it is useful to know what name Windows assigns to the service so that you can reference it when using a command-line tool or Windows PowerShell. Startup type: Disabled, Manual, Automatic, Automatic (Delayed Start). This option enables you to determine the startup behavior of the service. Start parameters. You can add properties to configure the service behavior when it starts. |
Log On |
Log on as Local System Account or This Account. Some services run in the context of the Local System Account. Others must be configured to use a specific, named account, for example, when communicating across the network with another service. You can create special local user accounts for the purpose of running services. When you define a specific user account and change the user password, you must update the password information on the Log On tab for the services that use that account. |
Recovery |
You can configure what happens when a service fails to start or crashes. Specifically, you can configure Windows 10 to attempt a restart of a service if it fails to start on the first attempt. On second attempts, you can choose another option, such as Restart The Computer. Available options for failures are Take No Action, Restart The Service, Run A Program, and Restart The Computer. If you select Run A Program, you can configure additional options for the path and name of the program, plus any runtime switches you want to apply. |
Dependencies |
Some services depend on other services, or groups of services, to run. In this way, Windows 10 can start efficiently by making sure only the required services are in memory. You cannot make changes on this tab, but it is informative to know whether a service has dependencies, especially when a service is failing to start properly. |
Using Event Viewer
As you can see in Figure 3-63, the status column in the Services snap-in shows whether a service is running. If a service is shown as not running, and you feel that it should be running, you can investigate further by using tools such as Event Viewer. You can see service startup information in the System log. Look for Service Control Manager source events, as shown in Figure 3-65.
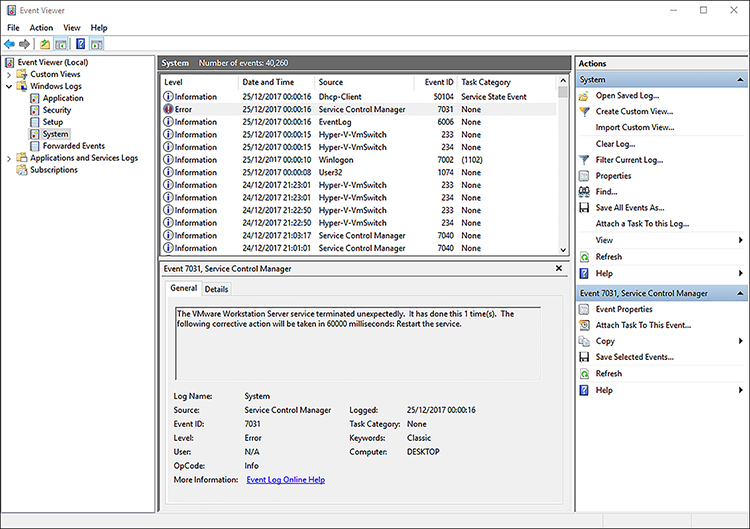
Using command-line tools
You can also use the command line to investigate and troubleshoot service startup. Table 3-17 shows some of the more common command-line tools you can use to work with services. To use these commands, open an elevated command prompt.
TABLE 3-17 Managing services from the command line
Command |
Explanation |
|---|---|
Net start |
When used without arguments, lists the running services. When used with the name of a service, the service, if not running, is started. For example, net start workstation starts the Windows workstation service. |
Net stop |
Must be used with the name of a running service. For example, net stop workstation will stop the Windows workstation service. |
Sc query |
Displays a list of services. |
Sc stop |
Enables you to stop a named service. For example, to stop the spooler service, run: Sc stop spooler. |
Sc start |
Enables you to start a named service. For example, to start the spooler service, run: Sc start spooler. |
You can also use Windows PowerShell to manage services. This is particularly useful because you can use Windows PowerShell to administer other computers remotely, including their services. In addition, you can script Windows PowerShell cmdlets, enabling you to store common administrative tasks for future use. Table 3-18 shows the cmdlets you can use to manage services in Windows 10. Open an elevated Windows PowerShell window to use these cmdlets.
TABLE 3-18 Managing services with Windows PowerShell
Cmdlet |
Explanation |
|---|---|
Get-service |
Lists available services. To get a list of running services, use the following cmdlet: Get-Service | Where-Object {$_.status -eq “running”} |
Stop-service |
Enables you to stop the named service(s). For example: Stop-service - name spooler |
Start-service |
Enables you to start the named service(s). For example: Start-service - name spooler |
Restart-service |
Enables you to stop and start the named service(s). For example: Restart-service - name spooler |
Set-service |
Enables you to reconfigure the startup and other properties of the named service. For example, to change the display name of the Workstation service, use the following cmdlet: set-service -name lanmanworkstation -DisplayName “LanMan Workstation” |
Need More Review? Managing Services
To review further details about using Windows PowerShell to manage services, refer to the Microsoft PowerShell Documentation website at: https://docs.microsoft.com/powershell/module/microsoft.powershell.management/?view=powershell-6.
Use the System Configuration tool
If you are experiencing problems with starting your Windows 10 device, and you suspect a service might be the cause of the problem, you can control which services start when you start your computer by using Safe Mode. This reduces the set of services that start to the minimum required to run Windows.
You can force your computer into Safe Mode during startup or use the System Configuration tool, Msconfig.exe, as shown in Figure 3-66. To access the System Configuration tool, run msconfig.exe. You can then configure your computer’s startup behavior. Configurable options are described in Table 3-19.
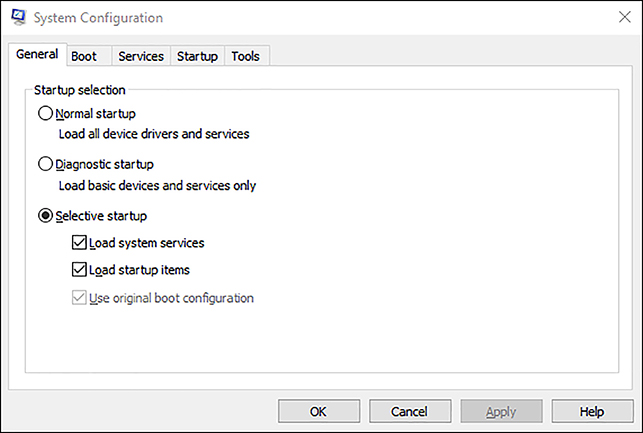
TABLE 3-19 System configuration options
Tab |
Options and explanation |
|---|---|
General |
Select Normal Startup to configure normal operations on your computer. Choose Diagnostic Startup to load a minimal set of devices and services. Choose Selective Startup to be more selective about what is initialized during startup. |
Boot |
You can enable Safe Mode by clicking Safe Boot. Then you can choose additional options: Minimal, Alternate Shell, and Network. You can also start without the GUI, enable a boot log, and configure startup to use a base video driver and configuration. The Advanced Options button enables you to restrict Windows to using fewer logical processors and a reduced amount of memory. These options are useful for re-creating a computer configuration in which a specific problem was experienced. If multiple operating systems are installed on your computer, they are listed on this tab, enabling you to select between the available operating systems. You can choose to make your boot selections permanent, but you should exercise caution with this option in case the settings you have selected are inappropriate. |
Services |
The Services tab displays the available operating system services and enables you to configure their startup behavior. For example, you can disable any services that you suspect might be causing issues with your computer. To disable a service, clear the check box next to its name. |
Startup |
The Startup tab enables you to access the Start-up tab in Task Manager to control the startup behavior of apps. |
Tools |
The Tools tab provides a consolidated list of available system tools, including: Change UAC Settings, System Properties, Computer Management, Device Manager, and the Registry Editor. |
Configure Device Manager
Devices are hardware components, either built in to your device or connected as a peripheral device. The operating system interacts with devices by using device drivers, specialist pieces of software generally developed by the hardware vendor.
You can manage devices and the associated drivers by using the Device Manager management console snap-in.
You can access Device Manager from the Computer Management tool or by right-clicking Start and then clicking Device Manager, as shown in Figure 3-67.
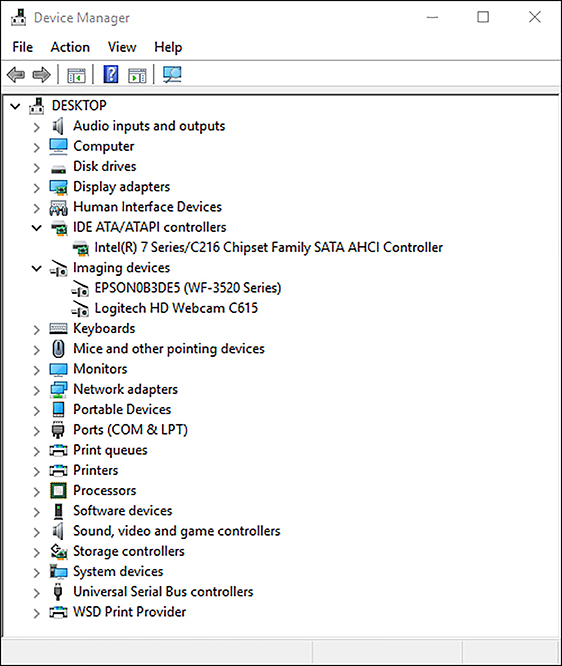
If there is a problem with a device, it is shown with an exclamation mark in Device Manager. You can then manage the device by right-clicking it and then choosing:
Update Driver Software Use this to update the driver software for your device. You can choose to use a device driver that you have obtained and stored locally or have Windows try to detect and download the latest driver.
Disable You can stop the device from running. This option leaves the device configured in Windows for possible later use.
Uninstall This option enables you to remove the device and its driver from Windows. When you restart, Windows might detect the device and install the default driver for it.
Scan For Hardware Changes Windows normally detects changes in hardware and might reconfigure devices to accommodate such changes. For example, adding additional hardware might force Windows to reconfigure existing devices. If you suspect Windows has not properly adapted to a change in hardware, you can force it to scan for hardware changes.
Properties You can configure advanced options by using the Properties option for a device, as shown in Figure 3-68. Table 3-20 describes the configurable options.
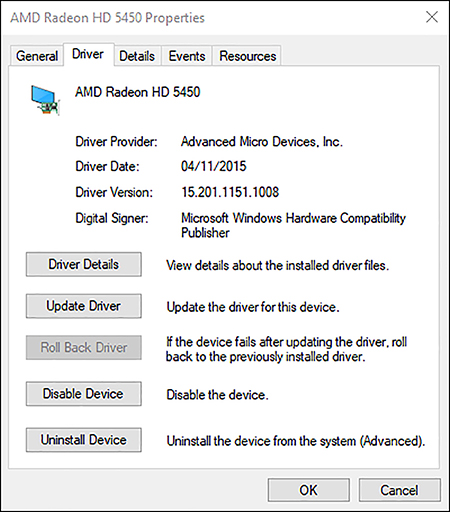
FIGURE 3-68 Properties of a device
TABLE 3-20 Device Manager device properties options
Tab |
Options and explanation |
|---|---|
General |
Shows the current status of the device. No configurable options. |
Driver |
Current driver information appears: Driver Provider, Driver Date, Driver Version, and Digital Signer. You can also view driver details, update the driver, roll back the driver (if previously updated), and disable or uninstall the driver. |
Details |
Enables you to view advanced properties for the device. No configurable options. |
Events |
Provides a useful history of events that relate to the device, for example, when the device was installed, updated, or reconfigured. No configurable options. |
Resources |
Displays the hardware resources the device uses. Conflicts with other devices are shown, where they exist. No configurable options. Note: This tab is not always present. |
Power Management |
Enables you to configure two power-related settings:
Note: This tab is not always present. |
Configure and use the MMC
Most of the administrative and management tools built in to Windows 10 are based on Microsoft Management Console. This tool is a framework into which you can plug management tools. You can also set the focus of the tool to be local or remote, enabling you to manage not just your own Windows 10-based device, but also other Windows devices on the network.
Configure the management console
To launch a new Microsoft Management Console, type mmc.exe into the Start search and accept the UAC prompt. You can add management tools, or snap-ins, to the console by clicking the File menu and then choosing Add/Remove Snap-in, as shown in Figure 3-69. You can then choose one or more snap-ins to add to your console.
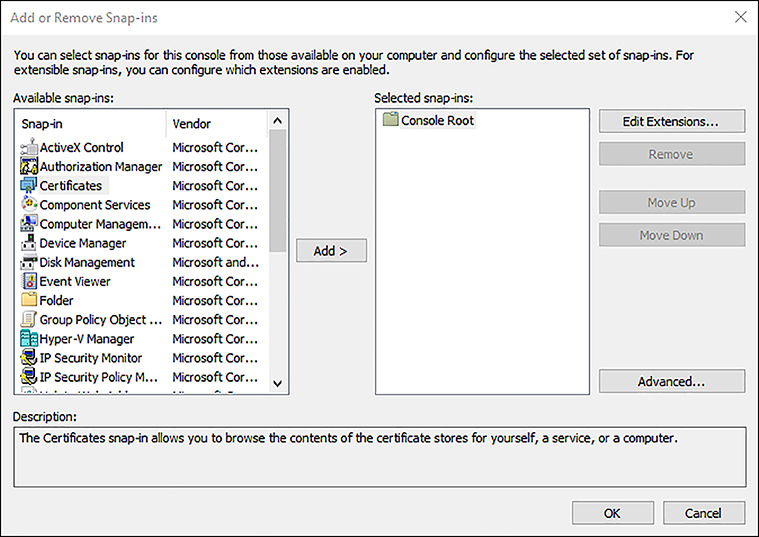
When you add a snap-in, you are asked whether the focus for the snap-in will be the local computer or a remote computer. Make this selection and then click Finish. If you want, you can add additional snap-ins to the console. When you have added all the required snap-ins, click OK.
After you have added your snap-ins, you can save the console. Click File and then click Save. Specify a suitable name and location for the console. Click Save.
Customize your console by using Taskpad views
You can further customize your console by using Taskpad Views. Taskpad enables you to create a task-focused version of your console. This is particularly useful for when you want to designate a particular subset of management tasks to a user. To create a Taskpad view, click Action and then click New Taskpad View. The New Taskpad View Wizard appears. As shown in Figure 3-70, you have the option to display Taskpad as a vertical or horizontal list or use no list. Complete the wizard by giving your Taskpad a name and then click Finish.
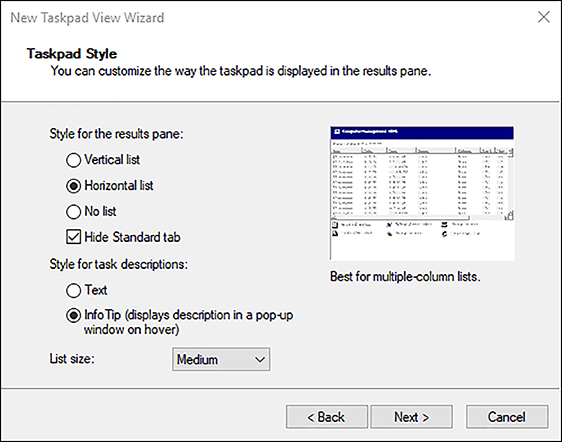
You are prompted to launch the Add New Task Wizard. This enables you to add specific tasks to the Taskpad view. In the New Task Wizard, you can add menu commands, shell commands, or navigation options. You can run through the wizard as many times as you need to set up the individual tasks that you want to enable in Taskpad.
Finally, you must restrict a user to use only the Taskpad view you have created. This is achieved by clicking the File menu and then the Options menu. In the Options dialog box, in the console mode list, click User Mode - Limited Access, Single Window. Clear the Allow The User To Customize Views check box and then click OK. Save your console.
For example, as shown in Figure 3-71, tasks for viewing user properties, deleting users, and setting user passwords have been added to a Taskpad view. Note that the user still requires administrative rights to perform the management tasks that the console facilitates.
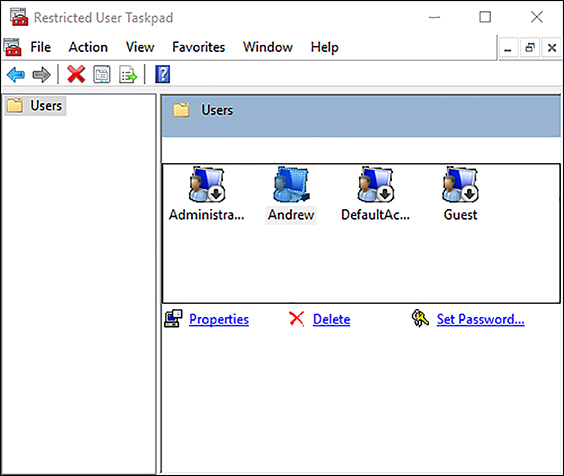
After you have created the console with its Taskpad view, you can distribute it to users that have the appropriate management rights to perform the task.
Configure Task Scheduler
Often, there will be tasks that you must perform at specific times, or on a repeated basis. Task Scheduler can help you. You can use it to schedule simple or complex tasks, either on the local computer or on a remote computer.
You can access Task Scheduler from the Windows Administrative Tools node on the Start menu, or from Administrative Tools in Control Panel. In fact, Task Scheduler is a management console snap-in and can be added to any custom console using the procedure outlined earlier.
To create a task, load Task Scheduler, as shown in Figure 3-72 and from the Action pane, click Create Basic Task.
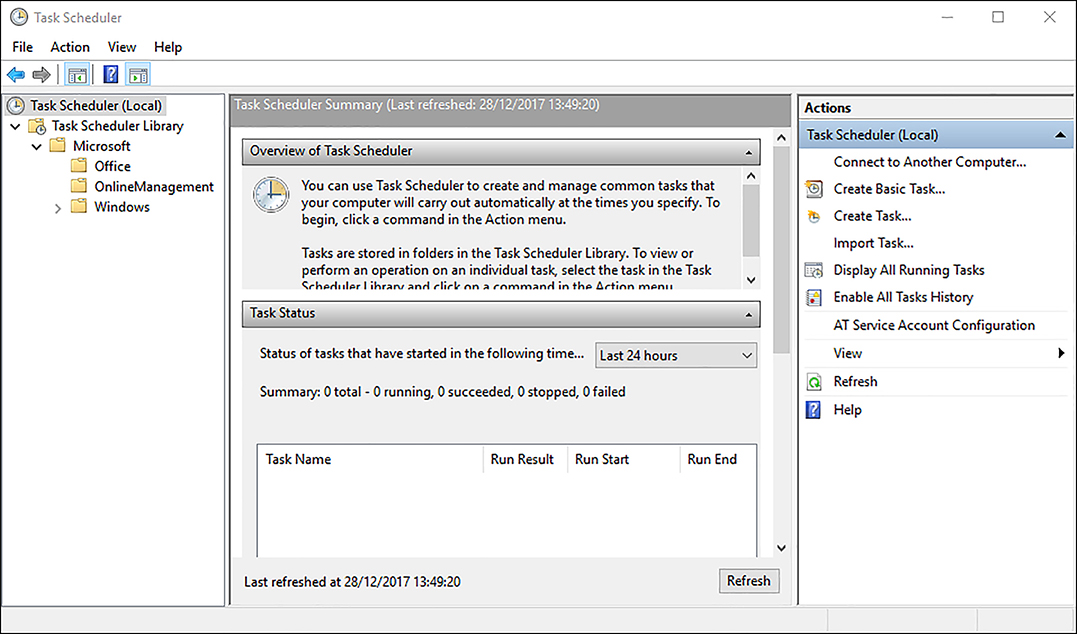
The Create A Basic Task Wizard starts. Use the following procedure to create a task.
On the Create A Basic Task page, type a name and description for your task and then click Next.
On the Task Trigger page, specify when you want the task to start. Choose from Daily, Weekly, Monthly, One Time, When The Computer Starts, When I Log On, and When A Specific Event Is Logged. Click Next. If you chose a time trigger, you must then specify the time. For example, if you chose Weekly, you must define when during the week. Click Next.
On the Action page, choose Start A Program.
On the Start A Program page, specify the name and location of the program and any command-line switches for the program. Click Next.
On the Summary page, click Finish. You can select the Open The Properties Dialog For This Task When I Click Finish check box to review your task settings.
To review or reconfigure your scheduled task, in the navigation pane, click Task Scheduler Library and, in the center pane, locate and double-click your task. You can then use the tabbed dialog box to reconfigure the properties, as shown in Figure 3-73.
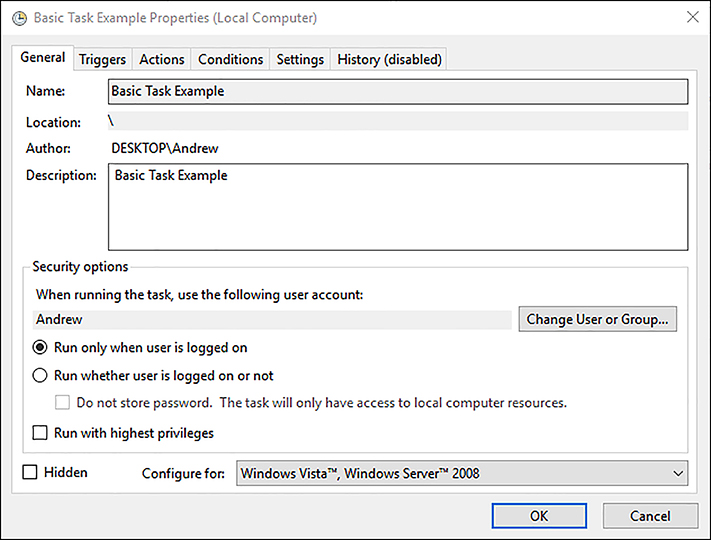
![]() Exam Tip
Exam Tip
You can view and manage scheduled tasks from the command line by using the Schtasks.exe tool. You can find out more on the website at: https://docs.microsoft.com/en-us/windows-server/administration/windows-commands/schtasks.
Configure automation of management tasks with Windows PowerShell
You have already seen in this book how useful Windows PowerShell can be and how pervasive this management tool in Windows 10 is. However, it’s worth considering the benefits of using Windows PowerShell to automate common or repetitive administration or management tasks.
Building complex scripts in Windows PowerShell can be daunting and is beyond the scope of this book. However, there is no reason you cannot begin to gain skills with Windows PowerShell and save your frequently used cmdlets to .ps1 files for subsequent reuse.
Create simple scripts
Windows PowerShell cmdlets are constructed of verbs and nouns. The nouns are always singular. For example, you have seen in this chapter that you can use the get-service cmdlet to retrieve information on Windows 10 services; “get” is the verb, “service” is the noun.
You can also add parameters to most cmdlets. So, for example, to retrieve information about the service called LanmanWorkstation, add the -name parameter to the get-service cmdlet:
get-service -name lanmanworkstation
You can pass the results of one cmdlet to another for additional processing. This is known as piping. For example, you can retrieve a list of services with the get-service cmdlet and then pipe the result (a list of all services) and look for those services that are running, as shown in the following code.
Get-Service | Where-Object {$_.status -eq "running"}
In the preceding command, you search through the list of all returned services and look for those services for which the status value equals running. You could just as easily use the same approach to look for services that are not running and then pipe that on to another cmdlet that might start those services or query why they’re not running.
You can see that a few simple cmdlets joined together begin to create a powerful script. Your script can contain any Windows PowerShell cmdlet that you have used in the Windows PowerShell window. You can also use variables and gather input from an operator and provide output to the monitor to let the operator know what’s happening in the script.
To create a simple script, you merely need to store your cmdlets in a text file with a .ps1 file extension and then run the script, by referencing it using the full path and name of the file in a Windows PowerShell window.
Enable scripts to run
To protect you from unsafe scripts, Windows 10 prohibits running unsigned scripts. Unless you can sign your scripts, you must enable your computer to run unsigned Windows PowerShell scripts. You can do this by using the Set-ExecutionPolicy cmdlet in an elevated Windows PowerShell window.
To enable your computer to run any scripts that you create locally, but only digitally signed scripts from remote sources, run the following cmdlet.
Set-ExecutionPolicy RemoteSigned
Need More Review? Windows Powershell
To review further details about getting started using Windows PowerShell scripts, refer to the Microsoft website at: https://docs.microsoft.com/en-gb/powershell/.
Use Windows PowerShell ISE
Windows PowerShell ISE, shown in Figure 3-74, provides command-completion functionality. This feature enables you to learn about cmdlet syntax as you use them. You can also create and edit scripts in Windows PowerShell ISE and then run the scripts step by step in the script window. This procedure can help you debug your scripts to ensure that they are running as intended.
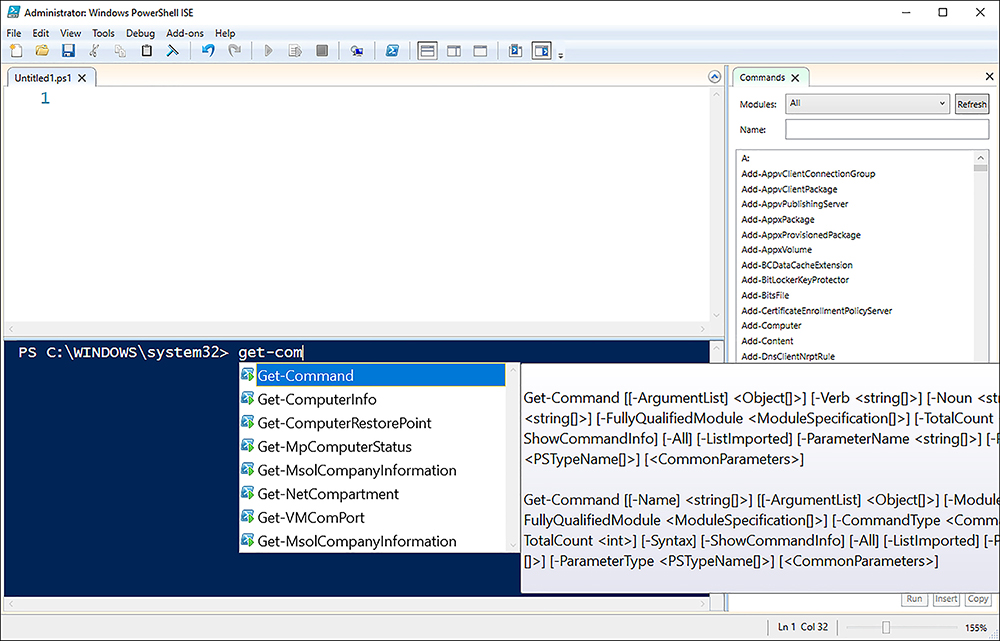
Convert Group Policy objects to MDM policies using the MDM Migration Analysis tool
The MDM Migration Analysis Tool (MMAT) is new with the Creators Update and helps accelerate the process of moving from traditional group policies to mobile device management (MDM). The tool is able to analyze and provide a colored coded report for which group policies are configured on a targeted machine, advising which GPO can be configured by MDM.
The tool covers over 800 policies across 60 management areas.
To run MMAT to determine which Group Policies have been set for a target user/computer and then cross-reference them against the built-in list of supported MDM policies follow these steps:
Install Remote Server Administration Tools for Windows 10, from https://www.microsoft.com/en-us/download/details.aspx?id=45520.
Download and unzip the MMAT tool from this website: https://github.com/WindowsDeviceManagement/MMAT, to your PC.
Open an elevated PowerShell console.
Change the console directory to the folder which contains the unzipped MMAT tool and scripts.
Run the following scripts in PowerShell as shown in Figure 3-75:
Set-ExecutionPolicy -ExecutionPolicy Unrestricted -Scope Process
$VerbosePreference="Continue" ./Invoke-MdmMigrationAnalysisTool.ps1 -collectGPOReports –runAnalysisTool

FIGURE 3-75 Running the MDM Migration Analysis Tool The Invoke-MdmMigrationAnalysisTool.ps1 completes and generates three outputs:
MDMMigrationAnalysis.xml XML report containing information about GPO policies found on the target and how they map, if at all, to MDM.
MDMMigrationAnalysis.html HTML representation of the XML report which you can view in a browser.
MdmMigrationAnalysisTool.log A log file containing the detailed MMAT activity.
You should review the MDMMigrationAnalysis.xml as shown in Figure 3-76, to view the detailed analysis of the MMAT tool.
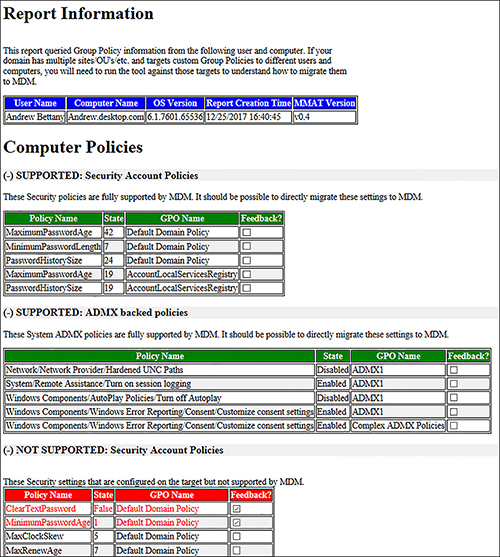
FIGURE 3-76 MDM Migration Analysis Tool XML Output
Need More Review? MDM Migration Analysis Tool Instructions
For more information on the MMAT you can view the “MDM Migration Analysis Tool Instructions.pdf” contained in the unzipped MMAT folder.
Although the tool was released in the Creators Update timeframe, it can be used on devices running Windows 7 and later.
MMAT will then generate both XML and HTML reports, which indicate the level of support for each Group Policy and whether policies are enabled or disabled in a modern MDM environment.
Thought experiments
In these thought experiments, demonstrate your skills and knowledge of the topics covered in this chapter. You can find the answers to these thought experiments in the next section.
Scenario 1
Your organization is considering upgrading the whole company to Windows 10 in the next six to nine months. You need to be able to recommend which version of Windows 10 the company requires as well as keep up to date with the continual development of the operating system. Your organization specializes in the health care industry and has approximately 2,000 members of office and mobile staff. The Research and Development team use a specialist LOB application that does not need access to the Internet or require any operating software updates.
Your team needs to understand the new Universal Windows Platform Store apps to see whether some current applications can use this format. Until this research is complete, you need to restrict the use of Store apps.
Answer the following questions for your manager.
How will you keep abreast of the latest development in Windows 10 and access the preview builds?
Which branch of Windows 10 will you recommend for the office and mobile staff and the Research and Development team?
How could you prevent users from installing apps from the Windows Store?
Scenario 2
Your company has recently upgraded half of its computers from Windows 7 to Windows 10 Pro. Staff members use Office and a web-based line-of-business application. The Help Desk Manager has received several complaints from users, who state a variety of problems following the upgrade, including that:
Their computers are slow
Apps stop responding
Websites are slow to load
The remaining Windows 7-based computers do not exhibit the same issues. You need to offer the help desk some advice on how to diagnose these problems and recommend how to resolve them as soon as possible.
Answer the following questions from the Help Desk:
Why might the computers be slow after the upgrade?
Which tool could you recommend to help the Help Desk support members verify which apps are freezing?
You suspect that the network card could be a performance bottleneck. How could this suspicion be tested?
How would a network card bottleneck present itself?
Scenario 3
Your company is upgrading its operating system from Windows 7 Pro to Windows 10 Pro for its 500 users. The Sales team members will be provided with new Surface Pro tablets with Windows 10 Pro. The remaining members of the staff use desktop PCs. The Sales team members work away from the office and are required to create a local backup of data contained on their tablets to an external USB hard drive on a weekly basis.
The networked file server in the head office is available for all staff to use, either through the local network or by using VPN technology. Office users do not create backups because data backups are performed automatically on the file server.
You need to ensure that the users of the Surface tablets can create backups and access files contained in previous backups as necessary.
Answer the following questions for your manager.
Which Windows 10 backup tool will you implement for the Sales team members?
One of the Sales team members needs to access a file saved on their old laptop. How will you advise this user?
All users need to be able to restore files without contacting the Help Desk function. How can this be achieved?
Scenario 4
You work as a desktop support technician. Your company has recently deployed Windows 10 and is implementing authentication and authorization. Your manager has some concerns about security of devices used by the Sales team, and is considering replacing them with new laptops. You must investigate and then configure features in Windows 10 that can help allay your manager’s concerns.
Answer the following questions about authentication and authorization in your organization.
Your manager asks you about the benefits of using Microsoft accounts over those of using local accounts on your users’ Windows 10 devices. What are these benefits?
Your manager wants to know why entering a four-digit PIN is more secure than using a complex password. How would you answer?
Windows 10 implements a feature called User Account Control. What is the default prompt that a user receives when they attempt to perform a management task requiring elevation when they are signed in using a standard user account?
What are the requirements of Windows Defender Device Guard in Windows 10?
What is the purpose of Device Registration?
Scenario 5
You work as a desktop support technician. Your Windows 10 deployment for 5000 devices is now complete, and you are now busy supporting your users. Answer the following questions about using advanced management tools and techniques for your organization:
You find that you are repeatedly performing the same management task on multiple computers. At the moment, you use several customized Microsoft Management Consoles to perform the required tasks. How could you achieve this more easily?
A number of users are experiencing problems with their computers. You determine that the issue relates to a service that occasionally stops and is then restarted. Where can you track information about this problem?
What command-line tools can you use for managing services?
You decide to delegate administration of resetting user passwords to a specific user in each department. You have already assigned the appropriate users the required management rights to perform this task. You want to provide a management tool for this task, and only this task. What could you do?
Thought experiment answers
This section provides the solutions for the tasks included in the thought experiment.
Scenario 1
You should sign up to be a Windows Insider at https://insider.windows.com/. On a physical or virtual machine, and install Windows 10 on it and also any applications and settings that your company uses. You should then enroll the device into the Windows Insider program and allow the device to be upgraded to the latest version of the Insider Preview of Windows 10. You should review the new features and test compatibility and reliability with your apps and settings. You can also review the regular Insider newsletter.
As an enterprise customer, you would recommend the Current Branch of Windows 10 Enterprise for all staff users. (This is being renamed to Windows 10 Enterprise Semi-Annual Channel). For the Research and Development team, you would recommend the latest Long-Term Servicing Branch version for the devices that are required to run the LOB application.
You could configure the Group Policy setting, Disable All Apps From Windows Store, which is found in the Computer Configuration/Administrative Templates/Windows Components/Store node. This prevents the launching of all apps from the Windows Store on all devices. The Windows Store will also be disabled. The Group Policy should be applied to all Windows 10-based devices.
Scenario 2
Answers might vary. Several potential areas need to be investigated. The original computers should have met the minimum specification for Windows 10 to upgrade from Windows 7. The computers might be quite old and contain components that are slow in comparison to modern hardware, such as older hard drives without cache, or slow RAM memory. The BIOS or motherboard firmware might be old and need updating. The hardware device drivers might not have been updated to the latest versions for Windows 10.
Recommend to the Help Desk that it suggest using Reliability Monitor to review the stability history of the computers that are reporting app freezing. The Reliability Monitor report should identify the failing app and how often it is failing, together with potential solutions. You should also be able to see whether other failures are occurring that might relate or contribute to the app failure.
Answers might vary. You could review the network card driver version and see whether there are any known issues relating to the network card and Windows 10 on the manufacturer’s website. You could use Performance Monitor to review the performance for the Network Interface counter and monitor the Output Queue Length.
Network-related activities such as web browsing and opening and saving resources across the network would be slower than normal. If there is network saturation, the report should indicate that the queue length is more than 2, meaning that the network card cannot process network packets quickly enough.
Scenario 3
The Sales team members should use the File History feature in Windows 10, which will back up their data to a removable drive.
The Windows 7 laptop devices were regularly backed up. The Backup And Restore (Windows 7) tool allows access to the backups created with Windows 7. The user should be able to restore the required file by launching the Backup And Restore (Windows 7) tool on their Windows 10 Surface device and accessing the backup of the Windows 7 laptop.
Previous Versions is the preferred method for users to restore files that have been deleted or accidentally modified from File Explorer. The Sales team members can use Previous Versions, which is enabled on their Surface devices. This is automatically enabled by their use of the File History feature. For office staff, the Previous Versions feature on the network shared files will need to be enabled on the file server.
Scenario 4
Microsoft accounts offer the following benefits to users of Windows 10 devices, which are not available to local accounts:
Access to personal Microsoft cloud services, including OneDrive, Outlook.com, and other personal apps
Access to Microsoft Intune, Microsoft Office 365, and Microsoft Azure
The ability to download and install apps from the Microsoft Store
The ability to sync user settings between devices that are linked to your Microsoft account
A PIN is more secure because it is based on two-factor authentication: knowledge of the PIN and possession of the device where that PIN is registered as an authentication gesture. Knowing the PIN alone, will not allow access. A complex password is itself very secure, but it can be used on any device, and only knowledge of the password is required.
A standard user receives the prompt for administrative credentials when they attempt elevation to perform a management task. This would require a call to the Help Desk whom would then connect remotely to provide the correct administrative credentials and allow the management task to complete.
To implement Windows Defender Device Guard, your device requires a 64-bit version of Windows 10 Enterprise; a UEFI version 2.3.1 or greater; Secure Boot; virtualization features: Intel VT-X, AMD-V, and SLAT; a VT-d or AMD-Vi input-output memory management unit; a TPM; and firmware lock.
Device Registration enables users with their own devices to access corporate network resources by using SSO. From the organization’s perspective, these devices can be managed as part of an MDM policy.
Scenario 5
You could create Windows PowerShell scripts as required, that contain the required management cmdlets. Because Windows PowerShell supports remoting, it is easy to run the script against remote computers at the same time. You must, however, ensure that the execution policy for each computer supports the running of PowerShell scripts and that Windows PowerShell remoting is enabled.
Use the System log in Event Viewer. You can group events based on source; in this instance, the source is Service Control Manager.
You can use Windows PowerShell to manage services, but also the SC.exe and Net.exe command-line tools can be used.
You could create a custom Taskpad view for the required task.
Chapter summary
Windows 10 will be updated with ongoing servicing updates containing security, software updates, and feature upgrades, providing new features and functionality.
Windows 10 Home users cannot disable updates or defer feature upgrades.
Pro, Enterprise, and Education editions of Windows 10 can opt to use the current branch for business and defer upgrades by at least 365 days.
A special build of Windows 10, Long-Term Servicing Branch (LTSB), is available, which won’t force businesses to accept feature upgrades.
Delivery Optimization enables Windows 10 to source Windows Update from local PCs and from devices on the Internet.
The Windows Insider program enables members to gain access to the pre-release versions of Windows 10 and provide feedback directly to the development team.
Windows updates can be rolled back individually and prevented from re-installing.
You can remove a Windows 10 Insider preview build completely and revert to the previous build of Windows without losing settings or data.
Windows Store apps are automatically updated, but you can modify this setting and manually update each app.
You can restrict access to the Windows Store, apps, and app updates by using Group Policy.
Event logs automatically record system activity such as logons, application errors, and services stopping and starting.
You can pull event logs from remote computers by using event subscriptions if you enable remote management.
Windows 10 includes several tools to view system performance, including Task Manager, Performance Monitor, and Resource Monitor.
In Performance Monitor, you can create benchmarking reports by creating your own user-defined collector sets and running them to generate a performance baseline.
Windows 10 provides the Print Management console, which provides a consolidated view of print-related activities, including print devices, drivers, and print queues.
Windows 10 introduces the option manage your default printer by setting this to the last printer you used rather at your current location.
The built-in Search feature uses the background indexing service to index areas of your hard drive automatically, including files stored in your user profile.
Windows Defender provides a comprehensive antimalware solution that automatically runs and updates itself to protect your system.
Windows Defender Advanced Threat Detection enables Microsoft to respond rapidly to new malware threats by receiving and analyzing telemetry from Windows 10 devices worldwide.
Reliability Monitor provides a graphical history of your computer’s reliability and offers solutions to resolve issues.
A recovery drive can be stored on a USB drive or SDHC memory card (8 GB minimum capacity) and used to boot to Windows RE to access the advanced recovery tools.
System Restore can provide you with an effective method of recovering your system after a corrupt device driver or malware infection.
When resetting your device, you can remove everything and return your device to the OOBE state or keep your files and reset the operating system.
Windows 10 provides additional tools in the advanced troubleshooting mode and still supports many older options such as booting in Safe Mode.
You should configure System Protection to safeguard your computer’s system files, settings, and data on a regular schedule.
Windows 10 provides multiple backup tools, including File History and Backup And Restore (Windows 7).
WBAdmin enables you to perform backups from the command line and restore data from Windows RE.
File History provides a continuous backup of your personal data files, offering a high level of recovery granularity.
The Previous Versions feature is included in Windows 10 and offers users a simple method of recovering deleted or accidentally modified files from File Explorer.
You can recover deleted files in OneDrive by using Recycle Bin in OneDrive.com or File Explorer for up to 90 days before they are automatically removed.
UAC helps prevent malware from damaging PCs and should not be turned off.
You can use either local or Microsoft accounts for authentication in Windows 10.
You can use Windows Hello, Windows Hello for Business, and picture passwords to improve authentication security.
Users with smartphones can use Dynamic Lock which allows users to automatically lock their device whenever they step away from their PC.
For devices that sign on using a Microsoft account you can use Credential Manager to secure and roam passwords.
Windows Defender Credential Guard helps protect authentication by using virtualization based security.
Windows Defender Device Guard and Device Health Attestation can help secure Windows 10 devices that are vulnerable to attack, such as kiosk or high risk devices.
Devices can access domain resources by belonging to that domain or by using the Device Registration enrollment within the Settings App.
For users belonging to organizations that have Office 365 or Microsoft 365 tenants, machines can be joined to the Azure Active Directory (Azure AD) during the initial OOBE or at any time after setup has completed.
Operating system services can be controlled from the Services snap-in, from the command prompt, and with Windows PowerShell.
The System Configuration tool enables you to control aspects of system startup behavior, including minimal services startup.
You can use Device Manager to view and manage device drivers and the underlying hardware devices, including updating drivers, disabling devices, and uninstalling devices.
You can customize the management console to your needs with whichever snap-ins you need and use Taskpad views to create a specific, restricted tool for delegated administration.
Windows 10 enables you to create and manage a schedule of automated tasks by using Task Scheduler.
By saving commonly used administrative Windows PowerShell cmdlets in a .ps1 file, you can easily automate routine management tasks with scripts.
Windows PowerShell ISE provides a user friendly interface that allows you to create and edit scripts and run and debug scripts step by step in the script window.
The MDM Migration Analysis Tool (MMAT) allows you to identify which GPOs are configured on a targeted machine and advise which GPO can be configured by MDM.