Throughout this book, I have presented many different techniques for configuring and customizing SharePoint. When discussing these techniques, I have focused on practical examples that solve common issues. There will be many times, however, when you want to go beyond the basics and create an advanced feature or solve a problem particular to your organization. In these situations, you will need a strong understanding of site definitions, the SharePoint object model, and the exposed web services. In this chapter, I will present these advanced programming interfaces so that you can make use of them in your solutions. All of these interfaces are fully documented in the WSS and MOSS SDKs available at http://msdn2.microsoft.com.
Although I have presented many different ways to customize the look, navigation, and content of a SharePoint site, there are times when you will want to create your own site definition. Creating your own site definition has significant advantages because it represents a single template that can be used to create multiple sites. Furthermore, sites that are built from a site definition are always uncustomized, which means that changing the site definition will change all of the sites based on that template. I discussed the performance and maintenance issues surrounding customized and uncustomized pages in Chapter 5.
A site definition provides the fundamental structure of a site and specifies its initial feature set, available web parts, defined lists, navigational elements, and more. Site definitions are the underlying structures that result in the list of site templates that appear in SharePoint. As such, site definitions are the most fundamental building block of a SharePoint solution. A site definition consists of several files located in folders beneath the Program FilesCommon FilesMicrosoft Sharedweb server extensions12TEMPLATESiteTemplates directory. The key files are listed in Table 11-1, and I discuss them in detail throughout this section.
Table 11.1. Key Site Definition Files
File | Description |
|---|---|
| This is the main site definition file. This file specifies various configurations available for a site including lists, web parts, navigation, and features. |
| This is the file that will be used to render the home page of sites created from this definition. Each site definition may have its own |
| This is the |
| There are several files by this name that define the initial column set for lists and libraries in a site. |
| This file defines view information for a site. It should never be edited. |
| This file defines view information for lists. It should never be edited. |
Creating new site definitions is accomplished using the Collaborative Application Markup Language (CAML). CAML is a language based on XML elements that define all aspects of a SharePoint site, from link structure to available web parts. Each time you create a new SharePoint site, a CAML template is used to generate the pages associated with the site. By modifying these CAML structures, you can make small changes to a site layout or even create radically new site structures.
While it is theoretically possible to create your own site definition from scratch, there really is no reason to attempt it. Instead, it is better to start off by copying one of the existing site definitions and modifying it. All of the site definitions can be found in the C:Program FilesCommon FilesMicrosoft Sharedweb server extensions12TEMPLATESite Templates directory. In this directory, you will find a folder for each definition. Along with these specific site definitions, some common elements have been factored out into the separate directory C:Program FilesCommon FilesMicrosoft Sharedweb server extensions12TEMPLATEGLOBAL. This folder contains the definition for common lists and the default.master page.
Note
Once again, Microsoft has saddled us with some disappointing terminology by using the term site template in different ways. This term is sometimes used in SharePoint to refer to a site that has been saved as a site template file (STP), but it is also used to refer to a site definition. This is unfortunate because there is a significant difference between these two mechanisms for creating new sites. Sites created from site definitions are always uncustomized, while sites created from STP files are always customized. As I discuss in Chapter 5, customizing sites can have a significant impact on maintenance. In order to avoid confusion, more precise terminology is required to make it clear which technique you are using to create a site.
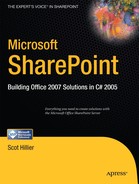
In order to make your own site definition, all you have to do is copy one of the directories and give it a new name. When you create your new folder, make sure that it is located in the Site Templates directory. Copying an existing site definition folder will give you all of the elements necessary to render a new site template in SharePoint. As a simple example, I copied the STS folderwhich defines a standard team siteand renamed it SOFTWARE. I want to use this site definition to create a new type of site for supporting software development projects. Figure 11-1 shows the new folder in the File Explorer.
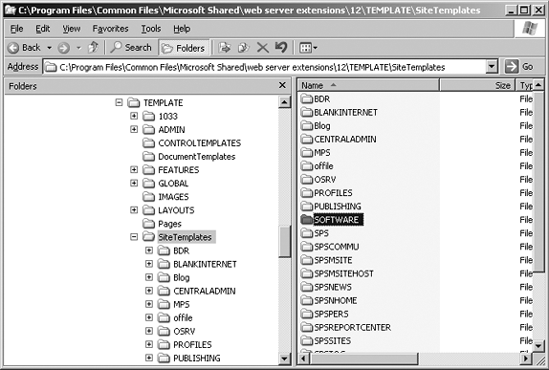
Copying a site definition folder is not enough to make the new site definition available for use within SharePoint. In order to make the template available, you must create a new web template file. A web template file is a listing of site definitions for SharePoint to load. The base web template file is named WEBTEMP.XML and is located in the cultureXML directory. This file contains the information about the basic site templates that are part of any SharePoint installation including team sites and Central Administration. If you also have MOSS installed alongside WSS, you will have several other files that contain all the templates that are specific to a MOSS installation. You can add information about your own site definitions by simply copying an existing web template file and appending a unique string at the end. This is because SharePoint combines all the template files that begin with WEBTEMP to create the complete set of site definitions. For my example, I copied the WEBTEMP.XML file and renamed it WEBTEMPSOFTWARE.XML. Figure 11-2 shows my new web template file in the File Explorer.
Once you have created your own web template file, you can simply open it in Visual Studio for editing. When you open the new template file, you'll see that it is made up of Template and Configuration elements. The Template elements reference the site definitions contained in the folders and the Configuration elements define one or more possible configurations for the site. These configurations determine, among other things, what web parts are displayed on the page by default. The STS template has, for example, three different configurations: Team Site, Blank Site, and Document Workspace.
The Template element has a Name attribute that must be the exact name of the site definition folder you created. The ID attribute must contain a unique number that is greater than 10,000 because SharePoint reserves all smaller numbers for itself. In order to ensure that your templates and configurations are consistent, you should be sure to use the Template element that was originally associated with the site definition you copied. If you copied the STS definition, for example, then work with the STS template element in the XML file. Listing 11-1 shows the WEBTEMPSOFTWARE.XML file from my example.
Example 11.1. A New Web Template File
<?xml version="1.0" encoding="utf-8"?>
<!-- _lcid="1033" _version="12.0.4518" _dal="1" -->
<!-- _LocalBinding -->
<Templates xmlns:ows="Microsoft SharePoint">
 <Template Name="SOFTWARE" ID="10001">
    <Configuration
    ID="0"
    Title="Software Development"
    Hidden="FALSE"
    ImageUrl="/_layouts/images/stsprev.png"
    Description="A site for software projects."
    DisplayCategory="Collaboration" >
  </Configuration>
 </Template>
</Templates>
The Configuration element does not have to be changed in order to create your own site definition, but you may want to customize some of the text to make clear how your templates differ from the originals. You can give your templates titles and descriptions and associate an image with them. Table 11-2 explains each attribute of the Configuration element.
Table 11.2. The Configuration Element
Attribute | Type | Description |
|---|---|---|
| Integer | The only required attribute. It must be a unique number. |
| Text | A title for the configuration. |
| Text | A description for the configuration. |
| Text | An association between a configuration and a specific site definition. |
|
| A value that controls the visibility of the configuration. |
| Text | The URL of the preview image used in the template page. These are typically located in the directory Program FilesCommon FilesMicrosoft Sharedweb server extensions12TEMPLATEIMAGES. |
| Text | The tab under which the site definition will appear in SharePoint. |
|
| The identifier of a feature that must be activated before this definition will be available in SharePoint. |
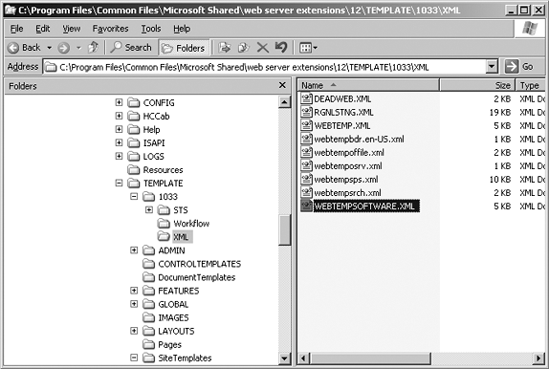
Once you have copied a site definition folder and created a web template file, you must reset IIS. After that, your new site definition will appear in SharePoint. Of course, your new definition won't be any different than the old definition because you simply copied it. However, you do have the foundation in place for making the changes you want. Figure 11-3 shows the example site definition in the list of templates.
In order to customize the configurations for your site definition, you will need to make changes to the ONET.XML file. ONET.XML is the backbone of the site definition in SharePoint. Each site definition folder contains its own ONET.XML file that describes all of the key aspects of the site. You can locate the ONET.XML file under your site definition folder in the XML directory.
The top-level element in ONET.XML is the Project element. This element is the container for all of the various configurations supported by the site definition. Most of the time, you will only see the Title and ListDir attributes specified, but there are several other attributes available. Table 11-3 lists all of the Project element attributes and their purpose.
Table 11.3. The Project Element
Attribute | Type | Description |
|---|---|---|
| Text | Allows you to specify a different Cascading Style Sheet (CSS) to use with your site definition. |
| Text | Allows you to specify an alternate header to use with your site definition. The header should be an ASPX file located in Program FilesCommon FilesMicrosoft Sharedweb server extensions12TEMPLATELAYOUTS[culture]. |
| Text | Allows you to specify a custom JavaScript file that can be executed within your site's definition. These files should be located in Program FilesCommon FilesMicrosoft Sharedweb server extensions12TEMPLATELAYOUTS[culture]. |
| Text | Allows you to specify that certain features in Microsoft SharePoint Designer cannot be used to edit your sites. This attribute is a semicolon-delimited list with any of the following values: |
| Text | Allows you to specify the subdirectory in your site definition folder where the list definitions are located. This is usually Lists. This is not required if you are not using any custom lists. |
| Text | Allows you to specify the default title for sites built from the template. |
Understanding Resource Strings
As soon as you open the ONET.XML file, you'll notice that many of the Name and Title attributes within the file reference $Resource files. Whenever you see $Resource, this is a reference to one of the many resource files located in the C:Program FilesCommon FilesMicrosoft Sharedweb server extensions12Resources directory. Resource strings are used in SharePoint as they are in any other application; they help manage multilingual representations of names and titles.
Customizing the Site Navigation
Once you have a working site definition, you'll want to make several changes to the final site structure. One of the most common changes you'll make is to the site navigation. By making changes to the NavBars element section in ONET.XML, you can alter the navigation elements in the SharePoint site. The NavBars element has no attributes but contains one or more NavBar elements that define the navigation elements in the site. A NavBar element in turn contains one or more NavBarLink elements that define a particular navigation link.
Opening ONET.XML in Visual Studio immediately exposes the NavBars element because it is near the top of the file. Within the NavBars element you'll see a NavBar element for the top navigation area and a separate NavBar element for each of the five Quick Launch areas defined for the basic SharePoint site. Within this element is defined the HTML that is used to display links added to the Quick Launch area. You can add a new NavBar to the Quick Launch area by simply copying an existing NavBar and changing the ID attribute to a unique value. Additionally, you can add links to the NavBar using the NavBarLink element. For my example, I added a new NavBar named Knowledge where I'll put links to the SharePoint software development kits. Listing 11-2 shows the definition for my new NavBar.
Example 11.2. A New NavBar
<NavBar Name="Knowledge" Prefix="<table border=0 cellpadding=4
cellspacing=0>"
Body="<tr><td><table border=0
cellpadding=0 cellspacing=0><tr><
td><img src='/_layouts/images/blank.gif'
ID='100' alt='' border=0> </td><td
valign=top><a ID=onetleftnavbar#LABEL_ID#
href='#URL#'>#LABEL#</td></tr></table>
</td></tr>" Suffix="</table>" ID="1028" >
<NavBarLink Name="MOSS SDK"
Url="http://http://msdn2.microsoft.com/en-us/library/ms550992.aspx" />
<NavBarLink Name="WSS SDK"
Url="http://msdn2.microsoft.com/en-us/library/ms441339.aspx" />
</NavBar>Working with List and Document Templates
The ListTemplates element in ONET.XML contains the definitions for all of the lists that are part of the site definition. The ListTemplates element has no attributes but contains a set of ListTemplate elements. Each ListTemplate element references a list definition that is contained within the Lists directory of the site definition. Each list definition includes a SCHEMA.XML file for defining the list and several ASPX files for adding and editing list items. The lists that appear within the Lists directory are unique to the site definition, unlike the common lists that are defined in the GLOBAL directory.
The DocumentTemplates element in ONET.XML contains the definition for all of the document libraries that are part of the site definition. Just like the ListTemplates element, the DocumentTemplates element does not have any attributes. Instead it contains a set of DocumentTemplate elements. Each DocumentTemplate element defines an available document library type that will appear on the Create page for the site.
Working with Configurations and Modules
The web template file contains a set of possible configurations for each site template. For example, the STS template, which defines the standard Team Site template in WSS, has three possible configurations. These are the Team Site, the Blank Site, and the Document Workspace configurations. Each of these configurations is also assigned a unique identifier. This unique identifier is the connection between the WEBTEMP.XML file and the ONET.XML file. Each configuration identifier contained in WEBTEMP.XML is referenced in the Configurations element of the ONET.XML file.
The Configurations element is used as a child of the Project element and contains the set of Configuration elements that relate to the configurations specified in the web template file. Each Configuration element in turn contains Lists, SiteFeatures, WebFeatures, and Modules elements that define the capabilities of the site.
The Lists element has no attributes, but contains a set of List elements that define the lists that will be initially created with the site. In my example, I didn't want a discussion list or an announcements list included by default, so I deleted these entries from ONET.XML. The SiteFeatures and Web Features elements define the features that will be deployed with the site definition by referencing the GUID of the feature.
The Modules element is used in two different places inside of the ONET.XML file. It can be a child element of either the Project element or the Configuration element. When used as a child of the Project element, the Modules element specifies components, such as web parts, to include in the site definition. When used as a child of the Configuration element, the Modules element ties a specific module to a site configuration.
The Modules element has no attributes but contains a set of Module elements. When used as a child of the Project element, the Module element contains a set of File elements that define external files that are part of the site definition. These external files are typically ASPX files such as the Default.aspx page that defines the appearance of the home page. When you include such files, they are stored directly under the site definition folder. Furthermore, you can edit these files in Visual Studio to change their appearance.
When you open the Default.aspx page, you'll notice that it is full of placeholders. This is exactly what you should expect based on what you've learned about SharePoint throughout the book. The Default.aspx page references the default.master page, which provides placeholders for content. It is the job of Default.aspx to define the content for the placeholders.
In my example, I wanted to add a third Web Part zone to the page, which normally only has two. My new Web Part zone will span the entire page and appear above the other two zones. The Web Part zones are defined as rows in a table within the PlaceHolderMain placeholder. By copying an existing zone and modifying it a bit, I was able to create the three zones. Listing 11-3 shows the code from my PlaceHolderMain placeholder.
Example 11.3. Adding a New Web Part Zone to Default.aspx
<asp:Content ContentPlaceHolderId="PlaceHolderMain" runat="server">
<table cellspacing="0" border="0" width="100%">
<tr>
<td class="ms-pagebreadcrumb">
<asp:SiteMapPath SiteMapProvider="SPContentMapProvider" id="ContentMap"
SkipLinkText="" NodeStyle-CssClass="ms-sitemapdirectional"
runat="server"/>
</td>
</tr>
<tr>
<td class="ms-webpartpagedescription">
<SharePoint:ProjectProperty Property="Description"
runat="server"/></td>
</tr>
<tr>
<td>
<table width="100%" cellpadding=0 cellspacing=0
style="padding: 5px 10px 10px 10px;">
<tr>
<td valign="top" width="100%">
<WebPartPages:WebPartZone runat="server"
FrameType="TitleBarOnly" ID="Top" Title="Top" />
</td>
</tr>
<tr>
<td valign="top" width="70%">
<WebPartPages:WebPartZone runat="server"
FrameType="TitleBarOnly" ID="Left" Title="loc:Left" />
</td>
<td>
</td>
<td valign="top" width="30%">
<WebPartPages:WebPartZone runat="server" FrameType="TitleBarOnly"
ID="Right" Title="loc:Right" />
</td>
<td> </td>
</tr>
</table>
</td>
</tr>
</table>
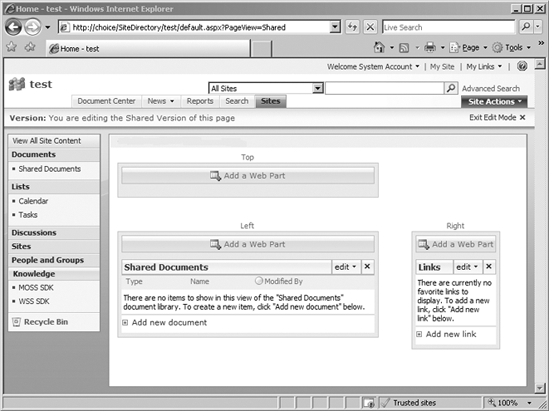
</asp:Content>Within the File element, you may include several child elements such as View, AllUsersWebPart, and NavBarPage. The View element allows you to add a list to the page. The AllUsersWebPart element allows you to add a web part to the page, and the NavBarPage element is included if the file is the site home page. Using these elements, I have decided to remove the standard graphic that appears on the home page along with the calendar and announcements. Instead, I substituted a view of the document library. Listing 11-4 shows the code for the new default module and Figure 11-4 shows the final site in edit mode with the new links in the Quick Launch area, a new Web Part zone, and the document library displayed.
Example 11.4. Changing the Displayed Web Parts
<Module Name="Default" Url="" Path="">
  <File Url="default.aspx" NavBarHome="True">
    <View List="$Resources:core,shareddocuments_Folder;"
      BaseViewID="6" WebPartZoneID="Left" />
    <View List="$Resources:core,lists_Folder;/$Resources:core,links_Folder;"
      BaseViewID="0" WebPartZoneID="Right" WebPartOrder="2" />
    <NavBarPage Name="$Resources:core,nav_Home;" ID="1002" Position="Start" />
    <NavBarPage Name="$Resources:core,nav_Home;" ID="0" Position="Start" />
  </File>
</Module>Microsoft has spent a significant amount of time developing .NET namespaces for SharePoint. This comprehensive set of namespaces allows you programmatic access to a significant portion of WSS and MOSS. The SharePoint Services object model is extensive, to say the least. There are 30 namespaces within the object model and dozens of classes covering most of the features of SharePoint. The depth and breadth of the architecture makes it impractical to study the object model directly. Instead, it is better to use the object model to address broad categories of solutions that you can create. In this section, I cover the main portions of the object model that you will find useful.
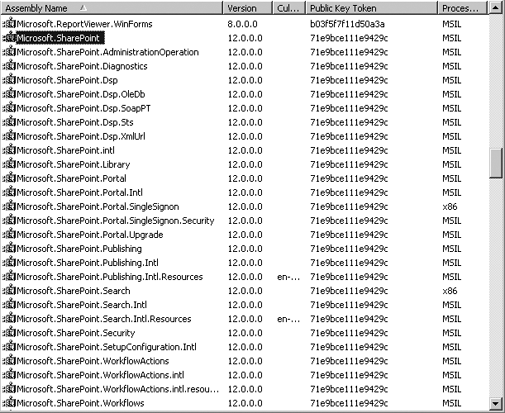
In order to get started with the SharePoint object model, you must set a reference to the appropriate assemblies in Visual Studio. Generally, this means that you must have Visual Studio 2005 installed on the same machine as SharePoint. Opening the References dialog in Visual Studio will reveal several entries for both Windows SharePoint Services and Microsoft Office SharePoint Server. These references correspond to the different assemblies that make up a SharePoint installation. Figure 11-5 shows a view of the Global Assembly Cache (GAC) with some of the SharePoint assemblies visible. For most of the basic operations, you will generally need to set a reference to the Microsoft.SharePoint.dll assembly. This assembly appears as Windows SharePoint Services in the Visual Studio 2005 References dialog.
Setting a reference to SharePoint assemblies is easy to do if you are creating a web part or writing an assembly as part of a feature. You simply use the References dialog and select the assembly as you have done countless times. Then just deploy the solution as I have outlined in previous chapters. When you are creating ASPX pages, however, the story is a bit different.
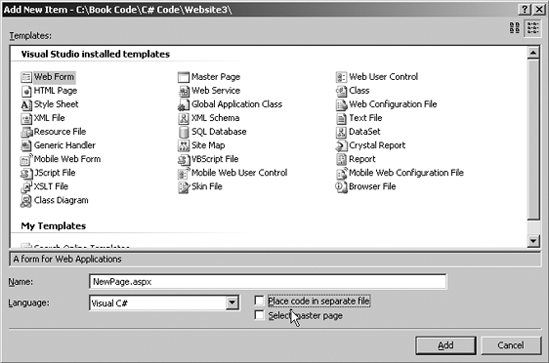
The simplest way to deploy ASPX pages is to create them in a single file and save them to the LAYOUTS directory. When you create ASPX files this way, however, the ASP.NET code must be written inline without the advantages of the normal code-behind model. Figure 11-6 shows the Add New Item dialog in Visual Studio. Note that the box labeled Place Code in Separate File is unchecked, which will create an ASPX page as a single file suitable for deployment into the LAYOUTS directory.
When you place all of your code in a single file, you must include the assembly references and namespaces imports at the top of the file. Additionally, you should reference the application.master or default.master file so that your pages take on the same look as other pages in SharePoint and you can make use of the content placeholders defined within the master page. Listing 11-5 shows how to set up a basic ASPX page with the proper references and the main content placeholder supported by the application master file.
Example 11.5. Setting Up an ASPX Page
<%@ Page Language="C#" MasterPageFile="~/_layouts/application.master"%>
<%@ Assembly Name="Microsoft.SharePoint, Version=12.0.0.0,
             Culture=neutral, PublicKeyToken=71E9BCE111E9429C" %>
<%@ Import Namespace="Microsoft.SharePoint" %>
<%@ Import Namespace="Microsoft.SharePoint.WebControls" %>
<asp:Content ID="Content4" runat="server" ContentPlaceHolderID="PlaceHolderMain">
//Page content goes here
</asp:Content>Note
If you are interested in making use of the ASP code-behind model for developing SharePoint solutions, you can do it by creating a new web application in the LAYOUTS directory. However, this requires changes to the web configuration file and implementing the form digest token, which is part of the SharePoint page-level security model. Readers interested in this topic should reference the SDK.
Accessing objects in the SharePoint model is accomplished in a manner similar to any hierarchical object model you may have worked with in the past. The key to navigating such a model is to find the starting point for the model. In SharePoint, this is done through the ASP.NET Context object using the following code:
SPSite site = SPControl.GetContextSite(Context);
The SPControl class is a member of the Microsoft.SharePoint.WebControls namespace and is the base class from which all other WebControls in the namespace are created. You do not have to create an instance of the SPControl class to use it. Simply call the GetContextSite method and pass the Context property. The Context property comes from the System.Web.UI.Page object and is always available to web parts and ASPX pages that reside in the LAYOUTS directory. The GetContextSite method returns an SPSite object, which represents the site collection where the web part or ASPX page is currently running.
SPSite objects contain information about the site collection and the sites within it. In order to access any particular site in the collection, you must return a collection of SPWeb objects. You may then access the individual web sites by enumerating them or accessing one directly through an index. Listing 11-6 shows a code snippet that enumerates sites in a web part.
Example 11.6. Enumerating Sites in a Web Part
protected override void RenderContents(HtmlTextWriter writer)
{
  SPSite siteCollection = SPControl.GetContextSite(Context);
  SPWebCollection sites = siteCollection.AllWebs;
  foreach (SPWeb site in sites)
  {
    writer.Write(site.Title + "<br/>");
  }
Note
It is one of those oddities of naming conventions that a site collection is represented by an SPSite object, while a site is represented by an SPWeb object. This naming convention goes back to previous versions of SharePoint where site collections were sometimes called sites and sites were sometimes called webs. Over time, these naming conventions have lost favor, but the object model retains the names for consistency.
If you want to make use of object model code in an ASPX page, you must add the code to the PlaceHolderMain placeholder associated with the application master file. When you do this, you simply place the code directly in the ASPX page surrounded by the <% %> delimiters. Listing 11-7 shows an ASPX page that enumerates the sites in a collection using an ASPX page. You can take this page, save it to the LAYOUTS directory and access it through the browser with an address of the format http://[server]/[site]/_layouts/[pagename].aspx (e.g., http://vsmoss/sites/intranet/_layouts/SiteList.aspx).
Example 11.7. Enumerating Sites in a Web Page
<%@ Page Language="C#" MasterPageFile="~/_layouts/application.master"%>
<%@ Assembly Name="Microsoft.SharePoint, Version=12.0.0.0,
             Culture=neutral, PublicKeyToken=71E9BCE111E9429C" %>
<%@ Import Namespace="Microsoft.SharePoint" %>
<%@ Import Namespace="Microsoft.SharePoint.WebControls" %>

<asp:Content ID="Content4" runat="server" ContentPlaceHolderID="PlaceHolderMain">
    <%
        SPSite siteCollection = SPControl.GetContextSite(Context);
        SPWebCollection sites = siteCollection.AllWebs;
        foreach (SPWeb site in sites)
        {
            Response.Write(site.Title + "<br/>");
        }
    %>
</asp:Content>Many of the operations you perform with the object modeleven a simple listingwill require administrative permissions. This is because SharePoint applies security restrictions to the use of the object model. However, there are many times when you would like to display informationsuch as a site listingto a user that does not have administrator rights. In these cases, you must utilize the SPSecurity class to temporarily run object model code with elevated permissions. These elevated permissions allow you to run code under the identity of the application pool account.
In order to run code with elevated permissions, you must encapsulate the code in a function that has no return value. You then create an instance of the CodeToRunElevated class using the name of the function as an argument. You can subsequently execute the code by calling the RunWithElevatedPrivileges method of the SPSecurity object and passing in the CodeToRunElevated object. Listing 11-8 shows an example that calls a method to list all of the available features in a farm.
Example 11.8. Running Code with Elevated Permissions
<%@ Page Language="C#" MasterPageFile="~/_layouts/application.master"%>
<%@ Assembly Name="Microsoft.SharePoint, Version=12.0.0.0,
    Culture=neutral, PublicKeyToken=71E9BCE111E9429C" %>
<%@ Import Namespace="Microsoft.SharePoint" %>
<%@ Import Namespace="Microsoft.SharePoint.WebControls" %>

<asp:Content ID="Content4" runat="server"
     ContentPlaceHolderID="PlaceHolderMain">
<%

    SPSecurity.CodeToRunElevated myCode =
        new SPSecurity.CodeToRunElevated(ShowFeatures);
    SPSecurity.RunWithElevatedPrivileges(myCode);

%>
</asp:Content>

<script language="C#" runat="server">

    protected void ShowFeatures()
    {
        //Code goes here
    }
</script>
Warning
Running code with elevated permissions should be done only after careful consideration of the consequences. Obviously, you would not want to grant such permissions regularly. Additionally, this new capability should make you extremely wary of using third-party web parts from untrusted sources because they could easily be running with elevated privileges and you would not know it.
Along with site collections, you will access lists and list items frequently. Typically when dealing with lists, you are interested in a particular site rather than a site collection. You can get a reference to an individual site by using the GetContextWeb method of the SPControl object. Once a site is open, you may access all of the lists it contains through the SPListCollection object. The collection contains an SPList object for every list on the web site. The following code shows how to enumerate the lists for the current web site:
SPWeb site = SPControl.GetContextWeb(Context);
SPListCollection lists= site.Lists;

foreach(SPList list in lists)
{
    //add code here
}
It is important to understand that SharePoint considers almost everything to be a list. This includes not only obvious components such as task lists, but more subtle components such as document libraries and discussion forums. Therefore, you will find it useful to be able to differentiate between various lists that are returned in code. Each SPList object has a BaseType property that returns an SPBaseType enumeration specifying what kind of list is represented. Here is a list of the members of the SPBaseType enumeration:
SPBaseType.DiscussionBoardSPBaseType.DocumentLibrarySPBaseType.GenericListSPBaseType.IssueSPBaseType.SurveySPBaseType.UnspecifiedBaseType
Once you have accessed a list of interest, you may subsequently access the items in the list. Each item in the list is represented by an SPListItem object contained in an SPListItemCollection object. Enumerating these list items follows the same pattern as you have already seen.
Regardless of whether you are accessing sites, lists, or items, each object has a set of properties and methods that are meaningful. Typically, this means returning the Name, Title, or URL associated with an object. Additionally, each object has some special properties and methods designed to return useful collections. For example, you can return just the webs associated with the current user by utilizing the GetSubwebsForCurrentUser method of the SPWeb class.
When iterating through sites and lists, you quite often want to know how they apply to the current user. You may be interested in knowing what role the current user has on a site or what items in a list are assigned to the current user. You can access this information using an SPUser object. The following code shows how to return the SPUser object that represents the current user:
SPSite siteCollection = SPControl.GetContextSite(Context);
SPWeb site = siteCollection.OpenWeb();
SPUser user = site.CurrentUser;
Once the SPUser object is returned, you can retrieve the logon name of the user through the LoginName property. You can also retrieve the display name for the user through the Name property. Because list assignments are made using these values, you can often determine which items in a list belong to the current user by comparing the Assign To field of a list item to these values. Listing 11-9 shows how to look through a collection of lists and display the tasks assigned to the current user in a web page.
Example 11.9. Determining List Item Ownership
<%@ Page Language="C#" MasterPageFile="~/_layouts/application.master"%>
<%@ Assembly Name="Microsoft.SharePoint, Version=12.0.0.0, Culture=neutral,
             PublicKeyToken=71E9BCE111E9429C" %>
<%@ Import Namespace="Microsoft.SharePoint" %>
<%@ Import Namespace="Microsoft.SharePoint.WebControls" %>

<asp:Content ID="Content4" runat="server"
 ContentPlaceHolderID="PlaceHolderMain">
<%
SPSite siteCollection = SPControl.GetContextSite(Context);
SPWeb site = siteCollection.OpenWeb();
SPUser user = site.CurrentUser;
SPListCollection lists = site.Lists;

Response.Write("Tasks for " + user.Name + "<br/>");

foreach (SPList list in lists)
{
  if (list.BaseType == SPBaseType.GenericList ||
      list.BaseType == SPBaseType.Issue)
  {
     for (int i = 0; i <= list.ItemCount - 1; i++)
     {

        try
        {
          SPListItem item = list.Items[i];
          string assignedTo = item["Assigned To"].ToString().ToUpper();
          if(assignedTo.IndexOf(user.LoginName.ToUpper()) > 1 ||
             assignedTo.IndexOf(user.Name.ToUpper()) > 1)
           {
               Response.Write(item.Title + "</br>");
           }
        }
        catch { }
     }
   }
}
site.Close();
siteCollection.Close();
%>
</asp:Content>In addition to the object model, you can also access SharePoint information using web services. SharePoint exposes web services for a wide variety of data sources and administrative tasks. SharePoint web services are used in Visual Studio 2005 in the same way as any other web service. After starting a project, you must set a web reference to the web service. Table 11-4 lists all of the available web services for WSS and MOSS, describes each one, and lists the web reference address.
Table 11.4. SharePoint Web Services
Service | WSS/MOSS | Address | Description |
|---|---|---|---|
Both |
| Provides services for creating, deleting, and managing site collections | |
Both |
| Provides services for managing alerts | |
Both |
| Provides services to authenticate users | |
Both |
| Provides services for copying files to or within a site | |
Document Workspace web service | Both |
| Provides services to interact with Document Workspaces |
Both |
| Provides support for returning the forms that are used to manage lists | |
Both |
| Provides support for creating and managing image libraries | |
Both |
| Provides services to create, delete, and manage lists | |
Both |
| Provides services to create, delete, and manage Meeting Workspaces | |
Both |
| Provides services to return information about people | |
Both |
| Provides support for managing site and list permissions | |
Both |
| Provides services to return site and list data | |
Both |
| Provides support for returning data from sites | |
Both |
| Provides support for searching SharePoint | |
Both |
| Provides support for working with SharePoint users and groups | |
Both |
| Provides support for working with file versions | |
Both |
| Provides support for working with list views | |
Both |
| Provides support for managing web parts | |
Both |
| Provides support for creating, deleting, and managing sites and subsites | |
MOSS only |
| Provides support for sending files to a records repository | |
MOSS only |
| Provides support for Office clients to receive links that are targeted at them by SharePoint | |
MOSS only |
| Provides support for changes to user profiles | |
MOSS only |
| Provides support for returning information from user profiles | |
MOSS only |
| Provides support for managing workflows |
Once the web service is referenced, you can use it in your project just like any other namespace. Values returned from the web service vary depending upon which service is called, but the calling technique is largely the same. Before calling the web service, you must authenticate the current user with the service. After authentication, you can make calls to the methods of the service. I'll go over the details necessary to accomplish this in the following sections.
An easy way to get started with SharePoint web services is to return some information about sites. Beginning with the site collection you are interested in, you can use the Webs web service to return the information for that particular collection. Using this web service, you can return all of the sites in the collection at once, or call methods recursively to build a hierarchy.
Once the web reference is made, it is a simple matter to return a collection of all webs in the referenced site collection. This can be done by calling the GetAllSubWebCollection method. Calling this method returns an XmlNode that contains the titles and addresses of every web in the current collection:
vsmoss.Webs service = new vsmoss.Webs();
service.Credentials=System.Net.CredentialCache.DefaultCredentials;
System.Xml.XmlNode node = service.GetAllSubWebCollection();
Console.WriteLine(node.OuterXml);
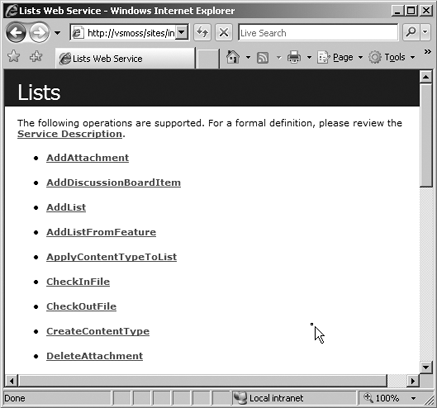
Because many custom solutions involve list data, the Lists web service is used extensively by SharePoint developers. Therefore, it is a service with which you should be familiar. You can access the Lists web service for the intranet you created in Chapter 2 at http://vsmoss/sites/intranet/_vti_bin/lists.asmx. Figure 11-7 shows the resulting page in the browser, which displays the available methods.
Once the Lists web service is referenced, you can authenticate against it and call methods. The following code snippet shows how to authenticate the current user with the service and return a set of lists as an XML fragment:
vsmoss.Lists service = new vsmoss.Lists();
service.Credentials=System.Net.CredentialCache.DefaultCredentials;
System.Xml.XmlNode node = service.GetListCollection();
Console.WriteLine(node.OuterXml);
The GetListCollection method is used to return a CAML fragment that defines all of the lists available on a site. The return CAML fragment is a set of List elements. One List element is returned for each list on the target site. Listing 11-10 shows a single List element of a return CAML fragment.
Example 11.10. A Portion of the GetListCollection CAML Fragment
<Lists xmlns="http://schemas.microsoft.com/sharepoint/soap/">
    <List
        DocTemplateUrl=""
        DefaultViewUrl="/sites/Test/Lists/Announcements/AllItems.aspx"
        ID="{970DF0FB-CC31-40C3-AF4C-6515C37CE582}"
        Title="Announcements"
        Description="Use the Announcements list to post messages on
        the home page of your site."
        ImageUrl="/_layouts/images/itann.gif"
        Name="{970DF0FB-CC31-40C3-AF4C-6515C37CE582}"
        BaseType="0"
        ServerTemplate="104"
        Created="20040603 16:00:26"
        Modified="20040603 16:00:26"
        LastDeleted="20040603 16:00:26"
        Version="0"
        Direction="none"
        ThumbnailSize=""
        WebImageWidth=""
        WebImageHeight=""
        Flags="4096"
        ItemCount="1"
        AnonymousPermMask=""
        RootFolder=""
        ReadSecurity="1"
        WriteSecurity="1"
        Author="1"
        EventSinkAssembly="" EventSinkClass="" EventSinkData=""
        EmailInsertsFolder=""
        AllowDeletion="True"
        AllowMultiResponses="False"
        EnableAttachments="True"
        EnableModeration="False"
        EnableVersioning="False"
        Hidden="False"
        MultipleDataList="False"
        Ordered="False"
        ShowUser="True" />
.
.
.
</Lists>
You can access the fields associated with a list by calling the GetList method. The GetList method takes the title or GUID of the list as an argument and returns a CAML fragment that contains a single List element along with a collection of Field elements that provide information about each field in the list. The CAML fragment returned from the GetList method can be quite long, depending on how many fields are defined in the list. Listing 11-11 only shows the first Field element of a CAML fragment associated with a standard document library.
Example 11.11. A Portion of the Returned GetList CAML Fragment
<List ...>
   <Fields>
      <Field ColName="tp_ID" ReadOnly="TRUE" Type="Counter" Name="ID"
 DisplayName="ID" FromBaseType="TRUE" /><Field ColName="tp_Created"
 Hidden="TRUE" ReadOnly="TRUE" Type="DateTime" Name="Created
 DisplayName="Created Date" StorageTZ="TRUE" FromBaseType="TRUE" />
.
.
.
   <Fields>
   <RegionalSettings>
      <Language>1033</Language>
      <Locale>1033</Locale>
      <AdvanceHijri>0</AdvanceHijri>
      <CalendarType>1</CalendarType>
      <Time24>False</Time24>
      <TimeZone>300</TimeZone>
      <SortOrder>2070</SortOrder>
      <Presence>True</Presence>
   </RegionalSettings>
</List>
Once you understand the fields associated with a list, you will want to return specific items from the list. Returning items from a list is accomplished using the GetListItems method of the web service. Like all the other method calls I have presented, the return value from the GetListItems method is a CAML fragment. The set of items returned is enclosed within a data element and each item is defined using a row element. The attributes of the row element will vary based on how you construct the method call, but you should note the ID, Title, and FileRef attributes because these will be critical later when working with the returned items. Listing 11-12 shows a typical returned CAML fragment containing the information for a single document.
Example 11.12. Returned GetListItems CAML Fragment
<listitems xmlns:s="uuid:BDC6E3F0-6DA3-11d1-A2A3-00AA00C14882"
   xmlns:dt="uuid:C2F41010-65B3-11d1-A29F-00AA00C14882"
   xmlns:rs="urn:schemas-microsoft-com:rowset" xmlns:z="#RowsetSchema"
    xmlns="http://schemas.microsoft.com/sharepoint/soap/">
<rs:data ItemCount="1">
<z:row ows_FileRef="1;#sites/Test/Shared Documents/Document1.doc"
ows_Title="New Document"
ows_Customer="DataLan"
ows_Last_x0020_Modified="1;#2004-06-03 17:54:01"
ows_ID="1"
ows_owshiddenversion="8" ows_FSObjType="1;#0"
ows_FileLeafRef="1;#Document1.doc"
ows_Modified="2004-06-03 17:54:01"
ows_Editor="1;#SPSadministrator"
ows_DocIcon="doc" />
</rs:data>
</listitems>The GetListItems method takes several arguments and requires some additional effort to call because several of the parameters are actually CAML fragments themselves. These parameters must be constructed in code before the method call is made. Specifically, the GetListItems method requires the following parameters: listName, viewName, query, viewFields, rowLimit, and queryOptions.
The listName parameter is either the list name (e. g., Shared Documents) or the GUID of the target list from which items are to be returned. This is the same parameter that is used throughout the various methods of the Lists web service. This parameter is required.
The viewName parameter is the GUID of the view to be used when determining what fields to return. This parameter is optional and can be replaced with the keyword null in C#. When no view is specified, the method will return the fields contained in the default list view unless you override this behavior by specifying different fields. Generally, it is easier not to supply this parameter and specify the desired fields later.
The query parameter is a properly formatted CAML Query element that specifies what items to return from the list. This parameter is optional and can be replaced with the keyword null in C#. When provided, the defined query overrides the query normally associated with the default view.
The viewFields parameter is a properly formatted CAML ViewFields element that specifies what fields are to be returned with each item. This parameter is optional and can be replaced with the keyword or null in C#. When provided, the defined field set overrides the field set normally associated with the default view.
The rowLimit parameter is a string representing the number of items to return from the method call. This parameter is optional and can be replaced with the keyword null in C#. When provided, the rowLimit overrides the limits associated with the default view. The rowLimit parameter can also be used to set up a paging when used in conjunction with the queryOptions parameter.
The queryOptions parameter is a properly formatted QueryOptions element. This parameter is optional and can be replaced with the keyword null in C#. The QueryOptions element acts as a container for other elements that specify the options for the method call.
In the same way that we parsed the returned CAML fragment from previous method calls, we can do this to display the information returned from the GetListItems method; however, you should note that the field names returned from this method call are prefixed with ows_, which must be taken into consideration when writing the code. Listing 11-13 shows a complete example that returns all the documents from a library and displays their titles in a list.
Example 11.13. Returning Documents from a Library
MyService.Lists objService = new MyService.Lists();
objService.Url = "http://Server_Name/Site_Path/_vti_bin/Lists.asmx";
objService.Credentials = System.Net.CredentialCache.DefaultCredentials;
XmlDocument objDocument = new XmlDocument();
XmlNode objQuery;
objQuery = objDocument.CreateNode(XmlNodeType.Element, "Query", "");
objQuery.InnerXml = "<OrderBy><FieldRef Name='Title'></FieldRef></OrderBy>";
XmlNode objFields;
objFields = objDocument.CreateNode(XmlNodeType.Element, "ViewFields", "");
objFields.InnerXml = "<FieldRef Name='Title'/>";
XmlNode objCAML;
objCAML = objService.GetListItems(MylstLists.SelectedItem.ToString, null,
          objQuery, objFields, null, null);
foreach (XmlNode objNode in objCAML.ChildNodes(1).ChildNodes) {
 if (!((objNode.Attributes == null)) &&
     !((objNode.Attributes("ows_Title") == null))) {
   MyDocs.Items.Add(objNode.Attributes("ows_Title").Value);
 }
}
After you have identified the fields for a given document, you may want to update them and save those changes back to the list. You can update any field associated with a list using the UpdateListItems method of the Lists web service. This method takes as parameters the title or GUID of the list and a CAML Batch element that defines the operations to be performed on the list items.
The CAML Batch element is a container for one or more Method elements that define the individual operations to be performed as a single batch. This structure allows you to perform multiple insert, update, and delete operations with a single call to the UpdateListItems method of the web service. The Method element provides an identifier attribute for the individual operation and a command attribute to specify an insert, update, or delete operation. Each Method element in turn contains a set of Field elements that provide data for the method and identify the item to receive the operation. As an example, the following code shows a Batch element that defines an update to the Title field of the document associated with ID=3:
<Batch>
    <Method ID='MyIdentifier' Cmd='Update'>
        <Field Name='ID'>3</Field>
        <Field Name='FileRef'>
           http://MyServer/MySite/MyDocs/Document1.doc
        </Field>
        <Field Name='Title'>My New Title</Field>
    </Method>
</Batch>The Single Sign-On (SSO) service is a combination of a Windows 2003 service, a SQL Server data store, and web-based administration tools that provide credential storage and retrieval services to your web parts, applications, and the business data catalog. Using the service allows your solutions to programmatically log in to external systems using credentials specifically provided for that purpose. For example, you could write a web part that retrieves credentials from SSO to access a database and display information. SSO is installed by default along with MOSS; however, the service is stopped and set to manual startup. In order to begin working with SSO, you must configure and start the service.
Before the SSO service can be started, you must create a new global security group that will contain an account used to run the service. This same group will contain the accounts that are authorized to administer the SSO service. The account used to run the SSO service will also be a member of this group. This group must meet several requirements:
Belong to the local administrators group on the application server.
Belong to the local administrators group on the server running the configuration database.
Belong to the WSS_ADMIN_WPG group on every server in the farm where SharePoint is installed.
Have db_owner and public rights for the SharePoint configuration database.
Belong to the Server Administrators role for the SQL Server instance where the SSO database is located.
Once you have defined a security group with an account, you can configure the SSO service to run under the specified account. Additionally, you can add users to the security group so that they can define credentials in the data store. Designated users may then define sets of applications and credentials for enterprise applications.
To set up the required SSO accounts, follow these steps:
Log in to VSPDC as the domain administrator.
Select Start

In the Active Directory Users and Computers dialog, right-click the Users folder and select New
In the New Object dialog, type SSOAdmins in the Group Name. Any member of this group will be allowed to administer the SSO service.
Click OK.
In the Active Directory Users and Computers dialog, right-click the Users folder and select New
In the New Object dialog, type SSOService in the Full Name and User Logon Name boxes.
Click Next.
Type a password for the account.
Uncheck the User Must Change Password at Next Logon box.
Check the User Cannot Change Password box.
Check the Password Never Expires box.
Click Next.
On the next screen, click Finish.
Right-click the SSOService account and select Properties from the pop-up menu.
On the Member Of tab, click Add.
Type in the account name DOMAINSSOAdmins and click the Check Names button.
Once the account name is validated, click OK.
Click OK again.
After the required accounts are created, you must give them permissions on the local servers where SharePoint is running. This means adding the SSO administrator group to the local administrators account and the WSS_ADMIN_WPG.
To add the SSO administrators to the local groups, follow these steps:
Log in to VSMOSS as the local administrator.
Select Start
In the Computer Management dialog, expand the Local Users and Groups node and open the Groups folder.
In the Groups folder, right-click Administrators and select Add to Group from the context menu.
In the Administrators Properties dialog, click Add.
Type in the account name DOMAINSSOAdmins and click the Check Names button.
Once the account name is validated, click OK.
In the Administrators Properties dialog, click OK.
In the Groups folder, right-click WSS_ADMIN_WPG and select Add to Group from the context menu.
In the WSS_ADMIN_WPG Properties dialog, click Add.
Type in the account name DOMAINSSOAdmins and click the Check Names button.
Once the account name is validated, click OK.
In addition to having access to the local machine where SharePoint runs, the SSO administrator group must also have access to the SQL Server installation. This will allow the group to read and write credentials. SSO uses SQL Server as its credential store.
To set up SQL Server permissions, follow these steps:
Log in to VSSQL as the local administrator.
Select All Programs
In the Connect to Server dialog, select VSSQL from the Server Name drop-down list and click the Connect button.
Expand the Security folder in the Object Explorer tree.
Right-click the Logins node and select New Login from the context menu.
In the Login dialog, type DOMAINSSOAdmins in the Login Name field.
Click the User Mapping page.
On the User Mapping page, check the box associated with the MOSS configuration database (e.g., MOSS_Config).
In the list of database roles, check db_owner and Public.
Click the Server Roles page.
On the Server Roles page, check the Serveradmin box.
Click OK.
Right-click the Logins node and select New Login from the context menu.
In the Login dialog, type DOMAINSSOService in the Login Name field.
Click the Server Roles page.
On the Server Roles page, check the Securityadmin and Dbcreator boxes.
Click OK.
Once the SSO administrator account has all the required permission sets, you can start the SSO service. The SSO service must be set up to run under the account you created earlier. Once the correct identity is added, the service should be configured to start automatically.
Follow these steps to start the SSO service:
Log in to VSMOSS as the local administrator.
Select Start
In the Services dialog, right-click the Microsoft Single Sign-On Service and select Properties from the context menu.
On the Log On tab, select the option This Account, and type DOMAINSSOService.
Enter the password you set for this account.
Click Apply.
On the General tab, change the Startup Type to Automatic.
Click Start to start the service.
Before you can access credentials using SSO, an application definition must be created for the credentials. Application definitions consist of a unique name for the application and the definition of the logon fields to accept. SSO is capable of managing a number of fields beyond username and password. In fact, you can define any custom field for the service, such as domain or database name. The exact fields that you define will depend upon what fields are expected by the target application.
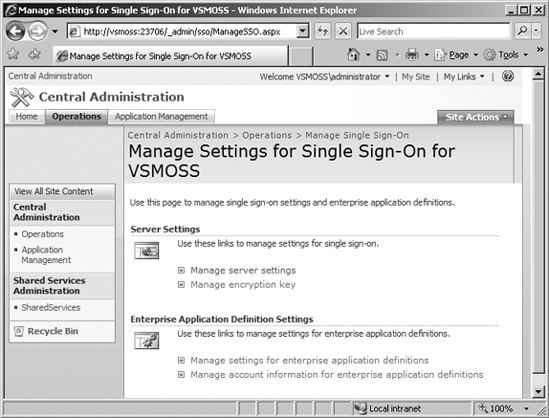
SSO administration is done through the Central Administration site by clicking the link titled Manage Settings for Single Sign-On located on the Operations tab. When you first access the administration pages, only one option is available. You must complete the setup by logging in as the SSO Service account and clicking the Manage Server Settings link. The server settings require you to specify the accounts that will be used to manage the SSO service and define new applications. Until these settings are complete, you cannot define new applications. Figure 11-8 shows what the page should look like the first time you access it.
Follow these steps to complete the configuration of SSO:
Log in to VSMOSS as DOMAINSSOService.
Select Start
When the Central Administration site opens, click the Operations tab.
Click the link titled Manage Settings for Single Sign-On.
On the Manage Settings for Single Sign-On page, enter DOMAINSSOAdmins in both of the Account Name fields.
Click the OK button.
Once the initial settings are entered, you may return to the Manage Settings for Single Sign-On page where the additional hyperlinks will be available. Clicking Manage Settings for Enterprise Application Definitions opens a page where you may define new applications. This page allows you to name the application, define the fields that should be managed, and determine whether the application will use a group or an individual login.
You should use a group login when you want a single set of credentials to be used by your code, regardless of what user is accessing the system. This design is often associated with read-only information, where users do not normally need separate identification. An organization might use this, for example, to give employees access to public information regarding corporate performance. In this scenario, it is not important which employee is accessing the system, because the read-only information will not change.
Where you are more concerned about access and permissions you should use an individual login. Applications defined with an individual login will require that each end user have his or her own set of credentials. SSO is capable of prompting individuals for credentials the first time they use a solution; after this, the service automatically stores the credentials for future use.
To create an enterprise application definition, follow these steps:
Log in to VSMOSS as a member of the DOMAINSSOAdmins group.
Select Start
When the Central Administration site opens, click the Operations tab.
Click the link titled Manage Settings for Single Sign-On.
On the Manage Settings for Single Sign-On page, click Manage Settings for Enterprise Application Definitions.
On the Manage Enterprise Application Definitions page, click the New Item link.
On the Create Enterprise Application Definition page, type My Application into the Display Name box.
Type MyApp into the Application Name box.
Type [email protected] into the Contact E-mail Address box.
Change the Account Type to Individual.
Type Username into the Field 1: Display Name box.
Type Password into the Field 2: Display Name box.
Choose the Yes option for Mask under Field 2 to mask the password when it is entered.
Click OK.
Although SSO is capable of prompting users for credentials, you can set them up ahead of time by using the administrative web pages. Because you will not know individual login information, this capability is clearly most useful when an application is defined to utilize a group login. Individual logins will generally prompt users for credentials when they first use your application.
Here is what you need to do to define login credentials:
Log in to VSMOSS as a member of the DOMAINSSOAdmins group.
Select Start
When the Central Administration site opens, click the Operations tab.
Click the link titled Manage Settings for Single Sign-On.
On the Manage Settings for Single Sign-On page, click Manage Account Information for Enterprise Application Definitions.
In the User Account Name box, enter DOMAINAdministrator.
Click OK.
On the Account Information page, type MyUsername into the User Name box.
Type MyPassword into the Password box.
Click OK.
One of the most common uses for SSO is to allow web parts to access external systems. As I discussed in Chapter 2, SSO is a good alternative to Kerberos because it will allow a web part to authenticate to an external source regardless of how many "hops" are between it and the SharePoint server. Additionally, SSO can work across the Internet between domains. In order to use the Microsoft SSO service in code, you must first set a reference to the SingleSignOn assembly in Visual Studio which is contained in the namespace Microsoft.SharePoint.Portal.SingleSignon.
The Microsoft.SharePoint.Portal.SingleSignon namespace provides several classes that provide complete access to all of the administration functions of SSO. You can use these classes not only to access enterprise systems, but also to create your own separate administration interface. You can even go so far as to build a web part that allows portal users to perform self-service on their own credentials.
When code needs to access an external system, it calls the GetCredentials method. Any user is allowed to call GetCredentials; however, the active security policy determines the level of access allowed. If the credentials exist in the data store, they are returned as an array of strings. The order of the data returned in the array is the same as the order in which the application fields are defined by the administrator. The following code shows the basic technique:
Note
The policies WSS_Minimal and WSS_Medium do not allow access to SSO functionality. In order to grant access, you must modify the web configuration file or create a custom policy file.
string user = null; ;
string password = null; ;
string[] credentials = null;

Credentials.GetCredentials(1, "MyApp", ref credentials);

user = credentials[0];
password = credentials[1];
If the code attempts to retrieve credentials and fails, the GetCredentials method throws a SingleSignonCredsNotFoundException. Any other SSO error is thrown as a SingleSignonException. The exact reason for the failure is subsequently determined by examining the LastErrorCode property of the SingleSignonException object. You should not be concerned that the credentials do not exist when you attempt to retrieve them. This situation can happen frequently with application definitions that contain an individual login. In fact, it is almost guaranteed to happen the first time a user invokes a code that accesses a new application definition.
Because an administrator will not know individual credentials, your web part should expect to handle the SingleSignonCredsNotFoundException the first time any user accesses your code. In response, you must help the user enter the correct credentials into the data store for future use. SSO supports the user by providing a web page where the user can enter their credentials if they are not found.
Users access the logon form provided by the SSO by clicking a hyperlink that you build in code. The hyperlink is generated by the SingleSignonLocator class. This class supports the GetCredentialEntryUrl method, which takes the application name as an argument. Listing 11-14 shows a complete example of an ASPX page that accesses the credentials for the application you created earlier and creates a sign-in link if the credentials are not found.
Warning
The GetCredentialEntryUrl method will fail if the current user has no account information in the SSO database. Talk about a catch-22! The workaround is to first define dummy credentials for each user and then delete them. This will associate the user with an application definition while ensuring that the SingleSignonCredsNotFoundException exception occurs when the code is first accessed.
Example 11.14. Using SSO in Code
<%@ Page Language="C#" MasterPageFile="~/_layouts/application.master"%>
<%@ Assembly Name="Microsoft.SharePoint, Version=12.0.0.0,
    Culture=neutral, PublicKeyToken=71E9BCE111E9429C" %>
<%@ Assembly Name="Microsoft.SharePoint.Portal, Version=12.0.0.0,
    Culture=neutral, PublicKeyToken=71E9BCE111E9429C" %>
<%@ Assembly Name="Microsoft.SharePoint.Portal.SingleSignon, Version=12.0.0.0,
    Culture=neutral, PublicKeyToken=71E9BCE111E9429C" %>
<%@ Import Namespace="Microsoft.SharePoint" %>
<%@ Import Namespace="Microsoft.SharePoint.WebControls" %>
<%@ Import Namespace="Microsoft.SharePoint.Portal" %>
<%@ Import Namespace="Microsoft.SharePoint.Portal.SingleSignon" %>

<asp:Content ID="Content4" runat="server"
     ContentPlaceHolderID="PlaceHolderMain">
<%

    try
    {
        string user = null; ;
        string password = null; ;
        string[] credentials = null;

        Credentials.GetCredentials(1, "MyApp", ref credentials);

        user = credentials[0];
        password = credentials[1];

        Response.Write(user);
        Response.Write("<br/>");
        Response.Write(password);
    }
    catch (SingleSignonCredsNotFoundException x)
    {
        Response.Write("<a href="" +
          SingleSignonLocator.GetCredentialEntryUrl("MyApp")
          + ""> Please sign in </a>");
    }
    catch (SingleSignonException x)
    {
        Response.Write("<p>" + x.Message + "</p>");
    }
    catch (Exception x)
    {
        Response.Write("<p>" + x.Message + "</p>");
    }


%>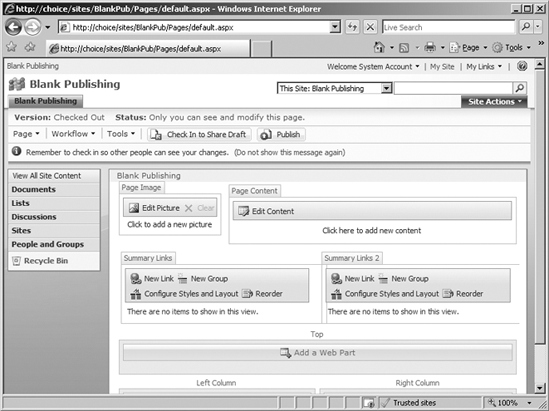
</asp:Content>Creating custom site definitions allows you to tightly control the capabilities and features that are deployed when a site is created. This is a useful approach when you intend to create many copies of the same site and you want to maintain the connection between the sites and the definition to simplify maintenance. In this exercise, you will create a custom site definition for a blank site with publishing features enabled. This type of site is valuable because it allows you to start with no predefined content while still having publishing enabled. This is a good way to build up a site because you can start with this definition and then add your own page layouts as I discuss in Chapter 5. Figure 11-9 shows a site built from the definition in this exercise.
In this exercise, you will start with the standard team site definition and customize it to create the blank publishing site. To begin this process, you will create a copy of the STS site definition and rename it BLANKPUB. Then you will create a web template file for the new definition.
Follow these steps to get started:
Log in to VSMOSS as a SharePoint administrator.
Open the File Explorer and navigate to the directory C:Program FilesCommon FilesMicrosoft Sharedweb server extensions12TEMPLATESite Templates.
In the File Explorer, right-click the STS folder and select Copy from the context menu.
Right-click the File Explorer area inside of the Site Templates folder and select Paste from the context menu. A copy of the STS folder will be created.
Right-click the copy of the STS folder and select Rename from the context menu.
Rename the folder BLANKPUB.
Select Start
When Notepad starts, type in the code from Listing 11-15. This is a simple web template file that will make the new site definition available in SharePoint.
When you are finished, save the file as
WEBTEMPBLANKPUB.XMLto C:Program FilesCommon FilesMicrosoft Sharedweb server extensions12TEMPLATE1033XML.
Note
Your folder will be named other than 1033 if you have a culture other than English-United States (en-us).
Example 11.15. The Web Template File
<?xml version="1.0" encoding="utf-8"?>
<!-- _lcid="1033" _version="12.0.4518" _dal="1" -->
<!-- _LocalBinding -->
<Templates xmlns:ows="Microsoft SharePoint">
 <Template Name="BLANKPUB" ID="10005">
    <Configuration ID="0" Title="Blank Publishing Site" Hidden="FALSE"
  ImageUrl="/_layouts/images/blankprev.png" Description="A blank publishing site."
  DisplayCategory="Publishing" AllowGlobalFeatureAssociations="False" />
 </Template>
</Templates>Once the site definition is copied, you must make several modifications to create the blank publishing site definition. Most of these changes will be made in the ONET.XML file, but you'll also delete an extra file. Creating a blank site is a bit easier because you'll mostly be removing information from the site definition. In this section, you'll create the proper configuration for the site definition.
Follow these steps to make the required changes:
Open the File Explorer and navigate to C:Program FilesCommon FilesMicrosoft Sharedweb server extensions12TEMPLATESite TemplatesBLANKPUB.
In the BLANKPUB folder, delete the file
DEFAULTDWS.ASPX. This file is used for the Document Workspace configuration of the team site. You will not need it for your definition.In the File Explorer, open the XML folder.
In the XML folder, right-click
ONET.XMLand select Open WithIn the
ONET.XMLfile, you will keep all of theNavBars,ListTemplate, andDocumentTemplateelements.Scroll down to the
Configurationselement. Here you will find four configurations namedNewWeb,Default,Blank, andDWS.The blank publishing site most resembles the blank team site. Therefore, you can delete the entire configuration for the
DefaultandDWSconfigurations. Don't delete theNewWebconfigurationit is for internal useand keep theBlankconfiguration to build on.Then change the
IDfor theBlankconfiguration from 1 to 0. The 0 identifier matches the value inWEBTEMPBLANKPUB.XML.Now you'll modify the configuration to include the publishing features in the site definition. Reference Listing 11-16 and edit the
Configurationssection ofONET.XML.
Example 11.16. The Configurations Section
<Configurations>
  <Configuration ID="-1" Name="NewWeb" />
  <Configuration ID="0" Name="Default">
    <Lists />
    <Modules>
      <Module Name="Default" />
    </Modules>
    <SiteFeatures>
        <!-- BasicWebParts Feature -->
        <Feature ID="00BFEA71-1C5E-4A24-B310-BA51C3EB7A57" />
          <!-- PublishingPrerequisites -->
          <Feature ID="A392DA98-270B-4e85-9769-04C0FDE267AA" />
          <!-- Office SharePoint Server Publishing -->
          <Feature ID="F6924D36-2FA8-4f0b-B16D-06B7250180FA" />
          </SiteFeatures>
      <WebFeatures>
        <!-- TeamCollab Feature -->
        <Feature ID="00BFEA71-4EA5-48D4-A4AD-7EA5C011ABE5" />
        <!-- MobilityRedirect -->
<Feature ID="F41CC668-37E5-4743-B4A8-74D1DB3FD8A4" />
<!-- Office SharePoint Server Publishing -->
<Feature ID="94C94CA6-B32F-4da9-A9E3-1F3D343D7ECB" />
</WebFeatures>
</Configuration>
</Configurations>After you have the Configurations section edited, you'll need to make changes to the Modules section. The Modules section defines the ASPX files that are part of the definition and the web parts that will appear on the page. In this case, you'll be removing everything except the home page and it will be rendered with no web parts.
Follow these steps to make the required changes:
Scroll down to the
Modulessection of theONET.XMLfile.In the
Modulessection, delete theDefaultandDWS Moduleelements. These modules are associated with the configurations that you deleted earlier.When you are done, you should only have the
DefaultBlank Moduleremaining. Rename this moduleDefaultto keep it in sync with the changes you made earlier.When you have made the changes, carefully edit the remaining module to look like Listing 11-17.
Example 11.17. The Modules Section
<Modules>
  <Module Name="Default" Url="" Path="">
    <File Url="default.aspx" NavBarHome="True" Type="Ghostable">
      <NavBarPage Name="$Resources:core,nav_Home;" ID="1002" Position="Start" />
      <NavBarPage Name="$Resources:core,nav_Home;" ID="0" Position="Start" />
    </File>
  </Module>
</Modules>After you have completed the site definition, reset Internet Information Server so that your new definition will be loaded by SharePoint. After the server is reset, you can create a new site collection from the Central Administration web site in the usual way. This time, however, the blank publishing site should appear in the list of available templates.
Displaying all of the sites that make up a SharePoint farm is a common programming task. Because of all of the different ways to retrieve data from SharePoint, there are actually several approaches to producing such a view. You could use the object model to get the information on site collections and sites, but this would require your application to reside on the SharePoint server or to create your own web service. In this project, you will use a combination of direct calls to the database and the Webs web service to create a hierarchical listing of all sites and webs in a given SharePoint installation. This approach allows you to get such information remotely.
To start the project, follow these steps:
Start Visual Studio 2005.
In Visual Studio, select File
In the Project Types window of the New Project dialog, click the Visual C# node.
In the Templates window, select Windows Application.
Name the new project Site Explorer and press the OK button.
When the new project is open, drop a
TreeViewcontrol onto Form1.Open the code window for
Form1.csand add the following statements:
using System.Data.SqlClient;
using System.Net;
using System.Xml;
This project makes use of the Webs web service to return information about sites and webs. In this section, you will set a reference to this web service. It does not matter which site you reference when setting up the service, because we will change it in code later.
Follow these steps to set the web reference:
In Visual Studio, select Project
In the Add Web Reference dialog, type
http://vsmoss/sites/intranet/_vti_bin/Webs.asmx?WSDLand press the Go arrow.When the Webs web service is located, type MOSSService in the Web Reference Name box and push the Add Reference button.
Before we can create the hierarchical view of the SharePoint installation, we must return the set of all sites that are contained in the installation. In this exercise, you will retrieve this information directly from the SharePoint configuration database. Going directly against the SharePoint databases can be a dangerous technique if you are doing more than reading data; however, it's handy to know that you can do it safely to retrieve information. Add the code from Listing 11-18 to return the top-level sites and add them to the tree.
Example 11.18. Returning Top-Level Sites
private void Form1_Load(object sender, EventArgs e)
{
    string conn =
    "Integrated Security=SSPI;" +
    "Initial Catalog=WSS_Content" +
    ";Data Source=VSSQL";

    string sql = "SELECT Title, FullUrl " +
    "FROM dbo.Webs " +
    "WHERE (ParentWebId IS NULL) AND (FullUrl <> '') " +
    "AND (FullUrl IS NOT NULL) " +
    "ORDER BY Title";

    try
    {
        //Return the sites
        using (SqlConnection connection = new SqlConnection(conn))
        {
            SqlDataAdapter adapter = new SqlDataAdapter();

            DataSet dataSet = new DataSet("root");
            adapter.SelectCommand = new SqlCommand(sql, connection);
            adapter.Fill(dataSet, "Sites");

            //Put top-level sites in tree
            DataRowCollection siteRows = dataSet.Tables["Sites"].Rows;

            foreach (DataRow siteRow in siteRows)
            {
                TreeNode treeNode = new TreeNode();
                treeNode.Text = siteRow["Title"].ToString();
                treeNode.Tag = "http://CHOICE/" +
                siteRow["FullUrl"].ToString();
                treeView1.Nodes.Add(treeNode);
                fillTree(treeNode);
            }
        }
    }
    catch (Exception x)
    {
        MessageBox.Show(x.Message);
    }
}Once the top-level sites are returned, you can use the Webs web service to return all of the child webs beneath each site. This is done through a recursive call to the web service. These calls are made until each branch is filled out to the leaf. Add the code from Listing 11-19 to build out the tree.
Example 11.19. Adding Child Webs
private void fillTree(TreeNode parent)
{
    //Redirect web service
    SPSService.Webs service = new SPSService.Webs();
    service.Url = parent.Tag.ToString() + "/_vti_bin/Webs.asmx";
    service.Credentials = CredentialCache.DefaultCredentials;

    //Get child webs
    XmlNode nodes = service.GetWebCollection();

    //Add child webs to tree
    foreach(XmlNode node in nodes)
    {
        TreeNode child = new TreeNode();
        child.Text = node.Attributes["Title"].Value;
        child.Tag = node.Attributes["Url"].Value;
        parent.Nodes.Add(child);
        fillTree(child);

    }
}After you have all the code entered, simply run the project. The tree view should return with a complete listing of all sites and webs in the target installation. If you have trouble, check to be sure that you are referencing the correct server and that your account has permission to access the content database.