
Now we will look at examples of setting up the three different types of ALTQ queues: priority-based, class-based bandwidth, and HFSC.
The general syntax for ALTQ queues in PF looks like this:
altq oninterface type[options ... ]main_queue{sub_q1,sub_q2..} queuesub_q1[ options ... ] queuesub_q2[ options ... ] {subA,subB, ... } [...] pass [ ... ] queuesub_q1pass [ ... ] queuesub_q2
Note that cbq and hfsc queues can have several levels of subqueues. The priq queues are essentially flat, with only one queue level. We will address syntax specifics for each type in the following sections.
The basic concept for priority-based queues (priq) is fairly straightforward and perhaps the easiest to understand. Within the total bandwidth allocated to the main queue, all that matters is traffic priority. You assign queues a priority value in the range 0 through 15, where a higher value means that the queue’s requests for traffic are serviced sooner.
For a real-world example, we can look to Daniel Hartmeier. He discovered a simple yet effective way to improve the throughput for his home network by using ALTQ. Like many people, Daniel had his home network on an asymmetric connection, with total usable bandwidth low enough that he felt a strong desire to get better bandwidth utilization. In addition, when the line was running at or near capacity, some oddities started appearing. One symptom in particular seemed to indicate there was room for improvement: Incoming traffic (downloads, incoming mail, and such) slowed down disproportionately whenever outgoing traffic started—more than could be explained by measuring the raw amount of data transferred. It all came back to a basic feature of TCP.
When a TCP packet is sent, the sender expects acknowledgment (in the form of an ACK packet) from the receiving end and will wait for a specified time for it to arrive. If the ACK does not arrive within the specified time, the sender assumes that the packet has not been received and resends the packet it originally sent. The problem is that in a default setup, packets are serviced sequentially by the interface as they arrive. This inevitably means that ACK packets, with essentially no data payload, wait in line while the larger data packets are transferred.
A testable hypothesis formed: If the tiny, practically data-free ACK packets were able to slip in between the larger data packets, this would lead to a more efficient use of available bandwidth. The simplest practical way to implement and test the theory was to set up two queues with different priorities and integrate them into the rule set. The following lines show the relevant parts of the rule set.
ext_if="kue0"

altq on $ext_if priq bandwidth 100Kb queue { q_pri, q_def }
     queue q_pri priority 7
     queue q_def priority 1 priq(default)

pass out on $ext_if proto tcp from $ext_if queue (q_def, q_pri)

pass in on $ext_if proto tcp to $ext_if queue (q_def, q_pri)
Here, the priority-based queue is set up on the external interface, with two subordinate queues. The first subqueue, q_pri, has a high priority value of 7; the other subqueue (q_def) has a significantly lower priority value of 1.
This seemingly simple rule set works by exploiting how ALTQ treats queues with different priorities. Once a connection is assigned to the main queue, ALTQ inspects each packet’s type of service (ToS) field. ACK packets have the ToS delay bit set to low, which indicates that the sender wanted the speediest delivery possible. When ALTQ sees a low-delay packet, and queues of differing priorities are available, it will assign the packet to the higher priority queue. This means that the ACK packets skip ahead of the lower priority queue and are delivered more quickly, which in turn means that data packets are serviced more quickly.
The net result is that a configuration like this provides better performance than a pure FIFO configuration with the same hardware and available bandwidth.[38]
In the preceding example, the rule set was constructed the traditional way, with the queue assignment as part of the pass rules. However, this is not the only way to do queue assignment. Using match rules (available in OpenBSD 4.6 and later), it is incredibly easy to retrofit this simple priority-queueing regime onto an existing rule set.
If you have been working through the examples in Chapter 3 and Chapter 4, it is likely that your rule set already has a match rule that applies nat-to on your outgoing traffic. If you want to introduce priority-based queueing to your rule set, you can get started by adding the queue definitions and making some minor adjustments to your outgoing match rule.
Start with the queue definition from the preceding example, and adjust the total bandwidth to local conditions, as in this example:
altq on $ext_if priq bandwidth $ext_bw queue { q_pri, q_def }
      queue q_pri priority 7
      queue q_def priority 1 priq(default)
This gives the queues whatever bandwidth allocation you define with the ext_bw macro.
The simplest and quickest way to integrate the queues into your rule set is to edit your outgoing match rule to read something like this:
match out on $ext_if from $int_if:network nat-to ($ext_if) queue (q_def, q_pri)
Reload your rule set, and the priority-queueing regime is applied to all traffic that is initiated from your local network.
You can use the systat command to get a live view of how traffic is assigned to your queues.
$ sudo systat queuesThis will give you a live display something like this:
2 users    Load 0.39 0.27 0.30                      Fri Apr  1 16:33:44 2011
QUEUE                BW SCH  PR   PKTS  BYTES  DROP_P  DROP_B QLEN
 BORRO SUSPE  P/S   B/S
q_pri                   priq  7  21705  1392K       0       0    0
               12   803
q_def                   priq     12138  6759K       0       0    0
                9  4620
Looking at the numbers in the PKTS (packets) and BYTES columns, you see a clear indication that the queuing is working as intended.
The q_pri queue has processed a rather large number of packets in relation to the amount of data, just as we expected. The ACK packets do not take up a lot of space. On the other hand, the traffic assigned to the q_def queue has more data in each packet, and the numbers show essentially the reverse packet numbers-to-data size ratio compared to the q_pri queue.
Note
systat is a rather capable program on all BSDs, and the OpenBSD version offers several views that are relevant to PF, so far not found in the systat variants on the other systems. We will be looking at systat again in the next chapter. In the meantime, read the man pages and play with the program. It’s a very useful tool for getting to know your system.
Maximizing network performance generally feels nice. However, you may find that your network has other needs. For example, it might be important for some traffic—such as mail and other vital services—to have a baseline amount of bandwidth available at all times, while other services—peer-to-peer file sharing comes to mind—should not be allowed to consume more than a certain amount. For addressing these kinds of requirements or concerns, the class-based queue (cbq) discipline offers a slightly larger set of options.
To illustrate how to use cbq, we move on to another example, which builds on the rule sets from previous chapters. This is a small local network, where we want to let the users on the local network connect to a predefined set of services outside their own network and also access a web server somewhere on the local network.
Here, all queues are set up on the external, Internet-facing interface. This approach makes sense mainly because bandwidth is more likely to be limited on the external link than on the local network. In principle, however, allocating queues and running traffic shaping can be done on any network interface. The following example setup includes a cbq queue for a total bandwidth of 2Mb with six subqueues.
altq on $ext_if cbq bandwidth 2Mb queue { main, ftp, udp, web, ssh, icmp }
      queue main bandwidth 18% cbq(default borrow red)
      queue ftp bandwidth 10% cbq(borrow red)
      queue udp bandwidth 30% cbq(borrow red)
      queue web bandwidth 20% cbq(borrow red)
      queue ssh bandwidth 20% cbq(borrow red) { ssh_interactive, ssh_bulk }
            queue ssh_interactive priority 7 bandwidth 20%
            queue ssh_bulk priority 0 bandwidth 80%
      queue icmp bandwidth 2% cbq
The subqueue main has 18 percent of the bandwidth and is designated as the default queue. This means any traffic that matches a pass rule but is not explicitly assigned to some other queue ends up here. The borrow and red keywords mean that the queue may “borrow” bandwidth from its parent queue, while the system attempts to avoid congestion by applying the RED algorithm.
The other queues follow more or less the same pattern, up to the subqueue ssh, which itself has two subqueues with separate priorities. Here we see a variation on the ACK priority example. Bulk SSH transfers, typically SCP file transfers, are transmitted with a ToS indicating throughput, while interactive SSH traffic has the ToS flag set to low delay and skips ahead of the bulk transfers. The interactive traffic is likely to be less bandwidth-consuming and gets a smaller share of the bandwidth, but receives preferential treatment because of the higher priority value assigned to it.
This scheme also helps the speed of SCP file transfers, since the ACK packets for the SCP transfers will be assigned to the higher priority subqueue.
Finally, we have the icmp queue, which is reserved for the remaining 2 percent of the bandwidth, from the top level. This guarantees a minimum amount of bandwidth for ICMP traffic that we want to pass but that does not match the criteria for being assigned to the other queues.
To make it all happen, we use these pass rules, which indicate which traffic is assigned to the queues and their criteria:
set skip on { lo, $int_if }
pass log quick on $ext_if proto tcp to port ssh queue (ssh_bulk, ssh_interactive)
pass in quick on $ext_if proto tcp to port ftp queue ftp
pass in quick on $ext_if proto tcp to port www queue http
pass out on $ext_if proto udp queue udp
pass out on $ext_if proto icmp queue icmp
pass out on $ext_if proto tcp from $localnet to port $client_out
The rules for ssh, ftp, www, udp, and icmp assign traffic to their respective queues. The last catchall rule passes all other traffic from the local network, lumping it into the default main queue.
The simple schedulers we have looked at so far can make for rather efficient setups, but network admins with traffic-shaping ambitions tend to look for a little more flexibility than can be found in the pure priority-based queues or the simple class-based variety. After the gentle queuing introduction we’ve just been through, how does it sound to you if I say there is a regime with flexible bandwidth allocation, guaranteed lower and upper bounds for bandwidth available to each queue, and variable allocations over time—and one that only starts shaping when there is an actual need?
The HFSC queueing algorithm (hfsc in pf.conf terminology) offers all of these, but the added flexibility comes at a price: The setup is a tad more complex than the other types, and tuning your setup for an optimal result can be quite an interesting process.
Working from the same configuration we altered slightly earlier, we insert this queue definition early in the pf.conf file:
altq on $ext_if bandwidth $ext_bw hfsc queue { main, spamd }
       queue main bandwidth 99% priority 7 qlimit 100 hfsc (realtime 20%,
 linkshare 99%)
            { q_pri, q_def, q_web, q_dns }
          queue q_pri bandwidth 3% priority 7 hfsc (realtime 0, linkshare 3% red )
          queue q_def bandwidth 47% priority 1 hfsc (default realtime
 30% linkshare 47% red)
          queue q_web bandwidth 47% priority 1 hfsc (realtime 30% linkshare 47% red)
          queue q_dns bandwidth 3% priority 7 qlimit 100 hfsc (realtime
 (30Kb 3000 12Kb),
                  linkshare 3%)
       queue spamd bandwidth 0% priority 0 qlimit 300 hfsc (realtime 0,
 upperlimit 1%,
            linkshare 1%)
As you can see, the hfsc queue definitions take slightly different parameters than the simpler disciplines. We start off with this rather small hierarchy by splitting the top-level queue into two. At the next level, we subdivide the main queue into several subqueues, each with a defined priority. All the subqueues have a realtime value set; this is the guaranteed minimum bandwidth allocated to the queue. The optional upperlimit sets a hard upper limit on the queue’s allocation. The linkshare parameter sets the allocation the queue will have available when it is backlogged; that is, it has started to eat into its qlimit allocation.
In case of congestion, each queue by default has a pool of 50 slots, the queue limit (qlimit), to keep packets around when they cannot be transmitted immediately. In this example, the top-level queues main and spamd both have larger than default pools set by their qlimit setting: 100 for main and 300 for spamd. Cranking up queue sizes here means we are a little less likely to drop packets when the traffic approaches the set limits, but it also means that when the traffic shaping kicks in, we will see increased latency for connections that end up in these larger than default pools.
The queue hierarchy here uses two familiar tricks to make efficient use of available bandwidth:
It uses a variation of the high- and low-priority mix demonstrated in the earlier pure priority example.
We speed up almost all other traffic (and most certainly the web traffic that appears to be the main priority here) by allocating a small but guaranteed portion of bandwidth for name service lookups. For the
q_dnsqueue, we set up therealtimevalue with a time limit—after3000milliseconds, therealtimeallocation goes down to12Kb. This can be useful to speed connections that transfer most of their payload during the early phases.
The next step is to tie the newly created queues into the rule set. Assuming you have a filtering regime in place already, the tie-in becomes amazingly simple by adding a few match rules:
match out on $ext_if from $air_if:network nat-to ($ext_if) queue (q_def, q_pri)
match out on $ext_if from $int_if:network nat-to ($ext_if) queue (q_def, q_pri)
match out on $ext_if proto tcp to port { www https } queue (q_web, q_pri)
match out on $ext_if proto { tcp udp } to port domain queue (q_dns, q_pri)
match out on $ext_if proto icmp queue (q_dns, q_pri)
Here, the match rules once again do the ACK packet speedup trick with the high- and low-priority queue assignment, just as you saw earlier in the pure priority-based system. The only exception is when we assign traffic to our lowest priority queue, where we really do not care to have any speedup at all:
pass in log on egress proto tcp to port smtp rdr-to 127.0.0.1 port spamd queue spamd
This has the intention of slowing down the spammers a little more on their way to our spamd. With a hierarchical queue system in place, systat queues shows the queues and their traffic as a hierarchy, too.
2 users    Load 0.22 0.25 0.25                      Fri Apr  1 16:43:37 2011
QUEUE                 BW SCH  PRIO     PKTS    BYTES   DROP_P   DROP_B QLEN
 BORROW SUSPEN   P/S    B/S
root_nfe0            20M hfsc    0        0        0        0
        0    0                   0      0
 main                19M hfsc    7        0        0        0
       0    0                   0      0
  q_pri             594K hfsc    7     1360    82284        0
        0    0                  11    770
  q_def            9306K hfsc           158    15816        0        0
    0                 0.2     11
  q_web            9306K hfsc           914   709845        0        0
   0                  50  61010
  q_dns             594K hfsc    7      196    17494        0        0
    0                   3    277
 spamd                 0 hfsc    0      431    24159        0        0
    0                   2    174
The root queue is shown as attached to the physical interface—as nfe0 and root_nfe0 in this case. main and its subqueues q_pri, q_def, q_web, and q_dns are shown with their bandwidth allocations and number of bytes and packets passed. The DROP_P and DROP_B columns are where number of packets and bytes dropped, respectively, would appear if we had been forced to drop packets at this stage. The final two columns show live updates of packets per second and bytes per second.
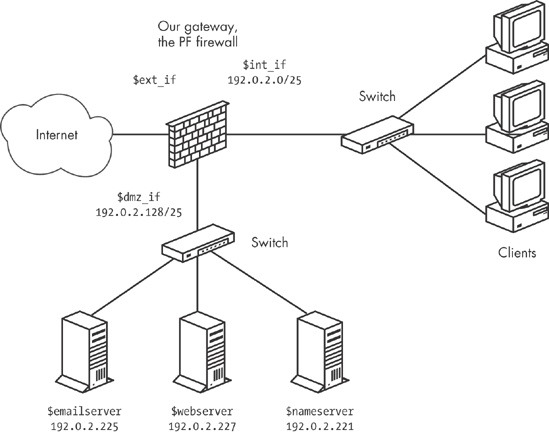
Back in Chapter 5, we set up a network with a single gateway but all externally visible services configured on a separate DMZ network. That way, all traffic to the servers from both the Internet and the internal network has to pass through the gateway.
The network schematic is shown in Figure 7-1, which is identical to Figure 5-2.
With the rule set from Chapter 5 as the starting point, we will be adding some queuing in order to optimize our network resources. The physical and logical layout of the network will not change.
The most likely bottleneck for this network is the bandwidth for the connection between the gateway’s external interface and the Internet at large. The bandwidth elsewhere in our setup is not infinite, of course, but the available bandwidth on any interface in the local network is likely to be less of a limiting factor than the bandwidth actually available for communication with the outside world. For services to be available with the best possible performance, we need to set up the queues so the bandwidth available at the site is made available to the traffic we want to allow.
In our example, it is likely that the interface bandwidth on the DMZ interface is either 100Mb or 1Gb, while the actual available bandwidth for connections from outside the local network is considerably smaller. This consideration shows up in our queue definitions, where you clearly see that the actual bandwidth available for external traffic is the main limitation in the queue setup.
total_ext = 2Mb
total_dmz = 100Mb
altq on $ext_if cbq bandwidth $total_ext queue { ext_main, ext_web, ext_udp,
    ext_mail, ext_ssh }
queue ext_main bandwidth 25% cbq(default borrow red) { ext_hi, ext_lo }
queue ext_hi priority 7 bandwidth 20%
queue ext_lo priority 0 bandwidth 80%
queue ext_web bandwidth 25% cbq(borrow red)
queue ext_udp bandwidth 20% cbq(borrow red)
queue ext_mail bandwidth 30% cbq(borrow red)
altq on $dmz_if cbq bandwidth $total_dmz queue { ext_dmz, dmz_main, dmz_web,
     dmz_udp, dmz_mail }
queue ext_dmz bandwidth $total_ext cbq(borrow red) queue { ext_dmz_web,
     ext_dmz_udp, ext_dmz_mail }
      queue ext_dmz_web bandwidth 40% priority 5
      queue ext_dmz_udp bandwidth 10% priority 7
      queue ext_dmz_mail bandwidth 50% priority 3
queue dmz_main bandwidth 25Mb cbq(default borrow red) queue { dmz_main_hi,
    dmz_main_lo }
queue dmz_main_hi priority 7 bandwidth 20%
queue dmz_main_lo priority 0 bandwidth 80%
queue dmz_web bandwidth 25Mb cbq(borrow red)
queue dmz_udp bandwidth 20Mb cbq(borrow red)
queue dmz_mail bandwidth 20Mb cbq(borrow red)
Notice that the total_ext bandwidth limitation determines the allocation for all queues where the bandwidth for external connections is available. To make use of the new queuing infrastructure, we need to make some changes to the filtering rules, too. Keep in mind that any traffic you do not explicitly assign to a specific queue is assigned to the default queue for the interface. Thus, it is important to tune your filtering rules as well as your queue definitions to the actual traffic in your network.
The main part of the filtering rules could end up looking like this after adding the queues:
pass in on $ext_if proto { tcp, udp } to $nameservers port domain
    queue ext_udp
pass in on $int_if proto { tcp, udp } from $localnet to $nameservers
    port domain
pass out on $dmz_if proto { tcp, udp } to $nameservers port domain
    queue ext_dmz_udp
pass out on $dmz_if proto { tcp, udp } from $localnet to $nameservers
    port domain queue dmz_udp
pass in on $ext_if proto tcp to $webserver port $webports queue ext_web
pass in on $int_if proto tcp from $localnet to $webserver port $webports
pass out on $dmz_if proto tcp to $webserver port $webports queue ext_dmz_web
pass out on $dmz_if proto tcp from $localnet to $webserver port $webports
    queue dmz_web
pass in log on $ext_if proto tcp to $mailserver port smtp
pass in log on $ext_if proto tcp from $localnet to $mailserver port smtp
pass in log on $int_if proto tcp from $localnet to $mailserver port $email
pass out log on $dmz_if proto tcp to $mailserver port smtp queue ext_mail
pass in on $dmz_if from $mailserver to port smtp queue dmz_mail
pass out log on $ext_if proto tcp from $mailserver to port smtp
    queue ext_dmz_mail
Notice that only traffic that will pass either the DMZ interface or the external interface is assigned to queues. In this configuration, with no externally accessible services on the internal network, queuing on the internal interface would not make much sense, since it is likely the part of our network with the least restrictions on available bandwidth.
So far, we have focused on queuing as a method to make sure specific kinds of traffic are let through as efficiently as possible given the conditions that exist in and around your network. Now, we will look at two examples that present a slightly different approach to identify and handle unwanted traffic. These examples demonstrate some queuing-related tricks you can use to keep miscreants in line.
Think back to the Turning Away the Brutes section (page 86), where we used a combination of state-tracking options and overload rules to fill up a table of addresses for special treatment. The special treatment we demonstrated in Chapter 6 was to cut all connections, but it is equally possible to assign overload traffic to a specific queue instead.
Consider this rule from our earlier class-based bandwidth example earlier in the chapter:
pass log quick on $ext_if proto tcp to port ssh flags S/SA
    keep state queue (ssh_bulk, ssh_interactive)
We could add state-tracking options, like this:
pass log quick on $ext_if proto tcp to port ssh flags S/SA
    keep state (max-src-conn 15, max-src-conn-rate 5/3,
    overload <bruteforce> flush global) queue (ssh_bulk, ssh_interactive)
Then we could make one of the queues slightly smaller:
queue smallpipe bandwidth 1kb cbq
And then assign traffic from miscreants to the small-bandwidth queue with the following rule:
pass inet proto tcp from <bruteforce> to port $tcp_services queue smallpipe
It might also be useful to supplement rules like these with table-entry expiry as described, as described in Tidying Your Tables with pfctl in Tidying Your Tables with pfctl.
Chapter 6 covered several ways to use spamd to cut down on spam. If running spamd is not an option in your environment, you can use a queue and rule set based on the common knowledge that machines that send spam are likely to run a particular operating system.
PF has a fairly reliable operating system fingerprinting mechanism, which detects the operating system at the other end of a network connection based on characteristics of the initial SYN packets at connection setup. The following may be a simple substitute for spamd if you have determined that legitimate mail is highly unlikely to be delivered from systems that run that particular operating system:
pass quick proto tcp from any os "Windows" to $ext_if port smtp queue smallpipe
Here, email traffic originating from hosts that run a particular operating system get no more than 1 kilobit of your bandwidth, with no borrowing.
[37] This really dates the book, I know. In a few years, these numbers will seem quaint.
[38] Daniel’s article about this version of his setup, at http://www.benzedrine.cx/ackpri.html, contains a more detailed analysis.