If photographing nature and landscape or still-life imagery is calming and meditative, making images of people is part of life itself. From ancient civilizations to modern day, making art from the likenesses of people has been a part of our culture. Whether you photograph portraits with high-end digital equipment or use point-and-shoot or mobile phone cameras, you are a part of that tradition. (See Figure 5.1.)

Figure 5.1. Making portrait images of people has been a part of our culture since ancient times. Copyright © Steve Weinrebe, Getty Images
I personally believe portrait photography is one of the highest forms of artistic photography, although I use the term “portrait” loosely. Not all portraits are formal, and portraits can be made indoors or outdoors. Most people, upon first acquiring a camera, photograph themselves—in mirrors, with the self timer, or just hand-holding the cameras in front of their faces. Self-portraits are an important part of the art of portrait photography.
Besides that self-portraits can be fun to make, they’re part of the process of discovery for how we work with people in front of the camera. There is no more powerful tool in portrait photography than the photographer’s “attitude” (see Chapter 3). If you are tentative and shy when taking pictures of yourself, you may have that demeanor when taking pictures of others. People respond to the photographer, not the camera. If you want to capture someone, or a group of people, at their best, project your best when taking pictures. Be gregarious, even if you are not a gregarious person. Be entertaining, funny, direct, uninhibited, even if you might not act that way without the camera in your hand. Portrait subjects want you to be that way; they want to be loosened up because most people understand that they will be remembered for how they are captured in one fraction of a second, and few people want to be remembered as stiff and withdrawn.
When you do have a portrait subject in front of the camera, you may need to act and react quickly. As with other types of photography, planning ahead can help you a lot, because the fewer decisions you have to make while taking the pictures, the more your mind will be on your subject. If you have a scheduled portrait, don’t wait for someone to show up before you think about what you want to do. Always give yourself options: choice of backgrounds, lighting, clothing, and props, even if you end up using few of these. Photography is full of happy accidents, and the best portraits can be the result of such “accidents.” Are they really accidents, though? Not if you are well prepared. Then those spontaneous moments were guided to, and given time to evolve, because of the preparation, environment, and atmosphere you created for the shoot. (See Figure 5.2.)
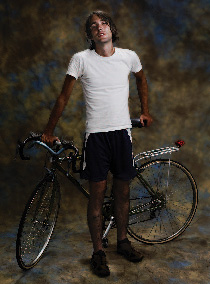
Figure 5.2. Being open to spontaneity can help capture impromptu portraits. My wife’s nephew had just arrived after a four-day bicycle ride from Ohio to New Jersey. Before he cleaned up, I placed him in front of a background with his bike, positioned some lights, and shot this portrait. Copyright © Steve Weinrebe, Getty Images
Portrait tools are marketed in abundance in stores and catalogs, at trade shows and in online videos. You could mortgage your home to set up a first-class portrait studio. But in the era of six-dollar portraits at mass retailers, paying for that equipment won’t be easy. Whether you are shooting portraits professionally, as a hobby or avocation, or as a favor to someone you know, having some easily found tools and handy lighting solutions can help you with your portrait photography, and leave you with some money left over for a lens or new camera to make portraits with.
Unless you plan to only photograph portraits outdoors or in room settings, backgrounds are an essential part of a portrait set. Painted backgrounds can be purchased or made, but because they have a character to them from the colors used and the patterns of the paint, they may be right only for certain portraits. Plain backdrops are more flexible, and neutral-colored backdrops are the most flexible for the same reason neutral colors are good for clothing or cars or anything else. Neutral colors don’t stand out or scream for attention, and don’t distract from the surroundings. In the case of portraits, neutral colors won’t distract from the people posing in the picture. Clothes are less likely to clash with the background as well. (See Figure 5.3.)
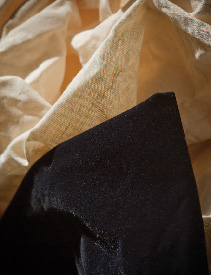
Figure 5.3. Plain-colored cloth can make simple background material for portraits. Copyright © Steve Weinrebe
One simple choice for background material is black velvet. Buy it by the yard at any retailer that sells fabric. Black velvet is very inexpensive, and if you sew it together, the seams will not likely show in photos. Black velvet chews up light. By that I mean that the material has almost zero reflectivity and so you can concentrate on lighting your subjects and not worry too much about the light falling on the background. Contrast that with using a paper or painted background, which will show pronounced shadows if too close to your subject. (See Figure 5.4.)

Figure 5.4. Black velvet provides an even, dark backdrop without texture or sense of distance to the subject. Make sure the black extends to the edges of the image area for the best effect. Copyright © Steve Weinrebe
For home-based portrait setups, space is usually a problem. You may be photographing portraits out of your basement or living room, or you may be photographing someone in their own living room. Either way, you’ll be dealing with low ceilings and lots of problematic reflections, especially f you’re using a light with an umbrella, or a soft box. Black velvet can give you freedom to light the portrait subject from a light positioned just to the side of the camera. Because the background will be jet black, make sure to fill in the shadow side of faces to separate those tonal areas from the background.
Tip
If there is anything reflective in the framing of your portrait photograph, such as a glass-covered picture on the wall behind the person, you can use black velvet to make the reflection go away. Position a sheet of black velvet, whether taped or pinned to the wall, or hanging from a pole, so that it is reflecting into the glass instead of other parts of the room.
Muslin, like black velvet, provides a neutral background color that can be used again and again. The shade of the muslin, how bright it is, can be controlled by how far or near the light source is. You can use it outside for daylight studio portraits, or in your own studio setup. Muslin can be purchased in 10-foot widths. In fact, a muslin painter’s dropcloth can work very well for the same purpose. (See Figure 5.5.)

Figure 5.5. Muslin has a neutral color that’s suitable as a backdrop to match a wide variety of outfits. In this portrait, the muslin is out of focus, to make any wrinkles smooth, and lit from beneath, to create a slightly textured look similar to a painted backdrop. Copyright © Steve Weinrebe
Don’t bother to fold your muslin backdrop; just stuff it in a bag. That’s not out of laziness. It’s because random wrinkles look more natural and less distracting in a backdrop than evenly spaced folds do. A thinly milled 10-foot-by-10-foot sheet of muslin will stuff into a plastic shopping bag easily. Thicker fabric can be stuffed into plastic storage containers that can be purchased at most discount retailers. (See Figure 5.6.)
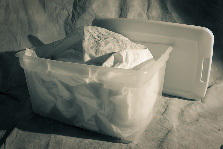
Figure 5.6. Containers like this can be purchased at discount retailers and big-box hardware stores, and can hold a 10-foot-by-20-foot bundle of muslin. Copyright © Steve Weinrebe
Painting muslin backdrops can be fun, although a bit tedious to make. If you want to paint your own backdrop, just be prepared to use a lot of paint. Muslin really soaks the paint up, and to achieve a random pattern with different colors or tones will take a lot of time and patience, as well as a large area of floor to lay the muslin out on for painting. If you want an art project, though, making a painted muslin backdrop can be fun and rewarding. (See Figure 5.2.)
The farther you can get a muslin backdrop behind your subject, the more out of focus the wrinkles in the muslin will be. A wide aperture will help send any wrinkles out of focus because the wide aperture gives the photo a very narrow depth of focus. Those out-of-focus wrinkles will become a random texture behind your subject, making your portrait subject stand out from the backdrop. If you are shooting your portrait subject full figure, it may be hard to send the background out of focus. Don’t worry, though, because at that distance the wrinkles in a muslin backdrop will be very small and still take on the feeling of a random texture set apart from your subject. And you can always make any wrinkles look out of focus with some blurring in post-production.
For pure simplicity, use a white bedspread for a neutral high-key backdrop. Don’t fold it, though, and if you have just purchased a white sheet for photography, wash it, throw it in the dryer, and then stuff it in a bag just like with muslin so that the sheet will have random wrinkles. On the other hand, if you have a way to stretch the fabric out to be a very flat white background, like pinning it to a wall tightly from corner to corner, iron the wrinkles out first. (See Figure 5.7.)

Figure 5.7. Like muslin, a white bedsheet makes a good white background for portrait photography. In this portrait, I positioned the sheet several feet behind the subject and kept the light intensity low so that the sheet wouldn’t become a blown-out white in the photograph. The neutral color gives a different mood to the portrait compared with the warm-toned muslin background in Figure 5.5 Copyright © Steve Weinrebe
When shopping for a white sheet for a background, look at the white color of the sheet. The color white can vary widely from product to product. Just look at white paper around your home or office and you’ll see several different whites. Look for a warmer white, or a white that has a slightly cream color, for portraits. Stay away from white sheets that have a cool, or blue, bias to the white because that will be less attractive against skin tones.
Tip
A colored bedspread can make a nice backdrop for photography as well. Bedspreads can be expensive, but you may find a plain-colored sheet on sale for a real bargain cloth backdrop. Because the bedspread will be used for a photo background, it doesn’t matter what the fabric is; a polyester backdrop photographs just as well as cotton.
Whatever you end up using for your photo background for portraits, you’ll need a way to hold the background up. Pipe does a great job holding up both rolled backgrounds and cloth backdrops. Galvanized electrical pipe makes an excellent background holder for a number of reasons. The pipe is neutral in color, comes in 10-foot lengths (long enough to hold a 9-foot roll of background paper or a large cloth backdrop), and has a narrow enough diameter to easily accommodate spring clamps. (See Figure 5.8.)

Figure 5.8. Galvanized electrical conduit makes a lightweight, sturdy, and inexpensive support pole to suspend backgrounds from. Copyright © Steve Weinrebe
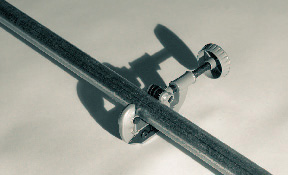
For supporting photo backgrounds, avoid narrow-diameter PVC pipes. They are too flexible and will tend to bend in the middle under the weight of the background. Half-inch copper plumbing pipe (you may have a piece lying around) is also good for suspending shorter backgrounds like a 4-foot background. A 10-foot length of copper pipe can suspend a large background, but if the background has any weight to it, like with a 10-foot roll of background paper or a heavy muslin backdrop, the copper pipe will tend to sag in the middle. (See Figure 5.9.)
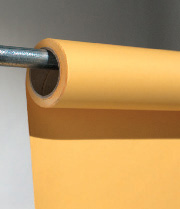
Figure 5.9. Electrical conduit is a sturdy and inexpensive solution for supporting even heavy portrait backgrounds. Copyright © Steve Weinrebe
That’s where galvanized electrical conduit comes in. Also known as electrical metallic tubing, both the half-inch and the three-quarter-inch size work very well as a background support. The metal is less flexible than copper, and the extra diameter provided with the three-quarter-inch electrical conduit provides a much sturdier support that won’t sag under the weight of most backgrounds. Electrical conduit is lightweight and, like most small-gauge pipe, can be easily cut with a pipe cutter. (See Figure 5.10.)
Pipes make great supports for backgrounds, but now you need something to hold up the backdrop support for the portrait shoot. That can be accomplished a number of ways. Of course there are traditional supports for background poles including light stands and clamps, and if you’re a professional photographer, you may have several of these already. But if you are dabbling in portrait photography or setting up a home studio, you may want an economical solution to hold up your portrait backgrounds. As long as you are willing to drill a couple of holes in your wall or ceiling, storage hooks make a great solution for holding up the pole, or pipe, that supports your background. (See Figures 5.11 and 5.12.)
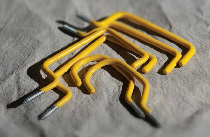
Figure 5.11. Storage hooks are strong enough to hold up heavy rolls of background paper or cloth backgrounds. Copyright © Steve Weinrebe
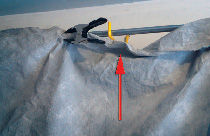
Figure 5.12. Sling the pole, or pipe that holds the background, over the storage hooks. Copyright © Steve Weinrebe
Storage hooks come in many different shapes and sizes. They are coated with a non-skid rubber, so the pipe that your background is attached to won’t easily slide on them. Storage hooks come in a variety of colors as well. You should ideally look for black ones only so that they won’t reflect into anything you may ever have in a photo set that has a mirrored surface. But for portraits, the color doesn’t matter, so feel free to buy red, yellow, or any other color hooks as it pleases you. In fact, if they will be anywhere they may be bumped in to when not supporting a background, a bright color may be a good idea.
Always pre-drill a hole when you are going to screw in one of these hooks. Use a drill bit slightly smaller than the threads of the screw-in part of the hook. Once screwed in, these hooks will stay put and hold up background poles quite easily. Most storage hooks have a depth to them so you can fit more than one pole onto them, but that’s not practical when using paper rolls. However, if you are hanging different colors of cloth for backgrounds, you can hang a few backdrops, each attached to its own length of pipe, and just rotate the one you want to be in front by lifting it off and repositioning it in the order they sit on the hooks. (See Figure 5.13.)
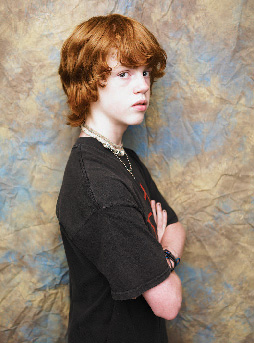
Figure 5.13. Storage hooks can hold up a background roll anywhere you want to position the portrait set, as long as you have a wall or ceiling to screw them into. Copyright © Steve Weinrebe, Getty Images
Tip
If you have a drop ceiling, you can use the brackets that support the ceiling panels to hold up your background. Use picture-hanging wire to make about a 6-inch loop around the brackets that support the ceiling panels. The loop will go up around the bracket, and hang down. Try threading the wire up around the bracket and back down, and then tying the ends securely together. You need two of these spaced apart a little less wide than your support pipe. Then just slip each end of the pipe through each loop to hang the background support pipe from your ceiling. If your background has substantial weight to it, hang the loops on the drop ceiling brackets near where the brackets are supported by the ceiling joists. Test them and use good judgment as to how much weight you can hang from them, but the drop ceiling brackets, if installed properly, should be strong enough to hold a cloth background clamped to a lightweight pipe.
If you’ve ever used a 9-foot roll of background paper and unrolled it from high up while on a ladder, you may know that as soon as the weight of the paper that’s been dropped down gets heavy enough, it will keep pulling the paper down of its own accord, and you have to quickly stop the paper from unwinding or the entire roll will end up in a heap on the floor. If that happens, you need to immediately clamp your background paper down to the pipe that’s holding it. A-clamps, a.k.a. spring clamps, are what you’ll need, and you should have a couple in your pocket, or clamped to the ladder, background support pipe, or your clothing, before you begin unrolling any background paper. (See Figure 5.14.)

Figure 5.14. A-clamps, a.k.a. spring clamps, are an essential photo tool for holding in place the pipes that support your portrait backgrounds. Copyright © Steve Weinrebe
A-clamps can be bought very inexpensively at any big box hardware retailer. They are called A-clamps because they are shaped like the letter A, but your retailer may know them as spring clamps. I like the ones the hardware stores sell because they usually have black rubber handles and clamp tips, and cost about a dollar. There are A-clamps that are marketed specifically to photographers and videographers, film gaffers and the like, that cost three times as much or more. I own several of those more expensive clamps as well, and I find little difference between the two. The rubber at the tips of the clamps may last longer with the more expensive variety, but I’ve never had a real problem, and the A-clamps from the big box hardware stores are so inexpensive it’s a lot easier to purchase a dozen or more without feeling like you’ve just put a dent in your savings.
Two ways to use A-clamps to hold backgrounds are at the side of a roll of paper to keep it from unraveling, and along a pipe that holds a cloth background. For rolls of background paper, you need at least two clamps, one to hold the paper to the pipe and one to hold the pipe to whatever is holding the pipe up. You may want a couple of clamps at the bottom of the paper, as well, to hold the paper from curling back up. For cloth backgrounds like velvet or muslin, clamp the top end of the cloth to a pipe at intervals, and then let the cloth hang down for the portrait background. (See Figures 5.15 and 5.16.)
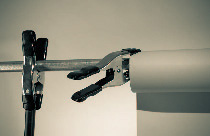
Figure 5.15. Use inexpensive A-clamps from big box hardware stores to prevent a roll of background paper from falling or unraveling. A-clamps are used here to hold the paper’s support pole to a light stand, as well, by letting the pole rest in the open end of the clamp. Copyright © Steve Weinrebe
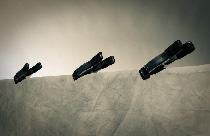
Figure 5.16. Use A-clamps at intervals to secure a cloth background to a pipe. Copyright © Steve Weinrebe
For a more direct use of A-clamps in portrait photography, you can clamp a subject’s clothes tightly against their body. I learned this trick years ago when shooting portraits of local news anchors. When they sat on a stool for a head-and-shoulders portrait, their jackets or dresses would often look rumpled in the front. An A-clamp at the subject’s back side does a great job keeping clothes from looking rumpled in the front. (See Figure 5.17.)
Figure 5.17. An A-clamp, at a subject’s back and hidden from the camera, can hold a jacket or dress tightly to someone’s body so it doesn’t look rumpled in a portrait. Copyright © Steve Weinrebe
Tip
Search dollar stores for very inexpensive A-clamps. The cheaper, the better, and the weaker the better. Weak A-clamps, clamps that have a spring without a tremendous amount of tension, serve a purpose in portrait sets: holding a reflector to a light stand without punching a dent into the reflector, for instance. Having both strong and weak A-clamps gives you the option to use a clamp with more or less tension when clamping things together.
When I’m teaching, I like to have a stool to sit on when I’m not standing or jumping around making a point, and I’m always amazed at the blank looks I get when I ask for one. You may not need one for me, but for portrait photography you should always have two or three stools, preferably of different heights, waiting to be used. (See Figure 5.18.)
Figure 5.18. Keep a few stools around for portrait photography. Choosing sturdy stools is more important than choosing pretty stools, since the stools will likely be out of the photo. Copyright © Steve Weinrebe
You should have at least one short stool and one taller stool. A 24-inch stool and a 30-inch stool will do nicely. The stool that your subject will sit on isn’t a prop and will likely be out of the picture. It’s just a way for the subject to relax but still sit at a good height for your camera. You can buy nice stools, but for portrait photography the stability of the stool is more important than its looks. The stools I use for portraits are very generic but very stable, and have enough weight that they won’t easily tip over.
When sitting on a stool, your subjects can vary their posture without chair arms or back getting in the way, or the slope of a chair’s seat setting their body off at a funny angle. A stool can be easily positioned or taken out of a set with one hand. If you’re photographing a group portrait, you can use stools to help even out the subjects’ height for the photo composition. You can put a shorter person in a taller stool, for instance. (See Figure 5.19.)

Figure 5.19. Different height stools help accommodate different sized people. Copyright © Steve Weinrebe
I’m not a fan of cushioned stools unless I’m sitting on them for something other than photography. Your portrait subjects aren’t going to be sitting on the stools for a long time, and a hard-topped stool will keep them more still. I find that subjects tend to wobble on cushioned stools, so I stay away from them for a portrait set.
If you need to shoot a larger area and the area of the stool is going to end up in the frame, use a cloth backdrop if possible. If it is large enough, like 20 feet by 30 feet, for example, you can drape some extra cloth from the foreground of the cloth over a stool so that the stool is hidden.
Soft focus portraits have a sentimental and timeless look. Although soft focus isn’t for everyone’s taste, it’s a look that can add a dreamy quality to portraits and be attractive for a subject. There are many types of soft focus filters for cameras and many of them are excellent. I own several myself and have my favorites. But one of the problems with soft focus filters is that they have a fixed diameter, and if you own several lenses with varying filter sizes, you would have to own a soft focus filter for each of them to cover yourself. If you usually use one lens for portraits—an 85mm or 105mm, for example— you could buy a soft focus for only that lens, but you’ll always be limited if you want to try out a different lens, with a different filter size, for a portrait. For the simplest and most flexible of soft focus techniques, simply breathe on your camera lens just prior to taking the portrait. (See Figure 5.20.)
Figure 5.20. For a simple soft focus technique, breathe on your camera lens just prior to taking the picture. Copyright © Steve Weinrebe
The moisture from breathing on a lens doesn’t last long, only a few seconds in a dry environment, so you’ll have to work quickly. Every time you breathe on a lens, the diffusion quality of the soft focus may be different, but that adds to the spontaneity of your portrait session. If the moisture on the lens doesn’t evaporate quickly enough, or you accidentally get too much moisture on it, wipe the lens gently with a lens cleaning cloth or other suitable material. Always shoot some portrait exposures with and without a soft focus effect because you may decide afterward that you don’t like it.
Tip
Don’t try this outdoors in below freezing temperatures, or you may end up with ice crystals on your lens. Also, put the lens cap back on only after the moisture from your breath evaporates.
You can try adding the soft focus effect in digital post-production as well. There are some excellent techniques for doing so. In my experience, there is a difference between shooting through something diffuse, like a soft focus filter or a hazy lens, and creating soft focus in the computer. The effect of light coming through a fog filter, or a foggy lens, is a magical look that is difficult to replicate faithfully in digital post-production. (See Figure 5.21.)

Figure 5.21. For this portrait, I breathed on the lens just prior to snapping the shutter. Each try results in a different effect. I applied a contrast curve to the final image, to optimize the brightness values. Copyright © Steve Weinrebe
To control the intensity of the soft focus effect, you can try varying the aperture in the camera’s lens. But while this works with traditional glass filters, aperture control for softness is less meaningful here because the density of your breath on the lens will vary, and the evaporation on the glass will be different each time you press the shutter.
An advantage to shooting with a soft focus effect is that you can instantly please the portrait subject. People want to look good immediately, not be told they’ll look better after you’ve had your way with the digital file. You can use this technique, breathing on a lens for soft focus, for just a capture or two and show the subject the previews, knowing that the rest of the pictures will be photographed without any soft focus effect until you add it digitally. That way, the portrait subject knows what to expect, and you have the flexibility of adding the soft focus effect later.
Now that the digital transition for TV broadcast has taken place, you might find yourself with an old analog TV sitting around unused. If your camera has an analog (NTSC or PAL) video-out port, you can put that old television to good use as a portrait preview device. (See Figure 5.22.)

When taking someone’s picture for a portrait, you can provide yourself and your subject instant feedback when using an external display, and a small TV makes a simple and convenient preview device. It’s a great way to recycle an old television as well. Many digital cameras have analog video-out ports. You may even have one and not know it, so check your camera’s manual if you’re not sure. Use the cable provided with the camera, or go to an electronics store to buy the cable you need to connect your camera to the TV. If your camera has an analog video-out port, it will likely be a small round hole protected by a rubber cap.
A 13-inch television is a good size for video previews, and relatively easy to tote around as well. A larger television won’t necessarily be sharper, and a high-definition television may not be your best tool for a preview device because you’ll get false expectations of color, thinking the image is so crisp it must be accurate. Also, televisions can be very unforgiving, so you really just want to get an idea of what the photo looks like, the lighting and framing, not an exact replica of what the image will look like in your production-computer setup. You’d be better off sending the previews to a computer display for that, but that’s a problem if you have a desktop computer elsewhere that’s inconveniently located for your portrait set, and may require additional hardware for an optimal setup.
Depending how old your television is, you may need an adapter/converter to attach your camera’s video cable to the TV’s antenna input or Video In socket. If your TV has a Video setting, choose that. Another connection option is to plug your camera into a VCR’s input, and then attach the TV to the VCR. If you do this, set your VCR to Line or Video. That way, you can make good use of two old-tech devices at once. (See Figure 5.23.)
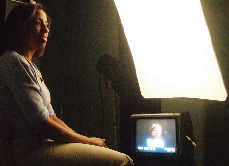
Figure 5.23. A television can give the subject guidance as to how the posture looks or just how the portrait session is turning out. Copyright © Steve Weinrebe
When I shoot portraits, I like to work fast. With portrait photography I don’t believe shooting more is better. Subjects tire and are most fresh in the early part of a portrait session. A television preview can help the subject get comfortable with how you are photographing them, but it may be a good idea to unplug the TV from the camera after a few preview captures. You don’t want your subject distracted by the TV.
If you’ve ever watched an interview subject on television who seems to be constantly looking away from the camera, it’s because there is a reference monitor nearby and the subject keeps looking at it. So use a cheap throwaway TV for a quick preview and then take it out of the equation so that the activity, and the dynamic, is just between you and your portrait subject. (See Figure 5.24.)
Figure 5.24. A television preview can help your subject take proper position in the camera, but it’s best to take the TV away while shooting so that it doesn’t distract your subject. Copyright © Steve Weinrebe, Getty Images
Tip
A TV for portrait previews is especially helpful when shooting group portraits. One of the difficulties of working with more than two subjects is that someone’s head is always in the wrong place. As the photographer, you’ll need to carefully guide your subjects to position themselves with optimum sight lines to the lens. But when you’re telling your subjects how to stand or squat or shift their heads, they can be greatly aided by having a video showing them exactly what you’re seeing through the lens. For positioning it doesn’t matter what their eyes are looking at, so it’s okay if the subject is looking at a TV preview while moving their head from behind someone’s shoulder in order not to be blocked for the photo.
If you have little or no experience with makeup, you should buy this one excellent makeup item to use for portrait subjects. I wish I could remember who taught me about translucent powder makeup, long ago, so I could thank them. Skin, under photo lights and without makeup, will tend to shine from the lights’ reflections. Keeping a compact of pressed translucent powder makeup in my camera bag at all times has saved countless portrait shoots by dulling the subject’s skin for photography. (See Figure 5.25.)
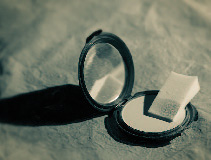
Figure 5.25. Colorless, translucent, powder makeup can dull the shine in a portrait subject’s skin. Copyright © Steve Weinrebe
A professional makeup artist can easily spend a half hour to an hour applying makeup to someone’s face for a photo shoot. Fashion models, news anchors, and television personalities are used to sitting in a chair having their face made up to appear in front of a camera. If you ever have an opportunity to hire a professional makeup artist, your job will be easier and your portrait will be better for it. But most portrait sessions don’t call for a professional to be on hand applying makeup. Usually, portrait photographers have their subjects very briefly, and you need to make the best use of your time taking pictures. The advantage of a translucent, or colorless, makeup powder is that you can quickly dull the shine from a subject’s forehead, nose, cheeks, and chin so that you can light the face without reflections. (See Figure 5.26.)

Figure 5.26. When applying makeup for a portrait shoot, pay attention to the forehead, nose, cheeks, and chin of your subject. Copyright © Steve Weinrebe
You don’t need to go to a department store cosmetics counter for this powder. You’ll find what you need in the cosmetics aisle of any major drugstore chain. Look for an inexpensive powder that is labeled as translucent or colorless. I like powder that has corn starch, and powder made from corn silk, as ingredients. Talc will also probably be an ingredient in any face powder you buy. I don’t believe a lot of chemical ingredients are necessary just to dull shine in someone’s face for a portrait photo session. Natural ingredients work wonders for neutralizing oily skin, and you won’t need to apply a lot of the powder. Ask your subjects first if they have any allergies to cosmetics, and especially to corn starch, for example.
I like the pressed powder, as opposed to loose powder—it’s less messy. When you buy the makeup, buy some disposable applicators, as well, so that each person gets his/her own applicator. If you want to splurge, get a new compact of powder for each portrait shoot. People like to see something new being opened just for them, especially if it’s something that’s going to touch their skin.
If you’re like me, you might have little experience in applying makeup. That’s okay. All you need to know is that less is more, and you’re applying makeup to your portrait subject for photography, not a night on the town. You’re not trying to soak up all the oils in someone’s complexion for the rest of the day, just the duration of the portrait session. Use a disposable applicator, brush, or cotton ball and lightly brush some powder on the forehead, nose, and chin of your subject. (See Figure 5.27.)

Figure 5.27. Go easy with the amount of powder that you apply to a subject’s face. Apply it before you start shooting and add more only if needed. Copyright © Steve Weinrebe, Getty Images
Don’t go overboard powdering someone’s cheeks; just gently swab a small amount of powder onto the cheeks with strokes that feather the powder in. A portrait subject’s cheeks are where you will most likely see flaws in powdering if there is a sudden transition from dull to shiny, so blend the powder in or skip the cheeks altogether if the subject isn’t especially shiny there.
A bald person’s head may need some powder as well. For obvious reasons, a hair light, or rim light, may not be a good idea if your subject is bald. But sometimes there is only one bald person in the group shot, and you may want a light from above to separate the shoulders of the subjects. While you are powdering the rest of that subject’s face, ask the bald person if you can powder his head, explain why you want to, and leave it up to him. If his skin tone is pale and his head is reflecting your lights, you may need to show him a preview shot to convince him of the need to powder.
No one, man or woman, neighbor, executive, or well-known personality, has ever objected when I asked if I could dab a little powder to cut down the shine on his face for a portrait. Even if at first sight someone doesn’t look like his face has a shine to it and you think you can put off applying makeup, you don’t want to snap your best portrait shot and realize the subject has already started to shine from perspiration. While taking your portrait photos, you want to concentrate on your subject’s expression and posture, not her complexion, so apply the powder before the shoot, and add a little during the shoot only if needed.
Tip
Try to buy an unscented face powder. Whether the powder you use has a scent or not, offer your portrait subject a place to wash it off after the photo session. If you have applied scented powder, you may need to remind your subjects to wash it off because they’ll forget you applied the powder by time the shoot is over.
As I mentioned, when applying powder makeup to a portrait subject, you want to use disposable makeup applicators. But besides foam swabs and cotton balls, there are other useful items that can be used to primp and alter someone’s appearance. (See Figure 5.28.)
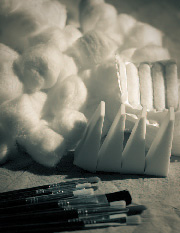
Figure 5.28. Use disposable makeup tools when working with portrait subjects. Copyright © Steve Weinrebe
Powdered makeup can be easily applied with little, foam, wedge-shaped makeup applicators that you can buy at drugstores or discount retailers by the bagful. Cotton balls and cotton swabs also work well and are likewise inexpensive and easy to find. If you are shooting a portrait at the subject’s location, a home or office, just pack a handful of applicators in a zippered plastic bag for the shoot.
Makeup brushes are more costly than the disposable applicators, but there’s an irreverent solution to nearly everything. Head to the nearest art supply store, hobby shop, or better yet a dollar store, and look for disposable bristle brushes sold in bulk packages. These brushes may not have the fullness of a dedicated makeup brush, but a portrait subject will be pleased to see you pull a new one out of a package and dispose of it when you’re finished applying makeup with it.
Combs can be bought in bulk packages as well. Use a new comb for your subject’s hair and dispose of it when you’re done. Hair, more than lint, is difficult to retouch in digital post-production. A few seconds tending to a portrait subject’s hair with a comb can save hours of effort with photo-editing software. Whether the combs come in a tub or plastic bag, if you go on location for the portrait, bring the container of combs with you. It’s not so evident that a comb hasn’t been used before, so let your subjects see you pull a new one out for their hair. It’s the little things that, bundled together, give your subjects a comfort level that will make your job taking their portraits easier. (See Figure 5.29.)
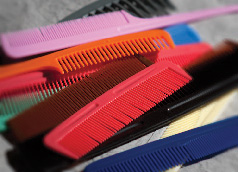
Figure 5.29. Use disposable combs for hair and, to add to your portrait subjects’ comfort level, let them notice that you are using a new one just for them. I purchased these combs in a variety pack at a dollar store for less than 10 cents each. Copyright © Steve Weinrebe
Tip
In Chapter 1, I mentioned that packing tape can be rolled into a reverse loop so that the sticky part of the tape is on the outside. Put your fingers into the loop and dab the tape against someone’s clothing to remove lint. This trick is especially useful for portrait photography, when you may be photographing close enough to clothing that lint will show. People like to be at their best in portraits, and they also like to feel the photographer is prepping them to look their best. Besides appreciating a little attention to makeup and hair, portrait subjects like the photographer, or photo assistant, to make sure their clothes look good. Use the tape tricks in Chapter 1, and your portrait subjects will appreciate it.
While you are applying the makeup and tidying the hair of your subject, you should consider using rubber gloves. That’s more important for you, the photographer, than for your portrait subject. Unlike a barber or hair stylist, you probably don’t have a sink next to your portrait set, and if you get makeup on your hand, you don’t want to transfer that makeup to your camera. (See Figure 5.30.)

Speaking of hair, there is an exceptionally easy way to get rid of cowlicks and stray tendrils, or to tighten curls on someone’s head. Simply spray a little water onto their hair. (See Figure 5.31.)
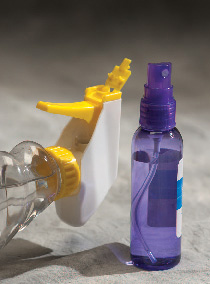
Figure 5.31. Spray a little water in a portrait subject’s hair to help keep stray hairs matted down, or keep curls in place. Copyright © Steve Weinrebe
Hairspray is an item you definitely want to keep away from your cameras. In any case, male portrait subjects may not like hairspray used in their hair. Keep a small spray bottle filled with water, nearby for before and during a photo shoot. More than makeup, which should stay put during a shoot, hair tends to have a life of its own. If someone has a cowlick or some hair that wants to lay in a different direction than all the other hair in your shot, spray just a little water on the hair and gently press it down.
You may have to do this repeatedly during the portrait session. It will be worth it to you so you don’t have to try to fix the hair later, digitally. (See Figure 5.32.)

Figure 5.32. Use a small spray bottle to apply a little water to hair to keep it in place. Copyright © Steve Weinrebe
Another use of a spray bottle is to smooth out a cloth background. If you have wrinkles you don’t want in a cloth background, spray the background well before the photo shoot. The wetness and weight of the background will naturally make the wrinkles smooth out. Spray water only until the background is slightly damp, not soaking wet.
For larger spraying applications, like for a background, recycle a spray bottle from a window cleaner or household cleaner. Wash the bottle thoroughly before filling it with water, and label it so that anyone who might use the bottle knows that the bottle contains only water.
If you decide to store more makeup than just a powder compact and some cotton balls, you should assemble a cosmetic kit for portrait photography. Cosmetic kits come in many expensive and stylish forms, but for photography you don’t need something that’s pretty to look at, just something utilitarian and preferably inexpensive. For a simple cosmetic kit that will hold just about everything you need for portrait shoots, a plastic pencil box is perfect. (See Figures 5.33 and 5.34.)
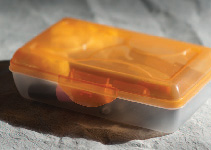
Figure 5.33. A pencil box makes a useful, portable, and inexpensive cosmetic kit. A bright-colored lid makes this box easy to grab in a darkened studio. Copyright © Steve Weinrebe

Figure 5.34. This pencil box cost only a dollar and holds more cosmetics than I usually keep on hand for portraits. Copyright © Steve Weinrebe
Pencil boxes can be purchased at any drugstore or discount retailer and come in a variety of colors. Test the clasp of the box in the store to make sure that it won’t open up easily in case you need to travel with your cosmetic kit. If you want to see the cosmetics without opening the box, which can be handy to know you have everything with you that you need, get a transparent or translucent plastic pencil box.
Because pencil boxes are marketed to school children, you may find some wild styles, so you can go with a sedate pencil box or a day-glow pencil box depending on your taste. I prefer a bright color for a makeup kit because it’s easy to lay my eyes on in my cluttered studio, although one with muted colors may look more like a piece of photo gear.
If you need something larger for your makeup kit, buy a fishing tackle box. Tackle boxes come with trays that pull out or fan apart in tiers when you open the lid. They have many different sized compartments in the trays, as well as a large compartment in the bottom of the box. You may need a lot of cosmetics to fill a tackle box, but you’ll have room to grow if you add to your cosmetic repertoire for prepping portrait subjects. (See Figure 5.35.)
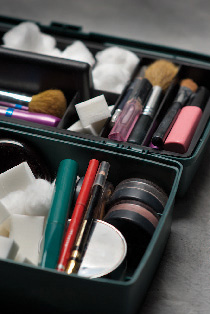
Figure 5.35. A fishing tackle box has loads of room for cosmetics, brushes, and other makeup items. This one cost well under $10, and its dark, muted colors make it fit in as a piece of photo gear. Copyright © Steve Weinrebe
Tip
If you ever shoot pet portraits, or suspect that a pet might play a role in a portrait shoot, keep dog and cat treats in your makeup kit. That way, you’ll always have them on hand. Buy sealed packets of pet treats so they don’t get stale or cause an odor in your makeup kit, or buy an extra pencil box just for the treats. You may need the treats to keep a pet in the set, and you may need the treats to keep a pet out of the set if the pet wants to get into the act and you prefer the pet on the sidelines. My cat, for instance, loves to walk onto a photo set for attention, and a treat or two lures her out quickly.
Nail your lighting down before your portrait subject arrives for the shoot. That may take some time. I like to set aside 90 minutes to prep and take some test shots before a portrait subject arrives. Sometimes I work faster, and sometimes slower and more methodically when setting up. But it always seems to take 90 minutes no matter what, so I plan accordingly. One tool I’ve found invaluable for that preparation is a dummy stand-in for the lighting. (See Figure 5.36.)
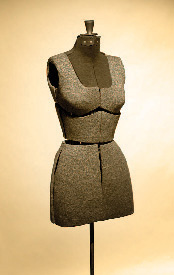
Figure 5.36. A dummy stand-in can help you nail down your lighting setup before your portrait subject arrives. Copyright © Steve Weinrebe
Many times I’ve found myself staring at a portrait set with a background surrounded by lights. If you have a photo assistant, or a family member with time to spare, you may have a stand-in ready at hand. You can watch them while you adjust the lighting, take test shots, white-balance the camera, and so forth. But if you don’t have an able and willing body to stand in for the portrait subject while you set up, you may be stuck. Using the self-timer on your camera can work, but it’s distracting and not the easiest solution.
The easy solution is to keep something around that’s roughly the height of a person and has some texture or substance to it—more than just a light stand. I have a dress form dummy that I use, as well as some other assorted props and items that I can position in place of the portrait subject. (See Figure 5.37.)
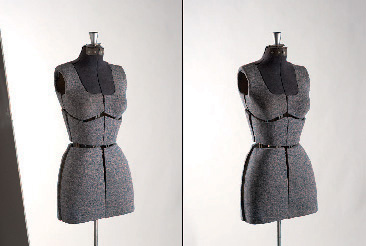
Figure 5.37. The dummy stands in for lighting tests before a portrait shoot. Here I use variations of simple portrait lighting, with two soft boxes and a reflector, to refine my setup before the portrait subject arrives. Copyright © Steve Weinrebe
Whatever you use, find something that has an adjustable height and that you can drape clothes on so you can get an idea of how light will fall on clothing. If the subject will wear white, I can put a white shirt on the dummy, or if the subject will wear black, I use a black jacket. If the subject is blond, it’s a good idea to use something at head height that is light in color. That way you can see if a hair light is too strong, or if you need one at all.
One simple solution for an adjustable-height stand-in is a light stand with a cardboard box, or boxes, held onto it to drape some clothing onto. Use an empty shipping box, make holes in one end large enough to fit over the top section of a light stand, and push the light stand through the hole and up through the box. When you’re done, you’ll have a simple dress-form dummy to drape clothes on. (See Figure 5.38.)
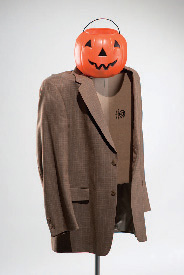
Figure 5.38. Don’t laugh ... by using even the simplest props, you can nail down the position of lights and the camera, as well as lens choices, before your portrait subject arrives. Here, improvising with what was at hand, I used a cardboard box, an old sport jacket, and my daughter’s jack-o-lantern to do just that. Copyright © Steve Weinrebe
I don’t know enough about Zen to write extensively about both Zen and archery, but I do know a little bit about archery because it was a sport I competed in when I was younger. There is little about the mental focus used in archery that I haven’t brought forward to photography, and those precepts have served me well time and again. (See Figure 5.39.)
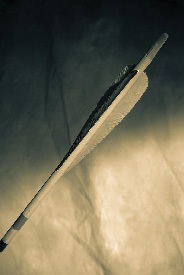
Figure 5.39. The mental focus needed to shoot an arrow on target is similar to the mental focus needed to capture a good portrait photo. Copyright © Steve Weinrebe
In archery, a key to shooting an arrow on target is to release the arrow at the same time that you know it will be on target, not before and not after. Photography of people works very much the same way. The Zen component comes from the mental connection that a portrait photographer creates with the subject. You want to snap the shutter at the same moment you know the portrait subject’s expression and posture is right for the portrait. You also want to create a rapport with your subjects so that they know it’s the right moment as well.
Good models, such as seasoned actors and fashion models, excel at knowing the right moment at the same time the photographer does. But after photographing hundreds of portrait subjects for advertising and editorial assignments, where I had only met the subject perhaps minutes before we started taking pictures, I’ve learned that any subject can connect with the portrait photographer if the photographer lets them. Let the subject know you are hunting for the right moment, whether you’re shooting quickly or slowly, and the subject will hunt with you by moving his/her face, expression, eyes, head, shoulders, and by using other types of body language that can be communicated to the camera. (See Figure 5.40.)

Figure 5.40. Let the portrait subject hunt for the right moment along with you. Create a mental conduit that lets your subject, with or without words, find the best expression for the portrait. Copyright © Steve Weinrebe, Getty Images
In archery, practicing the discipline of taking single shots builds the skill that allows those shots to hit their mark. Single captures in photography can help you build that discipline as well, so if you use a motor drive for portrait photography, turn it off, or set it to single capture mode, and slow down the process. The portrait subject, and you, will know the perfect moment and capture it at the same time.