
Appendix B. Dojo basics
Because the ArcGIS API for JavaScript is built with the Dojo Toolkit, you should be aware of a few details about Dojo. When Esri initially released the ArcGIS API for JavaScript, the company came under scrutiny for using Dojo as the core to the API as opposed to a more popular library such as jQuery. The developers at Esri stated that their reasons for choosing Dojo were that at the time the API was developed, Dojo had better tools for working with web services, and, more important, had better support for working with graphics across a variety of browsers. You can still use jQuery or any other third-party library in your applications, but one way or another, you’ll also use Dojo.
As the Dojo Toolkit has been upgraded over the years, so has the ArcGIS API for JavaScript. When the API moved to v3.0, it began using Dojo v1.7 for its core functions, and it continues to keep up with current Dojo updates.
The Dojo Toolkit is a vast resource of modules and utilities for developing robust and scalable applications, which requires an entire book of its own to cover in detail, but you can use this appendix as a starting point for the more detailed coverage in this book. This appendix covers the Dojo loader, the Dijit lifecycle, and common Dojo modules you’ll use when building applications with the ArcGIS API for JavaScript.
For more details about Dojo and the Dijit library, visit http://dojotoolkit.org/documentation/.
B.1. AMD loader
The introduction of Dojo v1.7 was a big shift for many developers using the ArcGIS API for JavaScript, in part because they were introduced to the asynchronous module definition (AMD) loading system, which is how your individual JavaScript files are loaded into your application. As of this writing, the ArcGIS JavaScript API is at v3.11 and based on v1.9 of the Dojo Toolkit. This isn’t an exhaustive appendix on the Dojo Toolkit, but it’s important to be aware of how to use the AMD loading system when developing your applications.
Prior to v3.0 of the API, you used dojo.require('my.classname') to import a module into your application. The API still supports this, but this method is outdated and will eventually go away, so it’s good practice for developers to take advantage of the newer AMD loading system. Let’s take a quick crash course on AMD.
AMD’s define and require methods
Two main components to the Dojo AMD loading system are important to understand: the use of define and require. Use the define method to define a module you want to use in your application. Similarly, use the require method to use the modules created with define. The following listing declares a new class that has a startup method.
Listing B.1. Declaring a new class

If you’re creating a smaller application that doesn’t require you to break your modules into multiple JavaScript files, you could do everything inside a single require statement. In applications that may require a couple of widgets and helper modules, you’ll most likely end up having to break up your modules into multiple JavaScript files, so when you do so, you can require them by path name, as shown in the following listing.
Note
The following module is defined in the chapter3/app/sample.js file, and the HTML file is in 3.1.html.
Listing B.2. AMD define and require

You can get a better understanding of how the files are related by reviewing figure B.1, which shows how the app/sample.js file is related to the main.js file.
Here you can clearly see that sample.js resides in the app folder, and that main.js requires the module defined in sample.js. This is how dependencies are managed with AMD loading. It allows you, as a developer, to modularize your application into smaller pieces.
Figure B.1. How files that define modules are related to other files that require them

One drawback to the AMD pattern, and one that’s gotten criticism, is the number of HTTP requests that may need to be made to load many different modules. Although it’s true that multiple HTTP requests should typically be avoided in web development, particularly when concerned with mobile devices, the truth is that when dealing with developing mapping applications, this is probably not as big of a concern. Every pan of the map sends a new HTTP request to the server to request new map data to be loaded for areas that haven’t been viewed. When all is said and done, mapping applications, by design, send multiple HTTP requests at various stages of use, so loading a few modules separately in your development doesn’t typically have much of an impact on performance.
The more you use the AMD pattern, the more familiar it will feel. When it becomes second nature, you won’t even think about it anymore.
Another important aspect of working with Dojo is using Dojo Dijits, so it’s beneficial to get an overview of the Dijit lifecycle.
B.2. Dijit lifecycle
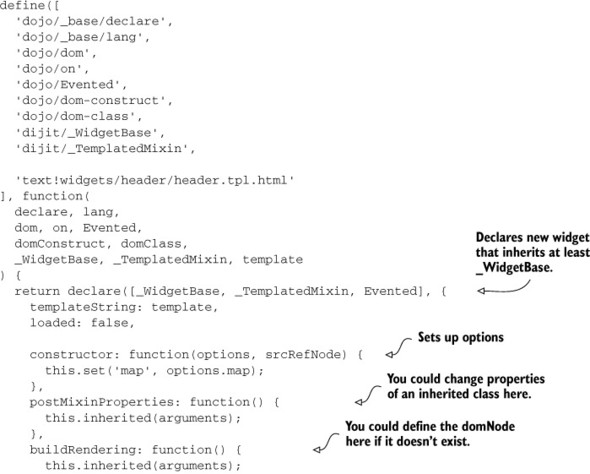
A widget is typically a module that represents an interface for the user to interact with. If you want to create a widget module for your application, you’re likely going to delve into the Dijit library. It could be used to work with HTML forms or a newsfeed widget that could be displayed on the page. The core of the Dijit library is the WidgetBase module. When a new class based on_WidgetBase is instantiated, it goes through the following lifecycle process:
- Constructor—This phase occurs when a class is instantiated with new. You usually assign any default properties of the widget in this function.
- postMixinProperties—This phase occurs before a widget is rendered on the screen. Variables from inherited classes are mixed in at this point.
Properties can be changed here before any DOM (Document Object Model[1]) elements for the widget are created, if needed. Personally, I’ve never had to do any work in here, but it may be useful
to you.
1 For more information about DOM elements, see www.w3.org/DOM/.
- buildRendering—This phase is typically handled by the Templated module, but it’s when the HTML elements for the widget are created. You could assign properties here that may be bound to something in the DOM element.
- postCreate—This is when the DOM elements for the widget are already created, but may not have been added to the page yet, so you could bind up events here or manipulate any DOM elements. I often work in this method related to subscribing to events.
- Startup—Runs once the HTML elements are built. If you have to do anything involving style lookups, this is the phase to do it.
- Destroy—This method does what it advertises. It destroys your widget and removes it from the Dijit widget registry to free up memory. To remove child widgets, use the destroyRecursive method. You don’t typically need to override destroy yourself, as the Dijit normally cleans things up, but if you instantiate a widget in the module that’s not a child widget, it may be necessary to perform the cleanup manually.
You can see what this process looks like in the following listing.
Listing B.3. Sample widget with all lifecycles defined

This listing isn’t a functional example, but it shows you how you might approach working with the Dijit lifecycle.
Throughout the book you’ve seen various examples of using Dojo widgets, and chapter 7 covers how to use the Dojo lifecycle described here to build applications from a single configuration file. In addition to the Dojo lifecycle, you should also be aware of common Dojo modules.
B.3. Common Dojo modules
When working with Dojo and the ArcGIS API for JavaScript, you’ll find yourself using a few modules over and over again. This section covers the basics of these common modules.
dojo/_base/lang
The lang module is a common module to use in building applications with Dojo. I use the following methods on a regular basis.
Mixin
The lang.mixin method does what it sounds like it does: it mixes in properties from one object to another. For example:
var options = { name: 'container', width: 25, height: 50 };
lang.mixin(options, { color: 'blue' });
The options object now has the property color with a value of blue that was mixed in using the lang.mixin method. This comes in handy when you need to merge datasets from different sources.
Hitch
I use the lang.hitch method in almost all my widgets. It allows you to execute a function in a given context. I often use this in widgets to listen for events to happen in the application and to execute a function on the widget in response to that event. In the following example, when the element with an ID of something is clicked, the handler method is executed, which writes out to the console the event that occurred:
require(['dojo/on', 'dojo/_base/lang'], function(on, lang) {
  return function() {
    this.handler = function(e) {
      console.debug('This just happened: ' + e);
    };
    on(document.getElementById('something'),
        'click',
        lang.hitch(this, 'handler')
    );
  };
});
You’ll probably find that you use this method frequently when working with events in your application.
The lang module has a few more methods you may find useful. You can read more about them at http://dojotoolkit.org/reference-guide/1.9/dojo/_base/lang.html.
dojo/_base/array
The module that I probably use the most is the array module, which provides support for working with arrays and works well with older browsers. The array module makes working with listed data easy and provides a couple of great ways to work with data.
Foreach
The array.forEach method provides a way to iterate over the items in an array:
var helper = function() {
  this.doSomething = function(n) {
    console.debug('I am number ' + n);
  };
  array.forEach([1,2,3,4], function(num) {
    this.doSomething(num);
  }, this);
};
This method provides a clean interface for iterating over the items in an array. All the array methods, including the forEach method, even take an optional third argument for the context of how the functions can be called in the method. In this example, you call this.doSomething, where this was passed as a third argument to the forEach method.
Map
The array.map method returns an array that’s equal to the results of the callback function:
var squared = array.map([2,4,6,8], function(num) {
  return num * num;
});
The value of squared is [4,16,36,64]. This method comes in handy when you need to process all the data in an array.
Filter
The array.filter method is used to filter values from an array that don’t meet the criteria as defined in the callback function:
var even = array.filter([2,3,4,5,6,7], function(num) {
  return (num % 2) === 0;
});
The callback function checks if the modulus (%), which is the remainder of the given number divided by 2, is equal to 0. If the remainder is 0, it’s an even number. The value of the even array is [2,4,6].
There are more methods in the array module you may find useful. Details can be found at http://dojotoolkit.org/reference-guide/1.9/dojo/_base/array.html.
dojo/on
The Dojo on module is used to listen for and to emit events in your application. When on is used as a function, you can listen for events to happen:
require(['dojo/on'], function(on) {
  return function() {
    on(document.getElementById('something'),
        'click',
        function() {
          console.debug('Something happened'),
        }
    );
  };
});
The on module listens for an element with an ID of something to be clicked, and when it’s clicked, it writes out to the console that something has happened. This is a clean interface for listening to events in an application.
Emit
The on module could even be used to emit events in an application:
require(['dojo/on', 'dojo/_base/lang'], function(on, lang) {
  return function() {
    on(document.getElementById('something'),
        'click',
        lang.hitch(this, function() {
          on.emit(this, 'custom-event'),
        })
    );
  };
});
The on module is used to emit an event from the context of this. This is a popular pattern in widgets that you’ll become familiar with.
You can find more details about the on module at http://dojotoolkit.org/reference-guide/1.9/dojo/on.html.