
Chapter 7. Advanced techniques
This chapter covers
- Building an application from a JSON configuration
- Writing a loader class to handle widget loading
- Treating new functionality as a new widget
- Taking advantage of the web map specification
- Implementing advanced offline functionality
By now you have a fairly good grasp of the basics of the ArcGIS API for JavaScript. You’ve seen how custom widgets are built, and you’ve loaded default widgets and used them in your applications. You should also have a well-rounded idea of how the Dojo Toolkit is used to build applications using the ArcGIS API for JavaScript. Believe it or not, I’ve intentionally kept things straightforward and tried to prevent showing overly complicated examples that detract from the core of the tasks at hand.
In this chapter we cover a few advanced techniques that I’ve found useful over the years. They help focus development on the purpose of the application so you don’t have to worry about too much boilerplate code. Many of these techniques involve using basic patterns of the ArcGIS JavaScript API that you may find while building applications. A couple of these techniques take advantage of lesser-discussed tools built into the ArcGIS API for JavaScript, such as how it can build a map from a simple WebMap ID from ArcGIS Online. This allows you to use specifications of the ArcGIS REST API to your advantage. I also cover more advanced techniques for working with the application when an internet connection is lost.
I’ll cover more powerful options available when building a map and adding layers. By the end of this chapter, you’ll know how to set up your application so you can add new widgets without writing a single line of additional code. You’ll also return to the disconnected editing covered in chapter 5 and look at advanced techniques that can ease the pain of disconnected editing.
These techniques aren’t required to be a successful ArcGIS API JavaScript developer, but I believe having them at your disposal will help make you an efficient one.
7.1. Using a single configuration file
One thing I’ve always found awkward when developing ArcGIS API for JavaScript applications is embedding all my configurations right into my code base. It’s not an issue with small apps and a handful of modules, but as an application begins to grow, I have to remember where I defined certain URL paths or widget configurations. I’m not so sloppy that they’re hidden away, but when returning to an application a few months after it’s completed, there’s a cognitive bump I need to get past before I can get back into the groove and update the application. One of the things I think Esri did really well with their FlexViewer application for ArcGIS API for Flex developers is this concept of building functionality in the form of new widgets. Each widget has its own configuration files where you can define parameters, such as Map service URLs and new layers. Maintenance is easy because changes and updates are applied using a configuration file.
This section covers the following:
- Loading a configuration file
- Defining map options in a configuration file
- Defining widgets in the configuration file
Note
The code for this section is available in the chapter7/part1 folder of the source code included with the book.
7.1.1. Defining a map
You’ll build a small application to load a configuration file that defines many of the settings for the application, including the map and what layers are in the map.
Setting up the application
To get started, build the simple index.html file as shown in the following listing. This file references the ArcGIS API for JavaScript, a custom stylesheet you can use with this application, and the JavaScript file that starts the application.
Listing 7.1. index.html—simple HTML file for application

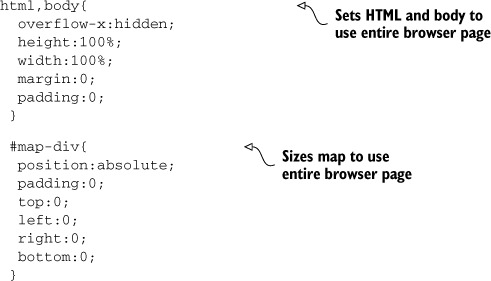
This HTML file has only the bare essentials of what’s needed to start an ArcGIS API for JavaScript application. The main.css file referenced here is also basic, covering only a few elements, as shown in the following listing.
Listing 7.2. css/main.css—simple style sheet to get started
You’ve seen this CSS throughout the book. The run.js file, shown in the following listing, should also look familiar.
Listing 7.3. js/run.js—sets up the Dojo path configuration

Run.js is a basic module that sets up the Dojo configuration for the application. You’ve seen this in previous chapters in each new application you’ve built. This process doesn’t change much. It’s in the main.js file where you’ll see that things are different from the way you’ve built applications in previous chapters.
Loading map options from a configuration file
Instead of defining layers and creating the map in the main.js file, let’s create a map based on an external JSON file, as shown in the following listing.
Listing 7.4. js/main.js—loads the config.json file
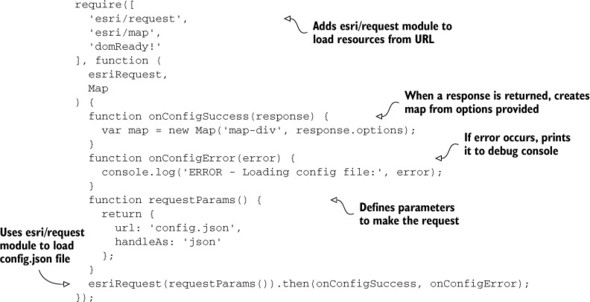
The main.js module now loads a JSON file. Remember, JSON is a subset of JavaScript that defines easy-to-read bits of information. When the JSON file loads, you can create a new map using the options described in the JSON file.
Defining map options in a configuration file
Basic map options defined in the config.json file look like this:
{
  "options": {
    "basemap": "topo",
    "center": [-118.210,34.285],
    "zoom": 10
   }
}
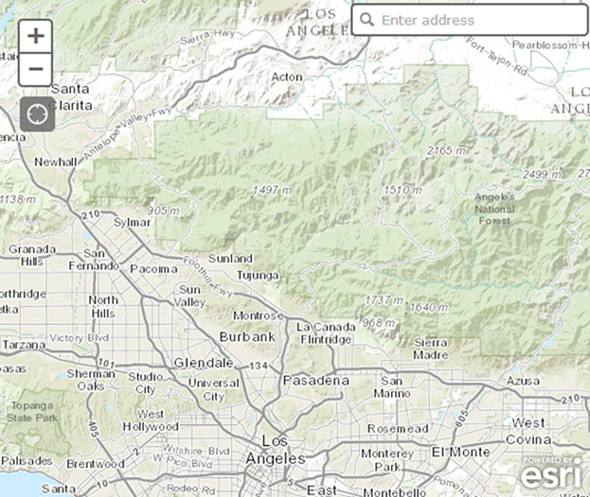
This config.json provides only basic map options, but it’s enough to get the party started. If you run the application at this point, you’ll see a map similar to what’s shown in figure 7.1.
Figure 7.1. Map created from JSON configuration
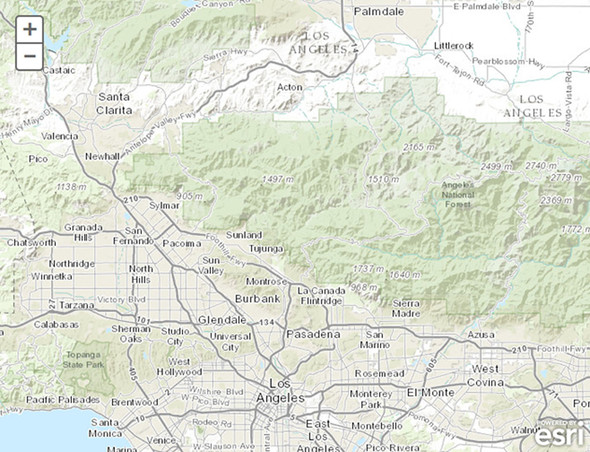
It’s fairly straightforward to load config.json and apply the options it defines for the map. This isn’t the finished product, but it’s a start.
Now suppose you also want to load another widget from the ArcGIS API for JavaScript, such as the Geocoder widget, which allows you to search for addresses. That widget has options you can also define in config.json.
7.1.2. Loading the Geocoder widget
The Geocoder widget has a couple of required options, such as the URL for the Geocoder service and a placeholder value to put in the input box. Let’s update config.json with the following options for use in the application:
{
  "options": {
    ...
  },
  "geocoderOptions" : {
    "arcgisGeocoder": {
      "url": "http://geocode.arcgis.com/arcgis/rest"+
      "/services/World/GeocodeServer",
      "placeholder": "Enter address"
    }
  }
}
You can give the Geocoder options a unique name to avoid confusing them with the map options. The URL shown is the default used in the widget; this URL is used even if you omit it. I’ve included it here to clarify that you can change it to a different URL if you choose.
Before you load the Geocoder widget, let’s add a div element to the index.html file that will contain the search box for the widget. You can add it after the map-div:
<body class="nihilo">
    <div id="map-div"></div>
    <div id="search"></div>
    ...
  </body>
Next, add styling in main.css to position the Geocoder widget:
#map-div{
  ...
 }

 #search {
  position: absolute;
  z-index: 2;
  top: 5px;
  right: 5px;
 }
This code positions the Geocoder widget in the upper-right corner of the browser.
The last thing to do before you load the Geocoder widget is to update the main.js file, as shown in the following listing. This file waits for the map to finish loading, and then passes the map and the options from the config.json file to the Geocoder.
Listing 7.5. js/main.js—loading the Geocoder widget
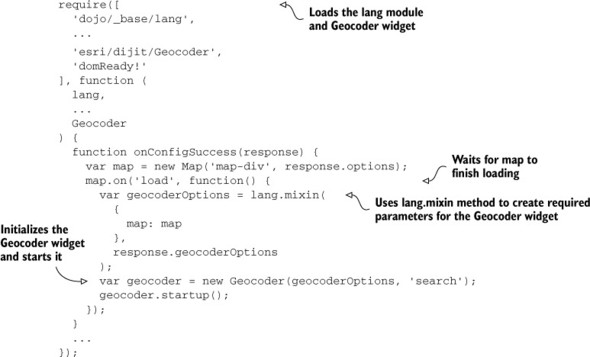
Now the main.js file loads the Geocoder widget along with another utility module: the dojo/_base/lang module. When the map finishes loading, pass the map as part of the parameters for the Geocoder widget. The lang.mixin method mixes in the fields of one object with another. You can then pass the completed options to the Geocoder and run the startup method to display it on the page. If you run the application now, you’ll see a page similar to figure 7.2, as shown on the previous page.
Figure 7.2. Geocoder widget added to the application

You can search for an address in the Geocoder widget as you would with almost any search engine, and it attempts to zoom the map to the correct location.
I used the Geocoder widget to not only show you an example of how widgets are typically loaded with the ArcGIS API for JavaScript, but also to see whether you noticed a pattern with other widgets you’ve seen throughout the book. If not, don’t worry; I’ll cover that next.
7.1.3. Looking for the patterns
In chapter 6, (see section 6.4), you used the Measurement and BasemapToggle widget in the browser-based application. You may have noticed that those widgets all followed a pattern similar to the Geocoder widget. A widget represents a tool that will be visually accessible in the browser. It’s typically designed to interact with the map in a particular manner, such as by changing the map extents, performing measurements, or adding and removing layers or features on the map. Looking at the widgets you’ve used so far, you can see a pattern begin to emerge:
1. Wait for the map to load.
2. Initialize the widget with options.
3. Pass the widget a reference node.
4. Run the startup method.
Given that most widgets in the ArcGIS API for JavaScript follow this basic pattern, it follows that there should be a way to exploit this pattern so you can load nearly any widget with minimal effort. Ideally, you could specify the widget to load and its options, and provide all the information in config.json—without manually loading modules for each new project. This is what you’ll set up in the next section.
7.2. Dynamic widget loading
Let’s think about which critical pieces of information are required to load widgets into an application:
1. Providing a path to the widget with options
2. Loading the widget with the given path and options
3. Designating an HTML element to display the widget
You could also consider the map a fourth component, but let’s focus on these three items.
7.2.1. Widget path and options
Let’s continue using the Geocoder widget you defined. To start off small, update config.json to move the options for the Geocoder into a widgets array. This update allows you to add more widgets as needed.
This time, though, you can provide the path to the widget the same way you would provide it in a Dojo module, as well as what HTML element to bind it to. You can see what this update looks like in the following listing.
Listing 7.6. config.json—updated options for widget
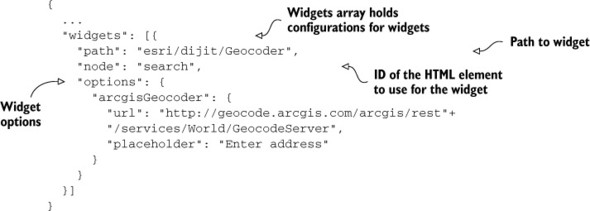
You now have all the items required to build a widget defined in config.json: the path to the widget, the HTML element that displays the widget, and the widget configuration. That was the easy part. Now you need to write code that knows how to handle this configuration.
7.2.2. Building a widget loader
With a pattern defined for building a widget, you need to build a loader module that knows how to parse what’s defined in config.json. Remember, you define modules using the define method. You need at least one require method to start any ArcGIS API for JavaScript application. The key words in that sentence are at least. There’s no rule that says you can’t use a require method inside a module.
Note
The code for this section is available in the chapter7/part2 folder of the source code included with the book.
Let’s write a simple widget loader module called widgetloader.js inside the js/controllers folder of the application. As shown in the following listing, this module iterates over the widgets array and creates new widgets based on the configuration information provided in config.json.
Listing 7.7. js/controllers/widgetloader.js—loader module for widgets

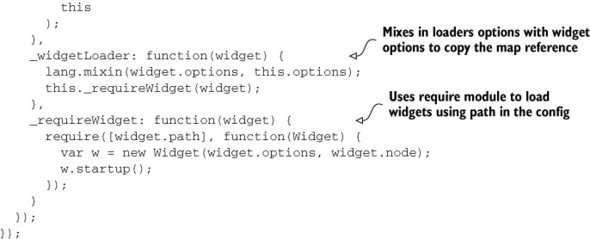
This little module is working hard:
- It loads the require method so modules can be dynamically loaded.
- It iterates over the array of widgets in the config.json file and loads the widgets using the path provided as well as the node.
- When a new widget is created, the startup method is initialized (as you’ve seen before).
- The options passed to this module also contain a reference to the map that has already been loaded.
The following listing shows how to use this module in the updated main.js file.
Listing 7.8. js/main.js—updated to use the widget loader
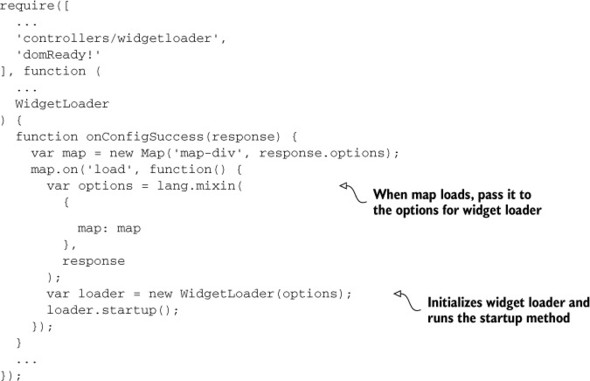
This doesn’t look that different from running any other widget. The key here is to pass the loaded map to the widget loader options so it can be used with other widgets.
7.2.3. Testing the widget loader
If you run the application now, it should look no different than figure 7.2, which is the goal. But to show the power of this widget loader module, let’s add another widget to the config.json file, as shown in the following code.
"widgets": [{
    ...
  }, {
    "path": "esri/dijit/LocateButton",
    "node": "locate",
    "options": {
      "highlightLocation": true
    }
  }]
You also need to add an HTML div to the index.html file:
<body class="nihilo">
    ...
    <div id="locate"></div>
    ...
  </body>
Finally, you need to update the main.css file to position the locate button appropriately:
#locate {
  position:absolute;
  top:95px;
  left:22px;
  z-index:50;
 }
With all this in place, if you run the application, you’ll see both the Geocoder widget and the button for the LocateButton widget under the zoom controls. The LocateButton widget pans the map to your location using the browser’s HTML5 geolocation capabilities. You didn’t have to write additional code to load this widget. The only update was in the configuration file, and widgetloader handled the rest. That’s a neat feature. The application will look similar to figure 7.3.
Figure 7.3. Two widgets loaded dynamically

At this point, you could continue this exercise with multiple widgets by adding widget entries to the config.json file until you’re blue in the face. You can add new functionality to your application with a simple addition to the configuration file and let widgetloader handle everything for you.
Now you can focus on building widgets that provide specific functions to your application without worrying about the boilerplate code to load them. You can see how powerful this method is, but you can take it even further. I find it annoying that I have to add a new HTML div to the index.html page every time I add a new widget. That doesn’t seem to fit into the grand scheme of dynamically generated applications. Let’s build a solution for that.
7.2.4. Adding HTML elements
The third requirement for loading widgets is designating how they’re added to the page. Automating this process and eliminating having to update the index.html file every time is achievable in the widgetloader module.
Note
The code for this section is available in the chapter7/part3 folder of the source code included with the book.
Use the node option in the config.json file to create a new div element and add it to the page. Rather than pass that node reference into each widget constructor, you’ll create a new element and pass that instead. You can even specify whether the element should be added to another element already on the page; that can be defined by adding a target property in config.json with the ID of an element in the index.html file that it’ll use as a container. Take a look at the config.json where a target is specified:
{
  ...
  "widgets": [{
    ...
  }, {
    "path": "esri/dijit/LocateButton",
    "node": "locate",
    "target": "tool-container",
    "options": {
      "highlightLocation": true
    }
  }]
}
The purpose is to specify that the LocateButton widget should be placed inside an HTML element with an id of tool-container. Now you can add this element to the index.html page:
<html>
  ...
  <body class="nihilo">
    <div id="map-div"></div>
    <div id="tool-container"></div>
    ...
  </body>
</html>
With this in place, you can now modify the widgetloader to handle this situation. You need to use Dojo utilities that can handle creating the div element when it’s needed and append it to the body of the page or another element specified by the target property in the configuration for the widget, as shown in the following listing.
Listing 7.9. js/controllers/widgetloader.js—modified to add HTML elements to page

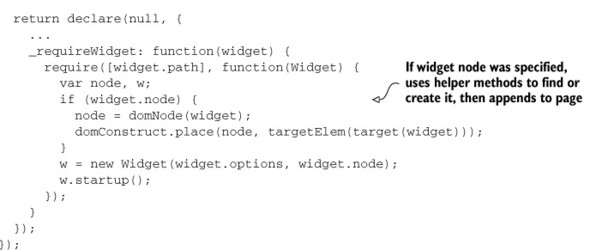
The code in listing 7.8 looks at whether a target property was provided for the widget. If not, it defaults to use the document.body of the browser page. If it was provided, try to find that element on the page. If a new div element was created, add that element to the browser page using the target as the container. If you rerun the application at this point, it should look identical to figure 7.3.
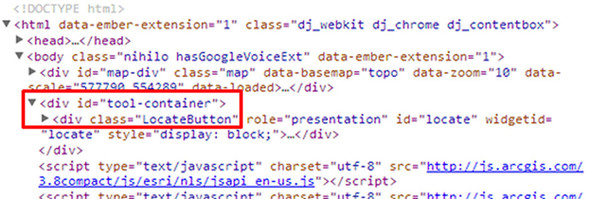
Because you specified a target for the LocateButton in the configuration of that widget, it was added inside that element on the page. You didn’t specify a target for the Geocoder widget, so it was added to the body of the page. If you inspect the HTML page elements using a browser debugger, you should see the LocateButton inside the tool-container div, as shown in figure 7.4.
Figure 7.4. LocateButton added to tool-container div as specified in the configuration for the widget
You now have a fully functional dynamic widget loader. I recommend either appending all widgets to the body of the page or appending all widgets to the tool-container div purely for organizational purposes. You no longer need to update the index.html file when you want to add a widget.
Now that widget creation is in place, it would also be convenient to define all map options in config.json, including map services to display and the details for each service. That’s what you’ll work on in the next section.
7.3. Adding a web map
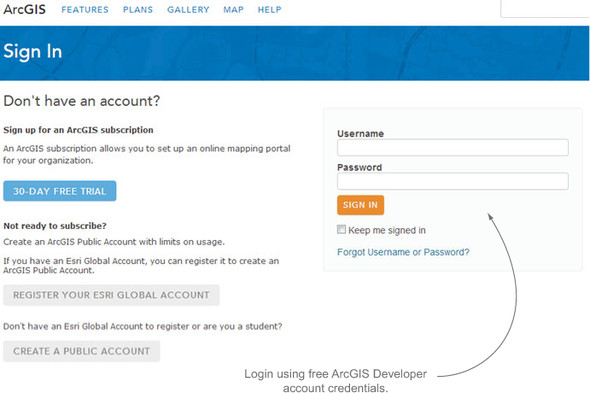
ArcGIS Online has one simple way to build a map. In chapter 4 you created a free ArcGIS developer account that allowed you to create data you could use in your application or share with others. In chapter 6, you used this account with OAuth 2.0 to provide a layer of security for your application. You can use that same account to log in to the ArcGIS Online website, create a map, and share that map with others.
This section covers the following:
- Defining a web map in ArcGIS Online
- Sharing the web map
- Using the web map in your application
7.3.1. Creating the web map
You can get to the ArcGIS Online sign-in page at www.arcgis.com/home/signin.html. You’ll see a page similar to figure 7.5.
Figure 7.5. ArcGIS Online sign-in page
Once you log in, you’re greeted by the account page, which provides details about how many credits you have remaining, as well as links for managing an ArcGIS Online organization, which is beyond the scope of this book. From this page, click the Map link at the top of the page, as shown in figure 7.6.
Figure 7.6. ArcGIS Online account page

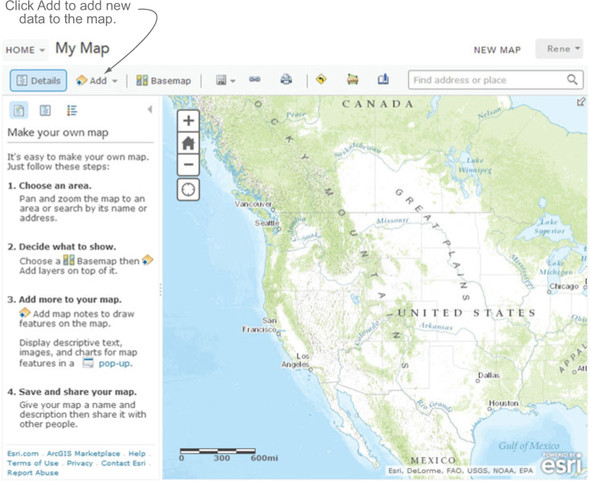
When you click the Map link, you’re directed to a robust mapping application (see figure 7.7) where you can change the basemap and add new data from your developer account or other services available on ArcGIS Online. Take time to explore this online application. It’s meant to provide users a quick and easy way to look at data you want to share.
Figure 7.7. Page to make a custom map on ArcGIS Online
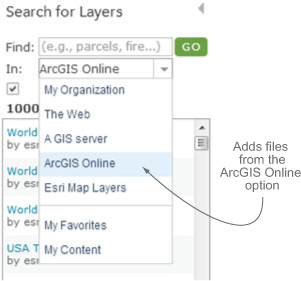
When you’re done reviewing this page and its many options, click Add from the toolbar at the top of the page, and then choose Search for Layers from the menu options. A sidebar window opens from which you can search for layers in different areas. Select ArcGIS Online from the In drop-down menu to see the services available to you, as shown in figure 7.8.
Figure 7.8. Menu to search for layers in the ArcGIS Online map editor
Add the Weather Stations (NOAA) service, and then click the Save icon. Choose Save As to display the Save Map window. Provide a title for your map, a couple of tags, and a summary, as shown in figure 7.9.
Figure 7.9. Saving a map in ArcGIS Online

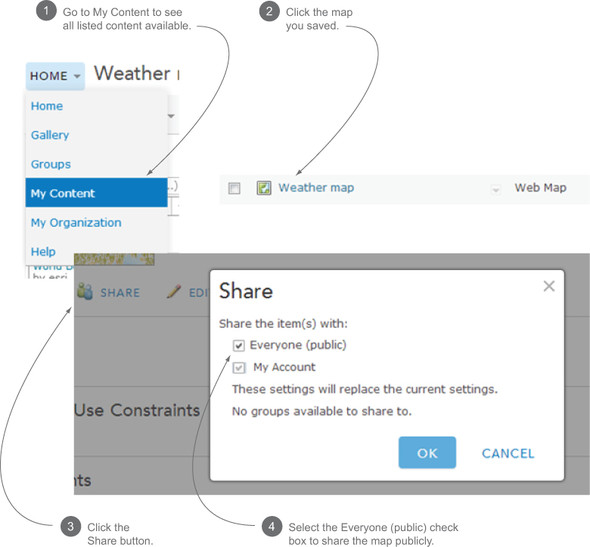
Once you save a map, complete the following steps to share your map:
1. Click the Home button and then click My Content from the menu options.
2. On the My Content page, find the map you saved in the list and click it.
3. On the details page, click the Share button.
4. When the Share window appears, click the Everyone (public) check box to share this publicly, and then click OK.
This process is shown in figure 7.10.
Figure 7.10. Steps to share a web map
You’ve created a web map you can share. But you can also use this web map in your web applications. While you’re on the same page as the map details, copy the web map ID from the URL in the browser, as shown in figure 7.11.
Figure 7.11. Finding the web map ID in the URL of the map details page

Save this ID for future reference; you’ll use it to create the web map when configuring your application. Feel free to use my map ID if you prefer.
7.3.2. Adding the web map to an application
The ArcGIS API for JavaScript can add web maps created in ArcGIS Online to your custom application. To clarify, think of map creation as another widget.
Note
The code for this section is available in the chapter7/part4 folder of the source code included with the book.
Creating the map widget
You can create a new widget called map.js in a folder called map in the widgets directory of your application. This widget’s purpose is to create the HTML element that will contain the map, as well as to create the map using the web map ID of the ArcGIS Online map. When the map is ready, it dispatches an event called map-ready so the widgetloader module knows to continue loading widgets, as most of them have a dependency on the map, such as the LocateButton. The map widget is shown in the following listing.
Listing 7.10. js/widgets/map/map.js handles creating map and DOM node
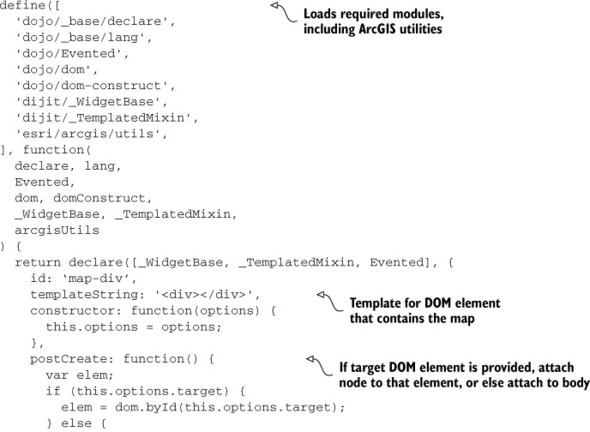

The ArcGIS API for JavaScript comes with a useful module called esri/arcgis/utils. This module takes a web map ID, goes out to ArcGIS Online, and pulls in the defined map, including all layers and extents. This is an incredibly useful way to manage maps and data in the ArcGIS API for JavaScript. If you need to add a new layer to the map in the future, you can update the map in ArcGIS Online, which propagates to all applications that use it.
Tip
When a widget extends _TemplatedMixin, the ID you provide for the widget will be the ID given to the DOM element that’s added to the page. If none is provided, the Dijit library assigns a generic ID.
Updating the widgetloader
The next step is to update the widgetloader module to make sure it creates the map widget before the other widgets, because most of the other widgets are dependent on the map to work properly. This requires more work, because now you have to separate the map widget from the other widgets, load the map widget first, wait for it to load, and then continue loading the other widgets. Because you know that the application has to wait for an action to occur before continuing another action, that’s a dead giveaway that this is a good place to use a promise, as was discussed in section 3.2.2. A promise allows you to perform an asynchronous action and wait for it to complete. Now you’ll incorporate a promise into the widget creation process. You can see what the updated widgetloader looks like in the following listing.
Listing 7.11. js/controllers/widgetloader.js—updated to wait for map to be created

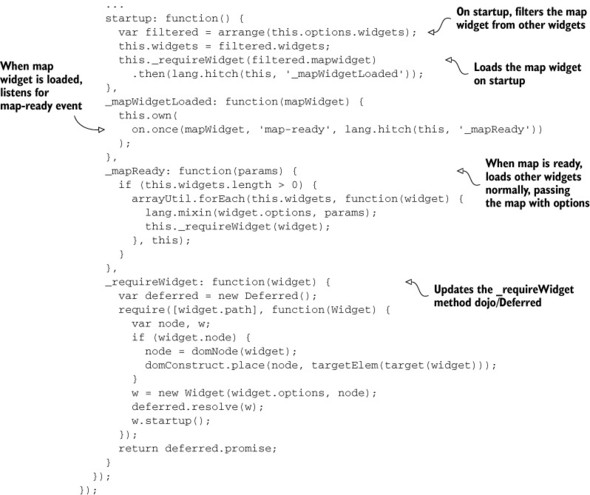
New functionality is happening in this widgetloader. The main change is that the map widget loads first, waiting for the map to be created, and then loads other widgets as needed. This simplifies the widget creation process and avoids any possibility that the map won’t be ready for use in other widgets that depend on it.
Updating the configuration
The last step is to update the configuration file to add the map widget and provide the web map ID it will use. The config.json file will now contain only an array of widgets. You can add the map widget parameters as you would for any other widget and provide the web map ID in the options. The configuration looks like this:
"widgets": [{
    "type": "map",
    "path": "widgets/map/map",
    "options" : {
      "webmapid": "68d81103c4014bafa886226f15acf6ae"
    }
  },
...
]
This is bare bones, but it’s all that’s needed to create the map.
Previewing the results
You can now remove the map-div element from the index.html file because the widgetloader adds the element automatically. If you run the application, you’ll see a map similar to figure 7.12.
Figure 7.12. ArcGIS Online web map displayed in ArcGIS API for JavaScript application
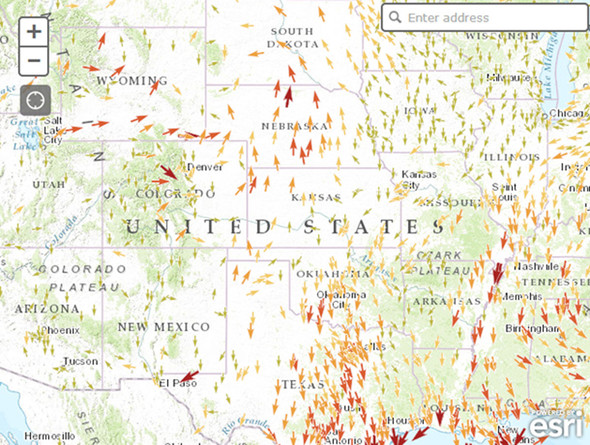
This is the same map that was created in the ArcGIS Online environment and made available for use in all your ArcGIS Online applications. The arrows in this map represent wind speed and direction. Any updates made to this map will now be propagated to your application.
That automation simplifies the development process, but what if you come across a situation where you can’t use a map from ArcGIS Online and have to build the map manually? You can use the same specifications that a web map uses.
7.3.3. Using the web map specification
For the ArcGIS API for JavaScript to load a map from ArcGIS Online, it must follow a standard format so the API can re-create the map as needed. That standard is called the web map specification.
Tip
The details of this specification are available at http://resources.arcgis.com/en/help/arcgis-web-map-json/#/Web_map_format_overview/02qt00000007000000/.
The web map specification describes what the JSON format for an ArcGIS Online map should look like, which makes it easy for the ArcGIS API for JavaScript to create a map from this format. The utilities provided with the API provide a JSON object that meets this specification instead of a web map ID. That’s something you can use to your advantage to define an entire map in your configuration file without having to write much extra code.
Note
The code for this section is available in the chapter7/part5 folder of the source code included with the book.
Building a simple web map object
We won’t cover the entirety of the web map specification, but we’ll stick to the parts that get you the most bang for your buck. Start by adding a basemap and mapOptions to the configuration and removing the webmapid option, as shown in the following listing.
Listing 7.12. basemap and mapOptions—web map specification
{
    "type": "map",
    "path": "widgets/map/map",
    "options" : {
      "id": "map-div",
      "mapOptions": {
        "center": [-118.209,34.285],
        "zoom": 10,
      },
      "webmap": {
        "itemData": {
          "baseMap": {
            "baseMapLayers": [{
              "url": "http://services.arcgisonline.com/arcgis/rest"+
                     "/services/World_Topo_Map/MapServer",
              "opacity" : 1,
              "visibility": true
            }]
          }
        }
      }
    }
  }
"/services/World_Topo_Map/MapServer",
"opacity" : 1,
"visibility": true
}]
}
}
}
}
}
You now have a mapOptions object as well as a webmap object in the configuration. Use the mapOptions object the same way you’d use a regular map object; in this case, you can define the center and zoom of the map when it loads. The webmap object is where you can define the specification for the web map in the application. The baseMap object contains an array of baseMapLayers. Add a single layer as shown. This is a perfectly suitable JSON object that meets the web map specification.
Updating the map widget
Now modify the map widget to use this webmap object when no webmapid is specified, as shown in the following listing.
Listing 7.13. js/widgets/map/map.js—updated to use web map JSON


The main change is checking for the webmap object if no webmapid was provided. The ArcGIS utilities module also accepts a third parameter that allows you to add the mapOptions object to center and zoom the map. Because nearly everything can be set by the configuration, you can also set the map’s ID from the configuration file.
This is only a start, but if you run the application now, you’ll see a map similar to figure 7.13.
Figure 7.13. Map created from web map JSON
Admittedly, the map isn’t exciting, but the prospect of using a specification from which you can build your entire mapping application in a simple configuration file is exciting. You can now add more layers to the map.
Working with operational layers
Any map service or layer in the map that isn’t a basemap is referred to as an operational layer. This layer is composed of unique data, such as census tracts, historical fire data, shipping routes, or locations of your favorite breweries. Operational layers are also defined in the web map specification, which allows you to easily add them to the map.
Adding an operational layer is easy. You can add an operationalLayers array to the itemData object of the webmap in the configuration. You can then define the layer as shown in the following code:
"operationalLayers": [{
  "url": "http://services.arcgis.com/V6ZHFr6zdgNZuVG0/"+
         "arcgis/rest/services/CensusLaborDemo/FeatureServer/1",
  "id": "Census_Labor",
  "visibility": true,
  "opacity": 0.8,
  "title": "Census Labor"
}, {
  "url": "http://services.arcgis.com/V6ZHFr6zdgNZuVG0/"+
         "arcgis/rest/services/la_county_labor_centroid/FeatureServer/0",
  "id": "Labor_Centroids",
  "opacity": 1,
  "title": "Labor Centroids"
}]
You could omit everything except the URL, which is the only required property in the configuration. Once the config.json file is updated, you don’t need to update the map widget, so when you run the application, you should see something similar to figure 7.14.
Figure 7.14. Map with operational layers added via configuration

As long as you adhere to the web map specification, you can build a highly customizable basic map with only simple additions to the configuration.
Defining pop-ups
A convenient feature of the web map specification is the ability to define what a pop-up looks like. You can define the fields, the labels, and even the format of numeric fields to display when a map feature is clicked. For any particular layer, you can add a popupInfo object that has various options, such as what fields are visible and the title of the pop-up.
You can add this to the layer of centroids for the labor population defined in the configuration, which you can see in the following code:
"popupInfo": {
  "title": "{NAMELSAD}",
  "fieldInfos": [{
    "fieldName": "NAME",
    "label": "Tract Number",
    "visible": true
  }, {
    "fieldName": "TOTAL_POP",
    "label": "Total Population",
    "visible": true
  }, {
    "fieldName": "POP_LABOR",
    "label": "Labor Population",
    "visible": true
  }, {
    "fieldName": "LABOR_PCT",
    "label": "Labor Pct",
    "visible": true,
    "format": {
      "places": 2
    }
  }]
}
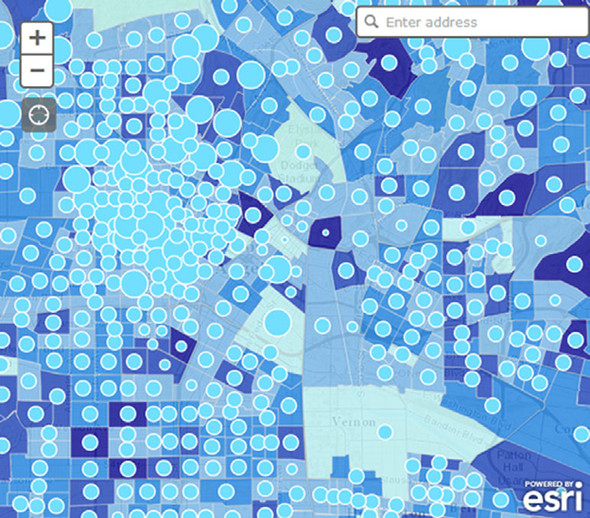
This addition to the configuration file uses the attributes from the layer to define what fields and labels are visible in the pop-up, because a few of the field names are obscure. Once that’s done, you can launch the application and click on any census centroid to see the pop-up, as shown in figure 7.15.
Figure 7.15. Pop-up on map defined in configuration for layer

I think that’s an awesome and easy way to display pop-ups in your map. Because you set up the map widget to use the web map specification as JSON, you haven’t added a single line of code to handle these additions to the configuration file. That’s slick. The renderer is another great feature you can add to the configuration file.
Defining a renderer
You learned how to apply a renderer to a layer in section 4.4, so the concept shouldn’t be foreign. But the web map specification also allows you to define the renderer in the configuration file. Do this by adding a layerDefinition property to the layer, in this case the labor centroids, and in that layerDefinition, define a drawingInfo property with a renderer that will define how the features in the layer look. This can be as simple or as complicated as you want.
For the labor centroids, define a classBreakRenderer that will display larger circles with a higher percentage of the labor population. This may look complicated, but you define a symbol once and change the size for each new category of percentages, as shown in the following listing.
Listing 7.14. classBreakRenderer—displaying larger circles
"layerDefinition": {
  "drawingInfo":{
    "renderer":{
      "type":"classBreaks",
      "field":"LABOR_PCT",
      "defaultSymbol":null,
      "defaultLabel":"",
      "minValue":0,
      "classBreakInfos":[{
        "classMaxValue":0.25,
        "label":"0 - 25%",
        "description":"",
        "symbol":{
          "type":"esriSMS",
          "style":"esriSMSCircle",
          "color":[115,223,255,255],
          "size":4,
          "angle":0,
          "xoffset":0,
          "yoffset":0,
          "outline":{
            "color":[255,255,255,255],
            "width":1
          }
        }
      }, {
        "classMaxValue":0.5,
        "label":"25% - 50%",
        "description":"",
        "symbol":{
          "type":"esriSMS",
          "style":"esriSMSCircle",
          "color":[115,223,255,255],
          "size":7.5,
          "angle":0,
          "xoffset":0,
          "yoffset":0,
          "outline":{
            "color":[255,255,255,255
            ],
            "width":1
          }
        }
      }, {
        "classMaxValue":0.75,
        "label":"50% - 75%",
        "description":"",
        "symbol":{
          "type":"esriSMS",
          "style":"esriSMSCircle",
          "color":[115,223,255,255],
          "size":11,
          "angle":0,
          "xoffset":0,
          "yoffset":0,
          "outline":{
            "color":[255,255,255,255],
            "width":1
          }
        }
      }, {
        "classMaxValue":1.00,
        "label":"75% - 100%",
        "description":"",
        "symbol":{
          "type":"esriSMS",
          "style":"esriSMSCircle",
          "color":[115,223,255,255],
          "size":20,
          "angle":0,
          "xoffset":0,
          "yoffset":0,
          "outline":{
            "color":[255,255,255,255],
            "width":1
          }
        }
      }]
    },
    "transparency":0,
  }
}
This configuration looks scarier than it is. You’ve defined the same symbol for each category, but you change the size accordingly. If you run the application again, you should see something similar to figure 7.16.
Figure 7.16. Renderer of a layer defined in the configuration file
This capability is why the ArcGIS API for JavaScript is so versatile. If you’re unhappy with the default look of a map service, no problem; you can change it. Once again, no extra code is needed because the entire map is defined using the web map specification.
The web map specification has additional options that I’ll leave for you to experiment with. The options covered in this section are what I consider the most powerful when building applications: how to better handle working with a web mapping application when an internet connection isn’t available.
7.4. Advanced techniques for offline mode
In chapter 5, you learned how to build an application that could still function, at least partially, when the user loses an internet connection. This is always a popular feature of working with web mapping applications. Remember, I also said there’s no perfect solution, which is true, but that doesn’t mean you can’t provide more features. In this section you’ll learn how to create an application cache and use a third-party library to build your mobile-friendly web mapping application.
7.4.1. Creating an application cache
An application cache is an HTML5 feature that caches files so users can browse a website offline.[1] In addition to the benefit of accessing a website offline, an application cache offers a speed boost because files are stored locally without sending requests to a server. This approach works well with most websites, but a web mapping application isn’t most websites. Still, you can use it in your applications as needed.
1 https://developer.mozilla.org/en-US/docs/Web/HTML/Using_the_application_cache
If your application cache doesn’t refresh in your browser, you may have to manually remove it. Technically, updating the application cache file updates the cache in the browser, but in my experience it can sometimes get stuck.
In Chrome you can manually remove the application cache from the URL chrome://appcache-internals/. This method works well only if you lose an internet connection; if you refresh the browser without an internet connection, the application won’t work.
What can go in the cache
Static files should go in your application cache, so style sheets and JavaScript files are always good candidates. You can also add images that you may use for icons. The idea is that once someone has used the application, they won’t need to download these items again.
Using the sample you worked on in section 7.3, you can build an application cache that lists not only the files you created but also the files that get downloaded from the ArcGIS servers to load the API for JavaScript. In the root directory of the project, create a file called manifest.appcache. You don’t have to use that name, but the appcache file extension is standard.
To find out what files to include in the cache, you can run the application in Chrome, and then complete the following steps:
1. Open the Chrome Developer tools.
2. Click the Sources tab.
Locate the small arrow button at the left and click it. A folder structure displays the files in use, organized by the domain they come from (see figure 7.17).
Figure 7.17. List of files used in the web application

3. Right-click any file, and then choose Copy Link Address to copy and paste that location to the manifest.appcache file.
Although this process of copying and pasting URLs to the appcache file can be tedious the first time you do it, you’ll only need to do minor updates in the future.
Note
The code for this section is available in the chapter7/part6 folder of the source code included with the book.
Writing the application cache
When you’re done copying the URLs to the appcache file, it should look similar to the following listing.
Listing 7.15. manifest.appcache—URLs added
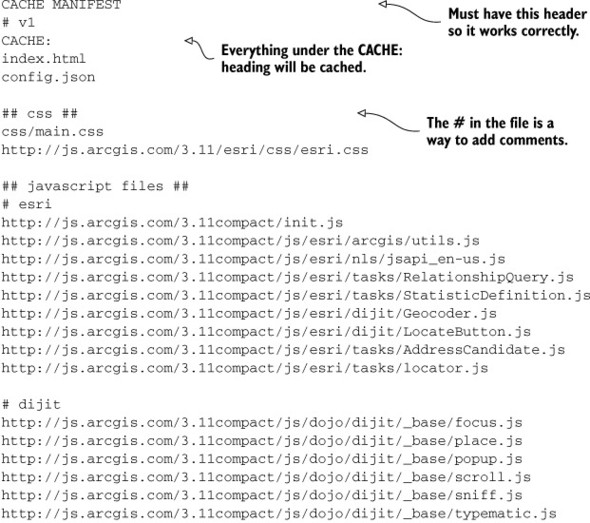

When writing the application cache file, you can use # to write comments. It’s good practice to give your appcache file a version number that you can update when you change the code in your application. The only way the browser will reload the files in the cache is if there’s an update in the appcache file. If you don’t do this, you’ll never see your changes.
Using application cache
With the manifest.appcache file completed, tell the browser to use it. Do this by adding a new attribute to the HTML node in the index.html file:
<html manifest="manifest.appcache">
Now when you run your application, prepare to be amazed!
Okay, not that amazing; it probably looks exactly like it did before. But that’s okay because you need to load the application at least once with an internet connection for the files to cache themselves. The application cache is a powerful feature, but it’s not magic, so reload the page one more time and admire the splendor of fast page load! Sorry if you don’t notice incredibly faster page loads in your desktop browser, but on a mobile device, this cache can help speed up the page loads.
If you poke around in Chrome, you can see that the files were loaded from the cache and not from the server. Click the Network tab in Developer tools and look at the Size column (see figure 7.18).
Figure 7.18. Chrome Network tab showing files that are cached
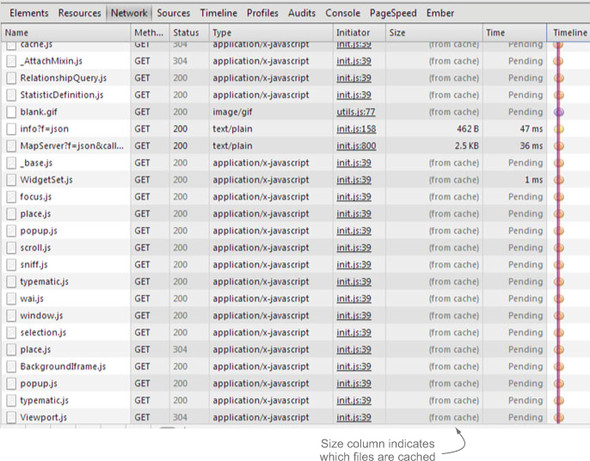
The only items not cached are actual requests that the code makes to the server. You may not see a noticeable difference in your application at the moment, but when you’re using a mobile device with sketchy internet, every enhancement is a plus.
If you have an application that loads custom fonts or a set of images that you use to make your application look nice, setting up the application cache can provide a decent performance increase and save on load times. Next, we’ll revisit saving data locally.
7.4.2. Storing data locally with the PouchDB library
In chapter 5, you learned how to use HTML5 storage capabilities to store data locally using IndexedDB. This is a database in the browser for storing complex data structures. Chapter 5 mentioned that IndexedDB isn’t supported in all mobile browser environments, even if the desktop browser counterpart supports it. A few mobile browsers support only Web SQL, which is a deprecated HTML5 storage solution. Once something is deprecated, people don’t stop using it overnight, so if you want to work with a storage solution on mobile browsers other than Local Storage, you need Web SQL. Using Web SQL in place of Local Storage doesn’t have to be difficult. A fantastic JavaScript library called PouchDB can save you hours of hair-pulling.
What is PouchDB?
PouchDB is a library that works with data locally and provides the capabilities to synchronize with CouchDB, a document-based database. It’s the offline data capabilities that make PouchDB a useful tool for web mapping capabilities. PouchDB provides an interface to work with browser-based data storage solutions.
PouchDB determines whether the browser supports IndexedDB or Web SQL and handles the local database creation, updates, and data retrieval with simple functions. Combine PouchDB with Dojo Store capabilities, and you have a powerful tool. A Dojo Store is an interface for accessing and manipulating data and is used as a data source for Dijit components.
Using PouchDB
To get started, PouchDB needs only the name of the database to use. You could use the following code:
var myDb = new PouchDB('mydb'),
That seems simple enough. To add to the database, pass an object to the put method:
myDb.put({ _id: new Date().toISOString(), title: 'Hi mom' });
PouchDB requires that each entry have a unique _id. Using an ISO standard timestamp will suffice to generate unique _id values. If you don’t want to specify one, you can use the post method, and PouchDB will generate a random _id for you:
myDb.post({ title: 'Hi mom' });
I prefer to use the put method because if you use the put method with an _id already in the database, it updates the data; if the _id isn’t in the current database, it adds it.
To retrieve a document, pass the _id to the get method:
myDb.get('unique_id', function(error, doc) {});
To retrieve all the documents, use the allDocs method:
myDb.allDocs({ include_docs: true }, function(error, results) {});
When set to true, the include_docs option returns all the documents in the database; when set to false, it returns only the _id field.
PouchDB has other features, but you know enough to start using it in your application.
Tip
For more details and documentation about PouchDB, visit http://pouchdb.com/.
Creating the PouchStore module
Although PouchDB isn’t overly complicated, it would be convenient to wrap its functionality in an easy-to-use module that handles database creation. This neat little module (shown in listing 7.15) exposes a couple of simple methods: add and getAll. It also uses a module for Dojo Store called QueryResults. This module wraps the results of the getAll method with the same functionality of Dojo array utilities, so you have access to methods such as forEach and filter.
Listing 7.16. js/stores/PouchStore—saves data locally
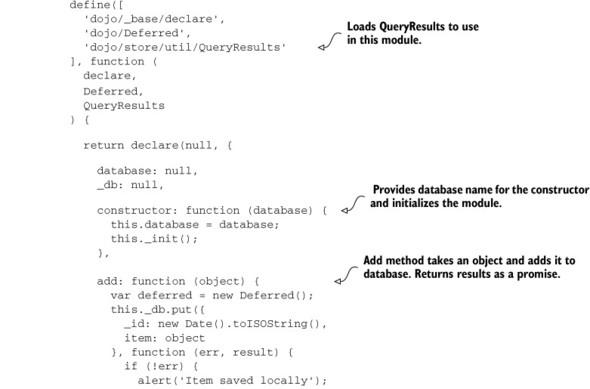

This module uses the put and getAll methods of PouchDB but uses promises to return the results to the outside world of the application. Remember, promises work great when you’re working asynchronously and you’re waiting for something to happen—in this case, read and write from the storage. The PouchDB API isn’t particularly complicated, but wrapping this functionality in one place makes it much more reusable.
Okay, great, you have an awesome PouchStore module. How do you use it?
Using the PouchStore
For this example, you can modify the project you completed in chapter 5 to do disconnected editing. The code for this section is available in the chapter7/part7 folder of the source code included with the book.
In this project, the editorService module is responsible for adding the points to the FeatureLayer. If an error occurs, it stores the features in localStorage and allows the user to sync the data at a later time. You can continue to use this method, but in this case, replace all the code that deals with localStorage with the PouchStore module. The updated editorService module is shown the following listing.
Listing 7.17. js/widgets/edit/editorService.js—using PouchStore to save data


The rest of the application can stay the same; you’re only changing the editor-Service module. You’ve left most of the core method names the same, only adding helper methods; this way, other modules that reference editorService won’t need to be updated.
The process is the same as before: if features fail to add to the FeatureLayer, they’re stored locally, and you display these features on the map in different symbology than other features. When an internet connection becomes available, you can run the sync function to get all the documents from the local database, convert them back to graphics, and add them to the FeatureLayer. When that’s complete, remove all the data from the local database and do cleanup, such as refreshing the layer. You can see what this process may look like when adding and syncing data in figure 7.19.
Figure 7.19. Syncing locally stored data to the server
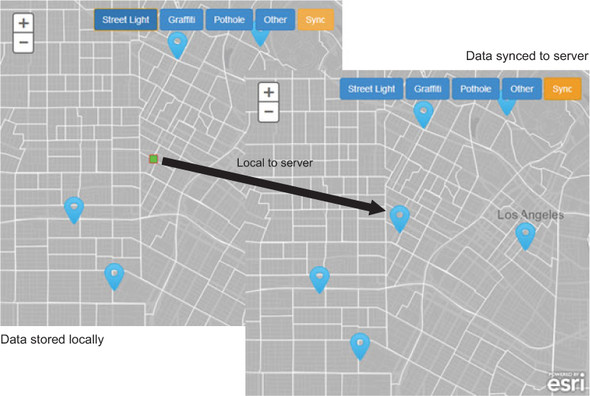
As you can see, you didn’t need to tell PouchDB to use IndexedDB or Web SQL because PouchDB determines which is available to use. This application now works on a variety of mobile browsers, and PouchDB handles the heavy lifting behind the scenes for you.
Of course, my caveats from chapter 5 still stand. When it comes to offline web mapping, especially disconnected editing, no perfect solution exists. But this method of using a third-party library to use the available storage is a better solution than doing nothing.
7.5. Summary
- This chapter covered a large quantity of material, particularly related to advanced techniques for loading Dojo widgets.
- The goal of this chapter was to introduce you to advanced topics in developing applications with the ArcGIS API for JavaScript and to reinforce the power of reusable code. This isn’t to say that my way is the definitive way, as I’ve seen others create template applications and JavaScript viewers that work differently. But the methods I described here have helped me, through trial and error (lots and lots of error), to go from prototype to production on many occasions.
- The techniques you learned might inch you closer to that coveted perfect disconnected editing web mapping application...almost. The application cache is a good start, and if you’re careful to include the files as they’re needed, you can save on requests when the application loads.
- Using a library such as PouchDB to handle the heavy lifting of saving data locally ensures that your application will work across multiple platforms. You can even store actual map tiles using PouchDB. The goal here was to provide you with additional advanced methods.