3 Magnetism
Tinkering with Magnet Toys and an Electromagnetic Dancer
Magnets scream to kids: “Play with me!” When you pass out the magnets, kids will need at least 10 or 15 minutes to muck around with the magnets before you’ll be able to talk to them much or start into a predefined activity; inspired kids will need a full hour. The reason is clear: magnets give force across a distance without contact. Normally, this is the realm of science fiction, but here it is happening in the palm of your hand1.
In fact, after giving many magnet lessons over the years, I’ve come to believe that it’s sacrilegious, or at the very least criminal, to introduce the principles of magnetism without having students tinker around with some magnets first. The old adage applies with particular severity: if you tell someone something, you’ve forever robbed from them the opportunity to discover it for themselves.
And discover they will. Every group I’ve ever had play with magnets that then discussed what they observed has, with only the slightest of nudge of guidance, come to the following conclusions about magnetism:
• Opposite sides attract.
• Like sides repel.
• Both sides will attract certain kinds of metal—the kind of metal that tends to rust.
• If you let a magnet move freely, and bring another magnet close by, you can control the orientation of the first.
• If you let a bunch of magnets move freely, away from other magnets, they will all align in the same orientation.
• The force a magnet gives drops off quickly with distance.
The way I do this activity is not complicated and is touched on elsewhere in this book: I let students play, suggest things to try, ask them what they’re noticing, write their observations on the board, group the observations, repeat questions I hear coming from the kids, and continue to ask clarifying questions until they all agree.
At the risk of beating a dead horse, let me reiterate that students (and teachers) I’ve worked with, some as young as second grade, discovered and agreed on the above listed truths without input—not from me, not from a textbook—beyond their own observations. Of course, you can also find this information detailed in most every middle school physical science textbook, equally true, but without proof. In other words, you’ll have to decide if you believe it or not, and even if you think the source is trustworthy, you won’t have a feel for what’s really happening. Clearly this is of limited value.
If the concept in question were nuclear reactions or something similarly complex, costly, or dangerous—perhaps we’d need to trust authority for now. But small ceramic magnets are safe2 and dirt cheap: $0.10 a pop at the time I’m writing this. There’s no excuse for not passing out a few of them to every kid in your group. Then, after your discussion, or even before the discussion, have them tinker with making these toys and others. This activity basically entails gluing magnets onto craft sticks and onto small wood pieces into interesting configurations and exploring the way magnets work.
Make: Magnet Toys
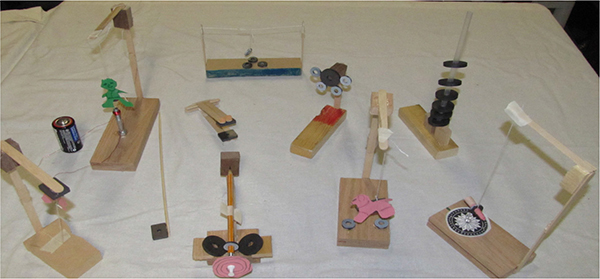
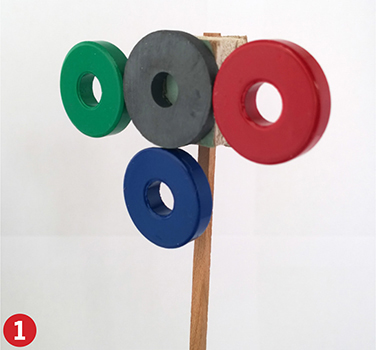
Figure 3-1. An assortment of toys you can make with magnets
Gather Stuff
• Magnets—nearly any size will work; here are the basic sizes shown in this chapter’s photos:
- Large ring (donut): 1.25" outer diameter, 0.375" hole diameter, 0.187" thickness
- Small ring (donut): 0.689" outer diameter, 0.296" hole diameter, 0.118" thickness
- Rectangular: 1" × 0.75" × 0.187"
- Small button magnets are also useful, around 0.35" diameter and 0.25" thick, but larger magnets can be broken into small ones for this purpose as well
• Base boards, 1/2" to 1" thick, 3" to 4" rectangular
• Tiny blocks to aid in gluing craft sticks at 90 degrees
• Craft sticks and/or tongue depressors
• Bamboo skewers
• Pencils
• Straws
• Paper clips
• Kite string or thread
• Masking or electrical tape
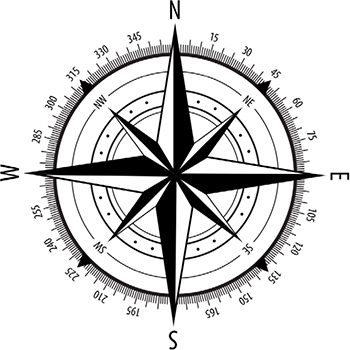
• Compass rose (the little circle of arrows pointing to the directions and degrees of a compass—see Figure 3-11) (optional)
Gather Tools
• Side cutters
• Scissors
• Hot glue guns and glue sticks Pushpin (for compass base)
• Colored construction paper or tissue paper for decorations
Tinker
Each of the following pictures and descriptions is a just an idea, using the stuff we had hanging around at the time. The supplies listed were used to construct them, but almost no item or dimension is critical, and you could probably make them using entirely different building supplies (Legos? Toothpicks?).
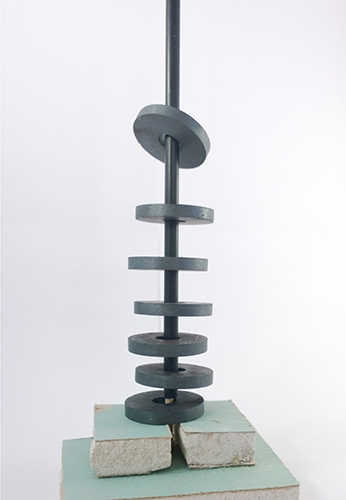
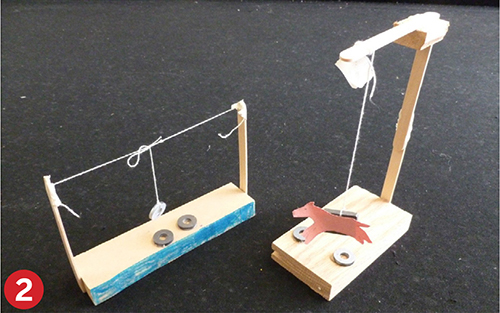
Make: Floating Stack
This is the old magnets-on-a pencil trick, here on a sturdy straw braced on the base board with little blocks of wood on either side. The straw gives slightly less friction than a pencil. Each magnet threaded on the straw is repelling the one next to it.
Make: Rolling Edges
Step 1
Glue one large donut magnet on the end of a stub of wood, which is glued onto a craft stick, which is in turn glued onto the base board. Then hang little donut magnets on its edge, adding them one by one. Each little magnet that sticks to the edge of the big one will repel the little one next to it.
Step 2
Glue one large donut magnet on the end of a stub of wood, which is glued onto a craft stick, which is in turn glued onto the base board. Then hang little donut magnets on its edge, adding them one by one. Each little magnet that sticks to the edge of the big one will repel the little one next to it.
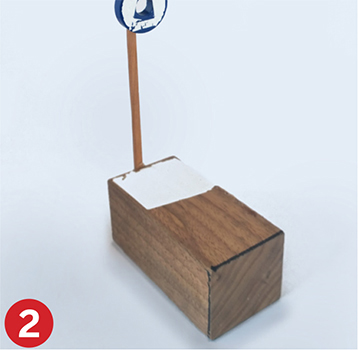
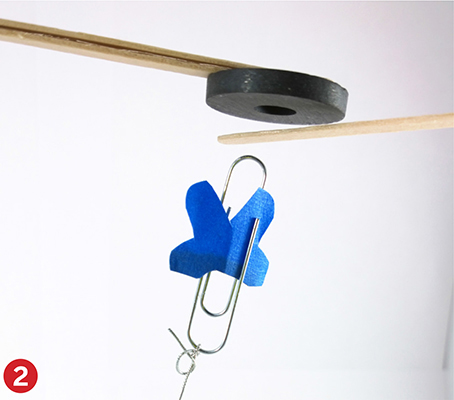
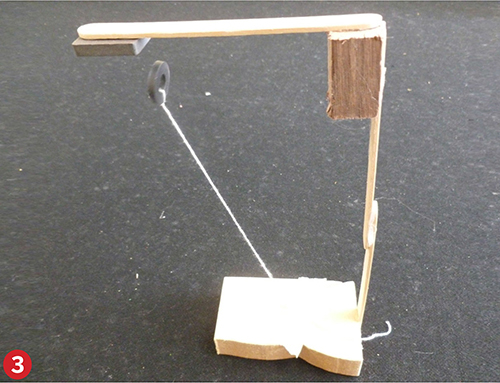
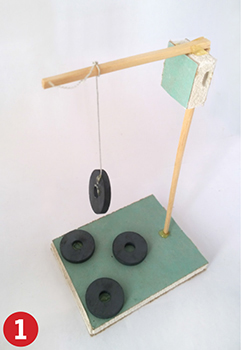
Make: Hanging Up
Step 1
Make a little stand out of a base board, craft sticks, and a little wood block.
Glue one magnet up high, and let a paper clip on a string be attracted to it but not touch it. Tape off the string on the base board so that the magnet’s pull beats the pull of gravity.
Make a figure out of paper—very light! Attach it to the paper clip, and it will look like it’s flying.
Step 2
You can also pass paper, cardboard, aluminum, steel, and anything else you want between the magnet and paper clip to see what happens.
Step 3
You can also replace the paper clip with another magnet and note the difference.
Step 4
With the right positioning, you can turn the whole thing on its side or upside down.
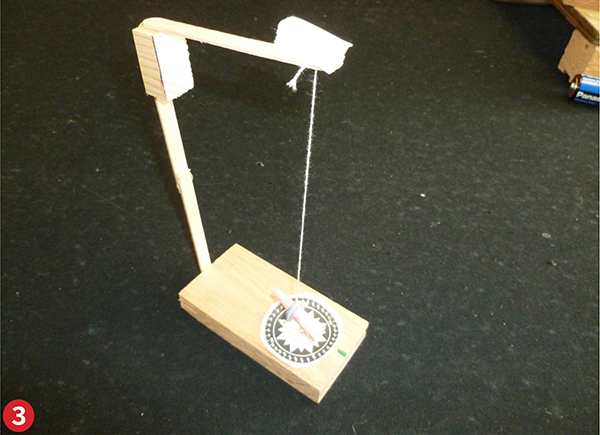
Compass

Beware, this one is mystical.
Step 1
Dangle a magnet from a single, thin thread. Now just consider it, like a Zen master. Take your time; this is good. The little, paper pointy thing through the center is optional. Try to make it point in different directions. Let it spin and stop it from spinning. Move around the room with it. Dangle other nonmagnetic things to compare their behaviors. Dangle it near metal and other magnets, and dangle it far from anything.
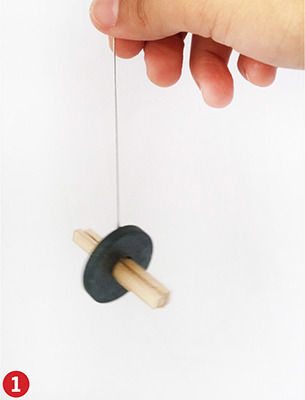
(What the heck is going on here?!) This dangling magnet, a lifeless hunk of ceramitized ferrite dust, always points the same way! It knows the directions, even if humans don’t! If you are a bit taken aback, you’ve got good company. For hundreds of years after this was discovered, no one had the slightest idea why this worked. Indeed, many believed it was mystical, a supernatural gift. It’s a compass. With it you can know your direction any time day or night, rain or shine, in completely foreign territory.
Step 2
Most small, ceramic magnets have poles on the faces (as opposed to the edges). Put a stick or straw or some sort of pointer through the central hole, as in the photo, mark the side pointing north,3 and you’ll have a full-fledged compass. If you forget to label the side pointing north, you’re sunk; see “What’s going on?” later in this chapter.
Step 3
Hang the magnet with the same sort of arrangement described in the previous project idea. Cut out a compass rose—the model is at the end of this project write-up—and stick it directly under the magnet with a pushpin right through the center. Make a mark exactly in the front. Now your compass is more functional. You can dial in a bearing, say 270°, line up the dangling magnet with north on the rose, and hike off at 270° like a professional orienteer.
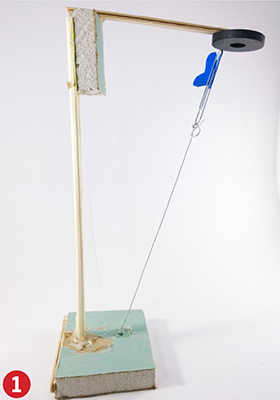
Make: Strange Pendulum
Step 1
Again with a simple stand, dangle a magnet over one or more other magnets glued down to the base board. Let the dangling one swing, and you’ll see strange motion. This is an example of complexity or chaos theory. Very small changes in the position in which you release the swinging magnet will result in completely different patterns of motion.
Step 2
It’s also good fun to play with if you put a little paper figure on the magnet. There are many ways to dangle a magnet, each with something interesting in store for you.
Make: Bouncing Jaws
If you press two magnets together, with like sides facing each other, they’ll push apart. Let one free and it will go shooting away. Hook them together with craft sticks in a sort of hinge configuration and you’ll have a bouncing alligator jaw. Leering eyes are optional.
Step 1
We used tape on two sides of two parallel craft sticks as the hinge. We tried smaller hinges, but the magnets would slip off to the sides.
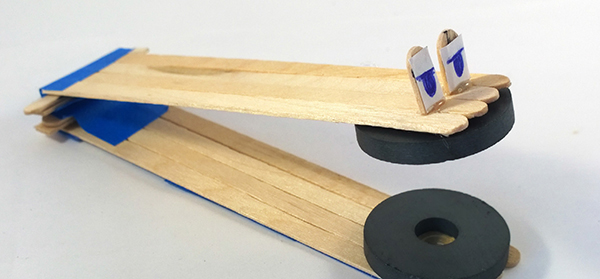
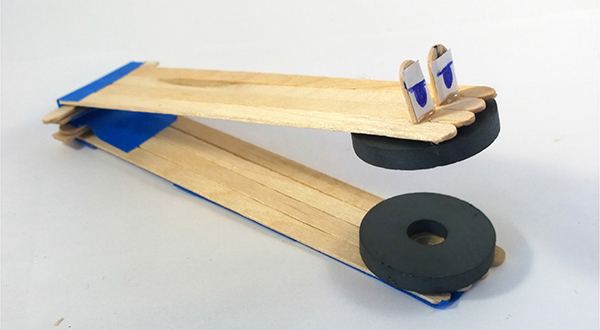
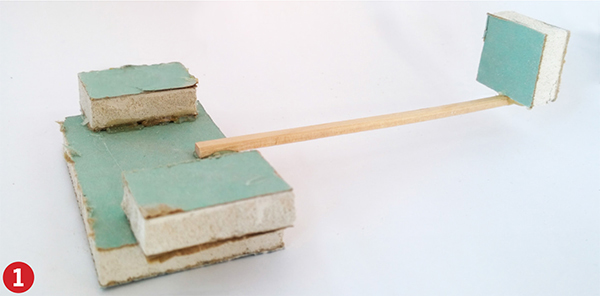
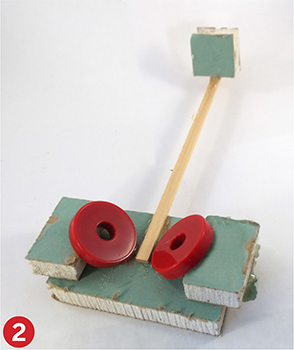
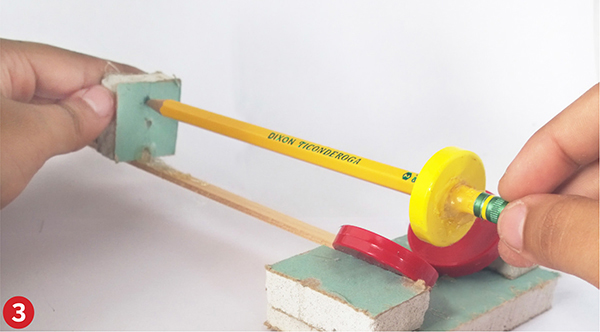
Make: Levitator
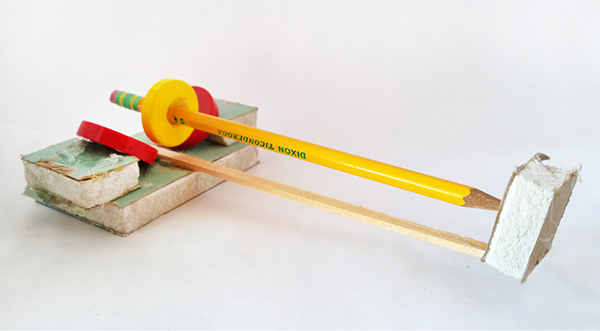
Step 1
This is a tricky one. First build the base, more or less like the photo below. The little blocks are about 1/4" thick, and about 1 1/2" apart. Glue a long stick or dowel in a line straight out from the gap between the two similar little blocks. Glue a little block on the end of the craft sticks sticking up.
Step 2
Put down two large magnets, round or rectangular, about an inch apart, straight across from each other, tilted in a bit on the small bits of wood. The faces pointing up must be the same pole—use another magnet to test them.
Step 3
Now comes the subtle part. Thread a third, ideally smaller, magnet onto a pencil or dowel and move it to exactly the position shown in relation to the other magnets. Hold the point of the pencil against the upright block so that the pencil is more or less horizontal. You’ll need to adjust the magnet back and forth on the pencil to find the right spot. You may need tape around the pencil to make the magnet stay in position. If it doesn’t seem to be working, flip the magnet over and thread it on the other way. Only one orientation is the right one!
Step 4
Once it’s balancing, make a small divot in the upright block just exactly where the point of the pencil rests with a small bolt or nail or even the point of scissors. This will make it more stable for spinning.
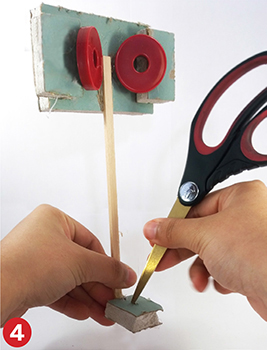
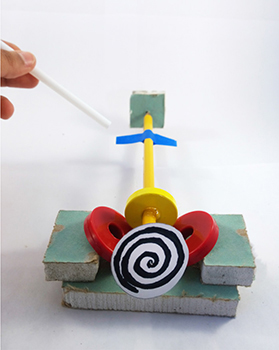
Step 5
It’s done now, but you can also put a little decoration on the end if you want, and little tape tabs on the pencil. See the next step to find out what the tabs are for.
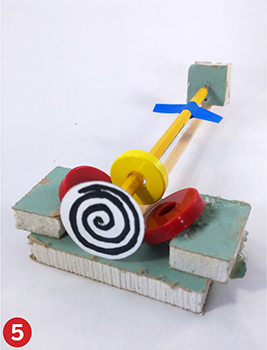
Try it out
Blow on the tabs with the straw; it should spin around while continuing to float.
Magnetic Wand (for use with all of above)
The magnetic wand—a magnet on a bamboo skewer—will have interesting effects on each device that you build.
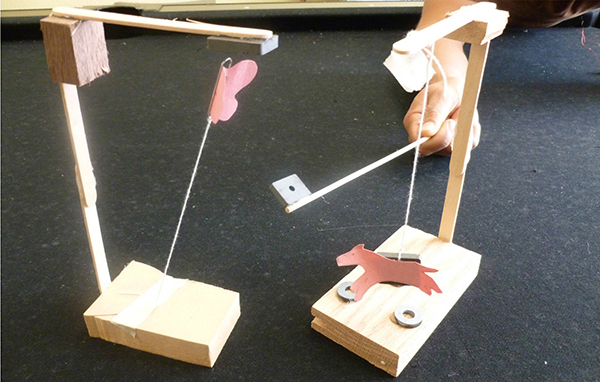
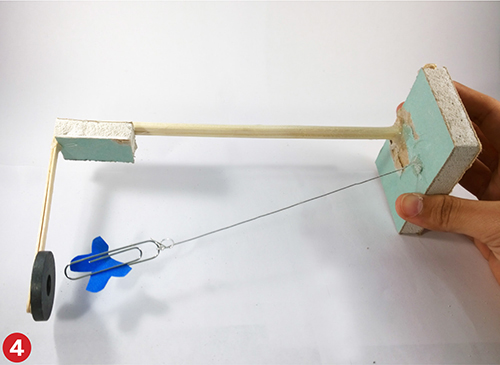
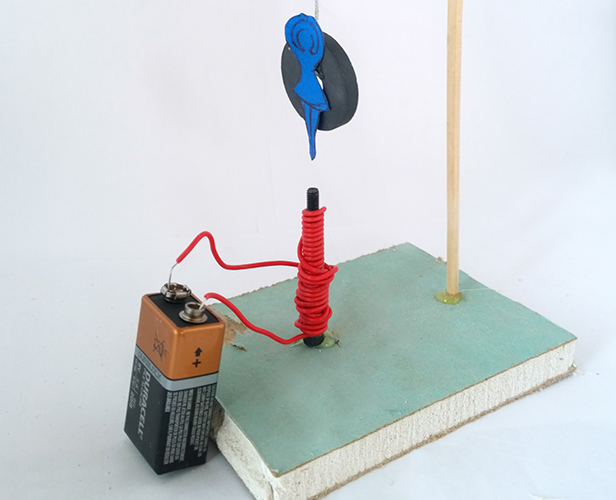
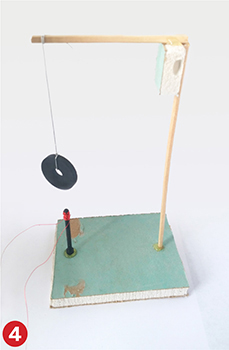
Make: Electromagnetic Dancer
Gather More Stuff
• Larger base
• Bolt or large nail
• Magnet wire—#20 to #30 gauge—or any thin, insulated wire
• Sandpaper
• Battery, any size
• Aluminum foil
Tinker
Step 1
Wrap the wire around the bolt or nail. Try for around 50 wraps, though the more you can make, the better. Leave both ends of the wire sticking out around a foot.
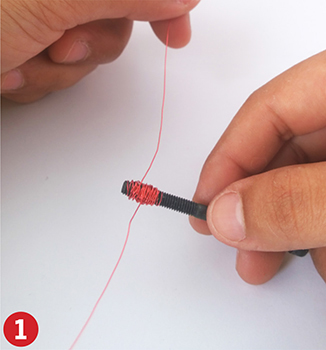
Step 2
Sand the tips to get the insulation off. Pulling it through a pinched bit of sandpaper works well. If the wire has vinyl insulation, strip the insulation with scissors or wire strippers.
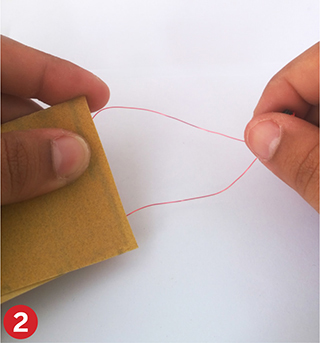
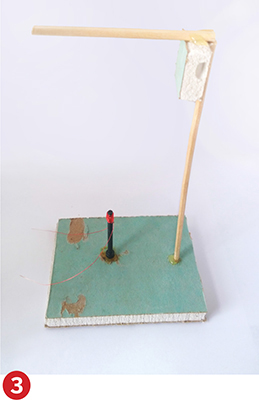
Step 3
This is your electromagnet. You could check it by connecting the two ends onto the two ends of the battery and seeing if you can pick up some paper clips. Or you can assume it works, since it is just about the simplest circuit you’ll ever make—a single wire—and glue it onto the base board. Build a high dangling stand for the dancer to swing from, directly above the magnet.
Step 4
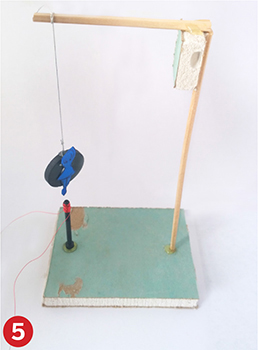
Hang a magnet on a string or thread, as close to the electromagnet as possible.
Step 5
Cut your dancing figure out of the paper. It should not hang down below the magnet—the dangling magnet must be very close to the electromagnet.
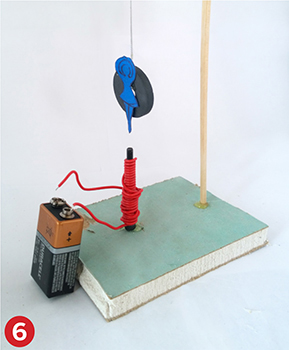
Step 6
Tape one end of the electromagnet wire to the bottom of the battery, or just squash the battery atop the wire. When you touch the other wire end to the top of the battery, the hanging magnet should twitch. You can also add little aluminum foil mittens, not shown, to the ends of the wires for better connections.
Tappity-tap the end of the wire on the top of the battery to make the figure dance! If you’re using A, AAA, C, or D cells, two batteries held together will make it dance even better.
What’s Going On?
Electricity and magnetism are aspects of the same force. This force is one of the four known forces in the universe, the other three being gravity, strong nuclear, and weak nuclear. As with these other forces, the electromagnetic force can be described as setting up a force field. Magnets put forces on things that draw close to them. Actually, the field goes out forever, but its strength drops off quickly.
Most of these little gadgets are cool because the magnets are pushing or pulling off one another at a distance. To feel this force and see how it curves and diminishes with distance is really critical: all the equations in the world won’t substitute for the real experience.
Did you notice that the hanging magnets are most sensitive to the influence of the Magnetic Wand? It’s because they can turn and twitch with little friction. If a magnet is sitting on the table, it takes quite a force to make it move; to be precise, a force larger than the friction it has with the table.
Magnets have two distinct sides (or poles) called north and south. You can’t tell by looking which is which. The only way to tell is to bring a magnet close to another one on which the poles are known. Then, as you noticed in your tinkering, opposites attract and likes repel. Repulsion is the special one: when you see it happening, you have two like poles. Attraction is not so special: it also happens between magnets and things made of iron, cobalt, and nickel (this is called magnetic induction). So when something is attracting, you can’t draw any conclusions about which pole is which.
Electromagnets work like permanent ones with the significant advantage that you can turn them off and on. A lot of work gets done this way: inside every electric motor are strong electromagnets pushing and pulling on other magnets to turn the shaft. The strength of an electromagnet depends mostly on how much current is going through the wire, how many times the wire is wrapped around the core, and how close the wires are packed to each other and what the core is made of. You can change any of these factors in this experiment and see if you can notice the difference.
Did your electromagnet act just like the permanent magnets? Did you try to find a way to turn off one of your permanent magnets?
If you stick a magnet to a hunk of iron, its field is diminished, but it’s not extinguished. You may have noticed in Hanging Up that if you put iron, such as scissors or a metal ruler, between the paper clip and the magnet, the paper clip falls. This is because the iron messed up the field. Paper, plastic, and a lot of other things have no effect on the field. You can’t turn off a permanent magnet without demagnetizing it, which means heating it red-hot, crushing it, or putting it in a powerful external magnetic field.
Compasses are simply magnets that are free to move. Hundreds of years ago in China, someone realized that the naturally occurring magnetic rocks would always turn and point the same way if free to move. So for hundreds of years, people were able to make use of that little nugget—quite valuable when you’re lost on a cloudy day—before anyone knew what was going on. At some point around the 1600s, people realized that the earth is a giant magnet, and the little compass magnet is doing nothing more than lining up with the earth magnet. The very next instant they realized that they had a conundrum on their hands: The north pole of the little magnet had been named north because it pointed north, but since opposites attract, this meant that the magnetic pole near the earth’s north geographic pole must actually be a south magnetic pole. And they couldn’t just change the names on every magnet and compass that had ever been made, so they just left it like that. Ah, well. You win some, you lose some.
The Levitator makes it seem like something is floating, but the tiny place where the pencil point touches the upright on the far end is important. You can’t replace that with another set of magnets. Working with just permanent magnets, not spinning, not hooked up to a computer feedback system, you can’t get stable levitation. You needn’t trust me on this: go try it yourself! You may find, as I did, that it’s a lot like balancing one marble on top of another.
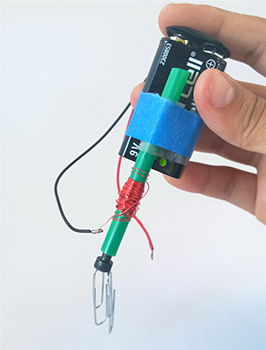
Figure 3-6. Here you can see it’s holding up the paper clip, with one unbent end stuck up inside
Poke a nail with the tape around it into the straw, and you’re back to a normal electromagnet (Figure 3-7).
When I was a kid I had an Erector Set, which included an electromagnet. I set up mine with a string behind the couch and a bidirectional pulley system to pick up a pile of scrap metal and move it into the back of a toy truck. Hours of glee. Forgot to take a picture.
Keep On
If you make an electromagnet with a hole in the middle, that is, no core at all, you can suck iron or steel objects in. This is called a solenoid, and you can make it as large as you want. Figure 3-6 is a slick little version with a straw.
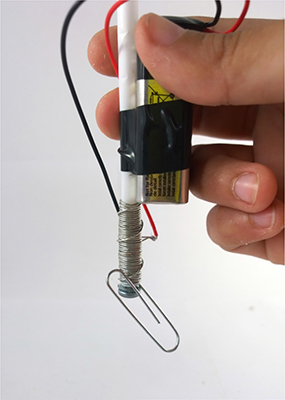
Figure 3-7. Just an ordinary electromagnet
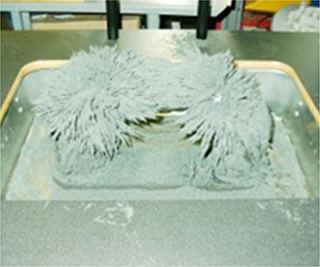
Figure 3-8. The Exploratorium’s magnetic sand
The Exploratorium has an exhibit with a couple of gallons of magnetic sand in a box with a giant magnet (Figure 3-8). The sand makes spikes along the lines of the magnetic field.
You may be able to collect magnetic sand by dragging a large magnet through a sandy place. If the sand near you has no magnetite, you can also scrape the black dust off of old VHS tapes and use that. First pull the tape so that it stretches and loosens the dust, and then scrape it off (Figure 3-9). This will take a while, so you may also want to visit a local metal shop and sweep their floor for them.

You can also tinker with magnetism using small uniform bits of steel, such as staples (already stapled or not), paper clips (Figure 3-10), or nails.
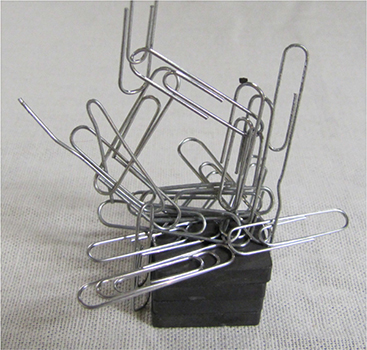
Figure 3-10. Fun with paper clips
Internet Connections
• Search for a video about a “levitating frog.” The magnetism we commonly talk about, that only works on iron, cobalt, and nickel, is called ferromagnetism. It turns out there are two other types—diamagnetism and paramagnetism—and that many things can be pushed on with very strong magnets due to their diamagnetic properties. No harm done to the frog, mind you.
• Search “superconducting magnetic levitation” to see how magnets will levitate stably over a chunk of conductor that is cooled to the point that it has no electrical resistance. This is due to induced eddy currents, another fascinating branch of magnetism.
• Check out “drop tower rides.” These amusement park rides drop you from way high in the air (100 to 400 feet) and then stop you at the bottom with magnetic eddy currents.
• Look at http://www.levitron.com. This one also actually does levitate, like I told you wasn’t possible, due to stability gained by spinning.
Standards Topics Links
• Electricity, magnetism, circuits, compass, forces, and fields
More Tinkering with Magnetism
• John Cassidy and Paul Doherty, Magnetic Magic: Magic Tricks Done with Magnets (Klutz, 1994; a modern classic—out of print, but I hear a new edition is on its way)
• Fred Jeffers, Mondo Magnets: 40 Attractive (and Repulsive) Devices and Demonstrations (Chicago Review Press, 2007)
• Simon Field, Gonzo Gizmos: Projects & Devices to Channel Your Inner Geek (Chicago Review Press, 2003)