
13 Engineering and Motors
Fun with a Hovercraft and Spin Art
You can tinker with circuits, magnets, and mechanics separately and come up with hundreds of great projects, or you can put them together and invent go-machines of all shapes and sizes. The trick is to get a hold of a little hobby motor.
A motor is an amazing thing. The first one was developed by Michael Faraday in 1821, just one year after Hans Christian Orsted accidentally stumbled upon the link between electricity and magnetism. Up until then, electricity, magnets, and motion were all separate areas of research and tinkering. Orsted noticed that electric current makes a magnetic field, and Faraday used that field to produce continuous motion. Don’t take my word for it, but inside the motor, you’ll find coils of wire forming electromagnets, and usually permanent magnets, too. The magnets in there push and pull on each other to turn the shaft.
And once you’ve got a shaft turning, baby, the world is yours! Look at the motors in our lives: washing machines and dryers, refrigerator compressors, CD/DVD players and computer disk drives, automatic cameras, automatic car windows, blenders, hair dryers, vacuums, fans, heaters and air conditioners, car starters, grain moving motors, heavy lift motors, conveyor belts, escalators and elevators, automatic doors and gates, drills, grinders, lathes, saws, milling machines, clocks, and, last but not least, toys.
Any toy with a battery that does something besides sing and light up is likely to have a motor inside of it. Sometimes it will be hooked into a set of gears or cams, and other times its shaft will be connected directly to a fan or wheel.

Cameras often have only a small battery in them, but also may have circuits that boost the low battery voltage to a high voltage necessary to set off the flash bulb. Be careful opening cameras! I’ve never seen a toy with such a circuit.
Most of these motors run on 3 to 12 volts, a perfectly safe voltage to fiddle around with. So, rip apart a dead toy and extract the motor, or go out and buy one for a couple of bucks. Now the action can really begin. You can build cars, boats, submarines, planes, and many things that just sit and spin or vibrate in a fascinating manner. Here are a few ideas, but really, the sky is the limit. I’ve personally written an entire book on motor engineering projects and have developed enough projects since then to write a second book.
Make: Hovercraft
Gather Stuff
• Paper plate
• Flexible plastic cup
• Hobby motor
• Two connection wires, three to four feet long
• Two to four D batteries
• Masking tape
• Electrical tape
Gather Tools
• Box cutter
• Hot glue gun with glue
• Scissors
• Nail
• Wire strippers
• Side cutters
• Pen
Tinker
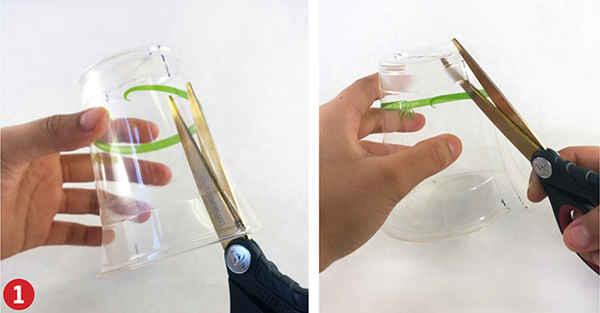
Step 1
Cut the cup in half.
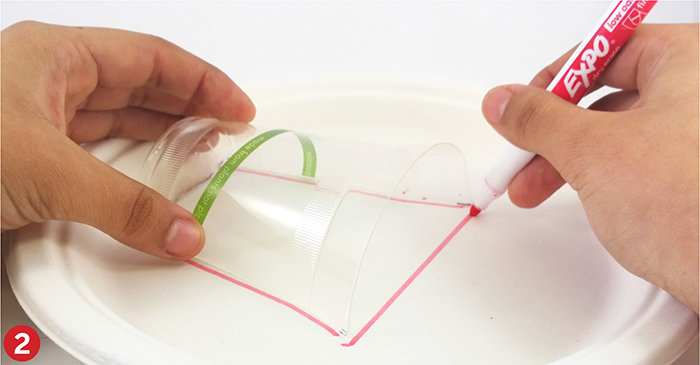
Step 2
Set it on the upturned paper plate with the cup’s bottom up against the outer circle on the base of the plate. Mark around it.
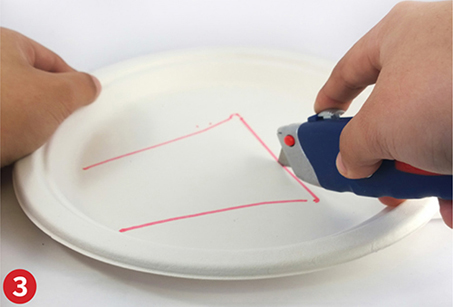
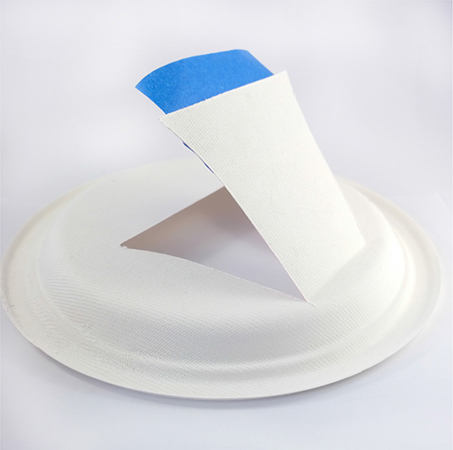
Step 3
Cut it out on three sides, leaving the one line corresponding to the bottom of the cup. Use the box cutter and scissors. Stick one piece of tape under the end of the flap in preparation for fastening it down.
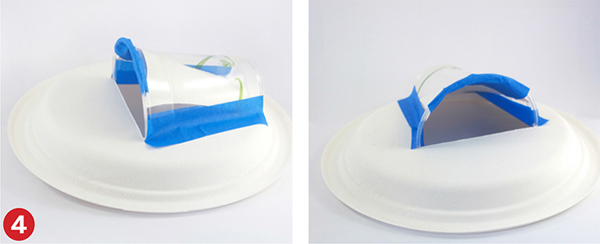
Step 4
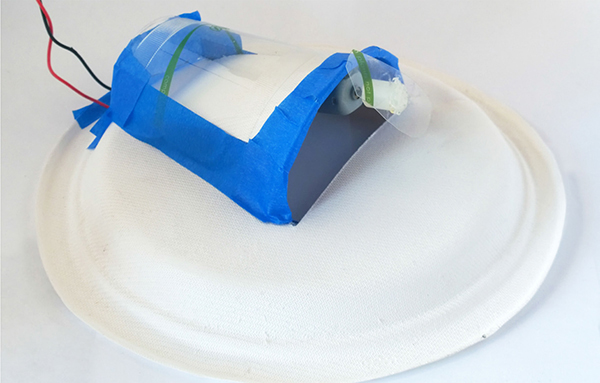
Tape the half cup down to the plate. Tape the flap up inside the cup. This will direct the air from the propeller down under the paper plate.
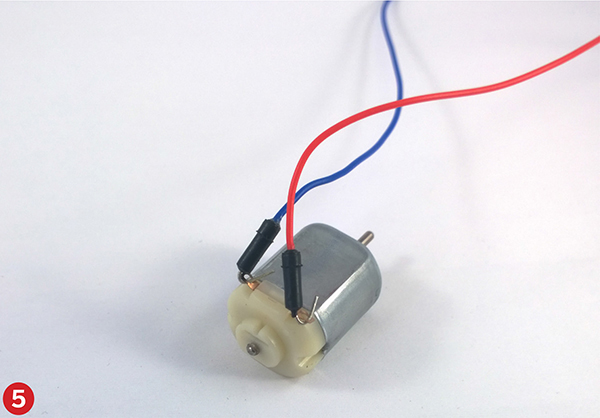
Step 5
Strip the two connection wires on both ends and connect them to the motor’s terminals.
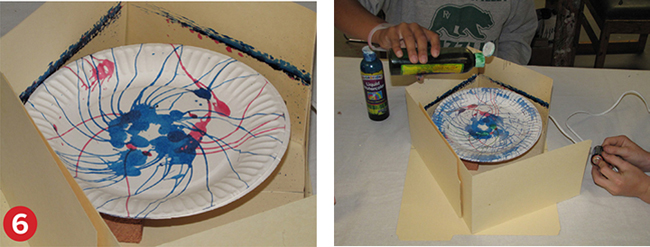
Step 6
Wad a bit of aluminum foil around the tip of one of the motor wires to make better contact. The other end has to be disconnectable to switch the motor off and on. Here you can see our unbent paper clip system for the switch side. Make a battery pack with two to four batteries and electrical tape. Press and tape the batteries and wires together securely.

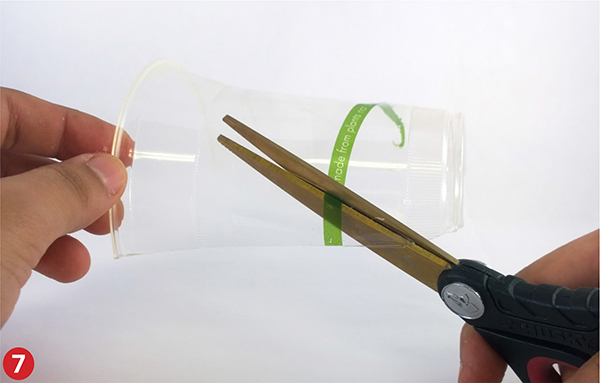
Step 7
From the unused side of the cup, cut a propeller about two inches long, half an inch wide. Cut it at an angle on the side of the cup and it will have the proper curvature built in. Round the edges for smooth action.
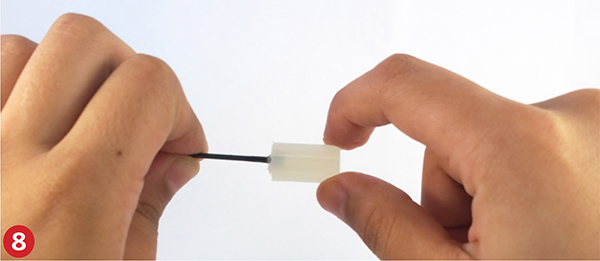
Step 8
Cut a bit of hot glue, maybe one inch long. Poke a hole in it with a small nail. It is important to poke the hole straight in: this is where the motor shaft will go in. If you’d like to make it easier, heat up the nail by sliding it into a hot glue gun’s tip for several seconds before you push it into the stick.
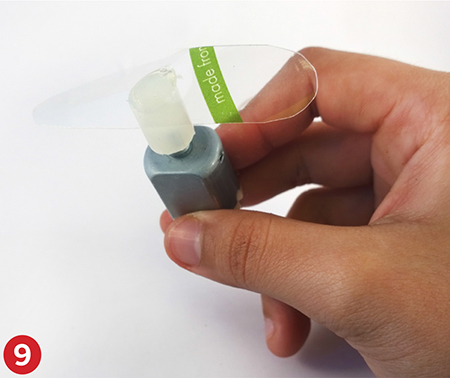
Step 9
Hot glue the propeller onto the nonholed end of the bit of hot-glue, smack dab in the center. It’s best if the curvature comes down around the glue stick as shown, instead of curving up away from it. Wait a few seconds after you put the hot glue blob on the bit of hot glue or the heat may cause the cup’s plastic to bend (but you can always tweak it later). Gently push the bit of hot glue stick onto the end of the motor shaft.
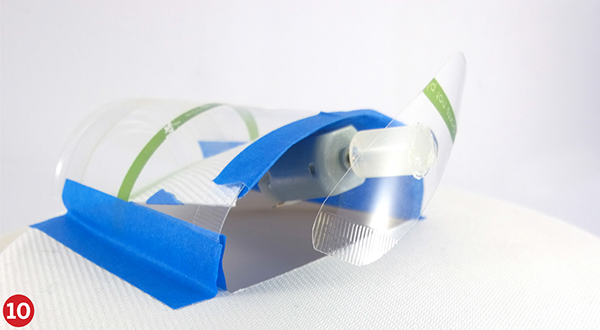
Step 10
Glue the motor snugly beneath the top of the cup. The closer you can get it, the less air will be lost around the side. Trim the propeller if it touches the paper plate when it turns.
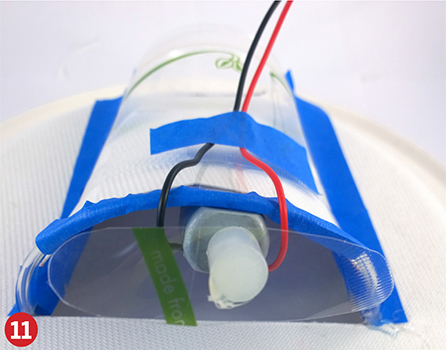
Step 11
Tape the wires back on the top of the cup to keep them out of the way of the spinning propeller.
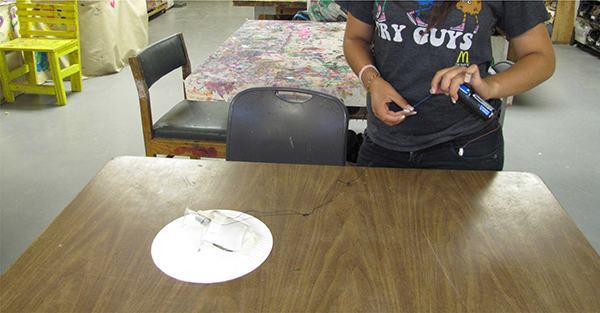
Let it rip!
It should go tearing around the table when you hook up the batteries.
If it doesn’t, chuck it in the garbage and take up poetry. No, just kidding. Actually they rarely work the first time. Here are a few of the common things that go wrong:
The motor is going the wrong way
If you point it at your face, you shouldn’t feel much air, whereas if you put your hand under the hovercraft, you should feel it blowing like crazy. If it’s blowing the wrong way, switch the wires around on the battery. This will make the motor turn in the other direction, and the propeller should blow in the right direction.
The propeller is not bent properly
If it is not blowing much at all in either direction, twist that propeller to make it look like a fan. Each side should be twisted to scoop the air and throw it back. If you grab the propeller by both ends, your hands should twist in opposite directions to make it right.
Not enough batteries
More is usually better, though getting up to 12 volts can fry one of these little motors.
The table is not smooth enough
Find a smooth one, clean and dry.
The plate got bent in the building process
It needs to be pretty flat around the rim that rests on the table. You can smooth it with your fingers.
The motor should be hanging right above the center of the plate, too. If it’s too close to one edge, rip off the motor and reglue it.
Your karma is no good
Do some good deeds and try again.
Make: Art Spinner
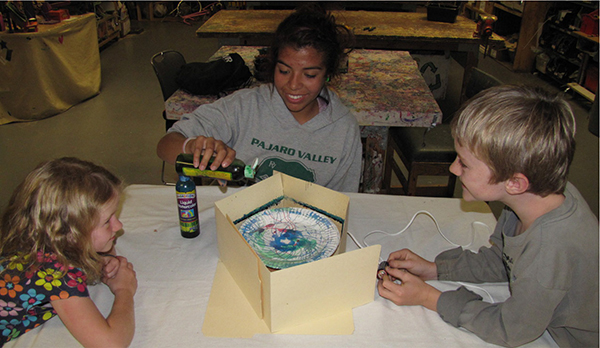
Figure 13-3. The spinner in action
Gather More Stuff
• Base board—any moderately heavy chunk of wood
• Another motor and battery
• Two more connection wires
• Small bit of wood
• File folders
• Paper plates
• Sticks of wood
• Liquid paint or food coloring
Tinker
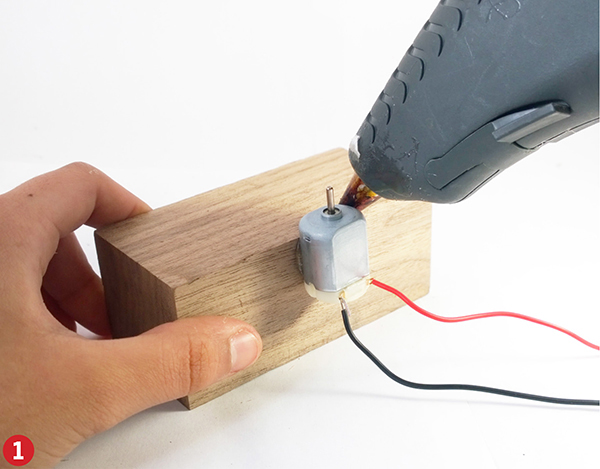
Step 1
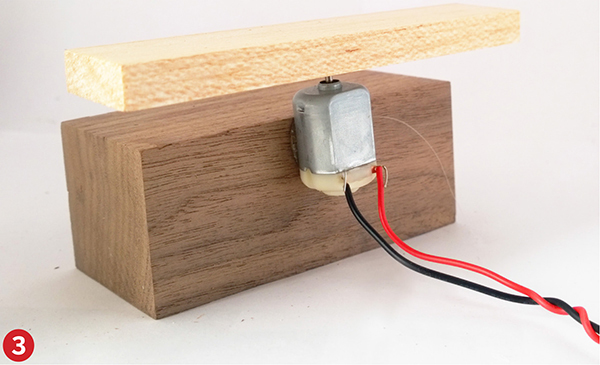
Strip all four ends of two long wires and connect them to the motor terminals. Glue the motor to the side of the base board with the shaft sticking up above the surface.
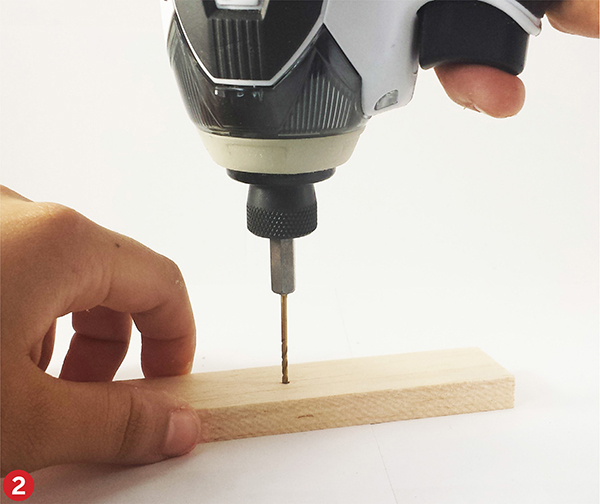
Step 2
Find a drill bit or nail to use in making a hole for the motor shaft. The hole has to be just smaller than the shaft so that the wood grips the shaft. It also has to be square with the piece of wood—straight in and straight out. If you can’t find a drill bit, you can just tap a nail into the wood. You can just tap the nail into the wood and then yank it out, but we find it easier to put that nail into a drill and make the hole. If you find a nail you think will work, but then it turns out to be too small, you can smash it a bit with a hammer to make it flat, which will enlarge the size of the hole it makes.
Step 3
Strip all four ends of two long wires and connect them to the motor terminals. Glue the motor to the side of the base board with the shaft sticking up above the surface.
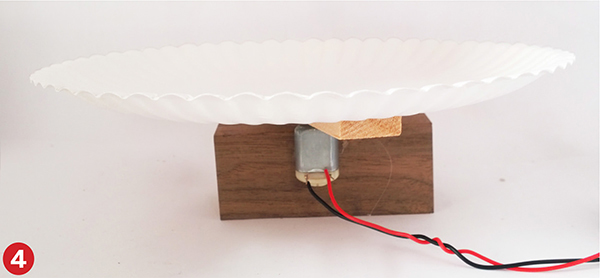
Step 4
Hot glue a paper plate onto that little block exactly in the center. If you spin it and it’s not in the center, rip it off and try again. Set another paper plate on top of the first one.
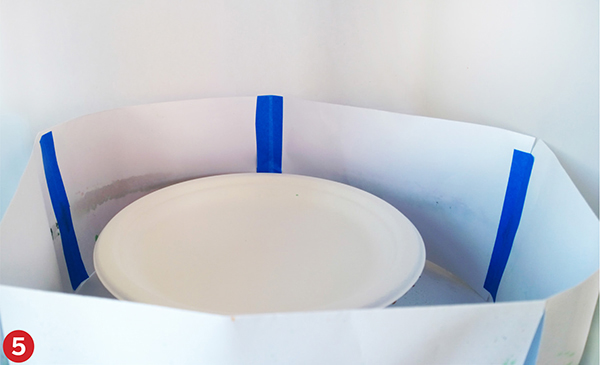
Step 5
Unless you want to paint your table, floor, walls, and self, build a little wall and floor around the spinner with file folders or thin cardboard. Now you’re ready to spin some colors.
Step 6
Hook up the motor to the battery; you can just press the two bare wires to the two ends of the battery. When it gets going, drip the colors onto the plate little by little. When you’re happy with one, slide the plate off, put it up on the refrigerator, and drop a clean one onto the base plate for your next masterpiece.
What’s Going On?
Let me go over the motor basics again. If your motor is like most, inside its wee casing are two kinds of magnets: black ceramic permanent magnets and electromagnets made of tiny coils of wire. Hook it up in a circuit, and the electricity flows from one pole of the battery to the other through the coils. With the rush of electric current, these electromagnets switch on and push off the permanent magnets to spin the motor shaft around. The electricity flows through tiny contacts called brushes that connect and reconnect the electromagnets so that they’re always pushing the shaft in the same direction.
Send more electricity through the motor with more batteries, and the electromagnets will push harder resulting in a faster spin. Send through too much electricity, and the poor little brushes will vaporize like the filament of a burned-out lightbulb. Send through too little, and the electromagnets won’t have the oomph required to push the shaft around, though they may still slowly drain your battery.
Grab the shaft of a spinning motor. Can you believe that the force you feel is just tiny magnets pushing on each other?
Hovercraft don’t fly; they float on a cushion of air. This gives them the significant advantage of nearly eliminating friction with the ground. Ground friction is what holds you back, so these gadgets can really go! Stopping, on the other hand, can be problematic, as can turning tight corners. That’s one main reason you don’t see many hovercraft waiting at the traffic light. But they work great on the surface of water.
Can you see a tiny space between the plate and the table? When my hovercraft flies over the edge of the table, that air cushion is broken and it skids to a halt.
Propellers throw air forward or back. This particular model of hovercraft cleverly uses the half cup to split the moving air from the propeller, some going back to provide forward motion and some going down to power the air cushion. Real hovercraft have one or more propellers dedicated to each of those two functions. Sometimes the propulsion propellers are able to swing side to side and control the direction of motion. Sometimes giant vanes are used to control the direction. Ours is doomed to random flight.
Can you think of a way to add another motor or control system of some kind that could guide your hovercraft? We tried using an electromagnet to push a vane back and forth, adding two more wires to the tether. It sorta worked, if we used our imagination.
Large propellers will move slower because they’re pushing on more air. Since these motors are made to spin fast, you don’t want too big a propeller. If yours is too small, on the other hand, it won’t push enough air to generate enough force.
The spin art gizmo pushes the motor’s lower speed limits. It has to start that (relatively) huge plate spinning and then keep it spinning when the paint splats onto it.
Did you notice how slowly it starts spinning, and how any little contact will prevent it from starting? During this start-up phase, the motor draws a huge current from the battery. That’s one of the interesting quirks of electrical motors: if you physically stop the shaft, the motor draws much more current from the battery than when it’s running.
Once the motor gets some momentum it does the job fine, and on only one battery. This is the way inertia works: it’s usually harder to get something going than to keep it going. The same goes for the drops of paint when they hit the plate. After falling tranquilly through the air, they suddenly encounter the spinning plate. The moving surface of the plate gives the drop an instant push in one direction, and it begins moving in that direction. But the plate is spinning, so the next instant the force is in a slightly different direction.
Well, thanks to inertia again, the drop is not interested in changing directions, so it begins a curved path, partially succumbing to the torque of the plate, partially following its own inertial will out to the edge of the plate. The result is magnificent art.
Did your spinner give paint line forms like the ones pictured earlier? The spin art shown here was done with food coloring. If you use thicker paint, it may show less curving and more straight-out (radial) motion. To better understand this rotational motion, try tossing on beads, coins, flour, bubbles, or anything else you can think of. 1
When a drop finally reaches the edge of the plate, it gets launched into the air. No longer feeling the torque of the plate, it will follow an arrow-straight path until it hits the wall, or the unlucky face of an innocent bystander.
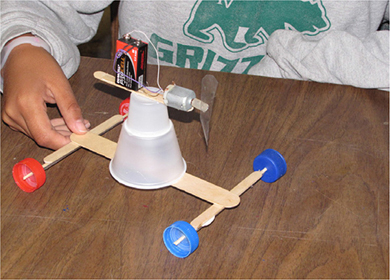
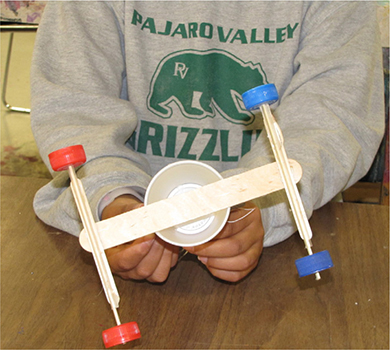
Keep On
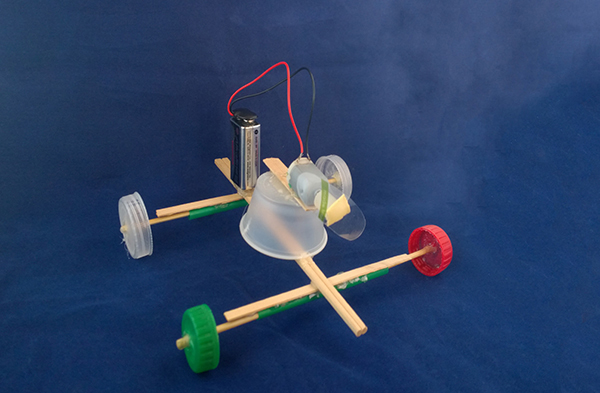
Many more tinkering projects are possible with this little spin master. One of the simplest is a car that is blown along by a propeller. The propeller is the same as in the hovercraft project, perhaps a bit longer. The car has to be pretty light, and the bearings have to be pretty good—any little friction will stop it from going. The bearings here are bamboo skewers—the straightest ones in the pack—inside of drinking straws. Wheels are bottle caps, but could be poker chips or anything round. We use a 9 volt battery for maximum torque, but it won’t live long. Two or three AA batteries would also do the trick and last longer.
The unlikely looking contraption in Figure 13-4 is a turning display table mounted on a hunk of two-by-four. It is one of our more difficult projects. These motors always spin quickly; there’s no slow setting. If you give them only a bit of juice, they lose all force and stop. One day a kid wanted to make a slowly turning display table for the snazzy little model car he had just finished. I told him to forget it, given that these motors only turn fast. He would not take no for an answer and kept nagging me until we came up with this. It’s driven by means of the tilted shaft of the motor directly contacting a CD, which is held in the horizontal position by a dowel loosely stuck in a hole (Figure 13-5). The weight of the wood and other stuff on the CD (the model car) presses the CD against the motor shaft, and the whole thing turns. Since the shaft diameter is tiny, even though it’s spinning like crazy, the CD goes round in lazy circles. Furthermore—and this is from my inner teacher—I rigged the motor with a binder-clip slider (Figure 13-6) such that you can slide it closer in to the center of the CD or further out toward the edge. This is a cheap transmission: the closer in it gets, the faster the CD spins; the farther out, the slower it spins.
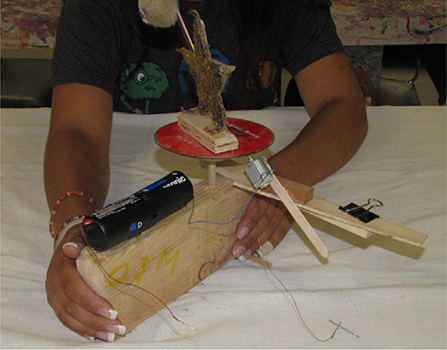
Figure 13-4. The turing display table

Figure 13-5. A closer look at the device
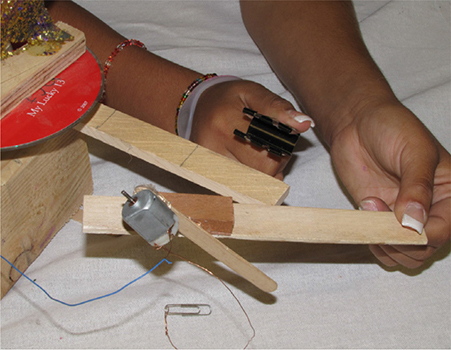
Figure 13-6. The binder clip slider
We sometimes fiddle around with proto-motors. These act sort of like a motor to show how motors work. Figure 13-7 shows one built on an upturned cup, balanced on a pencil point stuck in a bead hot glued to the bottom of the inside of the cup. Four magnets are hot glued around the edge of the cup (Figure 13-8), each with the same pole out. We then bring in an electromagnet, which you can turn off and on. By switching it off and on at the right moments, we can make this little device spin around. Useless, but instructive.
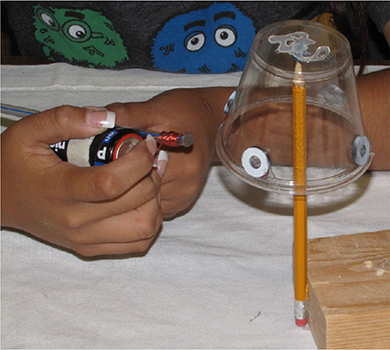
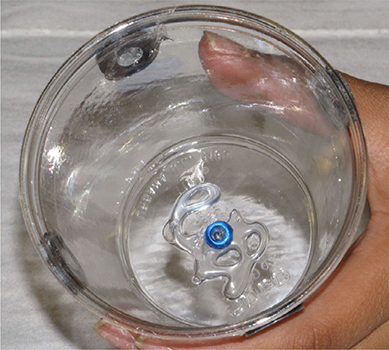
Figure 13-8. Magnets and beads glued in place
Of course, if you want to learn more about how these motors work, rip one apart (Figure 13-9)!
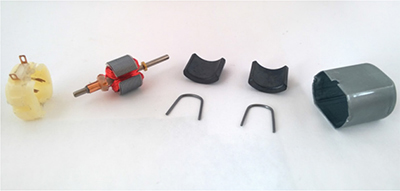
Figure 13-9. Dissecting a motor
Internet Connections
• Search for the biggest and smallest motors in the world, and prepare to change your vision of what a motor is and does.
• Check out a video of Faraday’s motor, and other homopolar motors.
• Some extremely efficient vehicles have been developed with one or more wheels having a motor built right inside. Search “wheel hub motor.”
Standards Topic Links
• Electricity and magnetism, motors, electrical coils, force, energy, power, torque, and magnetic fields
More Tinkering with Engineering
• I put a couple dozen of these motor activities, including a self-contained hovercraft that you can launch down a long hallway, into my first two books:
– Kinetic Contraptions (Chicago Review Press, 2010)
– Stomp Rockets, Catapults, and Kaleidoscopes (Chicago Review Press, 2008)
• Each of the commercial construction toys (Tinker Toys, Lego, K’Nex, Erector) includes a motor in the top-tier fancy set. Capsella toys were designed entirely around hooking up little motors inside capsules in creative ways; the system seems to exist now in the Danish company IQ-Key, but you can also get used ones on the Internet.
• The Maker Shed has several slick kits for motor toys. One good one is the SpinBot. Find them at www.makershed.com.