Chapter 2. Getting Started
Before you start writing code, you’ll need to do some housekeeping. First, you’ll need to install Node.js, the Arduino IDE, and libraries to support the Bluetooth LE chipset—the nRF8001 from Nordic Semiconductor—that we’ll be using in the products throughout the book.
Let’s get these housekeeping tasks out of the way so you can get to the interesting bit—the code—as soon as possible.
The Arduino
The Arduino started off as a project to give artists access to embedded microprocessors for interaction design projects, but it may well end up in a museum as one of the building blocks of the modern world. It allows rapid, cheap prototyping for embedded systems. It turns what used to be fairly tough hardware problems into simpler software problems (and we know that once problems are in the realm of software, they become almost exponentially easier).
The Arduino—and the open hardware movement that has grown up with it and to a certain extent around it—is enabling a generation of high-tech tinkerers both to break the seals on proprietary technology and to prototype new ideas with fairly minimal hardware knowledge. This Maker renaissance has led to an interesting growth in innovation. People aren’t just having ideas; they’re doing something with them.
The Board
The revision of the Arduino board we’re using in this book is known as the Arduino Uno, which is shown in Figure 2-1. It is based on the ATmega328 microcontroller, and it, along with its many clones and compatibles, is one of the most widely available and easily found microcontroller boards on the market today.

Figure 2-1. The Arduino Uno board with the ATmega328 microcontroller
It has 14 digital input/output pins, six of which can be used as PWM outputs, along with six more analog input pins. Table 2-1 shows the technical specifications of the Arduino Uno.
| Arduino Uno | |
|---|---|
| Microcontroller | ATmega328 |
| Operating Voltage | 5 V |
| Input Voltage (recommended) | 7 – 12 V |
| Input Voltage (limits) | 6 – 20 V |
| Digital I/O Pins | 14 (6 provide PWM) |
| Analog Input Pins | 6 |
| DC Current per I/O Pin | 40 mA |
| DC Current for 3.3V Pin | 50 mA |
| Flash Memory | 32 KB |
| SRAM | 2 KB |
| EEPROM | 1 KB |
| Clock Speed | 16 MHz |
The Arduino platform has everything needed to support the on-board microcontroller. It is attached directly to your computer for programming using a USB connection, and it can be powered via the same USB connection or with an external power supply if you want to detach the board from your computer after you’ve programmed it.
Powering the Board
The Arduino Uno can be powered via the USB connection, or with an external power supply. Unlike previous generations of the Arduino, the power source is selected automatically. If you’re using an earlier model, you will have to manually change between USB and external power sources using a jumper on the board itself; this jumper is usually located between the USB and power jacks.
The board can operate on an external supply of 6 to 20 volts. However, if supplied with less than 7V, the 5V pin may supply less than nominal voltage and the board may become unstable. If using more than 12V, the voltage regulator may overheat and damage the board. The recommended range is therefore between 7 and 12 volts.
Input and Output
Each of the 14 pins on the Uno can be used as an input or output. They operate at 5V, with each pin having an internal pull-up resistor (disconnected by default) of 20 to 50 kOhms. The maximum current a pin can provide is 40mA.
Note
Some pins have specialized functions. Perhaps the most important of these for the purposes of this book are pins 0 and 1. These pins can be used to receive (RX) and transmit (TX) TTL serial data. These pins are connected to the corresponding pins of the ATmega8U2 USB-to-TTL serial chip.
Communicating with the Board
The ATmega328 provides UART TTL serial communication at 5V, which is available on digital pins 0 (RX) and 1 (TX). The Ardunio Uno has an ATmega8U2 chip on-board that redirects this serial communication over USB, allowing the Arduino to appear as a virtual serial port to software on your laptop.
Installing the Arduino IDE
We will use the Arduino IDE to develop code, as shown in Figure 2-2.

Figure 2-2. The Arduino IDE
Note
The latest version of the Arduino development environment is available. At the time of writing, this was Arduino 1.6.5.
Go ahead and download the latest version of the development environment from the Arduino website.
Installing on OS X
Like most Mac applications, the development environment comes as a disk image (.dmg file) that should mount automatically after you download it. If it doesn’t, double-click on it to open it manually. After it is open, just click-and-drag the Arduino.app application into your /Applications folder. Double-click on the application to open it.
Warning
If you’re using a Mac when you connect the board to your computer, depending on the version of OS X you’re running, a dialog box may appear telling you that a new network interface has been detected. Just hit the Apply button. Even though the new interface will claim to be “Not Configured,” if you inspect it in System Preferences, you will see that it is working correctly.
Installing on Linux
The Arduino development environment has been packaged and can be installed by using the package manager. On Debian, type:
$ sudo apt-get install arduinoDetailed instructions for other flavors of Linux are available on the Arduino Playground.
Note
For the Aruino Uno, you need librxtx-java version 2.2pre2-3 or later installed.
Installing on MS Windows
The development environment comes as a ZIP file. Download it, unzip it, and double-click on it to open the folder, and then double-click on the application to open it.
If you’re running Windows when you connect the board to your computer, driver installation should begin automatically. However, if you’re running Windows 7, Vista, or XP, it may fail. If so, click on the Start Menu and open the Control Panel. Navigate to System and Security, and click on System. Once the System window is open, go ahead and open the Device Manager. Under Ports (COM & LPT), or possibly under Unknown Devices, you should see an entry named Arduino UNO (COMx). Click on the entry and choose Update Driver Software and Browse My Computer for Driver Software. Navigate to the folder containing the development environment and choose the Arduino Uno driver named Ardunio UNO.inf.
Connecting to the Board
Connect the Arduino to your computer with an appropriate USB cable. In the case of an Arduino Uno, you’ll need a USB-A (computer) to USB-B (Arduino) cable, the same sort needed for most USB printers. The green power LED (labeled PWR) should turn on.
After connecting the board to your computer, go to the Tools → Board menu item in the Arduino development environment (see Figure 2-3) and select your board from the list in the drop-down menu.
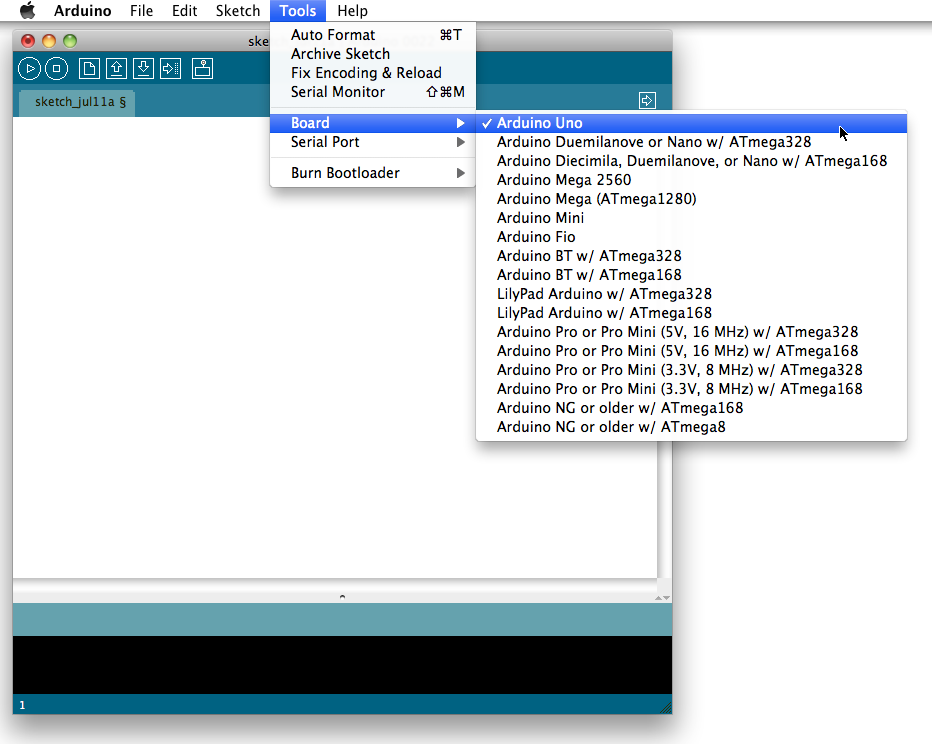
Figure 2-3. Selecting the correct board type
Then go to Tools→Serial Port and select the correct serial port for your board, as shown in Figure 2-4. On the Mac, the name will start with /dev/tty.usbmodem, whereas on Windows it will show up as a COM port.

Figure 2-4. Choosing the correct serial port
If you’re unsure which serial port corresponds to your board, you can always unplug and then re-plug-in the USB cable connecting your computer to the Arduino board to see how the menu changes.
Installing the BLE Peripheral Library
Now that we have the Arduino IDE installed, we need to install the Bluetooth LE Peripheral Library. This is an Arduino library for creating custom BLE peripherals with Nordic Semiconductor’s nRF8001 or nR51822.
The installation of this library has been simplified in the 1.6.x release of the Arduino IDE. Open the Arduino IDE and choose Sketch → Include Library → Manage Libraries… from the menu bar to open the Library Manager, as shown in Figure 2-5.

Figure 2-5. The Arduino Library Manager window
Go ahead and type BLEPeripheral into the search box on the top-left corner of the window. This will bring up the BLEPeripheral library. Select the library in the main pane and click on the Install button. The latest version of the library should be automatically installed and made available for use in your code.
Note
Throughout the book, we’ll use the Adafruit Bluefruit LE board based around the Nordic Semiconductor nRF8001 chipset. As we mentioned in the Preface, the nRF8001 Arduino library from Adafruit only supports a UART service. By using the BLEPeripheral library, we can use the same hardware but in a much more flexible and powerful way.
Setting Up Raspberry Pi
Some of the examples in this book use the Raspberry Pi. While the Pi doesn’t have Bluetooth LE built in, there are many USB Bluetooth LE adaptors available. We use the IOGEAR GBU521 adaptor, and highly recommend it.
Installing BlueZ
Linux uses the BlueZ package to provide support for the core Bluetooth layers and protocols.
The stock BlueZ that’s available via apt-get on Raspbian Wheezy is version 4.99, which can be installed by running:
sudo apt-get install bluez
Note
BlueZ 5.x is not yet considered stable, so for now you should continue to use BlueZ 4.x
Verifying the Bluetooth LE
Make sure your Bluetooth LE USB adaptor is plugged into the Pi, and then type:
$ hciconfigYou should see something like this:
hci0:   Type: BR/EDR  Bus: USB
    BD Address: 00:1A:7D:DA:71:0C  ACL MTU: 310:10  SCO MTU: 64:8
    UP RUNNING PSCAN
    RX bytes:979 acl:0 sco:0 events:43 errors:0
    TX bytes:910 acl:0 sco:0 commands:43 errors:0
Just to check that things are working correctly, type:
$ sudo hcitool lescanThen you should see any Bluetooth LE peripherals that are within range, such as:
LE Scan ... 78:C5:E5:6C:D5:EA(unknown)78:C5:E5:6C:D5:EA Hone
Hit ^C to stop the scan.
Node.js
Node.js is a system built on top of the V8 Javascript Engine. It uses an event-driven, non-blocking I/O model and has an extensive package management system called npm. It’s open source and uses a cross-platform runtime environment for server-side and networking applications. Node.js applications are written in JavaScript, and are run within the Node.js runtime environment.
We’re going to install the Node.js engine, and then install the relevant dependencies for the Bluetooth LE libraries we’ll use throughout the book.
Installing Node.js
Probably the easiest way to install Node.js for those running OS X or MS Windows is to download the installer directly from the Node.js website.
On Linux and Raspberry Pi
Node.js is available from the NodeSource Debian and Ubuntu binary distributions repository. On a Debian/Ubuntu distribution you can install Node.js as follows:
$curl --silent --location https://deb.nodesource.com/setup_0.12|sudo bash -$sudo apt-get install --yes nodejs
Optionally, you can install build tools that allow you to compile and install native add-ons from npm, like this:
$ sudo apt-get install --yes build-essentialInstalling Libraries with npm
Node.js libraries can be installed using the npm package manager that is installed alongside Node.js. You can install packages from the command line as shown here:
$ npm install PACKAGE_NAME
where PACKAGE_NAME is the name of the package you want to install. Some packages with command-line tools, like PhoneGap, can be installed globally by adding the -g flag. This is the exception. Installing packages locally is preferred. A full list of the packages available via npm can be found at npmjs.org.
Note
OS X users might be prompted to install the XCode or the command-line developer tools. This is only necessary if you will install Node.js packages that use native bindings and need to be built from source, such as noble and bleno.
Setting Up Dependencies for noble and bleno
OS X
Install Xcode from the Mac Appstore. After it is installed, make sure to open it once to accept the license agreement.
Raspberry Pi and Linux
Both noble and bleno require some dependencies for the native Node.js modules on which they depend. They can be installed using the following command:
sudo apt-get install bluetooth bluez-utils libbluetooth-dev libudev-dev
Installing PhoneGap
PhoneGap allows us to build cross-platform mobile applications with HTML, JavaScript, and CSS. These applications are packaged and delivered to phones as native apps through the Apple AppStore or Google Play.
At its simplest, PhoneGap looks like a web browser embedded in a native app, but it’s really more than that. PhoneGap provides JavaScript APIs to access native functions like Camera, Contact, and Accelerometer. These JavaScript APIs work across platforms. You can run the same code on iOS, Android, and Windows Phone. In addition to the built-in APIs, PhoneGap also provides a framework that allows anyone to add new APIs.
PhoneGap development requires command-line tools to be installed on your machine. It requires Node.js plus the native SDKs for each platform to be installed. It requires a Mac if you want to develop for iOS. iOS development also requires that you join the iOS Developer Program.
There are many barriers to entry here: tool setup, platform restrictions, developer programs. These are all things that can be easily conquered if you’re going to develop apps, but it is a bit much to include in a book that’s supposed to teach you about Bluetooth LE. Instead, we’re going to try a different approach.
PhoneGap Developer App
The PhoneGap team has released the PhoneGap Developer App. The idea is that you can install Node.js and PhoneGap on your computer, and you can develop apps without installing native SDKs or worrying about signing code.
The PhoneGap Developer App pairs with your computer and loads your program via WiFi. You can’t distribute these apps, but it works well for development. It is especially good for developing an iOS application on a Windows or Linux computer, which is something that’s otherwise impossible to do without jailbreaking.
First, you need to install the PhoneGap command-line interface. This command-line tool is installed using npm:
$ sudo npm install -g phonegapThen download the PhoneGap Developer App from the iOS App Store or Google Play onto your phone.
Bluetooth Low Energy Plugin
Bluetooth Low Energy support for PhoneGap is provided by a plugin. The examples in the following chapters show you how to use the plugin. The GitHub project has API documentation and additional code examples.
PhoneGap Versus Cordova
What’s the difference between PhoneGap and Cordova? PhoneGap was originally developed by Nitobi, which was later bought by Adobe. Before Nitobi was purchased by Adobe, they donated the PhoneGap codebase to the Apache Software Foundation to ensure it would remain open source. As part of the transition from Nitobi to Apache, the project was renamed as Cordova. PhoneGap is now Adobe’s distribution of Cordova.
PhoneGap is powered by Apache Cordova. Adobe continues to add additional tools like the PhoneGap Developer App and PhoneGap Build. We’re using PhoneGap here because it allows us to use the PhoneGap Developer App.
Platform Tools
When working with beacons in Chapter 10, you’ll need the Cordova iBeacon plugin. Since this plugin is not included in the PhoneGap Developer App, you’ll need to run the full version of PhoneGap. The full version of PhoneGap is also required if you want to deploy your applications directly to the phone instead of running them in the PhoneGap Developer App.
iOS
To deploy PhoneGap apps to iOS devices, you need to install the iOS SDK on a Mac. Launch Xcode one time so it can complete the installation after you agree to the license agreement. After Xcode is installed, open a terminal and run xcode-select to install the command-line tools.
$ xcode-select --installUse npm to install the deployment tools ios-sim and ios-deploy.
$ sudo npm install -g ios-sim
$ sudo npm install -g ios-deploy
Refer to the iOS Platform Guide for more detailed instructions.
Android
You can develop PhoneGap applications for Android using Windows, Mac, or Linux.
Install the Java SDK on your computer. For Windows, be sure to set the JAVA_HOME environment variable to point to the JDK location. For example, C:Program FilesJavajdk1.8.0_45.
Install the Android SDK. You can choose the standalone version or Android Studio. Follow the installation instructions from Google.
You need to include the tools and platform_tools directories from the Android SDK in your system path. For example, if you installed to /usr/local/android-sdk, add the following to ~/.bash-profile:
ANDROID_SDK=/usr/local/android-sdkexportPATH=$PATH:$ANDROID_SDK/tools:$ANDROID_SDK/platform-tools
Source bash profile to load the new PATH setting into the current shell.
source ~/.bash_profileOn Windows, right-click on Computer, select Properties, select Advanced System Settings, and open Environment Variables. Append the SDK location to the PATH variable.
;C:android-sdkplatform-tools;C:android-sdk ools
Use the Android SDK Manager (shown in Figure 2-6) to install the build tools and the SDK packages. Launch the SDK manager by typing android from a command prompt:
$ android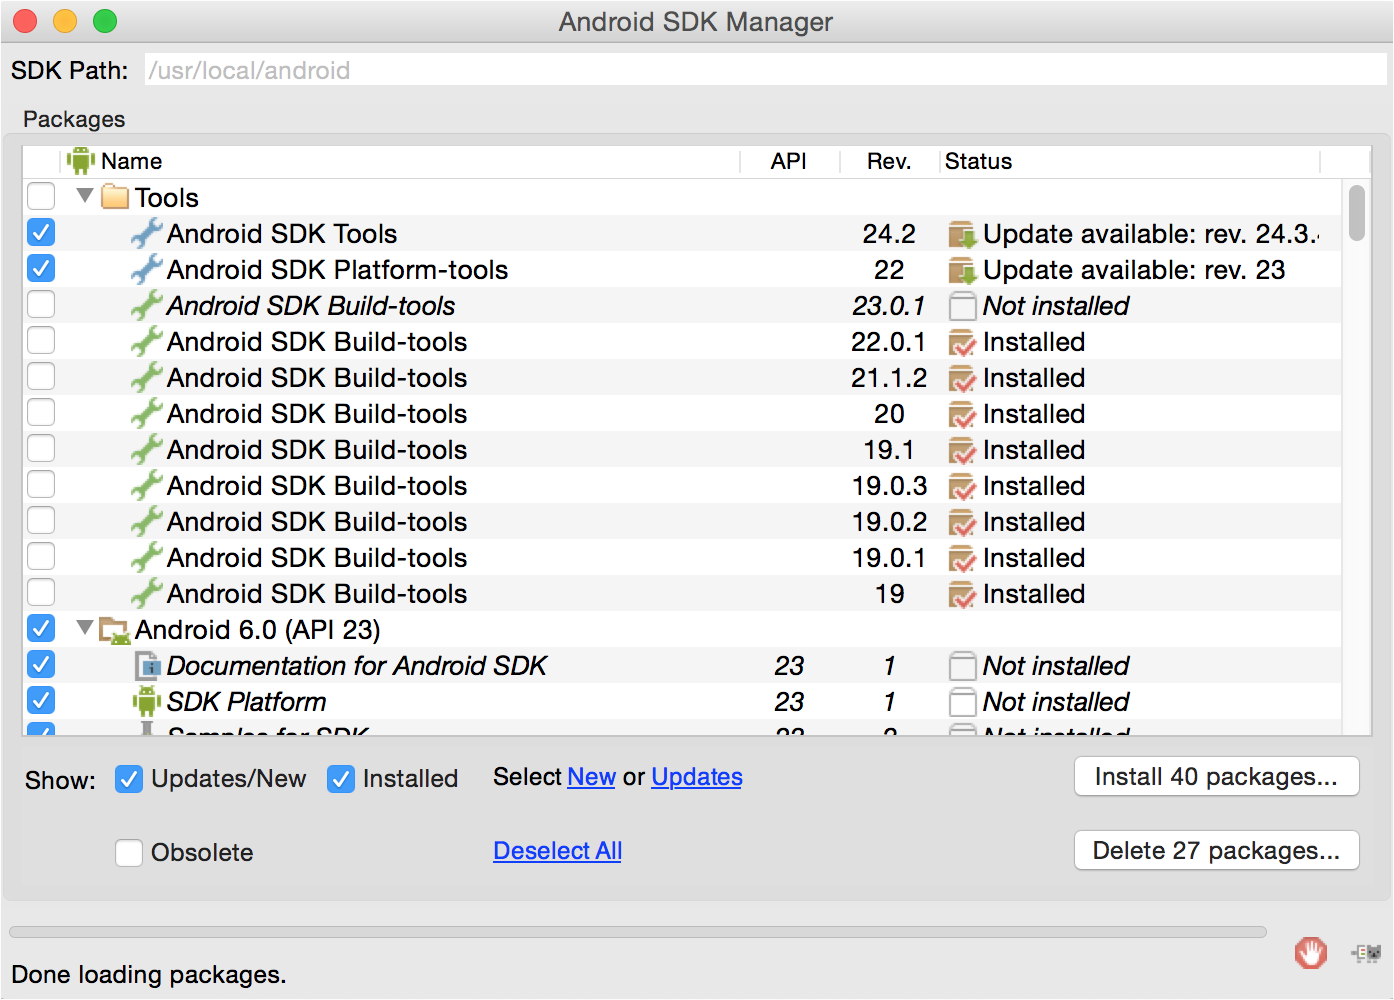
Figure 2-6. Android SDK Manager
Refer to the Android Platform Guide for more detailed instructions.