Chapter 4. BLE Lock
In this chapter you’ll build a lock that can be opened using your phone. The lock mechanism will be built with an Arduino Uno, Bluetooth LE radio, and a solenoid lock. You’ll also write an iOS and Android application using PhoneGap that opens the lock using Bluetooth LE.
Lock Service
Most Bluetooth LE hardware for Arduino comes with a service that emulates the Bluetooth classic Serial Port Profile (SPP). While an SPP-like service could work for this project, it doesn’t take full advantage of Bluetooth LE. For this project, use the custom lock service defined in Table 4-1.
| Characteristic | UUID | Properties |
|---|---|---|
unlock |
D271 |
write |
message |
D272 |
notify |
The lock service does two things. The unlock characteristic allows the lock to be opened by writing a secret code to the characteristic. The status message characteristic allows the lock to send information, such as invalid code or unlocked, back to the client. If a Bluetooth client subscribes to notifications on the message characteristic, it will be automatically notified whenever a new message is available.
Hardware
You will need the following hardware to build the lock:
-
Arduino Uno
-
12 V, 1A power supply
-
Darlington NPN Transistor (TIP120)
-
Red LED
-
Green LED
-
Two 220 Ohm resistors
The lock for this project has a solenoid actuated slug. The lock is normally in the closed or locked position. When power is applied to the solenoid, the bolt is drawn back with an electromagnet opening the lock. The lock draws 650mA at 12V, which is more current than you can safely pull through most Arduino pins. Arduino pins have a recommended maximum of 20 mA. The hardware uses pin 6 to switch a Darlington transistor on, sending the higher voltage and current from the VIN pin to the solenoid.
Tip
You might be able to run this project with a 9V power adapter. Some solenoid locks work with 9V, but others don’t. I’ve had better luck with 12V adapters.
The Arduino can handle 12V input because it has internal voltage regulators that power the board and Atmel chip at 5V. The VIN pin allow you to draw 12V current directly from the barrel jack. The 650mA the solenoid lock draws is less than the max of 1A for the VIN pin. Note that the VIN pin can handle much more current than a pin that is connected to the microcontroller.
This project can use either the Adafruit Bluefruit LE nRF8001 breakout board (Figure 4-1) or the RedBearLab BLE Shield (Figure 4-2). Some of the wiring will be different depending on which hardware you choose (see Figure 4-3). The software will be mostly the same since we’re using the Arduino BLE Peripheral library to create custom services.
Red and green LEDs are used to show the lock status. The green LED will light when the unlock code is correct. The red LED will light when the code is incorrect. Both the LEDs and the lock reset after four seconds.

Figure 4-1. Lock wiring for Adafruit Bluefruit LE nRF8001

Figure 4-2. Lock wiring for RedBearLab BLE shield

Figure 4-3. Lock wiring for Adafruit nRF8001 on left, RedBearLab BLE shield on right
Lock Software
The Arduino software hardcodes the passcode used to open the lock. For now, you’ll use the password 12345. I expect you to choose a better passcode for your top-secret project.
Use the Arduino IDE to program the hardware. Refer back to “Installing the Arduino IDE” if you need help configuring your development environment. “Installing the BLE Peripheral Library” describes how to install the Arduino BLE Peripheral library.
Programming
Open the Arduino IDE and create a new sketch using File → New. Save the file as BLE_Lock.
At the beginning of the sketch, include the SPI and Bluetooth libraries.
#include <SPI.h>#include <BLEPeripheral.h>
Define the pins for the lock and LEDs. The pin numbers defined in the code should match where the wires are plugged into the Arduino.
#define LOCK_PIN 6#define RED_LED_PIN 4#define GREEN_LED_PIN 5
Define the pins for the Bluetooth hardware you’re using.
For the Adafruit nRF8001, use the definitions in Example 4-1.
Example 4-1. Defines for Adafruit Bluefruit LE
// Adafruit Bluefruit LE#define BLE_REQ 10#define BLE_RDY 2#define BLE_RST 9
For the RedBearLab BLE Shield, use the settings in Example 4-2.
Example 4-2. Defines for RedBearLab BLE Shield
// RedBear BLE Shield 2.x#define BLE_REQ 9#define BLE_RDY 8#define BLE_RST UNUSED
You need to translate Table 4-1 into code. Create the BLE peripheral, service, characteristics, and descriptors. The descriptors aren’t required but help make the service self-describing.
BLEPeripheralblePeripheral=BLEPeripheral(BLE_REQ,BLE_RDY,BLE_RST);BLEServicelockService=BLEService("D270");BLECharacteristicunlockCharacteristic=BLECharacteristic("D271",BLEWrite,20);BLEDescriptorunlockDescriptor=BLEDescriptor("2901","Unlock");BLECharacteristicstatusCharacteristic=BLECharacteristic("D272",BLENotify,20);BLEDescriptorstatusDescriptor=BLEDescriptor("2901","Status Message");
The code that opens the lock is stored in a character array.
charsecret[]="12345";
Add an additional variable to track the last time the lock was opened.
longopenTime=0;
Setup
Create the setup function. Initialize the serial output so debug information can be sent to the serial monitor.
voidsetup(){Serial.begin(9600);Serial.println(F("BLE Lock"));
You created the blePeripheral instance in the preamble of the sketch. The peripheral needs to be configured in the setup function. Set the device and local name to BLE Lock. Set the lock service UUID as the advertised service UUID.
blePeripheral.setDeviceName("BLE Lock");blePeripheral.setLocalName("BLE Lock");blePeripheral.setAdvertisedServiceUuid(lockService.uuid());
See “Device Name Versus Local Name” for more information about device name and local name.
Add the lock service, characteristics, and descriptors to the peripheral. The order in which the items are added is important. Add the service first, followed by the unlock characteristic and the optional descriptor. Repeat the process for the status message characteristic and descriptor.
blePeripheral.addAttribute(lockService);blePeripheral.addAttribute(unlockCharacteristic);blePeripheral.addAttribute(unlockDescriptor);blePeripheral.addAttribute(statusCharacteristic);blePeripheral.addAttribute(statusDescriptor);
When a Bluetooth client writes a new value to the unlock characteristic, the sketch needs to process the data. Add an event handler for the BLEWritten event to the unlockCharacteristic. The unlockCharacteristicWritten function will be defined later.
unlockCharacteristic.setEventHandler(BLEWritten,unlockCharacteristicWritten);
Now that the blePeripheral is configured, it can be started.
blePeripheral.begin();
Finally, set the lock and LED pins to OUTPUT and the values to LOW, meaning off.
pinMode(LOCK_PIN,OUTPUT);pinMode(RED_LED_PIN,OUTPUT);pinMode(GREEN_LED_PIN,OUTPUT);digitalWrite(LOCK_PIN,LOW);digitalWrite(RED_LED_PIN,LOW);digitalWrite(GREEN_LED_PIN,LOW);}// end of setup function
Loop
The loop function has two responsibilities. First, it tells the Bluetooth radio to do whatever it should be working on. Next, it checks the last time someone attempted to open the lock. If the open time is not zero, and was at least four seconds, the lock is closed and the lights are reset.
voidloop(){// Tell the bluetooth radio to do whatever it should be working onblePeripheral.poll();// close lock and reset lights after 4 secondsif(openTime&&millis()-openTime>4000){resetLock();}
Unlock Characteristic Written
The implementation of unlockCharacteristicWritten must match the callback signature void bleCharacteristicEventHandler(BLECentral& central, BLECharacteristic& characteristic). Log the fact that the characteristic changed. Pass the characteristic data to the openLock function.
voidunlockCharacteristicWritten(BLECentral¢ral,BLECharacteristic&characteristic){// central wrote new value to the unlock characteristicSerial.println(F("Unlock characteristic written"));openLock(characteristic.value(),characteristic.valueLength());}
Open Lock
The open lock function checks the passcode written to the unlock characteristic against the secret code. If the code matches, the green LED is turned on, the lock is opened, and the status message is set to unlocked. If the code does not match, the red LED is turned on and the status message is set to invalid code.
voidopenLock(constunsignedchar*code,intcodeLength){openTime=millis();// set even if bad code so we can reset the lights// does the code match the secretbooleanmatch=false;if(strlen(secret)==codeLength){for(inti=0;i<codeLength;i++){if(secret[i]!=code[i]){match=false;break;}else{match=true;}}}if(match){// open the lockSerial.println("Code matches, opening lock");digitalWrite(GREEN_LED_PIN,HIGH);digitalWrite(RED_LED_PIN,LOW);digitalWrite(LOCK_PIN,HIGH);// open the lockstatusCharacteristic.setValue("unlocked");}else{// bad code, don't openSerial.println("Invalid code");digitalWrite(RED_LED_PIN,HIGH);statusCharacteristic.setValue("invalid code");}}
Reset Lock
The resetLock function is called from the loop function. It turns off the red and green LEDs, closes the lock, sets the status message characteristic to locked, and resets the open time:
voidresetLock(){// reset the lightsdigitalWrite(RED_LED_PIN,LOW);digitalWrite(GREEN_LED_PIN,LOW);digitalWrite(LOCK_PIN,LOW);// close the lockstatusCharacteristic.setValue("locked");openTime=0;}
See Example 4-3 for the complete listing of BLE_Lock.
Example 4-3. BLE_Lock.ino
#include <SPI.h>#include <BLEPeripheral.h>#define LOCK_PIN 6#define RED_LED_PIN 4#define GREEN_LED_PIN 5// See BLE Peripheral documentation for setting up your hardware// https://github.com/sandeepmistry/arduino-BLEPeripheral#pinouts// Adafruit Bluefruit LE#define BLE_REQ 10#define BLE_RDY 2#define BLE_RST 9// RedBear BLE Shield 2.x//#define BLE_REQ 9//#define BLE_RDY 8//#define BLE_RST UNUSEDBLEPeripheralblePeripheral=BLEPeripheral(BLE_REQ,BLE_RDY,BLE_RST);BLEServicelockService=BLEService("D270");BLECharacteristicunlockCharacteristic=BLECharacteristic("D271",BLEWrite,20);BLEDescriptorunlockDescriptor=BLEDescriptor("2901","Unlock");BLECharacteristicstatusCharacteristic=BLECharacteristic("D272",BLENotify,20);BLEDescriptorstatusDescriptor=BLEDescriptor("2901","Status Message");// code that opens the lockcharsecret[]="12345";longopenTime=0;voidsetup(){Serial.begin(9600);Serial.println(F("BLE Lock"));// set advertised name and serviceblePeripheral.setDeviceName("BLE Lock");blePeripheral.setLocalName("BLE Lock");blePeripheral.setAdvertisedServiceUuid(lockService.uuid());// add service and characteristicblePeripheral.addAttribute(lockService);blePeripheral.addAttribute(unlockCharacteristic);blePeripheral.addAttribute(unlockDescriptor);blePeripheral.addAttribute(statusCharacteristic);blePeripheral.addAttribute(statusDescriptor);// assign event handlers for characteristicunlockCharacteristic.setEventHandler(BLEWritten,unlockCharacteristicWritten);// begin initializationblePeripheral.begin();pinMode(LOCK_PIN,OUTPUT);pinMode(RED_LED_PIN,OUTPUT);pinMode(GREEN_LED_PIN,OUTPUT);digitalWrite(LOCK_PIN,LOW);digitalWrite(RED_LED_PIN,LOW);digitalWrite(GREEN_LED_PIN,LOW);}voidloop(){// Tell the bluetooth radio to do whatever it should be working onblePeripheral.poll();// close lock and reset lights after 4 secondsif(openTime&&millis()-openTime>4000){resetLock();}}voidunlockCharacteristicWritten(BLECentral¢ral,BLECharacteristic&characteristic){// central wrote new value to the unlock characteristicSerial.println(F("Unlock characteristic written"));openLock(characteristic.value(),characteristic.valueLength());}voidopenLock(constunsignedchar*code,intcodeLength){openTime=millis();// set even if bad code so we can reset the lights// does the code match the secret?booleanmatch=false;if(strlen(secret)==codeLength){for(inti=0;i<codeLength;i++){if(secret[i]!=code[i]){match=false;break;}else{match=true;}}}if(match){// open the lockSerial.println("Code matches, opening lock");digitalWrite(GREEN_LED_PIN,HIGH);digitalWrite(RED_LED_PIN,LOW);digitalWrite(LOCK_PIN,HIGH);// open the lockstatusCharacteristic.setValue("unlocked");}else{// bad code, don't openSerial.println("Invalid code");digitalWrite(RED_LED_PIN,HIGH);statusCharacteristic.setValue("invalid code");}}// closes the lock and resets the lightsvoidresetLock(){// reset the lightsdigitalWrite(RED_LED_PIN,LOW);digitalWrite(GREEN_LED_PIN,LOW);digitalWrite(LOCK_PIN,LOW);// close the lockstatusCharacteristic.setValue("locked");openTime=0;}
Testing the Lock
Now that the hardware has been built and programmed, you can use a generic Bluetooth application to test the service. Use LightBlue if you have an iPhone, iPad or iPod. Use nRF Master Control Panel if you have an Android device.
iOS
On iOS, use the LightBlue application to connect to the lock (Figure 4-4).

Figure 4-4. Left: LightBlue connected to the Lock Service; right: LightBlue opening the lock
-
Select the Status Message characteristic. LightBlue defaults to Hex for displaying characteristic data.
-
Switch the view from Hex to String by selecting Hex from the top-right corner of the screen.
-
Choose UTF-8 String from the list.
-
After the application navigates back to the characteristic view, select the “listen for notifications” link.
-
Use the link on the top-left to navigate back to the peripheral view.
-
Choose the Unlock characteristic. Follow the same process to switch from Hex to String.
-
Touch Hex link on the top-right.
-
Choose UTF-8 String. Now you are ready to open the lock.
-
Touch “Write new value”, enter
12345into the form, and pressDone. -
If you entered the correct code, the lock will open and LightBlue will receive the status notification (Figure 4-4).
Android
Android users should use the nRF Master Control Panel to connect to the lock. The lock service has the 16-bit UUID D270, but the application will display this as the expanded 128-bit version.
-
Choose
0000-.d270-0000-1000-8000-00805f9b34fb -
Subscribe to the Message characteristic by pressing the button with the down arrows next to UUID
0000-. Now you are ready to send the unlock code to the lock.d272-0000-1000-8000-00805f9b34fb -
Click the up arrow next to the Unlock characteristic
0000-. A new screen will pop up allowing you to write a value.d271-0000-1000-8000-00805f9b34fb -
Enter
12345as the value. -
Change the
BYTE ARRAYdrop-down toTEXT. -
Press the Send button. If you entered the correct code, the lock will open and the nRF Master Control Panel will receive the status notification. Note that the bytes
(0x)75-6E-6C-6F-63-6B-65-64are also displayed as the string “unlocked” (Figure 4-5).
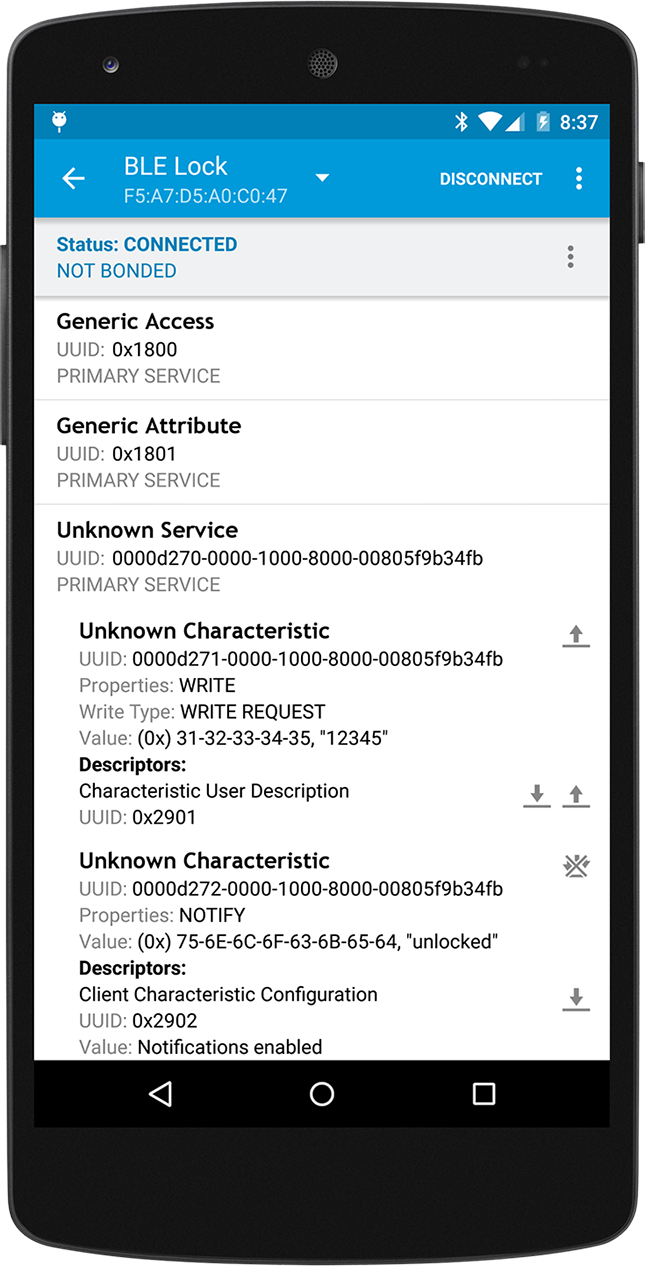
Figure 4-5. nRF Master Control Panel opening the lock
Mobile Application
Now that the hardware is set up and you know that BLE works, it is time to write a mobile application that opens the lock. The application will be written using PhoneGap so that one application can run on both iOS and Android.
PhoneGap applications are written using HTML, CSS, and JavaScript, which is packaged into a native iOS or Android application. PhoneGap provides Javascript APIs to access native phone functions like Camera, Contacts, and File System. Support for Bluetooth Low Energy is added with a third-party plugin.
Although PhoneGap applications are cross-platform, it requires that the native SDKs for each platform are installed on your system. We are going to circumvent that restriction by using the PhoneGap Developer App. The PhoneGap Developer App is a downloaded onto your iOS or Android device from the appstore. A minimal PhoneGap installation on your computer can deploy PhoneGap apps to the developer app running on your phone. This setup is great for experimentation and development, but can not be used to distribute applications. For more information on PhoneGap and getting your system setup refer to “Installing PhoneGap”. If you’d like to publish applications, you’ll need to install the iOS and Android SDKs in addition to the PhoneGap.
Callbacks
When we’re writing JavaScript apps, it’s important to understand that many API calls are asynchronous and there are lots of callbacks. This is particularly true with the PhoneGap APIs.
In many programming environments, you call a method and get a result back right away.
try{BigDecimaltemperature=api.getTemperature();System.out.println(temperature);}catch(IOExceptione){System.out.println("Error getting temperature: "+e);}
PhoneGap is a bit different. You call a method and pass in two functions. The first function is called with a result if the function is successful, and the second function is called if there is an error. The callback functions are invoked asynchronously. Sometimes they appear to be invoked immediately. Other times, callbacks are executed at some point in the future.
varsuccess=function(temperature){console.log(temperature);}varfailure=function(reason){alert("Failed to get temperature: "+reason);}api.getTemperature(success,failure);
BLE Lock App
Here’s the basic process for the mobile application. The application scans to find any hardware advertising the Lock Service. The user selects a device from the list of discovered devices. (In our case, there should only be one lock device listed.) The application connects to the selected peripheral and registers to receive notifications for the message characteristic. Registering for notifications allows the phone to be notified anytime the content of the message characteristic changes. After a successful connection, the user interface is changed to the lock details page so the unlock code can be entered using the number pad.
Open a terminal or cmd prompt on your computer. Change to the directory where you’d like to create the project.
cd ~/bluetoothUse the phonegap command-line tool to create a new project.
phonegap create ble-lock com.makebluetooth.blelock "BLE Lock" --template blank
Open the project in your text editor.
CSS
A CSS file is used to style the application and make it look a little better. Create a new directory named css inside the www folder. Create a new file named index.css in the new css folder. Copy the premade CSS from GitHub into index.css.
HTML
Open index.html. In the head section of the file, change title from Blank App to BLE Lock. Just above the title, add a new line to link to the stylesheet you copied into the project.
<linkrel="stylesheet"type="text/css"href="css/index.css"/><title>BLE Lock</title>
The user interface of the application is built with HTML. There are two screens in the application. Each screen is an HTML div. Divs are shown and hidden to switch screens. The status div is always visible to display messages to the user. The scrim div is shown while the application is processing data.
The main screen has an unordered list that we populate with the discovered BLE devices. When the user taps a device in this list, the application connects to the lock and switches to the second screen. The second screen has a text field where the user can enter the passcode.
Create the HTML for the device list screen inside the <body> tag of index.html.
<divid="deviceListScreen"><h1>Devices</h1><ulid="deviceList"><li>Searching...</li></ul><div><buttonid="refreshButton">Refresh</button></div></div>
The unlock screen is shown when the application is connected to a device. The form allows the user to enter the secret code that will be sent to the lock via Bluetooth.
<divid="unlockScreen"><form><inputtype="tel"name="code"><inputtype="submit"value="Unlock"></form><buttonid="disconnectButton">Disconnect</button></div>
The statusDiv sits at the bottom of the screen and can display messages to the user.
<divid="statusDiv"></div>
The scrim div is shown over the user interface while the application is processing data.
<divid="scrim"><p>Processing</p></div>
Lastly, the JavaScript files need to be included. PhoneGap automatically adds cordova.js when deploying the application. You will create js/index.js later.
<scripttype="text/javascript"src="cordova.js"></script><scripttype="text/javascript"src="js/index.js"></script>
See Example 4-4 for the complete listing of index.html.
Example 4-4. Contents of the index.html file
<!DOCTYPE html><html><head><metacharset="utf-8"><metaname="viewport"content="initial-scale=1, maximum-scale=1,user-scalable=no, width=device-width"><linkrel="stylesheet"type="text/css"href="css/index.css"/><title>BLE Lock</title></head><body><divid="scrim"><p>Processing</p></div><divid="deviceListScreen"><h1>Devices</h1><ulid="deviceList"><li>Searching...</li></ul><div><buttonid="refreshButton">Refresh</button></div></div><divid="unlockScreen"><form><inputtype="tel"name="code"><inputtype="submit"value="Unlock"></form><buttonid="disconnectButton">Disconnect</button></div><divid="statusDiv"></div><scripttype="text/javascript"src="cordova.js"></script><scripttype="text/javascript"src="js/index.js"></script></body></html>
Note
Hey! This application is sort of plain; wouldn’t it be better to use something like Ionic or React? Yes, there are libraries and frameworks that could make this application a lot fancier, but we are deliberately avoiding them to keep the examples as simple and understandable as possible. PhoneGap allows you to use any HTML and JavaScript, so pick your favorite library or framework and modify these examples.
JavaScript
JavaScript is used to control the application and manipulate the user interface. Create a new directory named js inside the www folder. Create a new file named index.js in the js folder.
At the beginning of index.js file, define some variables with the UUIDs for the Bluetooth Lock Service. These UUIDs are the same ones we used in the Arduino code and are defined in Table 4-1.
varSERVICE_UUID='D270';varUNLOCK_UUID='D271';varMESSAGE_UUID='D272';
The unlock code is entered into the application as a String, but the Bluetooth APIs expect to receive ArrayBuffers of bytes. Create a helper function to convert Strings into ArrayBuffers.
functionstringToArrayBuffer(str){// assuming 8 bit bytesvarret=newUint8Array(str.length);for(vari=0;i<str.length;i++){ret[i]=str.charCodeAt(i);console.log(ret[i]);}returnret.buffer;}
The status messages from the lock are received as ArrayBuffers. Create a helper method to convert an ArrayBuffer to a String.
functionbytesToString(buffer){returnString.fromCharCode.apply(null,newUint8Array(buffer));}
Create a variable named app. The application logic is created by adding functions inside the app object.
varapp={};
The PhoneGap application is started by calling app.initialize(). Typically, PhoneGap applications call initialize, bindEvents, and onDeviceReady as part of the bootstrapping process. The initialize function calls bindEvents and hides the divs containing the screens.
initialize:function(){this.bindEvents();deviceListScreen.hidden=true;unlockScreen.hidden=true;},
The bindEvents function is where HTML DOM events are connected to the application’s JavaScript. PhoneGap fires the deviceready event once the framework is initialized. It is important for PhoneGap apps to wait for deviceready before calling any PhoneGap APIs.
The touch events from buttons and list elements are attached to functions in this object. For example, scan is called when the refresh button is tapped.
bindEvents:function(){document.addEventListener('deviceready',this.onDeviceReady,false);refreshButton.ontouchstart=this.scan;deviceList.ontouchstart=this.connect;document.forms[0].addEventListener('submit',this.unlock,false);disconnectButton.onclick=this.disconnect;},
When deviceready is fired, the app can begin scanning for Bluetooth peripherals.
onDeviceReady:function(){app.scan();},
Scan clears any existing items out of the deviceList and shows the scrim div with a message before scanning for devices.
The UUID of the Lock Service is passed to the ble.startScan function. This limits discovery to only those BLE peripherals that are advertising the Lock Service. The success callback app.onDeviceDiscovered is called every time a Bluetooth peripheral is discovered. The failure callback is an inline function that shows an alert if something goes wrong.
scan:function(e){deviceList.innerHTML="";// clear the listapp.showProgressIndicator("Scanning for Bluetooth Devices...");ble.startScan([SERVICE_UUID],app.onDeviceDiscovered,function(){alert("Listing Bluetooth Devices Failed");});// stop scan after 5 secondssetTimeout(ble.stopScan,5000,app.onScanComplete);},
Warning
On Android 4.3 and 4.4, scan filtering is broken. Often you cannot filter scan results by UUID. If you are not seeing any devices while scanning, try passing an empty array [] to ble.scan instead of filtering for [SERVICE_UUID].
The function onDeviceDiscovered is called each time a peripheral is found. It receives a JSON description of the peripheral object. The onDeviceDiscovered function ensures the deviceListPage is visible, builds a new list item element with the peripheral information, and adds the new element to the device list.
The device’s id is stored in the list item’s dataset. This allows the device id to be easily retrieved when a list item is selected.
onDeviceDiscovered:function(device){varlistItem,rssi;app.showDeviceListScreen();console.log(JSON.stringify(device));listItem=document.createElement('li');listItem.dataset.deviceId=device.id;if(device.rssi){rssi="RSSI: "+device.rssi+"<br/>";}else{rssi="";}listItem.innerHTML=device.name+"<br/>"+rssi+device.id;deviceList.appendChild(listItem);vardeviceListLength=deviceList.getElementsByTagName('li').length;app.setStatus("Found "+deviceListLength+" device"+(deviceListLength===1?".":"s."));},
A timer in the scan method calls ble.stopScan after five seconds. The onScanComplete function is the success callback for ble.stopScan. The onScanComplete function checks if the list of discovered devices is empty and sets a status message to notify the user.
onScanComplete:function(){vardeviceListLength=deviceList.getElementsByTagName('li').length;if(deviceListLength===0){app.showDeviceListScreen();app.setStatus("No Bluetooth Peripherals Discovered.");}},
The connect function is called when the user taps an item in the device list. The device id is retrieved from the element’s dataset. The progress indicator is shown, and then the Bluetooth Low Energy API is used to connect to the device. The success callback, app.connect, is called when the connection is successful. The failure callback, app.disconnect, is called if the connection fails. The failure callback is a long-running callback and will be called anytime the peripheral unexpectedly disconnects.
connect:function(e){vardevice=e.target.dataset.deviceId;app.showProgressIndicator("Requesting connection to "+device);ble.connect(device,app.onConnect,app.onDisconnect);},
When the application successfully connects to a peripheral, onConnect is called. This function saves a reference to the connected peripheral in the app object so that other functions such as unlock have access to the peripheral.
The ble.startNotification API call is used to subscribe to notifications when the message characteristic changes. Whenever the message characteristic changes, app.onData will be called.
onConnect:function(peripheral){app.connectedPeripheral=peripheral;app.showUnlockScreen();app.setStatus("Connected");ble.startNotification(peripheral.id,SERVICE_UUID,MESSAGE_UUID,app.onData);},
The onDisconnect function is the failure callback from ble.connect that is called when the application unexpectedly disconnects.
onDisconnect:function(reason){if(!reason){reason="Connection Lost";}app.hideProgressIndicator();app.showDeviceListScreen();app.setStatus(reason);},
The disconnect function is called when the user wants to disconnect; it handles the event for the disconnect button. The function sets a status message and begins scanning again after disconnecting from the peripheral.
disconnect:function(e){if(e){e.preventDefault();}app.setStatus("Disconnecting...");ble.disconnect(app.connectedPeripheral.id,function(){app.setStatus("Disconnected");setTimeout(app.scan,800);});},
The onData function is the callback that is called whenever the status message characteristic changes. This is how the lock sends status data to the application. The function receives an ArrayBuffer and uses the bytesToString helper method to convert this to a string. The status message is displayed for the user and the progress indicator is hidden, if it is visible.
onData:function(buffer){varmessage=bytesToString(buffer);app.setStatus(message);app.hideProgressIndicator();},
The unlock function is a bit more complex. Unlock is called when the user submits the form with an unlock code. The unlock code is retrieved from the form data and stored in a variable. The function short-circuits if the unlock code is empty. Success and failure functions are created for the BLE API call.
The API call, ble.write, is used to send data to the peripheral. The application writes the unlock code to the unlock characteristic. The write function needs the peripheral id, service UUID, characteristic UUID, and data. The data must be an ArrayBuffer, so the helper function stringToArrayBuffer is used to convert the data. The success and failure callback are called based on the results of the write. If the write is successful, the form is simply cleared. The user will hear the lock open and see the LED turn green. The application will receive and display the “unlocked” status from the message characteristic.
unlock:function(e){varcode=e.target.code.value;e.preventDefault();// don't submit the formif(code===""){return;}// don't send empty dataapp.showProgressIndicator();functionsuccess(){e.target.code.value="";// clear the input}functionfailure(reason){alert("Error sending code "+reason);app.hideProgressIndicator();}ble.write(app.connectedPeripheral.id,SERVICE_UUID,UNLOCK_UUID,stringToArrayBuffer(code),success,failure);},
The remaining functions in app deal with the user interface. showProgressIndicator takes an optional message and overlays the progress scrim on top of the user interface. scrim.hidden=false ensures the element is displayed. Rules in the CSS ensure the div overlays the screen and is slightly transparent.
showProgressIndicator:function(message){if(!message){message="Processing";}scrim.firstElementChild.innerHTML=message;scrim.hidden=false;statusDiv.innerHTML="";},
hideProgressIndiator simply hides the scrim div. It can be safely called even if the progress indicator is not visible.
hideProgressIndicator:function(){scrim.hidden=true;},
showDeviceListScreen ensures the device list screen is visible and the unlock screen is hidden.
showDeviceListScreen:function(){unlockScreen.hidden=true;deviceListScreen.hidden=false;app.hideProgressIndicator();statusDiv.innerHTML="";},
showUnlockScreen ensures the unlock screen is visible and the device list screen is hidden.
showUnlockScreen:function(){unlockScreen.hidden=false;deviceListScreen.hidden=true;app.hideProgressIndicator();statusDiv.innerHTML="";},
setStatus logs the status message to the JavaScript console and displays it to the user.
setStatus:function(message){console.log(message);statusDiv.innerHTML=message;}};// end of app
The last line of the JavaScript file should call app.initialize.
app.initialize();
See Example 4-5 for the complete listing of index.js.
Example 4-5. Contents of the index.js file
varSERVICE_UUID='D270';varUNLOCK_UUID='D271';varMESSAGE_UUID='D272';functionstringToArrayBuffer(str){// assuming 8 bit bytesvarret=newUint8Array(str.length);for(vari=0;i<str.length;i++){ret[i]=str.charCodeAt(i);console.log(ret[i]);}returnret.buffer;}functionbytesToString(buffer){returnString.fromCharCode.apply(null,newUint8Array(buffer));}varapp={initialize:function(){this.bindEvents();deviceListScreen.hidden=true;unlockScreen.hidden=true;},bindEvents:function(){document.addEventListener('deviceready',this.onDeviceReady,false);document.forms[0].addEventListener('submit',this.unlock,false);},onDeviceReady:function(){deviceList.ontouchstart=app.connect;// assume not scrollingrefreshButton.ontouchstart=app.scan;disconnectButton.onclick=app.disconnect;app.scan();},scan:function(e){deviceList.innerHTML="";// clear the listapp.showProgressIndicator("Scanning for Bluetooth Devices...");ble.startScan([SERVICE_UUID],app.onDeviceDiscovered,function(){alert("Listing Bluetooth Devices Failed");});// stop scan after 5 secondssetTimeout(ble.stopScan,5000,app.onScanComplete);},onDeviceDiscovered:function(device){varlistItem,rssi;app.showDeviceListScreen();console.log(JSON.stringify(device));listItem=document.createElement('li');listItem.dataset.deviceId=device.id;if(device.rssi){rssi="RSSI: "+device.rssi+"<br/>";}else{rssi="";}listItem.innerHTML=device.name+"<br/>"+rssi+device.id;deviceList.appendChild(listItem);vardeviceListLength=deviceList.getElementsByTagName('li').length;app.setStatus("Found "+deviceListLength+" device"+(deviceListLength===1?".":"s."));},onScanComplete:function(){vardeviceListLength=deviceList.getElementsByTagName('li').length;if(deviceListLength===0){app.showDeviceListScreen();app.setStatus("No Bluetooth Peripherals Discovered.");}},connect:function(e){vardevice=e.target.dataset.deviceId;app.showProgressIndicator("Requesting connection to "+device);ble.connect(device,app.onConnect,app.onDisconnect);},onConnect:function(peripheral){app.connectedPeripheral=peripheral;app.showUnlockScreen();app.setStatus("Connected");ble.notify(peripheral.id,SERVICE_UUID,MESSAGE_UUID,app.onData);},onDisconnect:function(reason){if(!reason){reason="Connection Lost";}app.hideProgressIndicator();app.showDeviceListScreen();app.setStatus(reason);},disconnect:function(e){if(e){e.preventDefault();}app.setStatus("Disconnecting...");ble.disconnect(app.connectedPeripheral.id,function(){app.setStatus("Disconnected");setTimeout(app.scan,800);});},onData:function(buffer){varmessage=bytesToString(buffer);app.setStatus(message);app.hideProgressIndicator();},unlock:function(e){varcode=e.target.code.value;e.preventDefault();// don't submit the formif(code===""){return;}// don't send empty dataapp.showProgressIndicator();functionsuccess(){e.target.code.value="";// clear the input}functionfailure(reason){alert("Error sending code "+reason);app.hideProgressIndicator();}ble.write(app.connectedPeripheral.id,SERVICE_UUID,UNLOCK_UUID,stringToArrayBuffer(code),success,failure);},showProgressIndicator:function(message){if(!message){message="Processing";}scrim.firstElementChild.innerHTML=message;scrim.hidden=false;statusDiv.innerHTML="";},hideProgressIndicator:function(){scrim.hidden=true;},showDeviceListScreen:function(){unlockScreen.hidden=true;deviceListScreen.hidden=false;app.hideProgressIndicator();statusDiv.innerHTML="";},showUnlockScreen:function(){unlockScreen.hidden=false;deviceListScreen.hidden=true;app.hideProgressIndicator();statusDiv.innerHTML="";},setStatus:function(message){console.log(message);statusDiv.innerHTML=message;}};app.initialize();
Run the App
Save all the files, and you’re ready to run the application. Go back to your terminal or command prompt and start the server by typing phonegap serve from the project directory.
xvi:ble-lock don(master)$phonegap serve[phonegap]starting app server...[phonegap]listening on 10.0.1.14:3000[phonegap][phonegap]ctrl-c to stop the server[phonegap]
-
On your phone or tablet, start the PhoneGap Developer App. Verify that the server address listed in the app matches the address from the
phonegap servercommand. -
Press Connect. You should see a list of devices offering the BLE Lock Service.
-
Click on your device. You should see the unlock page (Figure 4-6).
-
Enter the
12345and press the unlock button. -
Click the disconnect button to go back to the device list.

Figure 4-6. Left: PhoneGap developer app. Center: Device list screen. Right: Unlock screen
The source code for this chapter is available on GitHub.
Tip
If you are interested in an earlier version of this project that uses Serial Port Profile, check out an older version of this project on the Make: Magazine Blog.
Improving the Lock
This project provides a basic lock example. There are many improvements you could add. From the usability perspective, you could make the mobile application remember the lock connection so the user wouldn’t need to select the Bluetooth device every time.
Another possibility could be to automatically unlock when the phone is in close proximity to the lock. You could do this after you learn about beacons in Chapter 10.
The lock has a short numeric passcode that is susceptible to brute-force cracking. You could create a longer passcode that is sent over the wire and use a short PIN to unlock the passcode on the phone. Twenty bytes of data will fit in a Bluetooth characteristic. Other alternatives could be adding a delay between unlock attempts, potentially increasing the delay every time an invalid passcode is entered.
A hardcoded password isn’t great. An alternate design could allow the initial passcode to be set when a button was pressed on the hardware. This would require additional software on the lock to enter a setup or configuration mode and additional characteristics for setting the password.
Use this project as a starting point and add enhancements to make your lock even better.