
THE BULLWHIP

Photography by Sam Murphy
WHIP IT GOOD
You don’t have to be Chuck Yeager to break the sound barrier. You just need a good bullwhip, which converts arm movement into supersonic speed and triggers the sonic boom we call a whip crack.
I love the scene in The Blues Brothers when Joliet Jake Blues (John Belushi) and his band are playing at a roadside dive. The tough crowd is throwing bottles, and the chicken-wire screen in front of the stage is doing only a mediocre job of protecting them. Jake spies a coiled bullwhip hanging on the wall, and a light bulb flashes in his head. He grabs the whip and gets the band to strike up the Rawhide theme. With each chorus, with each crack of the whip, the crowd’s demeanor changes, and by the time the Blues Brothers finish the song, the crowd is won.
Everyone loves the sound of a whip. But music and culture aside, whips are interesting physical devices: self-contained, human-powered machines that exceed the speed of sound, which is roughly 770 mph. Bullwhips are easy to make at home, and their deep, explosive crack is far more affecting when you experience it live, rather than just hear it recorded.
Set up: p.85 Make it: p.86 Use it: p.90
William Gurstelle is a MAKE contributing editor. He wrote the ornithopter flying machine project in Volume 08. His fifth book, Whoosh, Boom, Splat, comes out this March.
WHIP SMARTS

Illustration by Tim Lillis/narwhalcreativve.com
A whip is no mere rope on a handle – it’s a system of finely tuned interacting parts: the handle, the thong, the fall, the belly, and the cracker.
Speed Over Mass: A whip tapers gradually from base to end, to smoothly transfer momentum and energy from the thick plaits near the handle to the thin, flexible popper.
1. The whip-throwing motion causes a loop to propagate down the whip’s length.
2. As the loop continues down, its speed increases following the mathematical inverse of the thickness and weight of the whip’s cross-section.
3. By the time the roll approaches the end, the loop velocity has gone transonic, crashing through the sound barrier. Crack!
SET UP.

MATERIALS
[A] Leather hide, about 6" thick and at least 8’ long Purchase a hide from a leather shop. I purchased mine at Tandy Leather, a large national chain, and found the staff extremely knowledgeable. The shop buys hides from a tannery and then sells its products by the side, hide, skin, split, or belly. The size, thickness, and texture of each hide vary, so you’ll need to inspect several to find one that works. Try to get one that will let you cut straight 8’-long strips. Whip makers can cut curved strips from smaller hides, but this adds complexity.
[B] ¾" diameter smooth wooden dowel, about 7" long This will be the handle. You can make it longer or shorter according to your taste.
[C] Saddle soap
[D] Light cotton or nylon cord, at least 1’ or horsehair, hemp, or any other thin, fibrous material
[E] Small nails or heavy staples
TOOLS
[F] Vise or C-clamp on a sturdy support
[G] Saw
[H] Hammer
[I] Soft-leaded pencil
[J] Rubber band
[K] Ruler
[L] Straightedge (or use the ruler), the longer the better
[M] Sharp utility knife with spare blades
[N] Eye protection
[NOT SHOWN] Large, flat cutting surface
Sturdy support you can tie around
MAKE IT.

CRAFT YOUR BULLWHIP
START ≫ |
Time: 4–8 Hours Complexity: Medium Easy |
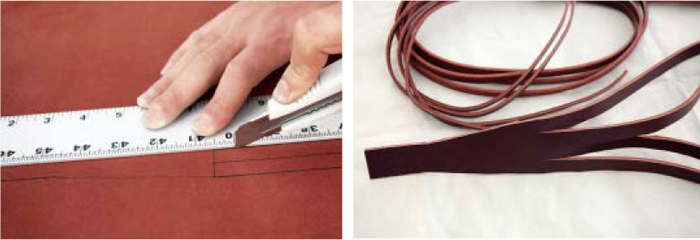
1. CUT THE LONG PIECES

1a. Cut the belly. Mark and cut a leather strip at least 8’ long, that tapers evenly and symmetrically from 3/16" at one end to ⅛", as shown in the Belly Cutting Diagram (below). This will be the whip’s belly, around which the thong plaits are laid. The plaits form a hollow tube through which the belly runs. If your hide is longer or shorter than 8’, adjust your layout accordingly. With a longer hide, you can make a longer whip.

1b. Lay out the thong. The thong consists of connected strips of leather that are woven or plaited together to form the main body of the whip. Thong layout is the most critical portion of the entire whip-making procedure, so take time to do this accurately. Adjust the length of the thong to match the length of the belly if it’s different from 8’.

Use a soft-leaded but sharp pencil to draw the outline of the thong on the leather hide, 2" wide at the widest point, following the Thong Cutting Diagram at the bottom of the previous page. The main concern is to keep the width of all 4 strips equal to one another at every point along the thong’s length.

1c. Cut the thong. Use a very sharp knife and a straightedge to guide your hand as you cut through the leather, following the layout.
2. PLAIT THE THONG
This is the most time-consuming portion of the project. Study the plaiting sequence photos carefully. The first time you plait your thong into a whip, it might be somewhat confusing, but keep trying, and before long the process will be not only easy, but also quite a bit of fun.
2a. Hang the belly and the thong. Secure the wide end of both the belly and the thong together, with the belly centered on top, with a C-clamp, vise, or other sturdy support. Tie the other end of the belly to another support, so that it’s stretched tight and will hold steady while you plait around it.

2b. Dress the leather. This prepares the thong to make it easier to pull tightly into good, even plaits. I apply saddle soap to the leather with my fingers and then work it into the leather, warming and softening it. Some serious whip makers use their own special dressings concocted from beef fat, beeswax, oils, and other stuff, although these will also make the whip more attractive for dogs to chew on.
2c. Do the actual plaiting. This takes a while to accomplish, but it’s pretty easy once you get the hang of it. Every wrap goes around the belly, which is the thinner strap shown in the background. Repeat the process, pulling the thongs tight after every step, until there is about 4" of unplaited thong left at the bottom. The belly will be longer than the plaited whip, and will extend out of the bottom. Tie off the plaited thong temporarily with a rubber band to keep it from unraveling.

3. ATTACH THE FALL AND CRACKER
The fall is a thin strip of easily replaceable leather attached to the end of the whip. Since the whip tip moves at supersonic speed, the end gets worn fairly quickly. The replaceable fall protects the plaits in the whip.
3a. Cut a 2’ strip from the hide, as shown in this Fall Cutting Diagram. Cut a 1" slit near the wide end.

3b. Attach the fall to the whip by placing the whip’s tip through the slit in the fall. Then tie 4 single overhand knots in each of the strands of the thong. Pull the knots tight and cut off the excess.

3c. Make the cracker by cutting an 8" length of light cotton or nylon cord (or horsehair) and tying it securely to the fall with a sheet bend knot (wikipedia. org/wiki/sheet_bend). Unwind a bit of the other end into individual fibers.

4. MAKE AND ATTACH THE HANDLE
4a. Cut the dowel down to handle size (I find 7" convenient), and cut a shallow groove in the handle 1" from one end.

4b. Cut an even leather strip ½"–¾" wide by 2’–3’ long, with gradually angled cuts at both ends. Use a nail or heavy staple to tack the strip to the top of the handle, opposite the groove. Wind the leather around the handle and tack again at the bottom end of the strip.
4c. Cut a 1"×7" leather strip from the hide. This will be the keeper, the piece that connects the whip plaits and belly to the handle.
4d. Cut a very thin leather strip, about ⅛"×15", from the hide. Bind the keeper to the handle with this thin strip, using the groove to anchor it firmly in place. First, tie the thin strip directly into the groove with a clove hitch (wikipedia.org/wiki/clove_hitch), then wind the leather strip several times around the keeper, and tie it off. Pull hard on the keeper to test it for strength. If necessary, retie or use a second thin strip to bind it on.

4e. Attach the plaited thong to the handle by first passing the handle through the slit in the thong, then pulling the thin end through the keeper. The whip is now ready for use!

FINISH X
NOW GO USE IT »
USE IT.
LET’S GET CRACKING
SAFETY
![]() Until you get a feel for how to handle a whip, expect to endure a few accidental welts. Things to remember:
Until you get a feel for how to handle a whip, expect to endure a few accidental welts. Things to remember:
• Eye protection is absolutely required. A hat that covers your ears is also a smart precaution.
• Wearing gloves, a jacket, boots, and heavy pants will reduce your chances of getting a whip-lash.
• Keep people, animals, and things you don’t want broken clear of your practice area.
PRACTICE
There are many methods of whip cracking. All require practice to obtain consistent results. Practice makes perfect, and builds arm strength too!

The Forward Crack Start with the whip laid out on the ground in front of you. Bring your arm up and back. Then with a sharp motion, bring your hand forward, similar to a baseball pitcher’s arm motion. Done correctly with a well-made whip, this results in a nice, sharp crack. Try various arm speeds to see what works best for your whip.
The Overhead Crack Begin by twirling the whip overhead to gain velocity. When the fast-moving whip tip is just behind and to your right (assuming a right-handed user), bring your hand forward smartly, and quickly snap your wrist. Done correctly, this will reward you with a brisant crack.
CRACKER CARE
Cracking a whip subjects the popper end to a lot of punishment, and they don’t generally last too long. I like to experiment with different cracker materials to see what gives the best report. To begin, try soft, thin cotton or nylon twine with one end unwound into its individual fibers. In my experience, different cracker constructions give widely different results. Experiment with various materials and lengths to see what works best with your particular whip.

Photograph above by Corbis; photograph below by Sam Murphy
RESOURCES
![]() For more family-friendly whipping tips and resources see makezine.com/09/bullwhip.
For more family-friendly whipping tips and resources see makezine.com/09/bullwhip.
LASH PROGRAMMING

Photograph: Corbis
Whips evolved as herding and cattle-driving tools. A good whip handler can produce a cracking sound that bursts from any location within the whip’s reach. Cattle instinctively turn away from the loud sound’s source, so the ability to precisely place these small sonic booms anywhere in midair lets cattle drivers steer their herds.
Crafting a whip that cracks well requires timetested methods. A well-designed whip is a lesson in supersonic fluid mechanics. It must taper gradually from base to end in a specific fashion, and it must be made of materials that gracefully and easily transfer the energy and momentum of the moving internal coil along its length.
Alain Goriely, professor of mathematics at the University of Arizona, has published several research papers on the way whips work, and has come up with several fascinating conclusions about how waves propagate through these flexible devices. His research describes how a loop moving down the length of a whip accelerates as the whip tapers, and he developed a series of equations that accurately model the curvature, boundary conditions, tension, and speed of the whip. Goriely’s computer analysis of whip dynamics confirms that the cracking sound results from hypersonic movement, and he has measured tip speeds in well-made whips that exceed Mach 3 — three times the speed of sound.
Goriely divides the world of whips into two categories: pain-making whips and noise-making whips. The pain-makers, such as the infamous cat-o’-nine-tails, are short, bulky, and made up of several strands that hang separately. They don’t crack. Noise-making whips are long and tapered, consisting of a braided single strand. Despite their frightening appearance, the noise-making whips are not used as weapons or torture devices; their purpose is to produce and aim incredibly high tip velocities.