

Photography by Zack Stern
ACTION MOVIE EFFECTS
Shoot a fight scene with a blood-spurting knife wound and a head smashing through a window.
The perfect action scene needs combat, gore, and at least one actor going through a window. Here’s how I shot a scene with all these ingredients, from making the special effects to shooting and editing the footage.
Movie Glass
We wanted one actor to shove another’s head through a kitchen window. Who wouldn’t? We found a good location that had a single-pane window, 30"×26", which we could swap out for our own fake-glass concoction. We made a harmless shattering window pane by casting sugar glass in a wooden frame (recipe next page). If your window is much bigger and has several panes, you can add thin balsa divisions between the panes. These will hold everything together until it’s shattering time.
First, glue together a rectangular frame to fit your window, using 3 layers of thin wood. Make all 3 layers flush around the window’s outer perimeter, but around the inner edge, sandwich the front and back layers around a narrower middle layer. This leaves a gap for the molten sugar to flow into. Glue the frame together and press the corners under weights until it dries (Figure A).
Put the frame on top of a sheet of cardboard that’s larger than the pane, and cut more cardboard to fit snugly in the frame and match the thickness of the bottom layer of wood. Cover the cardboard in the frame with aluminum foil (Figure B). Be careful to keep the foil flat; even small wrinkles in the foil will be cast into the sugar glass.
Cook the water, corn syrup, sugar, and coloring in a pot on a stove. Use a candy thermometer to monitor the temperature, and when it approaches boiling (212°F), lower the flame and let it simmer for half an hour.

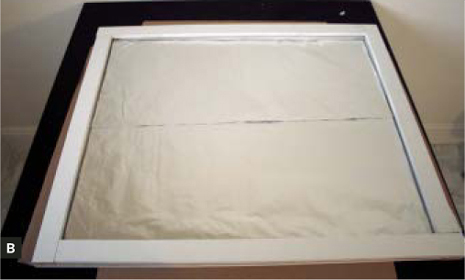
Fig. B: Foil over cardboard supports the pane.

Fig. C: Sugar pane poured into the frame.

Fig. D: Finished pane, broken (by villain’s head).
MATERIALS
Thin strips of wood
Wood glue
Aluminum foil
Sheet of cardboard
Balsa wood strips (optional)
4 cups water
2 cups light corn syrup
7 cups sugar
Food coloring (optional)
Pot, stove, candy thermometer
Turn the flame back up and heat the liquid to 302°F (about another half hour). Pour it into the frame (Figure C). Use a spatula to gently spread the mixture, but don’t disturb the foil.
With each batch, pour an extra spoonful onto a piece of scrap foil; use this to gauge the composition, and convince your actors that they’ll have fun smashing through it (Figure D). Aim for a thickness of about .75cm (or 7.5mm), otherwise the window will be either too easy or too hard to break. We needed 2 batches to fill our big window. If you use multiple batches, pour half at a time to avoid bumpy layers.
The sugar glass will take about 2 hours to fully cool and harden. After that, it’ll slowly melt and otherwise decay, so you should plan to have the window cooled and ready somewhere between several hours and one day before the shoot. Be gentle moving the window, keep the foil on until shooting time, and peel it off carefully to avoid cracking.
Blood-spurting Knife Wound
Use a Dremel or other tool to cut an arc into the knife that’s sized to fit around the victim actor’s neck, arm, fingers, or other body part. Work on the back side of the knife (whichever side you don’t want to show on-camera) to hide mistakes and gouges. Then use a Dremel and a metal file to dull all of the knife’s sharp edges. Also dull the tip of the knife. Be sure to remove any metal filings. You don’t want any actors getting hurt.
Cut a small length of tubing to run from the far edge of the arc to the knife’s handle. If you have big hands and can palm a turkey baster, attach that to the tube, and glue the tube to the knife handle. Otherwise, use a medicine dropper. Or you can also run a longer tube through the knifewielding actor’s sleeve to his other hand, where he won’t have to conceal the bulb.
MATERIALS
Cheap knives (2) Identical, with blades at least 1mm–2mm thick; ours cost $1.50 from a dollar store.
Turkey baster Or large medicine dropper or squeeze bulb
A few feet of thin plastic tubing From hardware store
Strong glue Or hot glue and glue gun
Red food coloring
Cornstarch
Water Dremel Or cutting tool
Metal file

Mix red food coloring, water, and a little cornstarch to make fake blood. Or use cheap red wine, or other on-hand substitutes. Pour it into a bowl and squeeze the bulb to load the knife up.
Roll Camera!
To get the most out of your special effects, make a shooting script that describes exactly what you need to include, shot by shot, and cross them off as you go. A storyboard can also help visualize each shot ahead of time, so that you don’t miss anything important. For example:
SHOT 1. Wide, establishing shot of kitchen with HERO chopping a carrot.
SFX: CHOPPING
An establishing shot orients the audience to your location. Show the whole room, including the window.
SHOT 2. Close-up of chopping, a shadow falls over the hands.
SFX: CHOPPING
HERO: I’ve been expecting you. I’m making us soup.
ASSASSIN: I’ve already eaten.
Edit this to be just a few seconds. This shot will increase the pace of the sequence and establish the knife. Don’t record the dialogue until the next shot.
SHOT 3. Wide shot from original, establishing perspective. Over-the-shoulder, ASSASSIN moves away from camera, toward HERO. HERO spins wildly, swinging the cleaver.
Record the action from both shots 2 and 3 from this angle, as one continuous shot. Mime the chopping, making no sound. When editing, begin the video of shot 3 a few frames after the Assassin begins moving. Let the dialogue lead the video, so you hear it begin over shot 2 and continue into shot 3.
Mark points on the floor where your actors can stand well apart during the knife swing. Be careful; you’re using a real knife! Keep at least 1’ of extra room between the blade and your actor. Because you’re shooting the characters in-line, the audience won’t be able to see the gap. When editing, cut this shot to end just when the knife would make contact.
SHOT 4. Cutaway, extreme close-up of HERO’s eyes.
SFX: THUNK (knife drives into ASSASSIN)
ASSASSIN: Aaagh!
Cut to this 1-second (or less) shot when the knife would hit the Assassin. Later, slam a knife into a chicken to record this sound; it’ll squish into the flesh and thud when it hits bone. When editing, layer that sound effect into the sequence. Don’t record the Assassin’s yell until the next shot.
SHOT 5. Medium, reverse shot of original perspective (over-the-shoulder from HERO to ASSASSIN). Knife is embedded in his arm, spurting blood. ASSASSIN grabs the knife.
HERO punches him in the face, knocking him down. He falls out of frame, pulling out the knife.
HERO: That was for Lt. James Mitchell. He was
one day from retirement.
ASSASSIN: (Groveling) I just do what they —
SFX: THUD
SFX: CLANK (knife hits the floor)
Use a waist-up medium shot to show the actors and the cleaver effect together. Use the prop knife, and for more blood spurting from under Assassin’s shirt, hide extra blood-filled bulbs and tubes running out to production assistants (read: siblings, friends, or children) to squeeze. Assassin should yell from the knife impact to begin the shot; edit the beginning of that sound to overlap shot 4.
Punching is another trick of perspective. The instigator should be able to swing fully and not reach the other actor, while the recipient then jolts his head in response. The camera angle obscures the point where the contact would occur, so the audience believes what it hears. For the sound effect, punch a whole chicken or slab of beef.
SHOT 6. Cutaway, close-up of bloody knife.
HERO: And this is ...
This short cutaway should last 1 second or less. Bloody up the real knife and floor, and drop the knife into the frame. As with previous shots, let the sound of the knife begin in the preceding shot, and edit this shot to show the last 20 frames of the knife clattering on the ground. Also, don’t record dialogue here; overlap it back from the following shot.
SHOT 7. Reverse shot, low perspective behind ASSASSIN toward HERO. HERO grabs the back of ASSASSIN’s neck and hair, twisting out of frame toward the window.
HERO: ... for me.
Shoot this with the full line, “And this is for me” so you can edit the audio to lead the video again. Add more blood running down the Assassin’s arm and hand.
The audience thinks the Hero is pulling the Assassin, but for safety the Assassin is pushing the Hero’s hand, controlling the action. The Hero should lightly hold the head and neck of the Assassin, but the Assassin should lead with his head and neck to trick the viewers.
SHOT 8. Wide shot of HERO driving ASSASSIN’s arms and head through window.
SFX: CRASH
Use this break to make sure everything is set up properly for this, the one-take-only shot. Practice the choreography first with an open window.
As in the preceding shot, the weaker character leads all of the action, pushing through the fake window with their arms. While the sugar glass will crumble and shatter on impact, long sleeves can prevent scratches from the edge of the break. Have the actor tuck in his chin to protect his face.
For the sound effect, don some goggles and record a large, round bottle, like an apple juice jar, shattering on cement. Or search for a clip online.
SHOT 9. Wide, reverse shot of HERO pulling bloody ASSASSIN back in, then pushing him stumbling toward the door.
HERO: You tell El Gato that I’m sick of running away. You tell El Gato I’m coming for him.
Add blood to the Assassin’s face before this shot, and he can stumble out of frame during the dialogue.
SHOT 10. Overhead crane shot starts tight, then pulls back. HERO drops to knees. The floor is filled with blood, glass, and the knife.
Cut to black.
HERO: (Yelling) El Gatoooooooooooooooo!
To be your own crane, firmly attach the camera to a strong tripod and swing the tripod from a ladder.
For tips on how to record convincing effects and clear dialogue, visit makezine.com/09/diyimaging_effects.
Zack Stern (zackstern.com) is a San Francisco video producer and writer who has current or upcoming articles in CRAFT, ReadyMade, and other publications.

Photography by Dennison Bertram
TILT-SHIFT PHOTOGRAPHY
Flexible lens makes scenes look miniature.
One of the fancier lenses in the world of SLR and DSLR photography is the tilt-shift lens. You might not know what these lenses look like, but you probably have seen their effects. Architectural photographers use tilt-shift lenses to eliminate the perspective distortions that sometimes give buildings the appearance of falling over. Aerial photographers use them to make large cities look like toy models. Art and portrait photographers use them to control exactly where the focus falls.
Tilt-shift lenses cost $1,000-plus, which is far beyond what most photographers will pay to experiment. Fortunately, building your own tilt-shift lens is easy, and doing so will open up a remarkable array of creative optical effects.
To build your own tilt-shift lens, you start with a spare lens that’s built for a film format larger than that of the camera you’ll use the lens on. For example, I used a 6×6 lens (designed for 6cm film) to make a tilt-shift lens for a 35mm camera body. With 35mm or APS format digital SLR cameras, you’ll need a lens built for 6×6 film or larger. The oversized lens gives you extra room to move and distort the image that lands on the film or CCD, while still filling the frame. (You could use this hack to mount a 35mm lens on a 35mm camera, but it would only work with a macro lens, for very close objects.)
Assembly
Using a rotary tool or hobby knife, hollow out the middle of the camera body cap (Figure A), then grind or file it down smooth, so there are no rough spots or burrs (Figure B).
The plunger will act as a flexible camera bellows, allowing us to tilt and shift the lens to our heart’s desire. Cut a hole in the top of the plunger, where the stick is (Figure C), making it just large enough to stretch around the base of your lens (or make it a bit smaller and enlarge it later).
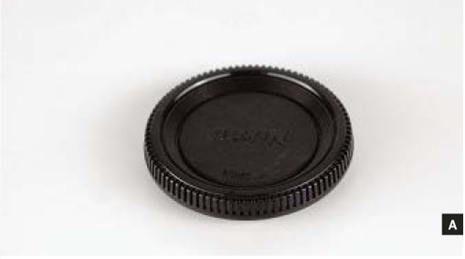
Fig. A: Hacked lens begins with a standard plastic body cap.

Fig B: Body cap is hollowed out.

Fig. C: Humble plunger becomes camera bellows.
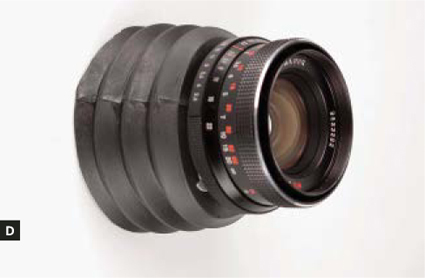
Fig. D: Plunger bellows should fit tightly to lens.
MATERIALS
SLR (single-lens reflex) or DSLR (digital SLR) camera body with interchangeable lens mount
Oversized lens I used an old Carl Zeiss made for the now-obsolete Pentacon 6 camera format. Millions of these were manufactured, and eBay is full of good deals on them.
Rubber plunger with bellows design Any will do, so long as it’s flexible and not too large.
Stiff cardboard (non-corrugated) Or stiff, black plastic
Plastic body cap to fit camera body I use a lot of these in my work. They’re the perfect way to attach your camera to your own hacked-lens creations, and they’re also cheap.
Hot glue and glue gun or other adhesive You need to bond the body cap to the cardboard/plastic and the cardboard/plastic to the plunger rubber. If you want a more robust setup, skip the glue and attach the pieces with small hobby nuts and bolts.
Go ahead and stick your lens onto the plunger to see if it fits, and trim the rubber as necessary. Don’t worry about gluing the lens down yet, but the hole should be tight enough so the lens fits snugly (Figure D). I even cut grooves in the rubber to let me screw the precious lens into place. Keep holding onto the lens, though; don’t expect the rubber to hold so tight that you can let go.
If you’re really enterprising; you could buy a bayonet adapter for the lens you’re using, attach it to the plunger bellows, and then screw your lens onto that when needed.
Next you need to build the backing. To do this, I cut a ring out of cardboard with the inner circle the same circumference as the body cap and the outside matching the bottom of the plunger (Figure E). Although not shown here, it helps to paint one side of the cardboard black, to cut down light refraction inside the bellows.
Then I hot-glued the parts together, body cap into ring, and ring, black side in, onto bellows (Figure F). The hot glue is for expediency; if, after some experimenting, you think you’ll use this lens setup often, I recommend finding something sturdier than hot glue and cardboard to hold it together.
You’re all done! Attach your lens, and you’re ready to shoot.

Fig. E: Cardboard backing ring.


Fig. G: Bendable lens makes Prague look miniature.
Shooting
This hack works surprisingly well. The image quality of the Zeiss is awesome, and I didn’t get any optical interference between it and my Nikon DSLR’s CCD chip. But there are a number of things to keep in mind while shooting. First, automatic exposure modes will not work with this lens, so you have to shoot manually. The apertures will still work, but in general you want to shoot with the lens wide open, or it will be far too dark to focus.
Needless to say, autofocus also won’t work. With this lens, you focus (or selectively un-focus) by squeezing the lens and plunger down, bending it, and twirling it around to get the cool effects you want. To give a “miniature” effect to a cityscape, tilt the lens forward or backward so that the only things in focus are in the middle ground, in mid-frame horizontally. The blurred foreground and background simulate the look produced by a macro lens taking a close-up of something small (Figure G).
If you want to use a lens like this in low light conditions, where you’ll need to hold the lens in one position for a long time, you might augment this design with an adjustable mechanical frame that controls the lens’ range of motion. If you build a tilt-shift lens with a frame, a photographic bellows will be more flexible than a plunger.
A note to digital camera users: dust is a common problem with most digital cameras. Projects such as this one can exacerbate the situation. Before using this lens, be sure to clean it out with some strong puffs of air, to get rid of any loose dust particles that might be inside.

Dennison Bertram is a fashion and beauty photographer who lives in the Czech Republic.


Illustrations by Damien Scogin
ONLINE VIDEO PRODUCTION
Tips and techniques for daily content.
As creator of Rocketboom, I’ve been producing a 3-minute daily video news report since 2004. Here’s how I prevent the every day thing from becoming everyday.
Camera
Use a MiniDV camera that takes MiniDV tapes. We have a $350 Panasonic, an older $2,000 3-chip model, and a nice new Sony HDR-HC1 MiniDV/HDV camcorder, which at $1,400 is the best deal on the market right now. Tapeless cameras will also work, but their storage is too expensive. It’s nice to keep all your source material archived at full resolution. A 60-minute full-res video will take up a whole hard drive, or you can capture it onto a tape that only costs a couple of bucks.
There’s really only one feature I recommend for people investing in a new camera: make sure it has a microphone input or a line-in jack. If not, you’ll be dependent on the camera’s built-in microphone, which in many environments will prevent you from doing good interviews and getting clean audio.
Also consider whether the camera is a single-CCD or 3-CCD model. A 3-chip camera processes each color separately, producing a brighter and sharper picture. Most cameras under $500 are 1-chip; these are also fine, but may look a bit more grainy, especially in low light. Most people use 1-chip cameras, since 3-CCD models have only recently become affordable.

So, you want to produce an online news show yearround on a daily schedule, and keep it interesting? Use a good MiniDV camera with a tripod and a separate microphone. Pay attention to lighting and image compressibility. Always keep an eye out for good source material. Cook up techniques that work with what you have and are capable of.
In a pinch, however, anything will be fine. I often use footage from my little still camera that records video. If I happen to be somewhere without my camera, and someone else has one, I’ll get their contact info and try to hook up with their footage later. Even if I do have my camera, it’s nice to get more footage and a different perspective to work with. Pictures, video, audio: these are all assets that can be used.
We get source material from pretty much everything under the sun, so it’s helpful to always look around and see what’s available. Sometimes you don’t need video at all; just an audio clip is fine, and you can build a story with images, website data, and other stuff surrounding the source.
Holding the Camera
Use a tripod whenever you can. Do it! Otherwise, hold the camera as still as possible. Too much jerkiness can ruin a scene. The “raw” quality of videoblogging can be charming, but not when the camera is jerky and moving around a lot.
Compression-wise Shooting
When a video is compressed, the file size can be twice as large if the frame contains a lot of fine detail and movement. If you are shooting trees and moving the camera around, your video won’t compress easily. I never sacrifice any detail and movement that is important to a shot, but otherwise I try to keep these to a minimum.
Lighting
Most cameras auto-adjust for lighting, but the darker it gets, the more grainy the video will look. Too much darkness is not charming either. Use the same lighting sense you have from taking still pictures; for example, have the light coming from behind you, but don’t stand in front of it. The brighter the light, the more brilliant the picture (until you go overboard and everything becomes overexposed and saturated).
Sound
Nicer handheld microphones use a microphone cable, and you will need an adapter like a Beachtek to convert their XLR plug to the ⅛" mini that you can plug into a camcorder. This is worth it and will make a big difference. Cheap microphones add a lot of noise to the signal.
If you’re interviewing people on location in loud surroundings, it’s best to have separate handheld microphones for everyone. But if you don’t, treat your camera like a microphone. When someone is talking, bring the camera way up close to the person, get a good audio signal, and don’t worry about the video. Then, later, when they are finished, take B-roll footage of the environment, and try to capture the stuff that they were talking about. Then in post-production, take the audio track and lay B-roll over it where appropriate. The audio comes first, and you cut the video to match.

Every picture tells a story: Rocketboom production tricks have added visual appeal to phone interviews, made single-camera shoots look like multi-camera, and covered up creatively for missing footage and sound.
Situations
We’ve come up with a lot of tricks for navigating various constraints. Here are some examples, and you can watch the reports themselves at rocketboom.com/vlog/archives, where they are organized by broadcast date.
For our Nov. 30, 2005 webcast, we did a phone interview. To set up, we pointed a camera at Amanda Condit here in New York City, and our interviewee Joshua Davis pointed a camera at himself in California. Amanda called Joshua, and they did the interview with both people being taped. Then Joshua mailed us his tape, and we put the segment together with assets he gave us, website images, etc.
When you shoot a great musical performance, you can build an entire broadcast over one song. Shoot the entire song from one angle, keeping the mic the same distance from the performers throughout. Then shoot in and around the scene to get B-roll to add in. This is a favorite technique, and I used it for our June 17 and July 20, 2005 shows. Both of these look like 2-camera coverage, but if you are really savvy, you can see where I cheated.
Our April 6, 2006 show was a phone interview recorded as audio only, with no video. Our interviewee Erin Peterson didn’t have to do anything but talk to us. We added visuals afterward using images from Flickr, and Amanda filmed an intro and outro of herself starting and ending the phone interview, to frame it.
For our episode on Aug. 10, 2005, Amanda went to cover a garden and did a lot of talking, but we screwed up and the audio was off the entire time. We didn’t realize this until much later, and we decided to turn it into an “art piece” by adding music and effects to the silent footage.
Andrew Baron is the creator and producer of Rocketboom, a 3-minute online daily news show with a daily audience of more than 300,000.

Photography by Alek Komarnitsky
OUTDOOR WEBCAM ENCLOSURE
Capture winter scenes from hanging sewer pipes.
I anteed up the big bucks for a wireless security webcam with motorized pan, tilt, and 10x optical zoom — specifically, the D-Link DCS-6620G. Nice webcam, but I wanted to put it outside so people everywhere could view my Halloween decorations and infamous Christmas lights.
The problem is that the webcam is rated only down to 32°F, and here in Colorado, temperatures can drop below zero. Suitable prefab outdoor enclosures cost about $500 and include a blower and heater, so I decided to build my own simpler webcam enclosure. It cost me a whopping $27, and it has successfully stood up to two full seasons of Rocky Mountain rain, cold, and snow.
I installed the webcam at my neighbors’ house, hanging it from a 6" can light fixture under an eave that had good line-of-sight to our house. The basic idea was to attach 2 brackets hanging down from the inside of the can, and build an easily removable enclosure that would hang from a rod running horizontally through the brackets.
For the brackets, I straightened two 5" L-brackets in a vice, and extended their internal cut with a hacksaw. Then I used sheet metal screws to anchor the brackets to the inside walls of the recessed light fixture. I screwed in an adapter to convert the fixture’s socket into a power plug for the webcam, which is the only physical connection the webcam needs.
I made the enclosure itself out of 6" inner diameter, foot-long ABS sewer pipe. (Yes, sewer pipe — no expense spared!) I cut a 1’ length of pipe and drilled 2 holes at one end to hang it from. A threaded rod runs through the pipe and the hanging brackets inside, and 2 wing nuts hold the rod in place.

Fig. A: Metal rod "hanger" attaches to can light with metal brackets.

Fig. B: D-Link DCS-6620G webcam with cover plate.

Fig. C: Internal view of webcam enclosure.

Fig. D: Webcam assembly hangs from friendly neighbor’s second floor balcony.
MATERIALS
D-link DCS-6620G with threaded base and transformer 6" ABS plastic sewer pipe, 1’ long cut down from 2’ section sold at Home Depot
6" ABS end cap
5" round cover plate
5" metal L-brackets (2)
Sheet metal screws (4)
1’ threaded metal rods (3) with matching wing nuts (6)
¼-20 bolt with washers and nuts
Light socket to 2-prong plug adapter
Electrical tape
Clear plastic CD case cover from free AOL install disc
Outdoor recessed can light fixture already installed in good location for observation

Before installing the webcam enclosure at my neighbors’ house, I tested the basic concept on a recessed ceiling light in our upstairs hallway. The pipe hung securely, but this indoor can light was 6½" in diameter, which meant that the two brackets stayed visible on either side of the pipe. The light fixture at the neighbors’ is just 6" wide, so the pipe fits around the brackets and conceals them, which looks nicer.
Inside the enclosure, the webcam itself hangs from 2 more rods that run through holes drilled side by side farther down the pipe. To suspend the webcam upside down, I ran a ¼-20 bolt through the center of a 5" cover plate and screwed it into the webcam’s tripod mount. I added extra nuts onto the bolt to reduce the chance of stripping the webcam threads. Inside the pipe, the cover plate rests on the 2 lower rods, and the webcam hangs underneath.
For the enclosure’s view port, I cut a hole in the pipe and made a window by taping on the clear plastic from a free AOL install CD case.
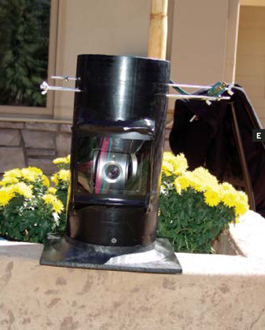
Fig. E: Portable webcam assembly can be hung under eaves or placed freestanding, weather permitting.

Fig. F: Webcam view at 2x optical zoom last fall. During the winter, the aspen leaves drop and open up the visibility.

Fig. G. 10x webcam picture of Alek taking picture of it.
I put a flat ABS end cap at the bottom of the enclosure, which is where the webcam’s 120VAC-12VDC transformer sits. This provides some warmth for low-temperature operation. I left the end cap vented (there’s about a ¼" opening on the top) to prevent fogging in the viewport. The flat end cap also lets me unhook the webcam and set it down to operate anywhere, connected via extension cord, weather permitting.
You can optionally add a cheap wireless temperature sensor inside the PVC, and also one taped to the outside, in order to provide a “delta temperature” reading.
Actual installation was super-duper easy since the entire unit is self-contained, with only a power cord coming out of the top. Plug that in, run the threaded metal rod through the PVC-bracket-bracket-PVC, screw down the wing nut, and you are ready for action!
The installation has worked great, although I did crack some plaster around the light fixture — oops! The webcam works even with the temperature dipping below 0°F a few times. The only issue was that the wireless signal would sometimes drop out, so I installed a Pringles-can antenna at my house pointed toward the webcam, and have had no problems after that.
The webcam enclosure is an integral part of my Controllable Christmas Lights for Celiac Disease website, which lets people remotely view live images of thousands of Christmas lights, and also control them with a click of a mouse. Besides being fun for people around the world, the site has raised over $16,000 for charity.
(Before making my Christmas lights controllable through my website in 2005, I simulated this effect with canned photos and a CGI script. The ruse spread far and wide before I invited the Wall Street Journal to reveal it as a hoax. But that’s another story.)
Alek Komarnitsky lives in the Republic of Boulder. When not spending time with his wonderful wife Wendy and two sons Dirk and Kyle, he enjoys tinkering with stuff. Read more at komar.org.