
The third item we will need to address is replacing the static content in our Headline region. Referring back to the mockup, we have a responsive slider, parallax content, and a jump to the menu icon. Tackling the next section will introduce some new steps:
- First, we will address the Headline slider, which will require us to build a view to aggregate Headline content using a block display.
- Next, we will assign the new block to our Headline region and refactor the markup.
- Finally, we will add a JS library for FlexSlider to enable the responsive slider.
Drupal 8 has taken the popular Views module and integrated it into the core module system. We can take advantage of Views to aggregate the content that our Headline slider needs.
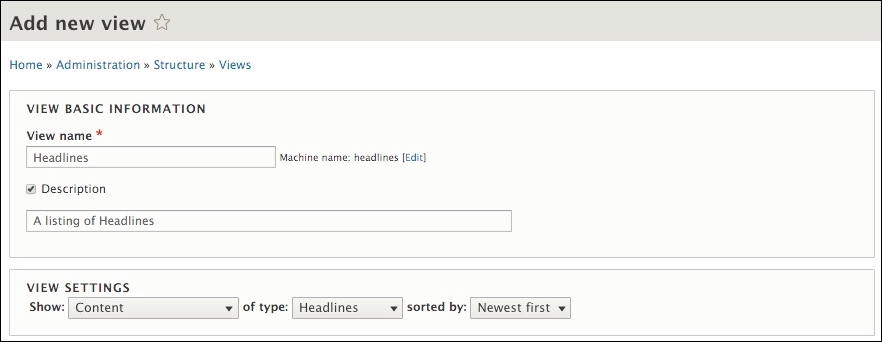
To get started, we will need to navigate to /admin/structure/views and click on the Add new view button from the Views Admin screen, where we will add the following information:
- VIEW BASIC INFORMATION:
- View name:
Headlines. - Check the Description box.
- Description:
A listing of Headlines.
- View name:
- VIEW SETTINGS: Show: Content of type: Headlines sorted by: Newest first
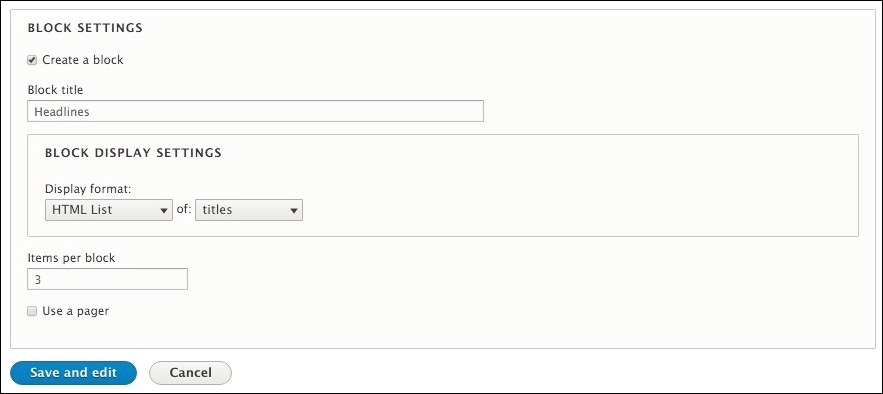
- BLOCK SETTINGS:
- Check the Create a block checkbox.
- Block title:
Headlines.
- BLOCK DISPLAY SETTINGS:
- Display format: HTML List of: titles.
- Items per block:
3. - Click on the Save and edit button.
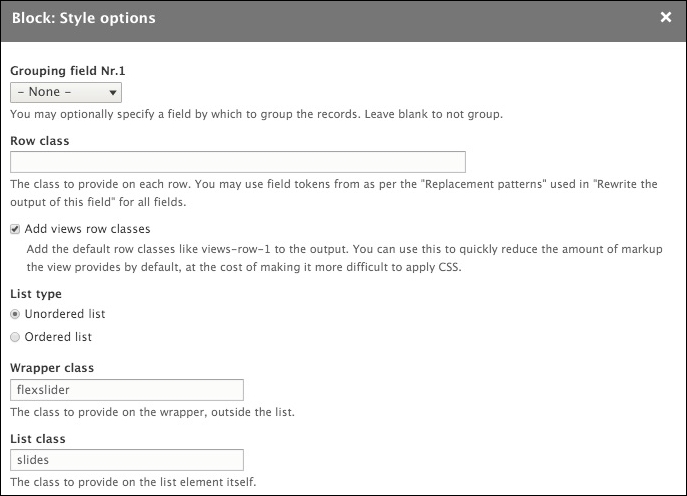
Now that our Headlines view has been created, we will need to add an additional field and adjust the format settings before we can use our new block. With the view still open, we will need to make the following adjustments to the Block: Style options.
- Click on the Settings link next to the Format: HTML List link under the FORMAT section.
- Change the Wrapper class from item-list to
flexslider. - Add a List class named
slides. - Click on the Apply button.
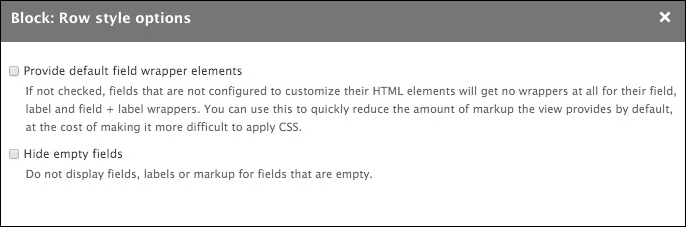
Next, we will need to make adjustments to the Block: Row style options:
- Click on the Settings link next to the Show: Fields link under the FORMAT section.
- Uncheck the Provide default field wrapper elements checkbox.
- Click on the Apply button.
We now need to add an additional field for our Headlines view that will display the subheading under the main heading of our content. We can accomplish this by performing the following steps:
- Click on the Add button in the Fields section.
- From the Add fields dialog, enter subheading in the Search field
- Check the checkbox next to Sub Heading.
- Click on the Apply (all displays) button.
- From the Configure field: Content: Sub Heading dialog, expand the STYLE SETTINGS and uncheck Add default classes checkbox.
- Click on the Apply button and then on the Save button to make sure that our changes to the Headlines view have been saved.
One last field configuration we will need to make is to the Title field. We need to have it displayed as an H2 heading for styling and SEO purposes.
- Click on the Content: Title link in the FIELDS section.
- Expand the STYLE SETTINGS section.
- Check the Customize field HTML checkbox.
- Select H2 from the HTML Element field.
- Uncheck the Add default classes checkbox.
- Click on the Apply (all displays) button.
At this point, make sure to save the View, and then we can move on to the next step of placing our block.
We can start by navigating to /admin/structure/block and following these steps:
- Click on the Place block button in the Headline region.
- Locate the Headlines block.
- Click on the Place block button.
- Uncheck the Display title checkbox.
- Click on the Save block button.
We now have our Headlines block placed into the Headline region for us to be able to output from our homepage template.
Within our page--front.html.twig template, we want to be able to display our Headlines block. In order to do this, we will need to add the {{ page.headline }} variable.
- Open
page--front.html.twig. - Add the Twig variable
{{ page.headline }}directly below theheadlinecontainer and delete the remaining markup between the opening and closingheadlinecontainer so that our markup looks like the following:<div class="headline"> {{ page.headline }} </div> - Save
page--front.html.twig.
Make sure to save our changes, clear Drupal's cache, and refresh the browser. Feel free to review the page--front.html.twig template located in the Chapter06/end/themes/octo/templates folder to compare the markup if needed. If everything was done properly, our Headline region should be displaying three headlines, as shown in the following image:
FlexSlider is a fully responsive jQuery slider developed by Woo Themes. The slider is very easy to implement and has numerous configuration options. We can find detailed information regarding FlexSlider at https://www.woothemes.com/flexslider.
To ensure that we use the same version of FlexSlider, we will need to navigate to the Chapter06/start/themes/octo/vendor folder and copy the flexslider folder to our themes/octo/vendor folder. Once the files are accessible by Drupal, we can follow these remaining steps to add FlexSlider to our theme:
Open octo.libraries.yml and add the following entry:
   flexslider:
     version: 2.5.0
     css:
       theme:
         vendor/flexslider/flexslider.css: {}
     js:
       vendor/flexslider/jquery.flexslider-min.js: {}
     dependencies:
       - core/jquery
Make sure to save our changes and clear Drupal's cache for our changes to take effect. Next, we need to consider how we will be using the FlexSlider library. If we were going to use it globally, then we could add it to our octo.info.yml file. However, because we will only be using it on our homepage, we can take advantage of the {{attach library() }} function.
In order to attach a library using Twig, we will need to follow these steps:
- Open
page--front.html.twig. - Add the following Twig function to the top of our template:
{{ attach_library('octo/flexslider') }}
Make sure to save our changes and clear Drupal's cache for our changes to take effect. If we now inspect our homepage, we will see the FlexSlider library loading. However, if we go to any of the interior pages and inspect the markup, we will see that the FlexSlider library is absent. Being able to attach libraries only where needed is helpful, as it makes sure unnecessary CSS or scripts are not loaded.
In order for us to enable FlexSlider, we have one last step. We need to add the configuration for our slider to our octo.js so that it knows which markup to use for the slides:
Open octo.js. and add the following script block:
   //-- Flexslider
   (function() {
     $('.flexslider').flexslider({
       direction: "vertical",
       controlNav: false,
       directionNav: false
     });
   })();
Make sure to save our changes and clear Drupal's cache for our changes to take effect. If we browse our homepage, we will see our Headline slider is now fully functional, as shown in the following image:

We have almost completed our Headline region. There are two more pieces of UI to implement, one of these is what is known as the Parallax effect.
Parallax is a scrolling effect where the background image scrolls at a slower speed than the foreground of the page. The effect creates a subtle 3D effect. In order for us to implement this, we just need to add a small script block to our octo.js file, which targets our markup that has a class of intro and then uses data attributes on that section to manage the speed of the effect and how far to scroll.
Open octo.js and add the following script block:
   //-- Parallax
   (function() {
     $(window).scroll(function(e){
       var bg = $('.intro'),
       var yPos = -($(window).scrollTop() / bg.data('speed'));
       var coords = '50% '+ yPos + 'px';
       bg.css({ backgroundPosition: coords});
     })
   })();
Make sure to save our changes and clear Drupal's cache. If we browse our homepage, we will see the Parallax effect within the Headline region. As we begin to scroll down the page, we will see that our Headline background image scrolls at a slower speed.
A subtle yet nice touch to our homepage is the addition of an animated scroll effect. At the bottom of our Headline region we have a link, which when clicked by a user smoothly scrolls the page to the next section. The markup is already in place and uses IDs for JavaScript to trigger the effect and to know where to scroll the page to. All we need to do is add the library and the script, and attach the library to our homepage.
Begin by navigating to the Chapter06/start/themes/octo/vendor folder and copy the jquery-scrollTo folder to our themes/octo/vendor folder. Once the files are accessible by Drupal, we can follow these remaining steps to add the library:
Open octo.libraries.yml and add the following entry:
   scroll-to:
     version: 2.1.1
     js:
       vendor/jquery-scrollTo/jquery.scrollTo.min.js: {}
     dependencies:
       - core/jquery
Make sure to save our changes and clear Drupal's cache for our changes to take effect.
In order for us to enable jQuery Scroller, we need to initialize it within our octo.js so that we know which element should be triggered when the user clicks on the link.
Open octo.js and add the following script block:
   //-- Scroll to
   (function() {
     $('#goto-section2').on('click', function(e){
       e.preventDefault()
       $.scrollTo('#section2', 800, { offset: -220 });
     });
   })();
Make sure to save our changes and clear Drupal's cache for our changes to take effect. Finally, all that is left is attaching the library to our homepage.
In order to attach our library using Twig, we will need to follow these steps:
- Open
page--front.html.twig. - Add to the top of our template the following Twig function:
{{ attach_library('octo/ scroll-to) }}
Make sure to save our changes and clear Drupal's. If we browse our homepage and click on the link at the bottom of our Headline region, we will now see the animated smooth scrolling functioning perfectly.
We definitely covered a lot of different techniques when refactoring our Headline region, but we now need to move on to our Before Content region.